7Managing End of Lease and Remarketing Activities
Managing End of Lease and Remarketing Activities
This chapter provides information about using Siebel Automotive functionality to manage end of lease activities and remarketing of leased, repossessed and corporate vehicles. It includes the following topics:
About End of Lease and Vehicle Remarketing
Siebel Automotive and Siebel Dealer allow you to manage end of term and to remarket leased vehicles.
After a vehicle’s lease expires, the automotive company:
Schedules inspection of the vehicle at a dealer or at a third-party inspection vendor, and bills the leasee for any liability.
Schedules an appointment for the leasee to return the vehicle to a dealer.
Attempts to sell the returned vehicle to dealers.
Sells the vehicle at auction if no dealer buys it.
These tasks are performed by the automobile company using Siebel Automotive and by dealers using Siebel Dealer.
Scenario for Managing End of Lease and Vehicle Remarketing
This topic gives one example of managing end of lease and vehicle remarketing. You may do this differently, depending on your business model.
Contacting Customers Whose Leases Are Ending
When a customer’s lease on a car is about to end, Siebel Automotive automatically generates communications to the customer about the end-of-term process. If the customer does not respond favorably to these communications, a call center agent from the automobile company’s end-of-term department contacts the customer to try to convince the customer to buy a new car, buy the leased car, or extend the lease, possibly by offering promotions or other incentives.
Remarketing is necessary if the customer wants to end the lease, rather than buying the leased car or extending the lease. When the lease expires, the remarketing department will take possession of the leased car and resell it.
Scheduling Vehicle Inspection and Turn-In
If the customer decides to turn in the vehicle, rather than extending the lease or purchasing the vehicle, the agent uses this telephone call to schedule appointments for inspection in turn-in.
The remarketing agent schedules an inspection either with a dealer or with a third-party inspection vendor. At the end of the lease, the vehicle must be inspected to see if there is excessive wear and tear to the vehicle, which the customer is liable for.
The remarketing agent generally schedules a turn-in appointment with the dealer who leased the car to this customer.
Completing the Inspection
During the inspection, the inspection agency or dealer enters details about the condition of the vehicle.
If there are any outstanding charges as a result of the inspection, for example, charges to repair damage to the vehicle, the agent prepares a liability statement with the charges and the reason for each charge.
When the customer receives this liability statement, the customer may choose to have repairs done before returning the vehicle, rather than paying the amount on the liability statement to the automobile company. If so, the customer informs the remarketing agent, and the remarketing agent schedules a new inspection and new turn-in date after the repairs are complete.
In the most common case, the customer chooses to pay the bill on the liability statement, or there is no liability, so the customer can go to the scheduled turn-in appointment.
Returning the Vehicle
The customer usually returns the vehicle to the dealer where it was leased.
The dealer enters the vehicle return date, the odometer reading, and other information in the Siebel Dealer Portal. The dealer also makes sure the Odometer Disclosure Statement is completed, signed and returned to the automobile company.
If there are any remaining charges, for example because the odometer reading was greater than expected, the agent at the automobile company prepares a liability statement and mails it to the customer.
Selling Vehicles to Dealers
The remarketing department at the automobile company tries to sell the returned vehicle to dealers. The sales price to dealers is based on the automobile company’s internal pricing structure, guided by data from organizations such as NADA, Kelley Blue Book, and Black Book.
The vehicle is automatically offered to the turn-in dealer when it is returned. This dealer can use the Dealer Portal to purchase or to decline to purchase the vehicle.
If the turn-in dealer declines to purchase the vehicle or does not act within three days, then the vehicle is automatically offered to other dealers.
Auctioning the Vehicle
If the vehicle is not purchased by any dealer, it is sold by auction. The remarketing department at the automobile company plans for the auction sale and assigns the vehicle to the auction house that is expected to make the most profitable sale.
Setup Tasks for End of Lease and Remarketing
Before you can use Siebel Automotive to manage end of lease and vehicle remarketing, you must:
Set up the Siebel Dealer Portal and dealers’ access to it, as described in Siebel Dealer Administration Guide.
Integrate with external information sources to share data with third-party inspection vendors, to import fair market value data, and to share data with auction houses. For more information, see Web Service Reference for Vehicle Remarketing.
Perform the following additional set-up tasks:
Activating Workflow Processes for End of Leaseand Remarketing
Some of the end of lease and remarketing functionality is driven by workflow processes, which you must activate.
Activate all the workflow processes listed in Web Service Reference for Vehicle Remarketing.
For more information about how to activate workflow processes, see Siebel Business Process Framework: Workflow Guide.
Configuring the Siebel Server to Run the Scheduling Job
When the automotive company schedules inspections with dealers and third-party inspection agencies, all the inspections are listed in the Financial Accounts screen, Vehicle Batch Order Inspection List view.
You can trigger the batch run to schedule all the listed inspections manually, as described in Scheduling Inspection and Turn-In Appointments. However, it is recommended that you configure the Siebel server to run the scheduling job regularly, for example, every night. You can do this by setting up a component request. For more information on scheduling jobs, see Siebel Applications Administration Guide.
To set up a component request to run the batch scheduling job
Navigate to the Administration - Server Configuration screen, Enterprises, then Component Definitions view.
In the Component Request form, Query for the component Workflow Process Batch Manager.
If the component does not already exist, create it by adding new record to the Component Definitions list and completing the necessary fields.
Some fields are described in the following table:
Field Description Component
Enter Workflow Process Batch Manager
Alias
WfProcBatchMgr
Component Type
Select Workflow Process Manager with Batch as the runtime mode.
Component Group
Workflow Management
Navigate to the Administration - Server screen then the Jobs view.
Add a new record to the Jobs list and complete the necessary fields.
Some fields are described in the following table:
Field Description Component/Job
Select Workflow Process Batch Manager.
Repeating?
Select this check box.
Repeating Info
In the Repeating Info form, enter values in the Repeat Interval, Repeat Unit and Scheduled Start fields to determine when the job runs.
In the Job Parameters list, add new records with the following values in the fields.
Name Field Value Field Search Specification
[Account Type] = 'Asset Finance' AND [Account Status] = 'Open' AND ([Maturity Date Diff] = 180 OR [Maturity Date Diff] = 90 OR [Maturity Date Diff] = 30)
Workflow Process Name
eAuto CF Lease End Communication Workflow
User Name
Enter the user name.
Password
Enter the password.
Submit the job.
The status becomes Active, and the job runs at the repeat interval specified.
Setting Up the Return Receipt (Odometer Disclosure Statement)
When the vehicle is returned, the dealer gives the customer a return receipt.
To set up the return receipt, perform the following steps:
Creating a Return Receipt Category for Proposals
Add the value Vehicle Return Proposal as one of the proposal template types. This allows you to choose Vehicle Return Proposal from the Category list of values when you create the proposal template.
To add a value for this document to the list of values
Navigate to the Administration - Data screen, then the LOV Explorer view.
In the List Of Values - Type list, query for APPLICATION_TYPE.
Click the Show More icon next to the APPLICATION_TYPE folder, then the Values folder, then the MS_Word folder, then the Child List of Values folder.
In the Child List of Values list, add a new record and complete the necessary fields, described in the following table:
Field Description Type
PROPOSAL_TEMPLATE_TYPE
Name
Vehicle Return Proposal
Creating the Proposal Template for the Vehicle Return Receipt
Use Microsoft Word to create the proposal template used for the vehicle return receipt. Give the document the name, Vehicle Return Receipt.
Map the bookmarks in the Word document to the fields in the eAuto Vehicle Return business object, eAuto Vehicle Return business component that you want to display in the return receipt. Give the mapping the name, eAuto Vehicle Return Receipt Proposal.
For more information about creating proposal templates and mapping them to fields, see Siebel Correspondence, Proposals, and Presentations Guide.
To create the mapping
Navigate to the Administration - Document screen, then the Proposal Field Mapping view.
In the Business Objects list, add a new record and complete the necessary fields, described in the following table:
Field Value Mapping Name
eAuto Vehicle Return Receipt Proposal
Business Object
eAuto Vehicle Return
Double-click the Business Components folder, add a new record to the Business Components list, and as the business component, select eAuto Vehicle Return.
Double-click the Business Component Fields folder, add new records to the Business Component Fields list, and use these records to map the business component field to the bookmark for every bookmark you added to the Word document.
Adding the Proposal Template to the Siebel Business Application
Finally, make the proposal template available in the Siebel Business Application.
To add the proposal template to the application
Navigate to the Administration - Document screen, Proposal Templates view.
In the Templates list, add a new record and complete the necessary fields, described in the following table:
Field Description Name
Enter Vehicle Return Receipt.
Category
Select Vehicle Return Proposal.
Mapping
Select eAuto Vehicle Return Receipt Proposal.
Template
Select the Word document where you created the template.
Setting Up the Fair Market Values
The Fair Market Values Reference Data is used to store the fair market values (FMV) of vehicle products. This is used for reference, and it may be used in different ways depending on your business model.
Typically, these values are imported into the Siebel application from data created by NADA, Kelley Blue Book, Black Book, or similar organizations using the Vehicle Market Value Web service. See Vehicle Market Value Web Service.
This data appears in the Administration - Application screen, Fair Market Values Reference Data view.
Setting Up the FMV Auction Values
Use this table to store the fair market auction values of vehicle products. This is used for reference, and it may be used in different ways depending on your business model.
The data may be imported from an external source such as Kelley Blue book, or it may be created by your own sales division.
After being entered or imported, this data appears in the Administration - Application screen, FMV Auction Values Reference Data view.
Setting Up Auction Events and Pricing
To sell vehicles at auction, you must do the basic work of setting up auction events, such as entering information about the auction houses that you work with.
For more information about setting up auction events, see Siebel Events Management Guide.
In addition, you must set up pricing for automotive auction events.
Key fields that affect pricing include:
Odometer. Entered in Vehicles screen, More Info view. This is the current mileage of the vehicle, which is useful for calculating mileage adjustments.
Damage Extent. Entered in Vehicles screen, More Info view. This is the damage that has occurred to the vehicle, which is useful for calculating the damage adjustments based on the value of the Damage Benchmark field, which is specific to each product.
Damage Adjustment Amount. Entered in Administration - Product screen, More Info, More Info view.
Damage Benchmark Amount. Entered in Administration - Product screen, More Info, More Info view.
Excess Mileage Factor. Entered in Administration - Product screen, More Info, More Info view. This is the decimal value that is multiplied with the Excess Mileage, with the result deducted from Vehicle Price. It is specific to each product.
Process of Setting Up Pricing for Auction Events
This topic describes how to set up pricing for auction events.
To set up pricing for auction events, perform the following tasks:
Setting Up the Price Vehicle and Price All Vehicles Buttons
You must create signals and variable maps to set up the Price Vehicle and Price All Vehicles buttons in the Events screen, Auction Events, Vehicles view.
This task is a step in Process of Setting Up Pricing for Auction Events
For more information about signals and variable maps, see Siebel Order Management Infrastructure Guide.
Creating Variable Maps for Context and Row Set
To set up these buttons, you must also create or modify variable maps.
To create a new variable map
Navigate to the Administration - Order Management screen, then the Variable Maps view.
In the Variable Maps list, add a new record and enter a name.
Lock the variable map by selecting the Locked Flag check box.
In the Versions list, click the Work Space hyperlink to drill down on the version of the new variable map.
Click the Modes tab, and in the Modes list, define the modes for this variable map.
For Price Auction Vehicle - Context, enter Any as the mode and Header as the object name.
For Price Auction Vehicle - Row Set, enter Any as the mode and Line Item as the object name.
Click the Details tab.
In the Variable Definitions list, create variable definitions. Variable definitions are the same for the Price Vehicle button and the Price All Vehicles button.
Variable definitions for the variable map Price Auction Vehicle - Context are listed in the following table:
Sequence Variable Name In/Out Type On Null 1
Price List Id (The Id of the Price List selected for this auction in the Events screen, Auction Events view.)
In
ID
Ignore
2
Header Id
In
ID
Ignore
Variable definitions for the variable map Price Auction Vehicle - Row Set are listed in the following table:
Sequence Variable Name In/Out Type On Null 1
Product Id (The Id of the Product that the vehicle is based on.)
In
ID
Ignore
2
Id
In
ID
Ignore
3
Geographic Location (As entered in the Vehicle screen, More Info view, State field.)
In
Text
Ignore
4
Purchase Price (This field is updated with the calculated price of the vehicle, which is displayed in the Events screen, Auction Events, Vehicles view, Resale Price field.
In/Out
Currency
Ignore
5
Damage
In
Number
Ignore
6
Mileage
In
Number
Ignore
7
Currency Code (Defaulted to the local currency.)
In
Text
Ignore
8
Exchange Date (Defaulted to the current date.)
In
Date
Ignore
9
Exterior Color (Taken from the vehicle attribute in the Vehicles screen.)
In
Text
Ignore
10
Engine (Taken from the vehicle attribute in the Vehicles screen.)
In
Text
Ignore
11
Transmission (Taken from the vehicle attribute in the Vehicles screen.)
In
Text
Ignore
12
Damage Benchmark
In
Number
Ignore
13
Multiplicative Factor
In
Number
Ignore
14
Damage Adjustment Amount
in
Number
Ignore
In the Variable Sources list, define the source of the variable for each mode. The same fields are used for the Price Vehicle and Price All Vehicles buttons.
Variable sources for the variable map Price Auction Vehicle - Context are listed in the following table:
Mode Path Source Type Auto Vehicle
$Current/Header/Auction Price List Id
In
Auto Vehicle
$Current/Header/Event Row Id
In
Variable sources for the variable map Price Auction Vehicle - Row Set are listed in the following table:
Mode Path Source Type Auto Vehicle
$Current/Line Item/Product Id
In
Auto Vehicle
$Current/Line Item/Asset Id
In
Auto Vehicle
$Current/Line Item/Geographic Location
In
Auto Vehicle
$Current/Line Item/Purchase Price
In/Out
Auto Vehicle
$Current/Line Item/Damage
In
Auto Vehicle
$Current/Line Item/Mileage
In
Auto Vehicle
$Current/Line Item/Currency Code
In
Auto Vehicle
$Current/Line Item/Exchange Date
In
Auto Vehicle
$Current/Line Item/Exterior Color
In
Auto Vehicle
$Current/Line Item/Engine
In
Auto Vehicle
$Current/Line Item/Transmission
In
Auto Vehicle
$Current/Line Item/Damage Benchmark
In
Auto Vehicle
$Current/Line Item/Multiplicative Factor
In
Auto Vehicle
$Current/Line Item/Damage Adjustment Amount
In
Define child variable maps, as necessary.
Navigate back to the Variable Maps list applet and click the Release New Version button to release the variable map version.
Creating Adjustments for Geographic and Vehicle Attributes
When you create a price list, you will adjust the list price for each vehicle based on attributes that represent its geographic location and its customizable features. In this step, you create these attribute adjustments.
The attributes are visible in the Administration - Product screen, More Info, More Info view. The list price in the price list is the base line price for these vehicles, and the price is adjusted based on the value of these attributes: for example, the price might be higher if a vehicle has a more powerful engine.
This task is a step in Process of Setting Up Pricing for Auction Events
To create adjustments for Geographic and Vehicle Attributes
Navigate to the Administration - Pricing screen, then the Attribute Adjustments view.
In the Attribute Adjustments list, add a new record and complete the necessary fields, as described in the following table:
Field Value Name
Auto CF Asset Pricing Adjustments
Class
The Product Class of the Product
Type
Single Dimension
Effective From
Enter the start date of the time period when this attribute adjustment is active
Effective To
Enter the end date of the time period when this attribute adjustment is active
Specify Dimensions and Domains for the attributes you created:
In the Attribute Adjustments list, select the attribute adjustment whose dimensions you are specifying.
In the More Info view, click Create Result Dimensions.
-
Click the Dimensions view tab.
In the Dimensions list, add a record for each dimension that affects the price and complete the necessary fields, as described in the following table:
Dimension Type Name Op Var Map Type Var Name Data Type Domain Type Bounded LOV Sort Order Sort Method Condition
Geographic Location
=
Row
Geographic Location
Text
LOV
Y
STATE_ABBREV
1
Asc
Condition
Transmission
=
Row
Transmission
Text
LOV
Y
AUTO_TRANSMISSION_TYPE
1
Asc
Condition
Engine
=
Row
Engine
Text
LOV
Y
AUTO_ENGINE_TYPE
1
Asc
Condition
Exterior Color
=
Row
Exterior Color
Text
LOV
Y
AUTO_EXTERIOR
1
Asc
Add conditions, which are the rules that state the result of the adjustment for each combination of condition dimensions:
In the Attribute Adjustments list, select the attribute adjustment whose rules you are specifying.
Click the Conditions view tab.
The conditions list appears, with a Name column for the name of each condition.
If all domain values of each dimension impact price, you can generate rules as follows:
In the Attribute Adjustment form, click Generate Rules. Records are added to the Rules list with every possible combination of domain values of the condition dimensions domains.
In the Rules list, enter the Adjustment Type and Adjustment Value for each record.
In the Conditions form, enter the rules.
Associate variable maps with these pricing adjustments:
Navigate to the Administration - Pricing screen, Attribute Adjustments, then the Variable Map view.
Select the appropriate row set and context variable maps from the pick lists.
Creating Adjustments for Mileage
You create a discount matrix to adjust the prices for mileage.
This task is a step in Process of Setting Up Pricing for Auction Events
To create adjustments for mileage
Navigate to the Administration - Pricing screen, then the Discount Matrices View.
Add a new record to the Discount Matrices list and complete the necessary fields, as described in the following table:
Field Value Name
Auto CF Mileage Adjustments
Discount Matrix Type
Product-Based Adjustment
In the Discount Criteria list, add records for all the criteria dimensions that you want made available in the discount matrix.
The criteria dimensions that you can add depend on the value selected in the Discount Matrix Type field in the previous step.
After all the necessary criteria dimensions are added (Mileage Lower Bound, Mileage Upper Bound, Product), click Complete Definition in the Discount Matrix list.
Clicking this button freezes the definition of the discount matrix. After this step, you cannot change the discount matrix type or the criteria dimensions.
Creating a Price List for the Auction
To create a price list
Now that you have created adjustments, you can create a price list for the auction which adjusts prices of vehicles based on their list price and on those adjustments.
This price list can apply to many auctions, and you link it specific auctions in the Events screen.
For more information about creating price lists, see Siebel Pricing Administration Guide.
This task is a step in Process of Setting Up Pricing for Auction Events
Navigate to the Administration - Pricing screen, then the Price List view.
In the Price List list, add a new record and complete the necessary fields.
Drill down on the Name field of the price list.
Add a line item for each product and complete the necessary fields. Some fields are described in the following table:
Field Value Product
Select the product.
Attribute Adjustment
Select the adjustment for this product.
Link the price list to a specific auction:
Navigate to the Events screen, then the Auction Events view.
-
In the Auction Events list, select the desired auction.
-
In the Price List field, select the desired price list.
Adding Vehicles to be Auctioned
Now, you can add the vehicles to be auctioned at a given auction. For each auction, add the vehicles and select the appropriate adjustment used for each vehicle.
This task is a step in Process of Setting Up Pricing for Auction Events
To add the vehicles to be auctioned
Navigate to the Events screen, the Auction Events, and then the Vehicles view.
For each vehicle to be auctioned, add a record to the Vehicles list and complete the necessary fields.
Process of Managing End of Lease and Vehicle Remarketing
To manage end of lease and vehicle remarketing, perform the following tasks:
Contacting Customers Whose Leases Are Ending
Siebel Automotive automatically contacts customers whose leases will end soon to convince them to buy or lease a new vehicle, to buy the leased vehicle, or to extend the lease. Communications are generated by the workflow process eAuto CF Lease End Communications Workflow Process.
If the customers do not respond to these automatic communications, the remarketing agent contacts them and attempts to convince them to buy or lease a new vehicle, to buy the leased vehicle, or to extend the lease. If the customer does not buy the leased vehicle or renew the lease, the agent schedules inspection and turn-in of the leased vehicle and enters information about the leased vehicle.
Remarketing agents usually have their Siebel Automotive application set up so the customers whose leases will end soon are displayed on their home page when they log in. If not, they can find these customers by using the following procedure.
This task is a step in Process of Managing End of Lease and Vehicle Remarketing.
To contact customers whose leases are ending
Navigate to the Financial Accounts screen, then the Financial Account List view.
Query to find all records where the value in the Type field is Asset Finance and the value in the Status field is not Closed.
Sort the records based on the value in the Maturity Date field, so leases that will expire soon are at the start of the list.
For leases that will expire soon, drill down on the account number to see more information, and review the account to see correspondence from the customer, possible delinquency activities, and other information.
Click the Activities view tab to view correspondence that was sent to the customer.
Check whether the customer has decided to turn in the vehicle:
If the value in the Account States field in the Financial Account form is Turn In, the customer has decided to turn in the vehicle.
If the customer has not decided whether to turn in the vehicle, telephone or write the customer to see whether they want to renew the lease or buy the vehicle.
Scheduling Inspection and Turn-In Appointments
If the customer does not want to renew the lease or buy the leased car, the remarketing agent schedules the inspection appointment at a dealer or a third-party inspection agency, to determine whether there is any damage to the vehicle that the customer is liable for. At the same time, the remarketing schedules a turn-in appointment at a dealer, usually at the same dealer where the customer leased the vehicle.
All inspection appointments scheduled are listed in the Batch Inspection view. The appointments in this list are sent to the inspection agencies every night.
After the remarketing agent adds this record to indicate that inspection is necessary, the dealer or inspection agency follows up with the customer to set the date and time of the inspection appointment.
This task is a step in Process of Managing End of Lease and Vehicle Remarketing.
To schedule the inspection appointment
Navigate to the Financial Accounts screen, then the Financial Account List view.
Drill down on the Account number for the vehicle.
Click the Asset Inspection view tab.
Create a new Asset Inspection Summary record and complete the necessary fields, described in the following table:
Field Description Ordered
Displays the current date and time.
Status
Select Scheduled.
Asset ID/VIN
Select the identification number for the vehicle.
Company
Select the company that will perform the inspection. This may be either a dealer or a third-party inspection agency.
To view vehicles scheduled for the batch inspection run
Navigate to the Financial Accounts screen, then the Vehicle Batch Order Inspection List view.
To run batch inspection
Navigate to the Financial Accounts screen, then the Vehicle Batch Order Inspection List view.
Click Schedule Inspection.
Scheduling Turn-In Appointments
During this telephone call, the remarketing agent also makes an appointment for the customer to turn in the vehicle. Usually, the vehicle is turned in at the same dealer where it was leased.
You share information with dealers using the Siebel Dealer Portal.
To schedule the Turn-in Appointment
Navigate to the Financial Accounts screen.
Drill down on the Account number for the vehicle.
Click the Asset Turn In view tab.
Create a new Asset Turn In record and complete the necessary fields, described in the following table:
Field Description Turn-In Date
Select the date and time of the appointment.
Asset ID/VIN
Select the identification number for the vehicle.
Turn-In Mileage
Enter the mileage at the time of turn in.
Partner/Dealer
Select the dealer where the vehicle will be turned in.
Status
Select Scheduled.
Possible values are Scheduled, Confirmed, and Actual.
Canceling an Inspection Appointment
If necessary, you can cancel an inspection appointment. For example, a customer may call and say that he or she has a conflicting appointment at that time.
To cancel a scheduled inspection
Navigate to the Financial Accounts screen, then the Financial Account List view.
Drill down on the Account number for the vehicle.
Click the Asset Inspection view tab.
In the record for the appropriate inspection appointment, in the Canceled field, select the current date and time.
Entering Inspection Information (Dealer or Third-Party)
Either a third-party inspection vendor or a dealer may perform the inspection.
After it sees that the automobile company has added an asset inspection record, it contacts the customer to set the date and time of the inspection appointment.
If a third-party vendor performs the inspection, the inspection information is usually entered in the vendor’s own application. You can obtain the inspection information by integrating Siebel Automotive with the third party vendor’s application using Web services.
If a dealer performs the inspection, she can enter the inspection information in the Dealer Portal. For more information, see Siebel Dealer Administration Guide.
This task is a step in Process of Managing End of Lease and Vehicle Remarketing.
Viewing Inspection Information and Generating Charges
After the inspection, the agent receives information from the inspection agency which appears in the Asset Inspection, Inspection Assessment Summary view of Siebel Automotive. This includes the following forms:
Body Assessment form. The inspection agency entered the number of small and large dings, dents, and scratches and the cost of repairing them.
Excess Usage form. The inspection agency entered the actual odometer reading at the time of inspection. The area also displays the initial odometer reading, the mileage allowed by contract, and the per mile charge for excess mileage beyond what is allowed by contract.
The remarketing agent calculates the charges to the customer based on the information entered by the inspection agency. These charges appear in the Asset Inspection, Inspection Assessment Details view.
The agent generates an invoice and mails it to the customer.
The customer may want to do some of the repairs and take the car for inspection again after the repairs are complete, or the customer may decide to pay the charge. If a second inspection is needed, the agent schedules a new inspection appointment and turn-in appointment, as described in Scheduling Inspection and Turn-In Appointments.
This task is a step in Process of Managing End of Lease and Vehicle Remarketing.
To view inspection information and generate charges
Navigate to the Financial Accounts screen.
Drill down on the Account number for the vehicle.
Click the Asset Inspection view tab.
Select the appropriate Asset Inspection Summary record.
The Inspected field of the Asset Inspection Summary record tells you when the vehicle was inspected.
Scroll down, and click Generate Charges.
Click the Inspection Assessment Details link to view the details of the charges, which were inserted here when you clicked Generate Charges.
Click Generate Invoice, print the invoice, and mail the invoice to the customer.
Receiving Returned Vehicles (Dealer)
At the time of the turn-in appointment, the dealer receives the returned vehicle and logs into the Dealer Portal to complete information such as the actual return date and the actual return mileage.
For more information, see Siebel Dealer Administration Guide.
This task is a step in Process of Managing End of Lease and Vehicle Remarketing.
Selling Returned Vehicles to Dealers
After the dealer has received the returned vehicle, the automobile company tries to sell the vehicle to dealers.
When the dealer receives the vehicle, it is automatically posted for sale to the receiving dealer on the Dealer Portal.
The sales price is automatically based on the residual value of the vehicle, which appears in the Current Residual field of the Financial Accounts screen, Assets/Vehicles view.
Initially, the vehicle is only visible to the dealer who leased it and the dealer who received it, who have the exclusive right to purchase the vehicle. If these dealers decline to purchase the vehicle, or if they do not act within three days, the vehicle automatically becomes visible and available to all the dealers in the same territory as this dealer. The territory is a geographical area that is associated with every dealer. If no dealer purchase the vehicle within ten days, it is removed from the vehicle purchase list and is no longer available for sale.
In the Dealer Portal, dealers can purchase or decline to purchase the vehicle. For more information, see Siebel Dealer Administration Guide.
This task is a step in Process of Managing End of Lease and Vehicle Remarketing.
Auctioning Returned Vehicles
If no dealers buys the product, the account manager works with an auction house to plan the event where this vehicle will be auctioned.
When the information about the auction event is available, the account manager enters the information about the event and about all the cars that will be auctioned at that event in Siebel Automotive, and sends this information to the auction house by email.
This task is a step in Process of Managing End of Lease and Vehicle Remarketing.
Entering Information About an Auction Event
After planning of an auction event is complete, the account manager enters information about the auction event.
To enter information about the auction event
Navigate to the Events screen, then the Auction Event List view.
Add a new record and complete the necessary fields, described in the following table:
Field Description Event ID
Displays an identification number for the event.
Event Type
Select the type of auction. Options are Open, Close, Online, Employee Sale.
Event Sub Type
Select the sub-type of the auction.
Event Status
Displays the status of the event. The field is populated as follows:
In Planning. Set automatically when the Event record is created.
- Scheduled. After you have entered all the necessary data about the auction, select Scheduled manually in the Status field to cancel the event.
Closed. Select this value after the auction has closed.
Cancelled. Select Cancelled manually in the Status field to cancel the event.
No Sale. Select No Sale manually in the status field if no vehicles are sold at the event.
Event Date
Enter the date of the event.
Event Price List
Select the price list for the auction. This list specifies the base price, the minimum price accepted for each vehicle.
Auction ID
Select the auction house.
Auction House
Displays the name of the auction house after you select the house in the Auction ID field.
Cancel Date
Displays the date when the auction was cancelled. If you select Cancelled in the Status field, this field is automatically populated with the current date.
Team
Displays the team at the automotive company that deals with this auction house. This is populated automatically when you select the house in the Auction ID field.
Created By
Displays the user ID of the employee who created this record.
Event Volume
Displays the sum of all volume that the remarketing department wants to include in this event. This is a forecast for the event.
Adding Vehicles to an Auction Event
You can add vehicles to an auction event when you create the Auction Event record or at a later time.
To add vehicles to the auction event
Navigate to the Events screen, then the Auction Event List view.
Drill down on the Event ID field for the auction you want to add the vehicle to.
The Auction Event form and Vehicles list appears.
Add a new record to the Vehicles list.
In the VIN field of the new record, select the vehicle.
Other fields of the Vehicles record, such as make, model, and year are automatically populated.
Enter the base price of vehicles in one of two ways:
Select vehicles and click Price Vehicle to price the selected vehicles
Click Price All to price all vehicles.
The price of each vehicle is displayed in the Resale Price field, based on the price list and on the attributes of the vehicle.
If you want to see the details of how this price was determined, you can click the Resale Price field to display a pricing waterfall.
For more information about pricing waterfalls, see Siebel Pricing Administration Guide.
Sending Info to the Auction House
After you have defined the auction event and added vehicles to it, you transmit this information to the auction house using the Auction List Web service. For more information, see Auction List Web Service.
Workflow Process Reference for Vehicle Remarketing
End of lease and remarketing uses the following workflow processes:
Auto CF EOT Account States Vehicle Turn In Workflow Process
This workflow process inserts account states for the financial account, based on the turn-in status of the vehicle. It is triggered when a new record is saved in the Asset Turn In view.
This workflow process is shown in the image.
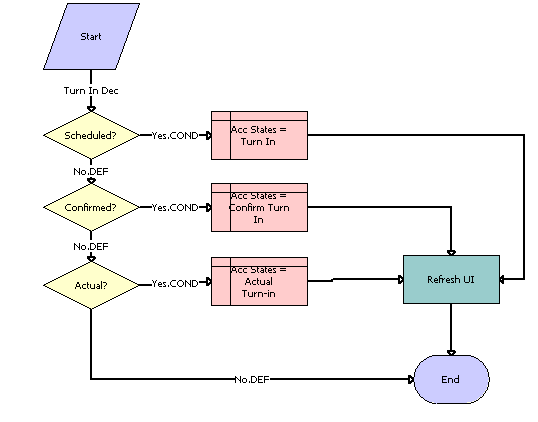
Workflow Process Description. This workflow process performs the following actions:
Scheduled? This step checks the value of the Turn In Status for the new saved record and if it is equal to Scheduled, the next step would be Acc States equal to Turn In.
Acc States equal to Turn In. This step inserts the Account States record with the value Turn In.
Confirmed? This step checks the value of the Turn In Status for the new saved record and if it is equal to Confirmed, the next step would be Acc States equal to Confirm Turn In.
Acc States equal to Confirm Turn In. This step inserts the Account States record with the value Confirm Turn-in.
Actual? This step checks the value of the Turn In Status for the new saved record and if it is equal to Actual, the next step would be Acc States equal to Actual Turn In.
Acc States equal to Actual Turn In. This step inserts the Account States record with the value Actual Turn-in.
Refresh UI. This step refreshes the view to reflect the change in Account State.
Auto CF EOT Account States Vehicle Inspection Workflow Process
This workflow process inserts the account states for the financial account, based on the value of the inspection status of the vehicle. It is triggered when a new record is saved in the Asset Inspection view.
This workflow process is shown in the image.
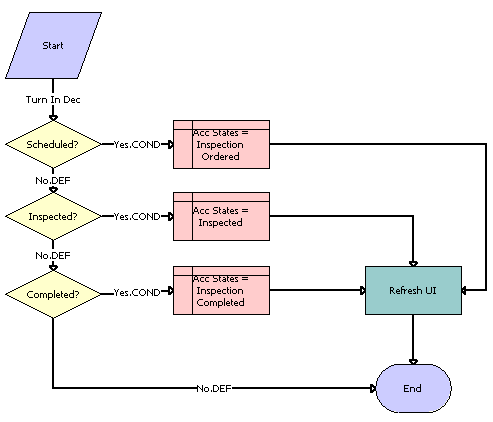
Workflow Process Description. This workflow process performs the following actions:
Scheduled? This step checks the value of the Inspection Status for the new saved record and if it is equal to Scheduled, the next step would be Acc States equal to Inspection Ordered.
Acc States equal to Inspection Ordered. This step inserts the Account States record with the value Inspection Ordered.
Inspected? This step checks the value of the Inspection Status for the new saved record and if it is equal to Inspected, the next step would be Acc States equal to Inspected.
Acc States equal to Inspected. This step inserts the Account States record with the value Inspected.
Completed? This step checks the value of the Inspection Status for the new saved record and if it is equal to Completed, the next step would be Acc States equal to Inspection Completed.
Acc States equal to Inspection Completed. This step inserts the Account States record with the value Inspection Completed.
Refresh UI. This step refreshes the view to reflect the change in Account State.
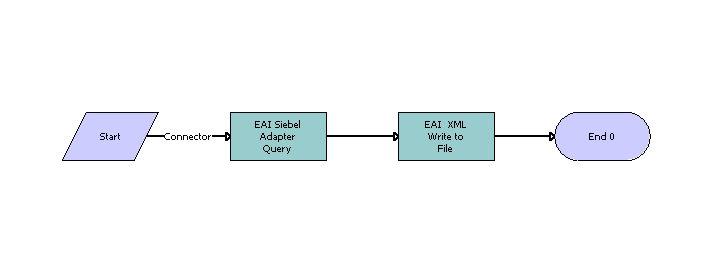
Auto CF Schedule Inspection Workflow Process
This workflow process generates a list of vehicles that need to be scheduled for inspection.
This workflow process is shown in the image.

Workflow Process Description. This workflow process performs the following actions:
Get the Vehicles List. This step finds all the vehicles that need to be scheduled for inspection. Uses the EAI Siebel Adapter service to query for the vehicles.
Write to File. This step retrieves the list of vehicles from the previous step and writes that list to an XML file.
Auto Generate Charges Workflow Process
This workflow process generates the inspection charges for the inspected vehicle.
This workflow process is shown in the image.
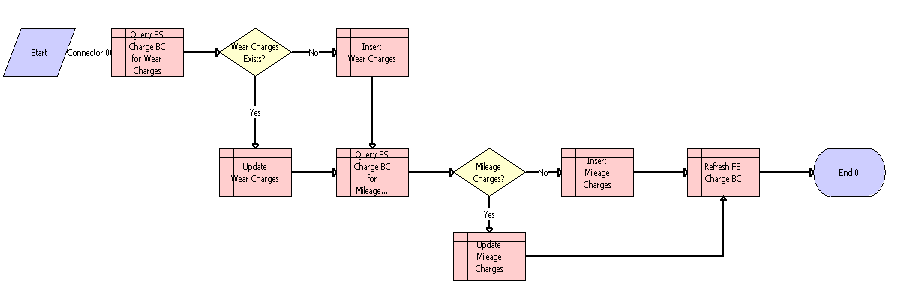
Workflow Process Description. This workflow process performs the following actions:
Query FS Charge BC for Wear Charges. This step queries the FS Charge table for the records whose type is Wear Charges.
Wear Charges Exists? This step checks whether any record with Wear Charges type exists. If so, the next step is Update Wear Charges; if not, the next step is Insert Wear Charges.
Update Wear Charges. This step updates the Wear Charges record of the vehicle with the total wear charge.
Insert Wear Charges. This step inserts the Wear Charges record for the inspected vehicle.
Query FS Charge BC for Mileage Charges. This step queries the FS Charge table for the records whose type is Mileage Charges.
Mileage Charges? This step checks whether any record with Mileage Charges type exists. If so, the next step is Update Mileage Charges; if not, the next step is Insert Mileage Charges.
Update Mileage Charges. This step updates the Mileage Charges record of the vehicle with the Total Mileage charge.
Insert Mileage Charges. This step inserts the Mileage Charges record for the inspected vehicle.
Refresh FS Charge BC. This step refreshes the Charges records.
eAuto CF Lease End Communications Workflow Process
This workflow process begins lease-end communications by sending notification letters. The workflow process is triggered by a batch job scheduled every night which processes all the records due for the end-of-term communication. The records that require further processing are assigned to the remarketing agent using Siebel Assignment Manager. An XML file is generated which includes all the financial records that have been processed.
This workflow process is shown in the image.
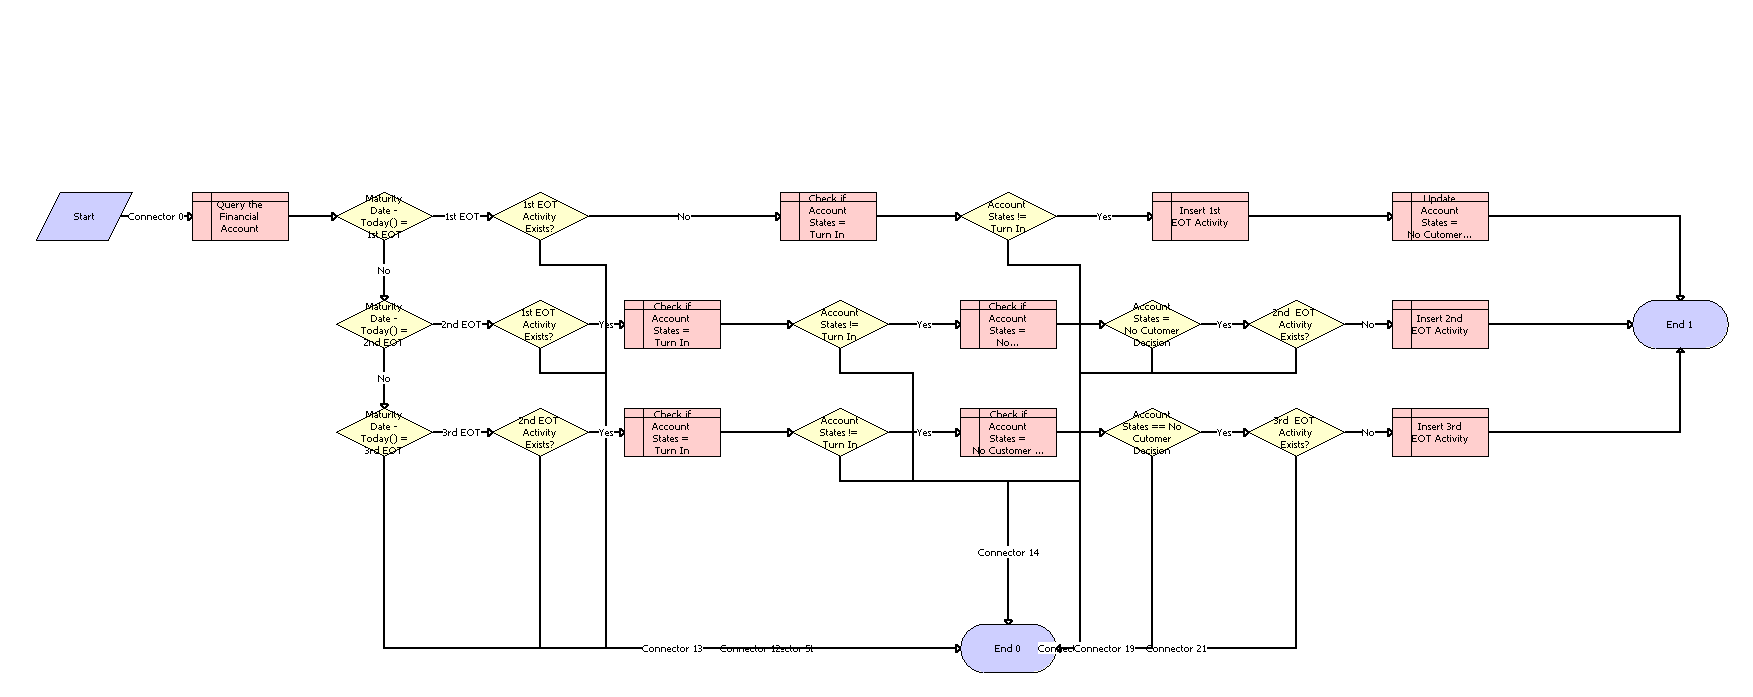
Workflow Process Description. This workflow process performs the following actions:
Query the Financial Account. This step finds all the recommended details of the financial account based on the current context.
Maturity Date - Today() equal to 1st EOT. This step checks if the difference between the maturity date and the current date is equal to the duration for the first lease-end communication.
1st EOT Activity Exists? This step checks if the first end-of-term Communication has already been carried out. If so, skips the following steps and ends the workflow process.
Check if Account States equal to Turn In. This step finds out if the account state of the financial account is Turn In.
Account States not equal to Turn In? This step checks if the customer has already decided to turn in the Vehicle. If so, skips the following steps and ends the workflow process.
Insert 1st EOT Activity. This step creates a first end-of-term Activity record.
Update Account States equal to No Customer Decision. This step updates the account states to No Customer Decision.
Maturity Date - Today() equal to 2nd EOT. This step checks if the difference between the maturity date and the current date is equal to the duration for the second lease-end communication.
1st EOT Activity Exists? This step checks if the first end-of-term Communication has already been carried out. If so, skips the following steps and ends the workflow process.
Check if Account States equal to Turn In. This step finds out if the account state of the financial account is Turn In.
Account States not equal to Turn In? This step checks if the customer has already decided to turn in the Vehicle. If so, skips the following steps and ends the workflow process.
Check if Account States equal to No Customer Decision. This step finds out if the account state of the financial account is No Customer Decision.
Account States equal to No Customer Decision? This step checks if the customer has communicated his decision. If so, skips the following steps and ends the workflow process.
2nd EOT Activity Exists? This step checks if the second end-of-term Communication has already been carried out. If so, skips the following steps and ends the workflow process.
Insert 2nd EOT Activity. This step creates a first end-of-term Activity record.
Maturity Date - Today() equal to 3rd EOT. This step checks if the difference between the maturity date and the current date is equal to the duration for the third lease-end communication.
2nd EOT Activity Exists? This step checks if the second end-of-term Communication has already been carried out. If so, skips the following steps and ends the workflow process.
Check if Account States equal to Turn In? This step finds out if the account state of the financial account is Turn In.
Account States not equal to Turn In? This step checks if the customer has already decided to turn in the Vehicle. If so, skips the following steps and ends the workflow process.
Check if Account States equal to No Customer Decision. This step finds out if the account state of the financial account is No Customer Decision.
Account States equal to No Customer Decision? This step checks if the customer has communicated his decision. If so, skips the following steps and ends the workflow process.
3rd EOT Activity Exists? This step checks if the second end-of-term Communication has already been carried out. If so, skips the following steps and ends the workflow process.
Insert 3rd EOT Activity. This step creates a first end-of-term Activity record.
eAuto CF Lease End Comm1 XML Generation Workflow Process
This workflow process generates an XML file that includes all the financial account records for the first lease-end communication. It is triggered by scheduling a job with Workflow Process Manager. Schedule Start should be set to a time that allows time to complete the batch job set for eAuto CF Lease End Communication Workflow Process.
This workflow process is shown in the image.

Workflow Process Description. This workflow process performs the following actions:
EAI Siebel Adapter Query. This step retrieves all the records that had the first end-of-term communication Activity created for the current day.
EAI XML Write to File. This step generates an XML file consisting of all the retrieved records.
eAuto CF Lease End Comm2 XML Generation Workflow Process
This workflow process generates an XML file that includes all the financial account records for the second lease-end communication. It is triggered by scheduling job with Workflow Process Manager. Schedule Start should be set to a time that allows time to complete the batch job set for eAuto CF Lease End Communication Workflow Process.
This workflow process is shown in the image.

Workflow Process Description. This workflow process performs the following actions:
EAI Siebel Adapter Query. This step retrieves all the records that had the second end-of-term communication Activity created for the current day.
EAI XML Write to File. This step generates an XML file consisting of all the retrieved records.
eAuto CF Lease End Comm3 XML Generation Workflow Process
This workflow process generates an XML file that includes all the financial account records for the third lease-end communication. It is triggered by scheduling a job with Workflow Process Manager. Schedule Start should be set to a time that allows time to complete the batch job set for eAuto CF Lease End Communication Workflow Process.
This workflow process is shown in the image.
Workflow Process Description. This workflow process performs the following actions:
EAI Siebel Adapter Query. This step retrieves all the records that had the second end-of-term communication Activity created for the current day.
EAI XML Write to File. This step generates an XML file consisting of all the retrieved records.
eAuto Vehicle Return Workflow Process
This workflow process creates a Proposal record when the Complete Return button is clicked.
This workflow process is shown in the image.

Workflow Process Description. This workflow process performs the following action:
Create a Proposal Record. This step creates a Proposal Record.
Update Proposal Record. This step updates the name of the proposal, appending the Row Id to the name.
Auto CF Activity Attachment Workflow Process
This workflow process creates an Activity record when the vehicle return receipt is generated, and it adds the receipt as an attachment to the created activity.
This workflow process is shown in the image.

Workflow Process Description. This workflow process performs the following actions:
GetFilePath. This step retrieves the file path of the vehicle return receipt.
Create an Activity. This step creates an Activity record.
Add Attachment. This step adds the receipt as an attachment to the Activity record.
Refresh Activity. This step refreshes the Activity applet.
Refresh Activity Attachment. This step refreshes the Activity Attachment applet.
Refresh UI. This step refreshes the user interface.
Auto Dealer Vehicle Purchase Workflow Process
This workflow process creates an order for the dealer to purchase the vehicle. It is triggered when the user clicks the Purchase Vehicle button on the Vehicle Purchase screen.
This workflow process is shown in the image.
Workflow Process Description. This workflow process performs the following actions:
Create Sales Order. This step creates the Sales Order record with purchasing dealer in the Account field.
Add Vehicle as Line item. This step adds a Line Item record for the order, with the purchased vehicle and its sale price.
Update Rmkt Status to Sold. This step updates the remarketing status of the vehicle as Sold.
EAI Siebel Adapter Query. This step queries the Sales Order and retrieves output as a hierarchy of Sales Order and Sales Order Line Item.
EAI XML Write to File. This step writes the hierarchy as an XML file.
Auto CF EOT Account States Vehicle Dealer Turn In Workflow Process
This workflow process sets the financial account’s State to Actual Turn In. It is triggered when a Vehicle Turn In record is created in the Vehicle Return Manager screen of the Dealer portal.
This workflow process is shown in the image.
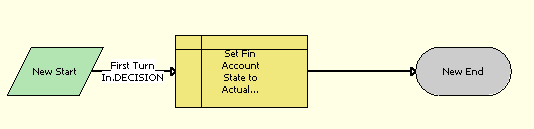
Workflow Process Description. This workflow process performs the following action:
Set Fin Account State to Actual Turn In. This step sets the financial account state to Actual Turn In, by inserting a record in FINS CF Account State.
Auto VehiclePublishForPurchaseORAuction Workflow Process
This workflow process either sets the PublishToOtherDlrsFlag to Y or sets the Remarketing Status to Available for Auction for turned-in vehicles, depending on the number of days passed. It is triggered once everyday by a scheduled job.
This workflow process is shown in the image.

Workflow Process Description. This workflow process performs the following actions:
Today-Record Creation Date. This step checks if the current date minus the record’s turn in date is equal to a number specified by the automotive company. This number defaults to 3, but it can be changed by changing the workflow process property NumDaysPublishToAll.
PublishToAllYes (condn). This step checks if the current date minus record turn in date is equal to a number specified by the automotive company. This number defaults to 3, but it can be changed by changing the workflow process property NumDaysPublishToAll.
Set PublishToOtherDlrsFlag to Y. This step sets the PublishToOtherDlrsFlag to Y. This makes the Vehicle visible to Dealers other than the original turn-in dealer that are in the same territory.
PublishForAuctionYes (condn). This step checks if the current date minus the record’s turn in date is equal to a number specified by the automotive company. This number defaults to 10, but it can be changed by changing the workflow process property NumDaysForAuction.
Set Rmkt Status as Available For Auction. This step sets the value of Rmkt Status to Available For Auction.
Auto CF Auction Vehicle List Workflow Process
This workflow process is responsible for generating a list of vehicles that is planned for an auction event.
This workflow process is shown in the image.

Workflow Process Description. This workflow process performs the following actions:
Query the list of Vehicles for Auction. This step finds all the vehicles, which need to be sent to an auction house. Uses the EAI Siebel Adapter service to query the vehicles.
Write to XML File. This step retrieves the list of vehicles from the previous step and writes that list to an XML file.
eAuto Vehicle Return Inspection Report Workflow Process
The purpose of this workflow process is to view the attached vehicle inspection report.
This workflow process is shown in the image.
Workflow Process Description. This workflow process performs the following action:
Go To Vehicle Attachment View. This step is used to call a sub process, eAuto Vehicle Go To View.
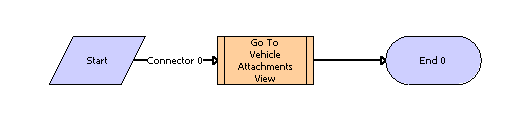
eAuto Vehicle Go To Vehicle Attachments View Workflow Process
The purpose of this workflow process is to navigate to the eAuto Vehicle Attachment view and retrieve the attachments for the asset.
This workflow process is shown in the image.

Workflow Process Description. This workflow process performs the following actions:
Go To View. This step navigates to the eAuto Vehicle Attachment view if the Vehicle Id is not Null.
Query for the Asset. This step queries for the Vehicle Id in the eAuto Vehicle Attachment view.
Auto CF Asset Pricing Procedure Workflow Process
The purpose of this workflow process is to price a vehicle set for Auction.
This workflow process is shown in the image.
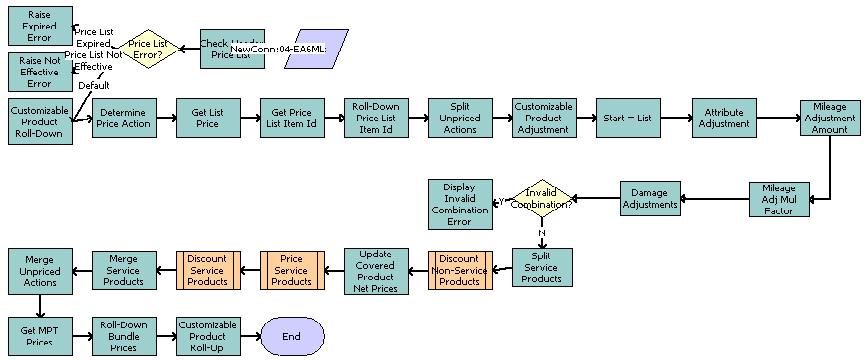
Workflow Process Description. The workflow process uses the Dynamic Pricing Procedure workflow process as its basis. For more information about the Dynamic Pricing Procedure workflow process, see Siebel Pricing Administration Guide. The following steps are added to this workflow process:
Mileage Adjustment Amount. This step applies mileage adjustments based on the adjustment amount configured in the discount matrix.
Mileage Adj Mul Factor. This step applies mileage adjustments based on the multiplication factor specified for a product.
Damage Adjustments. This step applies damage adjustments based on the damage amount and damage benchmark of a vehicle.
Web Service Reference for Vehicle Remarketing
Vehicle remarketing provides the following Web services:
Inspection Request Web Service
Use this outbound Web service to send a list of financial accounts that are scheduled for turn-in to the inspection services agency.
Inspection Request Message Description
For a description of this request message, see the following table.
Table Inspection Request Message
| Request Message | Description | Type |
|---|---|---|
FinancialAccountNo |
Customer's financial account number |
String |
VIN |
Turn-in vehicle's identification number |
String |
PrimaryContactFirstName |
Customer's first name |
String |
PrimaryContactLastName |
Customer's last name |
String |
PrimaryContactHomePhoneNo |
Customer's home phone number |
String |
PrimaryContactMobilePhoneNo |
Customer's mobile phone number |
String |
MaturityDate |
Date when the lease expires |
DateTime |
TurnInDate |
Date vehicle is scheduled for turn-in |
DateTime |
TurnInMileage |
Current odometer reading |
Number |
DealerName |
Name of the dealer where the vehicle will be turned in |
String |
DealerState |
State where the dealer is located |
String |
Street |
Street address of the customer |
String |
City |
Name of the city where customer lives |
String |
State |
Name of the State |
String |
Zip Code |
Zip code of the address |
String |
Country |
Name of the country |
String |
Inspection Request Web Service Application Interface
This topic describes the application objects called by this Web service.
Data Object (Integration Object)
For the Siebel Runtime Repository Name and external name of this Web service data object, see the following table.
Table Inspection Request Web Service Data Objects
| Siebel Runtime Repository Name | External Name |
|---|---|
FinsCfVehicleBatchOrderInspectionInterface |
FINS CF Vehicle Batch Order Inspection |
Inspection Report Web Service
Use this inbound web service to receive the inspection results from the inspection services agency.
Inspection Report Web Service Operations
For a list of operations associated with this Web service, see the following table.
Table Inspection Report Web Service Operations Descriptions
| Operation Name | Description |
|---|---|
VehicleInspectionReportInsert |
Creates a inspection report record for the vehicle |
VehicleInspectionReportInsertOrUpdate |
Creates or updates a inspection report record for the vehicle |
VehicleInspectionReportUpdate |
Updates a inspection report record for the vehicle |
VehicleInspectionReportDelete |
Deletes a inspection report record for the vehicle |
Inspection Report Message Description
This message contains the inspection results received from the inspection services agency. For a description of this message, see the following table.
Table Inspection Report Message
| Report Message | Description | Type |
|---|---|---|
AccountNumber |
Customer's Financial account number |
String |
ContactFirstName |
Customer's first name |
String |
ContactLastName |
Customer's last name |
String |
ContactHomePhoneNo |
Customer's home phone number |
String |
ContactMobilePhoneNo |
Customer's mobile number |
String |
VIN |
The turn in vehicle identification number |
String |
DealerName |
The dealer location where the vehicle will be turned in |
String |
OdometerReadingatCurrent |
The odometer reading when the inspection occurs |
Number |
InspectedDate |
The date when the vehicle inspected |
DateTime |
ReceivedDate |
The date the inspection report is received |
DateTime |
Status |
The status of the vehicle |
String |
LargeDDS |
Large Dings, Dents, Scratches number |
Number |
LargeDDSCharge |
Large Dings, Dents, Scratches charge |
Currency |
SmallDDS |
Small Dings, Dents, Scratches number |
Number |
SmallDDSCharge |
Small Dings, Dents, Scratches charge |
Currency |
Inspection Report Web Service Application Interface
This topic describes the application objects called by the this Web service.
Service Object (Business Service or Workflow Process)
For a description of the service objects for this Web service, seethe following table.
Table Inspection Report Web Service Application Interface
| Name | Boundary Object Type |
|---|---|
Vehicle Inspection Report Service |
Business Service |
Data Object (Integration Object)
For a description of data objects for this Web service, see the following table.
Table Inspection Report Web Service Data Objects
| Siebel Repository Name | External Name |
|---|---|
IntegFinsCfVehicleInspectionReportInterface |
FINCORP Account |
Vehicle Market Value Web Service
Use this inbound Web service to receive the market value of the vehicle from third party organizations such as Black Book and Kelley Blue Book.
Vehicle Market Value Web Service Operations
For a list of operations associated with this Web service, see the following table.
Table Vehicle Market Value Web Service operations
| Name | Description |
|---|---|
FairMarketValueInsert |
Creates a fair market value record for the vehicle |
FairMarketValueInsertOrUpdate |
Creates or updates a fair market value record for the vehicle |
FairMarketValueUpdate |
Updates a fair market value record for the vehicle |
FairMarketValueDelete |
Deletes a fair market value record for the vehicle |
Vehicle Market Value Message Description
For a description of this message, see the following table.
Table Request Message: FairMarketValueInsert
| Name | Description | Type |
|---|---|---|
ProductName |
Name of the product for which the market values are populated |
String |
FairMarketValue |
Fair market value of the product/vehicle |
Currency |
Wholesalevalue |
Value paid by dealer for the purchase of a vehicle |
Currency |
RetailValue |
Value paid by customer for the purchase of a vehicle |
Currency |
Msrp |
Manufacturer's Suggested Retail Price- Cost of vehicle when it was new |
Currency |
StartMileage |
Mileage at the beginning of the lease |
Number |
EndMileage |
Mileage at the end of the lease |
Number |
StartDate |
Date the lease began |
Date |
EndDate |
Date the lease ended |
Date |
Vehicle Market Value Web Service Application Interface
This topic describes the application objects called by this Web service.
Service Object (Business Service or Workflow Process)
For a description of the service objects for this Web service, see the following table.
Table Vehicle Market Value Web Service Application Interface
| Name | Boundary Object Type |
|---|---|
Vehicle Market Value Service |
Business Service |
Data Object (Integration Object)
For a description of data objects for this Web service, see the following table.
Table Vehicle Market Value Web Service Data Objects
| Siebel Runtime Repository Name | External Name |
|---|---|
IntegFinsCfVehicleMarketValueInterface |
FINS CF Fair Market Value FMV Admin |
Vehicle Residual Value Web Service
Use this inbound web service to receive the residual value the product/vehicle from a third party organization such as Black Book or Kelley Blue Book.
Vehicle Residual Value Web Service Operations
For a list of operations associated with this Web service, see the following table.
Table Vehicle Residual Value Web Service operations
| Name | Description |
|---|---|
ResidualValueInsert |
Creates a residual value record for the vehicle |
ResidualValueInsertOrUpdate |
Creates or updates a residual value record for the vehicle |
ResidualValueUpdate |
Updates a residual value record for the vehicle |
ResidualValueDelete |
Deletes a residual value record for the vehicle |
Vehicle Residual Value Message Description
This message contains the residual value details of the product/vehicle received from the third-party organization. For a description of this message, see the following table.
Table Vehicle Residual Value Message
| Name | Description | Type |
|---|---|---|
ProductName |
Name of the product for which the residual values are populated |
String |
ResidualValue |
Residual value of the product/vehicle |
Currency |
Terms |
The number of months in the lease (12, 24, 36, 48, 60, 72) |
String |
StartMileageRange |
The starting mileage |
Number |
EndMileageRange |
The ending mileage |
Number |
MileageAllowance |
The yearly mileage allowance in the lease |
Number |
Vehicle Residual Value Web Service Application Interface
This topic describes the application objects called by this Web service.
Service Object (Business Service or Workflow Process)
For a description of the service objects for this Web service, see the following table.
Table Vehicle Residual Value Web Service Application Interface
| Name | Boundary Object Type |
|---|---|
Vehicle Residuals References Service |
Business Service |
Data Object (Integration Object)
For a description of data objects for this Web service, see the following table.
Table Vehicle Residual Value Web Service Data Objects
| Siebel Runtime Repository Name | External Name |
|---|---|
IntegFinsCfVehicleResidualsReferenceInterface |
FINS CF Vehicle Residuals Reference Data |
Auction List Web Service
Use this outbound Web service to send a list of vehicles that is planned for an auction event. The list will be sent to the auction house.
Auction List Message Description
This message contains the details about a list of vehicles that is planned for an auction event. For a description of this request message, see the following table.
Table Auction List Message
| Name | Description | Type |
|---|---|---|
VIN |
Vehicle Identification number |
String |
Make |
Make of the vehicle; for example, BMW or Honda |
String |
Model |
Model of the vehicle; for example, Accord |
String |
Trim |
Trim of the vehicle; for example, LS, LX |
String |
Door |
Number of doors on the vehicle |
String |
ExteriorColor |
Exterior color of the vehicle |
String |
ResalePrice |
The price of the vehicle |
Currency |
EventId |
Unique identification number for the event |
String |
EventType |
The name value associated with the Event Type Code; options are Open, Close, Online, Employee Sale |
String |
EventSubType |
Delineates the subtype of the event; options differ depending on event type |
String |
EventStatus |
Status of the event |
String |
EventDate |
Date the event is being held |
Date |
EventPriceList |
The price list for the auction event |
String |
AuctionId |
The ID of the auction house that is conducting the event |
String |
AuctionName |
The name associated with the Auction ID |
String |
AuctionCancelDate |
Date user changed the event's status to Cancelled |
Date |
AccountTeam |
The account team of the auction house |
String |
Data Object (Integration Object)
For a description of data objects for this Web service, see the following table.
Table Auction List Web Service Data Objects
| Siebel Runtime Repository Name | External Name |
|---|---|
IntegFinsCfVehicleListForAuction |
Auto Remarket Auction Event |
Pre Term Campaign Vehicle List Web Service
Use this inbound Web service to update any reading for assets (vehicles). When you use this Web service, the application receives a list of vehicles with a certain mileage threshold.
Pre Term Campaign Vehicle List Web Service Operations
For a list of operations associated with this Web service, see the following table.
Table Pre Term Campaign Vehicle List Web Service operations
| Name | Description |
|---|---|
PreTermCampaignVehicleListInsert |
Creates a record for the vehicle with the threshold mileage |
PreTermCampaignVehicleListInsertOrUpdate |
Creates or updates a record for the vehicle with the threshold mileage |
PreTermCampaignVehicleListUpdate |
Updates a record for the vehicle with the threshold mileage |
Pre Term Campaign Vehicle List Message Description
This message contains the threshold mileage details for a list of vehicles. For a description of this message, see the following table.
Table Pre Term Campaign Vehicle List Message
| Name | Description | Type |
|---|---|---|
AccountNumber |
Financial Account number of the vehicle |
String |
CurrentMileage |
The odometer reading |
Number |
CurrentMileageReadDate |
Date when odometer is read |
Date |
VIN |
Vehicle identification number |
String |
Pre Term Campaign Vehicle List Web Service Application Interface
This topic describes the application objects called by the this Web service.
Service Object (Business Service or Workflow Process)
For a description of the service objects for this Web service, see the following table.
Table Pre Term Campaign Vehicle List Web Service Application Interface
| Name | Boundary Object Type |
|---|---|
Pre Term Campaign Vehicle List Service |
Business Service |
Data Object (Integration Object)
For a description of data objects for this Web service, see the following table.
Table Pre Term Campaign Vehicle List Web Service Data Objects
| Siebel Runtime Repository Name | External Name |
|---|---|
IntegFinsCfPreTermCampaignVehicleListInterface |
FINCORP Account |