22Repairs
Repairs
This chapter describes how to process and track product repairs. It includes the following topics:
About Repairs
In Siebel Repair, you can track symptoms and resolutions for repairs, create activity plans for repairs, assign and schedule repair activities, and view repair histories.
Process Flow for Repairs
The following figure shows the process flow for repairs.
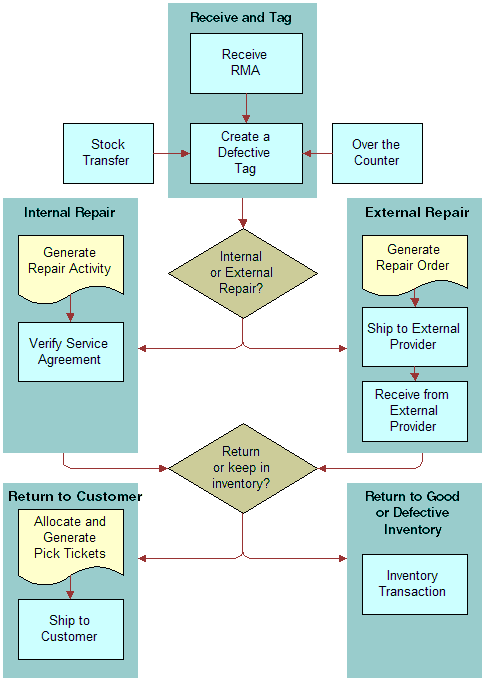
The repair process flow includes the following steps:
Receive and Tag. Receive the defective product, create a return material authorization (RMA) for the repair, and tag the product. Tagging also applies to products received as stock transfers and products received over-the-counter.
Internal Repair or External Repair. For an internal repair, generate a repair activity and verify the service agreement. For an external repair, generate a repair order, ship the product to a third-party vendor, and then receive the repaired product back from the third-party vendor.
Return to Customer or Return to Good or Defective Inventory. If you return the product to the customer after the repair is complete, then allocate the product, generate the pick ticket for the product, and ship the product. If you return the product to good or defective inventory, then generate an inventory transaction for the product movement to inventory.
Repairs begin when a customer contacts a service center about a defective product. The customer service representative asks the customer to ship the product to the repair center and associates an RMA with the product. The RMA (RMA Repair Return or RMA Advance Exchange) signifies that the product needs repair.
Repair Product Receipt
Employees at a repair center either ship a defective product to a third-party vendor for repair or repair the defective product themselves. For a shipment to a third-party vendor, you create a repair order (RO) with an order number. You can use this number to track the product to and from the third-party vendor. You can track the repair of the product to completion using the date of the shipment to and the date of the receipt from the third-party vendor. The inventory transactions to record these product movements are automatically created.
You can return repaired products to the customer or move them to good stock inventory.
Defective products are included in the repair process in the following ways:
Using a freight carrier, a customer can deliver a defective product to a repair center. If no return material authorization (RMA) is associated with the product, then you must create the RMA.
The field service engineer or an employee associated with an internal department can deliver a defective product over-the-counter (or directly) to a repair center.
An employee associated with an internal location can transfer a defective product to a repair center. (For example, a field office might collect defective products and then forward them to a repair center.) You can create an internal order to track a product transferred from an inventory location to another location, or you can create an inventory transaction type of Stock Transfer to track the product.
Repair Numbers
A repair number is automatically assigned to a repair record. It uniquely identifies the product to repair. A repair center agent attaches a tag containing this number to the product. This repair number is often a bar-coded label, and allows you to track defective products through the repair process. The defective products do not need serial numbers. For more information about the methods to customize this number, see Numbers for Business Components.
If the product is serialized, then add the asset number to the repair record to automatically designate the product name, inventory location, and inventory level for the product.
Some businesses prefer to expedite the receiving process by creating batches of repair numbers in advance in repair records with no other information. When a defective product arrives, an employee accesses one of these repair records and completes the record for the product.
To generate a repair number for a serialized product, the product must have an asset number. The transactions associated with receiving the asset, through a return material authorization (RMA) or product movement, identify the destination inventory location for the incoming product.
Repair Activities
For the repair of a product, Siebel Field Service includes the following functionality:
Activity plans. Repair activity plans include activity templates when predefined activities. When you select an activity template for an activity plan, you automatically generate activity records.
Activities. You can manually create and update activity records.
Activities, activity plans, and activity templates for repairs function much as they do for other service activities. For more information, see Service Activities
About Generating Inventory Transactions for Repairs
You can generate repair activities from an activity plan. These repair activities can result in product movements between inventory locations. Siebel Field Service recognizes product movements between inventory locations by updating the Location, Status, or Availability fields in the repair record. You can also manually update these fields. These updates automatically generate inventory transactions. Validations are performed for each movement. For example, to move an asset to a destination inventory location, the asset must exist at the source inventory location.
The following steps summarize the inventory transaction process for an internal repair:
Generate an inventory transaction with a value of Stock Transfer for the Type field.
Commit the inventory transaction.
Update the inventory location ID (Prod_INV_ID) for the repair number (S_PART_RPR).
The following table describes the rules for the inventory transactions that relate to internal repairs.
Table Rules for Inventory Transactions: Internal Repairs
| Old Transaction Value | New Transaction Value | Transaction Required? |
|---|---|---|
NULL |
NULL |
No |
NULL |
INV1 |
No |
INV1 |
INV1 |
No |
INV1 |
INV2 |
Yes (an inventory transaction with a value of Stock Transfer for the Type field). Validations are performed. |
INV1 |
NULL |
No |
About Shipping Defective Products to Third-Party Vendors
In the Repair Pick Ticket view of the Shipping screen, clicking the Process Shipment button generates transactions (with a value of Ship To TP in the Type field) to move a product from the defective inventory location to the third-party vendor. This transaction updates INV_STATUS_CD to Defective and INV_AVAIL_CD to On Hand.
The following steps summarize the inventory transaction process for shipping a defective product to a third-party vendor:
Generate 2 inventory transactions with a value of Ship To TP and De-Allocate for the Type field.
Commit the inventory transactions.
Using the BusComp FS Repair Without Update processing logic, update the inventory location ID (Prod_INV_ID), inventory location (INVLOC_ID), status (INV_STSTUS_CD), and availability (INV_AVAIL_CD) for the repair number (S_PART_RPR).
About Receiving Repaired Products from Third-Party Vendors
In the Receive Purchase Order, Receive RMA, and the Receive Internal Order views of the Receiving screen, selecting the Process Receipt command generates transactions (with a value of Receive From TP in the Type field), to move a product from a third-party vendor to the appropriate inventory location.
To access the Receive Purchase Order, Receive RMA, or Receive Internal Order view, navigate to the Receiving screen, select All Pending Orders from the visibility filter, and drill down on the Receive Type field for a record. These views appear, and associated lists for line items and serial numbers appear in these views.
To receive an product from a third-party location, define the third-party location in the Service Orders screen and the receiving location in the To Inventory field in the Line Item Receipts view of the Receiving screen.
The following steps summarize the inventory transaction process for receiving a repaired product from a third-party vendor:
Generate an inventory transaction with a value of Receive From TP for the Type field.
Commit the inventory transaction.
Using the BusComp FS Repair Without Update processing logic, update the inventory location ID (Prod_INV_ID), inventory location (INVLOC_ID), status (INV_STSTUS_CD), and availability (INV_AVAIL_CD) for the repair number (S_PART_RPR).
The following table describes the rules for the inventory transactions that relate to receipts from third-party vendors.
Table Rules for Inventory Transactions: Receipts from Third-Party Vendors
| Inventory Transaction Type | Source Inventory | Source Inventory Level | Source Assets | Destination Inventory | Destin. Inventory Level | Destin. Assets |
|---|---|---|---|---|---|---|
Receive From TP |
Source Invloc ID. The Destination Location field in the Actions view in the Line Items view of the Service Orders screen. |
On Hand Defective |
Yes |
Destination Invloc ID. The Source Location field in the Actions view in the Line Items view of the Service Orders screen. |
On Hand - Good Defective |
Yes |
Exchanging an Asset During a Third-Party Repair
If the third-party vendor returns a different product, then the inventory transaction fails unless the new asset exists in the third-party inventory location. You can create the new asset in one of the following ways:
Use the previous Asset ID, and change the serial number associated with the record.
Create the new asset, and receive it from the third-party vendor using a Receive Other transaction. Then, create another transaction to delete the previous asset.
Returning Products to Good Inventory
To return a product to good inventory, select values for the Location, Availability, and Status fields in the repair record. You usually select a value of Good for the Status field. Changing the field values in the repair record creates an inventory transaction that changes the inventory quantity.
Inventory Levels for Repaired Products
If you receive a defective product with an return material authorization (RMA) for repair and return, then the repair center returns the product using the regular shipping process of allocating the product, generating a pick ticket for the product, and shipping the product.
When a third-party vendor or a company repair center repairs a product, you assign an inventory level (an Availability field value and a Status field value) to the product in the Repairs screen. When you ship the product back to the customer, the inventory transaction recognizes the movement of the product, but the information in the Repairs screen still indicates the same inventory level of the last location for the repaired product in inventory. The movement for shipping the product does not update the last location of the product in the repair record.
Process of Managing Repairs
The following list shows the tasks that end users typically perform to manage repairs. Your company might follow a different process according to its business requirements.
To manage repairs, end users perform the following tasks:
Creating Repair Records (End User)
You create a repair record so that you can recognize information about the repair of a defective product. This information includes orders, activities, and product movements that are associated with the repair.
This task is a step in Process of Managing Repairs.
To create a repair record
Navigate to the Repairs screen.
Create a new repair record, and complete the fields as appropriate.
Some fields are described in the following table.
Field Comments Asset #
Select an asset number if the repair record applies to a serialized product.
RMA #
Select an RMA number to associate a return material authorization with the repair record. For more information about creating return material authorizations, see Creating Orders for Repairs (End User).
SR #
Select a number to associate a service request with the repair record.
If you want to associate a repair order for a third-party vendor with the repair record, then complete the following steps:
Drill down on the Repair number (#) field for the repair record, and click the More Info view tab.
In the Repair Vendor field, select the third-party vendor.
In the RO Item number (#) field, select the repair order.
For more information about creating repair orders, see Creating Orders for Repairs (End User).
Adding Information to Repair Records (End User)
After you create a repair record, you can add information to it. Complete the procedures in this topic to add information to repair records.
This topic includes the following related information:
This task is a step in Process of Managing Repairs.
Generating Repair Activities for Repair Records
You select an activity template for an activity plan to generate repair activities for a repair record. For more information about activity templates, see Creating Activity Templates.
To generate repair activities for a repair record
Navigate to the Repairs screen.
Drill down on the Repair number (#) field for a selected repair, and click the Activity Plans view tab.
In the Activity Plans list, create a new activity plan record, and complete the fields as appropriate.
When you save the record, the Activities list is populated with the repair activities in the template that you select.
Updating Repair Activities for Repair Records
To update a repair activity for a repair record, you can change the field values for the activity, record labor for the repair activity, and record expenses for the repair activity.
To update a repair activity for a repair record
Navigate to the Repairs screen.
Drill down on the Repair number (#) field for a selected repair, and click the Activities view tab.
Change the values in the fields for a selected activity as needed, and drill down on the Type field for the selected activity.
To record labor for the repair activity, click the Time Tracker view tab, create a new time record, and complete the fields as appropriate.
For more information, see Recording Labor for Activities (End User).
To record expenses for the repair activity, click the Expense Tracker view tab, create a new expense record, and complete the fields as appropriate.
For more information, see Recording Expenses for Activities (End User).
Recording Movements of Defective Products in Repair Records
In a repair record, you can record the movement of defective products that relate to the repair. To record product movements, you update the Location field in the repair record and the inventory level (the Availability field and the Status field) in the repair record. These updates automatically generate inventory transactions.
To record the movement of a defective product in a repair record
Navigate to the Repairs screen.
Drill down on the Repair number (#) field for a selected repair, and click the More Info view tab.
Complete the fields as appropriate.
Some fields are described in the following table.
Field Comments Location
Select the location of the product.
Availability
Select the availability of the product. Values include In Transit, On Hand, and On Order.
Status
Select the condition of the product. Values include Defective and Good.
Creating Orders for Repairs (End User)
You can create orders for repairs. For more information about creating orders, see Siebel Order Management Guide. For more information about associating orders for repairs with repair records, see Creating Repair Records (End User).
You can create the following types of orders for repairs:
RMA Repair Return. An order to return a repaired product to a customer.
RMA Advance Exchange. An order to return an exchanged product to a customer.
Repair Order. An order to ship a defective product to a third-party vendor for repair and to receive the repaired product back from the third-party vendor.
This task is a step in Process of Managing Repairs.
To create an order for repairs
Navigate to the Service Orders screen, then the List view.
Create a new order record, and complete the fields as appropriate.
Some fields are described in the following table.
Field Comments Type
Select the type of order. Values include RMA Repair Return, RMA Advance Exchange, and Repair Order.
Account
Select the customer account for the order.
Drill down on the Order number (#) field.
In the Line Items list, create a new record for each product to repair or exchange, and complete the fields as appropriate.
Creating Transactions for Receiving Defective Products Over-the-Counter (End User)
You can manually create an inventory transaction to receive a defect product over-the-counter (or directly) from a field service engineer or from an employee who is associated with an internal department. Customers frequently use a freight carrier to deliver defective products to you. For more information about automatically creating inventory transactions for receiving defective products with a return material authorization (RMA) or for receiving defective products by stock transfer, see Receiving Products in Orders (End User). For information about automatically creating inventory transactions for receiving repaired products from third-party vendors, see Receiving Repaired Products from Third-Party Vendors (End User).
This task is a step in Process of Managing Repairs.
To create a transaction to receive a defective product over-the-counter
Navigate to the Repairs screen.
Select a repair record, or create a new repair record.
Copy the value in the Repair number (#) field.
Navigate to the Inventory Transactions screen.
Create a new inventory transaction record, and complete the fields as appropriate.
Some fields are described in the following table.
Field Comments Type
Select Over-the-counter.
Repair ID
Paste the repair number value that you copied.
Creating Transactions for Shipping Defective Products to Third-Party Vendors (End User)
Instead of repairing a defective product at your repair center, you can ship the defective product to a third-party vendor for repair. You can manually create an inventory transaction for shipping a defective product to a third-party vendor. For more information about automatically creating inventory transactions for shipping products in orders, see Shipping Products in Orders (End User).
This task is a step in Process of Managing Repairs.
To create a transaction to ship a defective product to a third-party vendor
Navigate to the Repairs screen.
Select a repair record, or create a new repair record.
Copy the value in the Repair number (#) field.
Navigate to the Inventory Transactions screen.
Create a new inventory transaction record, and complete the fields as appropriate.
Some fields are described in the following table.
Field Comments Type
Select Ship To TP.
Repair ID
Paste the repair number value that you copied.
Viewing the History of Repairs (End User)
Repair histories for assets show asset defects over time. A repair history might show several repair numbers for asset. You can detect failure trends from the repair histories for assets. If an asset has several repair numbers, then you might identify the asset as a financial liability. Also, you might use a repair history to justify the decision to scrap an asset because the repair cost is too high, and you can find a more reliable substitute asset.
This task is a step in Process of Managing Repairs.
To view the repair history of an asset
Navigate to the Repairs screen.
Drill down on the Asset number (#) field for a selected repair, and click the Repairs view tab.
All of the repairs for the selected asset appear.
You can also review repair history of products.
To view the repair history of a product
Navigate to the Repairs screen.
Click Query, select the product in the Product field, and click Go.
All of the repairs for the selected product appear.