15Shipping and Receiving
Shipping and Receiving
This chapter describes shipping and receiving orders and the records that Siebel Field Service creates to track orders. It includes the following topics:
About Shipping Orders
You can ship products to a customer or to another inventory location for your service business. The replenishment process can initiate internal shipments.
Shipping activities focus on the pick ticket and the waybill. The pick ticket includes detailed information about the products required to fill orders. The waybill includes data related to the shipment, normally accompanies with the shipment, and connects shipping and receiving.
Process Flow for Shipping
Shipping begins when fulfillment ends and a pick ticket is generated. The following figure shows the process flow for shipping.
The process flow for shipping includes the following steps:
Get the pick ticket.
Pick the products.
Update the pick ticket with the products that you ship.
Select a carrier, and update the waybill.
Process the shipment.
Processing Logic for Shipments
The Process Shipment button is located in the Pick Ticket form of the Shipping screen. (To see this button, navigate to the Shipping screen, then the Shipments view, and drill down on the Pick Ticket field for a selected pick ticket.) Clicking this button generates following actions:
Examines all the records for allocated lines (in the S_ORDPART_MVMT table) for the selected pick ticket, and validates the Ship transaction for each allocated line. If a single validation constraint (for example, Product, Source Inventory Location, Source Availability, or Source Status) fails, then the entire transaction rolls back.
For each shipped record for an allocated line, generates an inventory transaction with a Ship type and another inventory transaction with a De-Allocate type. Inventory transactions (for example, Ship Internal or Ship Other) are generated by using the order type of the pick ticket. For more information about these inventory transactions, see About Inventory Transactions.
If the shipped quantity is less than the allocated quantity, then inserts a De-Allocate action for the line for any extra quantity and generates an inventory transaction with a De-Allocate type. This transaction is in addition to the De-Allocate transaction in Step 2.
Checks whether the Auto-Receive check box is selected in the Fulfillment view in the List view of the Service Orders screen. The Auto-Receive check box applies to internal orders, and (if selected) automatically generates received line items and processes the receipt for the trunk inventory location of a field service engineer. For an internal order with a Trunk type for the inventory location of the destination, this check box is automatically is selected.
If this check box is selected, then generates the received line items for the processed shipped line items, and processes the receipt of the order. For more information about the processing logic for receipts, see About Receiving Orders.
Pick Tickets and Orders
Pick tickets and orders have the following relationship:
Orders include 1 or more line items.
Order line items can include 1 or more actions (records) in the Siebel database.
One or more actions (with a value of Allocate in the Type field) can have 1 pick ticket.
Although Order ID and Order Item ID do not appear in the Pick Tickets view, these values are located in the Siebel database. S_SHIPMENT_ID and S_ORDER_ITEM_ID are located in the S_ORDPART_MVMT table. S_ORDER_ID is located in the S_ORDER_ITEM table.
About Receiving Orders
Receiving applies to all order types, including the following types:
Internal orders for replenishment or internal transfers that a field office, repair center, or a field service engineer receives.
Return material authorizations (for product returns from a customer).
Purchase orders and repair orders (for product receipts from an external vendor).
Orders for any other received products (a receipt type of Unknown).
Process Flow for Receiving
When you receive a product, a receipt is generated as proof that the product arrived. The following figure shows the process flow for receiving.
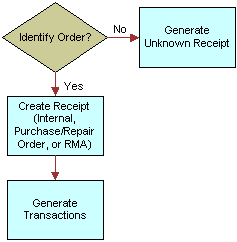
The process flow for receiving includes the following steps:
If the order is unidentified, then generate an unknown receipt.
If the order is identified (Internal Order, Purchase Order, Repair Order, or Return Material Authorization), then create a receipt.
Generate the transactions.
The necessary inventory transactions are created, and the necessary line item actions on received orders are created.
Processing Logic for Receipts
The Process Receipt button is located in the order form in the Receive Internal Order, Receive Purchase Order, Receive Repair Order, and Receive RMA views of the Receiving screen. Clicking this button generates the following actions:
Verifies that the asset exists at the source inventory location.
Generates the appropriate inventory transactions (for example, Receive Internal, Receive Other, and Receive From TP) affecting inventory levels. The order type determines the appropriate inventory transactions. For more information about inventory transactions, see About Inventory Transactions.
If the product received is serialized, then checks that the total number of assets received matches the product quantity.
About Validations for Shipping and Receiving Transactions
Siebel Field Service includes the following automatic validations for shipping and receiving transactions:
Quantity to ship must be less than or equal to the allocated quantity.
Quantity to receive must be less than or equal to the shipped quantity.
Total number of assets must be equal to the total quantity of a serialized product.
When generating inventory transactions, the source location of a serialized asset must be valid.
After an inventory transaction is generated, you cannot update the shipped or received line item. However, you can receive partial shipments for all order types except internal orders. You can add new receive actions as long as the quantity of received products does not exceed the quantity in the order.
About Hierarchical Assets for Shipping and Receiving
When you ship or receive a hierarchical asset, changes occur in some fields of the parent component for the asset according to the type of shipping or receiving transaction. These changes occur in the fields of the child subcomponents for the hierarchical asset if the fields are set to cascade the values from the parent to the children. For more information, see Hierarchical Assets.
Process of Managing Shipping
The following list shows the tasks that end users typically perform to manage shipping. Your company might follow a different process according to its business requirements.
To manage shipping, end users perform the following tasks:
Shipping Products in Orders (End User)
The Shipments view displays pick tickets that are generated for specific orders. The Fulfillment and Part Locator Engines automatically generate pick tickets. Also, you can use the Generate PickTickets command in the Service Orders screen to generate pick tickets. For more information about generating pick tickets, see About the Fulfillment Engine.
You can create pick ticket records in the Shipments view. If you select the Pending Pick Ticket views from the visibility filter, then only pick ticket records with a Status field value of Open appear in the view. The default shipment number in the Shipment number (#) field is the pick ticket number.
Serialized products have a check in the Serialized field in Fulfillment view in the Service Information view in the Products view of the Administration - Product screen. You must enter serial numbers for all movements and transactions of assets for serialized products.
This task is a step in Process of Managing Shipping.
To ship the products in an order
Navigate to the Shipping screen, then the Shipments view.
Drill down on the Pick Ticket field for a selected pick ticket.
In the Allocated Lines list, select a line.
If the selected line relates to a product for a serialized asset, then create a new records for the product in the Serial Numbers list.
The number of records in the Serial Numbers list cannot exceed the value in the Qty field in the Pick Ticket view.
If the selected line relates to a repaired product, then add repair numbers for the product in the Repair number (#) list of the Repair Pick Ticket view.
The number of records in the Repair number (#) list must equal the value in the Qty field in the Repair Pick Ticket view.
In the Allocated Lines list, click Ship to ship the products for 1 or more selected lines, or click Ship All to ship the products for all lines.
A shipped quantity in the Pick Ticket view or the Repair Ticket view that is equal to the allocated quantity for the lines is generated. Inventory transactions are not yet created.
If you want to ship a lesser quantity of product for the line, then click New in the Pick Ticket view or the Repair Ticket view, and change the quantity in the Qty field in that view.
Note: If the shipped quantity is less than the quantity for the corresponding quantity in the Allocated Lines list, then the quantity difference is de-allocated in a De-Allocate transaction. The De-Allocate transaction (and any other inventory transaction) occurs after you click Process Shipment in the next step.In the Pick Ticket form, click Process Shipment to create inventory transactions for the selected lines in the Allocated Lines list and for the specified quantity in the Pick Ticket view or the Repair Ticket view.
The appropriate inventory transactions are generated. For more information about the processing logic for shipments, see About Shipping Orders.
The Ship Qty field in the Allocated Lines list is populated with the shipment quantity, and the Status field in the Pick Ticket form changes to Shipped for internal orders and to Closed for other orders.
Note: If the Qty field on the Pick Ticket view or the Repair Ticket view does not contain a value, then inventory transactions are not created when you click Process Shipment.
Finding Pick Tickets for Order Line Items (End User)
You might want to find pick tickets for order line items.
This task is a step in Process of Managing Shipping.
To find a pick ticket for an order line item
Navigate to the Service Orders screen, then the List view.
Drill down on the Order number (#) field for a selected order, and click the Line Items view tab.
Select an order line item record.
On the link bar, click Actions.
Note the number in the Pick Ticket field for an action record.
Navigate to the Shipping screen, then the Shipping view.
In the Pick Tickets field, query for the pick ticket number.
Consolidating Pick Tickets (End User)
In the Consolidation view, you can combine products from existing pick tickets into a single pick ticket. This consolidation reduces shipping costs. You can process all order types, except for the Repair Order type, in this view.
The Qualified Lines list in this view shows the allocated lines for pick tickets that have the following attributes:
An Open or Pending status
The same Ship To address
The same source inventory location
The same order type
The Consolidated Lines list in this view shows the products and quantities combined into 1 pick ticket. The consolidated lines are processed as though they are part of the original order.
This task is a step in Process of Managing Shipping.
To consolidate pick tickets
Navigate to the Shipping screen, then the Consolidation view.
In the Pick Ticket form, select a pick ticket.
In the Qualified Lines list, select at least 1 other pick ticket to add to the consolidation.
Click Consolidate.
Products move from the Qualified Lines list to the Consolidated Lines list. The donor pick ticket no longer appears in the All Pick Tickets view.
Creating Waybills for Pick Tickets (End User)
You can create waybills for pick tickets. The waybill includes data related to the shipment, normally accompanies with the shipment, and connects shipping and receiving.
This task is a step in Process of Managing Shipping.
To create a waybill for a pick ticket
Navigate to the Shipping screen, then the Waybill view.
In the Pick Ticket form, select a pick ticket.
In the Waybill form, complete the fields as appropriate to ship the products in the selected pick ticket.
Some fields are described in the following table.
Field Comments Shipment #
Type the shipment number. The default shipment number is the same as the pick ticket number.
Waybill #
Type the waybill number. The default waybill number is the same as the Waybill number (#) field in the Shipments view.
Process of Managing Receiving
The following list shows the tasks that end users typically perform to manage receiving. Your company might follow a different process according to its business requirements.
To manage receiving, end users perform the following tasks:
Receiving Products in Orders (End User)
You can track the products in incoming orders and the associated line items in the Receiving screen. These orders originate from the Service Orders screen. For more information about service orders, see Siebel Order Management Guide.
When you ship the products in an internal order, the Status field value for the associated pick ticket changes to Shipped. (When you ship the products in other orders, this Status field value changes to Closed.) For internal orders, the Status field value for the associated pick ticket changes from Shipped to Closed when you receive the products in the order.
This task is a step in Process of Managing Receiving.
To receive the products in an order
Navigate to the Receiving screen.
In the Pending POs/ROs/RMAs list, drill down on the Receive Type field for a selected order.
For example, if you want to receive defective products with a return material authorization (RMA), then drill down on a Receive Type field of RMA Repair Return. Also, for example, if you want to receive defective products by stock transfer, then drill down on a Receive Type field of Internal Order.
In the Line Items list, select an order line item with products to receive.
In the Received Line Item list, create new records that describe the receipt details for the products in the selected line item.
The value in the Qty field in the Received Line Item list cannot exceed the value in the Qty field in the Line Items list.
If the selected line item relates to a product for a serialized asset, then create new records for the product in the Serial Numbers list.
The number of records in the Serial Numbers list cannot exceed the value in the Qty field in the Received Line Item list.
Note: The uniqueness of serial number is not verified in the Serial Numbers list.In the order form, click Process Receipt.
The appropriate inventory transactions are generated. For more information about the processing logic for receipts, see About Receiving Orders.
Receiving Repaired Products from Third-Party Vendors (End User)
Perform the following procedure to receive repaired products from a third-party vendor. For information about shipping defective products to a third-party vendor, see Creating Transactions for Shipping Defective Products to Third-Party Vendors (End User).
This task is a step in Process of Managing Receiving.
To receive a repaired product from a third-party vendor
Navigate to the Receiving screen.
In the Pending POs/ROs/RMAs list, drill down on the Receive Type field for a selected repair order.
In the Line Items list, select an order line item with product to receive.
In the Received Line Item list, create a new record that describes the receipt details for the product in the selected line item.
The value in the Qty field in the Received Line Item list cannot exceed the value in the Qty field in the Line Items list.
In the Repairs list, create a new repair record for the product in the selected line item.
In the order form, click Process Receipt.
The movement of the product from the third-party repair vendor to the specified inventory location is recorded.
Viewing All Lines Items for Orders (End User)
In the Receiving screen, you select Line Item Receipts from the visibility filter to view all order line items, including pending, processed, and closed line items. This view is useful for auditing receipts.
This task is a step in Process of Managing Receiving.
To view all line items for orders
Navigate to the Receiving screen.
From the visibility filter, select Line Item Receipts.
In the Line Item Receipts list, select a record, and complete at least one of the following steps:
Drill down on the Type field.
The receipt form for the selected receipt shows the status of the receipt and the associated order line items.
Drill down on the Order number (#) field.
Details about the order appear in the Line Items view of the Service Orders screen.
Drill down on the Waybill field.
The receipt form for the selected waybill shows the shipping waybill for the receipt.
In the Receiving screen, you select All Unknown Receipts from the visibility filter to view all line items with products received with incomplete information.
To view all line items with products received with incomplete information
Navigate to the Receiving screen.
From the visibility filter, select All Unknown Receipts.
In the Unknown Receipts list, select a record, and complete at least one of the following steps:
If the Shipment number (#) field has a value, then drill down on the field.
The Receive Unknown form shows the status of the receipt and the associated line items.
If the Match Order number (#) field has a value, then drill down on the field.
Details about the order appear in the Line Items view of the Service Orders screen.
If the Waybill field has a value, then drill down on the field.
The receipt form for the selected waybill shows the shipping waybill for the receipt.
Adding Information to Unknown Receipts (End User)
In the Receiving screen, you select All Unknown Receipts from the visibility filter to view all line items with products received with incomplete information. You can add this information and match receipts with existing orders.
This task is a step in Process of Managing Receiving.
To add information to an unknown receipt
Navigate to the Receiving screen.
From the visibility filter, select All Unknown Receipts.
In the Unknown Receipts list, drill down on the Shipment number (#) field for a selected receipt.
If you know the order number, then you can select the order number in the Match Order number (#) field.
If the receipt includes line items for products with serial numbers, then complete the following steps:
- In the Line Items list, select a line item for which the Serialized field is selected.
In the Received Serial Numbers list, create a new record for the selected line item, and type the serial number in the Serial number (#) field.