14Service Inventories
Service Inventories
This chapter describes how to set up and maintain service inventories. It includes the following topics:
About Service Inventories
Service businesses use the Service Inventory module to manage service inventory throughout its life cycle and to monitor inventory consumption during order fulfillment and during activities for field service engineers. Service Inventory also allows field service engineers who are mobile to manage their trunk inventories using a disconnected client.
Process Flow of Goods in Service Inventories
The following figure shows the process flow of goods in a service inventory.
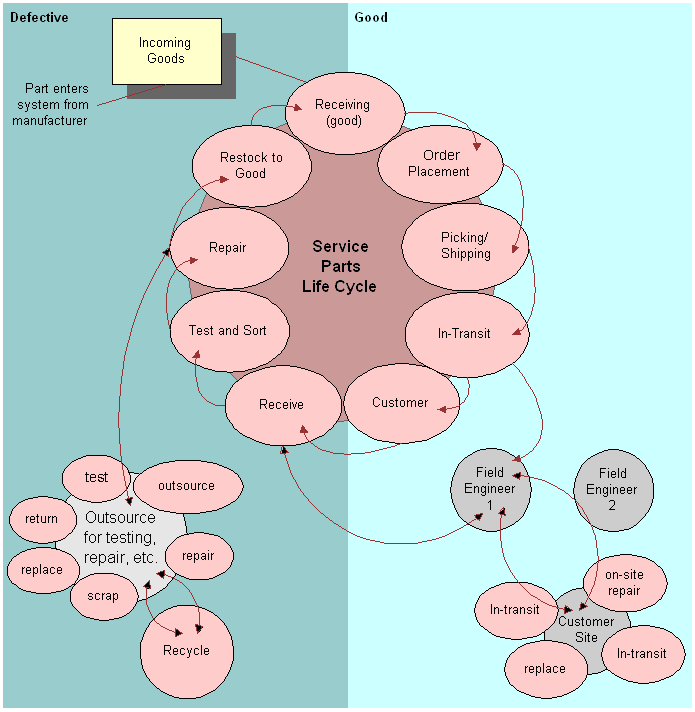
At the center of the process flow is the service parts life cycle, a closed-loop process. The life cycle includes the following stages: receiving (good), order placement, picking and shipping, in-transit, customer, receive, test and sort, repair, restock to good, and back again to receiving (good). Incoming goods from the manufacturer arrive at the receiving (good) stage. Goods go out to field service engineers during the in-transit and receive stages. Through the field service engineers, these goods go to customer sites through an in-transit stage for on-site repairs or replacements. Goods also leave the life cycle during the repair stage, when the outsource vendor can test, repair, scrap, recycle, and replace the goods.
A materials manager can automate these tasks using the Fulfillment or Part Locator Engines. The Replenishment Engine automates the production of orders to restock inventory locations. For more information, see Cycle Counting and Replenishment
About Structure for Service Inventories
A primary objective of the Service Inventory module is to record the organization of inventory.
The following figure shows an example of a service inventory structure that is hierarchical.
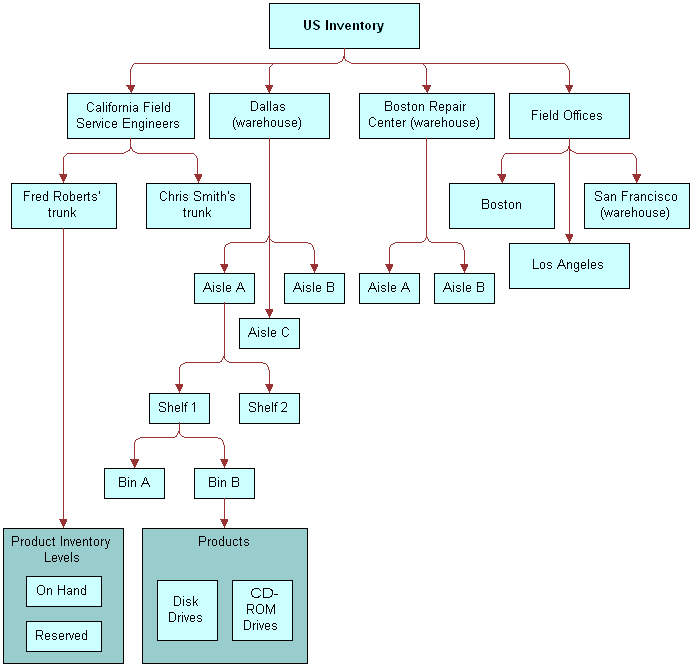
At the first level is US Inventory. At the next level, the structure is divided into California Field Service Engineers, Dallas (warehouse), Boston Repair Center (warehouse), and Field Offices.
California Field Service Engineers is divided into Fred Roberts’ trunk and Chris Smith’s trunk. Fred Roberts’ trunk has product inventory levels of On-Hand and Reserved. Dallas (warehouse) is divided into Aisle A, Aisle B, and Aisle C. Aisle A has Shelf 1 and Shelf 2. Shelf 1 is divided into Bin A and Bin B. Bin B has products of Disk Drives and CD-ROM Drives. Boston Repair Center (warehouse) is also divided into Aisle A and Aisle B. Field Offices is divided into Boston, Los Angeles, and San Francisco (warehouse).
About the Process Flow for Setting Up Service Inventories
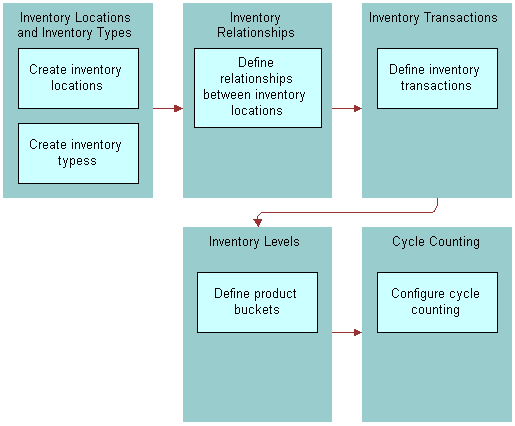
The following figure shows the process flow of the tasks for setting up a service inventory.
Inventory Locations
You use inventory locations to consolidate and manage all records pertaining to a service inventory. An inventory location can be a trunk for a field service engineer, a warehouse, or a portion of a warehouse, such as a shelf or an aisle. An inventory level specifies the availability and status of a product. You can add an inventory level to any location in an inventory structure. For more information about inventory locations, see Creating Inventory Locations (End User).
Consider the following factors when setting up inventory locations:
The inventory locations that you track using the Service Inventory module
The inventory locations that you track using other means, such as an external back-office inventory application
The number of hierarchical levels that apply to each inventory location
You can define different types of inventory locations. The following types of locations are basic to service inventory:
Warehouse. The default inventory location. You define the inventory fulfillment and replenishment relationships for this inventory location. Also, you generate pick tickets at this location. You can define all other inventory locations as subcategories of the warehouse.
Trunk. Mobile inventory that is assigned to a field service engineer. Each engineer has inventory for 1 trunk location.
Field Office. Inventory that can supply several field service engineers. This location is an intermediate location between a warehouse and trunk inventory.
Virtual. A logical, not a physical, inventory location. The External Location virtual location is essential for proper functioning of inventory transactions, and has a ROW_ID value of VIRTUAL_INVLOC. This location allows an inventory application to receive products from outside of the company. A virtual inventory location is the source, and the destination is a physical inventory location (for example, a shelf).
External Inventory Locations
The seed data in Siebel Field Service contains an inventory location value of External Location. This inventory location that has a Type field value of Virtual is the default inventory location if a source or destination location is not specified.
Inventory transactions can occur between organizations by using 2 transactions and the inventory location value of External Location as follows:
The first transaction (Inv1) is from the source location in an organization to the External Location value. A user can view this transaction, and the External Location commits this transaction.
The second transaction (Inv2) is from the External Location to the destination location in a different organization. A user can view this transaction, and the External Location value commits this transaction.
Do not delete the External Location record. The ROW_ID (VIRTUAL_INVLOC) makes this record unique. Some C ++ code in Siebel Field Service uses this ROW_ID. If you delete this record and re-create it, then the record is assigned a new ROW_ID and some inventory transactions fail. However, you can rename this record.
To make sure that all field service engineers in any organization in the company can use the External Location value, use the Organization field to associate all organizations in the company with the External Location value.
Trunk Inventory Locations
To manage trunk inventories, field service engineers record part movements on their laptop computers. They periodically connect their laptop computers to a Siebel Server and synchronize data.
To maximize performance during synchronization to and from the local database of the field service engineer, docking rules control the number and context of the records that are extracted, initialized, and synchronized. Because of these rules, an engineer might not see asset records needed to commit a field part movement for a serialized product. To solve this problem, the engineer can add the asset numbers. After synchronization, an administrator reconciles the add-in asset numbers with the corresponding Siebel database records, and the administrator commits the transaction. After the administrator commits the transaction, the field service engineer must synchronize again to update the local database.
After the field service engineer synchronizes the laptop computer in the field, an administrator can use the Parts Movement Administration view to review and commit transactions. For more information, see Committing Transactions from Mobile Computers.
Inventory Relationships
An inventory location is linked to other locations by relationships that define physical spaces, replenishment sources, fulfillment sources, and cycle counting lists. An inventory structure includes a network of these relationships.
You can implement an inventory structure in the following ways:
Create an inventory location (for example, a warehouse), maintain the products at this location (in inventory levels), and then associate the physical location with the inventory level.
Assign locator numbers to logically divide an inventory location. Locator codes have values such as A1S3B7, meaning Aisle 1, Shelf 3, and Bin 7. A locator number does not imply an inventory type (for example, a bin). Use the locator numbers, along with the locator order, to optimize shipping and cycle counting.
Define each aisle, shelf, and bin as a separate inventory location. Only bin inventory has products. Typically only 1 or 2 products exist in each bin. The inventory name can reflect the combination of location and product. You can link these different inventory locations to each other with the Sublevel relationship type. This relationship type indicates, for example, that Aisle 1 is a sublevel inventory location of Warehouse.
When fulfilling orders, generating cycle counting lists, or running the Replenishment Engine for a warehouse, all inventories below the Warehouse level (and connected through sublevels) are automatically considered.
To improve performance (for example, to avoid traversing the inventory structure every time you want to find all sublevels of inventory for a warehouse), Siebel Field Service uses a denormalized table. This table stores every child, direct child, or grandchild (to any number of levels) of a parent inventory. For example, an inventory hierarchy is defined as follows:
Inventory A is a parent of Inventories B, C, and D
Inventory B is a parent of inventories E and F
The following table shows some entries in the denormalized table.
Table S_INVLOC_ROLLUP Table
| Parent Invloc | Invloc |
|---|---|
A |
B |
A |
C |
A |
D |
A |
E |
A |
F |
B |
E |
B |
F |
You can also relate inventory locations to each other through replenishment. Set fulfillment and replenishment relationships between inventory locations for warehouses, and not for lower levels (for example, aisles, bins, or shelves). When using relationships, the Fulfillment, Replenishment, and Part Locator Engines automatically search for products at lower levels by using sublevel relationships. Configuring a replenishment relationship to indicate that a field office replenishes a trunk might result in overstocking the trunk inventory if the trunk location is already a sublevel of parent inventory.
Inventory Tracking
You can track the physical location of a product in inventory using the following methods:
If you define inventory locations down to the shelf or bin, then associate the inventory level with a bin or shelf related to a fixed location that identifies the product.
Enter a description of the inventory location of the product in the Locator fields in the Product Inventory view of the Inventory screen. This view provides 3 Locator fields to allow multiple possible locations. For example, you might first find a product in the northeast corner of the San Francisco field office, then on shelf A in the supplies room, and then on shelf B in the supplies room.
Inventory Levels
An inventory level is a grouping of products that have the same Availability field value (for example, On Hand, On Order, and Reserved) and the same Status field value (for example, Good and Defective). The following table shows some examples of inventory levels for a product.
Table Examples of Product Inventory Levels
| Availability Field | Status Field |
|---|---|
On Order |
Good |
On Hand |
Good |
Reserved |
Good |
In Transit |
Defective |
You do not have to manually create products and associated inventory levels in the Product Inventory view of the Inventory screen. When an inventory transaction occurs, products and associated inventory levels are automatically created in the Siebel database if they do not exist. However, such products are not assigned minimum amounts, maximum amounts, safety amounts, an ABC class for cycle counting, and an XYZ class for cycle counting. You might have to navigate to the Product Inventory view of the Inventory screen and update these newly created records.
You can create or update inventory levels by loading the levels through the EIM_PRODINVLOC table. You can also create or update inventory transactions by loading the transactions through the EIM_INV_TXN table.
Negative Inventory Levels
Negative inventory levels can result from some inventory transactions. Only nonserialized products can have negative inventory levels. Inventory levels can acquire negative values in the following circumstances:
When the logical inventory does not match the physical inventory (when the product is on the shelf, but the Siebel database does not show that the product is available).
When reconciling transactions to or from an External Location. The External Location must have negative quantities so that it can receive inventory from an external source.
Managing Inventory Levels
If the Inventory levels do not exist, then an inventory transaction automatically creates them. However, it is recommended that you set up inventory levels as part of the authorized stock list for an inventory location. As part of the authorized stock list, create the default inventory levels (for example, On Hand - Good) when users create an inventory location or add a new product to an inventory location. If your company plans to stock an inventory level, then do not rely on an inventory transaction to create the inventory level.
You can set up a workflow process to automatically create an inventory level when a user adds a product to an inventory location. For more information about setting up workflows, see Siebel Business Process Framework: Workflow Guide.
Location Order
You can specify a preferred order for using inventory at several different locations. By specifying the location to use first, you minimize the time required for a warehouse clerk to find a product for shipping, to replenish inventory, or to perform cycle counting. Location order can suggest order management strategies, such as First-In-First-Out (FIFO). However, allocation takes the place of inventory levels and does not follow strategies such as FIFO or Last-In-First-Out (LIFO).
Location order is represented by locator numbers (1, 2, and 3). Each locator number is represented by a locator code that applies to a specific warehouse or inventory location. The following table shows examples of locator codes and inventory locations.
Table Examples of Locator Codes and Inventory Locations
| Locator Number | Locator Code | Inventory Location |
|---|---|---|
1 |
A3S1B1 |
Aisle 3, shelf 1, bin 1 |
2 |
A3S2B6 |
Aisle 3, shelf 2, bin 6 |
3 |
A15S3B1 |
Aisle 15, shelf 3, bin 1 |
Location order can be any sequence of locator numbers (for example, 123 or 213). Make sure that the location order represents the optimal path through the warehouse.
You specify locators (1, 2, and 3) for inventory levels in the Inventory Level list in the Product Inventory view of the Inventory screen. The Location Order field appears as a read-only field in the Inventory Locations view of the Products screen. Locators appear as read-only fields in the Part List view of the Cycle Counts screen.
About Inventory Transactions
The Service Inventory module is transaction-based. Inventory transactions update inventory levels when you move parts between locations or when an inventory level changes. Each inventory transaction has a product, quantity, source, and destination.
Some examples of business activities that create inventory transactions follow:
Perform a part movement by installing or removing the part and moving it out of or into the trunk of the field service engineer.
Allocate (or reserve) or de-allocate a product for an order line item. You can manually perform this task, or the Fulfillment Engine can perform this task.
Ship an order, and click the Process Shipment button in the Shipping screen.
Receive an order, and click the Generate Transaction button in the Receiving screen.
Manually create a transaction in the Inventory Transactions screen.
The following table describes the types of inventory transactions.
Table Types of Inventory Transactions
| Type | Description |
|---|---|
Adjustment |
Adjusts inventory levels when, after a cycle count, there is a variance between original inventory and counted inventory. This type is automatically generated in the Variance view of the Cycle Counts screen. You can manually generate this type in the Inventory Transactions screen. |
Allocate |
Adds inventory to an inventory level with an Availability field value of Reserved. This type is automatically generated when an Allocate action is called for an order line item. |
De-Allocate |
Clears inventory from an inventory level with an Availability field value of Reserved. This type is automatically generated when a De-Allocate action is called for an order line item. |
Exchange Between FSEs |
Moves inventory from a trunk inventory to another trunk inventory. This type applies to part movements between trunks of field service engineers. You can manually generate this type in the Inventory Transactions screen. |
Over-the-counter |
Moves inventory from an inventory location or level to another location or level. This type applies to part movements from warehouses to trunks of field service engineers. You can manually generate this type in the Inventory Transactions screen. |
Receive From TP |
Moves inventory from a third-party location defined in the Fulfillment view of the Service Orders screen to the inventory location defined in the Line Item Receipts view of the Receiving screen. |
Receive Internal |
Moves inventory from an inventory level with an Availability field value of In Transit to a physical inventory level, such as a shelf in a warehouse. This type is a stock transfer that is automatically generated in the Receiving screen. |
Receive Other |
Moves received inventory to an inventory level. This type is part of a customer transaction that uses a virtual inventory location of External Location or Customer. These locations are included as seed data in Siebel Field Service. Inventory is received from the Customer location to the location in the Line Item Receipts view of the Receiving screen. |
Ship Internal |
Moves inventory from a physical inventory level to an inventory level with an Availability field value of In Transit. This type is for internal orders and is a stock transfer that is automatically generated in the Shipping screen. |
Ship Other |
Moves inventory from a physical inventory level to an inventory level with an Availability field value of In Transit. This type is for outside orders and is part of a customer transaction that uses a virtual inventory location of Customer. The Customer location is included as seed data in Siebel Field Service. |
Ship To TP |
Moves inventory from the location from which the inventory is allocated (and for which the pick ticket is generated) to the destination location defined in the Fulfillment view of the Service Orders screen. |
Stock Transfer |
Moves inventory from an inventory level or location to another level or location. The inventory levels or locations can be in the same warehouse or in different warehouses. You can manually generate this type in the Inventory Transactions screen. |
Conditions for Generating Transactions
The following table lists the types of inventory transactions that are created for combinations of source and destination locations, inventory levels, and serialized or nonserialized assets.
Table Conditions for Generating Transactions Types
| Inventory Transaction | Inventory Txn Type | Source | Destination | ||||
|---|---|---|---|---|---|---|---|
| Inventory | Inventory Level | Assets | Inventory | Inventory Level | Assets | ||
Part movement on activity |
Ship Other |
Trunk of FSE |
On Hand |
Yes |
Customer |
On Hand |
Yes |
Receive Other |
Customer |
On Hand |
Yes |
Trunk of FSE |
On Hand |
Yes |
|
Allocate action. Insertion on order entry |
Allocate |
Customer |
On Order |
No |
Ord Part Movement Source Invloc ID |
Reserved |
No |
De-Allocate action. Insertion on order entry |
De-Allocate |
Ord Part Movement Source Invloc ID |
Reserved |
No |
Customer |
On Order |
No |
Ship other |
Ship Other |
Ord Part Movement Source Inv |
On Hand |
Yes |
Customer |
On Hand |
Yes |
De-Allocate |
Ord Part Movement Source Inv |
Reserved |
Yes |
Customer |
On Order |
Yes |
|
Ship internal |
Ship Internal |
Ord Part Movement Source Inv |
On Hand |
Yes |
Order Hdr Destination Invloc ID |
In Transit |
Yes |
De-Allocate |
Ord Part Movement Source Invloc ID |
Reserved |
Yes |
Customer |
On Order |
Yes |
|
Receive RMA and PO |
Receive Other |
Customer |
On Hand |
Yes |
Ord Part Movement Destination Inv |
Ord Part Movement Availability and Status |
Yes |
Receive internal |
Receive Internal |
Order Hdr Destination Inv |
In Transit |
Yes |
Ord Part Movement Destination Inv |
On Hand |
Yes |
Ship RO |
Ship To TP |
Ord Part Movement Source Inv |
On Hand |
Yes |
Order Hdr Destination Invloc ID |
On Hand |
Yes |
De-Allocate |
Ord Part Movement Source Invloc ID |
Reserved |
Yes |
Customer |
On Order |
Yes |
|
Receive RO |
Receive From TP |
Order Hdr Destination Inv |
On Hand |
Yes |
Ord Part Movement Dest Inv |
On Hand |
Yes |
The following rules regulate the generation of inventory and asset transactions:
If a product is serialized, then:
The part movement must be associated with an asset.
The quantity of the part movement must be 1.
The asset must be included the source inventory.
When these conditions apply, the inventory transaction is validated, and the inventory database is updated.
If the product is not serialized and no asset number is specified, then a committed inventory transaction is successfully generated without validation.
If the product is not serialized and no asset number is specified, then an asset validation and an asset transaction do not occur. The inventory location is not associated with the asset.
Mobile Inventory Transactions
Siebel Field Service can record part movements in the field (mobile inventory) without synchronizing with the Field Service server so that field service engineers can record asset transfers without having the asset number or serial number on their laptop computers.
Normally, recording transfers of assets without having asset numbers or serial numbers causes a transaction to fail. However, in Siebel Field Service, the part movement is recorded but not applied to the inventory database.
If the mobile computer is disconnected, then the local database is updated. When you synchronize the mobile computer with the Siebel Server, the information about the part movement is transferred to the server. If the server identifies the asset in the database on the remote computer, then the server records the change in inventory location in the Siebel database and then creates a transaction.
If a part movement (including part movements for add-in assets) is not validated on the remote computer, then an uncommitted part movement appears in the Parts Movement Administration view of the Administration - Service screen. An administrator must review uncommitted part movements and reconcile add-in serial numbers with existing asset numbers. The administrator then clicks a commit button to create transactions. For more information, see Committing Transactions from Mobile Computers. For more information about the types of transactions that are created for specific combinations of source and destination locations, see About Inventory Transactions.
The next time you synchronize the remote computer, its local database is updated to match the server database.
Validation Checks for Commit Buttons
Commit buttons appear in the Part Tracker view of the Activities screen and the Parts Movement Administration view of the Administration - Service screen. The commit step for a transaction begins when users save the record and select the Commit check. The field service engineer uses the commit buttons in the Part Tracker view to perform the following validation checks:
Verify that the source and destination inventories are specified. If the asset does not exist in the source inventory, then do not commit the asset.
Verify that the position of the activity owner is associated with a trunk inventory. Trunk inventories have a Type field value of Trunk.
If an asset number is specified, then verify that the number is valid.
For each asset transaction, verify that the asset exists at the specified inventory source location. This validation is not performed for the External location or the Customer location. For more information about external inventory locations, see Inventory Locations.
Verify that the asset is available. Verify the availability and status. This validation is not performed for the External location.
Verify that the quantity of specified assets exists in the source inventory. This quantity is 1 if the product is serialized.
If the product is serialized, then verify that the total quantity for the inventory transaction is equal to the total number of specified assets for the transaction.
If these validation checks are successful, then the Commit check box is selected for the records, and transaction records for part movements are generated in the Siebel database.
The commit buttons validate the movement of serialized and nonserialized assets that are recorded in the local database. If the part movement record defines an asset, then an asset transaction is recorded.
A user can create a part movement record without changing the inventory levels. To change the inventory levels, the user selects the Commit check box for the record or clicks the Commit button for the record.
The Commit button creates a transaction for a selected uncommitted record in the view. The Commit All button creates transactions for all uncommitted records in the view. Committed records are read-only. You cannot uncommit a record that is committed.
Part Movement Recognition
To generate records to record part movements, the processing logic performs the following steps:
Create a committed inventory transaction (for example, Receive Other).
Create assets for the inventory transaction.
Create new Siebel database records for the source and destination inventory location.
Update the asset record (ID).
Create asset transactions (for example, Install).
Commit the part movement by updating the Siebel database.
Asset Transactions
The asset transactions that maintain an installed base are Install, Uninstall, Upgrade, and Downgrade. These transactions do not directly update quantities in inventory levels.
When a field service engineer reports part movements in the field, inventory and asset transactions are automatically generated. For example, a part movement record with a Source field value of Customer and a Destination field value of Trunk means that the field service engineer took a part out of the installed base for the customer and put it in the trunk. The Mobile Inventory Transaction Engine reflects this transfer by creating an inventory transaction (to receive the part into a trunk) and an asset transaction (to change the installed base).
When a field service engineer repairs, updates, or replaces products in a service order, the engineer selects Service Order as the Source field value and Customer as the Destination field value. Because the engineer adds the product to the installed base for the customer, only an asset transaction is generated. You can manually create asset transactions in the Transactions view of the Assets screen.
If you perform any inventory transaction on a hierarchical asset, then only the Inventory Location field of the parent component shows the correct location. The Inventory Location field of the child subcomponents are blank or have a value of External Location.
Changes can occur in some other fields of the parent component for the asset according to the type of inventory transaction. These changes occur in the fields of the child subcomponents for the hierarchical asset if the fields are set to cascade values from the parent to the children. For more information, see Hierarchical Assets.
Serialization for Products
If a product is serialized (if the Serialized check box is selected in the Fulfillment view in the Service Information view in the Products view of the Administration - Product screen), then a serial number is required for all movements and transactions of assets for the product, including the following:
Inventory transactions
Field part movements
Cycle counts
Shipments
Receipts
Serialized products are treated differently from nonserialized products. If a product is serialized, then the user must enter assets for the product. When you ship or receive a serialized product, the correct number of assets with serial numbers must exist in Siebel Field Service. For example, if you ship or receive 4 serialized hard drives, then 4 separate serial numbers must exist in Siebel Field Service. For more information, see Siebel Enterprise Integration Manager Administration Guide.
Process of Administering Service Inventories
The following list shows the tasks that administrators typically perform to administer service inventories. Your company might follow a different process according to its business requirements.
To administer service inventories, administrators perform the following tasks:
Defining Products for Inventories
Before you set up inventory, you must define the products to include in inventory. For more information about defining products, see Siebel Product Administration Guide.
After you define the products, you must specify allocation for those products in the Fulfillment view in the Service Information view in the Products view of the Administration - Product screen. For more information, see Setting Up Product Fulfillment.
Users can associate the products with assets in the Assets screen.
This task is a step in Process of Administering Service Inventories.
Setting Up Location Types for Inventories
You set up inventory location types to designate the different kinds of locations for inventory. Users can select these inventory location types in the Type field in the Inventory Locations view of the Inventory screen. Examples of inventory location types include Aisle, Trunk, and Virtual. For more information about the fields for inventory location types that are used in cycle counting, see Defining Configuration Parameters for Inventory Location Types.
This task is a step in Process of Administering Service Inventories.
To set up an inventory location type
Navigate to the Administration - Service screen, then the Inventory Administration view.
In the Inventory Location Types view, create a new inventory location type record, and complete the fields as appropriate.
Setting Up Inventory Levels
You can set up inventory levels. An inventory level is a grouping of products that have the same Availability field value (for example, On Hand, On Order, and Reserved) and the same Status field value (for example, Good and Defective). Users can select these inventory levels in the Inventory Level list in the Product Inventory view of the Inventory screen.
You do not have to manually create products and associated inventory levels. When an inventory transaction occurs, products and associated inventory levels are automatically created in the Siebel database if they do not exist. However, such products are not assigned specific inventory levels, allocation values, substitution values, or cycle counting classes. You might have to navigate to the Inventory Administration view of the Administration - Service screen and update these newly created records in the Inventory Location Types view and the Inventory Level Categories view.
This task is a step in Process of Administering Service Inventories.
To set up an inventory level
Navigate to the Administration - Service screen, then the Inventory Administration view.
Click the Inventory Level Categories view tab.
Create a new inventory level record, and complete the fields as appropriate.
Setting Up Inventory Transaction Types
You can set up inventory transaction types. Inventory transaction types denote the nature of changes to product levels. Users can select these inventory transaction types in the Type field of the Inventory Transactions screen. For more information about inventory transaction types, see About Inventory Transactions.
This task is a step in Process of Administering Service Inventories.
To set up an inventory transaction type
Navigate to Administration - Service screen, then the Inventory Administration view.
Click the Inventory Transaction Types view tab.
Create a new inventory transaction type record, and complete the fields as appropriate.
Setting Up Siebel Remote
Siebel Remote allows mobile or remote clients (typically laptop computers) to connect to a Siebel Server and exchange updated data and files. This process is synchronization. For more information about setting up and using Siebel Remote, see Siebel Remote and Replication Manager Administration Guide.
This task is a step in Process of Administering Service Inventories.
Committing Transactions from Mobile Computers
The administrator can commit the field transactions that are not committed to the Siebel database. These transactions can apply to part movements between customer sites, service orders, and the truck inventories of field service engineers. For more information, see Mobile Inventory Transactions.
This task is a step in Process of Administering Service Inventories.
To commit a transaction from a mobile computer
Navigate to the Administration - Service screen, then the Parts Movement Administration view.
Select an uncommitted part movement record.
In the Asset number (#) field, select an asset.
The asset number must correspond to the add-in serial number that the mobile field service engineer entered.
Select the Commit check box to generate an inventory transaction that decrements the source inventory location and increments the destination location.
Process of Managing Service Inventories
The following list shows the tasks that end users typically perform to manage service inventories. Your company might follow a different process according to its business requirements.
To manage service inventories, end users perform the following tasks:
Creating Inventory Locations (End User)
You use inventory locations to consolidate and manage all records pertaining to a service inventory.
This task is a step in Process of Managing Service Inventories.
To create an inventory location
Navigate to the Inventory screen.
In the Inventory Locations view, create a new inventory location record, and complete the fields as appropriate.
Some fields are described in the following table.
Field Comments Position
Select a position for the inventory location. When you select a value of Owned in the Ownership field, employees who are associated with this position can view the inventory location in the My Inventory Locations view.
Ownership
Select a value that indicates the ownership of the inventory location. Values include Owned, Customer, and 3rd Party.
Organization
Select an organization for the inventory location. The organization limits the visibility of data. If you select All Inventory Locations Across Organizations in the visibility filter, then the inventory locations for all organizations appear. Inventory transactions can occur only between locations in the same organization. For more information about setting up organizations, see Siebel Security Guide.
If you own a record, then you can see it when you select My Inventory Locations in the visibility filter, even if the record does not apply to your organization. However, you do not see the record when you select All Inventory Locations in the visibility filter if the record does not apply to your organization.
Caution: Improper configuration of organizations and inventory locations can lead to unintended results. For example, you might be unable to complete inventory transactions between some locations.
Adding Products to Inventory Locations (End User)
You add products to inventory locations to designate the products that can exist at those locations and to specify other details about the products. Administrators set up products in the Products view of the Administration - Product screen.
This task is a step in Process of Managing Service Inventories.
To add a product to an inventory location
Navigate to the Inventory screen.
Drill down on the Name field for a selected inventory location.
In the Product Inventory view, create a new product record, and complete the fields as appropriate.
Some fields are described in the following table.
Field Comments Min
Type the minimum acceptable quantity of inventory for the product at the location.
Max
Type the maximum acceptable quantity of inventory for the product at the location.
Safety
Type the safe quantity of inventory for the product at the location. The safe quantity is less than or equal to the minimum acceptable quantity. The Fulfillment Engine does not allocate a product if the quantity is less than this quantity. You can override this value.
Serialized
Displays a check if instances of the product must have recorded serial numbers.
ABC Class
Select the financial-value classification of a product. Values include A, B, and C. Class A has the highest financial value. This value overrides the Class ABC field in Inventory Options list in the Fulfillment view in the Service Information view in the Products view of the Administration - Product screen.
XYZ Class
Select the turnover-rate classification of a product. Values include X, Y, and Z. Class X has the highest turnover rate. This value overrides the Class XYZ field in Inventory Options list in the Fulfillment view in the Service Information view in the Products view of the Administration - Product screen.
The Assets list shows the assets for the product at the selected inventory location.
In the Inventory Level list, create a new inventory level record, and complete the fields as appropriate.
Some fields are described in the following table.
Field Comments Location Order
Type a value for the preferred order for looking for product in Locators 1 through 3. For example, 213 means that the product is best obtained from location 2, then from location 1, and finally from location 3. The physical process of shipping and cycle counting uses this order. This order does not affect the Fulfillment or Cycle Counting Engines. For more information about location order, see Inventory Tracking.
Locator 1
Locator 2
Locator 3
Type the description of the physical location of a product at an inventory level.
Associating Vendors with Inventory Locations (End User)
To replenish inventory from an outside source, you must specify the vendors that can supply inventory for an inventory location.
This task is a step in Process of Managing Service Inventories.
To associate a vendor with an inventory location
Navigate to the Inventory screen.
Drill down on the Name field for a selected inventory location, and click the Vendors view tab.
Create a new vendor record, and complete the fields as appropriate.
Some fields are described in the following table.
Field Comments Account
Select a vendor.
Type
Select Vendor or Primary Vendor.
Associating Roles with Inventory Locations (End User)
You can associate the roles of employees with an inventory location.
This task is a step in Process of Managing Service Inventories.
To associate a role with an inventory location
Navigate to the Inventory screen.
Drill down on the Name field for a selected inventory location, and click the Roles view tab.
Create a new role record, and complete the fields as appropriate.
Defining Relationships Between Inventory Locations (End User)
The Relationships view shows the relationship between a selected inventory location and other inventory locations. If you use multiple inventory locations, then relationships between inventory locations are useful for automating inventory replenishment and order fulfillment. A relationship can be physical and hierarchical (for example, a shelf in an aisle) or logistical (for example, replenishment of inventory or fulfillment of orders).
This task is a step in Process of Managing Service Inventories.
To define the relationship between inventory locations
Navigate to the Inventory screen.
Drill down on the Name field for a selected inventory location, and click the Relationships view tab.
Create a new relationship record, and complete the fields as appropriate.
Some fields are described in the following table.
Field Comments Name
Select another inventory location.
Type
Displays the type of location. Values include Warehouse and Trunk.
Relationship
Select the relationship of the inventory location to the inventory location in the Inventory Locations view. Values include:
Fulfills. The inventory location fulfills orders for the inventory location in the Inventory Locations view.
Replenishes. The inventory location replenishes inventory for the inventory location in the Inventory Locations view.
Sublevel. The inventory location is a sublevel of the inventory location in the Inventory Locations view (for example, a shelf in an aisle).
Order Priority
Select the priority of an order to fulfill from the inventory location when the Relationship field value is Fulfills.
Viewing Inventory Statuses (End User)
You might want to view the status of products in inventory. Follow the procedures in this topic to view these statuses. You can view inventory transactions in the Inventory Transactions screen. You can view inventory status in the Inventory screen.
This task is a step in Process of Managing Service Inventories.
To view inventory status in the Inventory screen
Navigate to the Inventory screen.
Drill down on the Name field for a selected inventory location, and click the Product Inventory view tab.
Select a product.
The Inventory Level list shows the inventory status for all products at the selected location.
You can also view inventory status in the Part Browser screen.
To view inventory status in the Part Browser screen
Navigate to the Part Browser screen.
Select a record for a product at an inventory location.
Note: A product can exist at multiple locations.The Inventory Level list shows the inventory status for the selected product at that location.
Creating Inventory Transactions (End User)
Follow the procedures in this topic to create inventory transactions. Inventory transactions represent changes to product levels. The Inventory Transactions view includes all inventory transactions to allocate, ship, receive, transfer, or adjust the quantity and inventory levels for a product. You can create inventory transactions in other screens and views and in the Inventory Transactions view.
This task is a step in Process of Managing Service Inventories.
To manually create an inventory transaction
Navigate to the Inventory Transactions screen.
Create a new inventory transaction record, and complete the fields as appropriate.
If you want to add an asset to the inventory transaction, then complete the following steps:
Drill down on the Transaction number (#) field for the inventory transaction.
In the Assets view, create a new asset record, and complete the fields as appropriate.
Available assets vary dynamically according to the Source Location in the inventory transaction record. You can select only the assets that are available at that Source Location. If the Source Location is External Location, then all assets not currently assigned to any location appear.
You can receive a product as a stock transfer or over-the-counter transaction.
To receive a product as a stock transfer or over-the-counter transaction
Navigate to the Inventory Transactions screen.
Create a new inventory transaction record, and complete the fields as appropriate.
In the Type field, select Over-the-counter.
(Optional) If the product is serialized, then create a new record for the transaction in the Assets view.
Moving Parts Between Trunks (End User)
Follow the procedures in this topic to record the movement of parts between the trunks of field service engineers. You record these movements on the Inventory Transactions screen.
This task is a step in Process of Managing Service Inventories.
To move a part between trunks on the Inventory Transactions screen
Navigate to the Inventory Transactions screen.
Create a new inventory transaction record, and complete the fields as appropriate.
In the Type field, select Exchange Between FSEs.
You can also move a part from a trunk to another trunk on the Activities screen.
To move a part between trunks on the Activities screen
Navigate to the Activities screen, then the Activity List view.
Drill down on the Type field for a selected activity, and click the Part Tracker view tab.
Create a new part record, and complete the fields as appropriate.
Performing Bulk Inventory Transactions (End User)
Bulk inventory transactions allow you to simultaneously record the movement of multiple assets to a new inventory location. This functionality is useful in bulk stock transfers and receiving dock situations.
This task is a step in Process of Managing Service Inventories.
To perform a bulk inventory transaction
Navigate to the Assets screen, then the List view.
Select the assets to transfer, and click Transfer.
In the Inventory Transactions dialog box, complete the following steps:
In the Selection Type field, select Selected Items to transfer only the assets selected in the list, or select Entire Document to transfer all assets in the list.
Complete the other fields as appropriate.
Click Transfer.
Workflows for Performing Bulk Inventory Transactions
The Bulk Inventory Transaction - Asset List - Default workflow uses the FS Inventory Transaction business service and the Inventory Transaction - Asset List - Default workflow to move all assets from current inventory locations to the specified destination. Separate inventory transactions are created, and you can review them on the Inventory Transaction screen. The workflow is called when the user clicks the Transfer button in the Inventory Transactions dialog box. For more information about the methods used in this business service, see FS Inventory Transaction Business Service.
The Bulk Inventory Transaction - Asset List - Default workflow gets the asset-related details and source details, then organizes the asset list according to location, product, source, and availability. The workflow then calls the Inventory Transaction - Asset List - Default workflow. This workflow creates the inventory transaction headers, adds the asset details to the transaction headers, and commits the transaction.
Scrapping Inventories (End User)
You can create an inventory transaction to record scrapping (or writing-off) product inventory.
This task is a step in Process of Managing Service Inventories.
To scrap inventory
Navigate to the Inventory Transactions screen.
Create a new inventory transaction record, and complete the fields as appropriate.
Some fields are described in the following table.
| Field | Comments |
|---|---|
Type |
Select Ship Other or a new type that you create (for example, Scrap). For more information about creating a transaction type, see Setting Up Inventory Transaction Types. |
Destination Location |
Select External Location or a new virtual location that you create (for example, Scrap Location). For more information about assigning products to an inventory location, see Adding Products to Inventory Locations (End User). For more information about creating a virtual inventory location, see Creating Inventory Locations (End User). |