5 The FMS Dashboard
The Dashboard and the Fleet screens appear on your system start-up.
Dashboard
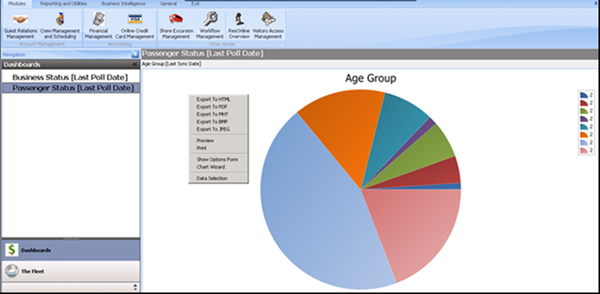
The Dashboard displays the daily data of ships. The revenue is grouped by financial classifications. The top 10 nationalities and the Age group chart represent the current status of guests onboard.
-
Right-click inside the Dashboard and select Show Customization Form. Drag and drop the individual items to the Dashboard.
-
Save your customized layout.
-
Right-click inside the Passenger Status [Last Poll Date] window and export the details to other formats, such as HTML and PDF. The following figure explains the Age Group chart that represents the current status of guests onboard.
Figure 5-1 The Age Group Chart

The Fleet
The Fleet screen shows the itinerary of the ship in a calendar view and according to the branding. The ships are arranged according to their branding in the left pane. For example, all ships belonging to the default brand would show under Default. When you select the individual dates, the details about the passengers, crew, and the revenue for that selected date is shown.
Overview of Guest Relation Management
-
Guest Details
-
Group Management
The following topics are available in this section:
Viewing Group Management
Group Management is similar to the Guest Management screen. For more information about Guest Management, see Viewing Guest Details
Viewing Shore Excursion Management
- On the Fleet Management screen, select Module menu, and click Shore Excursion Management.
- In the left navigation pane of the Excursion Setup Details screen, in the Search section, enter Excursion details in the given fields and click Search. The Shore Excursion details are displayed in the right pane.
Customizing Statistical Analysis
Exporting a Template
Financial Classifications
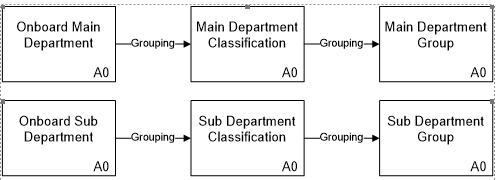
Figure 5-2 Grouping of Main and Sub Departments

-
Main Department - Group Classification
Main departments are grouped into main department classifications, and then to main department groups
-
Main department group (to be setup in FMS)
-
Main department classification (to be setup in FMS)
-
Main department of the individual vessel (as data transfer from the ship)
-
-
Sub-Department - Group Classification
Sub-department are grouped into sub-department classifications, and then to sub-department groups.
-
Sub-department group (to be setup in FMS)
-
Sub-department classification (to be setup in FMS)
-
Sub-department of the individual vessel (as data transfer from the ship)
-
Note:
The main and sub-department hierarchy is separate.Other Classifications
Other classifications enable you to group and analyze data on the cabin, category, sailing region base, and so on. Following are the current potential classifications and their descriptions:
Table 5-1 Classifications and their descriptions
| Classifications | Descriptions |
|---|---|
|
Cabin Classification |
Special grouping for cabins could be: Inside, outside, suite, Crew, staff, officer. |
|
Category Classification |
Ships stateroom categories can be grouped to the advertised brochure cabin categories, such as Deluxe Suite, Standard A; B; C, and so on. |
|
Cruise Itinerary Classification |
The cruises can be grouped by its cruise regions following brochures releases or other analyzing criteria’s, such as Europe, Mediterranean, Caribbean, Alaska, Baltic, and so on. |
|
Cruise Season Classification |
The cruises can be grouped by its cruise seasons following brochures releases or other analyzing criteria’s, such as Fall 2009, Spring 2010, Summer 2010, Holidays 2010, Christmas 2010, and so on. |
|
Excursion Classification |
Excursions can be classified as requested analyzing criteria’s, such as City tours, walking tours, half day, full day, or Low cost, high cost, and so on. |
|
Maintenance Area or Location Classification |
Areas for maintenance analyzing can be grouped fleet wise. |
|
Maintenance Task Group Classification |
Maintenance tasks can be grouped (higher level) and classified (lower level) for analyzing purpose. |
|
Medical Item Group Classification |
Medical sales items can be grouped (higher grouping level) and classified (lower grouping level). |
|
Menu Item Group Classification |
Menu sales items can be grouped (higher grouping level) and classified (lower grouping level). |
|
Ship Category and Ship Classification |
The vessels can be grouped by its ship category (holiday, rating category *****, and so on.) or by its ship classes (gross tons, Guest capacity, and so on.) |
Shore Side Departments
Data or information provided in Fleet Management is useful for corporate departments like Hotel Operations, Customer Services, Onboard Revenue, Finance, Marine Maintenance, Human Resources, and Marketing.
The following topics are available in this chapter:
Hotel Operation
-
Passenger data – Passenger listings per cruise/vessel/time period, including manifest data like Name, passport number, Date Of Birth, Guest picture, cruise and cabin details, address, flight details, etc.
-
Guest history records (all cruises per individual Guest).
-
Guest comments/complain data – per individual Guest and as analyzing summary per cruise/ship/fleet.
-
Amenities and special request data.
-
Medical records – individually per Guest, cruise/ship/fleet statistics. Possible medical fleet item classifications like Procedures, Medicines, X-rays (transactions, not images), Laboratory, etc.
-
Onboard spending and invoice data - Guest checks and invoice details.
-
Guest Comment Card data (cruise evaluation forms) – per individual Guest (image of scanned Guest card), analyzing, data comparison and charts per department, sailing, ship, fleet comparison.
-
Work-order – per individual Guest/sailing and as analyzing summary.
-
Guest group data – group, members, spending, and satisfactory level details.
-
Financial performance per division – sales analyzing per sub-divisions like Housekeeping, Front Office using financial Fleet Management Flash Groups. Revenue reporting for selected departments only.
-
House Account spending control - House Account, cruise, Guest check level.
Customer Service Department
-
Guest Invoices, Guest checks - can be recreated (printed, exported to file) at any time directly within Fleet Management.
-
Medical insurance invoices (Insurance claim forms) - can be reproduced (if initially issued onboard using medical module).
-
Individual Guest comments and complaints - onboard follow-up taken, Guest compensations per Guest/cruise.
-
Group records and account information.
-
Guest and public areas maintenance Work-order - statuses, date and time of completeness.
-
Credit card authorizations, settlements per Guest/cruise/transaction can be verified if transferred and required (details masked).
-
Amenities and special request – verifying inserts.
-
Guest history records (all cruises per individual Guest).
-
Application activities – time of check- in, routing of posting, close accounts, etc.
-
Gangway activities – verifying onboard presence during certain occasions.
-
Individual Guest Comment Card ratings with included handwritten comments on the Comment Card.
-
Complaint and work order statistics.
Onboard Revenue Department
-
Financial main and sub-department - by ship, ship class, cruise, fleet.
-
Financial classification - main and sub-group, classification.
-
Shore excursion - revenue analysis, per tour, port, country, excursion, demographics.
-
MICROS item analysis – item count and revenue per item (cruise, ship, and fleet).
-
Region analysis – revenue comparison of travelled region (Alaska cruises, etc.).
-
Demographic analysis – revenues per nationality, age group, gender, etc.
-
Back to back spending pattern – comparison of repeaters versus first cruiser.
-
Group spending comparison, reporting.
-
Revenue breakdown – average passenger per day, etc.
-
Selective revenue charting.
This includes the creation and assignment of financial sub/main department groups/classification, item classifications, and excursion classifications.
Finance Department
The main areas of interest to management are the financial reporting and verifying financial reports, submitted by the ships as well as cash book and payroll data.
The main financial classification usually follows the corporate financial reporting grouping.
This includes creating and assigning financial sub/main department groups/classifications.
-
Department Analysis – reporting by financial main and sub-department (cruise, ship, and fleet).
-
Quarter Revenue Reporting – following the calendar quarters.
-
Void journal controlling.
-
Revenue reporting for Crew.
-
Payment journals.
-
Open balance reports.
-
System account analysis.
-
Cash book – reporting different currency cash books.
-
Online Credit Card Management - CC authorizations, settlement, per Guest, cruise, ship, fleet, type.
-
Payroll Overview and Reporting
Marketing Department
-
Guest onboard spending based on demographics.
-
Spending analyzing per department and demographics.
-
Guest Comment Card summaries (if the Comment Card module is used).
Includes cruise classification, cruise region classifications, and category classifications.
Adding and Editing a Ship
Adding Users and Groups
- To create a group:
- To create a user:
- On the Administration screen, click User Security. On the left panel under Groups, right-click any of the group and click Add.
- Enter the User Login, Password, First Name, Last Name, Group, and Class. You can enable or disable the user by selecting the User Enabled check box.
- Select the drop-down list of the group section and then click OK.
Logging And Security Shore-Side
In Fleet Management System, users are assigned rights based on their department/group. The departments can be Finance, Operations and Administrators, and rights that are assigned to them. Access rights are assigned based on group and users can be allotted within them, thus maintaining a filter of access. Groups that are part of Administrators will have full access rights. In the case of an invalid user name or password used at log in, a warning will appear on the screen. The user is locked out on the seventh (7th) attempt for five (5) minutes if incorrect credentials are entered.
Fleet Management System has a dedicated screen that logs the users’ access to different modules and applications, which shows the details of users and the activity they performed on the application including the date, workstation, OS User and user name.
Logging In FMS Database Shore-Side
-
The user’s access log to different modules in Fleet Management System application is stored in the ACTIVITY_LOG table in FCFMSADMIN schema in the database.
-
The ACTIVITY_LOG table logs in all activities of the user in the FMS System. These details can also be viewed from the FMS Activity Log Viewer function.
-
Each DDL activity performed is recorded in the FIDELIOBK.DDL_AUDIT table.
-
FIDELIOBK.DDL_AUDIT table capture activities like CREATE, ALTER, DROP, RENAME OR TRUNCATE ON SCHEMA.
Active Directory Integration In Fleet Management System
- Upon start-up the application fetches the active directory information of the OS user.
- Once the user is authenticated by the active directory, only then they can access the application. If the authentication is not done, then the application closes after giving a message.
- The active directory connection details are logged once the Active Directory authentication is done. The details logged are date, user, domain, email, group, and workstation.
- If User Groups do not already exist, then they are added to the User Groups of the Active Directory.
- The Operating System user gets the rights assigned to the Active Directory Groups within the application.
Setting up Active Directory
To set up an Active Directory:
-
Identify the users who must have administrator privilege in the Fleet Management System Application.
-
Ensure all such users belongs to the same domain.
-
Notify the exact domain group name for administrator rights so that we can set them up.
-
Once privileges are granted in Fleet Management System, the domain group users can try running the Fleet Management System from their domain group logged- in machines.
-
Any user of the domain with administrator privileges can grant or revoke privilege to users of another domain group.
-
All user privileges are based on domain group, hence any user belonging to a domain has the same privilege as members of that domain group.
-
A user belonging to more than one domain group would have the privilege that are union of both domain group.
-
Once a user from any new domain group logs in; their details are automatically entered in required tables.
-
The administrator user from the Administrator group as identified above can then give desired rights by right-clicking on the domain group and selecting edit.