
Setup Guide
|
|
After installation, it is highly recommended that you verify that the Groupware Service Provider has been set up correctly. An Administration Portlet is included to test the connection and to configure the Groupware Service Provider. The Administration Portlet works for both Microsoft Exchange and Lotus Domino.
Also, if there are issues with specific WebLogic Portal users, the Administration Portlet can be used to diagnose the problem and resolve the issue.
Note: Before you begin, the Administration Portlet must be added to a page on your existing Portal.
The starting point of the Administration Portlet is the welcome page. From here, you can diagnose your connection to either Exchange or Domino, configure the Exchange Service or Domino Service or obtain more information about the BEA WebLogic Portal User Profile that is being used by the Groupware Portlet. Select the correct option for your environment and click Start to continue. The next page will change depending on what option you choose. The rest of this chapter will discuss each possible section in more detail.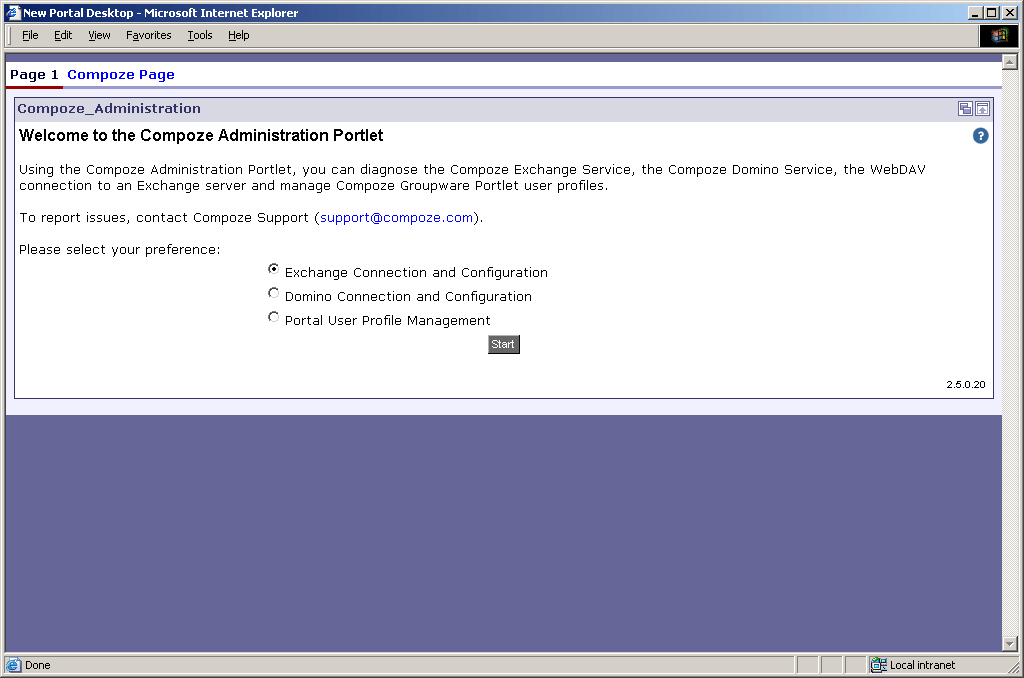
To verify that you can open a connection to the Exchange Service and that the service can connect to Exchange, use the Exchange Connection Portlet.
continue button. This will test common calls to the service such as getting the number of messages from the Inbox.|
The domain of the user that will access the Exchange mailbox |
|
|
The username of the user that will access the Exchange mailbox |
|
|
The password of the user that will access the Exchange mailbox |
|
|
The name of the Exchange Server as it can be resolved from the Exchange Service machine (may be omitted to test GAL lookups, but these must first be configured in the service. For more information, see "Global Address List Lookups" on page 4-9.) |
|
|
The name of a mailbox to connect to (may be omitted to test GAL lookups, but these must first be configured in the service. For more information, see "Global Address List Lookups" on page 4-9.) |
|
|
The hostname of the Exchange Service machine as it can be resolved from the Portal machine |
As a system administrator, you will be able to configure the Exchange Service. The configuration can be performed either manually (on the Exchange Service machine) or by using the Administration Portlet.
Soap Server entered in the ExchangeServiceConnection Portlet.Note: Some of the parameters will require a restart of the Exchange Service or IIS to take effect. These parameters are identified in the Portlet.
To manually configure the Exchange Service, you will need to first log on to the Service machine with a user who has the correct permissions to modify the Windows registry. The Windows Registry can be accessed by going to the Start > Run... menu and executing regedt32.
The following registry entries control the behavior of the Exchange Service. All of the following registry keys are located in HKEY_LOCAL_MACHINE\Software\Compoze Software, Inc.\czex. If any of these registry entries are not created, you must first create them. When creating registry entries, be sure that the type is correct (next to the key name in the table below), otherwise the setting will drop back to its default value.
|
The full path to the directory where attachments are temporarily stored while sending from IIS to the Exchange Service. The directory should be on a volume with sufficient disk space to store attachments while in transit. The exact amount of disk requirements will depend on the server load but choose a volume with at least a gigabyte of free space. If the directory does not already exist, then the Exchange Service will create it. |
||
|
If this entry exists and is set to 1 (the default), verify that the client version is the same as the service, otherwise do not allow sessions to be opened. NOTE: if you do not perform verification that the versions are the same, you may run into compatibility issues between your Java code and the service. |
||
|
The domain of the fixed GAL user (required for lookups in Exchange 2000 and above) |
||
|
The mailbox of the fixed GAL user (required for lookups in Exchange 2000 and above) |
||
|
The password of the fixed GAL user (required for lookups in Exchange 2000 and above) |
||
|
The fixed Exchange server for the user to connect to (required for lookups to work in any Exchange version) |
||
|
The username of the fixed GAL user (required for lookups in Exchange 2000 and above) |
||
|
The installation directory of the Exchange Service. For example: c:\Program Files\compoze\czex. This is the %COMPOZE_EXCHANGE_SERVICE_HOME%. |
||
|
If set to 0 (the default) do not log any normal COM exceptions that may occur during the course of execution. If set to 1 (useful for debugging) log all COM exceptions that occur to the Application Log in the Event Viewer. |
||
|
The chosen logon type performed in the service: 0 = Interactive Logon (LOGON32_LOGON_INTERACTIVE). This requires that each user be granted the Windows "Log on Locally" right to the Exchange Service machine, but can connect to remote Exchange servers in the same domain or a trusted domain. 1 = Batch Logon (LOGON32_LOGON_BATCH). This requires that each user be granted the Windows "Log on as a Batch Job" right, but can connect to remote Exchange servers in the same domain or a trusted domain. This right may be added without Log on Locally rights so that it disallows users from logging in interactively to the machine. 2 = Network Logon (LOGON32_LOGON_NETWORK). This does not require any special rights to be granted to users, but with this configuration the service MUST be installed on the same Exchange server that is being accessed. 3 = No Logon. With this logon type whatever user the service runs as will have to be able to access every account that needs to be accessed using the service. No user validation or logon is performed. |
||
|
If set to 1, log timing information for methods called in the Exchange Service to the event viewer. If set to 0 or if the key does not exist, do not log timing info. |
||
|
If a session is idle for this number of seconds, it will be closed. This prevents the Exchange Service from having sessions open in memory that are no longer in use. The default if the registry entry is not specified is 1800 seconds, or 30 minutes. The value of this setting will be re-read in no longer than one minute, so if it is changed from a large value to a small one for testing purposes, be sure to wait a minute for the change to take affect. |
||
|
If the service has been running for this many hours, it will be terminated as soon as there are less than or equal to ServiceTerminateMaxSessions still open. This is useful for forcing a service restart on the given interval (for example, 24 hours). The default is 0 (which means to never terminate the service). WARNING: The service will only restart if you have selected this in the Recovery tab of the Windows service properties as described in "Maintaining Service Uptime" on page 2-7. Otherwise, this setting will force the service to terminate and it will not restart. |
||
|
When deciding whether or not to restart the service, this setting is consulted to determine what the maximum number of sessions that can be open is. If 0 (the default) the service waits until no sessions are open to do a restart. If 5, for example, it will kick off up to 5 users in order to do a restart. |
||
|
If this parameter is supplied, the user password is encrypted with this key, even if SSL is not being used. A default key is chosen if it is not set. Be sure to supply the corresponding PROP_SOAP_ENCRYPTION_KEY property when instantiating the Session object on the client side, otherwise user logins will fail. |
The following registry entries control the behavior of the Microsoft SOAP Toolkit (and thus affect the Exchange Service). All of the following registry keys are located in HKEY_LOCAL_MACHINE\SOFTWARE\Microsoft\MSSOAP\30\SOAPISAP.
The Exchange Service can automatically look up the mailbox and/or home Exchange server for a user if they are not supplied when the session is opened. This is done by connecting to a fixed Exchange server and querying the Global Address List (GAL). The registry entries that control lookups begin with "Gal". See Manually Configuring the Registry Entries
If Exchange 5.5 is being used, the connection to the GAL can be anonymous and only the Exchange server must be supplied. Exchange 2000 and above requires that a separate account and mailbox be available for the purpose of GAL queries. Note that for non-anonymous GAL connections the LogonType registry entry is used to determine what type of Windows impersonation is done in the service, so the GAL user must have sufficient rights to access the Exchange Service machine as defined by the rights in LogonType.
In order to connect to a Exchange Service through an http proxy server. The following Java system properties may be set to control the proxy connection (notice that they are the same as the Java system properties that are used except they are prefixed by the string "czex"):
To verify that you can open a connection to the Domino Service and that the Domino Service can connect to Domino, use the Domino Connection Portlet.
As a system administrator, you will be able to configure the Domino Service. The configuration can be performed either manually (on the Domino Service machine) or by using the Domino Administration Portlet.
Domino Service URL entered in the DominoServiceConnection Portlet.Note: Some of the parameters will require a restart of the Domino Service or the Domino Server to take effect. These parameters are identified in the Portlet.
To manually configure the Domino Service, you will need to first log on to the Domino Service machine as a Lotus Domino Administrator. The following database entries control the behavior of the Domino Service. All of the following entries can be found in the czdo_config.nsf database found under the Lotus Domino Data directory.
You can obtain more information about the BEA User Profile information that is being accessed by WebLogic Portlets for Groupware Integration by selecting the Portal User Profile Management option from the Welcome page.
|
|
|