Setup Guide
Domino Service
This chapter describes the Domino Service architecture, installation, and configuration and supported platforms.
Getting Started
The following is required in order to install and configure the Domino Service:
- Lotus Domino R5.0.11 (or higher)
- Lotus Domino R6
- Lotus Domino R6.5
Architecture
WebLogic Portlets for Groupware Integration leverage a native Notes service (the Domino Service) which exposes Lotus Domino mail functionality to Java programs. The Domino Service acts as an intermediary between the BEA WebLogic Portal and Lotus Domino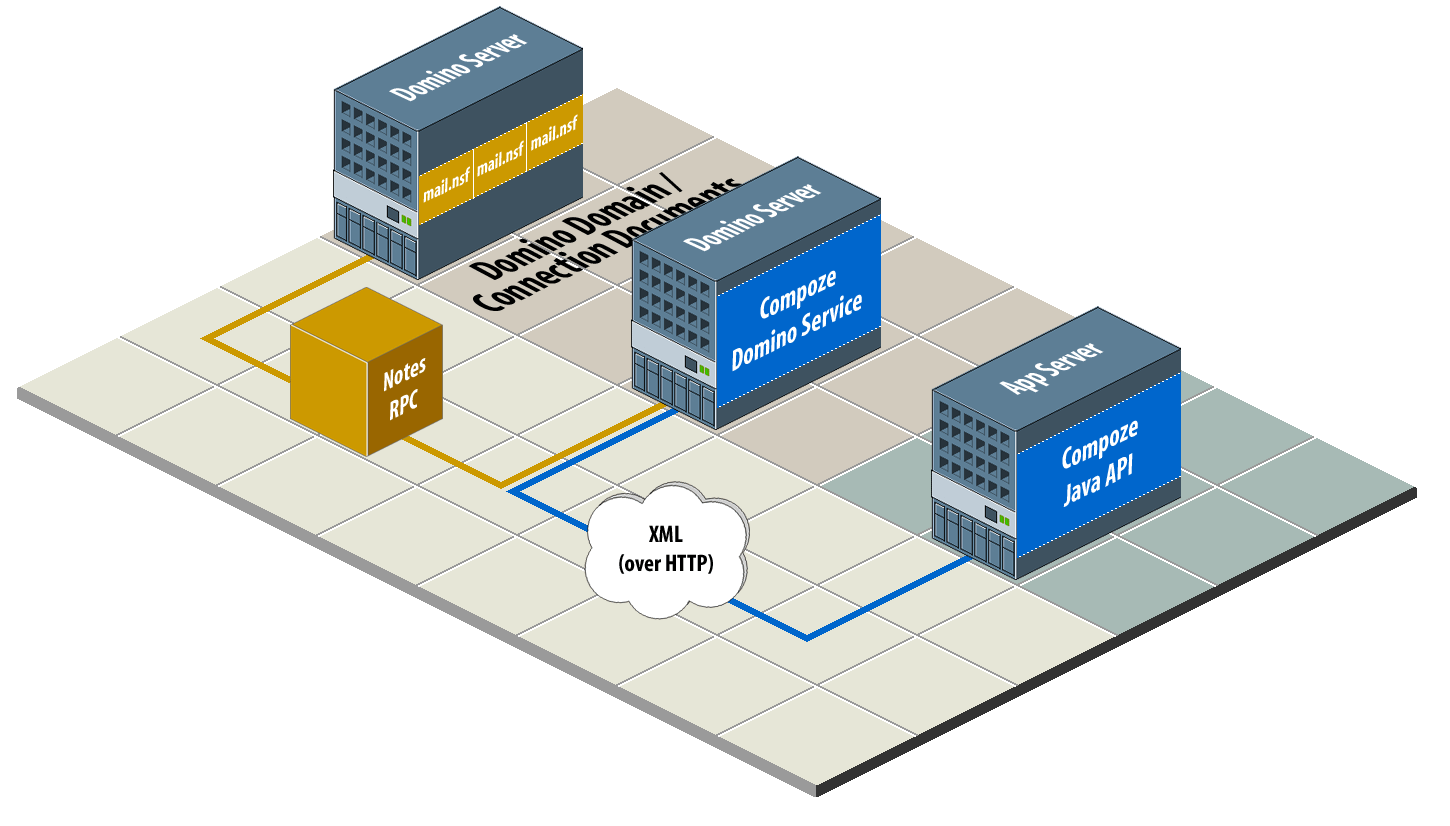 .
.
Connectivity to Domino
The Domino Service is implemented using a combination of Notes RPC and Notes DSAPI. It runs within Lotus Domino as part of the HTTP task. This is the reason the Lotus Domino install is a prerequisite of the installation. This is where Notes RPC and the Notes DSAPI filter for Domino are obtained.
Network/Firewall Requirements
The Domino Service must be located on a machine running Lotus Domino that is part of the same Notes Domain and the same Notes Named Network as the Domino server to access. It is possible to put the Domino Service on an existing Domino server, but be aware of the additional processor and memory burden that will be placed on Domino.
HTTP traffic must be able to pass between WebLogic Portlets for Groupware Integration and the Domino Service. Traversing an HTTP proxy is acceptable as long as it is able to pass the POST requests used by the XML protocol. Although a high-bandwidth, low-latency connection will improve performance, the protocol has been designed to reduce the number of round trips made on the network. The amount of bandwidth required depends on the number of users simultaneously using the application. Each user may consume roughly 1K/sec on average, with this number increasingly dramatically if users do a lot of work with large file attachments.
Notes RPC traffic must be able to pass between the Domino Service and Lotus Domino. Notes RPC requires TCP port 1352 to be open. The network connection for this Notes RPC traffic must have a low latency (less than 10 milliseconds, and preferably a 100 megabit LAN with less than 1 millisecond response times). Round trips are made over the network for each Notes RPC, therefore the Domino Service machine must be located as close as possible to Domino on the network.
Installation and Configuration
This section describes how to install and configure for the Domino Service.
Prerequisites
Before installing the Domino Service, the following steps must be taken:
- Uninstall and remove any previous installed version of Domino Service. This will ensure a clean install will occur.
- For Windows installation, ensure Windows 2000 with Service Pack 4 or higher is installed on the server.
- For Linux installation, ensure Red Hat 8.0 or higher is installed on the server.
- Lotus Domino R5, R6 or R6.5 with the HTTP Task, is installed on the server.
- The server is registered within the Notes domain.
Running the Installer on Windows
To install the Domino Service on Windows, follow these steps:
- Start the installer by double-clicking on setup_service.exe. The InstallAnywhere screen opens and begins preparing the installation.
- Read through the introduction and click Next. You will be able to exit the installation at anytime by clicking Cancel. You will also be able to go back a step by clicking Previous when available.
- Read through the license agreement and select an option:
- Selecting I accept the terms of the License Agreement will allow you to continue with the installation.
- Selecting I do NOT accept the terms of the License Agreement will terminate the installation.
- Select the directory Domino Service will be installed to. By default, %COMPOZE_HOME% is chosen. You may change this by entering the absolute path of the directory or by clicking "Choose" and selecting the directory.
- Choose the Lotus Domino program directory. On a Domino server the program directory is typically C:\Lotus\Domino, unless you installed the program files to a different location. You may change this by entering the absolute path of the directory or by clicking Choose and selecting the directory.
- Click Next. If the specified directory does not contain the Lotus Domino program files, an information screen appears stating such. Click Next to continue or Previous to go back and enter a valid Domino program directory.
- Choose the Lotus Domino data directory. On a Domino server the Domino data directory is typically C:\Lotus\Domino\Data, unless you installed the data directory to a different location. You may change this by entering the absolute path of the directory or by clicking Choose and selecting the directory.
- Click Next. If the specified directory is not a valid Domino data directory (for example, it does not contain the
names.nsf database), an information screen appears stating such. Click Next to continue or Previous to go back and enter a valid Domino data directory.
- Read the installation summary information. The summary will contain information such as the installation directory, the amount of disk space required, etc.
- Click Install to install the service.
- Once installation is complete, click Done.
Verifying the Windows Installation
To verify Domino Service was installed, check the following:
- A directory tree located at %COMPOZE_HOME%\domino_service.
- The following files added to %LOTUS_DOMINO_HOME% directory:
cz_xerces-c.dll
czdo.dll
czdo_service.dll
- The following database added to %LOTUS_DOMINO_DATA% directory:
czdo_config.nsf
Running the Installer on Linux
WebLogic Portlets for Groupware Integration on Linux can be installed in two different modes:
Note: It is critical you be root or have write permission for the directory where you plan to install WebLogic Portlets for Groupware Integration. You must also have write permissions for the Domino server directories.
GUI Mode
The installer running in GUI mode will utilize GUI panels and will ask for all necessary configuration questions through the graphical panel. You must have the X-Window server running on the machine where you are installing WebLogic Portlets for Groupware Integration.
To install the Domino Service on Linux using GUI mode, follow these steps:
- Start the installer. To start the installer, enter in the following at the command prompt:
prompt> chmod 755 setup.bin
prompt> ./setup.bin
- Read through the license agreement and select an option:
- Selecting I accept the terms of the License Agreement will allow you to continue with the installation.
- Selecting I do NOT accept the terms of the License Agreement will terminate the installation.
- Select the directory Domino Service will be installed to. By default, %COMPOZE_HOME% is chosen. You may change this by entering the absolute path of the directory or by clicking "Choose" and selecting the directory.
- Choose the Lotus Domino program directory. On a Domino server the program directory is typically /usr/lotus/notes/{version}/{platform} (or
$Notes_ExecDirectory), unless you installed the program files to a different location. You may change this by entering the absolute path of the directory or by clicking Choose and selecting the directory.
- Click Next. If the specified directory does not contain the Lotus Domino program files, an information screen appears stating such. Click Next to continue or Previous to go back and enter a valid Domino program directory.
- Choose the Lotus Domino data directory. On a Domino server the Domino data directory is typically /usr/lotus/notesdata, unless you installed the data directory to a different location. You may change this by entering the absolute path of the directory or by clicking Choose and selecting the directory.
- Click Next. If the specified directory is not a valid Domino data directory (for example, it does not contain the
names.nsf database), an information screen appears stating such. Click Next to continue or Previous to go back and enter a valid Domino data directory.
- Read the installation summary information. The summary will contain information such as the installation directory, the amount of disk space required, etc.
- Click Install to install the service.
- Once installation is complete, click Done.
Console Mode
The installer running in console mode will not utilize GUI panels (X-Window Server), but instead will ask all necessary configuration questions through the command prompt. This is best for machines running Lotus Domino Server without an X-Server.
To install the Domino Service on Linux using the Console mode, follow these steps:
- Start the installer. To start the installer, enter in the following at the command prompt:
prompt> chmod 755 setup.bin
prompt> ./setup.bin -i console
- Read through the license agreement and select an option:
- Entering Y accept the license agreement and allow you to continue with the installation.
- Entering N will decline the license agreement and terminate the installation.
- Select the directory Domino Service will be installed to. By default, %COMPOZE_HOME% is chosen. You may change this by entering the absolute path of the directory.
- You will be prompted if the selected directory is the correct directory to install the service.
- Entering Y will accept the directory and continue with the installation.
- Entering N will return you to the previous step to select the directory Domino Service will be installed to.
- Choose the Lotus Domino program directory. On a Domino server the program directory is typically /usr/lotus/notes/{version}/{platform} (or
$Notes_ExecDirectory), unless you installed the program files to a different location. You may change this by entering the absolute path of the directory.
- Press Enter. If the specified directory does not contain the Lotus Domino program files, the console will display information stating such. Press Enter to continue or enter Back to go back and enter a valid Domino program directory.
- Choose the Lotus Domino data directory. On a Domino server the Domino data directory is typically /usr/lotus/notesdata, unless you installed the data directory to a different location. You may change this by entering the absolute path of the directory.
- Press Enter. If the specified directory is not a valid Domino data directory (for example, it does not contain the
names.nsf database), the console will display information stating such. Press Enter to continue or enter Back to go back and enter a valid Domino data directory.
- Read the installation summary information. The summary will contain information such as the installation directory, the amount of disk space required, and so on.
- Press Enter to install the service.
- Once installation is complete, press Enter to exit.
Verifying the Linux Installation
To verify Domino Service was installed, check the following:
- A directory tree located at %COMPOZE_HOME%/domino_service.
- The following files added to %LOTUS_DOMINO_HOME% directory:
libxerces-c.so
libczdo.so
libczdo_service.so
- The following database added to %LOTUS_DOMINO_DATA% directory:
czdo_config.nsf
