10Administering a Workflow Process
Administering a Workflow Process
This chapter describes how to administer a workflow process. It includes the following topics:
Process of Deploying a Workflow Process
This process is a step in Roadmap for Developing Workflow Processes.
To deploy a workflow process, do the following tasks:
When deploying, Siebel CRM reads the workflow process from the repository, and then writes it to the run-time environment as XML code. You can use the Replication and Monitoring Level parameters during deployment. For more information, see Setting Monitoring Levels for a Workflow Process.
For an overview of this topic, see Architecture You Use to Deploy a Workflow Process.
Preparing the Run-Time Environment
This task is a step in Process of Deploying a Workflow Process.
This topic describes how to prepare the run-time environment to that it would run a workflow process. It includes the following topics:
Making Sure the Objects That the Workflow Process References Are Available
Deploying a Workflow Process to the Siebel Mobile Web Client
Although it is not required that you perform these topics in the order listed, you must consider each topic to determine if it applies to the workflow process you are deploying.
Making Sure the Objects That the Workflow Process References Are Available
If the workflow process you are deploying contains a sub process step, or if it references a new repository object, such as a business component, business service, or view, then you must make sure the workflow process that you are deploying can access this sub process step or repository object.
To make sure the objects that the workflow process references are available
Do one of the following:
Workflow process references a sub process. Deploy the sub process before you deploy the workflow process that calls the sub process.
Workflow process references new repository objects. Compile the new repository objects before you deploy the workflow process.
Activating a Field That a Workflow Process Uses
If the Object Manager does not activate a field, and if a workflow process references this field, then you must activate it:
If Siebel CRM displays a field in the Siebel client, then the Object Manager activates it and a workflow process that runs in the Object Manager that references this field can run properly.
If Siebel CRM does not display a field in the Siebel client, then the Object Manager does not activate it and a workflow process that runs in the Object Manager cannot use this field. If Siebel CRM attempts to use this field then, then it creates an error.
To activate a field that a workflow process uses
Do one of the following:
Activate the field programmatically:
Open Siebel Tools.
Locate the field in the Fields list.
Set the Force Active property of the field to TRUE.
Display the field in the Siebel client.
Use a script to activate the field, such as a script on a business service that activates the field before the workflow process uses it.
Deploying a Workflow Process to the Siebel Mobile Web Client
The Replication field in the Workflow Deployment view allows you to configure Siebel CRM to route a workflow process to the Siebel Mobile Web Client. Routing only the workflow process that the Siebel Mobile Web Client requires allows you to reduce the amount of data that the local database stores.
To deploy a workflow process to the Siebel Mobile Web Client
Navigate to the Administration-Business Process screen, Workflow Deployment, and then the Child Items view.
Define the Replication field using values from the following table.
Value Description All
Siebel CRM routes the workflow process to Siebel Mobile Web Clients and regional nodes. Changing the value in the Replication field from None to All adds the workflow process and related records to the Siebel Mobile Web Client or regional node when it synchronizes with the Siebel Server.
Regional
Siebel CRM routes the workflow process to the regional nodes only.
None
Siebel CRM does not route the workflow process to the Siebel Mobile Web Client or the regional nodes.
For more information, see Deploying a Workflow Process on a Regional Node.
Testing Routing Behavior with Full Copy Nodes
If Siebel CRM extracts a regional node with the routing group set to FULL COPY, then it routes a workflow process with Replication set to None to the Siebel Mobile Web Client.
To test routing behavior with full copy nodes
Modify two existing or define two new workflow processes, one with Replication set to All and the other with Replication set to None.
Extract a regional node with the routing group set to FULL COPY.
Examine the dx file in the outbox of the regional node to make sure that Siebel CRM routed each workflow process.
Using a Run-Time Event with a Mobile Client
Some variation exists in the way a run-time event performs in a Siebel Mobile Web Client when compared with other Siebel client types. If you configure Siebel CRM to use a run-time event with a mobile client, then it is recommended that you set the processing mode to Local Synchronous or Remote Asynchronous. If Siebel CRM uses Remote Asynchronous for a mobile client, then it starts the workflow process after it synchronizes with the Siebel Server. For more information, see Remote Synchronous Processing.
Notifying Mobile Users Who Are Not Synchronized
You can define a workflow process that sends a notification email to mobile users who are not synchronized. For more information, see 476188.1 (Article ID) or 476275.1 (Article ID) on My Oracle Support.
Deploying a Workflow Process on a Regional Node
Siebel CRM can run a workflow process on a regional node. It can call a workflow process from a script or from a run-time event.
To deploy a workflow process on a regional node
Make sure the workflow process resides on the regional node. Siebel CRM must replicate all settings and the environment on this node. The objects that the workflow references must be available on this node.
Deploying a Workflow Process as a Web Service
You can deploy a workflow process as a Web service.
To deploy a workflow process as a Web service
Open Siebel Tools and create a workspace.
In the Workflow Designer, examine definitions in the Multi-Value Property Window to determine if the Data Type field for a process property is set to Integration Object. If so, make sure a value is defined in the Integration Object field for each of these process properties.
If the workflow process uses hierarchical data in a business service, then you must set Data Type for the process property to Integration Object, and then define an integration object in the Integration Object field. If no integration object is defined, then an error that is similar to the following occurs:
The selected workflow process contains hierarchy type process properties without
having the integration object name defined.
For more information, see Using Process Properties.
Locate the workflow process that you must modify.
For more information, see Locating a Workflow Process in the Workflow Processes List.
Right-click the workflow process, and then click Deploy as Web Service.
In the top window of the Expose Workflow Process as Web Service dialog box, define the operation name for the new web service.
You can define the underlying method name of the business service without spaces, such as CreateAccount. Use a business service method that is defined in the workflow process.
In the bottom window of the dialog box, define the URL that identifies the address for the Web service. Replace webserver with a valid host name and lang with a valid language code, such as enu.
Optional. To create a Web Services Description Language (WSDL) file, click the Generate WSDL check box, and then specify a location to save the WSDL file.
Click Finish.
Siebel Tools creates the Web service.
To view the Web service, do the following:
Deliver the workspace.
In the Siebel client, navigate to the Administration-Web Services screen, and then the Inbound Web Services view.
Query the Name column in the Inbound Web Services list for the workflow process name you clicked in step 5.
To display Web services that Siebel CRM creates from workflow processes and business services, query the Namespace column for the following value:http://siebel.com/CustomUI
For more information, see Integration Platform Technologies: Siebel Enterprise Application Integration.
Delivering a Workflow Process
You must deliver your workspace to activate, publish and deploy your workflow.
To deliver a workspace process,
Make changes to the workflow in a workspace.
From Workspace menu, select Deliver.
On delivering the workflow process, the following happens:
The run-time definition of the workflow is created as an entry in the S_RR_WORKFLOW table.
If a run-time event is used to start a workflow process, then records of run-time events is created in the run-time tables during delivery process and a reference to RR table's row_id is also added in run-time tables.
During FullPublish, because the S_RR_WORKFLOW table is cleaned up, the corresponding run-time event records also are deleted. The records in run-time event tables generated during workflow deployment are cleaned up.
Note: If there are different run-time definitions of a same workflow modified in different workspaces, then appropriate definition will be picked up based on the configuration specifications of the user.
Process of Migrating a Workflow Process
This process is a step in Roadmap for Developing Workflow Processes.
After you test and deliver a workflow process in the development environment, you can migrate it to the production environment. Before you migrate data, make sure the data that the workflow process requires exists in the target environment. For example, if the workflow process requires custom entries in the List of values (LOV) table, then make sure these entries exist and are active.
When a workflow process is migrated from development environment (DR) to the production environment (RR), the following changes take place:
Full Runtime Repository migration: Only the records in S_RR_WORKFLOW are migrated. These records belong to the workflows that are active in the DR database.
Incremental migration: The new and modified workflows in the S_RR_WORKFLOW are migrated and updated. For the incremental migration of an object type, new records will be assigned the next version number of MAIN and the updated workflows will be "end-versioned" using the old version number.
At runtime, the Object Manager will read workflow definitions directly from S_RR_WORKFLOW. Hence, the following related to the workflow process are also migrated:
Workflow Monitor changes
Tables: S_RR_WORKFLOW, S_CT_EVENT, S_CT_ACTION_SET, S_CT_ACTION, S_WFA_DEFN_LOG
Migration with Workflows Across Versions
When the DR environment is updated to latest binaries while the RR environment remains of older version, the migration strategy of Workflow changes from DR to RR environment differs. For Workflows, only the development data related to the Workflow is migrated while in normal standard migration runtime data related to Workflow is migrated.
For a full-migration, set the following System Preference record(s) in the DR environment for SourceWSNames.
To set System Preference for cross version migration
Navigate to the Administration - Application screen of DR, then the System Preferences view.
Set the following system preferences and their values for the Source WS Name to be migrated:
FullMigCompabilityMode0, Workflow
FullMigCompabilityMode1, Workflow
If you migrate the Integration Workspace MAIN, set the Description field has to 'MAIN'. You can create multiple System preferences for different Integration Workspaces.
Importing and Exporting with Siebel Tools Features
The following Siebel Tools features do not support Siebel Workflow objects:
Object Compare.
Three way merge during an upgrade. For more information, see Siebel Application Services Interface Reference.
Importing and Exporting a Sub Process
If you import a workflow process that includes a sub process step, then you must import the sub process, and then import the workflow process that calls the sub process. You import the workflow process that calls the sub process only after you successfully import the sub process. This requirement also applies for importing workflow processes in batch.
If you export a workflow process, then it is not necessary to export the sub process first.
The name of the sub process must not exceed 100 characters in length. If the name exceeds 100 characters, then an error might error during import.
Importing and Exporting a Workflow Process
You can use the Import/Export utility to migrate workflow processes or to back up an individual workflow process. To make it easy to understand the purpose of the workflow process, it is recommended that you use a meaningful naming convention when you choose a file name for an exported workflow process. You must make sure that your deployment meets the prerequisites that Import/Export requires.
Importing a Workflow Process
This topic describes how to import a workflow process.
To import a workflow process
In Siebel Tools, navigate to the Workflow Processes list.
Right-click in the Workflow Processes list, and then click Import Workflow Process.
In the Open dialog box, choose a path and file name of the workflow process that Siebel Tools must import, and then click Open.
Choose the project to which you must add the workflow process.
Siebel Tools imports the workflow process with a status of In Progress.
If a workflow process of the same name already exists in the target environment, then Siebel Tools increments the version number for the newly imported workflow by one.
Exporting a Workflow Process
This topic describes how to export a workflow process.
To export a workflow process
Locate the workflow process you must modify.
For more information, see Locating a Workflow Process in the Workflow Processes List.
To choose more than one workflow process, press and hold the CTRL key while choosing the workflows.
Right-click in the Workflow Processes list, and then click Export Workflow Process.
In the Save As dialog box, enter the file path, file name, the .xml file name extension, and then click Save.
Siebel Tools exports the workflow process. If you export more than one workflow process, then Siebel Tools saves them to a single XML file.
If you export a workflow process that contains a sub process step, then you must also export the sub process. Siebel Tools does not automatically export the sub process.
Process of Administering a Workflow Process
This process is a step in Roadmap for Developing Workflow Processes.
To administer a workflow process, you do the following tasks:
Viewing Run-Time Instances of a Workflow Process
If you migrate the Integration Workspace MAIN, set the Description field has to 'MAIN'.
You can create multiple System preferences for different Integration Workspaces.
To view run-time instances of a workflow process
Log in to the Siebel client.
Navigate to the Administration-Business Process screen, and then the Workflow Deployment view.
In the Workflow Processes Repository Form Applet, query the Name field for the workflow process you must view.
Examine the workflow process configuration, using the following value.
Child Items: Shows Run-time Workflow details based on the query passed.
Where Siebel CRM Stores Information About a Workflow Process Instance
The following tables include information about workflow process instances:
S_WFA_INSTANCE
S_WFA_INST_PROP
S_WFA_INST_WAIT
The following tables include monitoring information about workflow process instances:
S_WFA_INST_LOG
S_WFA_INSTP_LOG
S_WFA_STPRP_LOG
Viewing Workflow Processes That Are Defined Before Siebel CRM Version 7.7
The Workflow Processes view allows you to view workflow processes that are defined earlier than Siebel CRM version 7.7.
To view workflow processes that are defined before Siebel CRM version 7.7
Log in to the Siebel client.
Navigate to the Administration-Business Process screen, and then the Workflow Processes view.
In the Workflow Processes list, query the Name field for the workflow process you must view.
Examine the workflow process configuration, using values from the following table.
View Tab Description Process Definition
Displays the definition of a workflow process that is defined earlier than version 7.7.
Process Designer
Displays the flow diagram of a workflow process that is defined earlier than version 7.7.
Process Properties
Displays properties of a workflow process that is defined earlier than version 7.7.
Administering Workflow Process Instances
The Workflow Instance Admin view displays workflow processes that have persistence set and that are in a run state, wait state, or an error state. If a workflow process contains a wait step, or if the Auto Persist property of a workflow process contains a check mark, then Siebel CRM sets persistence for a 7.0 workflow process. For more information, see Stopping a Workflow Process Instance and Manually Recovering a Workflow Process Instance.
To administer workflow process instances
Log in to the Siebel client.
Navigate to the Administration-Business Process screen, and then the Workflow Instance Admin view.
In the All Workflow Process Instances list, query the Process Name field for the workflow process you must administer.
Administer the workflow process instances, using values from the following table.
List Name Description All Workflow Process Instances
Lists workflow process instances that are running, in an error state, or are in a waiting state.
Related Instances
Displays workflow process instances that are chosen in the All Workflow Process Instances list.
Process Properties
Displays process properties of the workflow process instance that you choose in the Related Instances list. You can change the value of these process properties before you resume a workflow process instance that is waiting or that is in an error state.
Stopping a Workflow Process Instance
If persistence is defined for a workflow process, then you can stop an instance of that workflow process. Siebel CRM removes the instance after it stops. You cannot stop an instance that is in a run, wait, or error state. Stopping an instance is different than purging an instance. For more information, see Removing a Workflow Process from Workflow Instance Monitor.
To stop a workflow process instance
In the All Workflow Process Instances list of the Workflow Instance Admin view, query the Process Name field for the workflow process you must stop.
For more information, see Administering Workflow Process Instances.
In the Related Instances list, choose the instance you must stop.
In the applet menu, choose Stop Instance.
Stopping a Workflow Process Instance with a Script
You can use the _StopInstance method in a script to stop a workflow process instance. For example, assume you must stop an instance of an interactive workflow process that the user paused or that is suspended on a wait step. In this situation, Siebel CRM can determine the Process Instance Id.
To stop a workflow process instance with a script
Call the _StopInstance method on the Workflow Process Manager business service.
The following example hard codes the Process Instance Id:
var bs_WF = TheApplication().GetService("Workflow Process Manager");
var ps_inputs = TheApplication().NewPropertySet();
var ps_outputs = TheApplication().NewPropertySet();
ps_inputs.SetProperty("ProcessInstanceId", "1-IIT");
bs_WF.InvokeMethod("_StopInstance" , ps_inputs, ps_outputs);
Deactivating a Workflow Process
To deactivate
Create a new developer workspace under Main/Integration workspace.
Open Workflow object list from object explorer under this workspace.
Navigate to the Workflow Process List and select the workflow that needs to be deactivated and select the Inactive field.
Deliver the workspace.
Removing a Workflow Process from the Run-Time Environment
To remove a workflow process from the run-time environment, you can delete it, and then remove the workflow process instance from the log.
You can delete a workflow process in the Workflow Deployment view, which removes the workflow process definition from the run-time environment. It also stops any instances of the deleted workflow process that are currently running.
To remove a workflow process from the run-time environment
Inactivate the workflow in the development environment.
Deliver it and run migration to Runtime Environment. The workflow in runtime is removed.
Once you deliver a workflow, you cannot remove it. You can only inactivate a workflow that is equivalent to deletion.
Removing a Workflow Process from Workflow Instance Monitor
If a workflow process instance contains a status of Stopped or Completed, then can delete it from the log file. If you must delete a workflow process instance that is paused, then you must first stop this instance. If you delete a running instance from the log file, then Siebel CRM continues to run the instance.
To remove a workflow process from the log file
In the Siebel client, navigate to the Administration-Business Process screen, Workflow Instance Monitor, and then the Process Instances view.
In the Process Instances list, choose the workflow process you must delete.
Click Purge.
In the Workflow Instance Monitor Purge dialog box, choose a date.
Click Purge.
Monitoring a Workflow Process
This topic describes how to monitor and troubleshoot a workflow process in the production environment. It includes the following topics:
Overview of Monitoring and Troubleshooting Tools
You can use the following tools to monitor and troubleshoot a workflow process:
Progress and status information. Use the Workflow Instance Monitor view and the Workflow Instance Admin view to monitor the progress and status of each workflow process. For more information, see Setting Monitoring Levels for a Workflow Process.
Operation details. Use event logging to trace operations that each workflow process step performs. For more information, see Setting Monitoring Levels for Tracing and the Event Log.
Performance measurement data. Use SARM (Siebel Application Response Measurement) to capture timing data that measures the performance of a workflow process. For more information, see Collecting Timing Data.
Failure analysis records. Use Siebel FDR (Flight Data Recorder) to capture the events that might cause a system failure. For more information, see Collecting Information About System Behavior and Server Component Behavior.
Setting Monitoring Levels for a Workflow Process
The monitoring level you set determines the frequency that Siebel CRM uses to log data and the data that the views display for a workflow process instance. For more information, see Stopping a Workflow Process Instance and Removing a Workflow Process from the Run-Time Environment.
Monitoring Workflow Process Instances
The Workflow Instance Monitor view allows you to monitor workflow process instances, step instances, and aggregate data.
To monitor instances of a workflow process
Log in to the Siebel client.
Navigate to the Administration-Business Process screen, and then the Workflow Instance Monitor view.
In the Workflow Process list, query the Name field for the workflow process you must monitor.
Monitor the workflow process, using values from the following table.
List Name or View Tab Description Workflow Process
Displays definitions of workflow processes that have monitoring turned on. A workflow process with a Monitoring Level that is not set to NONE is turned on. For more information, see Monitoring Level.
Process Instances
Displays the related log instances for the workflow process that you choose.
Step Instances
Displays the steps and process properties for the workflow process that you choose.
Aggregate Data
Displays aggregate data as a chart view for the workflow process that you choose.
For more information, see Removing a Workflow Process from Workflow Instance Monitor and Using Instance Monitoring to Diagnose a Workflow Process.
Monitoring Level
If the Monitoring level is set for a deployed workflow process, then the workflow process instance remains in the Workflow Instance Monitor view after it finishes and Siebel CRM no longer displays it in the Workflow Instance Admin view. Siebel CRM might not display any records in the Step Instances or Aggregate Data views, depending on the monitoring level that is set for the workflow process you choose.
Setting the Monitoring Level Parameter
When Siebel CRM creates a workflow process instance, it reads the monitoring level from the workflow process. This level remains constant throughout the lifetime of the instance unless Siebel CRM pauses it. If Siebel CRM pauses an instance, then it rereads the monitor level from the workflow process when it resumes this instance.
| Monitoring Level | Record Process Instance | Record Step Instances | Record Process Properties |
|---|---|---|---|
0 None |
No |
None |
None |
1 Status |
Yes |
None |
None |
2 Progress |
Yes |
All Steps |
None |
3 Detail |
Yes |
All Steps |
All Steps |
4 Debug |
Yes |
All Steps |
All Steps |
To set the monitoring level parameter
In the Siebel client, navigate to the Administration-Business Process screen, and then the Workflow Deployment view.
In the Child Items View, set the Monitoring Level field.
Guidelines for Setting the Monitoring Level
The monitoring level determines how frequently Siebel CRM writes data to the disk. The run-time environment for Siebel Workflow sets this frequency according to the type of workflow process and to the monitoring level you choose. Monitoring can cause a performance overhead. It is recommended that you set the monitoring level to one of the following values:
0 (None) or 1 (Status) for a workflow process that Siebel CRM runs in a production environment.
2 (Progress) or higher only to debug a workflow process. If you set the monitoring level to Debug, then Siebel CRM writes the log to the disk after every workflow process step.
Monitoring Level and Compatibility with the 7.0 Workflow Process
Siebel CRM sets monitoring levels for a 7.0 flow workflow process according to the following value of the persistence frequency:
NONE. Siebel CRM sets the monitoring level to NONE.
ON_PAUSE or EVERY_STEP. Siebel CRM turns persistence on and sets the monitoring level according to the following value of the persistence level:
ALL_STEPS. Siebel CRM sets the monitoring level to PROGRESS.
CURRENT_STATE. Siebel CRM sets the monitoring level to STATUS.
Beginning with the Siebel CRM 8.1 release, persistence and monitoring are separate features that serve different purposes. Persistence affects quality of service and is controlled during development. Monitoring is an administrative tool and is controlled during deployment. Monitoring typically does not affect the functionality of a workflow process.
Setting Monitoring Levels for Tracing and the Event Log
You can use tracing levels to troubleshoot a workflow process. Setting a trace level over the default level affects performance. It is recommended that you reset the trace level to the default value after you finish troubleshooting.
| Event | Level | Description |
|---|---|---|
Workflow Definition Loading (DfnLoad) |
3 |
Traces object definitions for workflow processes and workflows process steps that Siebel CRM loads into memory. |
Workflow Engine Invoked (EngInv) |
4 |
Traces methods that Siebel CRM calls and arguments that it passes to the Workflow Engine. |
Workflow Process Execution (PrcExec) |
4 |
Traces work that Siebel CRM does to create and complete workflow process instances. Traces one of the following process properties:
|
Workflow Step Execution (StpExec) |
4 |
Traces work that Siebel CRM does to create and complete workflow process steps, evaluate decision conditions, call a business service, and insert or update a business component. |
Workflow Performance (WfPerf) |
4 |
Measures overall run time for a workflow process. |
Workflow Performance (WfPerf) |
5 |
Measures run time of the workflow process and of individual workflow process steps. |
Workflow Recovery (WfRecv) |
3 |
Traces recovery status and progress for a workflow process instance. Applicable only to the Workflow Recovery Manager server component. |
Workflow Recovery (WfRecv) |
4 |
Traces recovery details for a workflow process instance. Applicable only to the Workflow Recovery Manager server component. |
Increasing Tracing Levels for Server Components of the Workflow Management Server
You can configure Siebel CRM to create a more detailed trace file that you can use to troubleshoot the Workflow Process Manager, Workflow Process Batch Manager, or Workflow Recovery Manager. You can increase tracing levels before the Siebel Server process runs.
To increase tracing levels for server components of the workflow management server
In the Siebel client, navigate to the Administration-Server Configuration screen, Servers, Components, and then the Events view.
In the Components list, choose the server component that Siebel CRM must trace.
These server components include the Workflow Process Manager, the Workflow Process Batch Manager, or the Workflow Recovery Manager.
To view the configurable event types for the server component, click the Events tab.
Siebel CRM sets the log level to a default value of 1.
Change the log level value to 3, 4, or 5.
For more information, see Setting Monitoring Levels for Tracing and the Event Log.
Optional. For more troubleshooting, you can repeat step 4 to increase the tracing level for the Object Manager SQL log event.
Siebel CRM creates more tracing information as you increase the value of the Component Event Configuration Log Level. For more information about the different log level values that you can set, see Siebel System Monitoring and Diagnostics Guide.
Collecting Data About the Properties of a Workflow Process
A workflow process metric is a feature that allows you to collect data that is associated with the property of the workflow process. To collect metrics, you define the subset of metrics that Siebel CRM captures, and then activate metric collection after you deploy the Siebel CRM application.
To collect data about the properties of a workflow process
If necessary, display the WF Process Metrics object type in the Object Explorer.
For more information, see Displaying Object Types You Use to Develop a Workflow Process.
Locate the workflow process you must monitor.
For more information, see Locating a Workflow Process in the Workflow Processes List.
In the Object Explorer, expand the Workflow Process tree, and then click WF Process Metric.
Right-click in the WF Process Metrics list, and then click New Record.
In the Metric Name property, choose the desired metric from the list of predefined metric names.
For the Property Name property, choose a process property from the list of process properties that are defined for the workflow process.
Make sure the Inactive property does not contain a check mark.
The Inactive property allows you to turn off a metric and turn it on later.
Deliver the workflow process.
For more information, see Process of Deploying a Workflow Process.
In the Siebel client, navigate to the Administration-Business Process screen, and then the Workflow Deployment view.
Query the Name field of the Repository Workflow Processes list for the workflow process you delivered in step 8.
Set the Analytics Level field of the Active Workflow Processes to Property or All.
This step allows Siebel CRM to collect metrics at run time.
Collecting Timing Data
The Workflow Process Manager server component can use Siebel Application Response Measurement (SARM) to collect timing data. You can use this data to monitor Siebel CRM performance. SARM saves this information to binary files. For more information about configuring SARM and the SARM analyzer, see Siebel Performance Tuning Guide.
| SARM Level | Description |
|---|---|
1 |
The Workflow Process Manager business service records the time that Siebel CRM requires to run a business service method. RunProcess and ResumeInstance are examples of business service methods that run in the Workflow Process Manager. |
2 |
The Workflow Process Manager business service records the time required to do the following:
SARM level 2 can help you measure the logging overhead that occurs if you increase the monitoring level of a workflow process. |
| Level | Area | Subarea | Description |
|---|---|---|---|
1 |
WORKFLOW |
CORDR_RESUME |
Resume a paused workflow process. |
1 |
WORKFLOW |
CORDR_EXECUTE |
Run a workflow process. |
1 |
WORKFLOW |
ENGNE_INVOKE |
Call a method of the Workflow Process Manager business service. |
2 |
WORKFLOW |
STEPS_EXSTEP |
Run a workflow process step. |
2 |
WORKFLOW |
MONTR_WRTE |
Write monitoring data of a workflow process to disk. |
Collecting Information About System Behavior and Server Component Behavior
Log files that the Siebel Flight Data Recorder (FDR) creates include information about system behavior and server component behavior that occurs at run time. Siebel CRM logs the settings and events that occur that might contribute to a failure. The .fdr extension identifies these log files. You can use these fdr files to troubleshoot and analyze the settings and events that occur prior to the failure. Siebel CRM stores fdr log files in the following directory:
ORACLE_HOME\binary
where:
ORACLE_HOME is the root directory where you installed the Siebel Server.
The FDR instrumentation points that Siebel CRM uses in the Workflow Process Manager business service and the Workflow Recovery Manager business service collects detailed data.
For information, see How to Get Help with an Error of a Workflow Process and Siebel System Monitoring and Diagnostics Guide.
Diagnosing a Workflow Process That Has Failed
This topic includes following topics:
Diagnosing a Workflow Process That Has Failed in a Production Environment
This topic describes how to diagnose problems that occur in the production environment. For more information about some of the tools described in this topic, see Monitoring a Workflow Process.
Using Tracing to Diagnose a Workflow Process
You can use tracing to diagnose a workflow process that has failed.
To use tracing to diagnose a workflow process
Turn on tracing for the server component that runs the workflow process.
Example server components include Workflow Process Manager, Workflow Process Batch Manager, or the Application Object Manager. For details on how to turn on tracing, see Setting Monitoring Levels for Tracing and the Event Log.
View the event log files.
For details on how to turn on tracing, see Setting Monitoring Levels for Tracing and the Event Log.
Using Instance Monitoring to Diagnose a Workflow Process
You can use instance monitoring to diagnose a workflow process that has failed.
To use instance monitoring to diagnose a workflow process
In the Siebel client, navigate to the Administration-Business Process screen, and then the Workflow Deployment view.
In the Child Items List Applet, choose the workflow process you must monitor.
Set the monitoring level to 3-Detail or 4-Debug.
Siebel CRM stores the state and process properties values for each workflow process step, regardless of the server component that runs the step. The 3-Detail and 4-Debug monitoring levels affect performance of the Workflow Engine. You must use these levels for troubleshooting purposes only.
Navigate to the Administration-Business Process screen, Workflow Instance Monitor, and then the Process Instances view.
View the monitoring information and fix problems, as required.
Using the Business Service Simulator to Diagnose a Workflow Process
You can use the business service simulator to diagnose a workflow process that has failed.
To use the business service simulator to diagnose a workflow process
Run the workflow process from the Business Service Simulator using the Workflow Process Manager business service.
This step runs the workflow process in the Application Object Manager.
In the Siebel client, navigate to the Administration-Business Service screen, and then the Simulator view.
In the Simulator list, create a new record, and then set the fields using values from the following table.
Field Value Service Name
Workflow Process Manager
Method Name
RunProcess
Iterations
1
In the Input Arguments list, create a new record, and then do the following:
Set the Test Case # field to 1.
Choose and open the Property Name field.
In the multi-value applet that Siebel CRM opens, click New, and then set the fields using values from the following table.
Field Value Property Name
ProcessName
Value
(Enter the name of the workflow process.)
Click Save.
Repeat the step 5 and 6 for other parameters that Siebel CRM passes to the workflow process, especially RowId, if necessary.
In the multi-value applet, click OK.
In the Simulator list of the Simulator view, click Run.
For more information, see Business Service Simulator and Removing a Workflow Process from the Run-Time Environment.
Avoiding Excessive Records in the S_WF_PROP_VAL Table
The S_WF_PROP_VAL table stores values of process properties for a workflow process. When a workflow process runs, Siebel CRM creates records in the S_WF_PROP_VAL table along with a new S_WF_STEP_INST record.
The S_WF_PROP_VAL table might become very large over time because a workflow process typically contains five or more process properties. Siebel CRM might add five records to the S_WF_PROP_VAL table for each workflow process instance. If you enable Persistence on a large number of workflow processes, then the S_WF_PROP_VAL table might become very large. To avoid this situation, you can disable persistence on your custom workflow processes.
To avoid excessive records in the S_WF_PROP_VAL table
To disable persistence, set the Auto Persist property to NO on your custom workflow processes.
For more information, see Configuring Events.
How to Get Help with an Error of a Workflow Process
To get help with a workflow process error, you can create a service request on My Oracle Support. Alternatively, you can phone Global Customer Support directly to create a service request or get a status update on your current service request. Support phone numbers are listed on My Oracle Support. Be prepared to do the following:
Send the log files. To create log files see Monitoring a Workflow Process.
Send the error code and error message. Except for a service workflow process, if a workflow process encounters an error, then the state of the workflow is persistent with a status of In-Error. If a workflow process encounters an error in a sub process, then the state of the sub process is also persistent. Siebel CRM saves the error code and the error message in a process property. You can examine the error code and error message in the Process Properties list of the Workflow Process Instance Admin view. If you choose a record in the All Workflow Process Instances list, then the related instance list displays the parent and child workflows.
Troubleshooting Problems That Occur While a Workflow Process Runs
| Symptom | Diagnostic Steps and Cause | Solution |
|---|---|---|
The DisplayApplet run-time event starts a workflow process the first time it runs but not for subsequent runs of the workflow process. |
If the DisplayApplet run-time event is a UI event, and if the default Web UI framework uses a cache, then Siebel only starts the event the first time it accesses a noncached view. It starts the workflow process only if the event starts and works correctly. |
To make the field work in this situation, you can set the EnableViewCache parameter in the .cfg file to FALSE. |
After Siebel CRM starts a workflow process from a run-time event, it does not get the Row Id of the record on which the event occurs. |
Siebel CRM passes the run-time event to the Row Id of the primary business component and not to the Row Id of the business component on which the run-time event occurs. For more information, see Defining the Primary Business Component. |
To get the Row Id of the active business component, you can use a search specification. For example: the Active_row-id process property is equal to [Id], defined as Type equals Expression and the business component equals the business component name. |
Siebel CRM displays the following error message: Cannot resume Process x-xxxxx for Object-id x-xxxxx. Please verify that the process exists and has a waiting status. |
Deleting existing instances of the workflow process does not help. This error typically occurs in the following situation: 1. A workflow process instance starts and pauses, waiting for a run-time event. 2. The run-time event starts. Siebel CRM resumes the instance and runs it to completion. 3. The run-time event starts a second time. The Workflow Engine attempts to resume the instance but fails because the instance is no longer in a Waiting state. These steps must occur in the order described and in the same user session in order for Siebel CRM to report the error message. As a result, the error message disappears when the Siebel CRM application restarts. |
Ignore the error message and proceed. The Purge feature only works on instances that Siebel CRM has stopped and finished. To delete a persistent or incomplete instance, you first must manually stop the instance. |
Unable to access a different business object from a workflow process. |
Siebel Workflow restricts the use of one business object to a workflow process. |
Use a sub process step to access a different business object. |
Siebel CRM displays the following error message: Unable to initiate the process definition process_name. |
Not applicable |
Make sure each of the following items is true:
|
Siebel CRM displays one of the following error messages:
|
Not applicable |
Make sure the Siebel CRM application is running against the runtime repository definition for the language deployed. |
Siebel CRM displays the following error message: The selected record has been modified by another user since it was retrieved. |
A workflow process attempted to update a record that another user or task updated since Siebel CRM initially retrieved the workflow process. |
Define an error exception connector to handle the update conflict. For more information, see Defining an Error Exception Connector to Handle an Update Conflict. |
The DisplayApplet run-time event starts a workflow process the first time it runs but not for subsequent runs of the workflow process. |
If the DisplayApplet run-time event is a UI event, and if the default Web UI framework uses a cache, then Siebel only starts the event the first time it accesses a noncached view. It starts the workflow process only if the event starts and works correctly. |
To make the field work in this situation, you can set the EnableViewCache parameter in the .cfg file to FALSE. |
After Siebel CRM starts a workflow process from a run-time event, it does not get the Row Id of the record on which the event occurs. |
Siebel CRM passes the run-time event to the Row Id of the primary business component and not to the Row Id of the business component on which the run-time event occurs. For more information, see Defining the Primary Business Component. |
To get the Row Id of the active business component, you can use a search specification. For example: the Active_row-id process property is equal to [Id], defined as Type equals Expression and the business component equals the business component name. |
Recovering a Workflow Process
This topic describes how to use the Workflow Recovery Manager. It includes the following topics:
Overview of the Workflow Recovery Manager
The Workflow Recovery Manager provides the following functionality:
Recovers interrupted instances of a long-running workflow process if the Siebel Server fails. When Siebel CRM recovers an instance, the Workflow Engine attempts to continue running this instance. If forward progress is not possible, then Siebel CRM marks the instance as IN_ERROR and the user must manually resume the workflow process.
Siebel CRM resumes a workflow process instance at the last checkpoint. The Workflow Engine determines the checkpoint according to hints that you define during development. The Workflow Engine can persist relevant data, and then use it to resume running the workflow process after a failure.
Siebel CRM load balances the work it performs to recover workflow process instances. One server thread can determine the recovered instances. This server thread delegates resuming the recovered instance to other server threads in a load balanced manner.
Siebel CRM can recover a workflow process without interfering with the Workflow Engine. One server thread can recover workflow process instances while other threads in the Workflow Engine still handle new requests to run workflow processes.
Architecture of the Workflow Recovery Manager
The following figure illustrates the architecture that Siebel CRM uses to recover a workflow process.

Explanation of Callouts
The architecture of the Workflow Recovery Manager includes the following items:
Workflow Engine. The Workflow Process Manager server component runs a long-running workflow process. As this workflow process runs, the Workflow Engine saves the execution state to the Siebel database at the appropriate time.
Workflow Recovery Manager. A batch server component identifies the workflow process instance that a server failure interrupts. If Workflow Recovery Manager detects an instance that is interrupted, then it forwards this instance to the Workflow Engine. The Workflow Recovery Manager does not rerun the workflow process instance.
Database. A database stores the run state of the workflow processes. Siebel CRM uses the persistent record to restore the run state when the workflow process resumes running from a failure.
Server Message Queue. A queue through which the Workflow Engine and the Workflow Recovery Managers sends messages.
Business Process Administration View. A view that allows you to manually send a request to the Workflow Recovery Manager to recover an interrupted workflow process.
Server Administration Task Management. Allows you to define a recurrence server task for the Workflow Recovery Manager. The recurrent server task requests the Server Manager to periodically scan for interrupted workflow processes.
Process of Using the Workflow Recovery Manager
To use the Workflow Recovery Manager, you do the following tasks:
Enabling the Workflow Recovery Manager
This task is a step in Recovering a Workflow Process.
The status of the Workflow Recovery Manager is Online after it starts. Siebel CRM does not display any server tasks unless it recovers a workflow process instance after a server failure. If you run following command, and if Siebel CRM returns no server tasks, then this situation indicates that there are no failed instances, which is expected behavior:
List Tasks For Comp Wfrecvmgr
A Workflow Recovery Manager that is in an Active status indicates that it is up and running.
To enable the Workflow Recovery Manager
In the Server Manager command-line interface, enter the following command:
enable compgrp workflow
This step makes sure that Siebel CRM activates the component group for Siebel Workflow on the Siebel Server. For more information about Server Manager usage, see Siebel System Administration Guide.
In the Siebel client, navigate to the Administration-Server Management screen, and then the Components view.
Query for Workflow Recovery Manager.
If Workflow Recovery Manager is not Online, then click Start Up.
This step starts the Workflow Recovery Manager. It is not necessary to set other parameters.
Preparing to Test the Workflow Recovery Manager
This task is a step in Recovering a Workflow Process.
In this topic, you prepare to test the Workflow Recovery Manager.
To prepare to test the workflow recovery manager
Connect to the Server Manager from the Siebel Server.
You must use the smgr> prompt. For more information about Server Manager usage, see Siebel System Administration Guide.
To determine if the Workflow component group is active, enter the following command:
smgr>list compgrp
-
If the Workflow component group is not active, then do the following:
Enter the following command:
smgr> enable compgrp workflow
Stop, and then restart the Siebel Server.
In the Siebel client, navigate to the Administration-Workflow Process screen, and then the Workflow Deployment view.
Make sure a workflow process is running, and then fails.
In order for the Workflow Recovery Manager to attempt recovery, a workflow process instance must run, and then fail. To make sure such a workflow exists, you can examine the Active Workflow Processes list.
Testing the Workflow Recovery Manager
This task is a step in Recovering a Workflow Process.
In this topic, you test the Workflow Recovery Manager.
To test the workflow recovery manager
Open a Telnet session connected to the Siebel Server, enter the following command, and then make a note of the Process Id of the Siebel Server:
siebps
If you are using Windows, then use Windows Task Manager instead of Telnet.
Open a second Telnet session, and then connect to the Server Manager prompt.
To start the workflow process, enter the following command from the smgr> prompt:
Start task for comp wfprocmgr with processname = 'AutoRec_NN'
The Siebel Server starts a new server task for the Workflow Process Manager server component that includes the task Id of the task it started.
From the first telnet session you opened, determine if the Inloop.txt file is created.
The session adds numeric values to the file over time.
To reset the Siebel Server, enter the following command:
Reset_server -e enterprise -M server name
This step causes the workflow process that you are monitoring to fail.
Restart the Siebel Server, and then enter the siebps command.
The Siebel Server process restarts.
To resume running the workflow process from the point of failure, connect back to the smgr>prompt, and then enter the following command:
smgr>start task for comp wfrecvmgr
The Siebel Server starts a new server task for the Workflow Recovery Manager server component that includes the task Id of the task it started.
To examine the contents of the file, enter the following command in the Telnet session:
tail -f inloop.txt
The session adds numeric values to the file until the file reaches 2999.
To examine the last value entered in the file, enter the following command:
outfile.txt
The last and only value in this file must be 3000.
Enter the following command:
list tasks for comp WfRecvMgr
Observe that the list now includes one or more server tasks. Workflow Recovery Manager performs several tasks to recover workflow processes that are interrupted when you reset the Siebel Server.
Recovering Workflow Process Instances
If the Workflow Process Manager server component fails, then the Siebel Server resumes the interrupted workflow process instances when it restarts. The Workflow Recovery Manager recovers these instances according to the state information that the Workflow Engine saves for each instance.
Automatically Recovering a Workflow Process Instance
If the Workflow Process Manager server component fails due to an event that occurs outside of the Workflow Process Manager server component, such as a server failure, then Siebel Workflow resumes the interrupted workflow process instances when the Siebel Server restarts.
You can manually recover instances that Siebel Workflow cannot automatically recover. For example, if the Siebel Server fails while a Siebel operation updates a record, then the workflow process cannot determine if the Siebel operation finished. It might be necessary for you to manually make sure the workflow process finished this update before resuming the workflow process.
Siebel CRM can automatically recover a workflow process that runs in the server component. It cannot automatically recover a workflow process that runs on a local database.
Manually Recovering a Workflow Process Instance
You can correct and resume a workflow process instance that encounters errors. For example, if the Communications Server is not available, and if a workflow process uses email to send a notice, then Siebel CRM sets the status for this workflow process to In Error. You can activate the Communications Server, and then resume the workflow process.
To manually recover a workflow process instance
In the Siebel client, navigate to the Administration-Business Process screen, and then the Workflow Instance Admin view.
You can recover instances that Siebel CRM marks for manual recovery from the Workflow Instance Admin view. For more information, see Administering Workflow Process Instances.
In the Related Instances list, choose an option from the applet menu, using values described in the following table.
Menu Item Description Resume Instance-Next Step
To determine the next step to run, the recovery skips the current workflow process step, and then evaluates the decision conditions that emanate from the current step.
Resume Instance-Current Step
The recovery retries the current workflow process step. If the current step is a sub process step, then it starts a new instance of the sub process.
If the Resume Instance menu items are not available, then see How Call Depth Affects Resuming a Workflow Process.
How Call Depth Affects Resuming a Workflow Process
Siebel CRM can resume a workflow process instance only if the Call Depth setting of this instance is the highest among the related instances. If the instance is part of a set of related instances, and if one or more of these instances includes a higher Call Depth level, then Siebel CRM disables Resume Instance-Next Step and Resume Instance-Current Step. For example, assume multiple related instances exist, and that these instances include Call Depth settings of 0,1,2,3, and 4. Assume you choose the record with level 3. In this situation, Siebel CRM disables these Resume controls because level 3 is not the highest Call Depth level that it set among the related instances.
Guidelines for Recovering a Workflow Process
To recover a workflow process, it is recommended that you use the following guidelines:
To reduce the number of checkpoints and minimize run-time overhead, you can modify the Allow Retry Flag property on Siebel operation steps and business service steps. If the Workflow Recovery Manager cannot determine from which step it must recover the workflow process instance, then it marks this instance for manual recovery. To recover the instance, the Workflow Recovery Manager examines the state information for the instance that the Workflow Engine saves at recovery checkpoints. To optimize performance, the Workflow Engine determines the recovery checkpoints according to the step type and the Allow Retry Flag property on the step.
Separate a complex business service into a number of simpler business services. It is easier to recover from a smaller business service.
To avoid transient or permanent system problems, use multiple Workflow Recovery Managers. For example, a situation can exist in an environment where the subnet in which the Workflow Recovery Manager resides is frequently down. It is typical for only one Workflow Recovery Manager to exist as long as the Siebel Server can restart it if this server fails.
Upgrading a Workflow Process
This topic describes some information about upgrading Siebel Workflow from an earlier version. Siebel Database Upgrade Guide is the primary source for upgrade information. For important upgrade information about workflow processes, such as Workflow Premerge, Repository Merge, Workflow Postmerge, and Logging, see Siebel Database Upgrade Guide.
Upgrading the Runtime and Repository Schema
If Oracle changes the Siebel Workflow tables in the repository or the run-time schema, or if Oracle adds new columns to the repository or run-time schema, then as part of upgrade these new columns will be added to the Siebel database.
Oracle does not change workflow processes that exist in the run-time deployment table during an upgrade. To reactivate workflow processes after the merge finishes, you can create a workspace, set Inactive='N' for the all the workflows that need to be deployed and deliver the workspace.
For more information, see Siebel Database Upgrade Guide.
Merging Workflow Processes
Note the following:
If you upgrade to Siebel CRM version 7.7, then Siebel CRM moves workflow processes from the run-time tables to the repository tables. If you upgrade to version 8.0 from version 7.7 or from version 7.8, then Siebel CRM merges all workflow processes to the version 8.0 repository during the repository merge process.
If you upgrade to Siebel CRM version 8.0 directly from a version that occurs prior to version 7.7, then Siebel CRM copies all workflow processes to the version 8.0 repository. You must manually merge your custom workflow processes with the new 8.0 seed workflow processes.
Make sure you review your workflow customizations after the repository merge process finishes. For more information, see Examining Seed Workflow Processes. For information about how Siebel CRM does a merge, see Siebel Database Upgrade Guide.
Mode Requirements for an Upgraded Workflow Process
If you modify a 7.0 flow workflow process that you upgraded to version 7.7 or later, then the mode for the workflow process can remain the same.
Setting Workspace Version Support For Workflows
This topic describes the process of creating and executing workflow on different workspace versions.
Creating a Workflow on Different Workspace Versions
To create a workflow on different workspace versions
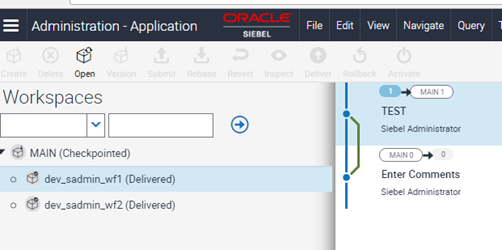
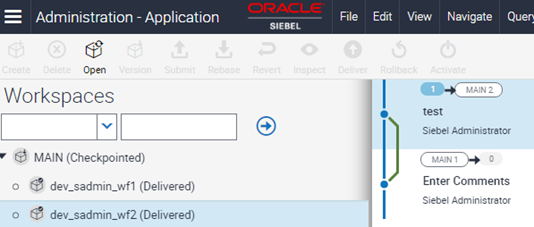
Create a developer workspace under Main. For example, dev_sadmin_wf1.
Create a workflow - Update Account that will query for the account 3com and update the field Account Type to Business.
Deliver the workspace to Main.
Create another developer workspace under Main. For example, dev_sadmin_wf2.
Query for the workflow Update Account.
Modify the workflow such that it updates the field Account Type to Banking.
Deliver the workspace to Main. Now there will be two workspace versions - Main/1 and Main/2.
Executing the Workflow on Different Workspace Versions
To execute the workflow on different workspace versions
Open the Call Center application.
Navigate to the Workspace Explorer.
Click on Main/1 and open dev_sadmin_wf1 workspace created in the example in Step 1 in Creating a workflow on different workspace versions.
Execute the workflow Update Account from the Business Service simulator.
Query for the Account 3com. The field Account Type must now have value Business.
Again navigate to the Workspace Explore.
Click on Main/2 and open dev_sadmin_wf2 workspace created in the example in Step 4 in Creating a workflow on different workspace versions.
Execute the workflow Update Account from Business Service simulator.
Query for the Account 3com. The field Account Type must now have value Banking.