5Using the Siebel Workflow Development Environment
Using the Siebel Workflow Development Environment
This chapter describes how to use the Siebel Workflow development environment. It includes the following topics:
Preparing Siebel Tools to Develop a Workflow Process
To develop a workflow process, you begin by preparing Siebel Tools.
To prepare Siebel Tools to develop a workflow process
Log in to Siebel Tools.
Choose the View menu, Toolbars, and then the Simulate menu item.
Display the object types that you use to develop a workflow process.
For more information, see Displaying Object Types You Use to Develop a Workflow Process.
If necessary, display business service objects.
For more information, see Making a Business Service Visible to a Workflow Process.
Displaying Object Types You Use to Develop a Workflow Process
This topic describes how to display the object types in the Object Explorer that you use to develop a workflow process.
To display object types that you use to develop a workflow process
Log in to Siebel Tools.
Choose the View menu, and then the Options menu item.
Click the Object Explorer tab.
Scroll down through the Object Explorer Hierarchy window to locate the Workflow Process object type, and then display it by making sure the Workflow Process object and all child objects for it contain a check mark.
Optional. Repeat Displaying Object Types You Use to Develop a Workflow Process for each of the following object types that you might use to develop a workflow process:
Business Object
Command
Toolbars
Workflow Policy Column
Workflow Policy Object
Workflow Policy Program
Click OK.
Locating a Workflow Process in the Workflow Processes List
This topic describes how to locate the object definition for a workflow process.
To locate a workflow process in the Workflow Processes list
Open Siebel Tools and create a workspace.
If necessary, display the workflow process object hierarchy.
For more information, see Preparing Siebel Tools to Develop a Workflow Process.
In the Object Explorer, click Workflow Process.
In the Workflow Processes list, query the Process Name property for the workflow process you must modify.
If the workflow process exists, then Siebel Tools displays the object definition of the workflow process in the Workflow Processes list. Querying for the workflow process in this way results in Siebel Tools displaying a single, isolated record. This configuration helps to make sure that you choose the correct workflow process in the list. It helps to make sure you modify the child objects for this workflow process rather than some other workflow process.
Displaying Properties of a Workflow Process
You can define some of properties of a workflow process, but not every property, in the Workflow Processes list, or the Properties window in the Process Designer. The Properties window in the Process Designer displays properties depending on context.
To display properties of a workflow process
Locate the workflow process you must modify.
For more information, see Locating a Workflow Process in the Workflow Processes List.
Right-click the workflow process, and then choose Edit Workflow Process.
Click the canvas, making sure no workflow process step or connector is chosen.
Choose the View menu, Windows, and then the Properties Window menu item.
Using the Process Designer
This topic describes how to use the Process Designer to define a workflow process in Siebel Tools.
The following image includes the elements of the Process Designer.
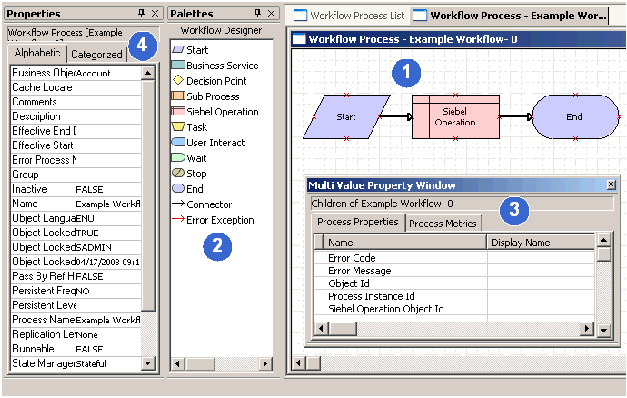
Explanation of Callouts
The Process Designer includes the following items:
Process Designer Canvas. A work area where you create the workflow process. You right-click the canvas to access a context-sensitive menu that allows you modify the workflow process that Siebel Tools displays on the canvas.
Workflow Designer Palette. A window that contains icons that represent the various step types you can add to a workflow process. To add a step, you move, and then place an icon from the palette to the canvas.
Multi Value Property Window (MVPW). A window that allows you to define properties for a workflow process and arguments for a workflow process step. For more information, see Using the Multi Value Property Window.
Properties Window. A window that allows you to define properties for an individual workflow process step or for the overall workflow process. The window is context-sensitive:
If you choose a step or connector, then Siebel Tools displays properties for this step or connector in the Properties window.
If no step or connector is chosen, then Siebel Tools displays properties for the workflow process in the Properties window.
For more information, see Overview of Workflow Process Steps.
Functionality of the Process Designer
You can do the following work in the Process Designer:
Copy and paste. Copy and paste objects in the canvas.
Edit shape properties and layout. Define shape colors and other attributes, such as the look of the line, the fill pattern, and the font for labels. You can align shapes and make shapes the same size and color as other shapes in the workflow process.
Zoom. Zoom in and out on the canvas to view the workflow process at various magnifications.
Copy drawings. Copy a workflow process into another application, such as a Microsoft Word document. You can right-click the canvas, and then click Copy Drawing.
Print. Print the workflow process.
Hide connector names. You can hide the names of connectors and error exception connectors. Hiding a connector name can be helpful to clarify the meaning of the conditional branching that emanates from a start step or a decision point.
Copy and paste functionality in the Process Designer works the same as it does in a typical Windows application. For example, you can use the CTRL+C and CTRL+V keyboard combinations.
Making a Workflow Process Editable
The canvas color in the Process Designer indicates that the workflow process is editable:
A plain (white) canvas with a grid indicates that you can edit the workflow process
A colored (yellow) canvas indicates that you cannot edit the workflow process
If a workflow process is editable, then you can modify it in a variety of ways, such as adding and removing steps and connectors, or changing step and connector properties. For more information, see Using the Process Designer.
To make a workflow process editable
Make sure the workflow process is checked out or is locked by the developer who is currently attempting to edit the workflow process.
Make sure the project that is defined in the Project property for the workflow process is locked.
If the workflow process is a seed workflow process, then make a copy of this seed workflow process, and then edit the copy.
For more information, see Examining Seed Workflow Processes.
If you still cannot edit an existing workflow process, then export the workflow process to your desktop, and then import it.
Siebel CRM increments the Version property for the editable version by 1. For more information, see Importing and Exporting a Workflow Process.
Data That a Workflow Process Can Access During Configuration
The data objects that are available for use as you design your workflow process originate in the Siebel repository. A change in the repository data is immediately available for you to use in a workflow process. You can use configuration data, such as a business component field or other repository information, while you create your workflow process. Consider the following examples:
Assume a List of Values (LOV), such as Account Status, contains values of Gold, Silver, and Bronze. You can use a newly added LOV in a decision condition of your workflow process while you define it.
If you add a new field to a business component, then this new field is immediately available in the Process Designer.
Run-time data is not available for you to use while you define a workflow process, such as an account name, ZIP code, or other transactional data. To use run-time data when you define a workflow process, you can make the data available through a process property. If necessary, you can use an unbounded drop-down list to hard code run-time data into your workflow process. For more information, see Using Process Properties.
Validating a Workflow Process
If you deliver the workflow process, then Siebel Tools validates the workflow process before it publishes this workflow process. For more information, see Validate Tool.
Deploying a Workflow Process Beginning with Siebel CRM Version IP2017
Beginning with Siebel CRM version IP2017, you can use the Workspace>Deliver option to deploy a workflow process. The following occurs in releases prior to Siebel CRM Version 8.0:
You must deliver the workspace in the Siebel client to activate it.
If no validation errors occur, then Siebel Tools does not display the Validate dialog box or the message that states the validation was successful. If no error occurs, then the validation runs implicitly without visibility to you.
Copying Instead of Revising a Workflow Process
In some situations, you can copy an existing workflow process rather than revising it. The copy feature allows you to continue to work on the original workflow. For an example, see Modifying the Existing Workflow Process.