10Billing in Siebel Communications
Billing in Siebel Communications
This chapter describes the procedures for handling customer inquiries about their invoices. It includes the following topics:
Generating Credit, Fraud, and Usage Information in Siebel Communications
Setting Up the Invoice Image Feature in Siebel Communications
About Accessing or Updating Billing Information in Siebel Communications
Process of Accessing or Updating Billing Information in Siebel Communications (End User)
Process of Entering Payment Against an Outstanding Balance in Siebel Communications (End User)
Viewing Unbilled Charges in Siebel Communications (End User)
Process of Creating Adjustments in Siebel Communications (End User)
Process of Making Payment Arrangements in Siebel Communications (End User)
Requesting a Duplicate Invoice in Siebel Communications (End User)
Updating a Billing Profile in Siebel Communications (End User)
About Billing in Siebel Communications
The procedures described in this chapter are usually performed by customer service representatives (CSRs). Using Siebel Communications, CSRs can retrieve past invoices, current unbilled charges, and other invoice details. CSRs can also arrange payment plans, record payments against an outstanding balance, or request adjustments to the customer’s records in the event of an incorrect bill.
Administrators involved with billing benefit from reading this chapter. It describes how your CSRs access billing information and update billing accounts. After becoming familiar with the end-user procedures, you can customize the software to fit your company’s needs.
Billing processes are integrated with an external billing application that Siebel Communications accesses to retrieve information, such as the customer’s last statement. That information is stored temporarily in Siebel database tables.
Performance of the billing screens depends on both the configuration and speed of retrieval from the external billing application. Configurators can set up Siebel Communications so that all messages are sent and received from the back-office application in real-time or batch mode. The results of these messages can also be stored in Siebel Communications database tables, allowing CSRs to resolve them in real-time.
Your company is responsible for performing the integration of Siebel Communications with billing applications. For more information, see Overview: Siebel Enterprise Application Integration. For information about setting up profiles that are used to run credit ratings, record billing preferences, or store tax exemption information, see Profiles in Siebel Communications.
Scenario for Using Billing in Siebel Communications
This topic gives one example of how billing might be used. You might use billing differently, depending on your business model.
A CSR at a telecommunications company receives a call from a business customer. The customer has just received his December invoice for mobile services and believes that his company was overcharged for international phone calls.
The CSR verifies the caller's identity and then accesses the customer's billing information, primarily maintained in an external billing system. With the Siebel front-office system, the CSR can access billing information as if it were stored locally.
The customer has a specific question about various international calls in his December invoice. The CSR looks at a list of recent invoices and finds the December statement. She brings up an image of the invoice and notices that the customer has been charged $300 for international calls.
The CSR wants to discuss the individual international calls to confirm the company made these calls. She first retrieves the customer's billing details information for the December billing period. She then sorts the calls by rate plan (that is, international) and informs the customer that all calls were made to the same number in Frankfurt, Germany. She also checks to see the other invoices for other months, and sees if this international calling pattern is consistent. It is not. The customer realizes that an employee has been making calls without the customer's knowledge.
The CSR mentions to him that he can request a block placed on his account for all international calls by creating a fraud profile for his account. The customer asks to check his calls for the current month to make sure that there will not be unexpected surprises in the next month's invoice. The CSR reviews the unbilled charges and reports that there are no unusual charges.
While looking at the invoice details, however, she notices that the customer is being charged a city tax, from which his company is exempt. The customer has been paying this amount for the last few months. To reimburse him for the error, she can enter an adjustment request against either the entire invoice or specifically against a line item in that invoice. She decides to associate the request with the invoice line item in this case.
She enters the amount of the tax and explains the reason for the request. She then submits the adjustment for processing by the external billing application. If it is accepted, then this adjustment amount is credited immediately to the balance of the account of the customer and is printed on the customer’s next invoice.
Before she forgets, she accesses the customer's exemption profile and makes a note that he is exempt from city tax, so that he is not incorrectly charged in the future.
The customer also wants to pay his outstanding balance. The CSR finds the most recent invoice, which is for the month of January. She creates a payment against the invoice, enters the customer's credit card information, and submits the payment for processing by the external billing application.
Before hanging up, the customer has one last request. He wants to start receiving invoices by email. The CSR goes to his billing profile, selects the appropriate Bill Media, and enters his email address. The customer thanks him for his time and hangs up.
After lunch, the CSR receives a phone call from another customer, who needs to arrange a payment plan. His recent invoice was considerably higher than normal, so he wants to spread out the payment over the next three months. After the CSR verifies that his credit is still good, she enters the payment arrangement request and notes the special circumstances. The external billing application processes the request and approves it in a few moments. The CSR informs the customer that his request has been accepted and that he can see that additional amount in the next three invoices.
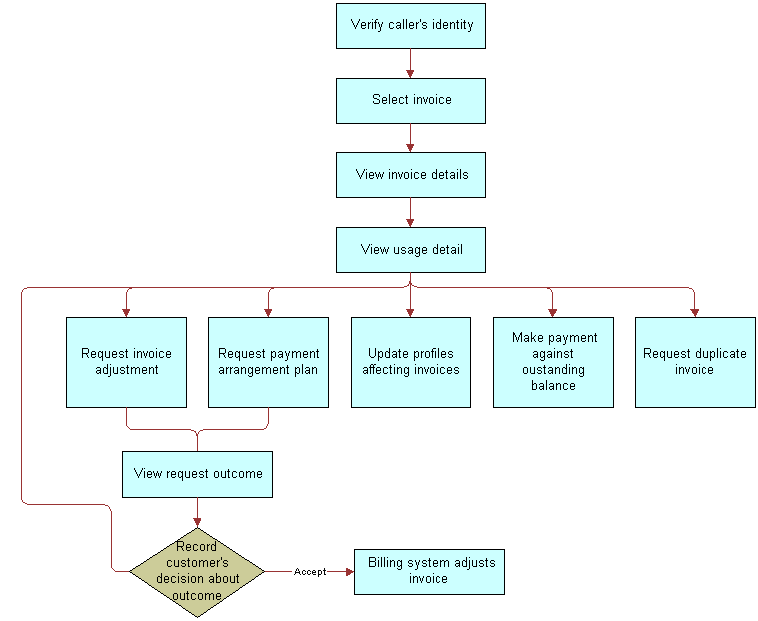
The following image summarizes the sequence of procedures an end user might use to update billing information in Siebel Communications. The steps in the procedure are as follows:
Verify callers identity.
Select invoice.
View invoice details.
View usage details.
Request invoice adjustment.
View request outcome.
Request payment arrangement plan.
View request outcome.
Update Profiles affecting invoices.
Make payment against outstanding balance.
Request duplicate invoice.
Record customer’s decision about outcome.
Billing system adjusts invoice.
Generating Credit, Fraud, and Usage Information in Siebel Communications
Siebel Communications contains a view for administrators that simulates an external billing application. From that view, you can create credit, fraud, and usage details for a billing account. End users do not have access to the view.
To generate credit, fraud, and usage information
Navigate to the Billing Data Administration screen, then the Billing view.
In the Billing Accounts list, drill down on the name of the account.
Click the Credit Alerts, Fraud Alerts, or Usage Detail view tabs.
In the appropriate list, add a record, and complete the necessary fields.
Setting Up the Invoice Image Feature in Siebel Communications
In the Siebel application, end users can view the image of a customer’s bill from the external billing application, if the administrator sets up this feature.
Bill Statement Host
When end users click the Invoice Image view tab of the Invoices screen, the invoice image that appears comes from the Bill Statement host. This image is not stored in the Siebel application. Complete the procedure in this topic to set up the integration between the Bill Statement host and the Siebel application.
To configure the integration with the Bill Statement host
Navigate to the Administration - Integration screen, then the WI Symbolic URL List view.
In the Host Administration list, select the host with a value of BillStatementHost in the Virtual Name field.
In the Name field for this host, enter the name of your invoice host.
From the Show drop-down list, select Symbolic URL Administration.
In the Symbolic URL list, complete the following steps:
Select the record with a value of BillStatement in the Name field.
Note: BillStatement is the name of the control defined in Siebel Tools. For more information, see Using Siebel Tools.For this record, complete the fields in the following table.
Field Comments URL
Type the URL in which the bill image appears.
Host Name
Select the name of the invoice host that you enter in Step 3.
Fixup Name
Select the fix up name. A value of InsideApplet displays the image in the current applet. A value of OutsideApplication displays the image in a new pop-up window.
Restart the application.
The invoice image is now obtained from the Bill Statement URL.
Web Center Content Host
When end users click the View Invoice button in the Bills view tab of the Billing Profile screen, the invoice image that appears comes from the Web Center Content (WCC) host. This image is not stored in the Siebel application. Complete the procedure in this topic to set up the integration between the WCC host and the Siebel application.
To configure the integration with the Web Center Content host
Navigate to the Administration - Integration screen, then the WI Symbolic URL List view.
In the Host Administration list, select the host with a value of wccserver in the Virtual Name field.
In the Name field for this host, enter the name of your invoice host.
From the Show drop-down list, select Symbolic URL Administration.
In the Symbolic URL list, complete the following steps:
Select the record with a value of WCC Invoice Popup Applet in the Name field.
Note: WCC Invoice Popup Applet is the name of the control defined in Siebel Tools. For more information, see Using Siebel Tools.For this record, complete the fields in the following table.
Field Comments URL
Type the URL in which the bill image appears.
Host Name
Select the name of the invoice host that you enter in Step 3.
Change the values for the records in the Symbolic URL Arguments list to accommodate your WCC host.
For example, if the user ID and password for the WCC host are the same as the user ID and password for the Siebel application, then change the Argument Value field from UserLoginid to UserSiebelLoginid for the record with a value of j_username in the Name field, and change the Argument Value field from UserLoginPassword to UserSiebelLoginPassword for the record with a value of j_password in the Name field.
If the user ID and password for the WCC host are different from the user ID and password for the Siebel application, then complete Step 6.
Repeat Step a through Step c for the record with a value of WCC Invoice Popup Applet_Demo in the Name field.
If the user ID and password for the WCC host are different from the user ID and password for the Siebel application, then complete the following steps so that end users do not have to enter these credentials a second time:
Navigate to the Administration - Integration screen, then the SSO Systems Admin List view.
In the SSO Systems Administration list, add a record, and complete the fields in the following table.
Field Comments System Name
Type WCC Invoice URL.
Symbolic URL Name
Select WCC Invoice Popup Applet or WCC Invoice Popup Applet_Demo.
Description
Type WCC URL Credentials
In the SSO System Users list, add a record, and complete the fields in the following table.
Field Comments Siebel Login Name
Select the user ID for the Siebel application.
Login Name
Type the WCC user ID.
Password
Type the WCC password.
Restart the application.
The invoice image is now obtained from the WCC URL.
About Accessing or Updating Billing Information in Siebel Communications
Siebel Communications allows end users to access the same invoice information through different views. By selecting one view or another, end users can find the information most relevant to them, according to the procedure they want to perform at that moment.
Most views allow end users to record interactions with a customer and to update the customer’s information. The functionality available to end users depends on the end user access rights. From these views, end users can access information about billing, such as the account balance, invoice history, payment history, and adjustment history.
End-User Views
The end-user views follow:
Billing Portal view (call center agent). The Billing Portal view summarizes the billing information that a call center agent most likely needs to review while talking to a customer. It also makes it easy for call center agents to handle the most common transactions associated with invoices.
The Billing Portal view serves as a starting point for most customer inquiries. Among other tasks, the Billing Portal views allow call center agents to complete the following tasks:
Review the account status, such as the balance, delinquency information, and pending financial transactions (credit and debit) that have not yet been applied to the balance.
View the most recent invoices of a customer and access detailed information about an invoice.
View the history of payments and adjustments.
This history is useful if customers claim that they have already made a payment and that the balance is not correct.
Access the usage history of different services that the customer has so that unexpected hikes can be explained to the customer.
Begin transactions, such as recording payments or adjusting balances.
The following describes the information available in the Billing Portal view.
Views Description Account
Displays account information that corresponds to the Accounts screen, More Info view. End users can edit this information.
Account Balance
Displays balance information for the account. Retrieves this information from an external billing application. Information is read-only.
Pay button. Navigates to the Invoices screen, Payments view, in which a payment has been created to settle the entire account balance.
Refresh button. Updates the information with the most current data.
Invoice History
Displays information from the Invoices screen. Information is read-only.
Invoice # hyperlink. Navigates to the Invoices screen, Line Items view.
Payment History
Displays the payment history for the account. Information is read-only.
Payment # hyperlink. Navigates to the Invoices screen, Payments More Info view, Invoices subview, in which they record payments.
Adjustment History
Displays a subset of the information from the Invoices screen, Adjustment Requests view. Information is read-only.
Request # hyperlink. Navigates to the Adjustment Requests view, Line Items subview.
Additional Info
Billing Profile hyperlink. Navigates to the Accounts screen, Profiles view, Billing Profile form.
Usage Detail hyperlink. Navigates to the Accounts More Info form, Usage Detail view.
Unbilled Charges hyperlink. Navigates to the Account More Info form, Unbilled Charges view.
Invoices views (call center agent). The Invoices views allow call center agents to view all bill details. These views are generally accessed to reply to customer complaints regarding a specific charge on the bill. The Invoices views also allow call center agents to start transactions, such as adjusting an invoice, recording a payment against the invoice, requesting a bill duplicate.
Time Zones in Date-Time Fields
The search functions of the Billing Profile views include Start Date and End Date fields, which are used to search the billing information using date range criteria. In these fields, end users can select a date and time, and can also select the time zone.
The Start Date and End Date fields of the Billing Profile screen are of UTC Date Time type, and send the values selected by users in UTC format (ISO Standard). The UTCCanonical user property, when set to Y, enables the feature that converts the date and time values to UTC format.
Process of Accessing or Updating Billing Information in Siebel Communications (End User)
To find and display billing information, perform the following tasks:
Accessing Billing Information
To resolve customer inquiries, end users first find the billing account. In this account, they generally record payments. For most other transactions, end users record information at the invoice level.
End users can access the most recent invoice or retrieve past invoices. They can view invoice details, such as line items, after selecting the invoice. In addition, they can view the image of an already-sent invoice bill in HTML format.
End users can navigate to the billing profile portal to view details about a billing profile. These details include balance groups, unbilled usage, bills, payments, and adjustments. You can return to the billing profile portal from the views accessed through the portal by clicking the Billing Profile link at the start of the view.
To access billing information through the Billing Portal view, follow this procedure.
This task is a step in Process of Accessing or Updating Billing Information in Siebel Communications (End User).
To access the billing profile portal
Navigate to the Accounts screen, then the Accounts List view.
In the Accounts list, click the Name field for the account.
In the Account Summary view, do one of the following:
Scroll to the Billing Profile list, and click the link in the Name field of the appropriate billing profile.
The service account is set to the paying account. The Profile Portal view shows all ordered usage of the assets of the paying account, along with rolled-up amounts for usage by nonpaying child accounts of the paying account, if any, for that billing profile.
Scroll to the Installed Assets list, and click the link in the Billing Profile field of the appropriate asset.
The service account is set to the paying account. The Profile Portal view shows all ordered usage of the assets of the paying account, along with rolled-up amounts for usage by nonpaying child accounts of the paying account, if any, for that billing profile.
Scroll to the Billing Items list, and click the link in the Billing Profile field of the appropriate billing item.
The service account is set to the account for which the current billing item was ordered, which might be either a paying account or a nonpaying child account. Consequently, if you want to display usage for the account currently displayed in the Account Summary view, then make sure to drill down on the Billing Profile field of a billing item ordered for that current account.
For a paying account, the Profile Portal view shows all ordered usage of the assets of the paying account, along with rolled-up amounts for usage by nonpaying child accounts of the paying account, if any, for that billing profile.
For a nonpaying child account, the Profile Portal view shows all ordered usage of the assets of the nonpaying child account only, for that billing profile.
The billing Profile Portal view displays forms for the billing profile details and the billing profile balance summary. View tabs for Balance Group, Unbilled Usage, Bills, Payments, and Adjustments appear after the forms. The Balance Group view tab displays a list of balance groups for the billing profile. Except for the Adjustments view, these views use virtual business components to bring real-time data from the external Billing and Revenue Management application.
In the Balance Summary form, click Refresh to retrieve up-to-date data from the billing application.
Viewing Balance Groups for a Billing Profile
In a billing profile, end users can view balance groups. A balance group is a collection of resources associated with one or more services within a bundle of services for an account. Examples of resources include:
1000 free minutes applicable to all the phone lines in a family plan.
1 frequent flyer mile for each minute of time on any phone line in a family plan.
3 MB of data to download at no charge.
100 Short Message Services (SMS) applicable to mobile and wire line services.
A balance group can have a single currency balance and multiple noncurrency balances (for example, the balance of unused phone minutes). Though customers are generally not aware of balance groups in a bundle, they understand how resources are applicable to the services within a bundle.
This task is a step in Process of Accessing or Updating Billing Information in Siebel Communications (End User).
To view balance groups for a billing profile
Navigate to the Billing Profile portal.
For information on the billing profile, see Accessing Billing Information
Click Refresh to retrieve up-to-date data from the billing application.
To view the currency and noncurrency balances as well as the services for a group, select that group in the Balance Group list and scroll down to the Balance list and to the Services list.
To view validity details for a balance, select that balance in the Balance listing.
The Balance Details list displays the validity details.
Viewing Unbilled Services for a Billing Profile
In a billing profile, end users can view the services that the customer used but that the company has not yet billed. They can view unbilled service details such as item charges (for example, cycle forward charges and usage charges), events (for example, phone call details), and noncurrency balance totals for events (for example, the balance of unused phone minutes).
This task is a step in Process of Accessing or Updating Billing Information in Siebel Communications (End User).
To view unbilled services for a billing profile
Navigate to the Billing Profile portal.
For information on the billing profile, see Accessing Billing Information.
Click the Unbilled Usage view tab to display a list of service charges that the company has not yet billed for the billing profile.
Click Refresh to retrieve up-to-date data from the billing application.
To see rolled-up totals of unbilled service charges for this account (and its nonpaying child accounts, if any), view the fields of the Balance Summary form in the upper part of the view.
To view the item charges for a service charge, select that service charge from the Service Charges list and scroll down to the Item Charges list.
To view the events for an item charge, click the Net Amount field for that item charge.
The Event Details list displays.
To find specific events in the Event Details list, click Search, enter search criteria, and click Go.
To view noncurrency balance totals for an event, select an event for which the Non-Currency check box is selected, click View Detail, and scroll down to the Non-Currency Balance Impacts for Event list.
The Non-Currency Balance Impacts for Event list is populated with the noncurrency balance totals for the event.
Note: If the Non-Currency check box is not selected, noncurrency balances are not available for the event, and the View Detail button is disabled.
Viewing Bills for a Billing Profile
In a billing profile, end users can view additional details for bills. They can view billed service details such as item charges (for example, cycle forward charges and usage charges), events (for example, phone call details), and noncurrency balance totals for events (for example, the balance of unused phone minutes). They can also view payments and adjustment request items for bills. Adjustment request items consist of adjustments, settlements, refunds, and write-off amounts.
This task is a step in Process of Accessing or Updating Billing Information in Siebel Communications (End User).
To view bills for a billing profile
Navigate to the Billing Profile portal.
For information on the billing profile, see Accessing Billing Information.
Click the Bills view tab to display a list of bills for the billing profile.
Click Refresh to retrieve up-to-date data from the billing application.
Click the Bill Number field for a bill that you want to view.
The Bill Details form for the bill displays and a list of service charges for that bill displays in the Service Charges view tab.
To view a list of payments for the bill, click the Payments view tab.
To view a list of adjustment request items for the bill, click the A/R Items view tab.
To view the list of service charges for the bill, click the Service Charges view tab.
To view the item charges for a service charge, select that service charge from the Service Charges list and scroll down to the Item Charges list.
To view the events for an item charge, click the Net Amount field for that item charge.
The Event Details list displays.
To find specific events in the Event Details list, click Search, enter search criteria, and click Go.
To view noncurrency balance totals for an event, select an event for which the Non-Currency check box is selected, click View Detail, and scroll down to the Non-Currency Balance Impacts for Event list.
The Non-Currency Balance Impacts for Event list is populated with the noncurrency balance totals for the event.
Note: If the Non-Currency check box is not selected, noncurrency balances are not available for the event, and the View Detail button is disabled.
Viewing Payments for a Billing Profile
In a billing profile, end users can view payments for the profile.
This task is a step in Process of Accessing or Updating Billing Information in Siebel Communications (End User).
To view payments for a billing profile
Navigate to the Billing Profile portal.
For instructions, see Accessing Billing Information.
Click the Payments view tab to display a list of payments for the billing profile.
Click Refresh to retrieve up-to-date data from the billing application.
To find specific payments in the Payments list, click Search, enter search criteria, and click Go.
Viewing Adjustments for a Billing Profile
In a billing profile, end users can view adjustments for the profile.
This task is a step in Process of Accessing or Updating Billing Information in Siebel Communications (End User).
To view adjustments for a billing profile
Navigate to the Billing Profile portal.
For instructions, see Accessing Billing Information.
Click the Adjustments view tab to display a list of adjustment requests for the billing profile and scroll down to the Line Items list.
To view the line items for an adjustment request, select that adjustment request in the Adjustment Requests list.
Viewing Account Balances for Nonpaying Accounts
In the case where the billing account of an asset is different from the service account of the asset, the integration creates a hierarchy in the external Oracle Communications Billing and Revenue Management application to represent the relationship. The service account is modeled as the nonpaying child account of the billing account. To view the balance of a service account that is the nonpaying child account of a billing account, follow the procedures in this topic.
To look up the balance of a nonpaying service account at the request of the user of that account, follow this procedure.
This task is a step in Process of Accessing or Updating Billing Information in Siebel Communications (End User).
To look up the balance of a nonpaying service account for the user
Navigate to the Accounts screen, then the Accounts List view.
Find the account whose nonpaying service account balance you want to view.
Drill down on the Name field.
Click the Account Summary view tab.
In the Installed Assets list, locate the service for which you want to retrieve the balance.
Drill down on the Billing Profile field.
The Billing Profile screen, Balance Group view appears. The integration retrieves the billing profile of the nonpaying service account and displays it in this view.
To view the bills associated with the displayed nonpaying service account, click the Bills view tab.
To look up the balance of a nonpaying service account at the request of the payer of that account, follow this procedure.
This task is a step in Process of Accessing or Updating Billing Information in Siebel Communications (End User).
To look up the balance of a nonpaying service account from the paying account
Navigate to the Accounts screen, then the Accounts List view.
Find the paying account.
Drill down on the Name field.
Click the Account Summary view tab.
In the Billing Items list, locate the service for which you want to retrieve the balance.
Drill down on the Billing Profile field.
The Billing Profile Summary screen displays the billing details of the selected service account. The Service Account field in the Billing Profile form is set to the service account of the service, and the billing information corresponds to the combination of the billing profile and the service account.
Viewing Invoices
Use the procedures in this topic to access and view billing information in invoices.
This task is a step in Process of Accessing or Updating Billing Information in Siebel Communications (End User).
Accessing Invoice Views
To access billing information through the Invoices view, follow this procedure.
To access the Invoice views
Navigate to the Invoices screen.
In the Show drop-down list, select All External Invoices.
The Invoices list displays the bills that are generated by an external application. The information in the Invoices list (header information) is generally stored in the Siebel database. However, due to the large volume of data, it is not recommended that your company store the Invoice Line Item information in the Siebel database, but instead access that data in real time through integration.
Note: When you select All Invoices from the Show drop-down list, the Invoices list displays all invoices, including external invoices.In the Invoices list, perform a query in the Bill To Account field for the account name.
The Invoices list displays all invoices for that account, sorted by invoice number.
In the Invoices list, drill down on the invoice number of the invoice you want to view.
Click a view tab to access specific information for that invoice.
Viewing Invoice Line Items
To view line items for an invoice, follow this procedure.
To view invoice line items
Navigate to the Invoices screen.
In the Show drop-down list, select All External Invoices.
In the Invoices list, drill down on the invoice number of the invoice.
The Invoices form appears with the Line Items list.
Viewing Invoice Images From the Invoices Screen
To view the image of an invoice from the Invoices screen, follow this procedure.
To view the image of an invoice from the Invoices screen
Navigate to the Invoices screen.
In the Show drop-down list, select All External Invoices.
In the Invoices list, drill down on the invoice number of the invoice.
Click the Invoice Image view tab.
The invoice image appears in the Invoice Image view if the administrator sets up the integration between the Bill Statement host and the Siebel application. For more information, see Setting Up the Invoice Image Feature in Siebel Communications.
Viewing Invoice Images From a Billing Profile
To view the image of an invoice from a billing profile, follow this procedure.
To view the image of an invoice from a billing profile
Navigate to the Billing Profile portal.
For information on the billing profile, see Accessing Billing Information.
Click the Bills view tab to display a list of bills for the billing profile.
Click Refresh to retrieve up-to-date data from the billing application.
In the Bills list, select the record for the invoice image that you want to view, and click View Invoice.
If the user ID and password for the Web Center Content (WCC) host are the same as the user ID and password for the Siebel application, then the invoice image appears in a separate dialog box if the administrator sets up the integration between the WCC host and the Siebel application. For more information, see Setting Up the Invoice Image Feature in Siebel Communications.
If the user ID and password for the WCC host are different from the user ID and password for the Siebel application, then you must complete the following steps to view the invoice image:
In the dialog box that appears, enter your login credentials, and click Sign In.
Close this dialog box.
In the Bills list, click View Invoice again.
The invoice image appears in a separate dialog box.
If you want to view another invoice image, then select the record for that invoice image in the Bills list, and click View Invoice again.
For the high-interactivity client, the invoice image appears in a second dialog box. For the Open UI client, the second invoice image replaces the invoice image in the first dialog box.
Viewing Invoice History
To view the invoice history, follow this procedure.
To view the invoice history
Navigate to the Accounts screen, then the Accounts List view.
Drill down on the name of the account.
Click the Billing Portal view tab.
The Invoice History list displays the most current records for the invoice. If the information does not appear in the Invoice History list, then perform a query to access the correct records.
Drill down on the invoice number of the invoice.
In the Line Items list, click the view tab for the information you want to view.
Process of Entering Payment Against an Outstanding Balance in Siebel Communications (End User)
End users can enter a payment for a customer at the account level, the profile level, or the invoice level, according to the accounting application used at their company.
To record and monitor bill payments, perform the following tasks:
Recording Account-Level Payments
To associate the payment against the account when the company’s accounting method applies the payment against the account balance (Balance Forward), perform this task.
This task is a step in Process of Entering Payment Against an Outstanding Balance in Siebel Communications (End User).
To record a payment at the account level
Navigate to the Accounts screen, then the Accounts List view.
Drill down on the name of the account.
Click the Billing Portal view tab.
In the Account Balance form, click Pay.
The Payments list appears with the account information for the new record.
In the field, select a method for payment.
In the Payments list, complete the necessary fields.
Some fields are described in the following table.
Field Comments Payment #
Displays a payment number that is automatically generated.
Payment Date
Displays a payment date that is automatically generated.
Payment Amount
Displays the payment amount by using the account and account balance. The Status field must be Open to enter the amount. Otherwise, this field is read-only.
Status
Displays a status value of Open. You can change this value to a value other than Submitted.
In the More Info form, complete additional fields, if necessary.
The available fields depend on the Payment Method selection you make as follows:
EFT. Deducts payment from the customer’s bank account.
Field Comments Bank Account #
Type the customer’s bank account number.
Account Holder Name
Type the name under which the customer’s bank account is registered.
Bank Branch
Type the reference number of the specific branch of the customer’s bank.
Credit Card. Charges payment to the customer’s credit card.
Reference. Captures payment details at a third-party location, such as post offices or banks.
Field Comments Location
Type the location where the payment is made.
Reference #
Type the reference number of the payment.
Click Submit.
Recording Invoice-Level Payments
You can associate the payment against one or more invoices when the company’s accounting method applies the payment against the bill balance (Open Item).
This task is a step in Process of Entering Payment Against an Outstanding Balance in Siebel Communications (End User).
Recording Payments for One Invoice
To record a payment against one invoice, follow this procedure.
To record a payment against one invoice
Navigate to the Invoices screen.
From the Show drop-down list, select All External Invoices.
In the Invoices list, click Pay.
A new record is created with the payment number, amount, date, and status already populated.
Complete Step 5 and the remaining steps of Recording Account-Level Payments.
Recording Payments for Multiple Invoices
To record a payment against multiple invoices, follow this procedure.
To record a payment against multiple invoices
Navigate to the Accounts screen, then the Accounts List view.
Drill down on the name of the account.
Click the Payments view tab.
In the Payments list, add a payment.
Drill down on the payment number of the payment.
The CME Payments view of the Payments screen appears with the Payment Detail form.
In the Payments list, drill down on the payment number of the payment again.
In the Invoices list, enter the amount that you want to apply to each invoice in the Payment Amount field.
In the Payment Detail form, enter the total amount.
Recording Profile-Level Payments
End users can enter payments for a billing profile or for a bill in that billing profile. When they enter a payment for a billing profile, the billing application applies that payment to the outstanding bills for the billing profile according to business logic in the billing application. To enter payments for a billing profile, complete the steps in the following procedure.
This task is a step in Process of Entering Payment Against an Outstanding Balance in Siebel Communications (End User).
To enter payments for a billing profile
Navigate to the Billing Profile portal.
For information on accessing billing profiles, see Accessing Billing Information.
Click the Payments view tab to display a list of payments for the billing profile.
Click New to add a new payment.
The Capture New Payment dialog box displays.
Enter an amount in the Payment Amount field, and select the One-Time Payment check box.
Select a method of payment in the Payment Method field:
If you select Credit Card, enter details in the Credit Card area of the screen.
If you select Automatic Debit, enter details in the Bank Account area of the screen.
Click Submit to submit the payment to the billing application.
A payment confirmation number displays. When the billing application processes the payment, the payment is included in the payments list.
When end users enter a payment for a bill, the billing application applies that payment to the bill. To enter payments for a bill, complete the steps in the following procedure.
To enter payments for a bill through a billing profile
Navigate to the Billing Profile portal.
For information on accessing billing profiles, see Accessing Billing Information.
Click the Bills view tab to display a list of bills for the billing profile.
Click the Bill Number field for the bill that you want to pay.
Click the Payments view tab to display a list of payments for the bill.
Click New to add a new payment.
The Capture New Payment dialog box displays.
Enter an amount in the Payment Amount field, and select the One-Time Payment check box.
Select a method of payment in the Payment Method field:
If you select Credit Card, enter details in the Credit Card area of the screen.
If you select Automatic Debit, enter details in the Bank Account area of the screen.
Click Submit to submit the payment to the billing application.
A payment confirmation number displays. When the billing application processes the payment, the payment is included in the payments list.
Viewing Billing Payment History
You can view a history of bill payments by account.
This task is a step in Process of Entering Payment Against an Outstanding Balance in Siebel Communications (End User).
To view billing payment history
Navigate to the Accounts screen, then the Accounts List view.
Drill down on the name of the account.
Click the Billing Portal view tab.
The Payment History list displays the most current records for the account.
Viewing Usage Details in Siebel Communications (End User)
End users can view usage details for an invoice.
To view usage details
Navigate to the Accounts screen, then the Accounts List view.
Drill down on the name of the account.
Click the Billing Portal view tab.
Scroll down to the Additional Info list.
Drill down on the usage detail of a record.
The Usage Detail list appears with the Usage History list.
In the Usage History list, select the data you want to view from the drop-down list.
Viewing Unbilled Charges in Siebel Communications (End User)
End users can view unbilled charges for an account. The total of all unbilled charges appears in the Billing Portal view, but for a breakdown of the charges, end users can follow this procedure.
To view unbilled charges
Navigate to the Accounts screen, then the Accounts List view.
Drill down on the name of the account.
Click the Unbilled Charges view tab.
The Unbilled Charges view displays the charges incurred since the last invoice.
Some fields are described in the following table.
Field Comments Next Invoice Date
Displays the date the next statement is generated.
Recurring Charges
Displays the recurring charges for the current period.
NonRecurrng Charges
Displays the nonrecurring charges for the current period.
Surcharges
Displays the taxes and surcharges for the current period.
Total Charges
Displays the total unbilled charges for the current period. The formula follows: Recurring charges plus nonrecurring charges plus surcharges equal to total charges.
Process of Creating Adjustments in Siebel Communications (End User)
End users must sometimes adjust customer bills for various reasons, such as to apply credit to compensate for an overcharge. For more information about integrating the billing component with an external billing application, see Defining Integration Workflows for Siebel Communications.
To create an adjustment, perform the following tasks:
Requesting an adjustment by initiating one of the following tasks:
Recording a Customer’s Decision About Adjustment Outcome Terms
Requesting an Adjustment to an Invoice
End users can associate the adjustment request with the entire invoice or with a specific line item in the invoice. Because the billing component is integrated with an external billing application, an adjustment request is sent to the external billing application, which processes the request.
This task is a step in Process of Creating Adjustments in Siebel Communications (End User).
Requesting Adjustments for Entire Invoices
To request an adjustment to an entire invoice, follow this procedure.
To request an adjustment to an entire invoice
Navigate to the Invoices screen.
From the Show drop-down list, select All External Invoices.
In the Invoices list, drill down on the invoice number of the invoice.
Click the More Info view tab.
On the Invoices form, click Adjust.
The Adjustment Request form appears with some fields populated.
Complete any necessary information, such as the reason for the adjustment, and click Submit.
The request is processed, and the fields are populated with the results.
Requesting Adjustments for Invoice Line Items
To request an adjustment to a line item in an invoice, follow this procedure.
To request an adjustment to an invoice line item
Navigate to the Invoices screen.
From the Show drop-down list, select All External Invoices.
In the Invoices list, drill down on the invoice number of the invoice.
Click the Line Items view tab.
The Adjustment Request form appears with the Line Items list. The Status fields default to Open and the Type fields default to Credit. The list displays a history of adjustment requests.
Select the line item you want to adjust, and click Adjust.
A new record is created with some fields populated.
Complete any necessary information, such as the reason for the adjustment, and click Submit.
The request is processed, and the fields are populated with the results.
Creating Adjustments for Bills
End users can create adjustments for bills. Requested adjustments that are approved are reflected on the next bill that the customer receives. You can adjust only a single bill and not multiple bills at a time. You can enter adjustments for an entire bill, for selected item charges on a bill, for selected events associated with an item charge, and for a balance total associated with a selected event.
The level of your selection in the bill detail determines the invoice lines that display when you create adjustments. For example, if you select an entire bill, no invoice lines display. If you select item charges for usage charges and balance forward charges on a bill, an invoice line for usage charges displays, and an invoice line for balance forward charges displays. If you select two phone call events for a usage item charge, an invoice line displays for each of the two phone calls. If you select a balance total for an event, a single invoice line displays for that balance total.
This task is a step in Process of Creating Adjustments in Siebel Communications (End User).
To create adjustments for an entire bill, complete the steps in the following procedure.
To create adjustments for an entire bill
Navigate to the Billing Profile portal.
For information on billing profiles, see Accessing Billing Information.
Click the Bills view tab to display a list of bills for the billing profile.
Click the Bill Number field for the bill that you want to adjust.
The Bill Details form for the bill displays and a list of service charges for that bill displays in the Service Charges view tab.
Click Adjust in the Bill Details form.
The Billing Adjustments screen displays showing the form to create an adjustment request with some fields populated and showing the Line Items view tab with no invoice lines.
Enter adjustment details in the fields for the form.
Some fields are described in the following table.
Field Comments Status
Status of the adjustment. The value in this field is automatically changed when the billing application processes the adjustment.
Status Description
Read only. Oracle Communications Billing and Revenue Management populates this field with a reason for an adjustment not being posted, if such a case arises.
Request Amount
Amount for which you want to adjust the bill. Defaults to 0.
Approved Amount
Read only. Amount approved for the adjustment to the bill. Defaults to 0. After you click Submit and the billing application processes the adjustment request, the portion of the Request Amount that the billing application approves appears in this field.
Customer Decision
The customer’s decision to accept or reject the adjustment.
Adjustment Type
Type of adjustment; for example, Credit, Cash, or Debit.
Reason for Request
Reason for the adjustment request; for example, Billing Error, Partner Code, Special Credit, or Other.
Approval Date
Read only. Date on which the billing application approves the adjustment. You cannot enter data in this field.
Comments
If necessary, enter additional comments about the adjustment request.
Request Percentage
Percentage by which you want to adjust the bill. If the Request Amount field contains a value, do not enter a percentage in this field.
Approved Percentage
Read only. Portion of the Request Percentage that the billing application approves. After you click Submit and the billing application processes the adjustment request, the percentage of the Request Amount that the billing application approves appears in this field.
Click Submit to submit the adjustment to the billing application.
The adjustment record becomes read-only, and its Status changes to Submitted. When the response message comes back from the external billing application, it updates the Status to either Posted (indicating that the adjustment succeeded) or Not Posted (indicating that the adjustment failed).
To create adjustments for the item charges on a bill, complete the steps in the following procedure.
To create adjustments for item charges on a bill
Navigate to the Billing Profile portal.
For information on billing profiles, see Accessing Billing Information.
Click the Bills view tab to display a list of bills for the billing profile.
Click the Bill Number field for the bill that you want to adjust.
The Bill Details form for the bill displays and a list of service charges for that bill displays in the Service Charges view tab.
Select the appropriate service charge from the Service Charges list and scroll down to the Item Charges list.
Select the item charges and click Adjust in the Item Charges list.
The Billing Adjustments screen displays showing the form to create an adjustment request with some fields populated and showing the Line Items view tab with invoice lines for the item charges that you select.
Note: You can delete existing line items, but you cannot add more line items.Enter adjustment details in the fields for invoice line items.
Some fields are described in the following table.
Field Comments Original Amount
The original amount of the item charge. This field is automatically populated with the amount in the Charge field in the Item Charges list. You cannot change this amount.
Request Amount
Amount for which you want to adjust the bill. Defaults to 0.
Approved Amount
Read only. Amount approved for the adjustment to the bill. Defaults to 0. After you click Submit and the billing application processes the adjustment request, the portion of the Request Amount that the billing application approves appears in this field.
Request Description
If necessary, enter additional comments about the adjustment request.
Status
The status of the adjustment. The value in this field is automatically changed when the billing application processes the adjustment.
Sub Status
Read only. Oracle Communications Billing and Revenue Management populates this field with additional information about the Adjustment being posted or not posted.
Status Description
Read only. Oracle Communications Billing and Revenue Management populates this field with additional information about the Adjustment being posted or not posted.
Adjustment Type
The type of adjustment (for example, Credit, Cash, and Debit).
Reason
The reason for the adjustment request (for example, Billing Error, Partner Code, Special Credit, and Other).
Click Refresh Total to see the cumulative effect of the adjustment line items in the Request Amount field of the form for the adjustment request.
Click Submit to submit the adjustment to the billing application.
The adjustment record becomes read-only, and its Status changes to Submitted. When the response message comes back from the external billing application, it updates the Status to either Posted (indicating that the adjustment succeeded) or Not Posted (indicating that the adjustment failed).
To create adjustments for the events on a bill, complete the steps in the following procedure.
To create adjustments for events on a bill
Navigate to the Billing Profile portal.
For information on billing profiles, see Accessing Billing Information.
Click the Bills view tab to display a list of bills for the billing profile.
Click the Bill Number field for the bill that you want to adjust.
The Bill Details form for the bill displays and a list of service charges for that bill displays in the Service Charges view tab.
Select the appropriate service charge from the Service Charges list and scroll down to the Item Charges list.
Click the Net Amount field for the appropriate item charge.
The Event Details list displays.
Select the events, and click Adjust in the Event Details list.
The Billing Adjustments screen displays showing the form to create an adjustment request with some fields populated and showing the Line Items view tab with invoice lines for the events that you select.
Note: You can delete existing line items, but you cannot add more line items.Enter adjustment details in the fields for invoice line items.
Some fields are described in the following table.
Field Comments Original Amount
The original amount of the event. This field is automatically populated with the amount in the Charge field in the Event Details list. You cannot change this amount.
Request Amount
Amount for which you want to adjust the bill. This field displays 0 (zero) by default.
Approved Amount
Read only. Amount approved for the adjustment to the bill. This field displays 0 (zero) by default. After you click Submit and the billing application processes the adjustment request, the portion of the Request Amount that the billing application approves appears in this field.
Request Description
If necessary, enter additional comments about the adjustment request.
Status
The status of the adjustment. The value in this field is automatically changed when the billing application processes the adjustment.
Adjustment Type
The type of adjustment (for example, Credit, Cash, and Debit).
Reason
The reason for the adjustment request (for example, Billing Error, Partner Code, Special Credit, and Other).
Click Refresh Total to see the cumulative effect of the adjustment line items in the Request Amount field of the form for the adjustment request.
Click Submit to submit the adjustment to the billing application.
The adjustment record becomes read-only, and its Status changes to Submitted. When the response message comes back from the external billing application, it updates the Status to either Posted (indicating that the adjustment succeeded) or Not Posted (indicating that the adjustment failed).
To create adjustments for the balance totals that are associated with a bill, complete the steps in the following procedure.
To create adjustments for balance totals associated with a bill
Navigate to the Billing Profile portal.
For instructions, see Accessing Billing Information.
Click the Bills view tab to display a list of bills for the billing profile.
Click the Bill Number field for the bill that you want to adjust.
The Bill Details form for the bill displays and a list of service charges for that bill displays in the Service Charges view tab.
Select the appropriate service charge from the Service Charges list and scroll down to the Item Charges list.
Click the Net Amount field for the appropriate item charge.
The Event Details list displays.
Select an event for which the Non-Currency check box is selected, click View Detail, and scroll down to the Non-Currency Balance Impacts for Event list.
The Non-Currency Balance Impacts for Event list is populated with the noncurrency balance totals for the event.
Note: If the Non-Currency check box is not selected, noncurrency balances are not available for the event, and the View Detail button is disabled.Select a balance and click Adjust in the Non-Currency Balance Impacts for Event list.
The Billing Adjustments screen displays showing the form to create an adjustment request with some fields populated and showing the Line Items view tab with an invoice line for the noncurrency balance total that you select.
Note: You can delete existing line items, but you cannot add more line items.Enter adjustment details in the fields for the invoice line item.
Some fields are described in the following table.
Field Comments Request Value
The value by which you want to adjust the balance total. This field is automatically populated with the value in the After AR Actions field in the Non-Currency Balance Impacts for Event list, but you can change this value. If you enter a percentage in the Request Percentage field, you must clear this field.
Approved Value
This field is automatically populated with the amount in the After A/R Actions field in the Non-Currency Balance Impacts for Event list, and you cannot enter data in this field. If you change the Request Value field, this field displays the value in the Request Value field. After you click the Submit button, and the billing application processes the adjustment request, the portion of the request value that the billing application approves displays in this field.
Request Description
If necessary, enter additional comments about the adjustment request.
Status
The status of the adjustment. The value in this field is automatically changed when the billing application processes the adjustment.
Request Percentage
The percentage by which you want to adjust the balance total. If the Request Value field contains data, do not enter a percentage in this field.
Adjustment Type
The type of adjustment (for example, Credit, Cash, and Debit).
Reason
The reason for the adjustment request (for example, Billing Error, Partner Code, Special Credit, and Other).
Approved Percentage
The portion of the request percentage that the billing application approves. You cannot enter data in this field. The billing application processes the adjustment request after you click the Submit button.
Click Submit to submit the adjustment to the billing application.
The adjustment record becomes read-only, and its Status changes to Submitted. When the response message comes back from the external billing application, it updates the Status to either Posted (indicating that the adjustment succeeded) or Not Posted (indicating that the adjustment failed).
Creating Adjustments for Unbilled Usage
You can create adjustments to charges for unbilled usage (for example, phone calls that have not yet been added to a bill). For more information about unbilled charges, see Viewing Unbilled Services for a Billing Profile. To create adjustments for unbilled usage, complete the steps of the following procedure.
To create an adjustment for unbilled usage
Navigate to the Billing Profile portal.
For instructions, see Accessing Billing Information.
Click the Unbilled Usage view tab to display a list of service charges that the company has not yet billed for the billing profile.
Click Refresh to retrieve up-to-date data from the billing application.
To view the item charges for a service charge, select that service charge from the Service Charges list and scroll down to the Item Charges list.
To view the events for an item charge, click the Net Amount field for that item charge.
The Event Details list appears.
To find specific events in the Event Details list, click Search, enter search criteria, and click Go.
Select the event representing the unbilled usage to be adjusted, and click Adjust.
On the Invoice Adjustment view, Siebel Communications creates an invoice to track the adjustment. The invoice contains the Bill Number.
In the Billing Profile Adjustments view, Siebel Communications creates a record for the adjustment. This adjustment record likewise contains the Bill Number.
Click Submit to submit the adjustment to the billing application.
The adjustment record becomes read-only, and its Status changes to Submitted. When the response message comes back from the external billing application, it updates the Status to either Posted (indicating that the adjustment succeeded) or Not Posted (indicating that the adjustment failed).
Creating Adjustments for Unbilled Usage for Child Accounts
To create an adjustment for unbilled usage for a nonpaying (child) account, complete the steps of the following procedure.
To create an adjustment for unbilled usage for a child account
Navigate to the Account Summary view.
In the Installed Assets list, find the asset (for example, Mobile Service) associated with the child account for which you want to create an adjustment for unbilled usage.
In the Installed Assets list, drill down on the Billing Profile.
Siebel Communications displays the Billing Profile screen, Balance Group view. The integration retrieves and displays the billing profile of the nonpaying account.
Click the Unbilled Usage tab and review the service charges.
Click the Item charges to review the currency and noncurrency event details.
Select the event representing the unbilled usage to be adjusted, and click Adjust.
Siebel Communications displays the Invoice Adjustment view.
An invoice is created to track the adjustment. The invoice contains the Bill Number. (The external Oracle Communications Billing and Revenue Management application tracks unbilled events in the bill with a status of Open.)
A list item is created in the Billing Profile view’s Adjustments list. This list item likewise includes the Bill Number.
Click Submit to submit the adjustment to the billing application.
The adjustment record becomes read-only, and its Status changes to Submitted. When the response message comes back from the external billing application, it updates the Status to either Posted (indicating that the adjustment succeeded) or Not Posted (indicating that the adjustment failed).
Viewing an Adjustment Request Outcome
Typically, the account adjustments and payment arrangement plans are determined in the back office, either manually or through an back-office application. The back-office application then sends the outcome of the request to Siebel Communications.
End users can view the request outcome and the history of adjustment requests.
This task is a step in Process of Creating Adjustments in Siebel Communications (End User).
Viewing Outcomes of Adjustment Requests
To view the outcome of an adjustment request, follow this procedure.
To view the outcome of an adjustment request
Navigate to the Invoices screen.
From the Show drop-down list, select All External Invoices.
In the Invoices list, drill down on the invoice number of the invoice.
The Invoices form appears with the view tabs.
Click the Adjustment Requests view tab.
In the Adjustment Request list, review the Amount Approved field.
The fields in this list show the response of external billing application to the bill repayment plan request. The Status field is updated automatically.
Viewing History of Adjustment Requests
To view the history of adjustment requests for an account, follow this procedure.
To view the history of adjustment requests
Navigate to the Accounts screen, then the Accounts List view.
Drill down on the name of the account.
Click the Adjustment Requests view tab.
The Adjustment Requests list displays all of the adjustment requests for the account.
Recording a Customer’s Decision About Adjustment Outcome Terms
After consulting with the customer, end users can record the customer’s decision to accept or reject the outcome terms.
This task is a step in Process of Creating Adjustments in Siebel Communications (End User).
To record the customer’s decision about the adjustment outcome terms
Navigate to the Invoices screen.
From the Show drop-down list, select All External Invoices.
In the Invoices list, drill down on the invoice number of the invoice.
The Invoices form appears with the view tabs.
Click the Adjustment Request view tab.
In the Adjustment Requests list, select the request record.
In the Customer Decision field, select information to indicate the customer’s decision to accept or reject the outcome terms.
Note: If your company does not require a customer decision regarding a bill adjustment outcome, then the customer decision fields might be unavailable.
Process of Making Payment Arrangements in Siebel Communications (End User)
End users can request a special arrangement if a customer is unable to pay for services when a bill payment is due. The customer can request a payment plan or a deferral of payment. In response, your company can approve the request, reject the request, or propose its own terms. The response might depend on factors such as corporate policy, customer credit history or credit worthiness, and longevity of the customer’s association with your company. For more information about integrating the billing component with an external billing application, see Defining Integration Workflows for Siebel Communications.
To make a payment arrangement, perform the following tasks:
Requesting a Payment Arrangement
Because the billing component is integrated with an external billing application, a payment arrangement request is sent to the external billing application, which processes the request and generates a response.
This task is a step in Process of Making Payment Arrangements in Siebel Communications (End User).
To request a payment arrangement
Navigate to the Invoices screen.
From the Show drop-down list, select All External Invoices.
In the Invoices list, drill down on the invoice number of the invoice.
Click the Payment Arrangements view tab.
In the Payment Arrangements list, add a record, and complete the fields as necessary.
Some fields are described in the following table.
Field Comments # of Installments
Type the number of installments. For a single-payment deferral plan, this number is 1.
Installment Amount
Displays the installment amount. This amount is calculated as follows: Amount owed divided by the number of installments.
The external billing application processes the request and populates the Payment Arrangements Outcome form at the end of the screen.
Viewing the Outcome of a Payment Arrangement Request
Siebel Communications receives the outcome of the request, which is generated by the external billing application.
This task is a step in Process of Making Payment Arrangements in Siebel Communications (End User).
Viewing Outcomes of Payment Arrangement Requests
To view the outcome of a payment arrangement request, follow this procedure.
To view the outcome of a payment arrangement request
Navigate to the Invoices screen.
From the Show drop-down list, select All External Invoices.
In the Invoices list, drill down on the invoice number of the invoice.
The Invoices form appears with the view tabs.
Click the Payment Arrangements view tab.
Scroll down to the Payment Arrangements Outcome form to review the response of the external billing application to the bill repayment plan request.
Viewing History of Payment Arrangements
To view the history of payment arrangements for an invoice, follow this procedure.
To view the history of payment arrangements
Navigate to the Invoices screen.
From the Show drop-down list, select All External Invoices.
In the Invoices list, drill down on the invoice number of the invoice.
Click the Payment Arrangements view tab.
In the Payment Arrangements list, select Payment Arrangements or Payment Arrangements Details from the drop-down list.
If the information does not appear in the Payment Arrangements list, then perform a query to access the correct records.
Recording a Customer’s Decision About Payment Arrangement Terms
After consulting with the customer, end users can record the customer’s decision to accept or reject the payment plan that their company is offering.
This task is a step in Process of Making Payment Arrangements in Siebel Communications (End User).
To record the customer’s decision about the payment outcome terms
Navigate to the Invoices screen.
From the Show drop-down list, select All External Invoices.
In the Invoices list, drill down on the invoice number of the invoice.
Click the Payment Arrangements view tab.
Scroll down to the Payment Arrangements Outcome form, and select a value in the Customer Decision field to indicate the customer’s decision to accept or reject the terms.
Requesting a Duplicate Invoice in Siebel Communications (End User)
Occasionally, a customer might request a copy of an invoice.
To request a duplicate invoice
Navigate to the Invoices screen.
From the Show drop-down list, select All External Invoices.
In the Invoices list, drill down on the invoice number of the invoice.
Click the Duplicate Request view tab.
In the Duplicate Request list, add a record, and complete the necessary fields.
Some fields are described in the following table.
Field Comments Street Address
Select the address to which to send the duplicate bill. The City, State, Zip, and Country fields are automatically populated when you select the address.
Comments
Type specific directions or descriptions about the duplication process.
To send the invoice to a different mailing address, complete the following steps:
In the Duplicate Request list, select Duplicate Bill Request Detail from the drop-down list.
In the Street Address field, select another address.
Updating a Billing Profile in Siebel Communications (End User)
When billing a customer,Siebel Communications integrates information, such as exemption information or discounts, that is stored in profiles. For more information about profiles, see Profiles in Siebel Communications.
To update a billing profile
Navigate to the Accounts screen, then the Accounts List view.
Drill down on the name of the account.
Click the Billing Portal view tab.
Scroll down to the Additional Info form.
Drill down on the billing profile of a record.
In the Billing Profile form, update the fields as necessary.
Additional End-User Tasks for Billing Management
This topic contains information about other tasks related to billing.
Caller Verification
When receiving an inbound call, end users first verify and find the caller. For more information about caller verification, see Siebel Applications Administration Guide.
Billing for Services
Some special billing procedures relate to billing for services. For more information about billing for services, see Siebel Order Management Guide Addendum for Communications.