6Registering for an Event
Registering for an Event
This chapter describes the different approaches to registration, such as registering an individual contact, an individual account, a list of contacts, or inviting prospected through Siebel Marketing.
This chapter includes the following topics:
Example Process Flow for Registering for an Event
The following image shows the recommended administrator and end-user procedures for registering for an event in Siebel Events Management.

Administrator procedures for event registration include the following:
Registering an Account (for Finance customers)
Registering Attendees
Attendee Session Registration
Account Session Registration (for Finance customers)
Managing Registration Status
End-user procedures for event registration include the following:
Registering to Use the Web Site
Self-Registering to Attend an Event
Registering One or More Attendees
In Siebel Events Management, you can build lists of attendees and register all of the contacts on the list. This feature is available for event plans and events, but not for sessions. This capability is particularly useful when the same group of attendees needs to be registered for multiple events of an event plan.
Registering a List of Attendees for an Event
The list of attendees that you register is built from within the Event Plans or Events screen, as a part of the attendee registration process.
The following procedure describes how to register a list of attendees.
To register an attendee list for an event
Navigate to the Site Map > Events > Event view.
In the Events list, select and drill down on the Event Name.
Click the Participants view tab, and then click Registration.
In the Registration list, click Add List.
In the Add Attendee List dialog box, select a list or create a new record, and then click OK.
Click Register All to invite the attendees.
After the list is registered, you can view the registered attendees using the Participants view tab.
Creating Attendee Lists
You can send out invitations to attendees who came to a specific event or session, or invite specific types of attendees to an event. For example, you might want to invite registered C-level executives to a special private event. You can create lists of attendees for this purpose, to be used for registration in other events. Creating an attendee list is different from creating a list of contacts, because you are working with a subset of attendees within a specific event or session.
When the list is created, note that the default format for the list name is “[Event or Session Name]-[Date][Time]. The name of the list can be changed.
To create a list of attendees
Navigate to the appropriate view:
For events, navigate to the Site Map > Events > Event > Attendees view.
For sessions, navigate to the Site Map > Events > Sessions > Attendees view.
(Optional) Query for the attendees by the criteria you want to search on, that is Status=Confirmed or Job Title=C.
In the Attendees list, select one or more attendees.
Click Create New List.
A message confirms that the list has been saved.
Specify the name of the list.
Registering an Attendee
There are two ways a potential attendee can be registered to attend an event:
Self-registration. The potential attendee can use a standard Web browser to visit the Siebel Events Web site and register for an event listed there. For more information on registering for an event, see End-User Procedures for Self-Registering for an Event.
Registration by an administrator. A member of your own company can use administrative screens to register the potential attendee for an event. For more information on registering an attendee for an event or session, see Registering an Attendee for an Event.
Although self-registration through the Events Web site home page is recommended over registration by an administrator, there may be times when it is convenient for an employee of the presenting organization to register an attendee for an event or a session, rather than requiring the attendee to self-register. This option is particularly useful for registration at events that allow registration at the door, because employees with access to administration screens can register walk-in attendees upon their arrival.
Self-registration is preferred because it uses LDAP security systems and authenticates a user’s username and password. Registration from administrative screens may require site-specific steps to create matching user accounts for both your Siebel application and the security system.
Registering an Attendee for an Event
The following procedure describes how you can register an attendee for an event or session directly from the administrative screens. Attendees who are registered for events and sessions are automatically registered for their parent events.
If an attendee registers for an event prior to the attendee’s account being registered for the event, the account is automatically registered for the event plan and for the event. The event registration status is set to Restricted Invite.
Siebel Events automatically adds attendees who are not in the system as contacts to the contacts table after the you complete the following registration procedure.
To register an attendee for an event
Navigate to the Site Map > Events > Event view.
In the Event Name list, select and drill down on the event for which you want to register an attendee.
Click the Participants view tab, and then click Registration.
In the Registration list, create a new attendee record.
When a contact record is added in the registration list, its status is blank. The administrator can decide whether to invite the contact.
If the event does not have a registration fee, and if there is space available, the value of the Registration Status should be Confirmed.
If the registration status is automatically set to Waitlisted, then all seats are taken for the event or session. If you want, you can continue registering additional attendees, but they are placed on the waiting list.
If there is a fee for attending the event or session, and if there are seats available, the registration status is Pending until the fee payment is submitted in the next step in this procedure.
After an account or contact is registered, it disappears from the Registration tab. The record is transferred to the Attendees or All Attendees view, as appropriate. There is no data loss.
If this is a fee-based event, to step through the Shopping Cart and complete the purchase transaction with a credit card, click Finish.
Note: The Finish button is available only if there is a fee.For Financial-services customers, the following table describes some fields in the Registration list.
Field Comments Attendee Type
A general category representing the type of attendee. Typical values include Standard, Attendee, Premium, VIP, Guest, Staff-Internal, Staff-External, Staff-VIP, Speaker, and Speaker-VIP.
LOV Type: PARTICIPANT_STATUS
Group
A text field for noting how this attendee is grouped with others. For example, one could group attendees by table number for a mealtime event with fixed seating.
Registered
The autogenerated date and time when the registration record is created. This field is not displayed by default in the Registration list, but can be added using the Columns Displayed menu command.
Registration #
A unique, read-only, alphanumeric code that is autogenerated for the current registration.
Registration Status
The status of the potential attendee’s registration. By default, available values include Invited, Pending, Confirmed, and so on. When this setting has a value of Invited, the event appears in the invitee’s My Invitations list on the Web site.
LOV Type: EVENT_REG_STATUS
The following table describes some typical Registration Status values.
Value Comments Attended
Indicates that the potential attendee actually attended the event plan, event, or session. Enter this value only after attendance has occurred.
Cancelled
Indicates that the potential attendee reversed their previous acceptance before the cancellation deadline.
Confirmed
Indicates the participant completed the registration process.
Invited
Causes the event to appear in the invitee’s My Invitations list on the Web site.
No-show
Indicates the potential attendee was confirmed for the event, but did not attend the event.
Pending
Indicates the potential attendee has been invited but has not yet responded to the invitation.
Walk-In
Indicates the attendee was not confirmed prior to the event, but did attend the event.
Registering Previously Invited Attendees to an Event
An event may have one or more previously invited attendees, that need to be either confirmed or canceled as part of the registration process. Attendees can self-register for an event that they are invited to, or an administrator can manually confirm their registration.
To confirm or cancel the registration of a previously invited attendee
Navigate to the Site Map > Events > Event view.
In the Events list, select and drill down on the event.
Click the Participant view tab, and then click Attendees.
In the Attendees list, click Query.
In the Registration Status field, selected Invited, and click Go.
Note: This field shows Attendees who were previously invited.Select the desired Attendee.
Click Confirm Registration or Cancel Registration to confirm or cancel this attendee’s registration.
Note: The Attendee’s registration status changes accordingly. If this is a fee-based event, the Shopping Cart appears when you select Confirm Registration.
Tracking Guests of Attendees
Certain types of events permit attendees to bring guests. You can track guests for each registered attendee.
To specify that an attendee is a guest of another attendee
Navigate to the Site Map > Events > Event > Attendees view.
In the Attendees list, select the attendee record for the guest you want to specify as a guest of another attendee.
In the Guest Of field, click the multiple select button to select the primary attendee.
Select the primary attendee, and then click OK.
Note: Only registered attendees appear for selection in the Guest Of field.
Registering a Group of Attendees for a Session
Sometimes, you may want to select a group of attendees to register for a session. Instead of registering each attendee for the session individually, you can select multiple attendees to register for the session simultaneously.
To register a group of attendees for a session
Navigate to the Site Map > Events > Sessions > Registration view.
In the Registration list, click Add Attendees.
Select multiple attendees by pressing the CTRL or SHIFT key.
When you have selected all the attendees you want, click OK to add the attendees to the Registration list.
Click Register All.
Registering an Account for Financial-Services Customers
You can control which contacts can register for an event by registering an account and issuing invitations to specific contacts associated with that account. Control of which contacts can register is determined by the registration status value you select for the account.
The status value that affects account contacts’ (namely, company employees) ability to register is Invited. If the account is registered for the event with a status of Invited, all contacts associated with the account can view the event listing on the Events Web site home page and register for the event.
After an account is registered, the contacts themselves are not registered until action is taken to register individual attendees or attendee lists. An individual attendee can be registered by yourself, the administrator, as described in Registering an Attendee, or by the contact, as described in End-User Procedures for Self-Registering for an Event. A contact list can only be registered by an administrator, as described in Registering One or More Attendees.
Additional considerations for registering accounts are as follows:
An account can be registered for an event, which automatically registers the account for the event.
An account can be registered directly at the session level.
The following procedure describes how to register an account for an event.
To register an account for an event
Navigate to the Site Map > Events > Event view.
In the Events list, select and drill down on the event.
Click the Participants view tab, and then click Registration.
To register an account, click the Add Attendee button in the Account Registration list.
The button appears as available when you set the event Status to Launched.
Choose a registration status according to the visibility and registration options you want to make available to account contacts.
If you want contacts associated with the account to be able to view and register for the event, choose Invited in the Registration Status field.
The following table describes typical Registration Status values.
Field Comments Attended
Indicates the potential attendee actually attended the event plan, event, or session. Enter this value only after attendance has occurred.
Cancelled
Indicates the potential attendee reversed their previous acceptance before the cancellation deadline.
Confirmed
Indicates the participant completed the registration process.
Invited
Causes the event to appear in the invitee’s My Invitations list on the Web site.
No-show
Indicates the potential attendee was confirmed for the event, but did not attend the event.
Pending
Indicates the potential attendee has been invited, but has not responded.
Walk-In
Indicates the attendee was not confirmed prior to the event, but did attend the event.
Registration Workflow
Siebel Events Management uses workflow rules to eliminate redundant data entry during the registration process. The following image illustrates the process for attendee event registration as follows:
Registering an attendee for the event will automatically register the account for the event if the attendee is associated to an account.
Event Plan aligns with Roll-up, Event for (Step 1) Register for Event and Session (Step 2) Register for Session.
Account (Finance users only) lists Roll-up, Register for Event and Auto Registered. Roll-up is connected with a one-way arrow to Register for Event. Attendee (Register for Session) is connect with a one-way arrow to Auto Registered.
If an account has been manually registered for an event then a new contact registration with the same associated account will not impact the existing account registration.
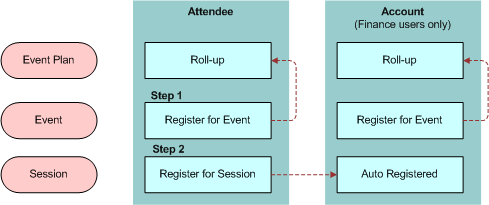
Attendees cannot register for a session until they have first registered for an event. Attendee records are rolled up to the Event Plan level for reporting purposes only.
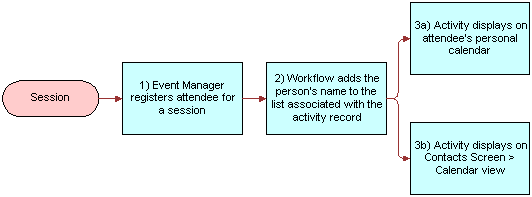
Session Registration and Activity Records
As part of session management, the workflow performs the following tasks:
When a session is first created, the workflow creates an Activity record to track that session, and sets the Activity Type = Session.
When an event manager registers a person for the session, the workflow adds the person’s name to the list associated with the Activity record.
These workflow activities are generated so that all internal employees who are registered for a session can see that session displayed on their personal calendar within the Siebel application (shown in the Calendar screen). In addition, for all external contacts who are registered for a session, an Activity of Type = Session shows on the contact-centric calendar, which is found in the Contacts screen, Calendar view.
The following image illustrates the workflow triggered during session registration as follows:
The Event Manager registers attendee for a session.
The workflow adds the person’s name to the list associated with the activity record
Then an activity displays on the attendee’s personal calendar.
In addition, the activity displays on the Contacts screen, Calendar view.
Removing a Session Activity
If you register an attendee for a session in error, you need to remove the session activity from the attendee’s personal calendar. Removing a session activity requires deleting the individual from the Attendee’s list for the session, then removing the attendee’s name from the Contacts field in the Activities form.
The following procedure describes how to remove a session activity from an attendee’s personal calendar.
To remove a session activity from an attendee’s personal calendar
Navigate to the Site Map > Events > Sessions view.
In the Sessions list, and select and drill down on the session.
Click the Participants view tab, and then click Attendees.
In the Attendees list, select and the attendee from the list and click Cancel Registration.
Navigate to the Site Map > Activities > All Activities view.
In the Activities list, select the activity.
In the Activity form, from the Contact’s field, click the select button.
In the Contacts dialog box, select the attendee, and click Remove.
Troubleshooting Registration
If you are experiencing difficulty submitting credit card information using the Shopping Cart, make sure that Siebel Events Management is properly configured for the database software in use. For more information, see Installing and Configuring Events Management.
Canceling Registrations and Using the Waiting List
In Siebel Events Management, you can cancel registrations only from administrative screens. End users who want to cancel their event or session registration must contact the organization holding the event and ask that an administrator cancel the registration.
When an event registration is canceled, all registrations for specific events and sessions associated with the event are canceled as well. Likewise, if an event registration is canceled, so are all registrations for specific sessions of the event. However, if a session registration is canceled, the event registrations are not canceled.
When the administrator cancels a registration for an event or session that is full, a seat becomes available. However, in some cases, it may be desirable to prevent a seat from becoming available. To prevent a seat from becoming available, the administrator should reduce the capacity immediately prior to canceling the registration.
If the capacity is not reduced, and a seat becomes available, it is allocated to the next user whose registration is added by the administrator or whose registration status is changed from Waitlisted to Confirmed, whichever comes first. In other words, after a seat becomes available, it is recommended that administrators immediately change the registration status of the next wait listed person to Confirmed. Otherwise, a new registrant may accidentally be given the seat designated for the wait-listed person.
The following procedure describes how to cancel an event registration from an administrative screen.
To cancel a potential attendee’s registration for an event
Navigate to the Site Map > Events > Event view.
In the Events list, select and drill down on the event name for which you want to cancel a registration.
In the Details form, note whether the potential attendee is due any refund of fees, and, if so, the amount to be refunded.
In the Events form, if you want to prevent a seat from becoming available because of the cancellation, reduce the Event Capacity by one. For example, if the Event Capacity is 100, manually change the field to 99.
Click the Participants view tab, and then click Attendees.
In the Attendees list, select the person to be canceled, and click Cancel Registration.
Use your organization’s standard procedure to provide any refund due to the person whose registration was canceled.
Note: It is possible to delete the registration record, rather than set the registration status to Cancelled, but this is not recommended. Deleting the record completely removes information about the registration that can be used to track the number of cancellations, to perform refunds, and so on.
After canceling a registration, the Event form shows that Openings increased by one and Seats Taken decreased by one.
You can give the new seat to the first person on the waiting list, as described in the following procedure. To do this, you first identify the person on the waiting list who has the oldest claim to an open seat. Next, you confirm their interest and availability for the event, and then, you change that person’s registration status from Waitlisted to Confirmed. The following procedure is specific to an event; however, the concept can also be applied to an event or a session registration.
To enable the waitlist for an event or session, make sure that the Allow Waitlist check box is selected. By default, all events and sessions have the waitlist function enabled.
To allocate an open seat to a person on the waiting list
Navigate to the Site Map > Events > Event view.
In the Events list, select and drill down on the event for which a seat has become available.
Click the Participants view tab, and then click Attendees.
In the Attendees list, click the menu button and choose Columns Displayed.
In the Columns Displayed list, make sure the Registered column is displayed.
In the Attendees list, click Query.
In the Registration Status field, select Waitlisted.
Run the query to display all currently wait-listed attendees.
In the Registered column header, click the up arrow to sort the listings by registration date and time.
The person with the oldest listing on the waiting list is displayed in the first row of the list.
Confirm the potential attendee’s interest and availability for the event.
In that person’s record, change the Registration Status from Waitlisted to Confirmed.
In certain cases you might want to disable the waitlist function for an event or session. For example, when the capacity is reached, attendees will no longer be able to register for the event or session. An error message is displayed to users who attempt to register for an event that is full, and whose waitlist function is disabled.
To disable the waitlist
Navigate to the appropriate view:
For an event, navigate to the Site Map > Events > Event > Details view.
For a session, navigate to the Site Map > Events > Sessions > Details view.
In the Details form, clear the Allow Waitlist check box.
End-User Procedures for Self-Registering for an Event
End users can self-register through the Events Web site. However, prior to a potential attendee self-registering for an event, the hosting organization should complete several tasks.
Establish the invitee’s User ID
Register the invitee to attend the event with a status of Invited
Send an email to the invitee, which includes the address of the Web site and information about the username and password to be used at the site
After being invited, the potential attendee performs the following tasks:
Visits the Web site and logs in using the specified username and password
Views his current event invitations
Self-registers to attend the event
Note: If the invitee registers to attend the event, that self-registration replaces the tentative registration record created by the administrator.
If the potential attendee wants to cancel his or her registration at any point in the process, that person must contact an administrator who can cancel the registration.
Registering to Use the Web Site
In order to self-register using a Web browser, a potential attendee must first be a registered user of the Siebel Events Web site.
End-User Events Visibility (for Finance Customers)
The following visibility rules and information are applied and displayed on the Web site according to the following criteria:
Upcoming Events. Displays the next five events that have a Status Launched, a Start date after today, an Event Type that is not Restricted, and Display on Website = Y.
View My Open Invitations. Displays events to which a contact has been personally invited. If the contact’s account is invited, but not the individual, the event does not appear here.
Events Web Site Registration Process
The first step in becoming a Siebel Events Web site user is to obtain the address for the site’s home page. This address may be obtained through one of the following:
A personal contact within the hosting organization
A link on the company’s corporate Web site
An email message sent by the hosting organization
An advertisement
After obtaining the home page address, and if the event is not restricted, any potential attendee can become a registered Web site user by clicking the New User link on the home page. After registration on the Web site, the potential attendee can view event information and self-register for the event. However, if the event is restricted, the company hosting the event must establish the potential attendee as a registered Web site user and then invite the Web site user to the event. This invitation allows enable the potential attendee to self-register over the Web site.
The following procedure describes how to self-register as an Events Web site user. You may want to adapt and distribute these instructions to your event-hosting employees and Web site users who have limited access to documented procedures.
To self-register as an Events Web site user
Use standard Web browser to navigate to the Events home page.
Click the New User link in the User Login form.
A Personal Information form appears.
Complete the fields on the Personal Information form, noting the username and password values you enter for future reference, and then click Next.
In the Contact Information form, complete the fields, and then click Next.
A Usage Terms dialog box appears, showing a license agreement.
Read the terms of the agreement, and then click I Agree to proceed.
A Registration Confirmation message appears.
Click Finish.
The Siebel Events Web site reappears, but the User Login form is no longer displayed, as you are now logged in.
Note: Siebel Events Management administration screens are accessed through Siebel applications such as Siebel Sales, Siebel Marketing, or Siebel Call Center. Depending on your Siebel application configuration, Siebel Events end-user screens may or may not be accessible through these Siebel applications, as well.
Self-Registering to Attend an Event
An end user can self-register to attend an event when all of the following are true:
The end user is a registered Events Web site user.
The event’s Event Type is not set to Restricted.
When these conditions are met, an end user can view the event and register to attend the event. However, if the Event Type is Restricted, the end user cannot register to attend the event, and he or she can only view the event if they are an invited attendee.
The following procedures describe how a registered user of the Events Web site can register to attend an event and any particular sessions within an event that may require separate registration. Note, however, in this release of Siebel Events Management, attendee registration is no longer required at the Event Plan level. Attendees must first register for an event, and then register for the sessions within an event.
To self-register to attend an event
Navigate to the home page of the Events Web site.
Log in as a registered user of the site. For more information about new user registration, see Events Web Site Registration Process.
The Siebel Events home page reappears without the User Login form.
Click one of the following links to view event information:
Events link in Browse Events list. Displays the Available Events list, which shows all events that are open to the general public.
Register for an Event. Also displays the Available Events list, which shows all events that are open to the general public.
View My Open Invitations. Displays the My Invitations list, which shows all events to which you have been invited, including restricted events.
Any event listed in the Upcoming Events area of the home page. Displays an Event form and a Sessions list for the selected event.
If you clicked one of the first three links in the previous step, click the name of an event that interests you. Otherwise, proceed to the next step.
In the Event form, click Register.
If there is no charge for the event, and if there is still space available, the My Events list appears. The list includes the event you selected, with the Status field set to Confirmed, showing that you are registered for the event. Also, an email message is automatically sent to you, reporting that your registration is confirmed for the event.
If there is no charge for the event, but the maximum enrollment has been reached, the My Events list appears, but the event listing shows a status of Waitlisted. An email message is automatically sent to you, reporting that you are on the waiting list and will be informed if space becomes available.
If there is a registration fee for the event, and if there is still space available, the Shopping Cart appears, containing information about the charge for the event.
(Optional) To continue registering for additional events before paying, return to the Events home page and repeat Step 3 and Step 4 of this procedure.
To pay for all of the events you for which are registering, click Check Out.
In the Payment Method form, enter your credit card and billing information. If you have used the Shopping Cart before, your previously entered information displays for you to edit or confirm.
Click Continue to display the Order Summary, and verify that all information is correct.
Click Confirm Order.
An Order Confirmation message appears.
Click Return to Home Page, and then click View Your Registrations to display the My Registered Events list.
The list includes the event or events that you selected, with the Status field set to Confirmed, indicating you are registered for the event. Also, two email messages are automatically sent to you, one reporting that your registration is confirmed, the other reporting your Shopping Cart transaction.
If there is a registration fee for the event, but maximum enrollment has been reached, the My Events list appears, but the event listing shows a status of Waitlisted. An email message is automatically sent to you, reporting that you are on the waiting list and will be informed if space becomes available.
If you do not complete the check-out process for the Shopping Cart, your registration status is set to Pending, by default. This status reserves a seat for you, if a seat is available, but only for a finite time period. The default length of time that a registration remains pending is four hours. After this period, Siebel Events automatically deletes pending registrations when you register another user for the same event.
The following procedure describes how to complete an unconfirmed registration for an event, either to convert a status of Pending to a status of Confirmed or to convert a status of Waitlisted to a status of Confirmed.
To complete a pending or wait listed registration to attend an event
On the Home Page in the My Events list, click the View Your Registrations link.
Locate the listing for the registration that you want to complete, and click the link in the Event Name column of that listing.
An Event form, a Sessions list, and a My Sessions form appears.
In the Event form, click Register.
If there is no charge for the event, and if there is still space available, the My Events list appears. The list includes the event you selected, with the Status field set to Confirmed, showing that you are registered for the event. Also, an email message is automatically sent to you, reporting that your registration is confirmed for the event.
If there is no charge for the event, but the maximum enrollment has been reached, the My Events list appears, but the event listing shows a status of Waitlisted. An email message is automatically sent to you, reporting that you are on the waiting list and will be informed if space becomes available.
If there is a registration fee for the event, and if there is still space available, the Shopping Cart appears, containing information about the charge for the event.
(Optional) To continue registering for additional events before paying, return to the Events home page and repeat Step 3 of the procedure in the procedure titled To self-register to attend an event.
To pay for all of the events you for which are registering, click Check Out.
In the Payment Method form, enter your credit card and billing information. If you have used the Shopping Cart before, your previously entered information displays for you to edit or confirm.
Click Continue to display the Order Summary, and verify that all information is correct.
Click Confirm Order.
An Order Confirmation message appears.
Click Return to Home Page, and then click View Your Registrations to display the My Registered Events list.
The list includes the event or events you selected, with the Status field set to Confirmed, indicating you are registered for the event. Also, two email messages are automatically sent to you, one reporting that your registration is confirmed, the other reporting your Shopping Cart transaction.
If there is a registration fee for the event, but maximum enrollment has been reached, the My Events list appears, but the event listing shows a status of Waitlisted. An email message is automatically sent to you, reporting that you are on the waiting list and will be informed if space becomes available.
The following procedure describes how to register for sessions within an event.
To register to attend sessions within an event
If you have not already done so, register for the sessions’ event, and make sure that your registration status is Confirmed.
For instructions on how to register, see Events Web Site Registration Process.
From the home page, click the link View your Registration.
In the My Registered Events list, click the Events Name.
An Event form, a Sessions list, and a My Confirmed Sessions list appear.
In the Sessions list, select the session or sessions you want to register for, and then click Register Session.
If there is no additional fee for the session, and if there is still space available, the Event form, Sessions list, and My Confirmed Sessions list reappear. The selected session is listed in the My Confirmed Sessions list with a value of Confirmed in the Status field.
If there is no additional fee for the session, but maximum enrollment has been reached, the Event form, Sessions list, and My Confirmed Sessions list reappear. The selected session is listed in the My Confirmed Sessions list with a value of Waitlisted in the Status field.
If there is an additional fee for the session, and if there is still space available, the Shopping Cart appears, containing information about the charge for the session.
(Optional) To continue registering for additional sessions before paying, return to the Events home page and repeat the Step 3 and Step 4 of this procedure.
To pay for all of the sessions you for which are registering, click Check Out.
In the Payment Method form, enter your credit card and billing information. If you have used the Shopping Cart before, your previously entered information displays for you to edit or confirm.
Click Continue to display the Order Summary, and verify that all information is correct.
Click Confirm Order. An Order Confirmation message appears.
Click Return to Home Page, and then click View Your Registrations to display the My Registered Events list.
Click the name of the event that includes the session you selected.
An Events form, Sessions list, and My Confirmed Sessions list reappear. The selected session is listed in the My Confirmed Sessions list with a value of Confirmed in the Status field.
If there is an additional fee for the session, but maximum enrollment has been reached, the Event form, Sessions list, and My Confirmed Sessions list reappear. The selected session is listed in the My Confirmed Sessions list with a value of Waitlisted in the Status field. To register for additional sessions, repeat Step 4 of this procedure.
If there is an additional fee for the session, and the user is already registered for one or more selected session, the Shopping Cart appears, but does not include the sessions that the user is already registered for.
If there is a time-conflict between two or more overlapping sessions, an error message is displayed.
Registering for Sessions Within a Track
Users have the choice of browsing and registering for sessions that appear within a specific track. This allows users to match their interested sessions with the available sessions in large events. For more information on Associating Events and Sessions with a track, see Associating Tracks with Events and Sessions.
To register for sessions within a track
From the home page, click the link Register for an Event.
In the All Available Events list, click the Event Name.
Note: An event form, a session list, and a track list appear.
Prospect Registration
Prospects who received an email invitation to the event by way of a marketing campaign, may register for an event without logging in to the Event Web site. A prospect must click the URL within the email invitation to be able to register for an event this way. Information about the prospect is embedded within the URL and passed onto the Event Web site.
If invited through a marketing campaign, any change in an attendee’s registration status results in a registration history (campaign response) record being created. Registration history records can be viewed in the Events screen, Attendees subview. For more information, see Inviting Contacts and Prospects to an Event Using Siebel Marketing.
Troubleshooting Registration
If you are experiencing difficulty submitting credit card information using the Shopping Cart, make sure that Events is properly configured for the database software in use. For more information, see Installing and Configuring Events Management.
Configuring the Register Button
The Register button in eEvents Event Register Form Applet does not invoke a workflow. Instead, this button invokes a method that calls the EnrollUser method in the Event Registration business service. The EnrollUser method then calls additional child methods to perform the following steps:
Checks if the user is a prospect.
Checks if the user is eligible for registration based on the event attributes and the user attributes. Also, checks if space is available for the event.
Checks if a prior registration record exists for the user. Also, checks if that registration record needs updating or is confirmed.
If no prior registration record exists, creates a new registration record to register the user.
If the registration record is confirmed, updates the space capacity.
If a quote is needed, calls the Quote method to create a quote and line item.
If you want the Register button to invoke a workflow, you can call the Register Events business service in a workflow step to complete these steps. If you do not call the Register Events business service, your workflow must complete these steps.
The code in the eEvents Event Register Form Applet invokes a business component that populates the input properties that the EnrollUser method and its child methods use. This applet code also invokes the Event Registration business service. You can create a script to accomplish these applet code tasks. In this script, you can call only the EnrollUser method because this method calls the child methods. However, if you want to change the child methods, you can change all methods using escript.
For more information about the EnrollUser method and its child methods, see Registration Business Service Methods.
Configuring Quantity Selection in Registration
If you use the Shopping Cart to charge attendees event or session registration fees, the Quantity field in the Shopping Cart automatically defaults to a value of 1. If you want to configure Siebel Events Management so that an attendee can purchase a quantity greater than 1, you can add a script to the write record method in the Quote Item business service.
The AddToShoppingCart method in the Event Registration Service business service calls the following methods:
IsItemInShoppingCart in the Shopping Service business service. This method checks to see if the item is already present in the Shopping Car.
AddToCart in the Shopping Service business service. This method adds the item to the cart and prices the item.
Customizing Siebel Events Home Page Applets
The Events Web portal contains navigational applets on the home page that are designed to simplify user navigation. Some of these navigational applets are not based on business component data, instead Siebel administrators or developers use Siebel Tools to customize the applets. The applets are as follows:
Customizing the My Events Applet
The My Events Applet provides links to views where users can register for events, view event invitations, or view events they have already registered for.
Each link and corresponding bitmap is represented by a control object on the applet. To create or modify a new control, Siebel administrators or developers should perform the following procedure.
To create or modify new controls on an applet
Using Siebel Tools create a link by setting the HTML Type property of the control to “Link and then set the Method Invoked property to “GotoView.
To specify the destination view, create a Control User Property with Name = “View and Value = “Destination View Name.
Each image is specified in the Control’s HTML Bitmap property, which refers to a Bitmap Category Item. The layout of the applet is defined by the Applet Web Template.
For more information about working with applets, views, drilldowns, bitmaps, and Web templates, see Configuring Siebel Business Applications, Using Siebel Tools, and Siebel Object Interfaces Reference.
Customizing the Browse Events Applet
The Browse Events Applet provides links to views where end-users can browse a list of events or session or query for a specific event or session.
The Browse Events Applet is built on the same structure, that is with link and image controls, as the My Events Applet. For more information, see the to create or modify new controls on an applet procedure in the Customizing the My Events Applet section.
Customizing the Upcoming Events Applet
The Upcoming Events Applet is based on the eEvents Event business component. This applet displays links to the event detail view.
The applet displays a link for each of the next five events where Status = “Launched, Start Date > current date, Event Type is not Restricted, and Display on Website= “Y. The applet is a special type of a list applet, whose Web template displays a bulleted list for each record. A drilldown object on the applet specifies that the Name field should have a context-sensitive link to an event detail view.
For more information about working with applets, views, drilldowns, bitmaps, and Web templates, see Configuring Siebel Business Applications, Using Siebel Tools, and Siebel Object Interfaces Reference.