4Setting Up and Running Territory Alignments
Setting Up and Running Territory Alignments
This chapter is about setting up rules and running territory alignments. It includes the following topics:
About Territory Alignments: Major, Intermediate, and Minor
There are three types of territory alignment:
Major. Typically, you run major alignments when you run an alignment for a sales force for the first time and when you make significant changes to an alignment. Major alignments provide a full refresh of the alignment. To a first approximation, the major alignment drops all existing rules from the territories and adds the new rules from the major alignment.
Minor. Typically, you run minor alignments when you are making smaller changes to a sales force that has already been aligned. To improve performance, the minor alignment processes only the minimum number of objects needed to change the current alignment, maintaining the alignment by both adding and dropping rules. You cannot change position rules in minor alignments.
Intermediate. Intermediate alignments take the current alignment into account, and they process all objects based on all active rules, including Active Territory Rule (without Effective End Date or Effective End Date greater than Today) and Add and Drop Rules for Alignment, so their performance is not as fast as minor alignments. You can run intermediate alignments if you want to change position rules but do not want to run a full alignment.
You can activate minor and intermediate alignments only after at least one major alignment has been activated. You can activate alignments only for primary hierarchies.
Differences Between Minor and Intermediate Alignment
Bear in mind the following differences between minor and intermediate alignment:
The minor alignment assigns only those objects that satisfy the rules added in the alignment. The intermediate alignment assigns objects that satisfy rules added in the alignment plus objects in the territories impacted by the alignment that satisfy previously existing rules.
Position rules can be defined for intermediate alignments but cannot be defined for minor alignments.
Intermediate alignments take more time than minor alignments. Minor alignments provide the fastest performance when you make minor territory changes.
About Rules for Siebel Territory Management
To perform a territory alignment, you need to set up rules that map the territories to positions. You also need to set up rules to map territories to at least one of the following:
Contacts
Accounts
Assets (used only in Siebel Life Sciences)
Geography
Geo zones (also called bricks, used only in Siebel Life Sciences)
Products
Industries
The following information lists the types of rules you can create for territory assignment if you are aligning territories by sales representative.
| Rule Type | Applies to... | This Type of Rule... | Examples |
|---|---|---|---|
Direct rule |
Contacts, accounts, and assets |
Assigns one account, contact, or asset to one territory.
Note: Direct rules are not supported for assignment of opportunities.
|
Add: Dr. Mike Adler (who is a contact) is assigned to territory A102. Drop: City Hospital (which is an account) is removed from territory A102. |
Indirect rule |
Geography, geo zones, products, and industries |
Assigns the accounts, contacts, assets, opportunities or a combination thereof in a given area (postal code or geo zone), for a given product, or for a given industry, to one territory.
Note: Asset assignment for geo zones is not available unless you configure Siebel Territory Management using Siebel Web Tools.
|
Add: Assets in ZIP Code 07920 are assigned to territory A102. Drop: Accounts in geo zone 42 are removed from territory T85. |
Position rule |
Positions |
Assigns one position to one territory. |
Add: Assign position Sales Rep 3 to territory A102. Drop: Remove position Sales Rep 4 from territory A102. |
If a record was added to a territory by an Indirect rule it can be dropped from this territory by the same Indirect rule only
If a record was added to a territory by a Direct rule it can be dropped from this territory by a Direct Drop rule only
If in an alignment, one record is being considered by both a direct and an indirect rule, one with an add and the other with a drop action, the rule with the add action will prevail.
There is always an OR relationship between any two rules in an alignment, irrespective of whether the rules are direct, indirect, or a combination of the two.
About Conditions in Siebel Territory Management
If you use indirect rules, you can also use conditions to limit the pool of objects (accounts, contacts, and assets) that are available for assignment by indirect rules. The following information describes the types of conditions.
| Rule Type | Applies to... | This Type of Rule... | Examples |
|---|---|---|---|
Global condition |
Accounts, contacts, assets, and opportunities |
Constrains the set of accounts, contacts, assets, or opportunities available for assignment by indirect rules. Conditions can be combined using AND or OR. |
Limit contacts available for assignment to those who have been called on this year. |
Local condition |
Accounts, contacts, assets, and opportunities within a given territory, geography, geo zone, or combination 2 |
Further restricts the set of accounts, contacts, assets or opportunities available for assignment by indirect rules, on a per territory, geography or geo zone basis. Local conditions cannot be used to relax global conditions, only to further restrict them. |
Limit the contacts in geo zone 42 to those where Last Call Date greater than 01 January 2005. |
This topic presents some important points and some examples of how conditions can be used in Siebel Territory Management. Because conditions cannot be explicitly grouped, the conditions that you can create for territory alignments are somewhat limited, and you need to understand these limitations in order to use conditions effectively.
What Is a Scope?
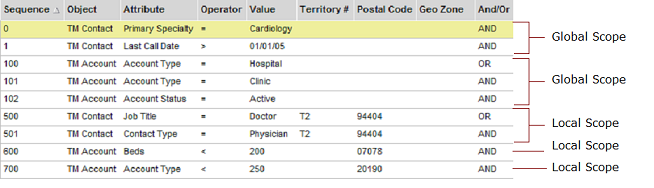
For global conditions, a scope is a set of conditions for the same object type. For local conditions, a scope is a set of conditions for a given object type, territory, postal code, and geo code combination. The following shows five scopes, some global and some local.
Condition Evaluation Within a Given Scope
One important difference between conditions in Siebel Territory Management and ordinary Boolean conditions is that, for a given scope, you must:
Place all the OR conditions first or
Place all the AND conditions first.
You cannot put OR conditions between AND conditions. You cannot put AND conditions between OR conditions. See the following image.
These grouped conditions are evaluated as follows:
A condition that includes only ANDs is evaluated in the usual way. The entire condition is true only if all the subconditions are true.
A condition that includes only ORs is evaluated in the usual way. The entire condition is true if any one of the subconditions is true.
A condition where the ANDs precede the ORs is evaluated as if it were grouped in the following way: 1 AND 2 AND 3 AND 4 OR 5 OR 6 is evaluated as 1 AND 2 AND 3 AND (4 OR 5 OR 6).
A condition where the ORs precede the ANDs is evaluated as if it were grouped in the following way: 1 OR 2 OR 3 OR 4 AND 5 AND 6 is evaluated as (1 OR 2 OR 3 OR 4) AND 5 AND 6.
Condition Evaluation Between Scopes
The AND operator is always automatically applied between global and local conditions. All subconditions must evaluate as true for the entire condition to be true. You cannot use the AND and OR operators between scopes, only within the same scope.
Local conditions for different scopes are handled separately. For example, consider the condition:
A AND B AND c AND d OR e
where A and B are global conditions, c is a local condition, and d and e are also local conditions but in a different scope from c.
It is evaluated as:
[(A AND B) AND c] OR [(A AND B) AND (d OR e)]
About Using Dates as Attributes for Conditions
Without configuration, Siebel Territory Management has three condition attributes for dates:
Last Call Date (for TM_Contact)
Installed Date (for TM_Asset)
Purchase Date (for TM_Asset)
If you create conditions using any of these attributes, be aware of the following:
When you enter a value for a date attribute, enter the date only, for example, 06/08/05. Do not include the time.
Assignment Manager interprets this date as midnight in the server’s time zone, for example, 06/08/05 12:00:00 AM.
Using the equals (=) operator with date attributes is not recommended. Use greater than or less than operators (<,<=,>,>=) or combine two conditions to specify a range.
About Using Divisions as Attributes of Conditions
To define alignments with different business rules that apply to different sales forces, use the Divisions field of the Conditions list applet. This allows you to create conditions that apply to one sales force, since divisions represent sales forces.
About Renumbering and Inserting Conditions
To allow you to insert conditions in the list, if you change the sequence number of a condition, Siebel Territory Management automatically renumbers all conditions that follow. This allows you to insert new conditions in the sequence by renumbering only one condition.
For example, you have defined ten global conditions for contacts, with sequence numbers from 1 to 10. You change the sequence number of the seventh condition from 7 to 15. Siebel Territory Management changes 8 to 16, 9 to 17, and 10 to 18. This allows you to insert new conditions with sequence numbers between 7 and 14.
When you renumber conditions, Siebel Territory Management checks that no overlap occurs. In this example, if there were already a condition with sequence number 17, this existing number would overlap with the new sequence numbers that are created automatically. Siebel Territory Management displays an error message so you cannot make this change until you have corrected the condition that causes the overlap.
About Copying Conditions from Another Alignment
Conditions are not incremental. You must define the entire set of conditions for each alignment.
You can click the Copy From Alignment button in the Alignment Administration screen, Conditions view to copy conditions from a previous alignment. Then you can use them as the basis of the conditions for a new alignment and modify them as needed for the new alignment.
When you click the Copy From Alignment button, it displays a dialog box that allows you to choose among conditions that have been created for the same territory hierarchy.
About Versioning of Territory Alignments and Rules
You can create similar alignments with different activation dates and expiration dates. This allows you to create different versions of rules that run at different times.
For example, you might assign all the postal codes in northern California to one representative and all the postal codes in southern California to another representative. The boundaries of the territories might change slightly at the end of the year. You can create an alignment that assigns representatives the appropriate postal codes for the year 2011, with expiration date of December 31, 2011, and an alignment that assigns the representatives the appropriate postal codes for the year 2012, with the activation date January 1, 2012.
Territory Alignments of Objects with Multiple Addresses and No Addresses
Postal code and geo zone rules can assign accounts or contacts with multiple addresses to more than one territory. For example, if an account has two addresses that are in different ZIP Codes and the postal code rules assign these ZIP Codes to different territories, then sales representatives for both territories are assigned to the account team.
Geo zone rules assign accounts and contacts only if they have addresses. If the account or contact has no address, then the geo zone rule does not consider them. In some cases this might cause alignment to fail because there is no contact or account data to process.
Effects of Different Definitions of Rules in Siebel Territory Management
The creation, modification, and expiration of rules depend on a number of factors:
Are the rules direct or indirect?
Is the alignment major, intermediate, or minor?
Is the Action flag set to Add or Drop?
Does an active rule already exist for the territory (although with different start and end dates)?
If an active rule already exists for the territory, is the activation date of the alignment before or after the effective start date of the current rule for the territory?
The following shows the effects of different definitions of rules.
| Rule Type | Alignment Type | Action | Defined in Alignment | Defined in Territory | Activation Date < Effective Start Date | Activation Date >= Effective Start Date |
|---|---|---|---|---|---|---|
Direct |
Major |
Add |
Yes |
No | New territory rule | New territory rule |
Yes |
Yes | New territory rule | No change to current territory rule | |||
No |
Yes | No change to current territory rule | Sets effective end date to the activation date for the current territory rule | |||
Drop |
Yes |
No | Drops not processed | Drops not processed | ||
Yes |
Yes | Drops not processed | Drops not processed | |||
No |
Yes | Drops not processed | Drops not processed | |||
Minor or Inter-mediate |
Add |
Yes |
No | New territory rule | New territory rule | |
Yes |
Yes | New territory rule | No change to current territory rule | |||
No |
Yes | No change to current territory rule | No change to current territory rule | |||
Drop |
Yes |
No | Not applicable because there is no territory rule to drop | Not applicable because there is no territory rule to drop | ||
Yes |
Yes | No change to current territory rule | Sets effective end date to the activation date for the current territory rule | |||
No |
Yes | No change to current territory rule | No change to current territory rule | |||
Indirect |
Major |
Add |
Yes |
No | New territory rule | New territory rule |
Yes |
Yes | New territory rule | New territory rule | |||
No |
Yes | No change to current territory rule | No change to current territory rule | |||
Drop |
Yes |
No | Not applicable because there is no territory rule to drop | Not applicable because there is no territory rule to drop | ||
Yes |
Yes | No change to current territory rule | Sets effective end date to the activation date for the current territory rule | |||
No |
Yes | No change to current territory rule | No change to current territory rule | |||
Minor or Inter-mediate |
Add |
Yes |
No | New territory rule | New territory rule | |
Yes |
Yes | New territory rule | No change to current territory rule | |||
No |
Yes | No change to current territory rule | No change to current territory rule | |||
Drop |
Yes |
No | Not applicable because there is no territory rule to drop | Not applicable because there is no territory rule to drop | ||
Yes |
Yes | No change to current territory rule | Sets effective end date to the activation date for the current territory rule | |||
No |
Yes | No change to current territory rule | No change to current territory rule |
Scenario for Running Territory Alignments
This scenario provides an example of how alignments are set up and run by the territory administrator and his team. Your company might follow a different process according to its business requirements.
A pharmaceutical company is preparing for a major alignment of its neurology sales force. The group working on the territory alignment begin work well in advance of the due date. They want to make sure that all parties involved have input into the territory alignment and that there is time to do as many trial runs as necessary to get the alignment right.
The Administrator Sets Up Rules and Conditions
The first step is to set up the rules and conditions for the territory alignment.
Position rules. The group begin by creating the position rules that map each sales representative, sales manager, and district manager in the sales force to a territory. The sales representatives are assigned to territories that are child territories of the sales managers. Sales managers are assigned to territories that are child territories of the district managers. In some cases, multiple positions are assigned to one territory (where an experienced sales representative is working with a trainee). In other cases, multiple territories are assigned to a single position (where a high-performing sales representative has two territories).
Indirect rules. To a first approximation, this company bases its territory assignments on postal codes. The company creates rules that map postal codes to territories. Then, all contacts with addresses in those postal codes are indirectly mapped to territories.
Direct rules. In addition to assigning contacts to territories according to postal code, the company has some contacts that it wants to assign to certain sales representatives’ territories even though the contacts are outside the geographic area of the representative’s territory. In many cases, assignments outside the geographic area occur because particular representatives have long-standing relationships with these contacts. Such assignments are made by creating direct rules that can assign individual contacts to particular territories.
Global Conditions. Because the neurology sales force does not call on all the contacts in the company’s database, global constraints are used to constrict the contacts assigned. Only contacts who specialize in neurology are to be assigned.
Local Conditions. In addition to the global conditions, some extra conditions are applied to specific postal codes. In some metropolitan areas, the company wants to further limit the neurologists assigned; for certain postal codes, only neurologists who have been called on within the last six months will be assigned.
The Administrator Runs, Reviews, Refines, and Reruns the Territory Alignment
After the rules and conditions have been set up, the administrator runs the alignment to review what the resulting territory assignments look like. He does a series of trial runs, making edits to the rules after each run. (These results are just written to a list. No actual changes are made to the sales representatives’ territories until the alignment is activated.)
The administrator then creates a report of the results (territories listed with their assigned accounts, contacts, and sales representatives). He distributes this report to the sales managers, asking them for their feedback. The responses that the administrator receives lead to some rule changes and rerunning of the territory alignment. Now, he has a finalized set of rules and conditions that are ready to be used to roll out new territories for the sales force at the beginning of the next quarter.
Process of Setting Up and Running Territory Alignments
To set up and run territory alignments perform the following tasks:
Excluding Addresses of Contacts, Accounts, or Assets from Territory Alignments. By default, all address for a contact, account, or asset are included in alignments. You can flag some addresses so they are not used in the alignment.
Setting Up Territory Alignment for Assignment of Sales Representatives. The territory administrator sets up the alignment and creates the rules which determine how territories are assigned to sales representatives.
Running Territory Alignments. The territory administrator runs the alignment. The new territory assignments are created, but they do not take effect until the alignment is activated.
Viewing Results of Territory Alignment Runs. The territory administrator can review the territory alignment results and, if necessary, can go back to Step 2 to make change the territory alignment rules and to Step 3 to rerun the alignments.
Reviewing and Changing Your New Territory Assignments (Sales Representative). Sales representatives can view the new territory assignments that apply to them, and they can change the rules to suggest changes in these assignments.
Reviewing Sales Representatives Changes in Territory Assignments. The territory administrator reviews changes suggested by sales representatives.
Tracking Information About Territory Alignments. Throughout the process, the territory administrator can track the changes that are made.
This process is a step in Roadmap for Using Siebel Territory Management.
Excluding Addresses of Contacts, Accounts, or Assets from Territory Alignments
By default, all the addresses for a contact, account, or asset are used in alignments. You can exclude some of these addresses from alignments by deselecting the Alignment Flag checkbox of the address record.
You can change this default by changing the user property Filter Addresses of the Target Object Selector business service. This user property has the following options:
Primary. Only primary addresses are used.
Alignment Flag. Only Addresses with Alignment Flag selected are used.
Primary & Align Flag. Only addresses with either Primary or Alignment Flag selected are used.
None. All addresses are used.
The default value for this user property is Primary & Align Flag. The following procedure applies only if you have not changed this default.
This task is a step in Process of Setting Up and Running Territory Alignments.
To exclude addresses of contacts, accounts, or assets from alignments
Navigate to the Contacts, Accounts, or Assets screen, List view.
In the list, drill down on the name of the desired contact, account, or asset.
In the Address field, click the select button.
In the Contact Addresses, Account Addresses, or Assets Addresses dialog box, deselect the Alignment Flag checkbox for all addresses that you do not want used in alignments, and click OK.
Setting Up Territory Alignment for Assignment of Sales Representatives
This topic describes how to create the alignment record and enter the rules and conditions that determine how objects and positions are assigned to territories.
Before creating rules, make sure that you understand how the rules that you create in your alignments combine with any rules that are currently active in territories.
This task is a step in the Process of Setting Up and Running Territory Alignments.
To set up a territory alignment to assign sales representatives
Navigate to the Siebel Territory Management screen, then the Alignments Administration view.
Create a new record and complete the necessary fields. Some fields are described in the following table.
Field Comments Name
Enter the name of the territory alignment.
Division
If the territory hierarchy contains more than one division and you want to align only the territories in one of the divisions (not all territories in the hierarchy), enter a division in this field.
Status
For information about this field, see About the Status Field.
Activation Date
Enter the activation date. This value is the date in the future that you want the new assignments to take effect, that is, to be rolled out to all the sales representatives in the hierarchy (or in the division and hierarchy combination).
Only territory nodes that are active on this date are included in the alignment.
Expiration Date
Optionally, enter an expiration date, used when the alignment is activated to enter an Effective End Date for the alignment rules that are activated.
Hierarchy
Select the territory hierarchy that you want to align.
You will be able to activate this alignment only if this is the primary hierarchy for all territories under the alignment. You align nonprimary hierarchies only to simulate results.
Coverage
This field currently has no function and can be left blank.
Type
Select major, intermediate, or minor territory alignment. (See About Territory Alignments: Major, Intermediate, and Minor.)
Click the value in the Name field to drill down on the alignment.
In the lower link bar, click Positions, and in the list, create rule records that map positions to territories.
Although you can assign a position from any division to a territory, in most cases, you only assign positions from the division that is associated with your territory hierarchy.
Create rules for assigning accounts, contacts, and assets to territories by clicking one or more of the following view tabs in the lower link bar:
Contacts. Create direct rule records for contacts. Use contact rules to add (or drop) contacts directly to territories.
Accounts. Create direct rule records for accounts. Use account rules to add (or drop) accounts directly to territories.
Assets. Create direct rule records for assets. Use asset rules to add (or drop) assets directly to territories.
Geography. Create indirect rules that assign contacts, accounts, assets, or opportunities in specified postal codes, cities, or states territories. If you create geography rules, do not create geo zone rules.
Geo Zones. Create indirect rules that assign contacts, accounts, or opportunities in specified geo zones to territories. If you create geo zone rules, do not create geography rules.
Products. Create indirect rules that assign contacts, accounts, or opportunities for specified products to territories.
Industries. Create indirect rules that assign contacts, accounts, or opportunities for specified industries to territories.
Some fields used in these views are described in the following table.
Field Comment Assignment Object
If you are creating indirect rules, use this field to specify which object is assigned to the sales representatives.
For example, you create an indirect rule for Geography to assign the Postal Code 94709 to the Territory A000. In the Assignment Object field, you choose Account. The accounts in this postal code will be assigned to the sales representative for Territory A000. Likewise, you can select Contact or Opportunity in the Assignment Object field to assign all contacts and opportunities in this postal code to the sales representative for this territory.
Affiliation Object
Select another object that is linked to the object being assigned and that is also assigned to the sales representative.
For example, you use the Alignment Administration screen, Rules view, Contacts list to assign contacts to sales representatives. In the Affiliation Objects field, you select Opportunity. When a contact is assigned to a sales representative, the opportunities associated with that contact are also assigned to that sales representative.
Rep Action
This field determines whether the rules will be submitted to the sales representative for review. Select Include to submit this rule for review, or select Exclude if you do not want this rule submitted for review.
From Territory #
This field determines which position-specific data is associated with the rule. Siebel Territory Management retrieves the primary position associated with the territory you select in this field, and it uses this as the source of position-specific data in the rule.
The rule does not include any position-specific data if:
The From Territory field is empty.
The From Territory is specified, but there is no primary position associated with it.
This field is included in all views except for the Assets view.
From Territory
Displays the name of the territory that you select in the From Territory field.
The buttons on the Rules list provide shortcuts for creating rules, as described in the following table.
Button Use this button to Drop
Change the Action field from Add to Drop for selected records.
Move
Drop from one territory and add to another. The button changes the Action on the selected record to Drop and creates a new record where the Action is Add.
Copy From Territory
Create rules based on current rules for selected territories. (To view the current rules for territories, see Viewing and Editing Rules for Individual Territories.)
Copy Manual Contacts
Create Rules based on manual assignments directly from the contact, account, or asset teams. It lists all objects that have been mapped to the position
(Optional) Create conditions using the following substeps:
Note: For information about conditions, see About Conditions in Siebel Territory Management.Click the Conditions view tab.
If you want to copy conditions from an existing alignment and use them as the basis of the conditions for this alignment, click Copy From Alignment, use the dialog box to select which alignment you want to copy the conditions from, and modify these conditions as needed for the new alignment.
As needed, create new Condition records and complete the necessary fields. Some fields are described in the following table.
Field Comments Sequence
The sequence number is supplied automatically.
You can edit the sequence field to reorder conditions, but some hard-coded restrictions apply according to the type of condition. For example, sequence numbers 0–299 are reserved for global conditions. (Global conditions apply to all objects and are not restricted to particular territories, postal codes, or geo zones.) If you edit a sequence field, subsequent sequence numbers are automatically renumbered.
Object
Choose to apply the condition to accounts, contacts, or assets.
Attribute
Choose an attribute. You can configure new attributes using Siebel Web Tools. See Configuring Additional Attributes for Territory Conditions.
Operator
Choose one of the standard operators.
Value
Enter the value used in the condition.
Division
You can use any of these alone or combine Territory with Postal Code or Territory with Geo Zone.
These are used to specify local conditions.
Territory
Postal Code
Geo Zone
And/Or
For information about the And/Or operator, see About Conditions in Siebel Territory Management.
Running Territory Alignments
When you run an alignment, a job is submitted to the Workflow Process Manager. The workflow creates assignment rules and submits a batch job to Assignment Manager. When the Assignment Manager job has finished, the results are presented in the Results view of the Siebel Territory Management screen.
No changes are made to the current assignments of accounts, contacts, or assets in the database—these changes do not occur until the alignment becomes active.
About the Status Field
The status field is an important indicator about the state of the alignment, from creation of the alignment record through to the rollout of the new assignments in the database. The following information lists the possible values for the Status field.
| Status Value | Indicates That... | Part of Process |
|---|---|---|
In Progress |
The alignment record has been created but the alignment has not yet been run. Additional information, such as activation date, rules, and conditions, might have been entered for the alignment record. The alignment remains In Progress until you click the Run Alignment button. |
Creation |
Creating Assignment Rules |
Siebel Territory Management is creating an Assignment Manager rule group and Assignment Manager rules based on the alignment’s rules and conditions. |
Running |
Splitting Assignment Tasks |
Load Splitter is splitting the assignment tasks based on the load splitting configuration. For information about configuring the Load Splitter for alignment runs, see Siebel Assignment Manager Administration Guide. |
Running Activation |
Identifying Affected Objects |
The TOS service is searching the database to identify which objects (contacts, accounts, assets, opportunities, or a combination thereof) are affected by the alignment. The purpose is to select only those objects affected and not all object in the database. |
Running Activation |
Request Submitted |
The request for alignment has been successfully submitted to Assignment Manager. |
Running |
Run Completed |
The Assignment Manager run has been successfully completed. When an alignment is run, this value is the final status. (You need to monitor the Server Management Administration screen, Tasks view to see when the Assignment Manager job is complete.) |
|
Moving Territory Rules |
The rules defined by the alignment are being copied to each of the territories covered by the alignment. During this process, territory rules are compared against the alignment rules and updated accordingly. |
Activation |
Scheduling Assignment Run |
An Assignment Manager job is being scheduled to run on the activation date. |
Activation |
Scheduled |
The scheduling of the Assignment Manager job has completed, and the alignment is scheduled to run. |
Activation |
Update Rules for Production |
The assignment rules are being converted to reflect the production environment. |
Activation |
Active |
The request for alignment activation has been successfully submitted to Assignment Manager. When an alignment is activated, this value is the final status. (You need to monitor the Server Management Administration screen, Tasks view to see when the Assignment Manager job is complete.) |
Activation |
Alignment Run Failed |
The alignment run did not complete successfully. This status can indicate some user-related issue such as:
It can also indicate some system-related issues, such as the server component Workflow Process Manager is not enabled. |
Running |
Alignment Activation Failed |
The alignment activation did not complete successfully. This status can indicate some user-related issue such as:
It can also indicate some system-related issues, such as the server component group Siebel Territory Management is not enabled. If the status is Alignment Activation Failed, the alignment cannot be rerun or reactivated. You need to copy the alignment, fix the problem, and then run and activate the copied alignment. |
Activation |
Running a Territory Alignment
This task is a step in the Process of Setting Up and Running Territory Alignments.
To run a territory alignment
Review the dates on the territory nodes to make sure that all the territories that you want to assign have active nodes:
Navigate to the Territory Management screen, then the Hierarchies List view.
Drill down on the hierarchy record.
In the Territory Nodes list, review the Effective Start Date and Effective End Date for each territory.
Navigate to the Siebel Territory Management screen, then the Alignments Administration view.
Drill down on the desired alignment record.
Click Run Alignment.
Refresh the screen to monitor the status as the alignment runs.
For information about status values, see the table in About the Status Field.
When the status shown is Request Submitted, from the applet menu, select Go to Server Tasks to view the status of the job submitted to the Assignment Manager.
When the alignment has finished running, you can see the results by navigating to the Siebel Territory Management screen, then the Alignments List, and then Results view.
Viewing Results of Territory Alignment Runs
When the alignment has finished running, the territory administrator can view the results in the Results list views and, can create reports of the results for printing and electronic distribution.
This allows the administrator to decide whether to activate the results of this alignment or to change the rules and rerun the alignment before deciding to activate it.
This task is a step in the Process of Setting Up and Running Territory Alignments.
To view the results of a territory alignment
Navigate to the Siebel Territory Management screen, then the Alignments Administration view.
Drill down on an alignment record.
Click the Results view tab.
In the lower link bar, click Contacts, Accounts, Opportunities, Quotas, or Assets according to which results you want to view.
The results of the alignment appear in the list.
To save the results in a format that can be printed or distributed electronically, run a report.
(For information about running reports, see Siebel Fundamentals. For information about customizing reports, see Siebel Reports Guide.)
To submit results to sales representatives for review, in the Alignment form, click Publish Results.
Reviewing and Changing Your New Territory Assignments (Sales Representative)
After the territory administrator has run the alignment, sales representatives can look at their new territory assignments. If sales representatives want to change any assignments, they can edit the rules that determine that assignment and submit the modified rule to their reporting manager.
When sales representatives navigate to the Territories Management screen, Territories List view and display My Territories, they see only the territories that they have been assigned to by the published alignment.
This task is a step in the Process of Setting Up and Running Territory Alignments.
To review and change territory assignments
Navigate to the Inbox screen, Inbox Items List.
There is one inbox item for each alignment published.
Drill down on the name of the inbox item.
Siebel Territory Management displays the alignment in the Siebel Territory Management screen, then the Alignments List view.
In the Alignments list, drill down on the alignment whose rules you want to review.
Under the Rules tab for the alignment, click the Contacts, Accounts, or Geography view tab to display the rules that you want to review.
The Geography view tab displays either postal code or geo zone rules, depending on which of these the Territories Administrator created.
For any rule you want to change, select Exclude in the Rep Action field.
When you select Exclude in the Rep Action field, the Action value is reversed: Add is changed to Drop and Drop is changed to Add.
After you have made all needed changes in rules, on the Alignment Form of Alignments List view, click Submit Changes.
The Rep Action fields in these rules become read-only for the sales representative. The changed rules are submitted to the territory administrator.
Reviewing Sales Representatives Changes in Territory Assignments
The manager reviews the sales representatives’ changes in territory rules and accepts them or rejects them.
This task is a step in the Process of Setting Up and Running Territory Alignments.
To review and change territory assignments
Navigate to the Territories Management screen, Alignments Administration view.
In the Alignments list, drill down on the alignment you want to review.
In the Rules view, click the Contacts, Accounts, or Geography view tab to display the rules that you want to review.
If you want to retain any change that a sales representative has made, select the record and click Accept Changes.
If you want to reject any change that a sales representative has made, select the record and click Undo Changes.
Run the alignment again, as described in Running Territory Alignments.
Tracking Information About Territory Alignments
Performing territory alignment is a project that typically takes place over a period of weeks as initial alignments are run, results reviewed by multiple people, and rules and conditions adjusted to optimize the alignment.
You can use the Activities, Attachments, and Audit Trail views on the Siebel Territory Management screen, then the Alignments Administration view to keep track of information about and changes made to an alignment.
This task is a step in the Process of Setting Up and Running Territory Alignments.
To keep track of alignment-specific information
Navigate to the Siebel Territory Management screen, then the Alignments Administration view.
Drill down on an alignment record.
Click the Activities, Attachments, or Audit Trail view tab.
Subview Use This Subview to... Activities
Create activities related to the alignment, assign the activity to the appropriate employee, and specify completion dates.
Example: You have sent out the first draft of an alignment. You want to create an activity for every team member so that each one can review the alignment by the end of the week. During the week, you can look at the activity list to see which team members have completed their activity.
Attachments
Attach documents related to the alignment.
Example 1: After creating a report of alignment results, you attach it to the alignment record.
Example 2: After reviewing the report, a sales manager emails you with suggestions for additional changes to the alignment. You attach this email to the alignment.
Audit Trail
View an audit trail of changes that have been made. The fields that can be audited are the fields in the form applet in the Alignments List view.
For general information about Audit Trail, see Siebel Applications Administration Guide.
Removing Positions from Territories
Follow the high-level steps in this procedure:
If you want to remove a position from a territory, or
If you have a position on multiple territories and you want to drop it from one of those territories.
To remove positions from territories
Create an intermediate alignment.
For more information, see Process of Setting Up and Running Territory Alignments.
Add all the position rules that need to be removed from this alignment, and select Drop as the action for them all.
Copy all the active rules for this territory node, and select Add as the action for them all.
Add all global conditions that were used in the last active alignment.
Run the alignment, and verify the results to make sure that all positions added with the action Drop have been removed from the territory node.
Activate the alignment
Configuring Additional Attributes for Territory Conditions
Without configuration, the Attribute field for TM_Account, TM_Asset, and TM_Contact contains a short list of attributes that can be used for conditions in Siebel Territory Management.
For example, the attributes available for creating TM_Account conditions are Account Status, Account Type, and Beds, and you want to create conditions on the Industry field. The following procedure outlines the modifications you need to make in the runtime repository to add additional attributes for creating conditions.
For general information about configuring workflow policy objects and columns and assignment attributes and columns, see Siebel Assignment Manager Administration Guide.
For information about how to configure additional attributes for territory conditions, see:
Making Attributes Available for Local Conditions
Use the following procedure to configure Siebel Territory Management to make attributes available for local conditions. For more information, see Configuring Additional Attributes for Territory Conditions.
To make additional attributes available for local conditions
In Siebel Web Tools, create a new workflow policy column record that points to the database column on which the condition attribute is based.
In the Workflow Policy Object table, add a new workflow policy component column under the corresponding workflow policy component under Workflow Policy Object.
If the Workflow Policy component has not already been created for that table, create it.
Create a new assignment attribute and a new assignment attribute column.
In the Siebel Business application, navigate to the Administration - Data screen, then the List of Values view.
Add a new value to the attribute list of values.
Example of Making Attributes Available for Local Conditions
The following procedure uses Industry as an example of an attribute to show how to configure Siebel Territory Management to make attributes available for local conditions. The actual values you must use depend on the actual attribute and the data model you are working with.
For more information, see Configuring Additional Attributes for Territory Conditions.
To make attributes available for local conditions
In Siebel Web Tools, create a new workflow policy column record and complete the fields as follows:
Property Example Name
Industry
Table Name
S_INDUST
Column Name
NAME
PickList
PickList Industry
Source Field
Name
Add a new workflow policy component column:
Navigate to the workflow policy object TM Account, workflow policy component Industry.
Create a new workflow policy component column.
Complete the fields as follows:
Property Example Workflow Column Name
Industry
Parent Name
Industry
Workflow Object Name
TM Account
Create a new assignment attribute record and complete the fields as follows; or, if the assignment record already exists, skip to Step 4.
Property Example Bounded
TRUE
Data Type
Varchar
Name
Industry Name
Pick List
PickList Industry
Use Range
FALSE
For the assignment attribute you created in Step 3, create a new assignment attribute column and complete the fields as follows:
Property Example Name
Industry
Assignment Object
TM Account
Workflow Policy Object
TM Account
Workflow Policy Component
Industry
Workflow Component Column
Industry Name
Create a new assignment criteria record and complete the fields as follows:
Property Example Name
Industry
Display Name
Industry Name
Team
FALSE
Use Expertise
FALSE
Note: As a best practice, you should use the same name for the TM Attribute LOV value and the corresponding Assignment Criteria in order to maintain consistency.For the assignment criteria record you created in Step 5, create a new assignment criteria attribute and complete the fields as follows:
Property Example Name
Industry
Assignment Attribute
Industry Name
Store Column
1
Display Sequence
1
Display Name
Industry Name
In your Siebel Business application, in Administration - Data screen, List of Values view, add a new value to the Attribute LOV and complete the fields as follows:
Field Value Example Type
TM_ASGN_ATTRIBUTE
TM_ASGN_ATTRIBUTE
Display Value
Text string
Industry Name
Language Independent Code
Text string
INDUSTRY NAME
Parent LIC
TM Object Name
TM ACCOUNT
For general information about adding a new value to an existing list of variables, see Siebel Applications Administration Guide.
Making Attributes Available for Global Conditions
Use the following procedure to configure Siebel Territory Management to make attributes available for global conditions.
For more information, see Configuring Additional Attributes for Territory Conditions.
To make attributes available for global conditions
The first step depends on which object the condition attribute is based on:
If the condition attribute is based on account, then modify the TOS*Account business component, except for TOS Account, TOS Target Territory-Account, and TOS Target Alignment-Territory-Account, in the following way:
For a one-to-one attribute, add a one-to-one join to the table where the condition attribute is stored.
For a many-to-many attribute, add a one-to-many join to the table where the condition attribute is stored.
Create a business component field referring to this new join and to the column where the condition attribute's data is stored.
Similarly, if the condition attribute is based on contact, then modify the TOS*Contact business component, except for TOS Contact, TOS Target Territory-Contact, and TOS Target Alignment-Territory-Contact, in the following way:
For a one-to-one attribute, add a one-to-one join to the table where the condition attribute is stored.
For a many-to-many attribute, add a one-to-many join to the table where the condition attribute is stored.
Create a business component field referring to this new join and to the column where the condition attribute's data is stored.
Similarly, if the condition attribute is based on opportunity, then modify the TOS*Opportunity business component, except for TOS Opportunity, TOS Target Territory-Opportunity, and TOS Target Alignment-Territory-Opportunity, in the following way:
For a one-to-one attribute, add a one-to-one join to the table where the condition attribute is stored.
For a many-to-many attribute, add a one-to-many join to the table where the condition attribute is stored.
Create a business component field referring to this new join and to the column where the condition attribute's data is stored.
In the Alignment Condition business component, add a user property of type Alignment Condition Attribute, as illustrated in Example of Making Attributes Available for Global Conditions.
In the Siebel Business application, in the Administration - Data screen, List of Values view, add a new value to the attribute list of values.
Example of Making Attributes Available for Global Conditions
The following procedure uses Industry as an example of an attribute, to show how to configure Siebel Territory Management to make attributes available for global conditions. The actual values you must use depend on the actual attribute and the data model you are working with.
For more information, see Configuring Additional Attributes for Territory Conditions.
To make additional attributes available for global conditions
In Siebel Web Tools, in the Alignment Condition business component, create a new user property and complete the fields as follows:
Property Value Example Name
Alignment Condition Attribute n
Alignment Condition Attribute 4
Value
"Parent LIC", "LOV LIC", "criteria name", "business object name, business component name, component field name"
"TM ACCOUNT", "INDUSTRY NAME", "Industry", "Account,Account,Industry"
Add a field record for the new attribute to the TOS business components related to the assignment object.
In this Industry example, to add the Industry field you must create two new joins, as shown in the following table.
Property Join 1 Join 2 Alias
S_ORG_INDUST
S_INDUST
Table
S_ORG_INDUST
S_INDUST
Outer
Y
Y
Destination Column (Join Specification)
OU_ID
ROW_ID
Source Field (Join Specification)
Id
Industry Id
You must also add both the Industry Id and Industry to the TOS*Account business components, as shown in the following table.
Property Field 1 Field 2 Name
Industry Id
Industry
Join
S_ORG_INDUST
S_INDUST
Column
INDUST_ID
NAME
Type
DTYPE_TEXT
DTYPE_TEXT
Force Active
Y
Y
The TOS*Account business components are:
TOS Account
TOS Target Alignment-Position-Territory-Account
TOS Target Alignment-Position-Territory-Country-Account
TOS Target Alignment-Position-Territory-Geo Zone-Account
TOS Target Alignment-Position-Territory-Industry-Account
TOS Target Alignment-Position-Territory-Postal Code-Account
TOS Target Alignment-Position-Territory-Product-Account
TOS Target Alignment-Position-Territory-State-Account
TOS Target Alignment-Territory-Account
TOS Target Alignment-Territory-Country-Account
TOS Target Alignment-Territory-Geo Zone-Account
TOS Target Territory-Industry-Account
TOS Target Territory-Postal Code-Account
TOS Target Territory-Product-Account
TOS Target Territory-State-Account
Note: You can display a complete list of the TOS*Account business components to add by querying in the Siebel Web Tools Business Components view for the string TOS*Account.
In your Siebel Business application, in Administration - Data screen, List of Values view, add a new value to the Attribute LOV and complete the fields as follows:
Field Value Example Type
TM_ASGN_ATTRIBUTE
TM_ASGN_ATTRIBUTE
Display Value
Text string
Industry Name
Language Independent Code
Text string
INDUSTRY NAME
Parent LIC
TM Object Name
TM ACCOUNT
For general information about adding a new value to an existing list of variables, see Siebel Applications Administration Guide.
Troubleshooting Territory Alignments
This topic provides guidelines for resolving territory alignment problems.
To resolve the problem, look for it in the list of Symptoms or Error messages in the following table.
| Symptom or Error Message | Diagnostic Steps or Cause | Solution |
|---|---|---|
Another alignment for hierarchy "H3" is running or activated. Please try again later. (SBL-SVC-00300) |
This error probably occurs because someone ran an alignment previously and it failed. |
See Resolving the Error: Another Alignment Is Running or Activated. |
No records exist for Request Id XXX.(SBL-ASG-50404) |
This error probably occurs because dates in other fields are later than the activation date of the alignment. |
Resolving the Error: Another Alignment Is Running or Activated
This task is part of Troubleshooting Territory Alignments.
This topic describes how to resolve the following error message generated by Siebel Territory Management:
Another alignment for hierarchy "H3" is running or activated. Please try again later. (SBL-SVC-00300)
This error is probably generated because someone ran an alignment on this hierarchy previously, and it failed. Siebel Territory Management locked the alignment while running it, and it did not unlock it because the alignment failed. Because it remains locked, you cannot run another alignment on this hierarchy.
If this problem is the cause of the error message, you can resolve it using the following procedure.
To resolve the error "another alignment is running or activated"
Cancel queued workflows:
Navigate to the Administration - Server Management screen, then to the Jobs view.
Check the tasks in the Jobs list to see whether any is a WfprocMgr (workflow process manager) task and has the status Queued.
Select and cancel these queued tasks.
Restart the Workflow Process Manager server component to remove these queued tasks from the list.
Remove failed alignments:
Navigate to the Territories Management screen, Alignments Administration view.
Select alignments in the list that have statuses indicating they have failed, and click Delete.
Resolving the Error: No Records Exist
This task is part of Troubleshooting Territory Alignments.
This topic describes how to resolve the following error message generated by Siebel Territory Management:
No records exist for Request Id XXX. (SBL-ASG-50404)
This error probably occurs because dates in the following fields are later than the activation date of the alignment:
Effective Start Date in the Postal Code view for the territory (if you use this view)
Effective Start Date in the Positions view for the territory
Effective Start Date in the Associate Territory to Hierarchy view for the territory
The value in the Activation Date field of the alignment in the Alignment view must be later than the value in these three fields.
To resolve the error "No records exist"
Navigate to the Postal Code view for the territory if you used it.
If the Effective Start Date for any postal code in the list is later than the activation date of the alignment, change it.
Navigate to the Positions view for the territory.
If the Effective Start Date for any position in the list is later than the activation date of the alignment, change it.
Navigate to the Associate Territory to Hierarchy view for the territory.
If the Effective Start Date for any territory in the list is later than the activation date of the alignment, change it.