
This section describes about OFS ALM Application pack upgrade.
Topics:
· Upgrade OFS ALM Application pack from Previous version to v8.0.6.1.0 or v8.0.7.2.0
· Upgrade OFS ALM Application pack from v8.0.6.1.0 or v8.0.7.2.0 to OFS ALM v8.1.0.0.0
· Install OFS ALMBI Application v8.1.0.0.0 on an Existing OFS ALM Application Pack v8.1.0.0.0 Set up
NOTE |
To support the existing custom ALM Batches or Tasks created prior ALM v8.1.0.0.0 upgrade, you must change the Application ID from ALM to OFS_ALM under the Optional Parameters in the Task Definition of the Batch Maintenance window for each affected task. |
The possible upgrade scenarios and a high-level sequence of steps to complete the upgrade are summarized in this section.
ATTENTION |
Always ensure you run the upgrade installer only on the cloned environment. |
Table 21: Upgrade Scenarios
Upgrade from OFS ALM Release v8.0.x on AIX or Solaris x86 Operating System |
Release v8.1.0.0.0 of OFS ALM is not certified for AIX and Solaris x86 Operating Systems. If you are currently running OFSAA v8.0.x on AIX or Solaris x86 Operating Systems and plan to upgrade to Release v8.1.0.0.0, then you must migrate from AIX or Solaris x86 to Linux or Solaris SPARC. See the 2700084.1 for details. |
Upgrade OFS ALM Application pack from Previous version to v8.0.6.1.0 or v8.0.7.2.0 In this scenario, you are upgrading the application pack from earlier release to Release 8.1.0.0.0. Example: You are on release 8.0.2.0.0 and now want to upgrade to Release 8.1.0.0.0. |
1. Upgrade your current OFS ALM version to the OFS ALM v8.0.6.1.0 or 8.0.7.2.0 version. 2. Clone your existing environment to the v8.1.0.0.0 Tech Matrix. 3. Upgrade from OFS ALM v8.0.6.1.0 or 8.0.7.2.0 version to OFS ALM v8.1.0.0.0. 4. Run the Environment Check Utility tool and ensure that the hardware and software requirements are installed as per the Tech Matrix. 5. Update the OFS_ALM_PACK.xml file to enable ONLY the existing installed applications. 6. Update the Silent.props file present in the OFS ALM v8.1.0.0.0 installer pack. 7. Trigger the Release 8.1.0.0.0 installation. |
Upgrade ALM Application Pack from v8.0.6.1.0 or v8.0.7.2.0 to ALM Application Pack v8.1.0.0.0 Example: You are using an application pack in release 8.0.7.2.0 and now want to upgrade it to Release 8.1.0.0.0. |
1. Run the Environment Check Utility tool and ensure that the hardware and software requirements are installed as per the Tech Matrix. 2. Clone your existing environment to the v8.1.0.0.0 Tech Matrix. 3. Run the Environment Check Utility tool and ensure that the hardware and software requirements are installed as per the Tech Matrix. 4. Update the OFS_ALM_PACK.xml file to enable ONLY the existing installed applications. 5. Update the Silent.props file present in the OFS ALM v8.1.0.0.0 installer pack. 6. Trigger the Release 8.1.0.0.0 installation. |
Install OFS ALM BI Application v8.1.0.0.0 on an Existing OFS ALM Application Pack v8.1.0.0.0 Set up You have installed some applications from the Release 8.1.0.0.0 pack; in the future, you decide to include other applications from the same pack. Example: You have installed ALM application using the ALM Pack installer 8.1.x. Later, you decide to license ALMBI application, and want to install them using the same ALM Pack installer 8.1.x. |
If the Schema Creator output file (OFS_ALM_SCHEMA_OUTPUT.xml) was generated: 1. Update the OFS_ALM_PACK.xml file to disable the existing applications and enable the newly licensed OFS ALMBI application. 2. Update the Silent.props file present in the Release 8.1.x pack ONLY for the newly licensed OFS ALMBI application. 3. Trigger the Release 8.1.0.0.0 installation. If the Schema Creator output file was NOT generated: 4. Run the Schema Creator utility. NOTE: While defining the Schema details for the applications, provide the same Schema details exactly as given in the previous installation. After executing the OFS_ALM_SCHEMA_IN.xml file, the output file OFS_ALM_SCHEMA_OUTPUT.xml is generated. 5. Update the OFS_ALM_PACK.xml file to disable the existing applications and enable the newly licensed OFS ALMBI application. 6. Update the Silent.props file present in the Release 8.1.x pack ONLY for the newly licensed OFS ALMBI application. 7. Trigger the Release 8.1.0.0.0 installation. NOTE: Configuring the OFSAAI_InstallConfig.xml file is not required. |
|
You have one application from a pack on 8.0.6.1.0 or 8.0.7.2.0. You want new application from the same pack on 8.1.0.0.0. Example: You have installed OFS ALM application from Release 8.0.6.1.0 or 8.0.7.2.0. Now you want to install OFS ALMBI of Release 8.1.0.0.0. |
If the Schema Creator output file (OFS_ALM_SCHEMA_OUTPUT.xml) was generated: 1. Run the Environment Check Utility tool and ensure that the hardware and software requirements are installed as per the Tech Matrix. 2. Clone your existing environment to the 8.1.0.0.0 Tech Matrix. 3. Update the OFS_ALM_PACK.xml file to disable the existing applications and enable the newly licensed OFS ALMBI application. 4. Update the Silent.props file present in the Release 8.1.x pack ONLY for the newly licensed OFS ALMBI application. 5. Trigger the Release 8.1.0.0.0 installation. If the Schema Creator output file was NOT generated: 6. Run the Schema Creator utility. NOTE: While defining the Schema details for the newly licensed applications, provide the same Schema details exactly as given in the previous installation. After executing the Schema Creator utility, the output file OFS_ALM_SCHEMA_OUTPUT.xml is generated. 7. Update OFS_ALM_PACK.xml file to enable ONLY the newly licensed OFS ALMBI application. 8. Update the Silent.props file for the sections related to the newly licensed OFS ALMBI application. 9. Trigger the installer. NOTE: Configuring the OFSAAI_InstallConfig.xml file is not required. This process upgrades the existing applications and installs the newly licensed applications. |
Before you plan to install or upgrade any of your application packs to Release 8.1.0.0.0, ensure that all the application packs in your current OFSAA instance are available in the Release 8.1.0.0.0 version. Contact My Oracle Support for more information about the release version details.
1. Backup the following environment file from the OFS_ALM_PACK/conf/ directory the directory:
§ OFS_ALM_PACK.xml
2. Backup the following environment files from the OFS_ALM_PACK/Schema_Creator/conf/ directory:
§ DBMASTER_SC.xml
§ OFS_ALM_SCHEMA_IN.xml
3. Backup the following environment file from the OFS_ALM_PACK/OFS_AAI/conf/ directory:
§ OFSAAI_InstallConfig.xml
4. Ensure that the following property files are present in the OFS_ALM_PACK/appsLibConfig/conf/ directory and make a backup:
§ Silent_upgrade_to_81.template
5. See the Tech Matrix for the hardware and software required to upgrade to the OFS ALM Application Pack Release 8.1.0.0.0.
6. Enable unlimited cryptographic policy for Java. For more information, see the Enabling Unlimited Cryptographic Policy section in the OFS Analytical Applications Infrastructure Administration Guide.
7. Clone your environment. For more information, see the OFSAA Cloning Reference Guide.
8. See the Compatibility Matrix before upgrading to the OFS ALM Application Pack.
To download the OFS ALM Application Pack Installer Release v8.1.0.0.0, follow these steps:
9. Log in to the Oracle Software Delivery Cloud (OSDC) with a valid Oracle account.
Figure 1: Oracle Software Delivery Cloud Page
Description of Oracle Software Delivery Cloud Page as follows
10. Search for the full product name Oracle Financial Services Asset Liability Management Application Pack and download the installer archive.
Figure 2: Oracle Software Delivery Cloud Search Page

Description of Oracle Software Delivery Cloud Search Page as follows
11. Copy the installer archive into the download directory (in Binary mode) in the setup identified for the OFS ALM Application Pack installation.
12. Download the following mandatory one-off patches from My Oracle Support into the download directory that exists in the OFSAAAI installation setup:
Patch ID |
Description |
31605076 |
Access to features owing to the additional license functionality that gets installed through the OFS AAI Extension Pack. |
31545589 |
For pack-on-pack installation on new atomic schema. |
NOTE |
Select the required archive files for either Solaris SPARC or Linux based on the operating system of your OFSAAAI. |
13. Log in to My Oracle Support, search for the 33663417 Mandatory Patch in the Patches & Updates Tab and download it.
ATTENTION |
On the 10th of December 2021, Oracle released Security Alert CVE-2021-44228 in response to the disclosure of a new vulnerability affecting Apache Log4J prior to version 2.15. The application of the 33663417 Mandatory Patch fixes the issue. For details, see the My Oracle Support Doc ID 2827801.1. Ensure that you reapply the 33663417 Mandatory Patch whenever you install or upgrade the application, or apply an incremental patch. |
NOTE |
You can download the OFS ALM ERWIN data model patch from the bug number 31483382. You can download the OFS ALMBI ERWIN data model patch from the bug number 31483401. Data model patches are now released at granularity of each application. This is in contrast to the strategy followed for OFS ALM v8.0.x.0.0, where the DM patches were only released at the pack level. · Installer will only upload the data model of the selected applications. Data models of the unselected or unlicensed applications will not be uploaded, that is, data model upload is skipped for the unselected or unlicensed applications. · Installer will only execute the installer scripts of the selected applications. Scripts of the unselected or unlicensed applications will not be executed and are skipped. If all applications in the pack are selected, then the installer handles both the data model upload and the installation scripts execution. |
To download and copy the OFS ALM Application Pack v8.1.0.0.0 archive file, see Downloading and Copying the OFS ALM Applications Pack Installer section.
For Solaris OS, download the mandatory one-off patch 31509494 from My Oracle Support.
The archive files are different for every operating system like AIX, Solaris, and RHEL/Oracle Linux.
1. Log in to the OFSAA Server with user credentials that was used to install OFSAA.
2. Shut down all the OFSAAI Services. For more information, see the Starting/Stopping Infrastructure Services section.
3. Execute the following command:
chmod -R 750 $FIC_HOME
4. If you have Unzip utility, skip to the next step. Download the Unzip utility (OS specific) and copy it in Binary mode to the directory that is included in your PATH variable, typically $HOME path or directory in which you have copied the 8.1.0.0.0 installer.
Uncompress the unzip installer file using the command:
uncompress unzip_<os>.Z
NOTE
If you notice an error message “uncompress: not found [No such file or directory]” when the package is not installed, contact your UNIX administrator.
5. Give EXECUTE permission to the file using the command:
chmod 751 OFS_ALM_81000_<OperatingSystem>.zip
6. Extract the contents of the Oracle ALM Application Pack 8.0.7.0.0 installer archive file using the following command:
unzip_<os> <name of the file to be unzipped>
7. Log in to OFSAA Infrastructure Config Schema and execute the following SQL query:
ALTER TABLE CONFIGURATION MODIFY PARAMNAME VARCHAR2 (100 CHAR);
8. For Solaris OS, extract and apply the one-off patch 31509494. See the Readme packaged with the patch for further instructions on how to install the patch.
9. Give EXECUTE permission to the archive file. Navigate to the path OFS_ALM_81000_<OperatingSystem>.zip and execute the command:
chmod -R 750 OFS_ALM_81000_<OperatingSystem>
10. Rename the SILENT.template file in the installer as Silent.props. Configure the Silent.Props file as mentioned in the Configuring the SILENT.props File section.
11. Execute setup.sh file using the following command:
./setup.sh SILENT
12. Verify if the release is applied successfully by checking the log files generated in the installation folder as mentioned below:
OFS_ALM_PACK/OFS_AAAI_PACK/logs/OFSAAIUpdate.log for Infrastructure installation log file.
OFS_ALM_PACK/OFS_ALM /logs/OFS_ALM_installation.log for OFS ALM Application Pack installation log file.
You can ignore following errors:
ORA-00001
ORA-00955
ORA-02260
ORA-01430
Error Message->DMT.DUPLICATE_RECORD_FOUND
Error Message->COMMONOBJECT.SAVE_FAILED
errors in the log file. For any other errors, contact My Oracle Support (MOS).
13. For more information on securing your OFSAA Infrastructure, see the Security Guide in OHC Documentation Library.
14. Add umask 0027 in the .profile of the UNIX account that manages the WEB server to ensure restricted access permissions.
15. Restart all the OFSAAI services. For more information, see the Stop Infrastructure Services and Start Infrastructure Services section for details.
16. Generate the application EAR or WAR file and redeploy the application onto your configured web application server. For more information on generating and deploying EAR or WAR file, see Create and Deploy the EAR/WAR Files.
17. Verify the log files in the locations mentioned in section Verifying the Log Files. You can also verify the OFSAAI log files from OFS_ALM_PACK/OFS_AAAI_PACK/logs directory.
18. Follow the steps mentioned in the Post Installation Steps section.
19. After successful installation, follow these steps:
Log in to the web application server and clear the application cache. Navigate to the following path depending on the configured web application server and delete the files.
Tomcat
<Tomcat installation folder>/work/Catalina/localhost/<Application name>/org/apache/jsp
WebLogic
<WebLogic installation location>/domains/<Domain name>/servers/<Server name>/tmp/_WL_user/<Application name>/<auto generated folder>/jsp_servlet
In case of WebLogic version 12.2.x.x, delete the folder named ".WL_internal" present in the path <WebLogic installation location>/user_projects/domains/< Domain name >/applications/<context_name>.ear/META-INF/", if it exists.
WebSphere
<WebSphere installation directory>/AppServer/profiles/<Profile name>/temp/<Node name>/server1/<Application name>/<.war file name>
20. Update the .profile file to define $OFSAA_LOG_HOME
Example of entry:
OFSAA_LOG_HOME=/u01/app/FTPSHARE//logs
export OFSAA_LOG_HOME
21. Verify FTPSHARE logs directory has 775 permission
chmod -R 775 FTPSHARE
22. If OFS Enterprise Modeling is licensed and enabled in your OFSAA instance, uninstall OFSAAIRunner package and reinstall the latest available OFSAAIRunner package. For more details, see Configuring Oracle R distribution and Oracle R Enterprise (ORE).
23. For enabling TDE, see the Configuring TDE in case of Upgrade section in Configuring TDE, Data Redaction and the Corresponding Settings in the Oracle Financial Services Data Foundation Application Pack Data Protection Implementation Guide.
You are upgrading OFS ALM application pack from previous version to Release 8.0.6.1.0 or 8.0.7.2.0:
1. Upgrade to v8.0.6.1.0 or v8.0.7.2.0. For more information, see the installation guides at https://docs.oracle.com/cd/E88917_01/alminstall.htm.
2. Upgrade from v8.0.6.1.0 or v8.0.7.2.0 to v8.1.0.0.0. For more information, see Upgrade from OFS ALM Application pack v8.0.6.1.0 or later versions to OFS ALM v8.1.0.0.0.
NOTE |
The minimum supported version is v8.0.6.1.0 |
Release v8.1.0.0.0 of OFS ALM is not certified for AIX and Solaris x86 Operating Systems. If you are currently running OFSAA v8.0.x on AIX or Solaris x86 Operating Systems and plan to upgrade to Release v8.1.0.0.0, then you must migrate from AIX or Solaris x86 to Linux or Solaris SPARC. See the 2700084.1 for details.
You are upgrading the OFS ALM Application Pack from Release v8.0.6.1.0 or v8.0.7.2.0 to Release 8.1.0.0.0.
Example: You are using release v8.0.7.2.0 and now want to upgrade to Release 8.1.0.0.0.
NOTE |
If upgrading from a release before v8.0.6.1.0, then first upgrade to v8.0.6.1.0 or v8.0.7.2.0. To upgrade to v8.0.7.2.0, see the installation guides at https://docs.oracle.com/cd/E88917_01/alminstall.htm. |
Clone your existing environment to the 8.1.0.0.0 Tech Matrix. For more information, see the OFSAA Cloning Reference Guide:
· OFSAA Cloning Reference Guide for Release 8.0.x
· OFSAA Cloning Reference Guide for Release 8.1.x
Update theSilent.props file present in the Release 8.1.0.0.0 pack.
Most parameters in the Silent.props file for v8.1.0.0.0 have default values. Before triggering the installation, ensure that you review them thoroughly and update as required.
1. Navigate to the OFS_ALM_PACK/appsLibConfig/conf directory.
2. Open the Silent.props file and edit only the following parameters.
Table 22: Parameters for the Silent.props File (Silent.template)
Property Name |
Description of Property |
Permissible values |
Comments |
LOG_MODE |
Mode for logging |
1= General 0 = Debug |
Optional; Default: 0 |
SEGMENT_1_CODE |
Segment Code |
Not Applicable |
Mandatory NOTE: The Segment Code should be in upper case. In case of upgrade, use the existing Segment Code. |
OFS_ALM SEGMENT_2_CODE |
Segment Code |
Not Applicable |
Not required. Specify as blank or ignore it. |
OFS_ALMBI SEGMENT_2_CODE |
Segment Code |
Not Applicable |
Not required. Specify as blank or ignore it. |
APPFTP_LOG_PATH |
Infodom Maintenance log path (to be created) for the new Infodom for applayer |
Not Applicable |
# Mandatory if this an App Layer Installation and if you want to create a new infodom. # That is, you have specified INSTALL_APP=1 and INFODOM_TYPE=0 |
DBFTP_LOG_PATH |
Infodom Maintenance log path (to be created) for the new Infodom for DBLayer |
Not Applicable |
# Mandatory if this an App Layer Installation and if you want to create a new infodom. # That is, you have specified INSTALL_APP=1 and INFODOM_TYPE=0 |
OBI_HOST |
The hostname or IP Address of the OBIEE server. |
For example: 10.11.12.13 Or myweb.server.com |
Mandatory If you are installing ALMBI. Else, enter some dummy value. |
OBI_PORT |
The port number of the OBIEE server. |
For example: 9500 |
Mandatory If you are installing ALMBI. Else, enter some dummy value. |
OBI_CONTEXT |
Context Name of the OBIEE Server |
For example: Analytics |
Mandatory If you are installing ALMBI. Else, enter some dummy value. |
OBI_PROTOCOL |
HTTP details of the OBIEE Server |
http or https |
Mandatory If you are installing ALMBI. Else, enter some dummy value. |
UPLOAD_MODEL |
If you want to perform Model Upload |
0 = No 1 = yes |
|
MODEL_TYPE |
Released data model or Customized data model |
0 = released 1 = customized |
|
DATAMODEL |
Path for the customized data model |
Not Applicable |
# Mandatory only if you want to upload the customized data model. # That is, you have specified MODEL_TYPE=1 |
DM_DIRECTORY |
File name for the customized data model |
Not Applicable |
# Mandatory only if you want to upload the customized data model. # That is, you have specified MODEL_TYPE=1 |
ETL_APPSRC_TYPE |
Create new ETL App or Src pair or use an existing one |
0 = New 1 = Existing |
# Mandatory if this an App Layer installation. # That is, you have specified INSTALL_APP=1 # 0 = If you want to create a new ETL app or src pair # 1 = If you want to use an existing pair |
ETL_APP_1_DESC |
Description for the ETL App |
Not Applicable |
# Mandatory if you want to create new ETL app or src pair. #That is, you have specified ETL_APPSRC_TYPE=0 |
ETL_SRC_1_1_DESC |
Description for the ETL Staging source description |
Not Applicable |
# Mandatory if you want to create new ETL app or src pair. #That is, you have specified ETL_APPSRC_TYPE=0 |
ETL_SRC_1_2_DESC |
Description for the ETL Processing source description |
Not Applicable |
# Mandatory if you want to create new ETL app or src pair. #That is, you have specified ETL_APPSRC_TYPE=0 |
ETL_APP_1_NAME |
ETL application name |
Not Applicable |
This is for App Layer installation. |
ETL_SRC_1_1_NAME |
ETL Staging source name |
Not Applicable |
This Source must be mapped to the above ETL Application. |
ETL_SRC_1_2_NAME |
ETL Processing source name |
Not Applicable |
This Source must be mapped to the above ETL Application. |
Update the OFS_ALM_PACK.xml File. Enable only the existing installed applications.
The OFS_ALM_PACK.xml file contains details of the various products that are packaged in the OFS ALM Application Pack.
This section details the various tags or parameters available in the file and the values that must be updated. Prior to installing the OFS ALM in SILENT mode, it is mandatory to update this file.
To configure the OFS_ALM_PACK.xml file, follow these steps:
1. Navigate to the OFS_ALM_PACK/conf directory.
2. Open the OFS_ALM_PACK.xml file in a text editor.
3. Configure the OFS_ALM_PACK.xml file as mentioned in the following table.
Figure 30: Sample OFS_ALM_PACK.xml File

Table 23: OFS_ALM_PACK.xml File Parameters
Tag Name or Attribute Name |
Description |
Mandatory (Y or N) |
Comments |
APP_ID
|
ENABLE |
YES for existing applications that you want to upgrade. For example, OFS_ALM and OFS_ALMBI in the preceding illustration.
|
Set this attribute-value to YES for every APP_ID which you want to install or upgrade. |
To trigger the installtion, follow these steps:
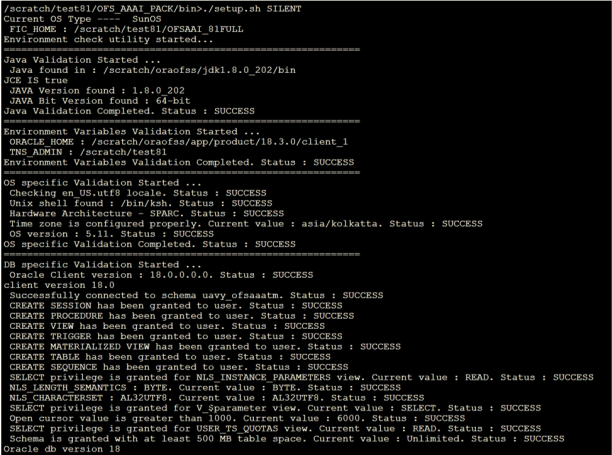
1. Enter the following command in the console to execute the application pack installer with the Silent option.
./setup.sh SILENT
2. The installer proceeds with the Pre-installation Checks.
Figure 31: Silent Mode of Installation

3. Enter the OFSAA Processing Tier FTP/SFTP password value and proceed, when prompted in the command prompt.
4. The process displays the OFSAA License. Enter Y and proceed.
Figure 32: Accept the OFSAA License Agreement

5. The OFS ALM installation begins.
Figure 33: OFS ALM Silent Mode Installation

Data Model Upload may take several hours to complete. You can check the installation logs in the following location: OFS_AAAI/OFS_AAAI/logs
6. The OFSAA Infrastructure installation performs a post-install check automatically on the successful installation of the product.
Congratulations! Your installation is complete.
See the following logs files for more information:
· The Pack_Install.log file in the OFS_ALM_PACK/logs/ directory for OFS ALM Application Pack installation logs.
· The Log file (or files) in the OFS_ALM_PACK/OFS_AAI/logs/ directory for Infrastructure installation logs.
· The OFSAAInfrastucture_Install.log file in the $FIC_HOME directory for Infrastructure installation logs.
NOTE |
After upgrading any OFSAA Application or OFSAA Application Pack to the 8.1.0.0.0 version, if the "invalid identifier" error occurs with the error code "ORA-00904" for the update-description-msg-oth.sql seeded script file, ignore the error. |
Follow the steps mentioned in the Post Installation Steps section.
You have installed some applications from the Release 8.1.0.0.0 pack; in the future, you decide to install other applications from the same pack.
For example: You have installed ALM application using the ALM Pack installer 8.1.x. Later, you decide to license ALMBI application, and want to install them using the same ALM Pack installer 8.1.x.
NOTE |
You must check the Compatibility Matrix to see if the new application to be installed is compatible with the installed applications. |
Update the OFS_ALM_PACK.xml file to disable the existing applications and enable the newly licensed applications.
The OFS_ALM_PACK.xml file contains details of the various products that are packaged in the OFS ALM Application Pack.
This section provides information about the various tags or parameters available in the file and the values that must be updated. Prior to installing the OFS ALM Pack in SILENT mode, it is mandatory to update this file.
To configure the OFS_ALM_PACK.xml file, follow these steps:
1. Navigate to the OFS_ALM_PACK/conf directory.
2. Open the OFS_ALM_PACK.xml file in a text editor.
3. Configure the OFS_ALM_PACK.xml file as mentioned in the following table.
Figure 34: Sample OFS_ALM_PACK.xml File
Table 24: OFS_ALM_PACK.xml File Parameters
Tag Name |
Attribute Name |
Value you must enter |
Comments |
APP_ID
|
ENABLE |
· YES for applications you want to install. · NO for applications which are already installed. |
Set this attribute-value to YES for every APP_ID which you want to install or upgrade. |
Most parameters in the Silent.props file for v8.1.0.0.0 have default values. Before triggering the installation, ensure that you review them thoroughly and update as required.
Update the Silent.props file in the Release 8.1.x pack ONLY for the newly licensed applications:
1. Navigate to the OFS_ALM_PACK/appsLibConfig/conf directory.
2. Open the Silent.props file and edit only the following parameters.
Table 25: Parameters for the Silent.props File (Silent.template)
Property Name |
Description of Property |
Permissible values |
Comments |
LOG_MODE |
Mode for logging |
1= General 0 = Debug |
Optional; Default: 0 |
SEGMENT_1_CODE |
Segment Code |
Not Applicable |
Mandatory NOTE: The Segment Code should be in upper case. In case of upgrade, use the existing Segment Code. |
OFS_ALM SEGMENT_2_CODE |
Segment Code |
Not Applicable |
Not required. Specify as blank or ignore it. |
OFS_ALMBI SEGMENT_2_CODE |
Segment Code |
Not Applicable |
Not required. Specify as blank or ignore it. |
APPFTP_LOG_PATH |
Infodom Maintenance log path (to be created) for the new Infodom for applayer |
Not Applicable |
# Mandatory if this an App Layer Installation and if you want to create a new infodom. # That is, you have specified INSTALL_APP=1 and INFODOM_TYPE=0 |
DBFTP_LOG_PATH |
Infodom Maintenance log path (to be created) for the new Infodom for DBLayer |
Not Applicable |
# Mandatory if this an App Layer Installation and if you want to create a new infodom. # That is, you have specified INSTALL_APP=1 and INFODOM_TYPE=0 |
OBI_HOST |
Host Name of the OBIEE Server |
Not Applicable |
|
OBI_PORT |
Port Number of the OBIEE Server |
Not Applicable |
|
OBI_CONTEXT |
Context Name of the OBIEE Server |
Not Applicable |
|
OBI_PROTOCOL |
HTTP details of the OBIEE Server |
URL |
|
UPLOAD_MODEL |
If you want to perform Model Upload |
0 = No 1 = yes |
|
MODEL_TYPE |
Released data model or Customized data model |
0 = released 1 = customized |
|
DATAMODEL |
Path for the customized data model |
Not Applicable |
# Mandatory only if you want to upload the customized data model. # That is, you have specified MODEL_TYPE=1 |
DM_DIRECTORY |
File name for the customized data model |
Not Applicable |
# Mandatory only if you want to upload the customized data model. # That is, you have specified MODEL_TYPE=1 |
ETL_APPSRC_TYPE |
Create new ETL App or Src pair or use an existing one |
0 = New 1 = Existing |
# Mandatory if this an App Layer installation. # That is, you have specified INSTALL_APP=1 # 0 = If you want to create a new ETL app or src pair # 1 = If you want to use an existing pair |
ETL_APP_1_DESC |
Description for the ETL App |
Not Applicable |
# Mandatory if you want to create new ETL app or src pair. #That is, you have specified ETL_APPSRC_TYPE=0 |
ETL_SRC_1_1_DESC |
Description for the ETL Staging source description |
Not Applicable |
# Mandatory if you want to create new ETL app or src pair. #That is, you have specified ETL_APPSRC_TYPE=0 |
ETL_SRC_1_2_DESC |
Description for the ETL Processing source description |
Not Applicable |
# Mandatory if you want to create new ETL app or src pair. #That is, you have specified ETL_APPSRC_TYPE=0 |
ETL_APP_1_NAME |
ETL application name |
Not Applicable |
This is for App Layer installation. |
ETL_SRC_1_1_NAME |
ETL Staging source name |
Not Applicable |
This Source must be mapped to the above ETL Application. |
ETL_SRC_1_2_NAME |
ETL Processing source name |
Not Applicable |
This Source must be mapped to the above ETL Application. |
To trigger the installation, follow these steps:
3. Enter the following command in the console to execute the application pack installer with Silent option.
./setup.sh SILENT
4. The installer proceeds with Pre-installation Checks.
Figure 35: Silent Mode Installation
5. Enter the OFSAA Processing Tier FTP/SFTP password value and proceed, when prompted.
Figure 36: OFSAA Processing Tier FTP/SFTP Password

6. The process displays the OFSAA License. Enter Y and proceed.
Figure 37: OFSAA License

7. The OFS ALM Pack installation begins.
Figure 38: OFS ALM Pack Silent Mode Installation

Data Model Upload may take several hours to complete.
8. Do not close the console until the installation is complete.
Figure 39: Silent Mode Installation in Progress

Figure 40: Silent Mode Installation Complete
 The
following message is displayed in the console:
The
following message is displayed in the console:
Congratulations! Your installation is complete.
See the following logs files for more information:
· The Pack_Install.log file in theOFS_ALM_PACK/logs/ directory for OFS ALM Application Pack installation logs.
· The Log file (or files) in the OFS_ALM_PACK/OFS_AAI/logs/ directory for Infrastructure installation logs.
· The OFSAAInfrastucture_Install.log file in the $FIC_HOME directory for Infrastructure installation logs.
NOTE |
After upgrading any OFSAA Application or OFSAA Application Pack to the 8.1.0.0.0 version, if the "invalid identifier" error occurs with the error code "ORA-00904" for the update-description-msg-oth.sql seeded script file, ignore the error. |
When executing the Schema Creator utility during the installation of a subsequent Applications Pack, you can choose to install the pack either on the same Information Domain or Atomic Schema of the existing application pack or on a new Information Domain or Atomic Schema. You can execute the Schema Creator utility either in Online or Offline mode.
1. Execute the Schema Creator utility, by following these steps:
NOTE |
While defining the Schema details for the applications, provide exactly the same Schema details given in the previous installation. The output file (OFS_ALM_SCHEMA_OUTPUT.xml) is generated as a result of the Schema creation process. |
a. Edit the file OFS_ALM_PACK/Schema_Creator/conf/OFS_ALM_SCHEMA_IN.xml in a text editor. See Configure the OFS_ALM_PACK.xml File for values to modify in the XML file.
b. Execute the utility with -s option.
For example: ./osc.sh -s
2. Follow the steps given in the If the Schema Creator output file (OFS_ALM_SCHEMA_OUTPUT .xml) was generated section.
Follow the steps mentioned in the Post-installation Steps section.
Upgrade existing v8.0.6.1.0 or v8.0.7.2.0 applications to v8.1.0.0.0, and then install additional applications from the same pack
Example: You have installed ALM application from release v8.0.6.1.0 or v8.0.7.2.0. Now you want to install ALMBI of Release 8.1.0.0.0.
Clone your existing environment to the v8.1.0.0.0 Tech Matrix. For more information, see the OFSAA Cloning Reference Guide.
While defining the Schema details for the newly licensed applications, provide exactly the same Schema details given in the previous installation. After executing OFS_ALM_SCHEMA_IN.xml file is executed, the output file OFS_ALM_SCHEMA_OUTPUT.xml is generated as a result process.
Update the OFS_ALM_PACK.xml file to disable the existing applications and enable the newly licensed applications.
The OFS_ALM_PACK.xml file contains details on the various products that are packaged in the OFS ALM Application Pack.
This section details the various tags or parameters available in the file and the values that must be updated. Prior to installing the OFS ALM Pack in SILENT mode, it is mandatory to update this file.
To configure the OFS_ALM_PACK.xml file, follow these steps:
1. Navigate to the OFS_ALM_PACK/conf directory.
2. Open the OFS_ALM_PACK.xml file in a text editor.
3. Configure the OFS_ALM_PACK.xml file as mentioned in the following table.
Figure 41: Sample OFS_ALM_PACK.xml File
Table 26: OFS_ALM_PACK.xml File Parameters
Tag Name |
Attribute Name |
Value you must enter |
Comments |
APP_ID
|
ENABLE |
· YES for applications you want to install. · NO for applications which are already installed. |
Set this attribute-value to YES for every APP_ID which you want to install or upgrade. NOTE: An application once enabled cannot be disabled. However, an Application not enabled during installation can be enabled later through the Administration UI. |
Most parameters in the Silent.props file for v8.1.0.0.0 have default values. Before triggering the installation, ensure that you review them thoroughly and update as required.
Update the Silent.props file in the Release 8.1.x pack ONLY for the newly licensed applications:
1. Navigate to the OFS_ALM_PACK/appsLibConfig/conf directory.
2. Open the Silent.props file and edit only the following parameters.
Table 27: Parameters for the Silent.props File (Silent.template)
Property Name |
Description of Property |
Permissible values |
Comments |
LOG_MODE |
Mode for logging |
1= General 0 = Debug |
Optional; Default: 0 |
SEGMENT_1_CODE |
Segment Code |
Not Applicable |
Mandatory NOTE: The Segment Code should be in upper case. In case of upgrade, use the existing Segment Code. |
OFS_ALM SEGMENT_2_CODE |
Segment Code |
Not Applicable |
Not required. Specify as blank or ignore it. |
OFS_ALMBI SEGMENT_2_CODE |
Segment Code |
Not Applicable |
Not required. Specify as blank or ignore it. |
APPFTP_LOG_PATH |
Infodom Maintenance log path (to be created) for the new Infodom for applayer |
Not Applicable |
# Mandatory if this an App Layer Installation and if you want to create a new infodom. # That is, you have specified INSTALL_APP=1 and INFODOM_TYPE=0 |
DBFTP_LOG_PATH |
Infodom Maintenance log path (to be created) for the new Infodom for DBLayer |
Not Applicable |
# Mandatory if this an App Layer Installation and if you want to create a new infodom. # That is, you have specified INSTALL_APP=1 and INFODOM_TYPE=0 |
OBI_HOST |
Host Name of the OBIEE Server |
Not Applicable |
|
OBI_PORT |
Port Number of the OBIEE Server |
Not Applicable |
|
OBI_CONTEXT |
Context Name of the OBIEE Server |
Not Applicable |
|
OBI_PROTOCOL |
HTTP details of the OBIEE Server |
URL |
|
UPLOAD_MODEL |
If you want to perform Model Upload |
0 = No 1 = yes |
|
MODEL_TYPE |
Released data model or Customized data model |
0 = released 1 = customized |
|
DATAMODEL |
Path for the customized data model |
Not Applicable |
# Mandatory only if you want to upload the customized data model. # That is, you have specified MODEL_TYPE=1 |
DM_DIRECTORY |
File name for the customized data model |
Not Applicable |
# Mandatory only if you want to upload the customized data model. # That is, you have specified MODEL_TYPE=1 |
ETL_APPSRC_TYPE |
Create new ETL App or Src pair or use an existing one |
0 = New 1 = Existing |
# Mandatory if this an App Layer installation. # That is, you have specified INSTALL_APP=1 # 0 = If you want to create a new ETL app or src pair # 1 = If you want to use an existing pair |
ETL_APP_1_DESC |
Description for the ETL App |
Not Applicable |
# Mandatory if you want to create new ETL app or src pair. #That is, you have specified ETL_APPSRC_TYPE=0 |
ETL_SRC_1_1_DESC |
Description for the ETL Staging source description |
Not Applicable |
# Mandatory if you want to create new ETL app or src pair. #That is, you have specified ETL_APPSRC_TYPE=0 |
ETL_SRC_1_2_DESC |
Description for the ETL Processing source description |
Not Applicable |
# Mandatory if you want to create new ETL app or src pair. #That is, you have specified ETL_APPSRC_TYPE=0 |
ETL_APP_1_NAME |
ETL application name |
Not Applicable |
This is for App Layer installation. |
ETL_SRC_1_1_NAME |
ETL Staging source name |
Not Applicable |
This Source must be mapped to the above ETL Application. |
ETL_SRC_1_2_NAME |
ETL Processing source name |
Not Applicable |
This Source must be mapped to the above ETL Application. |
To trigger the installtion, follow these steps:
NOTE |
Do not update the OFSAAI_InstallConfig.xml file. |
1. Enter the following command in the console to execute the application pack installer with Silent option.
./setup.sh SILENT
2. The installer proceeds with Pre-installation Checks.
Figure 42: Silent Mode Installation

3. Enter the OFSAA Processing Tier FTP/SFTP password value and proceed, when prompted.
Figure 43: OFSAA Processing Tier FTP/SFTP Password
4. The process displays the OFSAA License. Enter Y and proceed.
Figure 44: OFSAA License

5. The OFS ALM pack installation begins.
Figure 45: OFS ALM Pack Silent Mode Installation

Data Model Upload may take several hours to complete.
6. Do not close the console until the installation is complete.
Figure 46: Silent Mode Installation In Progress
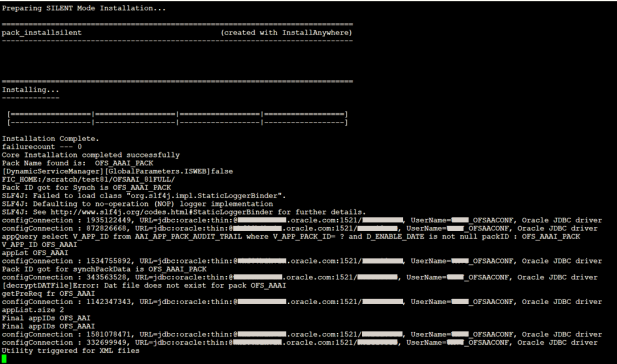
Figure 47: Silent Mode Installation Complete
The
following message is displayed in the console:
Congratulations! Your installation is complete.
See the following logs files for more information:
1. The Pack_Install.log file in the OFS_ALM_PACK/logs/ directory for OFS ALM Application Pack installation logs.
2. The Log file (or files) in the OFS_ALM_PACK/OFS_AAI/logs/ directory for Infrastructure installation logs.
3. The OFSAAInfrastucture_Install.log file in the $FIC_HOME directory for Infrastructure installation logs.
NOTE |
After upgrading any OFSAA Application or OFSAA Application Pack to the 8.1.0.0.0 version, if the "invalid identifier" error occurs with the error code "ORA-00904" for the update-description-msg-oth.sql seeded script file, ignore the error. |
When executing the Schema Creator utility during the installation of a subsequent Applications Pack, you can choose to install the pack either on the same Information Domain or Atomic Schema of the existing application pack or on a new Information Domain or Atomic Schema. You can execute the Schema Creator utility either in Online or Offline mode.
1. Execute the Schema Creator utility, by following these steps:
NOTE |
While defining the Schema details for the applications, provide exactly the same Schema details given in the previous installation. The output file (OFS_ALM_SCHEMA_OUTPUT.xml) is generated as a result of the Schema creation process. |
c. Edit the file OFS_ALM_PACK/Schema_Creator/conf/OFS_ALM_SCHEMA_IN.xml in a text editor. See Configure the OFS_ALM_PACK.xml File for values to modify in the XML file.
d. Execute the utility with -s option.
For example: ./osc.sh -s
2. Follow the steps given in the section If the Schema Creator output file (OFS_ALM_SCHEMA_OUTPUT .xml) was generated.
Follow the steps mentioned in the Post Installation Steps section.