2 System Configuration

This section describes the required configuration required before prior to you start using the Mobile Mustering application. This includes setting up of the Application Server for Mobile applications, Mobile Sync Interface, and Windows 10 Mobile/Tablet.

FC Mobile Database Preparation

Apart from storing the existing Muster Station information such as passengers, crews, and visitors details in the SPMS Database, a separate database is required for Mobile Mustering to store the essential information for its mobile devices, and this database may reside on the same server as SPMS Database.

You must create the FCMobile Schema User must using the below script

CREATE USER fcmobile IDENTIFIED BY <password> 
DEFAULT TABLESPACE USER_TABLES TEMPORARY TABLESPACE USER_TEMP;
GRANT CONNECT TO fcmobile;
GRANT DBA TO fcmobile;

To create the database tables for FCMobile Schema, you must perform a database verification on the MobileSync program. See Configuring Mobile Sync Interface for more details on Interface setup and database synchronization.

Setting Up Mobile Application Server

The installation of Mobile Application Server involves several components, and you can install in the order as described in the following section.

Turning on Microsoft Windows IIS Feature

You must turn on the IIS Feature to allow the Application Server to communicate with the World Wide Web Services.
  1. In Windows Server, access the Control Panel, Programs and Features.
  2. Select Turn Windows features on or off.
  3. At the Internet Information Services, expand the World Wide Web Services container.
  4. Ensure the ASP.NET and CGI check box is checked. If not, check the respective check boxes and click OK.

.NET Framework

The OHCruiseWeb Service requires a version of .NET Framework 4.0 installed. Verify the version installed on your Application Server by navigating to Control Panel, Programs and Features, Add Remove Software section. If you do not have a .NET Framework 4.0 installed, download a copy of the installation file from Microsoft website and manually run the offline Microsoft .NET Framework 4.0 Installer.

Oracle ODAC and Instant Client

You must have both the Oracle ODAC and Instant Client installed on the Application Server. Refer to Oracle Technology Network (OTN) website at http://www.oracle.com/technetwork/topics/dotnet/downloads/install112030-1440546.html and download the version listed in the Prerequisites. You do not have to uninstall the ODAC that you previously installed.

Adding Roles to Microsoft Windows Server 2012 R2

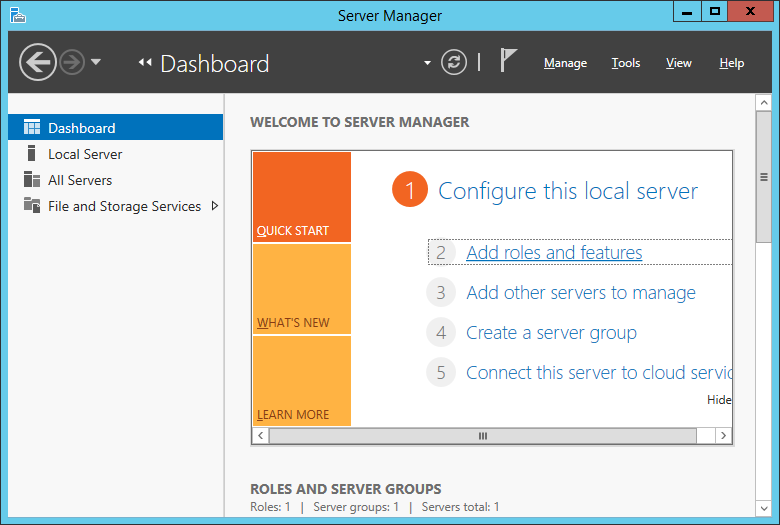
  1. At the Server Manager Dashboard, click Roles and select Add Roles.

    Figure 2-1 Mobile Server Dashboard


    This figure shows the Server Manager Dashboard where you can configure the server roles and features, other servers to manage or create a server group.
  2. At the Before You Begin page, check that the criteria listed on the page are met.
  3. Navigate to the Installation Type page and select the Role-based or feature-based installation.
  4. At the Server Selection section, select the server from the server pool option.
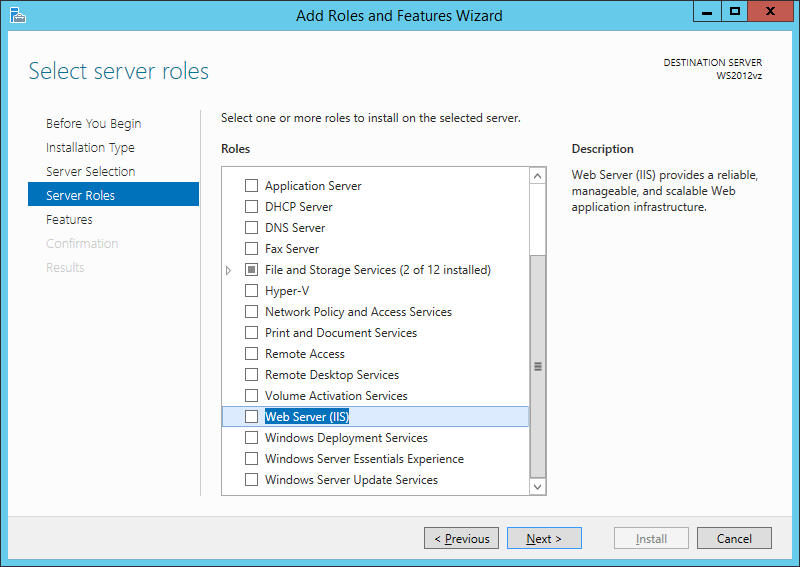
  5. At the Select Server Roles section, check the File Services and Web Server (IIS) component check box.

    Figure 2-2 Server Roles For Web Server (IIS)


    This figure shows the available Server Roles in Add Roles and Features Wizard.
  6. At the Features section, select the .NET Framework 4.0.
  7. At the Web Server Role window, select Management Tools, Common Http Features, Application Development, IIS 6.0 Management Tools, click Next, and follow the steps of the Installation Wizard.
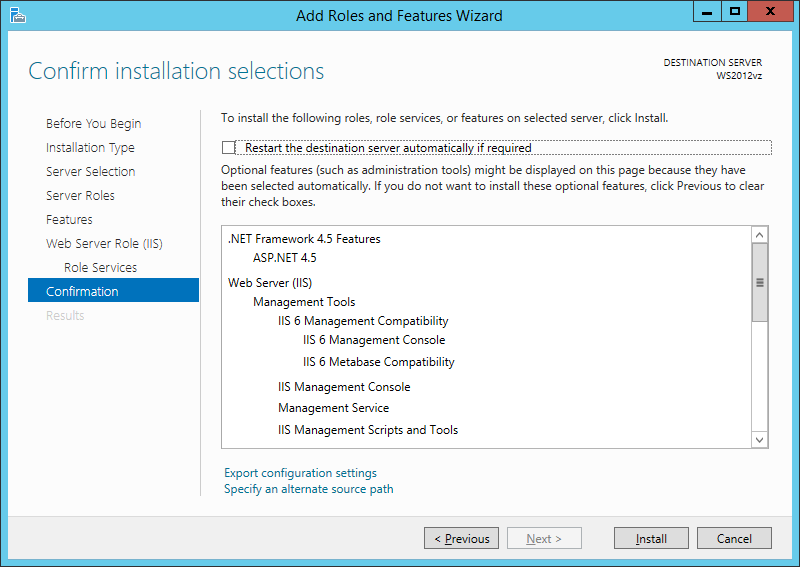
  8. At the Confirmation Window, select the Restart the destination server automatically if required and then click the Install button.

    Figure 2-3 Roles And Features Confirmation


    This figure shows the wizard confirmation pages of the selected roles and features
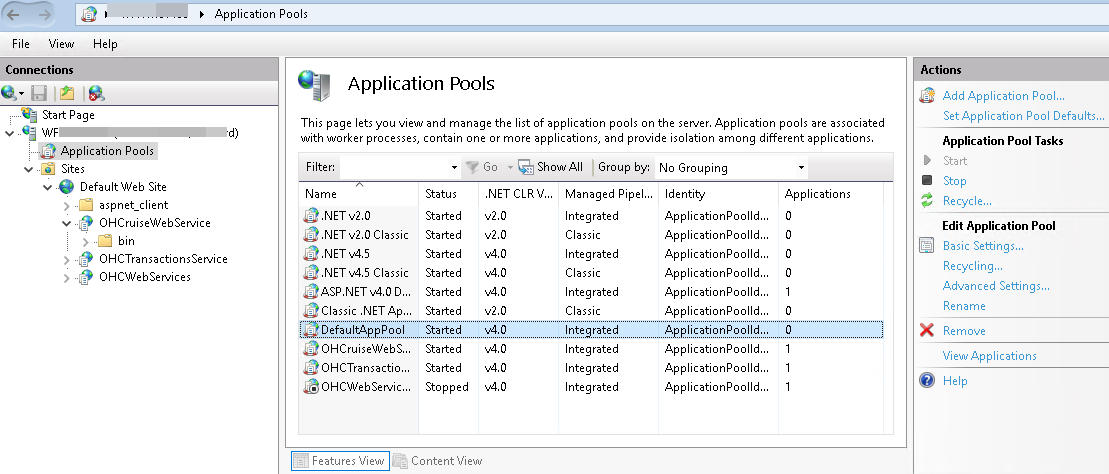
  9. From the Server Manager container, select Internet Information Services (IIS) Manager, then Application Pools, DefaultAppPool.
  10. Select Edit Application Pool, Advance Settings from the Action Panel and change the .NET CLR version to v4.0.

    Figure 2-4 IIS Manager Application Pools


    This figure shows the IIS Manager Application Pools screen.

Verifying the SSL Connection

Run below steps to ensure the SSL connection is properly setup.
  1. From the Application Server, navigate to the Server Manager window and select IIS Manager, Default Web Site.
  2. At the Actions pane on the left, under Edit Site and select Bindings.
  3. At the Site Bindings window, select Add.
  4. Enter the Port Number ‘80’ in at the Add Site Binding.
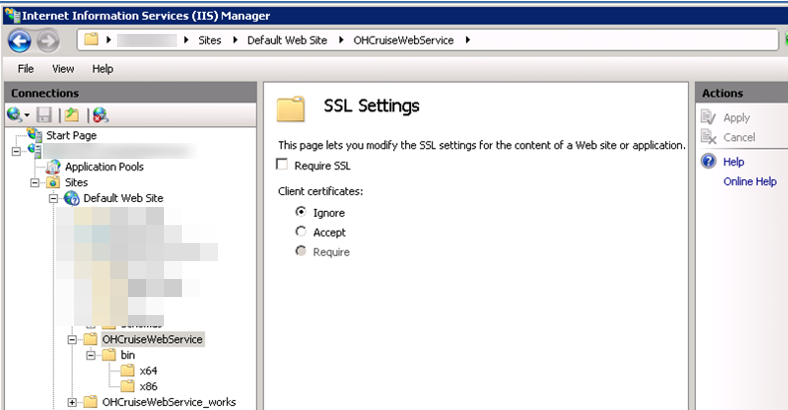
  5. Select OHCruiseService and then the Required SSL in SSL Settings.

    Figure 2-5 SSL Settings


    This figure shows the SSL Settings Configuration window for OHCruiseWebService.
  6. Click Apply to save.
  7. At the Default Web Site, OHCruiseWebService select Directory Browsing, and then click Enable at the Actions pane.

Setting Up OHCWebServices

  1. Launch the OHCruiseWebservice.msi file and follow the installation steps.
  2. At the OHCruiseWebservice, InstallShield Wizard, select the setup type Complete.
  3. Click Next and follow the installation steps until completion.
  4. The OHCruiseWebservice is listed under the Default Web Site of IIS Manager, Connection section once the setup is complete.
  5. From the Server Manager, Sites container, select OHCruiseWebService and navigate to Actions Panel and select Advance Settings
  6. Ensure the Enable 32–Bit Applications is set to True and .Net CLR version is set to v4.0
  7. In the Default Web Site, OHCruiseWebService, select Directory Browsing and then select Enable from the Actions Panel on the right

Configuring DB Source

  1. At the IIS Manager, Connection branch, right-click the OHCruiseWebservice and select Explore. This opens the C:\inetpub\wwwroot\OHCruiseWebService folder.
  2. Locate the Web.Config file and edit the connection string to point the connection to the correct Data Source.
    <connectionStrings configProtectionProvider="RsaProtectedConfigurationProvider">
    <add name="MyLocalOracleServer" connectionString="Data Source=spms;Persist Security Info=True;User ID=fcmobile;Password=<password>;" providerName="System.Data.OracleClient"/> 
    </connectionStrings>

Encrypting Web.config File

As an alternative, it is possible to encrypt and decrypt the Web.config file using a script.
  1. Open the Command Prompt with Run as Administrator .
  2. Change the directory to “%WinDir%\Microsoft.NET\Framework\v4.0.30319” .
  3. Run the below command to encrypt the connection string.
    <connectionString> aspnet_regiis -pe "connectionStrings" -app "/OHCruiseWebService" -prov "DataProtectionConfigurationProvider"

    The above command with the app switch assumes that there is an IIS Virtual directory called OHCruiseWebService and the command below assumes there is no virtual directory available.

    Encrypting configuration section... Succeeded!

    To Change the connection strings section back to clear text, run the following command from the command prompt.

    aspnet_regiis -pd "connectionStrings" -app "/OHCruiseWebService"

    If the command is successful, you will see the following output:

    Decrypting configuration section... Succeeded!

    To decrypt the connection Strings section specifying a physical path to your application's configuration file, use the -pdf switch as shown here.

    aspnet_regiis -pdf "connectionStrings"<DIR>\ OHCruiseWebService

Verifying WebServices Connection

To ensure the WebService connection is properly set up,
  1. Open a web browser from the machine where the web service is installed.
  2. Copy and paste the following URL into your browser.

    http://localhost/OHCruiseWebService/FCTransactionsService.asmx/MobileJsonGet?psFunction=connect&psSessionID=&psParam=&pbIsSelect=false&psSchemaName=

    You should get the following respond from the browser.

    <CResponseJson><bSuccess>true</bSuccess><sTables/><bISODateFormat>true</bISODateFormat></CResponseJson>

    If the Web Service is configured correctly, the following page is shown.

    Figure 2-6 WebService Connection Response Page


    This figure shows the response page of a successful WebService connection testing.

Setting Up Mobile Sync Interface

The MobileSync Interface is a program that synchronizes the data between the SPMS and the Mobile database, based on the interval time configured in the OHC MobileSync Interface.

Figure 2-7 Mobile Sync Interface
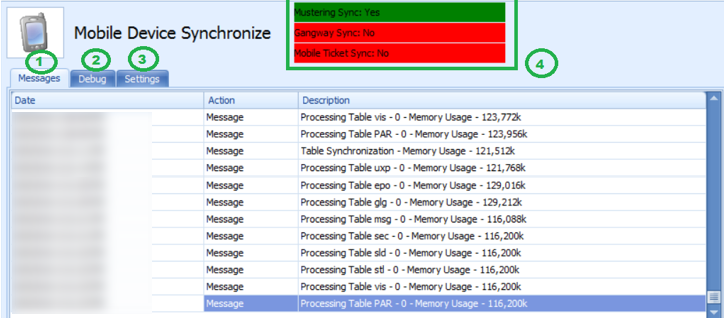

This figure shows the function of Mobile Device Synchronize Interface.
  1. Tab lists all synchronization activities.

  2. Tab presents all activities in debugging format with SQL Command.

  3. Tab defines the required settings and synchronization functions.

  4. Labels indicating the type of synchronization enabled within the Settings tab.

Ensure SPMS Database parameter table field ‘PAR_SYNC_TO_MOBILE’ value is set to 1. For list of parameters and settings required by MobileSync Interface, see Parameters.

Configuring Mobile Sync Interface

The data between the Ship and FCMobile database will synchronize smoothly when the interface is correctly set up.

Figure 2-8 OHCMobile Sync Settings
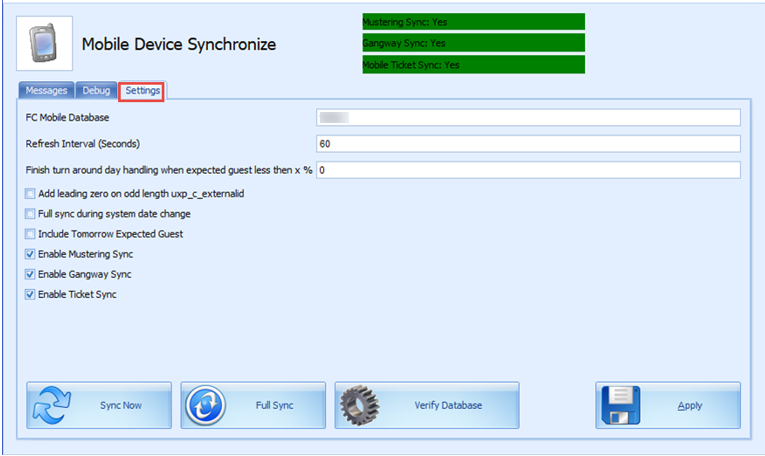

This figure shows the Settings within OHCMobile Sync Interface.
  1. Run the Mobile Sync.exe and navigate to the Settings tab.

  2. Enter the Mobile DB name in FC Mobile Database name field, similar to the one defined in Oracle Net Manager.

  3. The synchronization between the databases is based on the time enter in Refresh Interval Seconds. The default Refresh Interval (Seconds) is 60 seconds.

  4. Click Apply to save. The settings are saved in OHCSettings.par file.

Table 2-1 Field Definition of Mobile Sync Interface

Field Name Description

Refresh Interval (Seconds)

Triggers synchronization automatically according to the pre-defined seconds. The default is 60 seconds.

Enable Turn Around Day Handling

This function adds a message to CHG_MOBILE_IN table, signifying the turnaround day.

  • If the system date change matches the cruise start date, message 'START_TURNAROUND_DAY' will be written to the CHG_MOBILE_IN table.

  • If 'Expected Check-In guest < %' as per setup in MobileSync Setting, message 'END_TURNAROUND_DAY' will be written to the CHG_MOBILE_IN table.

  • If 'Expected Check-In guest > %' as per setup and if current System Cruise changed, message 'END_TURNAROUND_DAY' will be written to the CHG_MOBILE_IN table.

Add leading zero on odd length uxp_c_externalid

This function adds leading zero to the UXP_C_EXTERNALID (Odd length) in FCMOBILE DB whenever a full synchronization is performed.

Full Sync during system date change

This function automatically triggers a Full Synchronization during system date change.

Include Tomorrow Expected Guest

This function includes passenger departing the next day into synchronization.

Enable Mustering Sync

This function enables the synchronization process for Mobile Mustering application.

Enable Gangway Sync

This function enables the synchronization process for Mobile Gangway application.

Enable Ticket Sync

This function enables the synchronization process for Mobile Ticket application.

Sync Now

The Sync Now is an on-demand synchronization process that checks for any record change that requires updating in CHG_MOBILE_OUT in Mobile database to Ship database, followed by CHG_MOBILE_IN in Ship database to Mobile database.

Full Sync

The Full Sync triggers synchronization between FCMOBILE_DB with the Ship database. It truncates the FCMOBILE_DB before updating it with the latest data from the Ship database.

Verify Database

The Verify Database updates the FCMOBILE_DB structure with the latest version. The system verifies the version in FCMOBILE.PAR.MOBILE.MOBILE.DB and if it is found to be out of date, it prompts a warning 'Please Run Verify database first' before Full Synchronization can be performed.

Creating FCMobile Schema

At the creation of the FCMobile User in Database Preparation, the system requires you to run a database verification and creates the missing data tables in FCMobile Schema. This task can only performed by user that has Allow Run Verify Database permission.

Synchronizing the Database

There are two types of synchronization; on demand or full synchronization which truncates the database.

To perform a synchronization,
  1. At the Mobile Sync Interface, Settings tab, verify that the FC Mobile Database points to the correct ship database. If not, correct the database name and click Apply to save the changes.

  2. Select Sync Now to immediately perform the synchronization.

  3. If the Parameter Mobile, Mobile DB Version value is not the same in Fidelio and FCMobile Schema, the system prompts that you verify the database before it allow you to continue. Only user that has Allow Run Verify Database privilege is allowed to perform this task. Click the Verify Database to update the FCMOBILE.DB structure to the latest version.

  4. The system writes into the system log “Run Verify Database – Completed” at the end of the verification process. This message is also shown on the Message tab before synchronization commences.

Performing a Full Synchronization

The Full Sync not only truncates the data and photo from the FCMobile Database before synchronizing, it also purges all pending changes that exists in the database.

Important:

Perform with caution.
  1. At the Mobile Sync Interface, Settings tab, verify that the FC Mobile Database points to the correct ship database. If not, correct the database name and click Apply to save the changes.

  2. If there are changes pending from Mobile DB to the Database, the system prompts a warning message. Click Yes to delete all pending changes or No to cancel the Full Sync process.

  3. If you clicked Yes, enter the login ID and password when prompt.

  4. Navigate to the Message tab to view the progress. Ensure that the tables are synchronized without any error.

SPMS Configuration Codes

Before you begin using the Gangway Security and Mobile Mustering function, the codes must be configured in SPMS Administration module. See Administration User Guide on how to set up these codes.