4 OPI Handling
This section describes the steps taken to register a credit card in SPMS through OPI.
OHC Management
When Vendor Has No Internet
For PAR 'Enable Online Settlement' = 1:
When CpSettl is response <> OK and <> TO, system will insert a record with -1* POS amount into table POS. This will offset the credit amount to ensure invoice balance does not become 0 when settlement is failed.
-
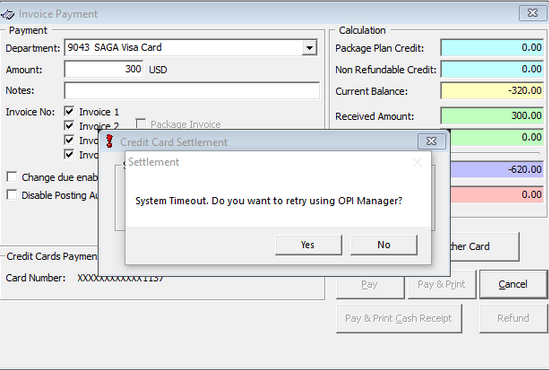
Yes: OPI Manager will process the transaction and CCT_STATUS set to 4. The number of retry is set in PAR: 'Number of retry for Outstanding Incremental Process'. After it hit the max number of retry, system will CCT_STATUS set to 5 and insert a record with -1* POS amount into table POS.
-
No: the transaction will be terminated and CCT_STATUS set to 6. System will insert a record with -1* POS amount into table POS.
Figure 4-1 System Timeout

For PAR 'Online Settlement' = 0:
The system will follow the 'Yes' logic above. When SPMS client is not able to connect to OPI API or Daemon, system will delete the POS record so that the invoice is not 0.
Registering a Credit Card
-
Login to Management module and select Guest from the Cashier Menu.
-
Select a checked-in guest and click the Get Credit Card button located at the bottom of the screen.
-
Swipe the credit card through the card device when prompt.
-
Once the guest enters the credit card pin, the OPI Web API checks and authenticate the initial authorization at the same time, and stores the card information in Guest Handling, Credit Card tab.
-
After received a valid credit card token from OPI, system will save card details and set card status to ‘active’ mode, regardless the status of initial authorization.
-
When the initial authorization is decline, the credit card status is in ‘deactivate’ mode.
-
Viewing Authorization Amount
-
Login to Management module and navigate to Guest Handling screen.
-
In the Search Panel, browse for the guest account.
-
Navigate to the Credit Card tab in the guest account. The registered card should be in Active mode.
-
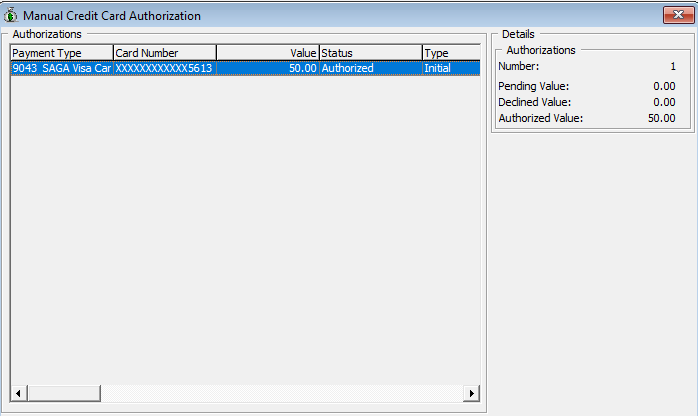
To display the initial authorization, select the credit card and click View Authorization.
Figure 4-2 Authorization Screen

Advance Quick Check-In (AQCI)
-
Login to AQCI module and select Guest option from the search function.
-
Select a guest from the list, and click the Get Credit Card button located at menu ribbon at the top of the screen.
-
Swipe the credit card through the card device when prompt.
-
The system processes the registration mentioned in step 4 of Registering a Credit Card.
-
Once the credit card is register successfully, the Credit Card information is populate in the credit card section.
AQCI Check-In Wizard (CIW)
-
At the AQCI module, click on the Wizard button from the menu ribbon at the top of the screen.
-
Search the guest from the guest lookup option.
-
Select a guest from the list, and click the Get Credit Card button located at menu ribbon at the top of the screen.
-
Swipe the credit card through the card device when prompt.
-
Once the guest enters the credit card pin, the OPI Web API checks and authenticate the initial authorization at the same time, and stores the card information in Guest Handling, Credit Card tab.
-
If initial authorization is approved or outstanding, the credit card status will be in ‘active’ mode.
-
Once we received a valid credit card token, the card status will be in ‘active’ mode.
DGS ResOnline
Majority of the reservations information including the credit card information are import through DGS ResOnline module. Initial authorization is trigger once the guest checked-in.
Data Import
Credit card information can be import through Data Import module, using a specific text file. For example, if you are importing a credit card information, the text file should only contain the credit card information. Initial authorization is trigger once the guest checked-in.
Web Service
Reservations information including the credit card information is imported through the OHC Web Services. Initial authorization is triggered once the guest checks in. See the Web Service Technical Specification for further details.
Registering a Gift Card
-
True: the system will allow multiple active gift cards and prompt a dialogue box for you to select the invoice within the guest account;
-
False: the system will deactivate an earlier registered gift card. Only the newly added gift card is set to active.
Note:
This feature would require OPI version 20.3OHC Management / OHC Crew
-
Login to OHC Management module and select Guest from the Cashier Menu.
-
Select a checked-in guest and click the Credit Card tab.
-
Under Rewards Card Panel, click the Get Gift Card button. This prompts the Inquire Gift Card Points window with “Requesting gift card token’ message.
-
At the Activate Gift Card dialogue box prompts, the card number is shown. You need to select the applicable invoice window for the card.
Note:
Invoice dialogue box will not display if Parameter ‘Enable Multiple Credit Card’ is set to False. -
Click Activate button to save the Gift Card Details.
-
After receiving a valid gift card balance response from OPI, the system will save the gift card details and set card status to an ‘Active’ mode.
-
Click View Card Transactions button and the Gift Card Authorization dialogue box will display. You will be able to viewthe Payment Type, Card Number, Balance Value, Status, Type, Auth Date, Auth Code,Error Code and Comments of selected Gift Card.
Note:
The system will not register the card if it is declined by the payment provider.