2 Cashier Function
The Cashier Menu is a widely used function in a Ship Operation, where the passenger profile, reservations, billing and stay histories are recorded and stored.
Guest Handling
This section describes the available functions to access guest data such as guest information, travel documents, invoice, guest history, group account and others. It also allows you to create, amend and cancel a reservation, post a charge and check out a guest/account. These functions are perform in Management, Cashier drop-down menu
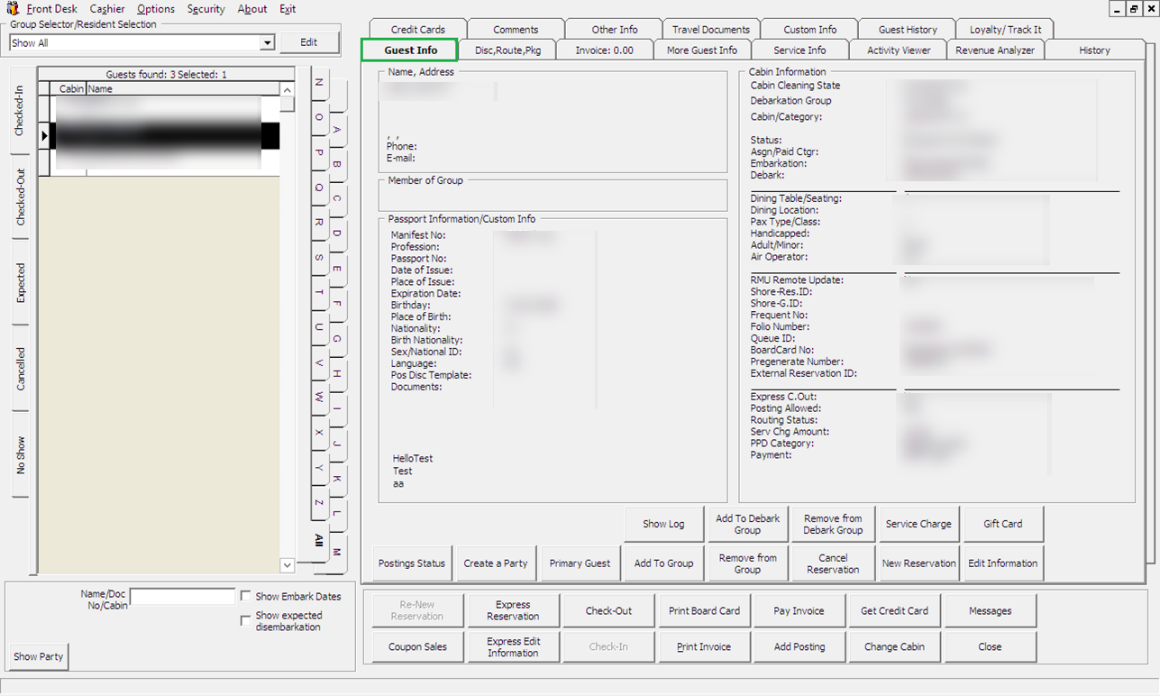
Figure 2-1 Guest Handling
Search Panel
Figure 2-2 Search Panel
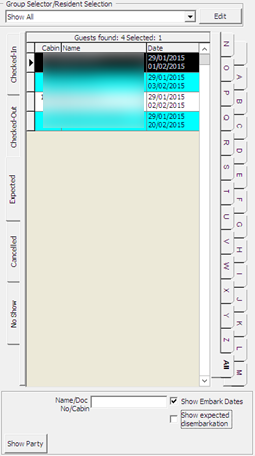
Table 2-1 Search Panel
| Tab | Description |
|---|---|
|
Checked-In |
This tab list all registered passengers. |
|
Checked-Out |
This tab list all checked-out passengers of past and current cruise. |
|
Expected |
This tab lists all passengers due to arrive for current or future cruises. |
|
Cancelled |
This tab lists all cancelled reservations. |
|
No Show |
This tab lists all reservations that fail to show up or yet to register during System Date Change. |
|
Show Embark Dates |
Check box includes guest embarkation/debarkation dates in the result list. |
|
Show Expected disembarkation |
Check box displays disembarking guest of selected date and cabin. |
Searching For Guest
- At the Search Panel, select the Status tab and then select an alphabet corresponding to the reservation’s last name. If ALL is selected, this displays all reservations in alphabetical order.
- You can narrow down the search using the guest name, document number or cabin number and date.
Guest Info Tab
The Guest Info tab is the default tab you access at Guest Handling function. It provides a single view of guest's information's such name, address, passport details, cabin information and others, and enable you to drill down further into the reservation for more information.
New Reservation Function
The New Reservation function allows you to create a booking for guest arriving without a reservation. A reservation form is launched when the New Reservation button is clicked and below are the field definitions of the form.
Figure 2-3 New Guest Information Window
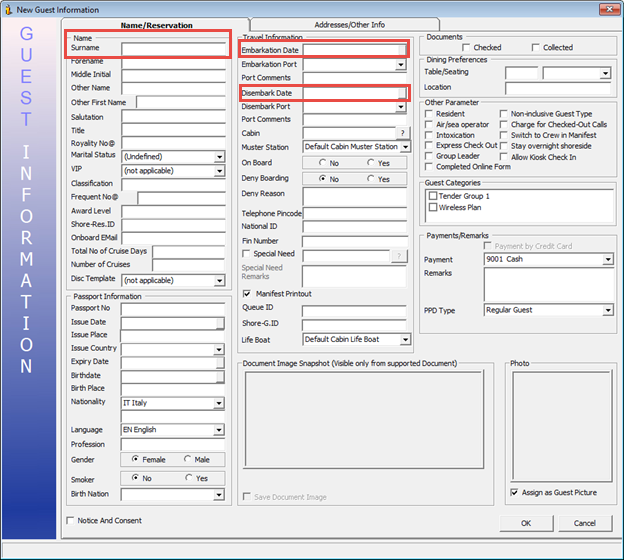
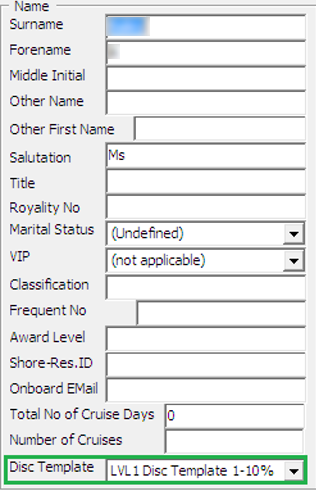
Table 2-2 Field Definition of Guest Information Tab (Name)
| Field | Description |
|---|---|
|
Name |
|
|
Surname |
Last name of the guest. |
|
Forename |
First name of the guest. |
|
Middle Initial |
Middle name of the guest. |
|
Other Name |
Other Last Name. |
|
Other First Name |
Other First Name. |
|
Salutation |
The salutation of the guest. |
|
Title |
Title of the guest. |
|
Royalty No |
Additional Title. A user definable label. |
|
Marital Status |
Marital Status of guest. Configurable system codes in Administration, System Codes, Marital Codes. |
|
VIP |
VIP classification of the guest. Configurable system codes in Administration, System Codes, Marital Codes. |
|
Classification |
Classification/VIP flag. |
|
Frequent No |
Frequent Cruiser number. A user definable label. |
|
Award Level |
Frequent Cruiser Award Level. |
|
Shore-Res.ID |
External System Reservation ID. A user definable label. |
|
Onboard Email |
Email contact whilst on board. |
|
Total No. of Cruise Days |
Total Cruise days signed up. Information from data import. |
|
Number of Cruises |
Number of cruises purchased. Information from data import. |
|
Disc Templates |
Discount templates applied to the account. |
Table 2-3 Field Definition of Guest Information Tab (Passport Information)
| Field | Description |
|---|---|
| Passport Information | |
|
Passport No |
Passport number of the guest. |
|
Issue Date |
Date travel document was issued |
|
Issue Place |
Place travel document was issued. |
|
Issue Country |
Country travel document was issued. |
|
Expiry Date |
Expiry date of travel document. |
|
Birthdate |
Birth date of the guest. |
|
Birth Place |
Birth place of the guest. |
|
Nationality |
Nationality according to travel document. |
|
Language |
Language spoken by guest. |
|
Profession |
Profession of the guest. |
|
Gender |
Gender identifier. |
|
Smoker |
Smoker identifier. |
|
Birth Nation |
The original nationality of the guest if differ from Nationality field. |
Table 2-4 Field Definition of Guest Information Tab (Travel Information)
| Field | Description |
|---|---|
|
Travel Information |
|
|
Port Comments |
Additional comments of the port. |
|
Debark Date |
Debarkation date. |
|
Debark Port |
Port of debarkation. |
|
Cabin |
Cabin number assigned. |
|
Muster Station |
Muster Station assigned. Linked to Cabin number. |
|
On Board |
On/Off board identifier |
|
Deny Boarding |
Deny boarding identifier |
|
Deny Reason |
Reason boarding denied. |
|
Telephone Pincode |
Pin code setup for outgoing calls and access to Kiosk. |
|
National ID |
Local identification document, for example, ID or Driving License |
|
Handicapped |
Disability status of the guest. A user definable label. |
|
Handicapped Remarks |
Disability remarks. |
|
Manifest Printout |
Default inclusion of guest in manifest print out. |
|
Queue ID |
Assigned queue ID during embarkation. |
|
Shore.G-ID |
Unique Identifier for FMS. A user definable label. |
|
Life Boat |
Life Boat assigned. Linked to Cabin number. |
Table 2-5 Field Definition of Guest Information Tab (Documents)
| Field | Description |
|---|---|
|
Documents |
|
|
Documents |
Confirmation check box of whether travel document is checked or collected. |
Table 2-6 Field Definition of Guest Information Tab (Documents)
| Field | Description |
|---|---|
|
Dining Preferences |
|
|
Table/Seating |
Assigned table number and seating preferences for dining. |
|
Location |
Assigned dining location. |
Table 2-7 Field Definition of Guest Information Tab (Other Parameter)
| Field | Description |
|---|---|
|
Resident |
Indicator whether the guest is a Resident. |
|
Air/Sea operator |
Indicator whether the guest is an Air/Sea operator. |
|
Intoxication |
Intoxication identifier. |
|
Express Check Out |
Indicates guest require Express Check Out. |
|
Group Leader |
Group Leader identifier. |
|
Non-inclusive Guest Type |
Indicates that guest is not part of a package or all inclusion plan. |
|
Charge for Checked-out Calls |
Define whether checked-out calls will be charged. |
|
Switch to Crew in Manifest |
Indicates that reservation has been moved Crew manifest. |
|
Stay overnight shoreside |
Indicates that guest stays overnight at shore side. |
Table 2-8 Field Definition of Guest Information Tab (Guest Categories)
| Field | Description |
|---|---|
|
Guest Categories |
|
|
Selection box |
User configurable system codes in Administration, System Codes, Guest Categories. |
Table 2-9 Field Definition of Guest Information Tab (Agent Information)
| Field | Description |
|---|---|
|
Payments/Remarks |
|
|
Payment |
Payment Department code for this reservation. |
|
Remarks |
Additional remarks pertaining this payment. |
|
PPD Type |
Revenue per person per day tag. |
Table 2-10 Field Definition of Guest Information Tab (Others)
| Field | Description |
|---|---|
|
Others |
|
|
Document Image Snapshot |
Displays snapshot of scanned passport. |
|
Photo |
Displays saved photo of the guest. |
|
Notice and Consent |
Mandatory field. Indicates passenger accept and agrees to the Notice and Consent Terms |
Figure 2-4 Guest Information Address / Other Information
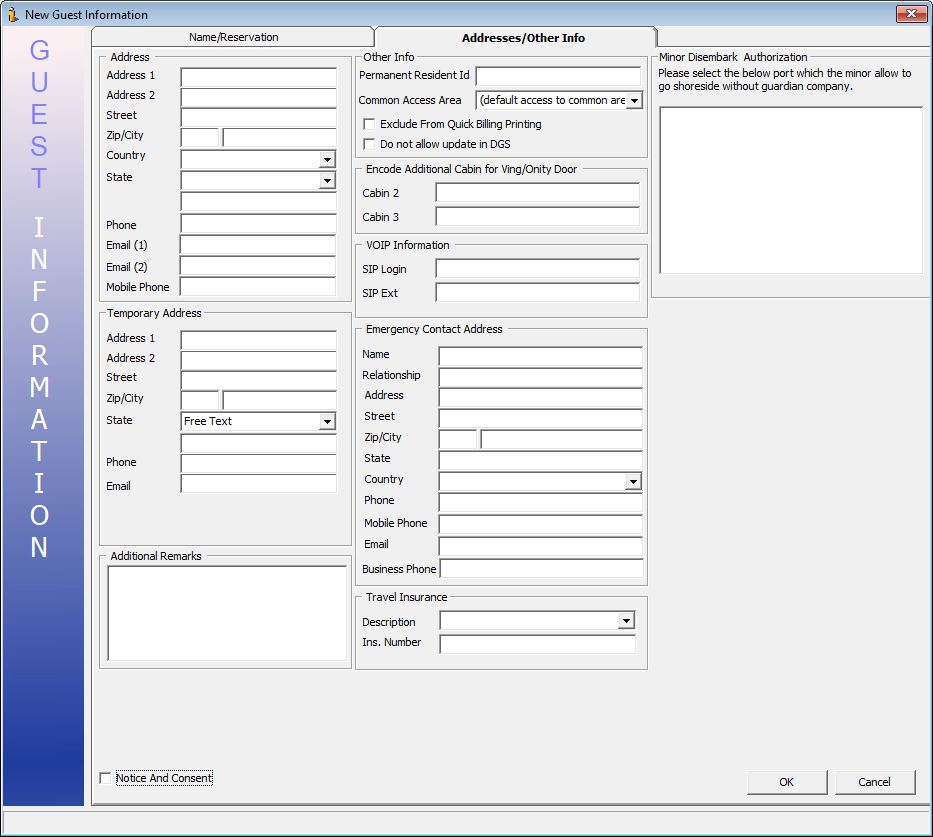
Table 2-11 Field Definition of Guest Information Address Tab
| Field | Description |
|---|---|
|
Address / Temporarily Address |
|
|
Address 1 |
Address 1 |
|
Address 2 |
Address 2 |
|
Street |
Street name |
|
Zip/City |
Zip Code / Name of city |
|
Country |
Country |
|
State |
State |
|
Phone |
Phone number of guest |
|
Email 1 |
Email address of the guest |
|
Email 2 |
2nd Email address of the guest |
Table 2-12 Field Definition of Guest Information Address Tab (Other Info)
| Field | Description |
|---|---|
|
Other Info |
|
|
Permanent Resident ID |
Permanent Resident ID of the guest |
|
Common Access Area |
Allowed common access area |
|
Exclude from Quick Billing Printing |
Indicator whether to exclude from Quick Billing printing |
Table 2-13 Field Definition of Guest Information Address Tab (Encode Additional Cabin for Ving/Onity Door)
| Field | Description |
|---|---|
|
Encode Additional Cabin for Ving/Onity Door |
|
|
Cabin 2/3 |
Cabin number of joint cabin |
Table 2-14 Field Definition of Guest Information Address Tab (Emergency Contact Address)
| Field | Description |
|---|---|
|
Emergency Contact Address |
|
|
Name |
Name of Emergency contact person |
|
Relationship |
Relationship of Emergency contact person ang |
|
Address |
Address |
|
Street |
Street |
|
Zip/City |
Zip code/city |
|
State |
State |
|
Country |
Country of Residency |
|
Phone |
Phone number of contact person |
|
Mobile Phone |
Mobile number of contact person |
|
|
Email address of the contact person |
|
Business Phone |
Business phone number of contact person |
Table 2-15 Field Definition of Guest Information Address Tab (Travel Insurance)
| Field | Description |
|---|---|
|
Travel Insurance |
|
|
Description |
User configurable system codes in Administration, System Codes, Travel Insurance |
|
Ins. Number |
Insurance Policy Number |
Table 2-16 Field Definition of Guest Information Address Tab (Minor Debark Authorization)
| Field | Description |
|---|---|
|
Minor Debark Authorization |
|
|
Port Date / Name |
Selectable port allowed for minor for debark |
|
Notice and Consent |
Mandatory field. Indicates passenger accept and agrees to the Notice and Consent Terms. |
Creating a New Reservation
- Click the New Reservation button at Guest Handling window to open a New Guest Information form.
- Enter all the relevant information, particularly the mandatory fields such as Notice and Consent. If this check box is unchecked, the system does not allow you to proceed and prompts a warning message. Do refer to your company standard operating procedure for the other mandatory fields.
- Click OK to save the form.
- The saved information is shown under Guest Info tab and is categorized as Expected Arrival.
Editing a Reservation
- Search the reservation from the Search Panel and then click the Edit Information under Guest Info tab to open the existing Reservation Form.
- Edit all the relevant information and click OK to save the changes.
Canceling Reservation
- Search the reservation from the Search Panel and then click Cancel Reservation under Guest Info tab.
- Select Yes to cancel the reservation when prompt. This places the booking under the Cancelled tab.
Posting Status
- Retrieve the reservation from the Search Panel and then click Posting Status in Guest Info tab.
- Enter the reason to disable the posting when prompt, either by selecting a predefined reason from the drop-down list or manually insert them.
- If Allow manual postings is checked, this will only disable posting from the interfaces. You can still perform manual posting within the Guest Handling function.
- Click OK to set the posting status for the account to No or Manual.
Figure 2-5 Posting Status (No or Manual)

-
Retrieve the reservation from the Search Panel and then click Posting Status in Guest Info tab.
-
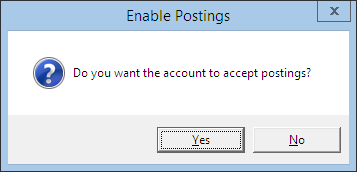
The system prompts for a response to accept the postings. Selecting Yes will resets the Posting status to allowed, whereas No will remain as unchanged.
Creating a Party
- Search the reservations in Search Panel.
- Use the CTRL+ key to select the names that make up a party.
- Click Create Party under the Guest Info tab.
- The system updates the guest of the same party with Shore-Res. ID.
Figure 2-6 Party Identifier

Showing a Party
To view list of travel companions within a party, click the Show Party button.
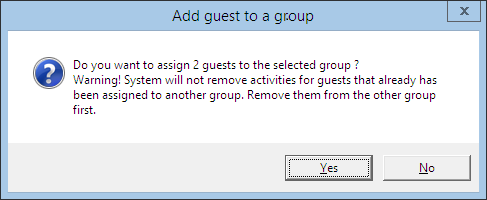
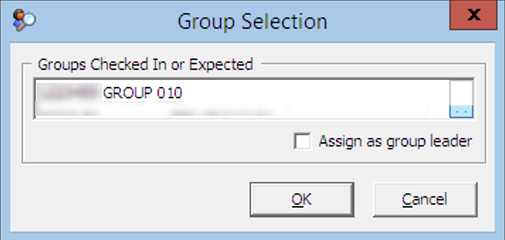
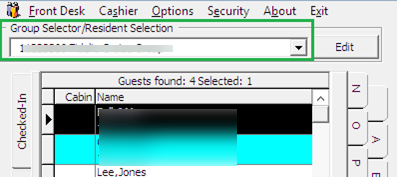
Adding to Group
Removing from Group
Removing a guest from group
- Search the guest name using the Search Panel.
- Mark the reservation(s) and then click Remove from Group.
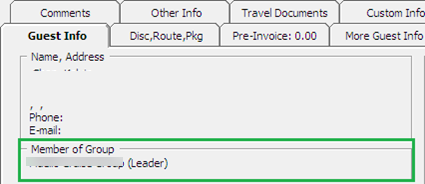
- The system prompts for a response to remove selected guest(s) from the group. Click Yes to proceed and the group name will be removed from the Guest Info, Member of Group field.
Primary Guest
Assigning a Primary Guest
- Identify the party by clicking the Show Party button.
- Highlight the name of the person to be designated as Primary.
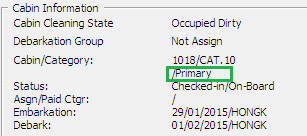
- Click Primary Guest to assign the selected person and the word Primary will show under the Cabin Information section.
Show Log
- Retrieve the reservation from the Search Panel, then click Show Log in Guest Info tab.
- The system returns a list of events, sorted by date/time order. Click Print to send a copy of the log to the printer.
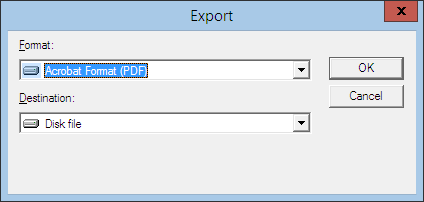
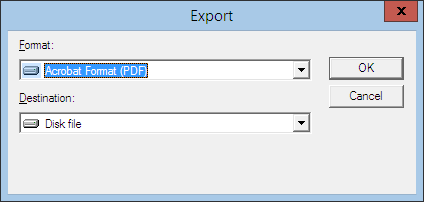
- Click the Export button to export the log into a supported file format, by selecting the format from the drop-down list.
Figure 2-7 File Export Prompt
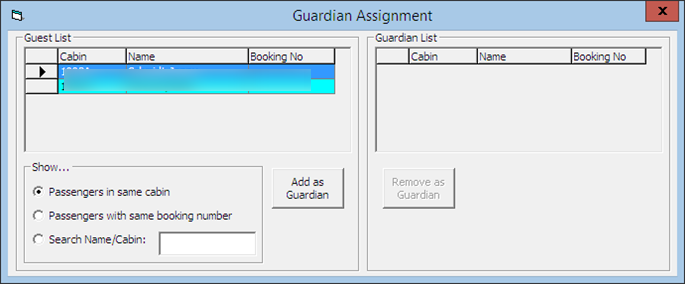
Guardian Assignment
Assigning a Guardian
Removing Guardian Assignment
You can remove the guardian from the minor account by clicking the Guardian Assignment, select the guardian name and then click Remove as Guardian.
Mark No Show
- Search the guest name from the Search Panel, Expected tab.
- Click the Mark No Show button at the Guest Handling window.
- At the mark Guest to No Show prompt, click Yes to change the reservation status. The booking will now appears in the No Show tab.
Service Charge
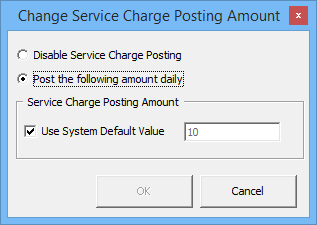
Posting a Service Charge
-
From the Change Service Charge Posting Amount window, select Disable Service Charge Posting, and then click OK to save.
-
At the Guest Info tab, the Service Charge Amount changes to No Service Charge Posting.
Disabling Service Charge Posting
- From the Change Service Charge Posting Amount window, select Disable Service Charge Posting and then click OK to save.
- At the Guest Info tab, the Service Charge Amount changes to No Service Charge Posting.
Add to Disembark Group
- At the Guest Info tab of the guest account, cluck Add to Disembark Group.
- In the selection window, select the available group from the grid and then click Select.
- At the Add guest to debarkation group prompt, click Yes.
- The assigned debarkation group is shown in the Guest Info tab, Cabin Information section.
Figure 2-10 Assigned Debarkation Group

Remove from Debark Group
When a passenger is wrongly assigned to a debarkation group, or they would like to depart with their friends, you are required to first remove the assignment and then reassign to the desired group.
To remove a passenger from the debark group, click the Remove from Disembark Group from the Guest Info tab.
Disc, Route, Pkg Tab
The Discount, Route, Package function routes the charges within the same invoice or to other crew prior to crew check in if setup, enabling allowable discounts in SPMS and MICROS. It also gives an overview of the Package Plan entitlement.
Routing
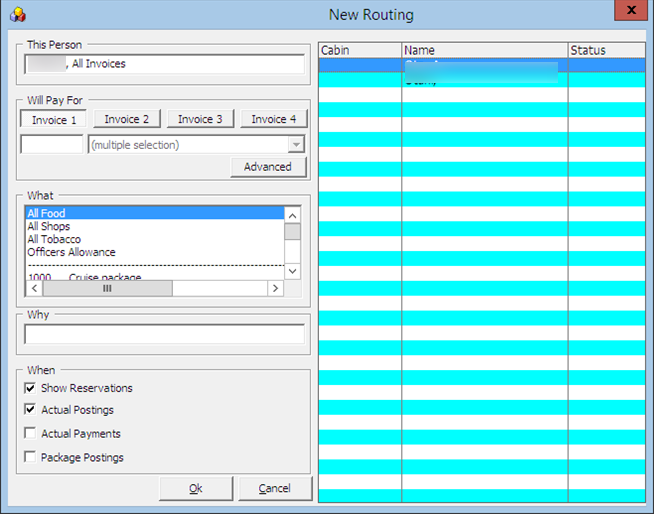
The Routing function automate transfer of charges within the crew account or to multiple accounts, allowing you to consolidate charges into one invoice/account. The use of this function is to facilitate the invoicing process at group reservations level or party/family traveling together. Depending on the requirements, the routing can be set up using one of this option - 'Pay for' or 'Paid by.
Figure 2-11 Routing Tab
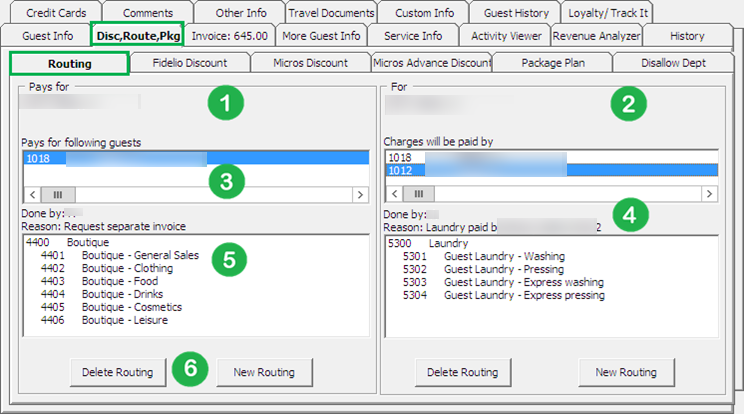
Table 2-17 Routing Tab Definition
| Section | Description |
|---|---|
|
1 |
Pays for - This section defines the payor account and whom the account is paying for. |
|
2 |
For - This section defines where the assigned financial department is routed to. |
|
3 |
Cabin number and name of guest payor is responsible for. |
|
4 |
User who setup the routing and reason. |
|
5 |
Financial Department code assigned. |
|
6 |
Button to setup or remove routing instructions. |
Note:
Prior to moving/routing the charges, be sure to first check the current routing arrangements to avoid duplication of routing, which will result to charges not being re-directed as planned.Pay for Another Party
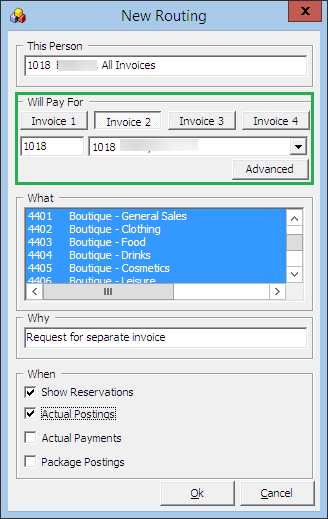
Below are the steps to set up an account/charge routing when guest A pays for guest B.
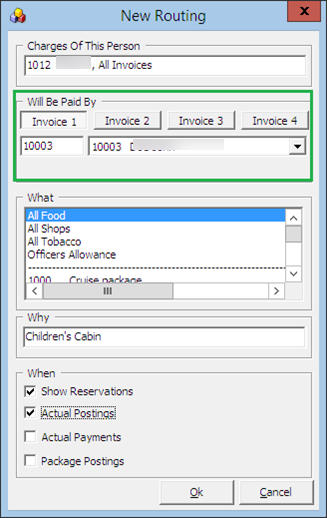
Paid by Another Party
Below are the steps to set up routing when guest B account/charges are paid by guest A.
Advanced Routing
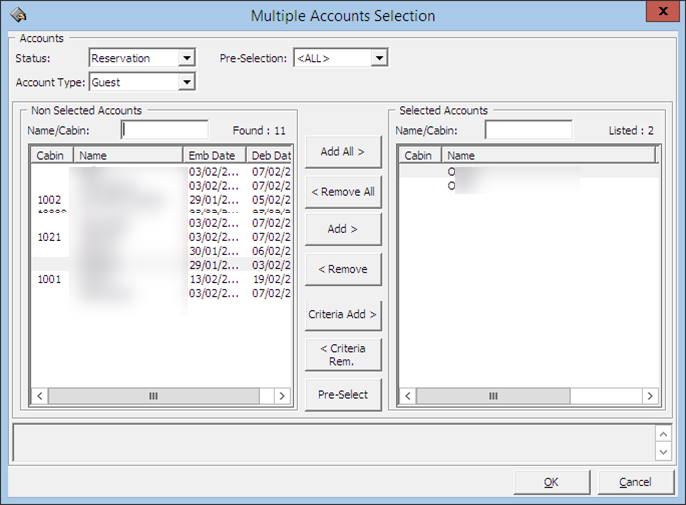
Below are the steps to set up routing for multiple guests, for example; group guest or parties travelling together.
Deleting an Existing Routing
Below are the steps to remote the routing set up in a guest account.
- Search the guest account and navigate to Disc, Route, Pkg, Routing tab.
- Select the sub-financial department code to delete the individual assignment, or the Main Financial Department to delete all, and then click Delete Routing.
- The system prompts for a confirmation to delete the assignment. Click Yes to confirm or No to return to Routing window.
SPMS Discount
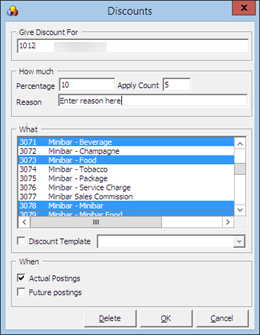
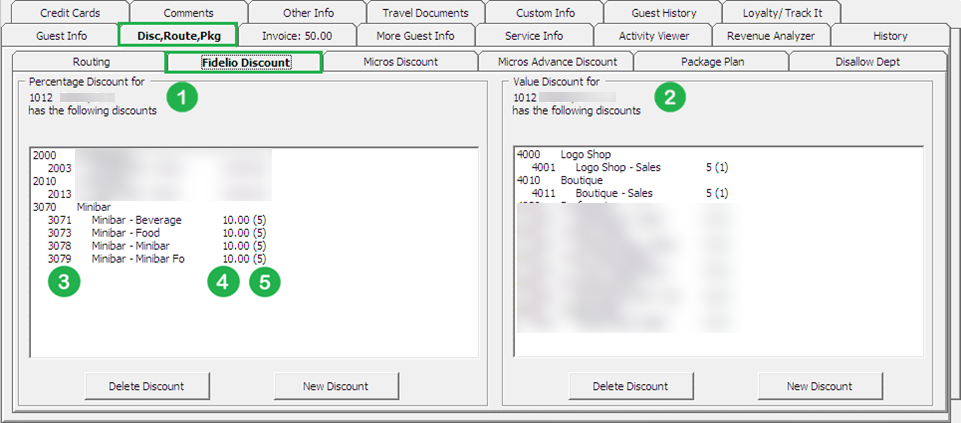
The SPMS Discount function enables you to assign eligible discount to a guest account either by percentage or value.
Deleting a Discount
- At the Disc, Route, Pkg, SPMS Discount tab, select the Financial code to delete, then click Delete Discount.
- If Delete Discount is clicked without first selecting any Financial code, this will delete All assignment from the respective window.
MICROS Discount
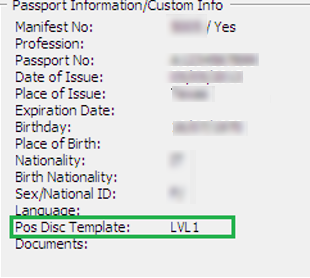
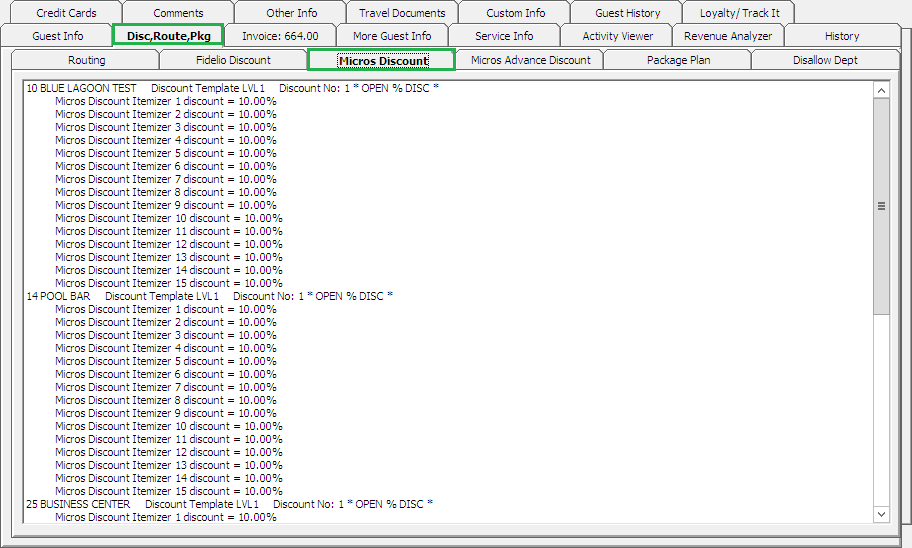
The MICROS Discount tab displays discounts accorded to the guest by Micros Discount Itemizer level. these discounts are shown when a guest has a discount level assigned in Guest Info, Edit Information, Discount Template field.
Figure 2-18 Disc, Route, Pkg — Micros Discount
Micros Advance Discount
The Micros Advance Discounts works similarly to Micros Discount, except that discounts are applied to Micros Major Group, Family Group and Menu Item level instead of Itemizer Level.
Figure 2-21 Micros Advance Discount
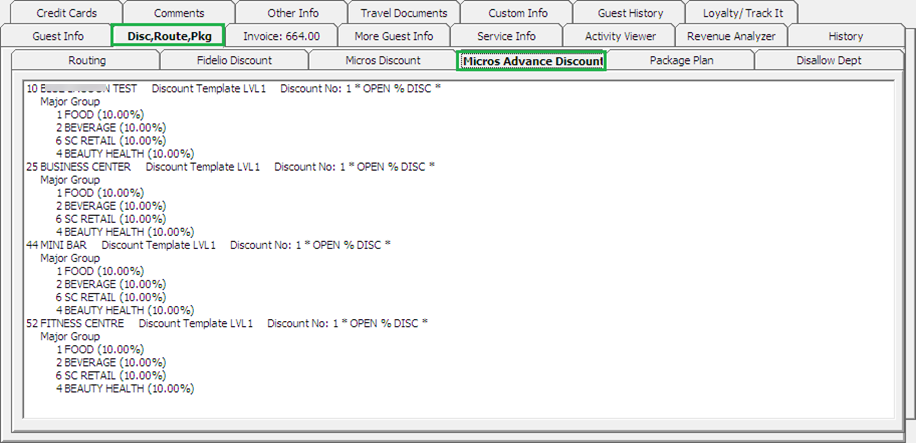
See Administration, POS Discount on how to configure the Advance Micros Discount.
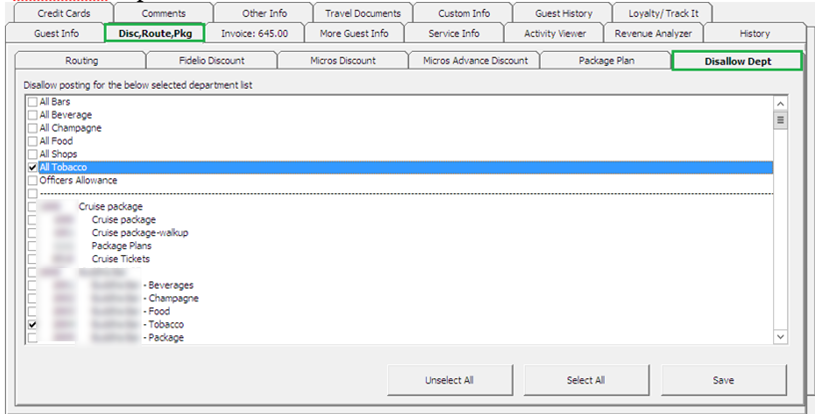
Disallow Department
The Disallow Department function manages charges not permissible from being posted to the guest account. For example, Casino Bar, all tobacco and others.
Setting Disallow Department
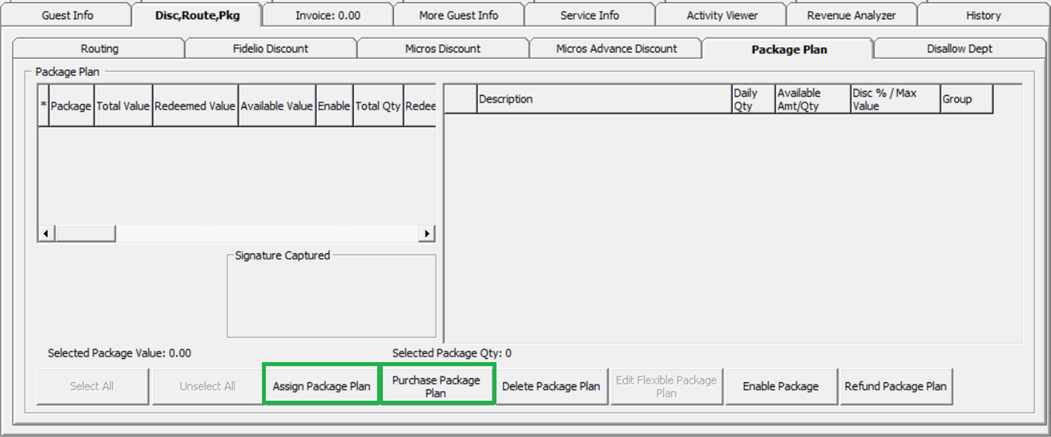
Package Plan
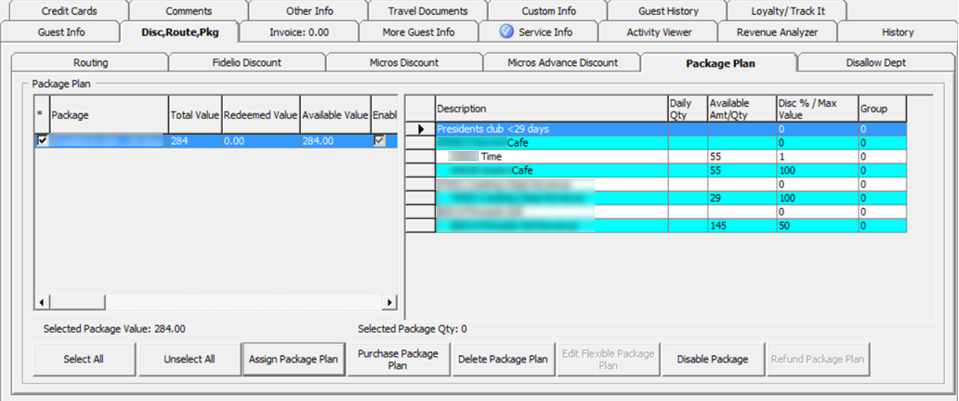
The Package Plan function enables you to customize a cruise package that suits the guest requirements, by combining various food and beverage outlets, excursions and/or activities using the flexi package plan option.
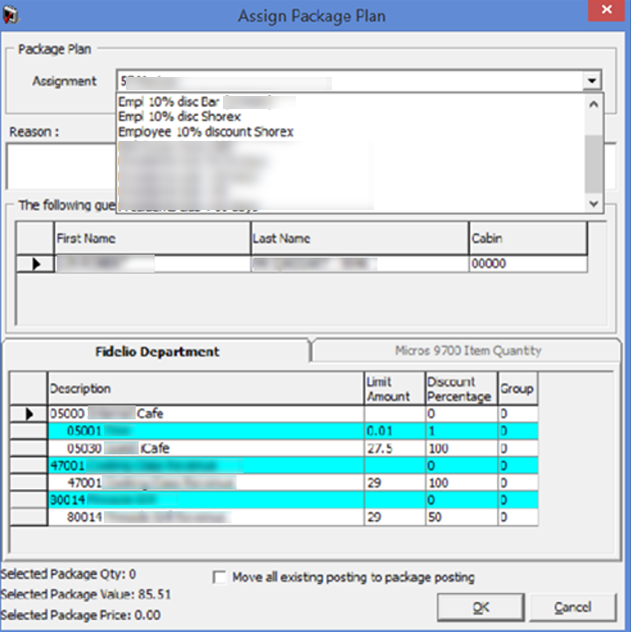
Assigning / Purchasing a Package Plan
Assigning the right package to the guest account enables transactions to be posted accurately throughout the cruise, and the packages can be assgined to the passenger account.
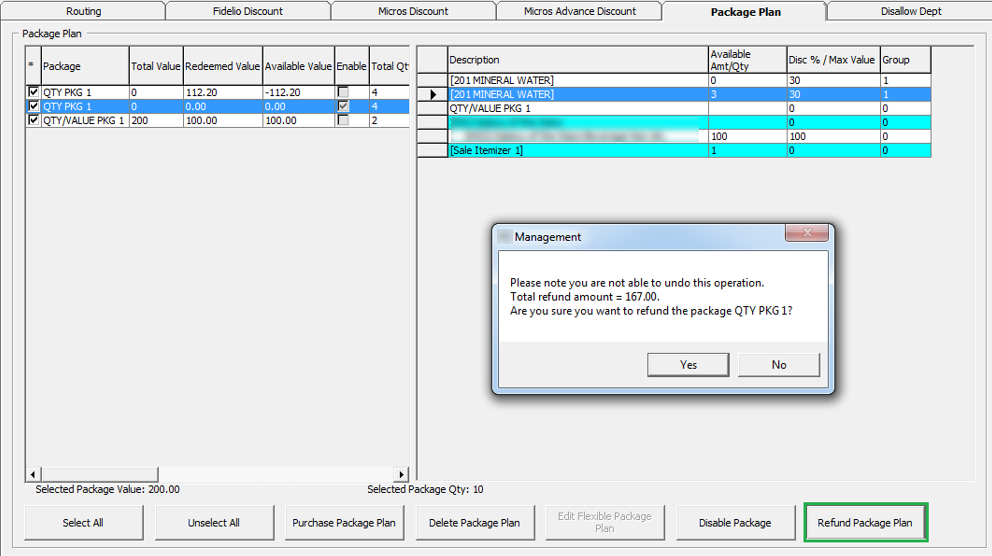
Refunding a Package Plan
Routing a Package Plan Posting
Routing of a package plan postings depends on two parameters. Do not allow post package to both buyer and payer and Package Plan Before Routing. In the event where boh payer and buyer has a package, all postings are posted to the payer account as normal posting.
Auto Balancing a Package Plan
An Auto Package Plan balancing may be set using parameter, Enable Package Auto Balance as 1 , and the system auto balances the package invoice/account after each transaction and reduces the total package value or quantity at the same time.
Figure 2-28 Package Plan Invoice Window
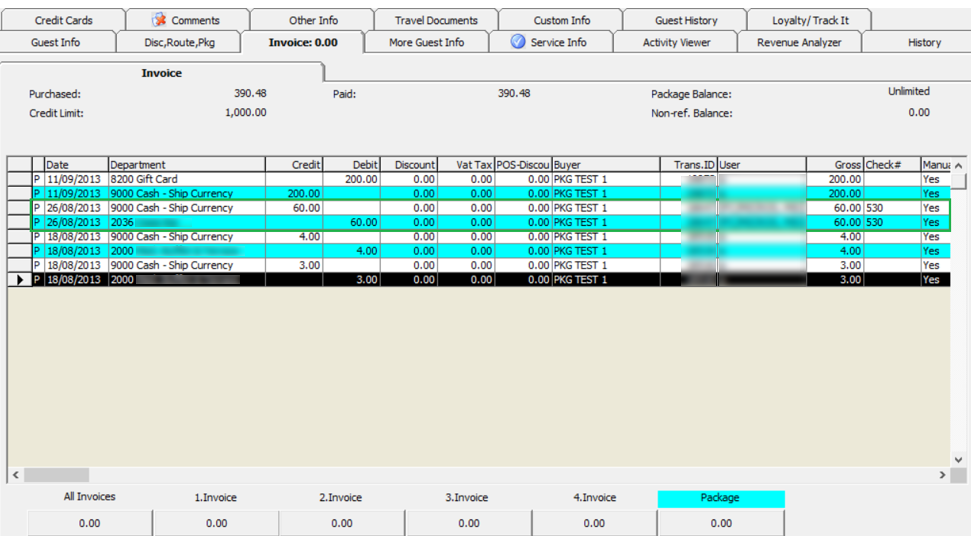
If the above parameter is set to 0, manual balancing of the package invoice/account is required using the Pay Invoice funtion.
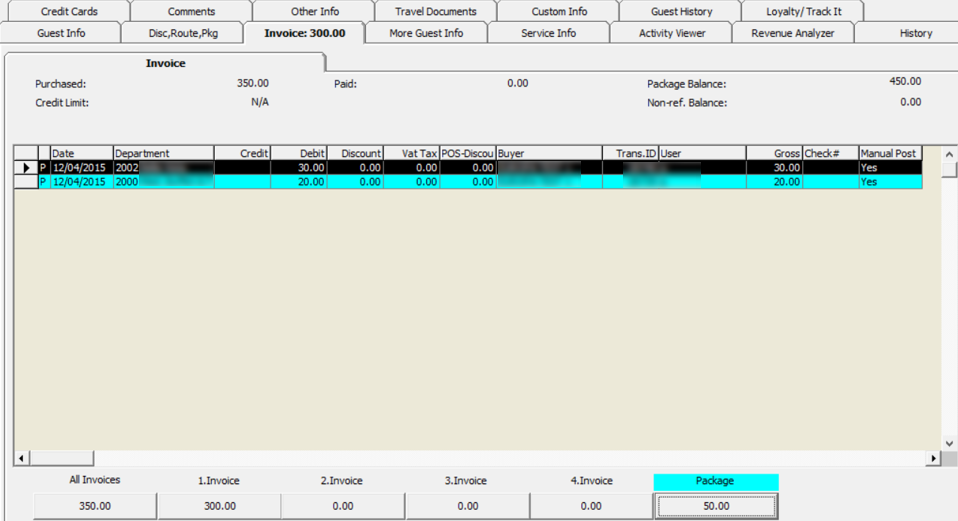
Invoice Tab
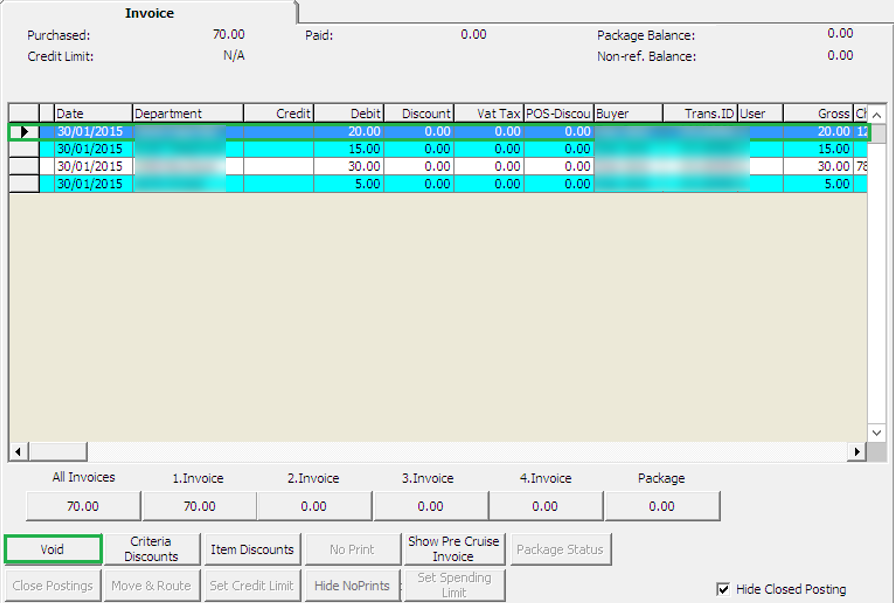
The Posting Handling function not only provides up to 4 invoices per guest, it also enables you to post a manual charge to an account, route postings and handle various payment processes.
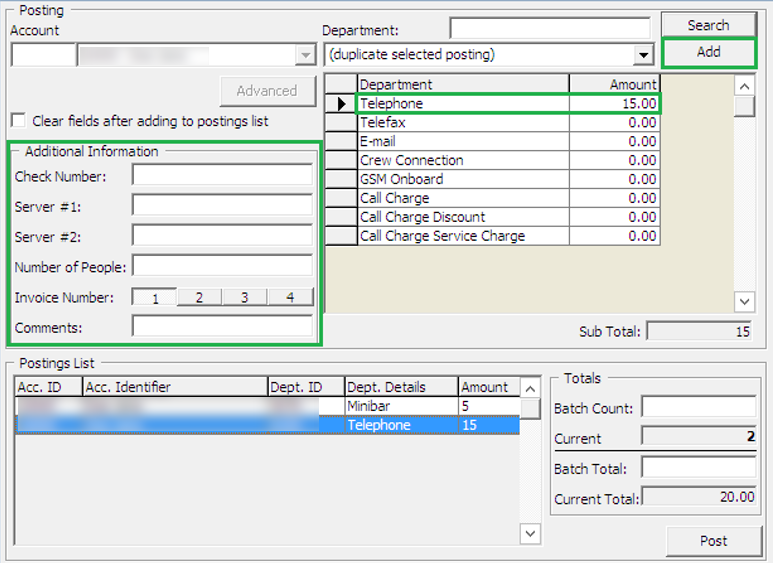
Figure 2-31 Add Posting Window
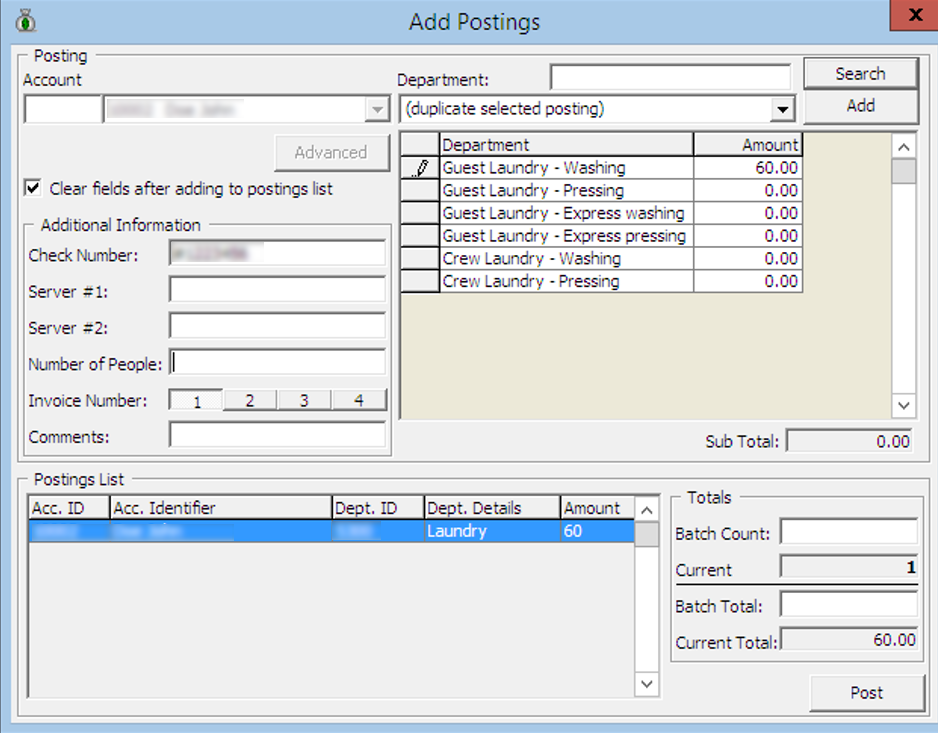
Table 2-18 Field Definition of Add Posting Window
| Field | Description |
|---|---|
|
Account |
Guest Account by Cabin No. and Name |
|
Department |
Financial Department codes |
|
Clear fields after adding to postings list |
Clear all information in Additional Information section after adding posting |
|
Check Number |
Check Number from POS System or any manual posting reference. |
|
Server #1: |
Server name appeared on POS check. |
|
Server #2: |
Server name appeared on POS check. |
|
Number of People |
No. of guest that dined. Information from POS System. |
|
Invoice Number |
Invoice number to post to |
|
Comments |
Additional comments. |
|
Posting List |
List of postings added |
|
Batch Count |
Confirmation of a number of postings added in Quick Posting function. |
|
Current Count |
Current count recorded in Postings List |
|
Batch Total |
Confirmation of total value posted in Quick Posting function. |
|
Current Total |
Accumulated value to post. |
Void Posting
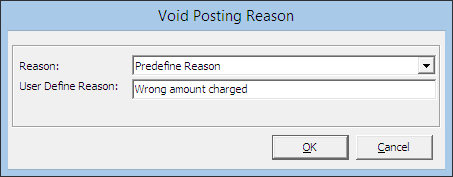
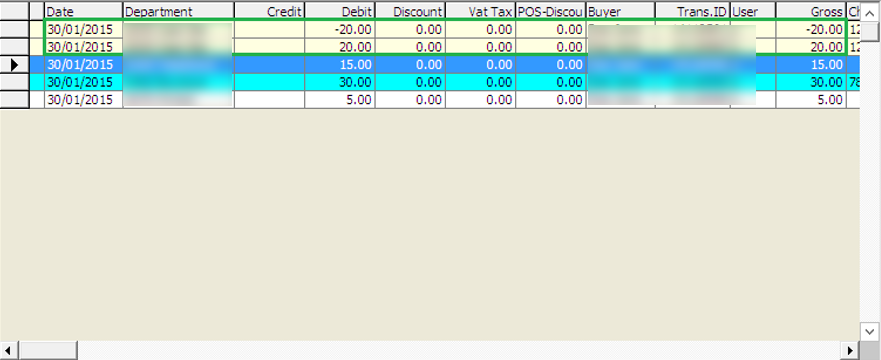
The Void Posting function is used to adjust the earlier posted transactions.
Voiding a Posting
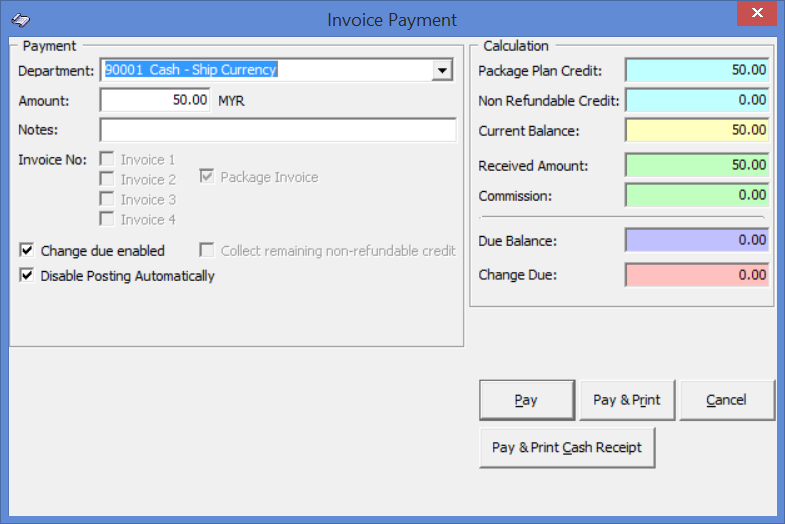
Pay Invoice
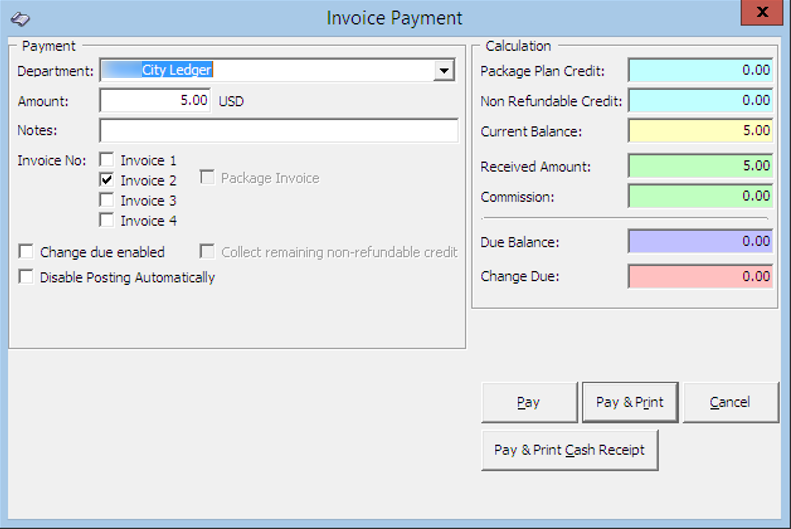
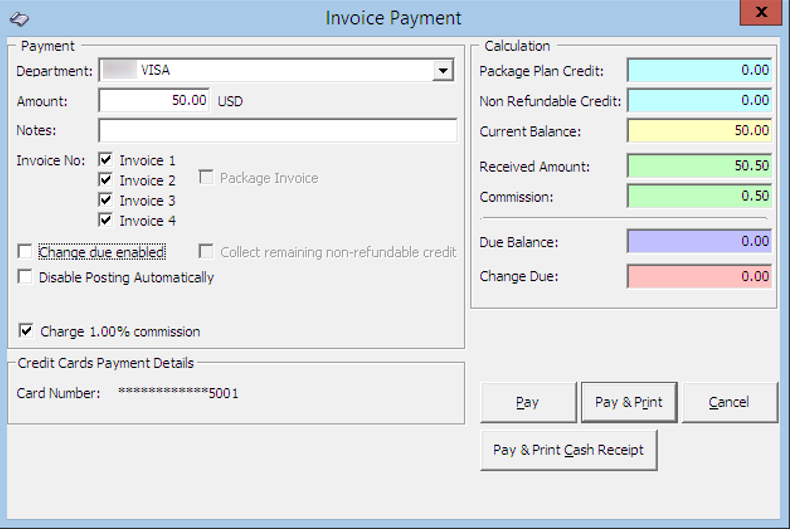
The Pay Invoice function is a settlement process against an invoice, be it part or full payment. As the Ship accepts various payment method, the process in applying these payments may vary.
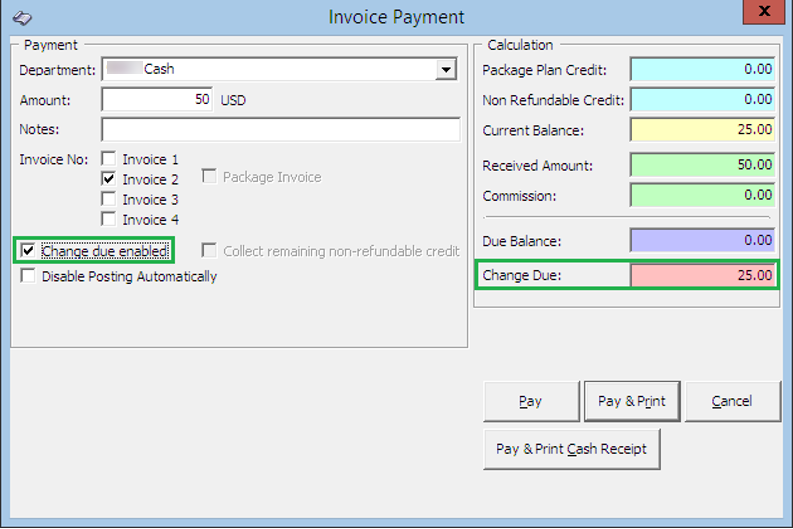
Figure 2-38 Invoice Payment Window
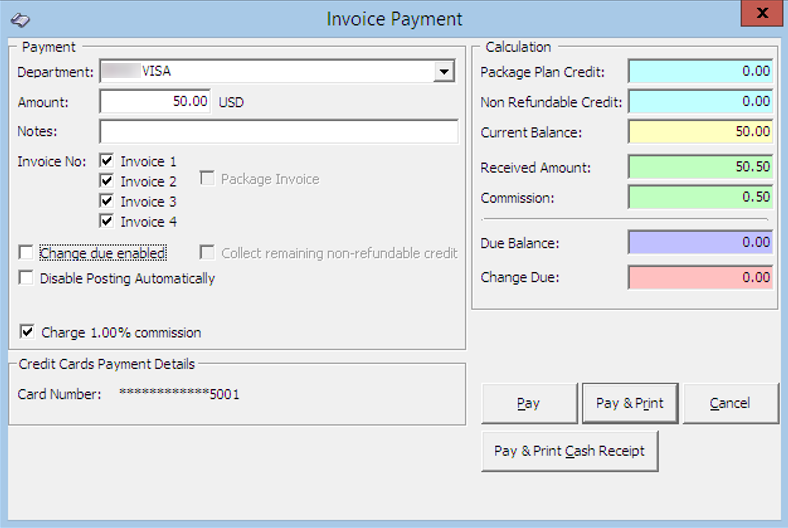
Table 2-19 Field Definition of Invoice Payment Window
| Field | Description |
|---|---|
|
Department |
Financial Department codes - Credit |
|
Amount |
Total amount due by guest, depending on the invoice no. selection. |
|
Notes |
Additional notes pertaining to this payment |
|
Invoice Number |
Invoice number to apply the payment. |
|
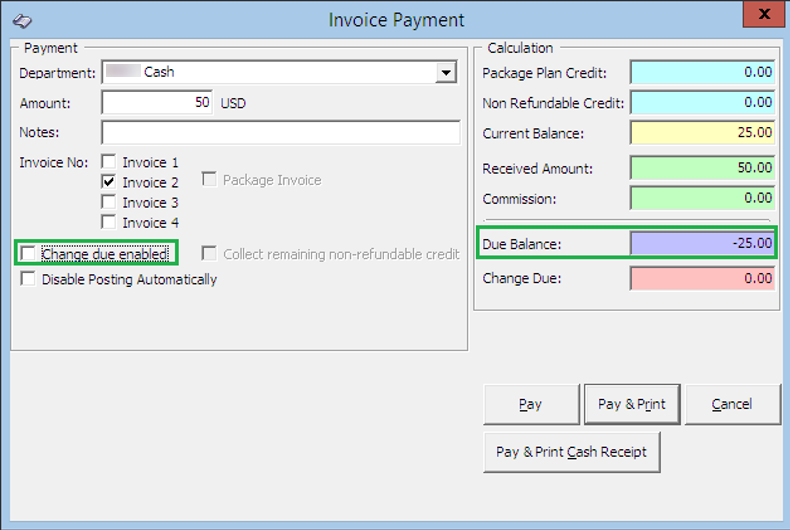
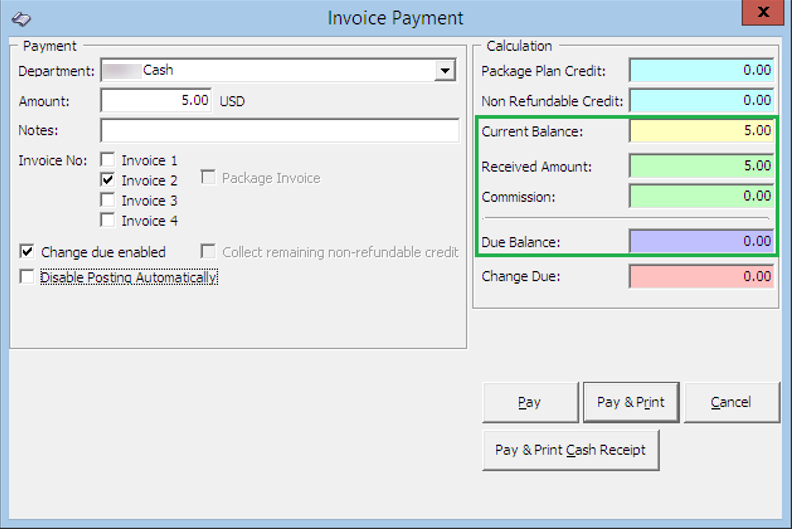
Change due enabled |
Enable auto calculation of change due to guest. |
|
Disable Posting Automatically |
Disable postings being posted into the invoice. This sets the Posting Allowed to No in Guest Info tab. |
|
Charge 1% Commission |
Credit Card commission charge. Amount auto populate in Commission field when checked. |
|
Credit Cards Payment Details |
Displays masked credit card number assigned to this invoice. |
|
Package Plan Credit |
Eligible credit value for Package Plan posting. |
|
Non Refundable Credit |
Credit value non-refundable to the guest. |
|
Current Balance |
Current Invoice Balance |
|
Received Amount |
Amount received. |
|
Commission |
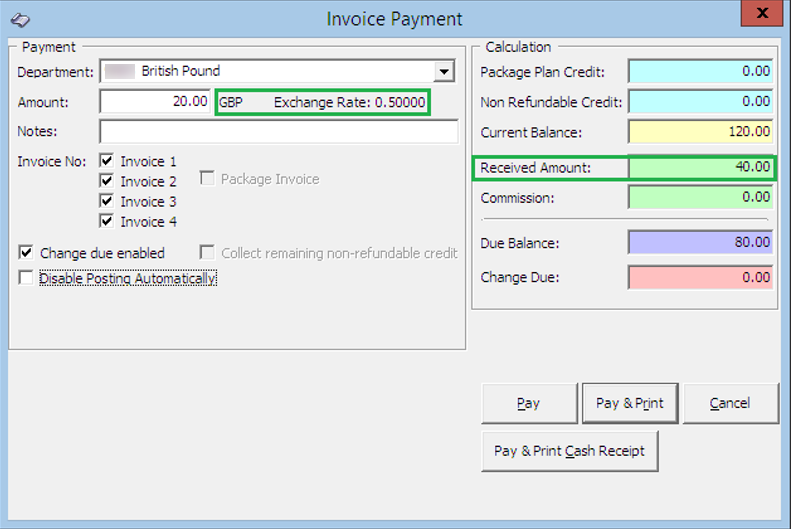
Applicable credit card/foreign exchange commission value. Calculate when Charge 1% Commission is ticked or when the foreign exchange has commission defined. |
|
Due Balance |
Outstanding sum after deducting payment applied. |
|
Change Due |
Balance due to guest when payment applied is more than invoice value. |
|
Pay |
Apply payment receipted and does not print cash receipt. |
|
Pay & Print |
Apply payment receipted and print invoice at the same time. |
|
Pay & Print Cash Receipt |
Apply payment receipted and print cash receipt at the same time. |
Payment by Cash, Change Due
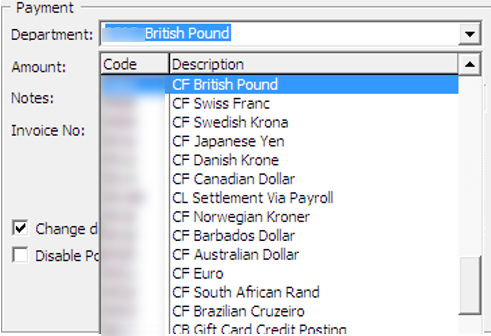
The Change Due function calculates the amount of change due to a guest when payment method is either cash or foreign currency. The option is available to default the “change due enabled” to be permanently checked. If this is not set as default, the user must check this option to activate the automatic change due calculation when applying to the payment.
Paying an Invoice by City Ledger
City ledger settlement is only permissible when there is a pre-arranged payment mode. For example, the account is settled by a company or an agent within agreed payment terms. The invoice is typically transferred to an Account Receivable, being the holding account and will age until payment is received.
Disable Posting Automatically
Figure 2-46 Disable Posting Automatically
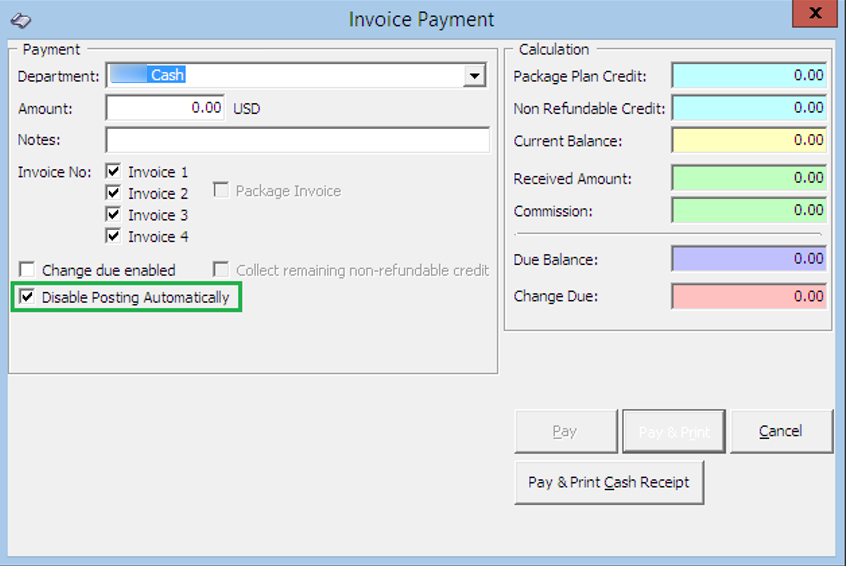
Figure 2-47 No Posting Allowed in Guest Info Tab

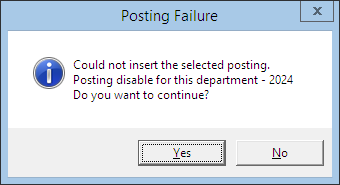
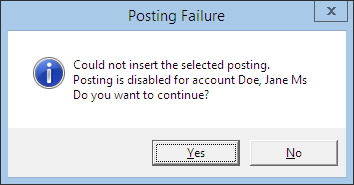
The system prompts below message when user tries to post a charge to this invoice and rejects the posting.
Figure 2-48 Disable Posting Prompt
Print Invoice
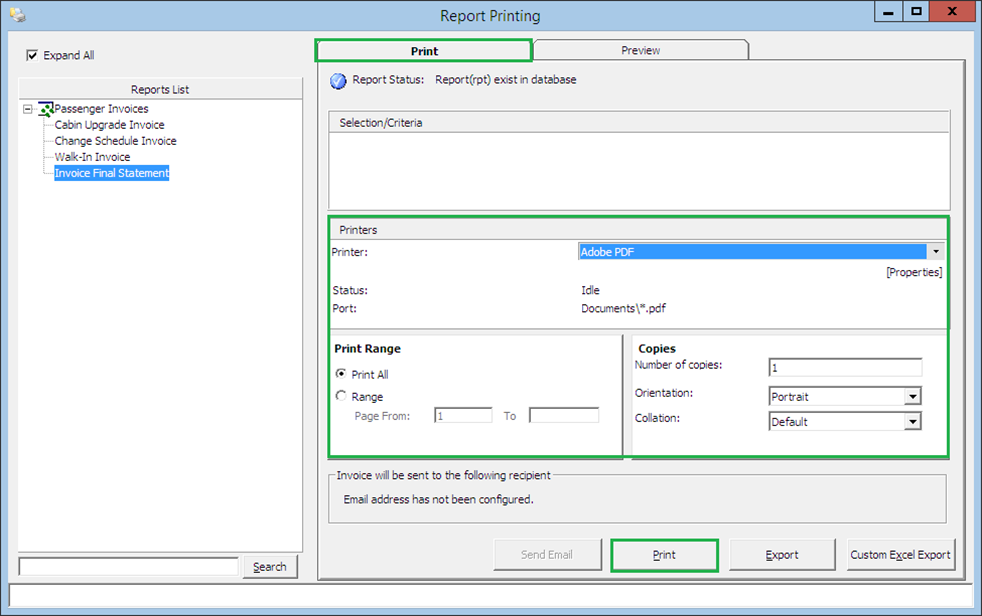
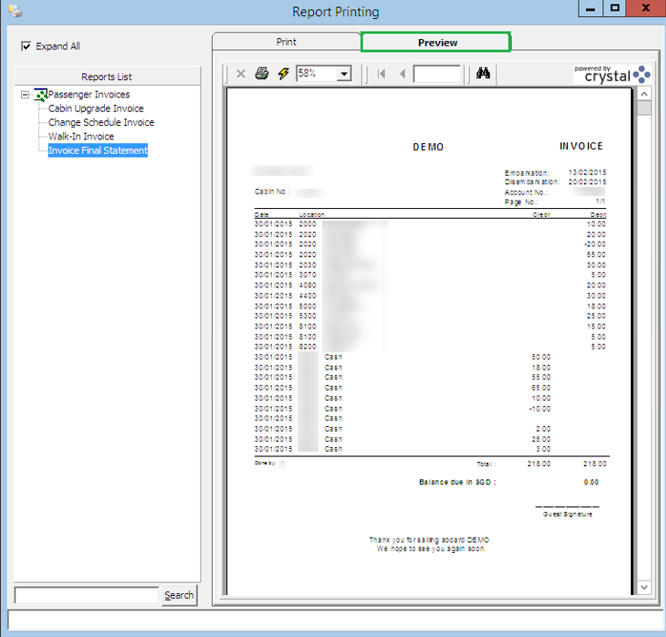
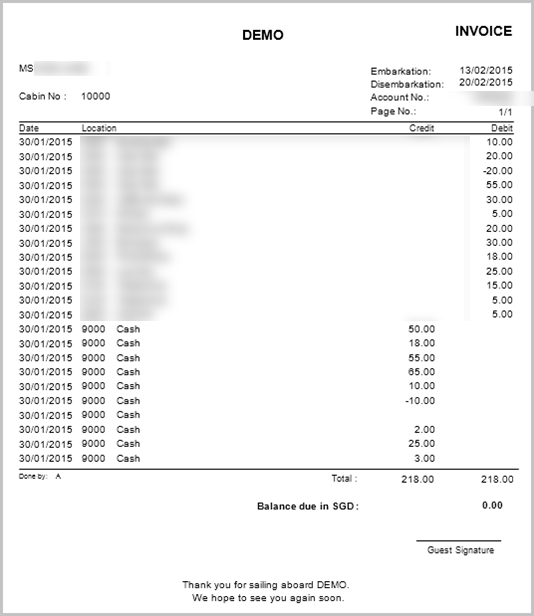
The Print Invoice function enables you to print invoices in a different layout, made available by the Ship. It has a preview function which allows you to view an invoice/statement prior ro printing a hard copy invoice.
Printing an Invoice
Preview Invoice
This function enables you to preivew the invoice prior to sending the job to a printer.
Emailing an Invoice
In a paperless environment, a copy of the invoice may be sent to the guest’s email account, only when on-board email is listed in the guest account. A special setup is required before an invoice can be used out by email. Such entry requires setup by your System Administrator.
- Repeat step 1 and 2 of Printing an Invoice.
- In the Print tb, press the Send Email button and you will receive a prompt once the emailis successfully sent.
- Click OK to close the function.
Exporting an Invoice
The system allows export of invoices intoanother file format. The supported file formats are: Acrobat Format, Crystal Report, MS Word, MS Excel and many more.
Custom Excel Export
This function exports the invoice into a predefined Excel format.
- Repeat step 1 and 2 of Printing an Invoice.
- In the Print tab, press Custom Excel Export.
- Enter the file name to save when the system prompts for file saving location.
Move & Route
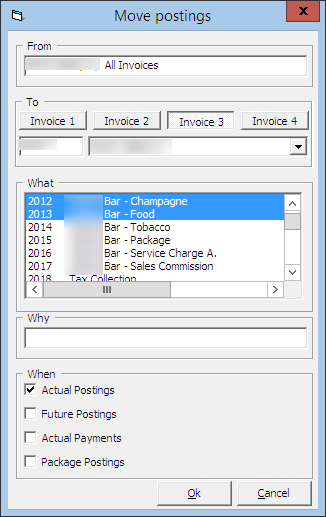
The Move and Route function enable bills to be organized at the time of credit sign up, during the cruise or at the end of the cruise when a guest would like to separate certain charges from the main invoice. Charges are easily moved using the drag and drop movement and various method is available to suits the operational needs.
Moving a charge from one invoice to another
Setting Up Charge Route
The following function allows guest to separate certain charges in another invoice throughout the cruise or route to another account. It would be more feasible to set up routing instructions to move both current and future postings to a new invoice.
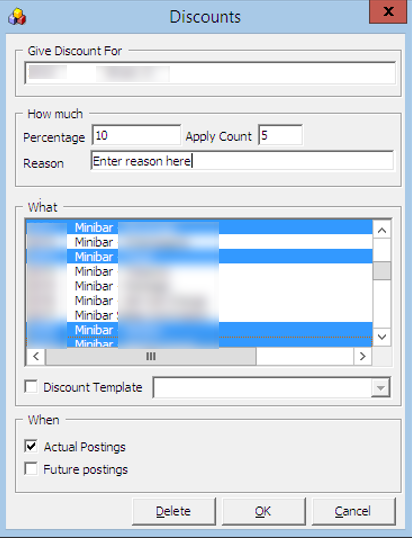
Criteria Discount
The following function works the same as Percentage Discount in Disc, Route, Pkg tab and has an additional check box for Actual Postings. The function creates a record in discount portion in Disc, Route, Pkg tab when Future Posting is checked.
See also Disc, Route, Pkg.
Item Discount
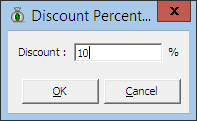
The Item Discounts is a function that deducts a specific percentage of selected postings on the guest invoice.
Note:
This is a Percentage discount and not available as value discount.According an Item Discount
Hide No Print
This function works with transactions that are marked with No Prints, for example: voided transactions. The process changes the information displayed, giving you an organized invoice view.
Hiding Transactions with No Prints
- Click Hide No Prints to switch the button from Hide No Prints to Show No Prints.
- Transactions marked with No Prints (pale yellow) are then hidden from the invoice window until user clicks the Show No Prints.
To Show No Prints Transactions
Transactions Marked with No Prints
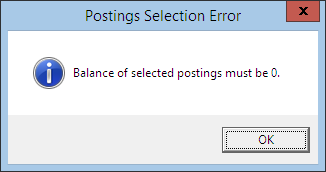
Transactions marked with No Prints are shown on the invoice window, in pale yellow. This function enables you to hide the voided posting or previous settlements from being printed on the invoices. It is only possible to set no prints for transaction entry equals to 0.00.
Figure 2-62 No Print Posting Not Equal to 0
- Retrieve the account and navigate to the Invoice tab.
- Select the desire transactions and click No Print.
- If the transaction balance does not equal to 0.00, the system then prompts an error message.
To Reset No Print Transactions to Original State
- Select the No Print transactions, then click No Print.
- Transactions are revert to normal posting and no longer shown in pale yellow.
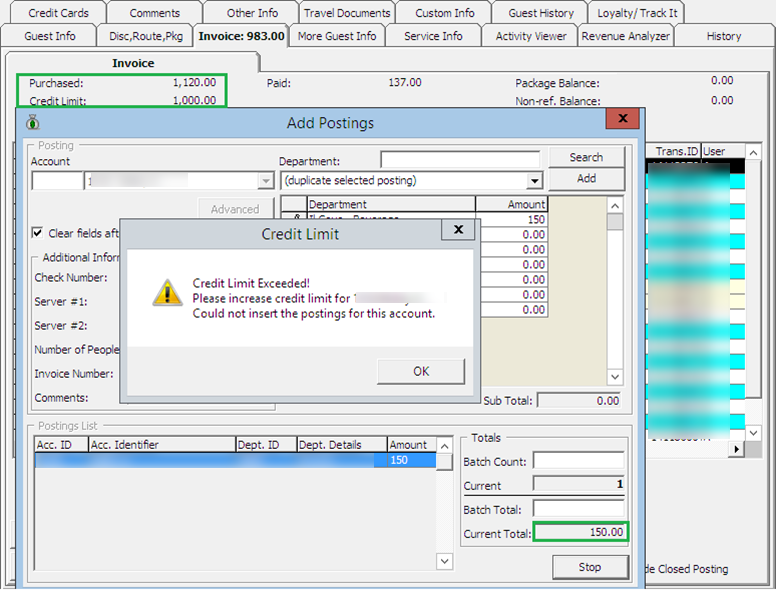
Set Credit Limit
The floor limit is a pre-set within the Financial Credit Sub-Department code and this can be adjusted for specific guest at the jurisdiction of the Chief Purser.
Set Credit Limit
The floor limit is pre-set within the Financial Credit Sub-Department code and this can be adjusted for specific guest at the jurisdiction of the Chief Purser.
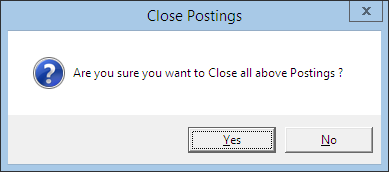
Close Posting
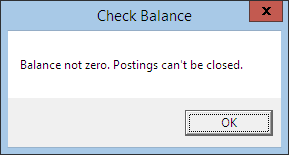
The Close Posting function generates an interim invoice and closes the balanced account without checking out the account. This function does not work when the account still has a balance.
WARNING:
Once the account is closed, this Can Not Be Undone.Set Spending Limit
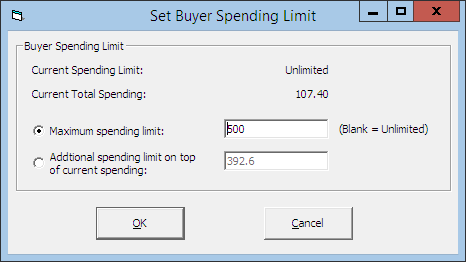
Set Spending Limit function limits the buyer spending value and is only enabled when an account is routed to another account, for example: Mr X is paying for Mr Y and would like to limit the spending of Mr Y to $500. The Set Spending Limit is enabled in Mr. Y account and not Mr. X.
WARNING:
Once the account is closed, this Can Not Be Undone.Set Spending Limit
Show Pre-Cruise Invoice
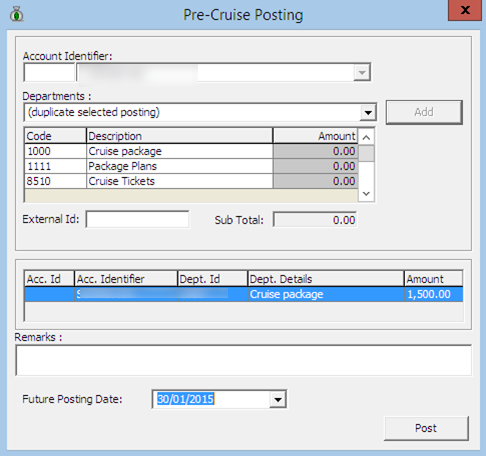
Pre-Cruise Invoice allows you to prepare an advance invoice for the guest. Postings and payments posted in Pre-Cruise INvoice function are not actual revenue until they are posted to a checked in account.
Creating a Pre-Cruise Invoice
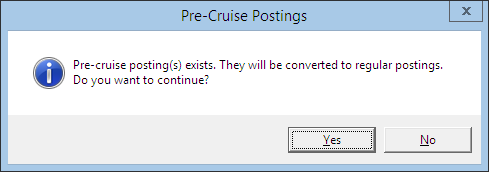
Undoing Non-Converted Pre-Cruise Posting
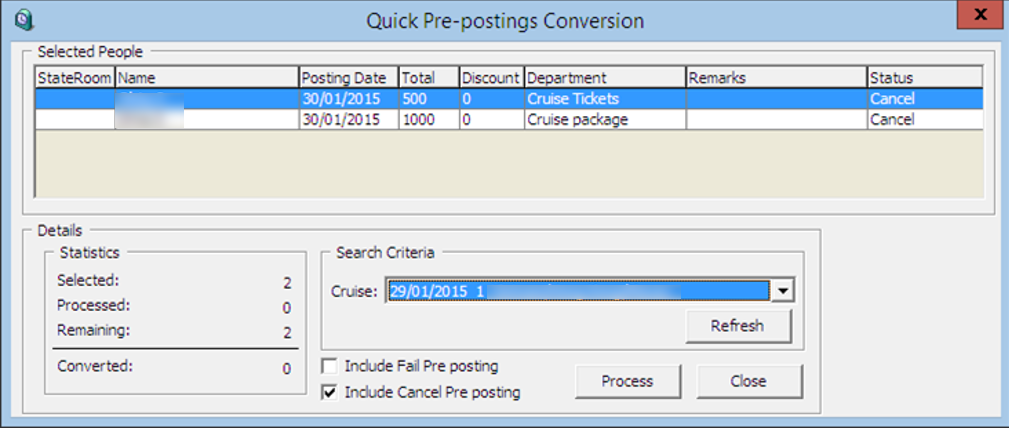
When you accidentally click No at the prompt to convert pre-cruise postings to regular postings, these postings are stored in Quick Pre-Posting Conversion function, allowing you to repost all the pre-posting.
More Guest Info Tab
The More Guest Info tab stores various information's such as Billing Address, Travel Agency contact, Cruise Reservation Related Information, guest picture and Document Return status, and most of all fields in Billing Address, Travel Agency and Product Details section are editable with an in-line edit function by simply clicking on the field name and insert the text. Editing other sections such as Take Picture, Edit Cruise Fare and Document Return would require the user to click on the available buttons.
Figure 2-72 More Info Tab
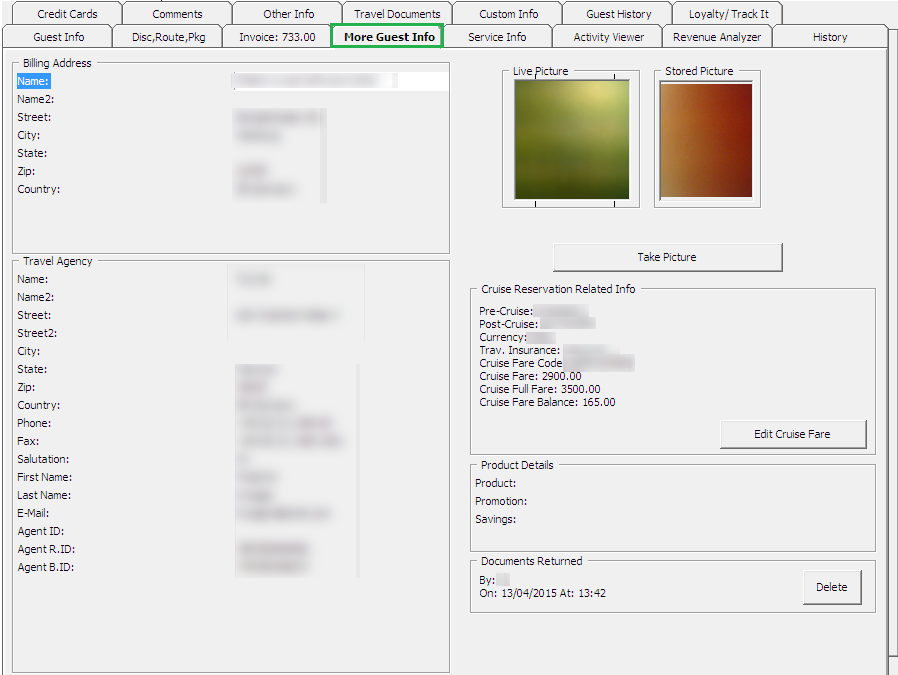
Table 2-22 Field Definition of More Info Tab
| Field | Description |
|---|---|
|
Name |
Billing Name |
|
Street |
Billing Address |
|
City |
City of Billing Address |
|
Zip |
State of Billing Address |
|
State |
Country of Billing Address |
|
Country |
Table 2-23 Field Definition of More Info Tab (Travel Agency)
| Field | Description |
|---|---|
|
Travel Agency |
|
|
Name |
Travel Agency Name |
|
Street |
Street Address of Agency |
|
City |
City |
|
State |
State |
|
Zip |
Zip Code |
|
Country |
Country |
|
Phone |
Phone number of Travel Agency |
|
Fax |
Fax number of Travel Agency |
|
Salutation |
Salutation of contact person |
|
First Name |
First name of contact person |
|
Last Name |
Last name of contact person |
|
|
email address of contact |
|
AgentID |
Agency ID |
|
Agent R.ID: |
Additional Agency ID |
|
Agent B.ID |
Additional Agency ID |
Table 2-24 Field Definition of More Info Tab (Take Picture)
| Field | Description |
|---|---|
|
Take Picture |
|
|
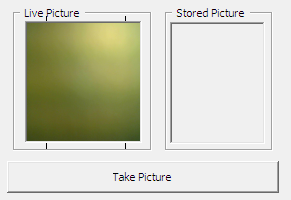
Live Picture |
Live view of the guest before picture were taken |
|
Stored Picture |
Picture saved using Live Picture function |
Table 2-25 Field Definition of More Info Tab (Cruise Reservation Related Info)
| Field | Description |
|---|---|
|
Cruise Reservation Related Info |
|
|
Pre Cruise |
Pre-Cruise arrangement. Information imported via DGS. |
|
Post Cruise |
Post-Cruise arrangement. Information imported via DGS. |
|
Currency |
Cruise Fare Currency. Information imported via DGS. |
|
Trav. Insurance |
Travel Insurance number. Information imported via DGS. |
|
Cruise Fare Code |
Fare code from the reservation system. Information imported via DGS. |
|
Cruise Fare |
Cruise Fare. Information imported via DGS. |
|
Cruise Full Fare |
Full Cruise Fare. Information imported via DGS. |
|
Edit Cruise Fare |
Function to edit cruise fare balance. User right dependent. |
Table 2-26 Field Definition of More Info Tab (Product Details)
| Field | Description |
|---|---|
|
Product Details |
|
|
Product |
Product code linked to the booking |
|
Promotion |
Promotion code linked to the booking |
|
Savings |
Discount code linked to the booking |
Table 2-27 Field Definition of More Info tab (Return Documents)
| Field | Description |
|---|---|
|
Return Documents |
|
|
Documents are not returned |
Indicate the date/time and user who returned the guest travel document. |
Take Picture
Taking Guest Picture
- Retrieve the account and navigate to the More Info tab.
- The live image of the guest is displayed in the Live Picture window.
- Click the Take Picture button to capture the image.
Figure 2-73 Take Picture
Cruise Reservation Related Info
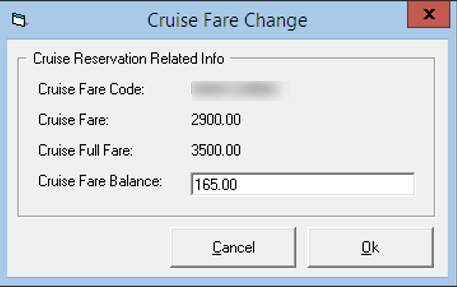
The Cruise Reservation Related Info section displays the cruise price paid in Reservation system, and these data are imported from DGS ResOnline. The fields are non editable, except for the Cruise Fare Balance, and it is dependent on User Access Rights #4461.
Editing Cruise Fare
- In the More Info tab, click the Edit Cruise Fare.
- Edit the Cruise Fare Balance and then click OK to save.
Figure 2-74 Edit Cruise Fare
Document Return
The Document Return section stores the date, time and user who returned the travel documents to the guest via the Document Return module.
Figure 2-75 Document Return in More Guest Info

- In the More Info tab, click Delete to reset the document status.
- This changes the button display to Return and status of the document as ‘Documents are not returned’.
Service Info Tab
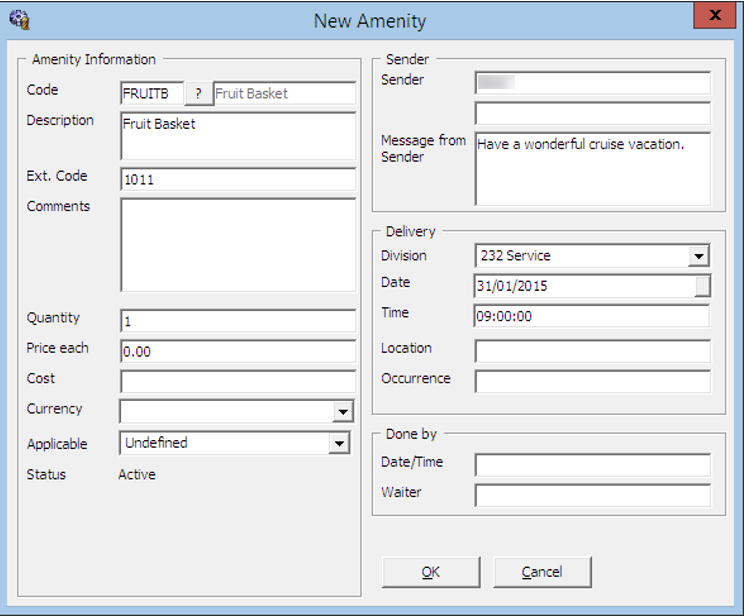
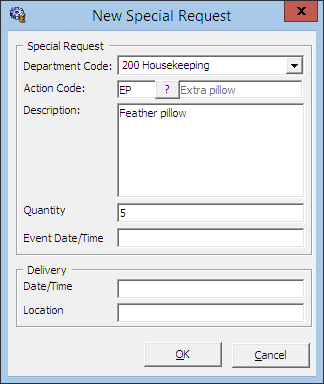
The Service Info function in Guest Handling window stores the type of service, amenities package or special requests rendered by the ship, without having to rely on the large manifest for information. The packages and requests arranged by the cruise company prior to actual sail date are also included in the reservation information during the periodic import. Although these information’s are mainly updated through reservations import file, manual update is possible when needed. Besides listing these requests under individual guest records, a summary of such information are populated in Amenities Overview function, allowing the responsible parties on board such as Manager, Chief Steward, Hostess/Group Coordinator an access, and ensuring requests are fulfilled.
Figure 2-76 Guest Handling — Service Information Tab
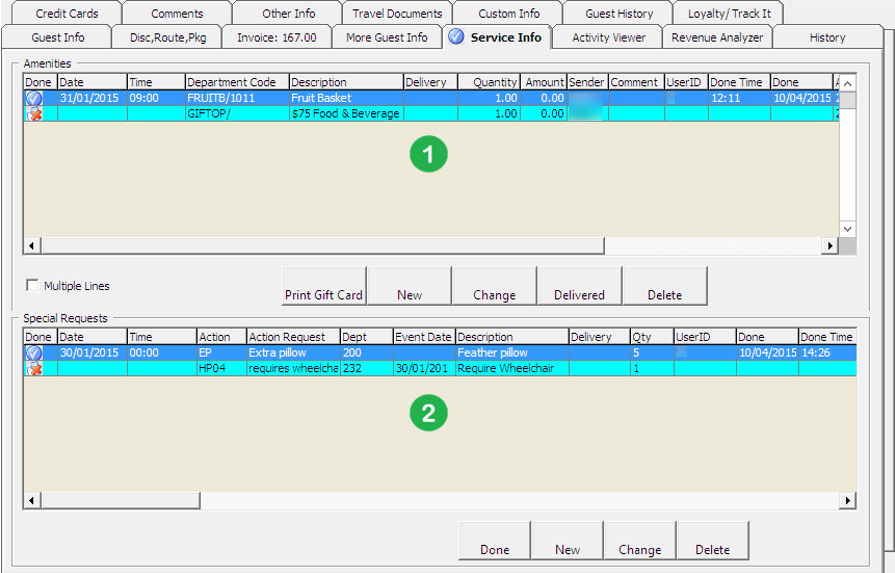
The window is divided into two sections:
- The section contains details of pre-planned company packages or any amenities to be accorded during the cruise.
- The section contains all the Special Request for a passenger with special needs.
Marking Items as Delivered
-
Select the item from the Amenity/Special Request section and then click Delivered.
-
The system then replaces the Red X envelope with a Check Mark in the Done column, with its Date/Time and User who complete the task shown
Figure 2-80 Amenities/Special Request Delivered Items

-
Click the OK to save, and this adds the items to the Special Requests section and a Red X envelope under Done column
-
The system places a check mark on the Service Info tab as an alert that there are entry needing follow-up.
Activity Viewer Tab
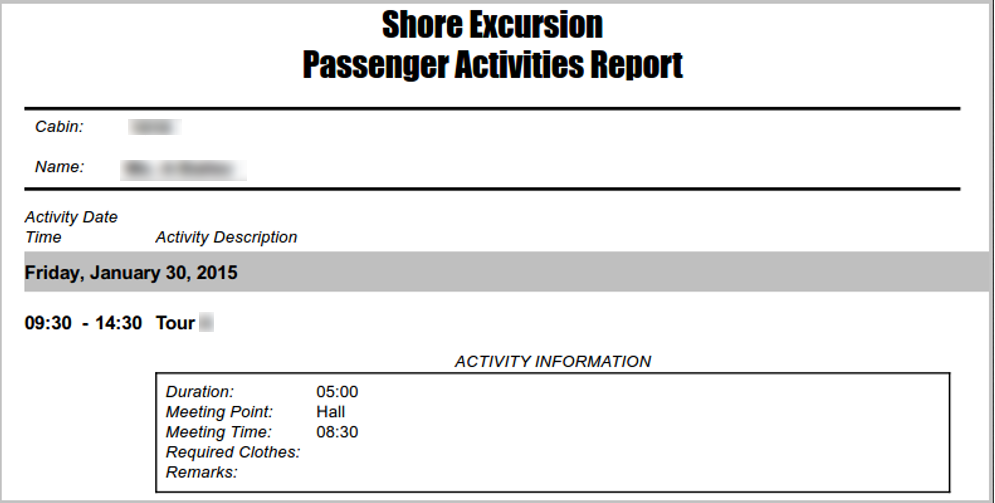
The Activity Viewer tab provides users a quick view of the activities signed up by the guest, be it Excursion, Dining arrangements or Spa booking, thus enabling them to locate the guest or follow up on up-coming activities. The information’s displayed are controlled by two (2) Parameters. Please contact Support/Consultant for the supported template setup/usage.
Figure 2-81 Activity Viewer Window
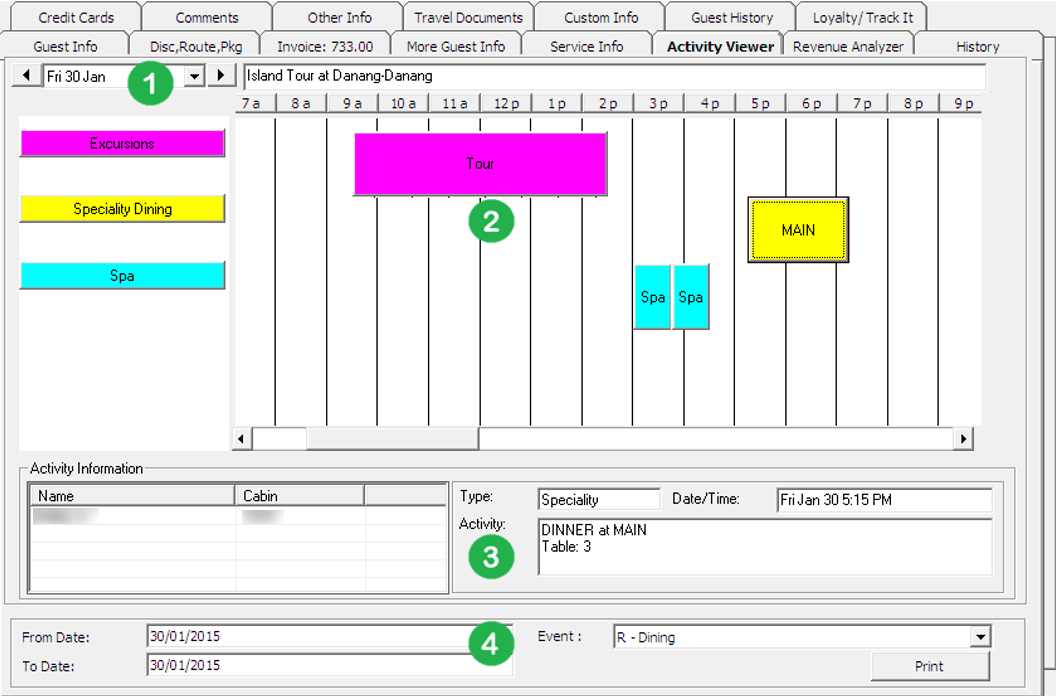
Table 2-29 Activity Window
| Field | Description |
|---|---|
|
1 |
Date/Time grid of activity window |
|
2 |
Type and scheduled time of activities |
|
3 |
Details of selected activity |
|
4 |
Date/Time of event filter for Itinerary print out |
By default, the time grid is set to an hourly grid and this can be easily changed by right-clicking on the time grid, and then select the desired time frame to display.
Figure 2-82 Changing Time Frame
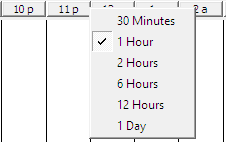
The activity time in the grid are indicated according to the color define for each type of activity.
Navigating Through Activity Viewer
- On the date field, select either the date to display using the down arrow key, or use the arrow left/right to navigate to previous or next day view.
- Use the scroll bar to navigate to the previous or future time period.
- Clicking the activity bar in the grid view will further display information such as passenger name of the selected cabin, activity type, activity date and time of a selected event outlet or table reservation in Activity Information section.
- An itinerary can be printed from the same window. A report configuration under report group Itinerary is required prior to printing an itinerary. See Administration User Guide, Report Setup section for report configuration steps.
Revenue Analyzer Tab
The Revenue Analyzer provides a revenue analysis of selected guest by date, department and transaction number order. It comprises two tabs - Department Details and Item Details. By default, information displayed on the window are imploded and only the transaction date, net total and gross total are shown. In order to view a detailed information, place a check mark inExpand All or manually click the ‘+/-'key to show/hide the column or click the arrow downon the drop-down list to further expand the information of respective column.
Figure 2-85 Revenue Analyzer Tab
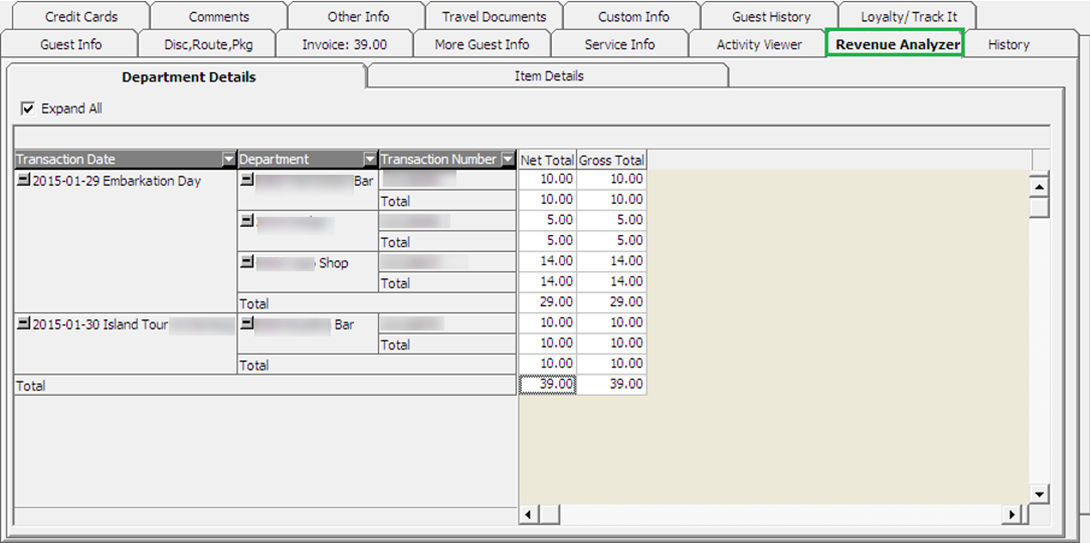
Table 2-30 Field Definition of Revenue Analyzer
| Field | Description |
|---|---|
|
Transaction Date |
Date transaction was posted |
|
Department |
Financial Department |
|
Transaction Number |
System generated transaction ID |
|
Total |
Sub-total of each Financial Department |
|
Net Total |
Total Net amount (Total value excluding discount) |
|
Gross Total |
Gross amount (Total value before discount) |
History Tab
The History tab stores future and past reservation records, as well as the cabin change log. Other than the Future Reservations section where the user is able to insert, edit and remove a reservation, all other information on this window are non-editable.
Figure 2-86 History Tab
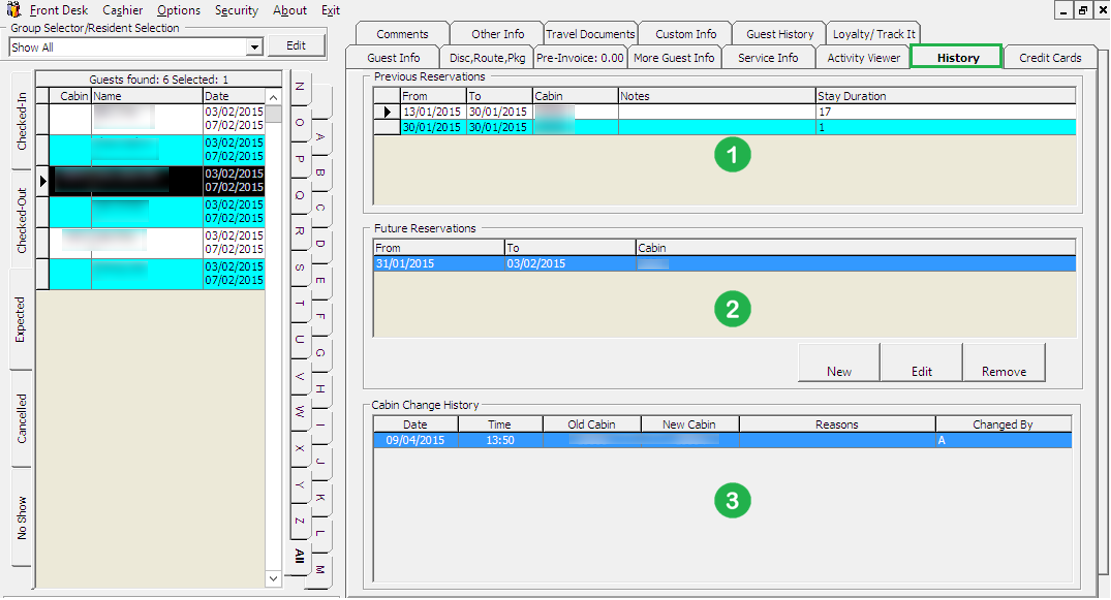
Table 2-31 Field Definition of History Tab
| Field | Description |
|---|---|
|
1 |
This section stores records of previous reservations by date, cabin number, notes and overall stay duration. Records are captured once user checks out the guest. |
|
2 |
This section stores records of future reservations. During system data change, the system checks for future. |
|
3 |
This section stores records of cabin assigned to the guest during their stay, including future reservations if any. |
Creating Future Reservation
- Click New to open the Future Reservations form.
- Enter the Cabin number and select the Expected Embarkation/Disembarkation Date.
- Click OK to save and the record is inserted in the Future Reservation section.
Figure 2-87 Creating Future Reservation
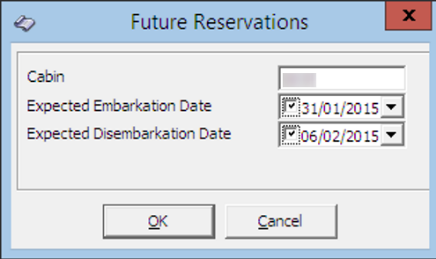
Editing Future Reservation
- In the Future Reservation section, select the future reservation.
- Click Edit to open the Future Reservations form.
- Alter the information and then click OK to save the changes.
Removing Future Reservation
- In the Future Reservation section, select the future reservation.
- Click Remove to remove the record.
Comments Tab
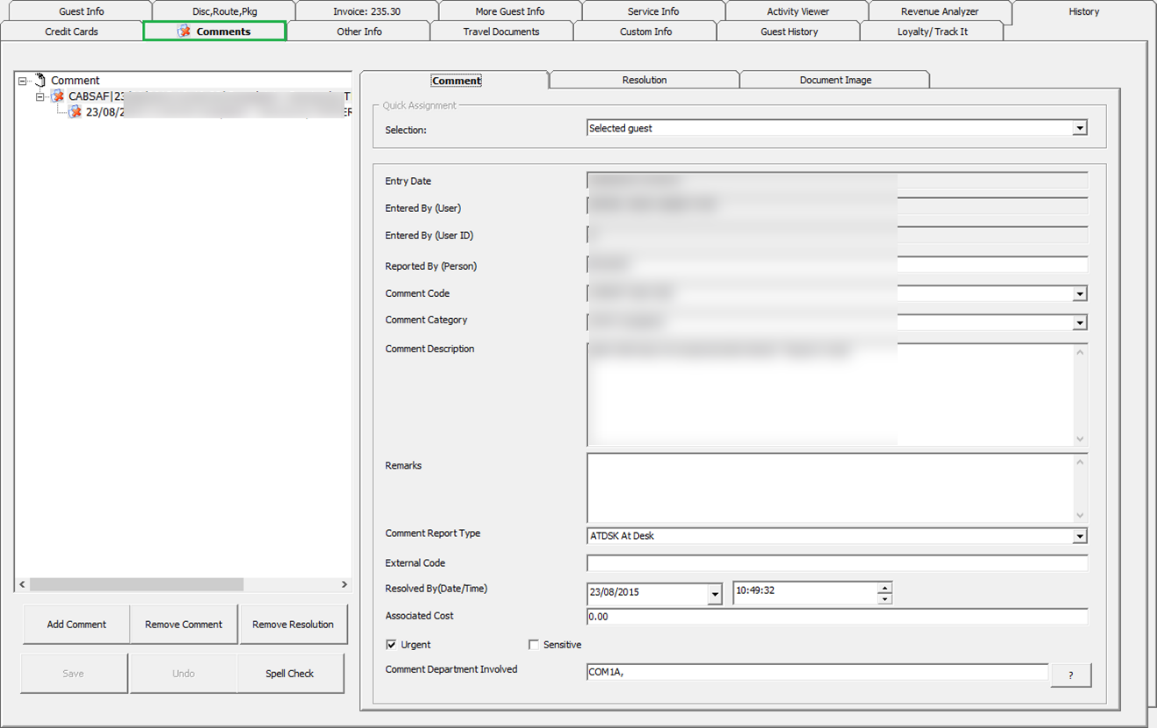
The Comments tab enable you to follow ups on feedback/complaints received pertaining to a cabin, services rendered, facilities and etc. You can scan or attach an image file besides inputting a comment.
Figure 2-88 Comments Tab
Adding a Comment/Sub-Comment
- Click the Add Comment.
- In the Comment tab, select the relevant fields using the drop-down list.
- Enter the Reported By, Comment description, Additional Cost and check the urgency and sensitivity, if any.
- Click Save to save the record. This places a Red Cross indicator on the Comment.
- When you select a Comment and click on Add Comment, this creates a sub-comment, defaulting the heading the same as main Comment Category and Comment Description and they are not editable.
Attaching Image File
- At the Document Image tab of the comment, click Scan Document or Upload File to upload an image from a storage location.
- Click Save to save the image to the database.
Resolving a Comment
- Select the main comment and then navigate to the Resolution tab.
- Enter the Resolved by (Person)and Resolution Description, and then check mark the Resolved check box.
- Click Save to save the resolution. This places a check mark next to the comment(s).
- Checking the Resolved check box will set all sub-comments as resolved.
Other Info Tab
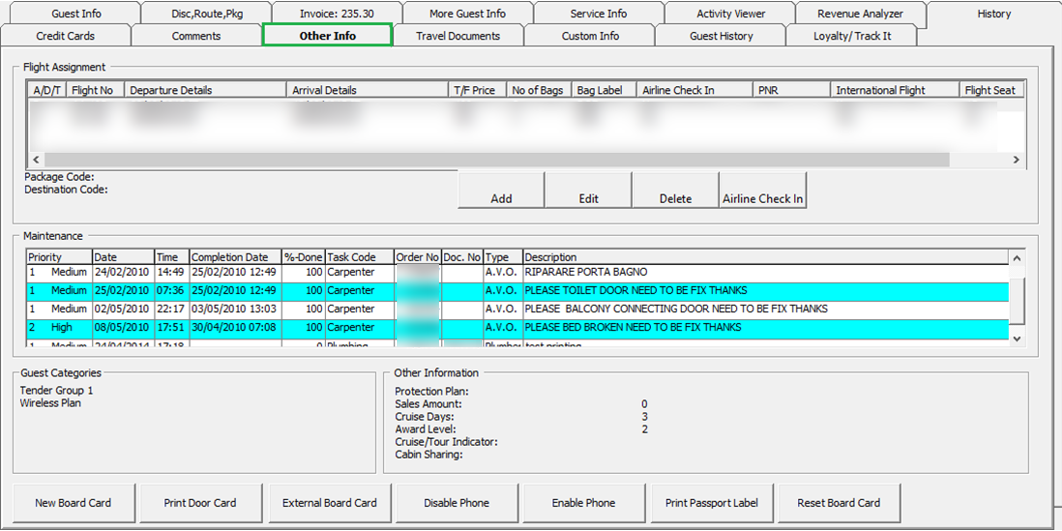
Other Info tab stores the passenger flight assignment, cabin maintenance tasks and other general information. Other functions included in this tab are board card printing, enabling/disabling phone and printing passport label.
Figure 2-89 Other Information Tab
Flight Assignment
Arrival/departure flight information and transfers arrangements are updated in the Flight Assignment section.
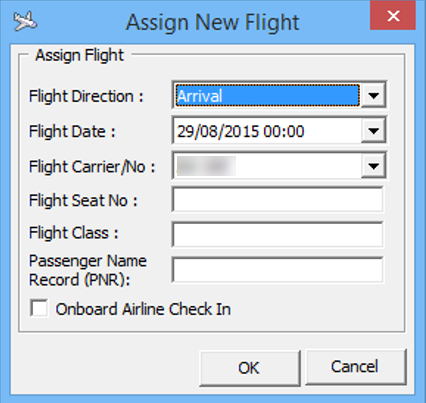
Figure 2-90 Flight Assignment in Other Information Tab
Adding arrival/departure flight details
- Click Add in the Other Info tab, Flight Assignment section.
- Select the Flight direction, date, Flight Carrier from the drop-downlist and enter the Seat No, Flight Class and Passenger’s Name.
- Click OK to save the record.
Note:
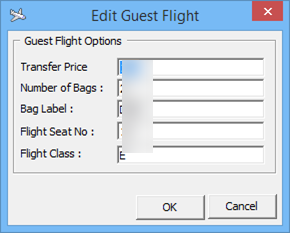
The Edit assignment only allows you to edit the Transfer price, no. of bags, bag label or Seat number.Figure 2-91 Edit Flight Assignment
Maintenance
The Maintenance section displays all maintenance task related to selected cabin, regardless of its completion status and these task are entered in Maintenance module..
Guest Categories
The Gust Categories section displays the selected information from Edit Information, Guest Categories check box. These information’s are configured in Administration, System Codes, Guest Categories codes.
Guest Categories / Other Information
The Guest Categories and Other Information section displays the selected information from Edit Information, Guest Categories check box and various fields in Name/Reservation section.
Travel Documents Tab
Details of the guest passport, identification or any travel documents captured through passport/ID scanning device are stored in this tab and are purged at the end of the cruise or according to the policy defined by the Ship.
Figure 2-92 Travel Documents Tab
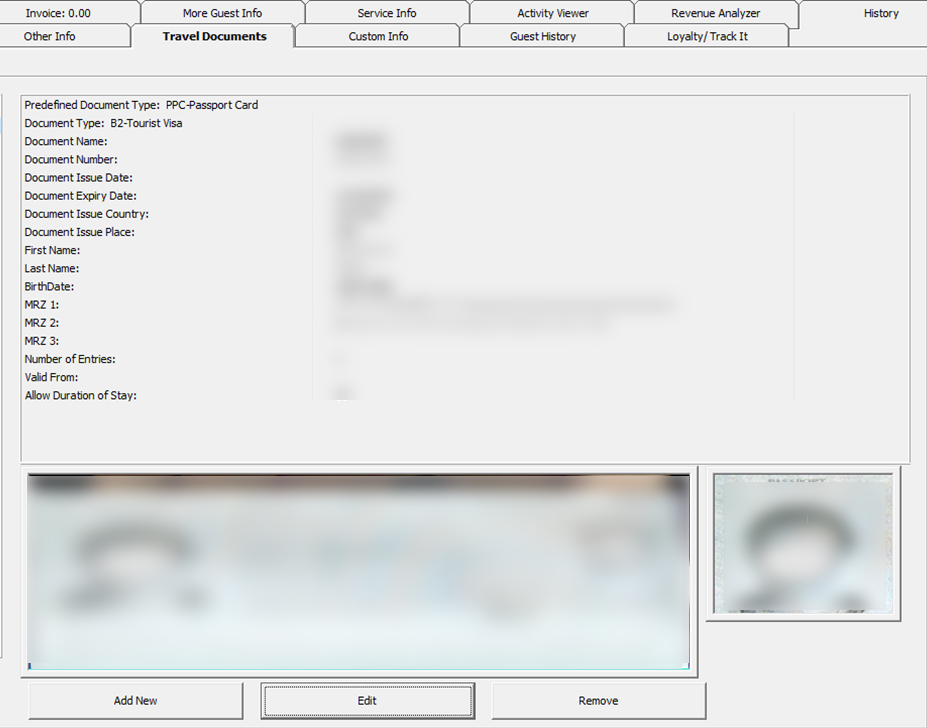
Table 2-32 Field Definition of Travel Documents
| Field | Description |
|---|---|
|
Predefined Document Type |
Document type configured in Administration Module, for example: passport, identification card. |
|
Document Type |
Type of Visa |
|
Document Number |
Passport or ID number |
|
Issue Date |
Document issue date |
|
Expiry Date |
Document expiry date |
|
Birthdate |
Passenger Birthdate |
|
Issued Country |
Country document were issued |
|
Valid From |
Validity of document |
|
Document Name |
Document type |
|
Issued Place |
Document issued place |
|
Last Name |
Last Name |
|
Code MRZ1 |
Machine Reader Track 1 |
|
Code MRZ2 |
Machine Reader Track 3 |
|
Code MRZ3 |
Machine Reader Track 3 |
|
Number of Entries |
Number of entries allowed |
|
Allow Duration of Stay |
Allowed duration of stay on each visit |
Adding/Editing a Travel Document
Figure 2-93 Travel Document Add/Edit Window
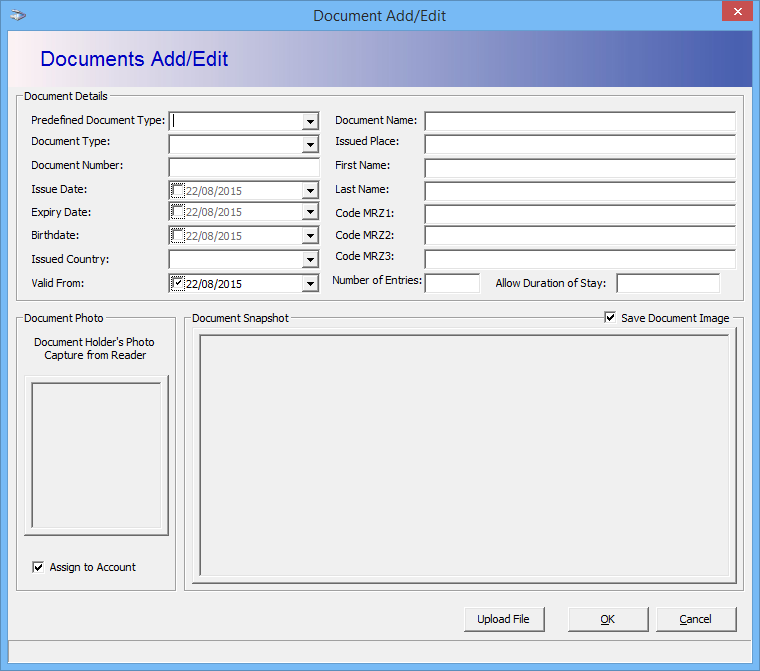
- In the Travel Documents tab, click Add new to open the Document Add/Edit form.
- Fill in all relevant information using the drop-down list or manually enter them.
- Click Upload File to upload the picture or scanned a document.
- Click OK to save the travel document.
- To edit, click the Edit, update the relevant information, and then click OK to save.
Custom Info Tab
The Custom Info tab is a user definable field that allows you to customize the field according to your operational requirements. The field names are defined in Administration, User Definable Field Setup guide.
Guest History Tab
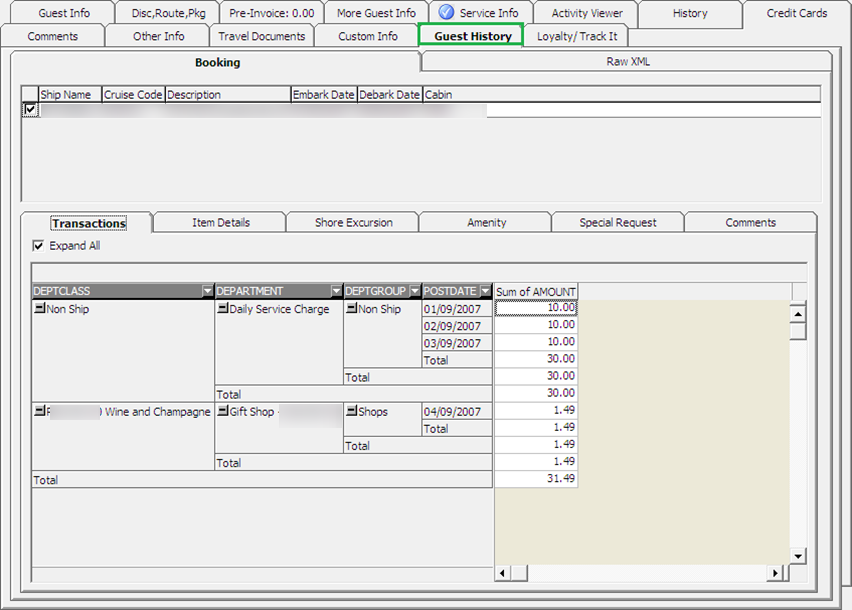
The Guest History tab captures the history of the guest from various ships such as reservations, the amount spent, amenity and special requests, and these data are transferred from Shoreshide Fleet Management System database through an ResOnline Interface. The Guest History window comprises two main tabs - Booking and Raw XML.
Booking tab
The Booking tab is segmented into five different views and they are: Transactions, Item Details, Shore Excursion, Amenity, Special Request and Comments.
Figure 2-94 Guest History Tab
Transactions Tab
The first tab of the Booking tab is Transactions. In this tab, past transactions from previous cruises sorted by Department class, Department code, Department Group, Postdate and Sum of amount are shown.
Pressing the +/- or the arrow down key will explode or implode the details under each station, enabling information in each respective columns to be further drilled down.
Figure 2-95 Department Check Box

Item Details
The Item Details tab list all the POS Postings in details.
Shore Excursion
The Shore Excursion tab displays past excursions participated by the guest.
Amenity
The Amenity tab displays past chargeable amenities requests from previous cruises.
Special Request
Special Request tab displays the request history during each stay whilst on-board.
Comments
The Comments tab displays past comments inserted on previous cruise.
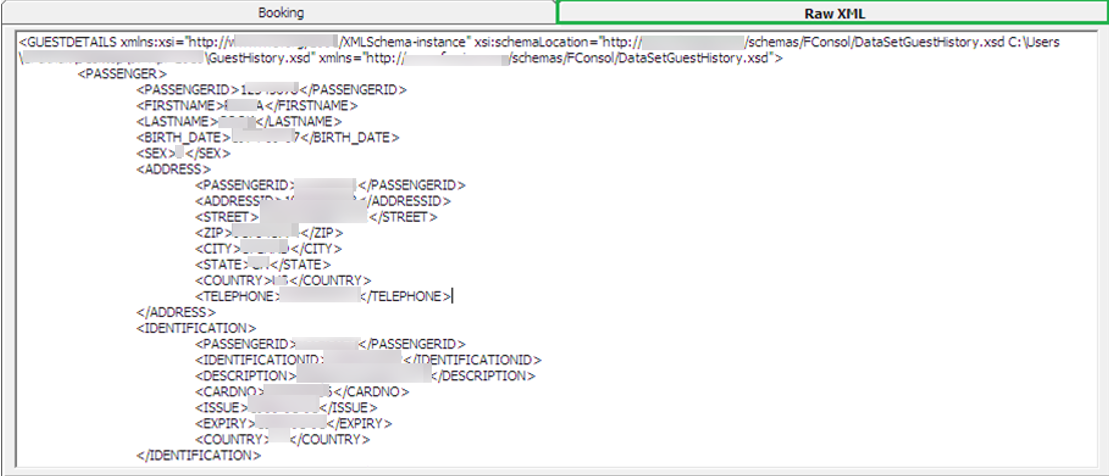
Raw XML
The Raw XML tab shows the actual passenger history in XML format that was sent from Reservation Online to the ship database.
Figure 2-96 Guest History Raw XML Tab
Loyalty/TrackIt Tab
Loyalty/TrackIt tab provides a quick overview on the loyalty program the passenger is attached to, and items that were confiscated or returned during embarkation/disembarkation, and the confiscated items are managed in TrackIt module.
Loyalty Assignment
A guest may sign up a loyalty program through the course of the voyage and information such as loyalty card number, points balance, personal details are stored in this tab.
Figure 2-97 Loyalty Program Form
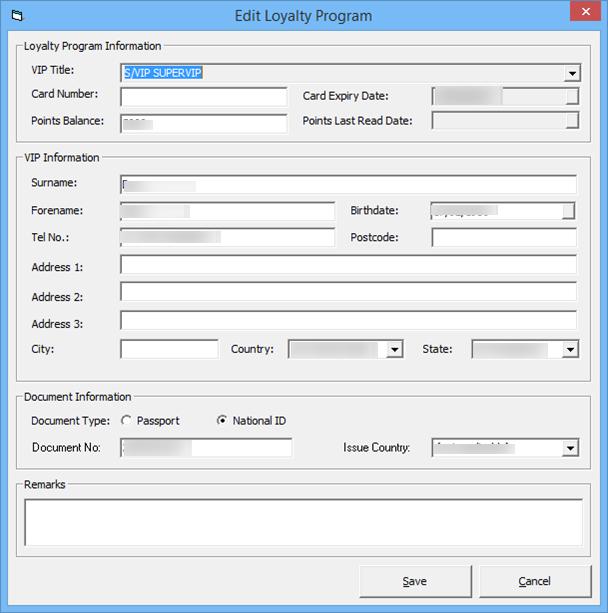
Adding / Editing a Loyalty Program
- In the Loyalty/TrackIt tab, click Add to open the Edit Loyalty program form.
- Fill in all relevant information’s using the drop-down list or maually enter them.
- To edit existing information, select the line item and then click Edit and then update the information.
- Click Save to save the information.
Confiscated Item
The movement and storage location of confiscated items are displayed in the following section and records are updated:
-
When a confiscated item is returned or
checked-out temporarily to the passenger, the system removesthe record from Confiscated Item section. -
When a confiscated item is checked-in by the passenger, then the system inserts a record in the Confiscated Item section.
Figure 2-98 Confiscated Item Storage Location

Renew Reservation Function
- Navigate to the Check Out tab in Search Panel.
- By default, the date is set to System Date. Change the date to the passenger checked-out date.
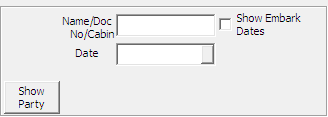
- Enter the guest last name or use the alphabets tab to search. Selecting ALL tab will list all passengers departed on the date specified.
- Click the Re-New Reservation at the Guest Handling window.
- At the New Guest Reservation prompt, select Yes to renew the reservation.
- Click Edit Information to change the expected arrival date, if required.
Express Reservation Function
Figure 2-99 Express Reservation Form
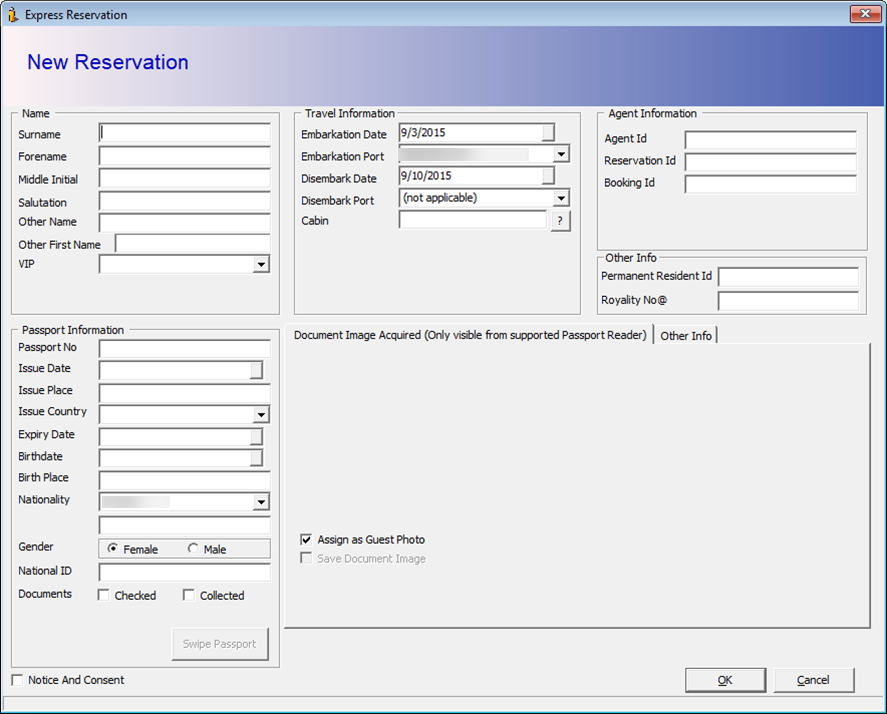
Creating an Express Reservation
- Click the New Reservation at the Guest Handling window to open the Express reservation form.
- Enter all required information’s and update the embarkation / debarkation date. By default, Embarkation Date on the form is set to current System Date.
- Click OK to save the reservation.
Get Credit Cards Function
Get Credit Card enables you to update the passenger credit card details by swiping the card through the magnetic card reader.
Updating Credit Card Details
-
In the Search Panel, search for the guest record and then click the Get Credit Card at the Guest Handling window to open the blank Credit Card Entry form.
-
At the blank Credit Card Entry form, swipe the credit card through the magnetic card reader to capture the credit card details and have it auto populate on window.
Figure 2-100 Setting Credit Card Spending Limit
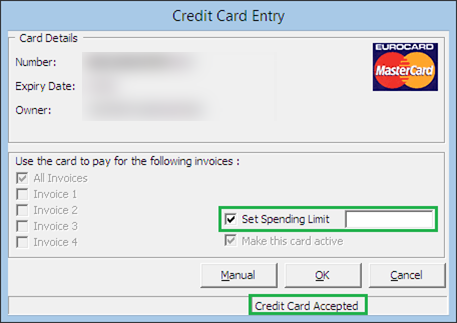
-
Check mark the Set Spending Limit check box to enter the credit limit of the card..
Manual Update of Credit Card Details
-
At the blank Credit Card Entry form, click Manual.
-
Manually enter the card information in the field provided and then click OK to save.
-
Click Yes at the CC-Check dialog box to update the credit card details onto the guest account.
-
You can view the stored credit card details from the Credit Card tab.
Capturing an Electronic Signature
If you have a Signature Capture device installed, you can capture a sample of the guest signature in the Credit Card tab.
Storing Sample Signature
-
Repeat steps 1 — 3 of above.
-
Sign on the column provided in the Signature Device, press Confirm and then Capture Signature to save the signature against the passenger credit card record.
-
The stored credit card details and signature are saved in Credit Card tab.
Registering Multiple Credit Card
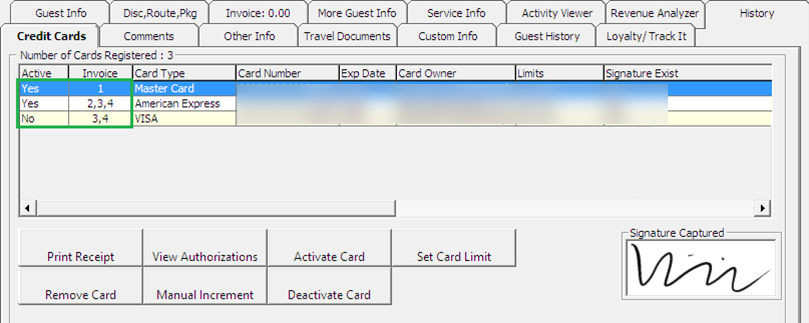
Multiple card types can be stored for ease of settlement and this is particularly useful when a guest decides to settle part of their invoices using certain card.
-
Repeat steps 1 — 3 of Updating Credit Card Details.
-
The system prompts a notification that there is more than one card being registered. Select Yes at the CC-Check prompt to register the card.
Activating Credit Card for a Particular Invoice
-
At the Credit Card tab, select the card to activate, and then click Activate Card.
-
Check mark the invoice at the Activate Credit Card prompt and click Activate.
-
The chosen invoice is shown under Invoice column and the card is set at Active.
Figure 2-101 Multiple Credit Card Assignment
Check In Function
Guest joining the cruise are required to checked-in to the system prior to boarding, and these reservations are categorized under the Expected tab.
-
Retrieve the reservation from the Search Panel, Expected tab and then click Check-In.
-
At the Check In prompt, select Yes to check in the reservation and print keycard at the same time.
Check Out Function
At the end of the voyage, you must check-out all the guest account from the system. This is to ensure that all accounts are in balance before performing a System Cruise Change.
-
Retrieve the reservation from the Search Pane, Check In tab and then click Check Out.
-
At the Check Out prompt, select Yes to check out the reservation.
-
If the account is unbalanced, the system prompts for an invoice to be settled before proceeding. Click OK to return to the guest account.
See Pay Invoice section for steps to settle an account.
Print Boardcard Function
The Print Board Card function in Guest Handling enables you to print a copy of guest board card if they are not printed earlier.
-
Retrieve the reservation from the Search Panel and then click the Print Board Card.
-
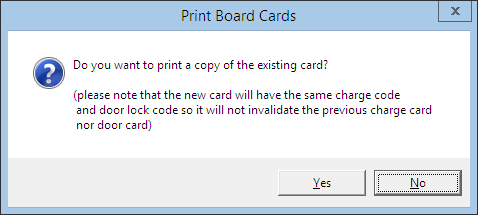
At the Print Board Cards prompt, select Yes to save the board card number under Guest Info tab. This process increases the Board card number shown in Guest Info tab, and the last digit of board card denotes the number of times the board card were re-printed. The first printed card always end with 0.
Figure 2-102 Print Board Card Prompt
-
Select a reason from the drop-down list when prompt and then press OK.
-
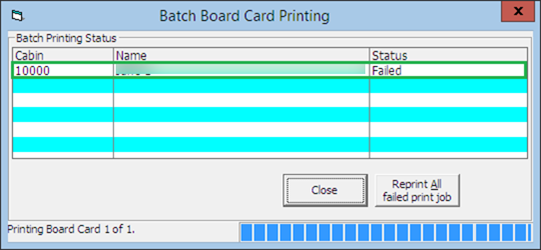
Status of the printed card is reflected in the Batch Board Card Printing window. If the card status is Failed, click Reprint All failed print job to reprint.
-
Check the Interface or Printer connectivity if the board card failed to print.
Figure 2-103 Batch Board Card Printing
Printing New Board Card
During a cabin move or when guest extends their stay, a re-code of board card is required and this card is printable from Guest Handling, Other Infotab.
-
At the Other Info tab, click the New Board Card and select Yes at the Recreate Cards prompt.
-
At the Print Board Card Reason prompt, select the reason from the drop-down list, then press OK to confirm.
Resetting a Board Card
For lost card, a change of lock combination for the cabin is necessary, and this process will re-assign a new board card number to all occupants of the same cabin.
-
At the Other Info tab, click the Reset Board Card.
-
Select Yes at the Recreate Cards prompt to invalidate all previously issued cards.
Figure 2-104 Recreate Board Card
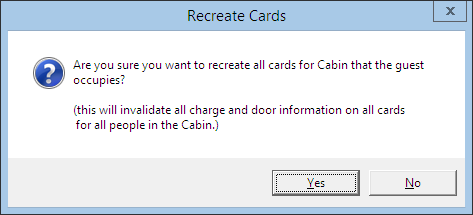
Figure 2-105 Boardcard Number in Guest Information Tab

-
At the Print Board Card Reason prompt, select the reason from the drop-down list, then click OK to confirm.
-
At the Batch Board Card Printing prompt, click Close if the card is printed successfully. Otherwise, repeat the above process.
Change Cabin Function
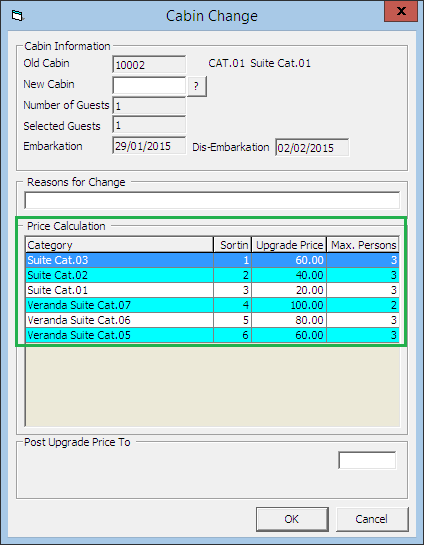
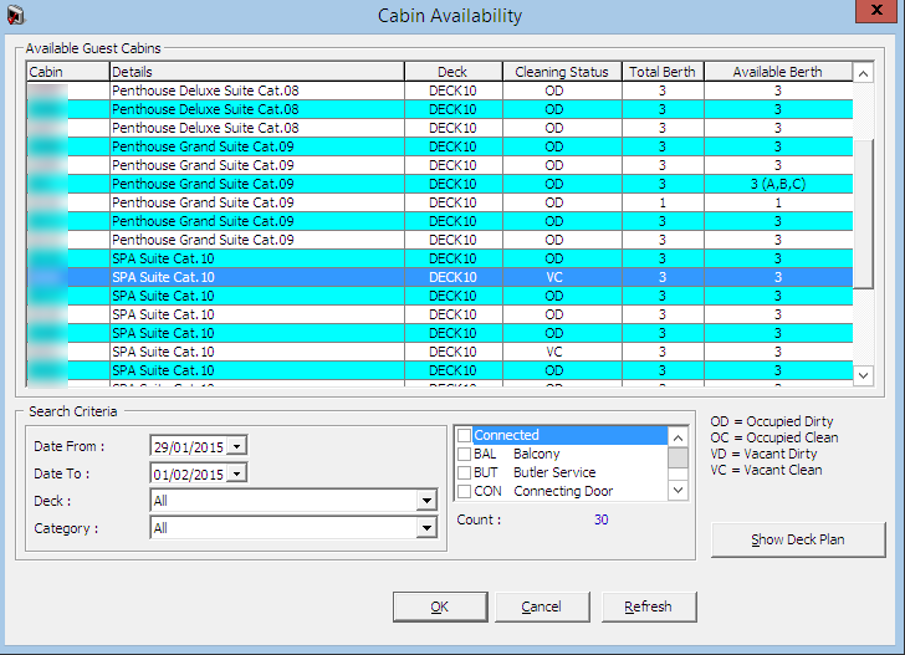
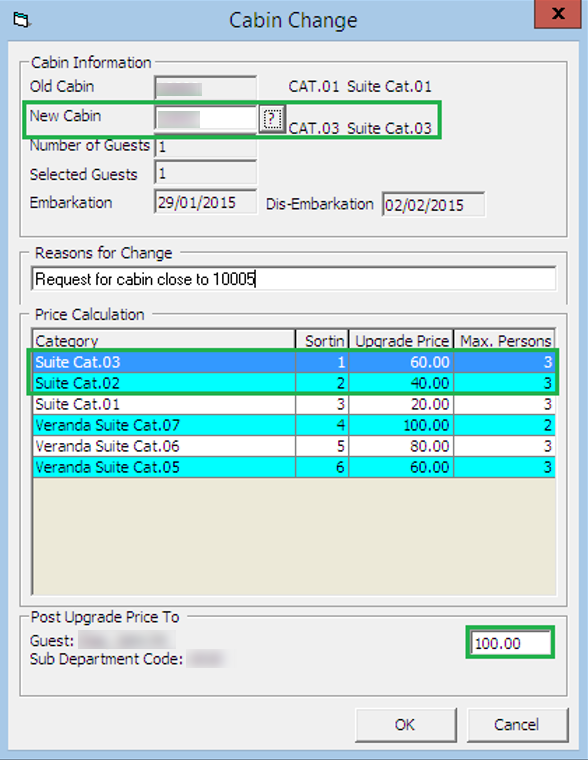
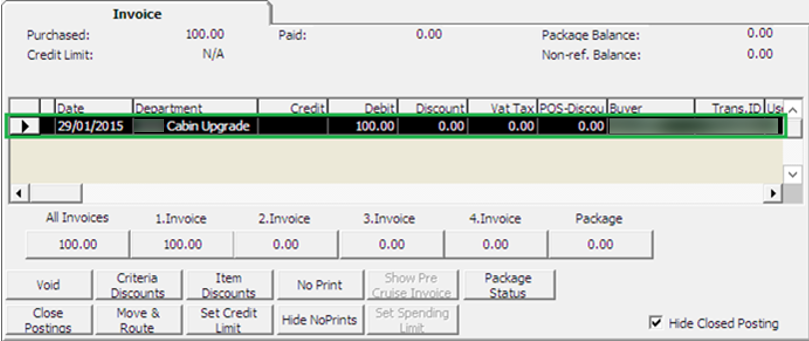
A cabin may become unavailable due to defect or guest may want to move to a larger cabin or cabin closer to their family/friends. This would require a cabin change, and depending on the policy and procedures set by the Ship, such change may be chargeable. If a fee is applicable, you can set this up in Administration, Financial Setup, Stateroom Upgrade Prices module.
You can perform a cabin change from different function — either using the Cabin Change function, Edit Information or Edit Express Reservation function.
When a cabin change is chargeable, it is recommended that you perform the task using Cabin Change option in Guest handling function. A setup such as Financial Department, General Change Reason and Database Parameter must be in place in order for the charge to be posted. See Administration User Guide, Stateroom Upgrade Setup for more details.
Changing an Assigned Cabin
When the assigned cabin for the guest becomes unavailable at the point of check-in, re-assignment of the cabin is required. In such cases, the cabin change is done by editing the reservation.
- Repeat steps 1 to 4 of the above.
- In the Reasons for Change prompt, select the reason of the change from the drop-down list, then click OK to save the changes.
- Click OK on the Edit Information form to save the cabin reassignment.
Assigning a Cabin in Edit Express Information
At the point of creating a reservation using Express Reservation, you can assign a cabin number to the guest and the process is the same as Changing An Assigned Cabin in Edit Information.
Messages Function
There are occasions that you are required to notify the guest is of their reservations, tour arrangements or inquiries by leaving a message in their cabin. These messages not only presented in hard copy, it can also prompt on window at the Gangway, Internal Gate or Immigration Gate when scanning the guest board card.
Figure 2-110 Message Form
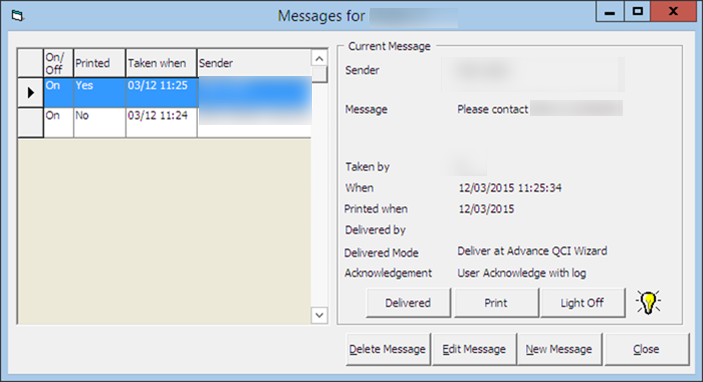
Table 2-33 Field Definition of Message Form
| Field | Description |
|---|---|
|
On/Off |
Message light indicator. |
|
Printed |
Indicator whether message has been printed. |
|
Taken When |
Date/Time message were entered. |
|
Sender |
Sender's Name enter. |
|
Message |
Content of the message. |
|
Taken by |
User who enter the message. |
|
Delivered by |
User who deliver the message. |
|
Delivered Mode |
Location of where to prompt for message delivery, either at Advance QCI Wizard, Gangway, Internal Gate, Immigration Gate or none. |
|
Acknowledgement |
Type of delivery acknowledgement, either by User, Manager or none. |
|
Delivered button |
Sets the message status to/from delivered. |
|
Print button |
Print selected message. |
|
Light On/Off |
Sets on/off phone message light in cabin. |
|
Delete Message |
Remove message from passenger account. |
|
Edit Message |
Edit message content and/change delivery mode. |
|
New Message |
Creates a new message. |
Creating / Editing a Message
- Look up the guest account in search Panel, then click Message at the Guest Handling window.
- On the Message form, click New Message to create a new message or Edit Message to edit and existing message.
- Enter the Sender’s name and message content in the respective area.
- Select the Delivery and Acknowledgement Mode from the drop-down list, then click OK to save.
- New Messages entered will set the message light to On automatically and this setting is controlled by Parameter, General, Message Light On.
- To edit a message, click Edit Message, then edit the content and click OK to save the changes.
- A check mark is placed in the Message tab as an indicator for undelivered messages.
Delivering / Undo Delivery of a Message
- Look up the guest account in Search panel, then click Message at Guest Handling tab.
- On the Message form, select the message to deliver, then click Delivered to confirm delivery and this inserts the delivered by, date/time.
- This process does not turn off the message light automatically. You are required to manually click Light Offto reset the message light.
- In the Delivered by, the user name, delivery date and time is record.
- To reset the message delivery to undelivered, click Delivered and select Yes at the message prompt.
Deleting a Message
- Search the guest account in Search Panel, then click Message at Guest Handling tab.
- On the Message form, select the message to delete and click Delete Message.
- At the Delete Message prompt, select Yes to confirm deletion of the Message or No to return to the earlier window. Once a message is deleted, it cannot be undone.
Printing a Message
- On the Message form, select a message and then click Print.
- The indicator in the Printed column will then switch to Yes, and the date the message was printed is shown in the Message Grid.
Turning Message Light On/Off
The message light is automatically turned on as an indicator to the guest that there are messages for them. If the message function is used as internal messaging, it is best not to set the message light on when creating a message and this is managed in Parameter, General, Message Light On.
- On the Message form, select the message and then click the Light On/Off.
- If the message light is:
- On: The light bulb is illuminated and clicking Light Off will turn off the light.
- Off: The light bulb is dimmed and clicking Light ON will illuminate the light.
- Clicking Light On/Off triggers the indicator for all message in the Message grid.
Express Edit Information Function
The Express Edit Information function enables you to edit the basic Reservation information’s as displayed in Express Reservation function.
- In the Search Panel, search for the guest account, then click the Express Edit Information at the Guest handling window.
- Update the relevant information on the Express Reservation form and then click OK to save the changes. See New Reservation Function for further information of the field descriptions.
