2 POS Discount Setup
-
A Basic Setup with discount applicable to MICROS discount itemizer level.
-
An Advance Setup with discount applicable to MICROS major group, family group, and menu item level.
You can choose to set up one or both methods to provide for different type of discounts. To configure the discounts, go to the Administration module, POS Discount.
Setting Up MICROS Server Connection
-
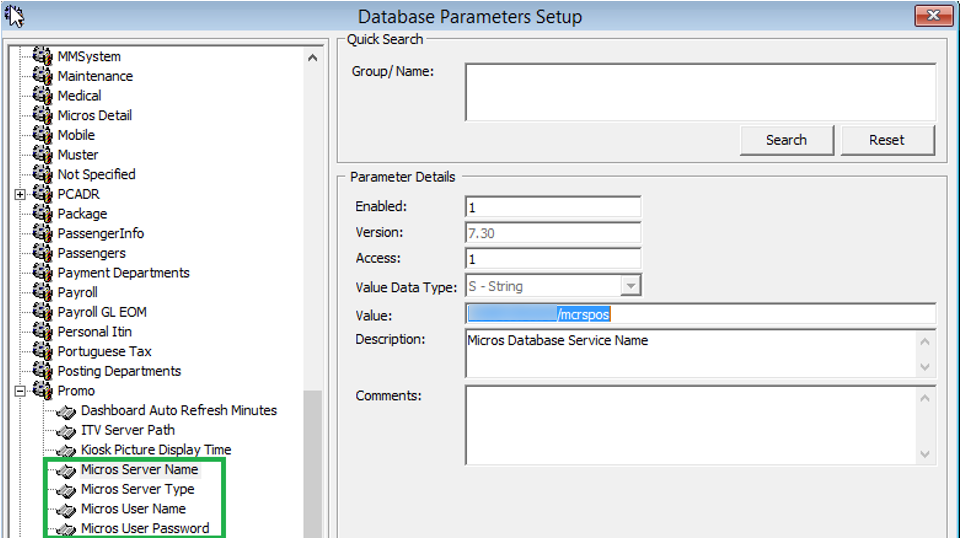
Login to the Administration module, System Setup, Database Parameters Setup.
-
In the Database Parameters Setup window, expand the Promo group.
-
Enter these values in their respective parameter field:
— MICROS Server Name: Database Net Service name
— MICROS Server TYpe: Set value to ‘0’ for Oracle Server
— MICROS User Name: Database username
— MICROS Password: Database password
-
The system prompts an error “MICROS Server is offline, MICROS setup will be disabled” when the parameter is entered incorrectly.
-
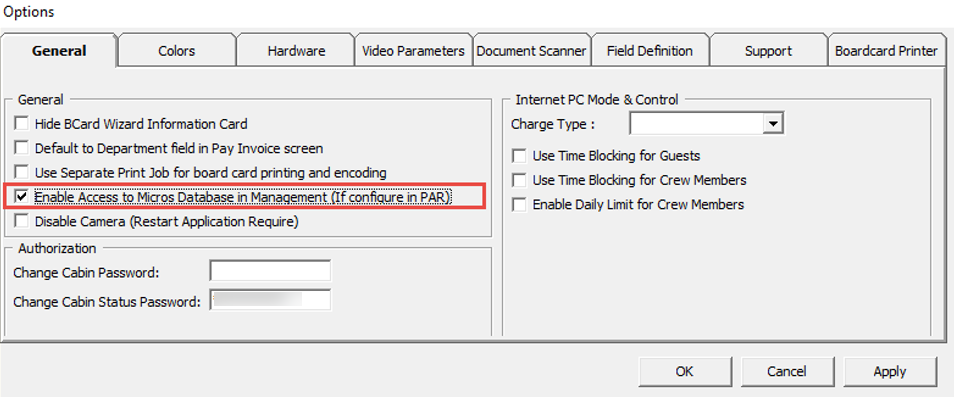
Log in to Management module and select the Options, General tab.
-
Select “Enable Access to MICROS Database in Management”.
-
Click Apply to save.
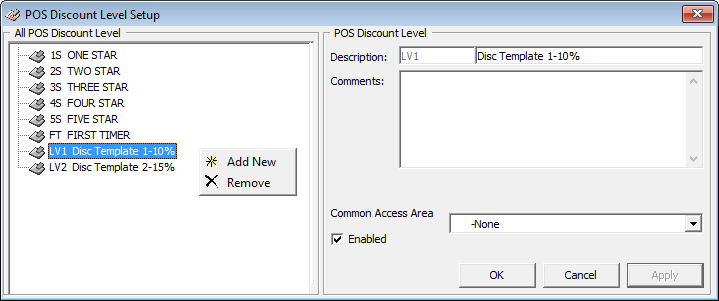
POS Discount Level Setup
Figure 2-1 POS Discount Level Setup
-
From the Administration, POS Discount menu, select POS Discount Level Setup.
-
In POS Discount Level Setup window, right-click and select Add New
-
In the Description field, enter a code and the description and comments, if any.
-
Click Apply to save and OK to exit.
-
Repeat the above steps to enter more discounts.
POS Discount Rate Setup
The POS Discount Rate Setup is the basic setup and is only applicable to the MICROS Discount Itemizer Level. The setup requires a connection to the MICROS Server. Before setting up the Discount Rate, you must configure the settings as shown below. For more information, see Setting Up Micros Server Connection
-
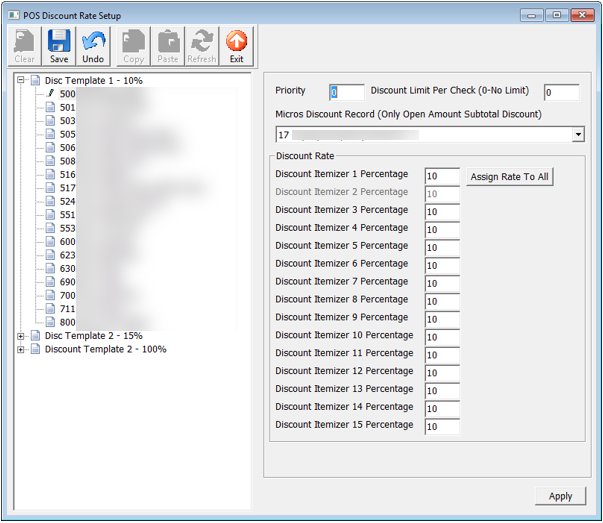
From the Administration, POS Discount menu, select POS Discount Rate.
-
In the POS Discount Rate Setup window, expand the tree-view of the discount level to display the MICROS Revenue Center.
-
Select MICROS Revenue Center of the discount level.
-
Assign the discount priority number in the Priority field for each of the outlets. The lower priority number would be the higher chance for the discount to be applied to the guest with the same cabin and booking number. For more information, see Discount Level Assignment.
-
Enter the total discount limit per sales check in the Discount Limit Per Check (0-No Limit) field. For more information, see Discount Limit Per Check.
-
In the MICROS Discount Record (Only Open Amount Subtotal Discount) drop-down list, select the MICROS discount record representing the discount key.
-
In the Discount itemizer 1 Percentage, enter the discount rate.
-
To apply the same discount rate to the rest of the discount itemizers, click Assign Rate To All.
-
Click Apply to save.
Discount Level Assignment
-
Guest X and Guest Y are staying in the same cabin and both have the same booking number;
-
Guest X assigned to Four-Star POS Discount level and Guest Y assigned to Five-Star POS Discount level.
Table 2-1 POS Discount Level Assignment
POS DIscount Level Revenue Center (Outlet) Priority Number Discount (%) for all itemizers Four-Star
A
1
40
B
2
30
C
0
20
Five-Star
A
0
50
B
2
40
C
1
30
-
Guest X spends in outlet A and is entitled to a Five-Star discount rate of 50% (The Five-Star level has a lower priority number in outlet A).
-
Guest X spends at outlet B and is entitled to a Four-Star discount rate of 30% (both Four-Star and Five-Star levels have the same priority number for outlet B).
-
Guest X spends in outlet C and is entitled to a Four-star discount rate of 20% (Four-Star level has the lowest priority number for outlet C).
-
Guest Y spends at outlet A and can be entitled to a Five-Star discount rate of 50%.
-
Guest Y spends at outlet B and can be entitled to a Five-Star discount rate of 40% (both Four-Star and Five-Star levels have the same priority number for outlet B).
-
Guest Y spends in outlet C and can be entitled to a Four-star discount rate of 20% (Four-Star level has the lowest priority number for outlet C).
Discount Limit per Check
The default value is set to zero (0 = no limit) per check. If you set a value per check at 50, the maximum discount is limited to $50 per check. When the total discount value for a check exceeds the predefined limit, the full value applies.
For example, One-Star POS Discount Level has a discount rate of 10% and a discount limit up to $100 per Guest check. A check posting at an outlet has a total of $1200, the Guest is only entitled to a maximum of a $100 POS Discount instead of $120.
POS Discount Eligibility Group Setup
The POS Discount Eligibility Group is the first set of configurations for the Advance POS Discount. This is to define the group eligible for a specific POS discount.
To configure, repeat the steps in the POD Discount Level Setup.
POS Discount Eligibility Setup
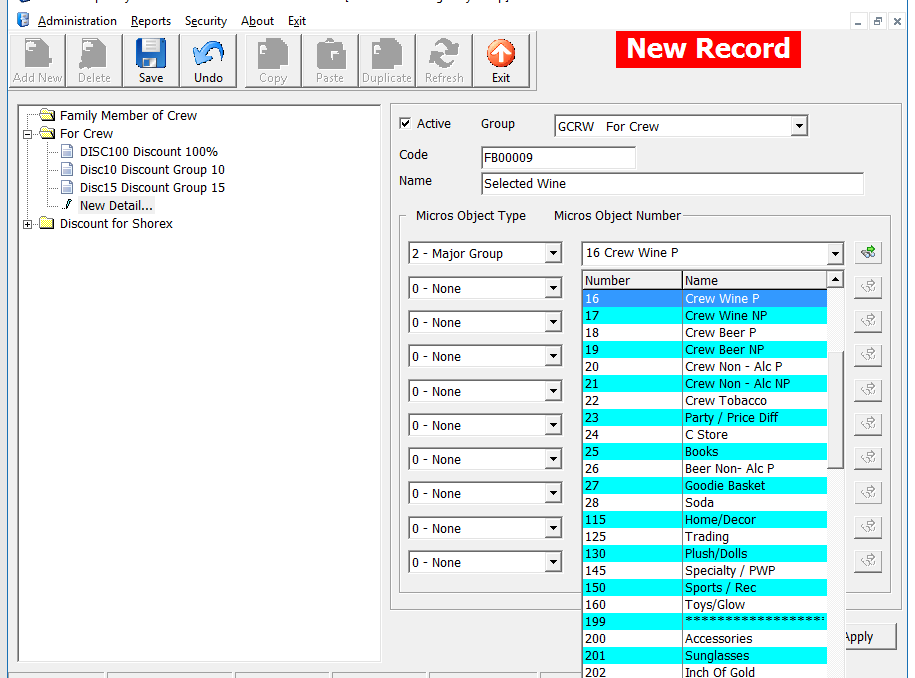
Figure 2-2 POS Discount Eligibility Setup
-
From the Administration, POS Discount menu, select POS Discount Eligibility Setup.
-
In the POS Discount Eligibility Setup window, click Add New on the ribbon bar.
-
In the Group field, select a group from the drop-down list.
-
Enter the code and the name.
-
Go to the MICROS Object Type section and select one of the following options; 0 = None, 1 = Menu, 2= Major Group, or 3 = Family Group
-
Select the respective item from the MICROS Object number drop-down list or click the Binocular icon to search.
-
To enter more menu items, repeat the steps above.
-
Click Apply to save.
POS Discount Rate (Advance)
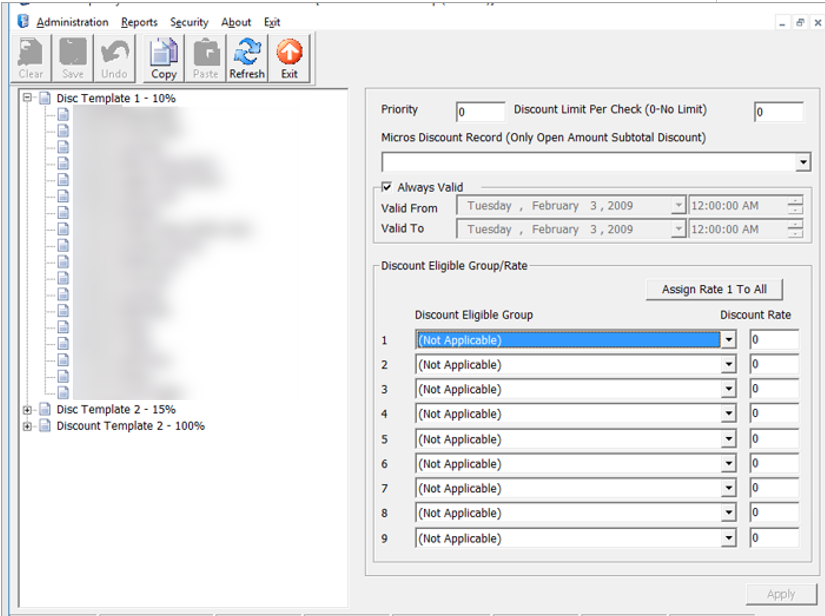
The POS Discount Rate (Advance) is the final part of the Advance POS Discount. This is used to define the discount eligible group per POS discount level, using a specific discount rate, and supports up to nine discount groups per revenue center.
Figure 2-3 POS Discount Rate (Advance)
-
From the Administration, POS Discount menu, select POS Discount Rate (Advance).
-
Repeat steps 2 to 5 of the POS Discount Rate Setup.
-
The Always Valid is checked by default. Deselect the checkbox if you need to change the validity period.
-
In the Discount Eligible Group section, select the discount group/rate from the drop-down list.
-
In the Discount Rate column, enter the discount percentage.
-
Repeat steps 4 and 5 if the POS Discount Level has more than one discount eligibility group.
-
If the discount applies to all itemizers, click Assign Rate To All.
- Click Apply to save.