Working with Tickler Events (WTEV)
Purpose: Use this menu option to set up each system delivered tickler event, including:
• tickler event settings at the event level
• tickler event settings at the event rule level
• event rule criteria for each rule you create
• event rule procedures for each rule you create
In this topic:
• Defining Tickler Events and Event Rules
• Active Tickler Events and Rules
• Event Rule Processing Sequence
• Work with Tickler Event Screen
• Work with Tickler Event Rule Screen
• Create Tickler Event Rule Screen
• BO (Backorders) Event Processing
• CO (Cancelled Orders) Event Processing
• HO (Held Orders) Event Processing
• MN (Manually Created) Event Processing
• NO (New Orders) Event Processing
• OO (Aged Open Orders) Event Processing
• SD (SVC Activation Decline) Event Processing
• SO (Soldout Orders) Event Processing
• SV (SVC Number Assignment) Event Processing
• UP (Unconfirmed Pick Tickets) Event Processing
• VP (Voided Pick Tickets) Event Processing
• WF (Remote Workflow) Event Processing
• Generic Workflow XML Message (CWWorkflow)
• WF Event Example: Sample XML
• Work with Tickler Event Rule Procedure Screen
For more information: See Workflow Management Overview and Setup for an overview on workflow management.
Defining Tickler Events and Event Rules
To create a tickler, you must define:
• the tickler events that can create a tickler. There are system actions that can create ticklers. You cannot create other tickler events for the system to evaluate for tickler creation. Also, each tickler event is delivered as not active.
• BO: backorders
• CO: cancelled orders
• HO: held orders
• MN: manually created ticklers
• NO: new orders
• OO: aged open orders
• SD: stored value card activation decline
• SO: soldout orders
• SV: stored value card number assignment
• UP: unconfirmed pick tickets
• VP: voided pick tickets
• WF: ticklers received from a remote system
• tickler event settings that define how the system creates ticklers for each event; see Tickler Event Settings.
• event rule settings that override the settings defined at the event level and determine how the event rule is processed; see Event Rule Settings.
• event rule criteria that define the criteria the system action must meet to create a tickler; see Event Rule Criteria.
• event rule procedures that define the instructions a user should follow to work with and resolve a tickler created by the event rule; see Event Rule Procedures.
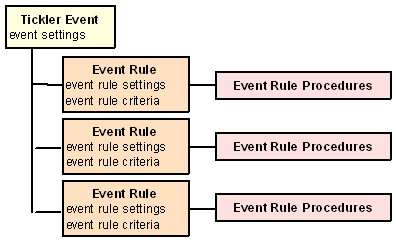
Tickler event hierarchy: For each tickler event, you can define multiple event rules. For each event rule, you can define procedures to resolve the tickler.
For each tickler event, you must define settings that determine how the system creates ticklers for the event. The settings you define are used as defaults for the created ticklers. You can also define settings at the event rule level. Unless otherwise noted, the settings at the event rule level override the settings at the event level.
You can define tickler event settings at the Change Tickler Event Screen and event rule settings at the Create Tickler Event Rule Screen or Change Tickler Event Rule Screen.
Active Tickler Events and Rules
The Active field defines whether the system creates ticklers for the event or event rule.
• Select the Active field for a tickler event to have the system evaluate the event when the associated system action is performed. The system does not create ticklers for tickler events that are not active, regardless of whether one or more of the event’s rules is active.
• Select the Active field for an event rule to have the system evaluate the event rule when the associated system action is performed. The system does not create ticklers for event rules that are not active, regardless of whether the event rule criteria are met.
If you do not want the system to create ticklers for a system action, deselect the Active field for the associated tickler event.
If you want the system to create ticklers for a system action, but do not want the system to create ticklers for a specific event rule, select the Active field for the associated tickler event and deselect the Active field for the event rule. Remember, to create a tickler for a tickler event at least one event rule must be active.
You can define the user(s) to work with and resolve ticklers created for the tickler event and also the tickler supervisor to monitor the ticklers created for the tickler event.
The tickler assignment settings at the event rule level override the tickler assignment settings at the event level.
Tickler user: You can define the user or group of users to work with and resolve ticklers created by the tickler event.
• select the Assign to original user field to assign ticklers to the order entry operator that entered the order associated with the tickler. If you assign ticklers to the original order entry operator, you must also enter a user ID in the Assigned to user field in case the original order entry operator is no longer valid. Note: If the order is an ecommerce order, the system uses the user ID from the Assigned to user field.
• enter a user ID in the Assigned to user field to assign ticklers to a specific user.
• enter a tickler user group code in the Assigned to group field to assign ticklers to a specific tickler user group. You can create tickler user groups using the Working with Tickler User Groups (WTUG) menu option; the tickler user group type indicates if the tickler group is a user group (type U).
Tickler supervisor: Optionally, you can define the supervisor to monitor the ticklers created by the tickler event by entering a supervisor group in the Supervisor group field.
Tickler supervisors perform all the actions a tickler user performs (works with and resolves ticklers) and also monitors the ticklers assigned to his supervisor group or monitor all ticklers, regardless of the assigned supervisor. A tickler supervisor can also reassign ticklers to different users or different tickler user groups.
You can create supervisor groups using the Working with Tickler User Groups (WTUG) menu option; the tickler user group type indicates if the group is a supervisor group (type S).
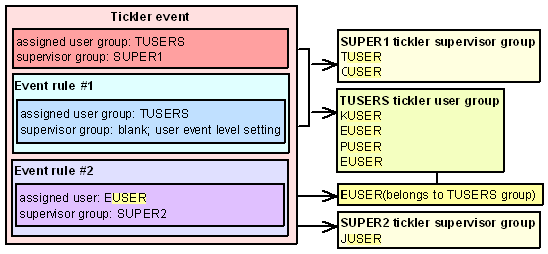
Tickler assignment example: The flowchart below displays tickler assignment at the event level and event rule level. In this example:
• ticklers created for event rule 1 are assigned to user group TUSERS and placed in this group’s work queue. Any user belonging to the TUSERS user group can work with and resolve the ticklers. Additionally, the supervisor group SUPER1 monitors the ticklers created for event rule 1. Any user belonging to the SUPER1 supervisor group can monitor the ticklers.
• ticklers created for event rule 2 are assigned to user ERIKH and placed in his work queue. User ERIKH belongs to user group TUSERS, but other members of this group cannot work with and resolve ticklers created for event rule 2 unless user ERIKH or a supervisor reassigns the tickler. Additionally, the supervisor group SUPER2 monitors the ticklers created for event rule 2. User JANEC monitors the ticklers since she is the only user assigned to this supervisor group.
For each tickler event, you can define whether the system sends an email when:
• a tickler is created for the event
• an existing tickler for the event is reassigned to another user or user group
• existing open or in process ticklers exist and are older than a specified number of days
Tickler Notification email: The Tickler Notification email informs the assigned to user/group that a new tickler has been created and placed in the tickler work queue. Users can review and work with ticklers assigned to them or their tickler user group using the Working with Tickler Users/User Groups (WTIC) menu option.
To generate: An email is generated and sent to the assigned to user or to all of the users in the assigned to user group each time the system creates a new tickler or a user manually creates a tickler and the Notify user/group field in the Tickler table is selected. The system uses the email address from the User Extended table.
The notify user/group setting at the event rule level overrides the notify user/group setting at the event level.
Email template: The format of the Tickler Notification email differs based on whether the system action that creates the tickler is an interactive process or batch process.
• If ticklers are created for an interactive process, such as order entry, the system sends an email to the assigned to user/user group for each tickler created.
• If ticklers are created for a batch process, the system sends one email to the assigned to user/user group for all of the ticklers created by the batch process. The system includes a report with the email, which displays the ticklers created by the batch process. The batch processes that create ticklers are:
• Processing Auto Soldout Cancellations (MASO)
• Working with Credit Card Cancellations (WCCC)
• Working with Backorders Pending Cancellation (WBPC)
• Processing Item Substitutions (PSUB)
• Evaluate Tickler periodic function (program name PFR0072); used to create ticklers for the OO and UP tickler events.
Note: When you manually create a tickler and assign the tickler a future date, the system sends a Tickler Notification email when the tickler is created, not when the assigned future date is reached.
Sample email (interactive): The system generates an email similar to the sample below for all interactive system actions that create ticklers.
From: |
flast@EXAMPLE.COM |
To: |
eleanorjohnson@example.com |
Subject: |
Tickler # 000002923 CO# 555 |
Tickler # 000002923 ORDER LINE STATUS IS BLANK (OPEN) has been assigned to you with a date of 10/11/02. |
|
Contents:
• From: The email address of the user that started the background async jobs.
• To: The Email address field in the User Extended table for:
• the assigned to user.
• the user belonging to the assigned to user group.
• the user that entered the order associated with the tickler (the assigned to original user).
• Subject: Standard subject for tickler notification emails.
• the tickler number is the next available number for the Tickler Number number assignment value.
• the company number is the company where the system action occurred that created the tickler.
• Message line: Standard message notifying the user of the newly created tickler.
• For MN ticklers, the text defined for the Short note displays after the tickler number. The date is the assigned date defined for the tickler. The text of the line differs if the tickler is assigned to you (...assigned to you...) or one of your tickler groups (...assigned to KAB...).
• For all ticklers except MN, the description of the event rule that created the tickler displays after the tickler number. The date is the assigned date defined for the tickler. The text of this line differs if the tickler is assigned to you (...assigned to you...) or one of your tickler groups (...assigned to KAB...).
Sample email (batch): The system generates an email similar to the sample below for batch processes that create ticklers.
From: |
flast@EXAMPLE.COM |
To: |
eleanorjohnson@example.com |
Subject: |
XXREPORT.TXT |
Sold Out Orders Report Count for CO# 555 for KAB is 4. Please see attached report for more information. |
|
Contents:
• From: The email address of the user that started the background async jobs.
• To: The Email address field in the User Extended table for:
• the assigned to user.
• the user belonging to the assigned to user group.
• the user that entered the order associated with the tickler (the assigned to original user).
• Subject: Standard subject for tickler notification batch emails, where XX is the tickler event code.
• Message line: Standard message notifying the user of the newly created ticklers, displaying:
• the name of the process that created the ticklers, for example Sold Out Orders.
• the user ID or tickler group assigned to the ticklers.
• the number of ticklers created.
Tickler Notification batch report: The report sorts in event, user/user group, created date, tickler number sequence.
The name of the report is based on the batch process that created the ticklers:
• Backorders Report displays for newly created BO ticklers.
• Cancelled Orders Report displays for newly created CO ticklers.
• Aged Open Orders Report displays for newly created OO ticklers.
• Sold Out Orders Report displays for newly created SO ticklers.
• Unconfirmed Picks Report displays for newly created UP ticklers.
10/15/02 12:02:15 KAB Co. Sold Out Orders Report for KAB Event: SOLD OUT ORDERS User: KBROWN Created Assigned Tickler# Sts Evnt Cat Rule Description/Note 10/15/02 10/15/02 3132 O SO SO 001 BATCH PROCESS ONLY IS Y Order# Sts Customer# Name/Email Telephone# 6270 - 001 X 6 PAWS AND CLAWS PET SUPPLIES ATTN: LAST 508 555-0100 pawsandclaws@example.net -------------------------------------------------------------------------------------- 10/15/02 10/15/02 3133 O SO SO 002 INTERACTIVE MODE IS M Order# Sts Customer# Name/Email Telephone# 6270 - 001 X 11 NONNIE, NONA 978 555-0101 nnonnie@example.net -------------------------------------------------------------------------------------- 10/15/02 10/15/02 3134 O SO SO 003 ITEM IS BLUEBERRY Order# Sts Customer# Name/Email Telephone# 6270 - 001 X 16 LAST, FIRST 508 555-0102 bmiranda@example.net -------------------------------------------------------------------------------------- Total ticklers for event SO 3 Total ticklers . . . . . : 3 |
Contents:
• Event: The description of the tickler event associated with the ticklers created by the batch process.
• User/user group: The user or tickler group assigned to the newly created ticklers.
• Created: The date the tickler was created.
• Assigned: The date the tickler was assigned to the current user/tickler user group; the assigned date is the same date as the created date.
• Tickler#: The newly created tickler number.
• Status: The status of the tickler; when a tickler is first created, the status is O (open).
• Event: the code for the tickler event associated with the newly created tickler.
• Category: The tickler category assigned to the tickler.
• Rule: The event rule that created the tickler.
• Description: A description of the event rule that created the tickler.
• Order#: The order associated with the tickler.
• Status: The status of the order associated with the tickler.
• Customer#: The sold to customer associated with the tickler. If this email is for the AR tickler event, the bill to customer associated with the tickler displays.
• Name: The sold to customer associated with the tickler.
• Email: The primary email address defined for the sold to customer.
• Telephone: The telephone number defined for the sold to customer.
• Total ticklers for event: The total number of newly created ticklers for the tickler event.
• Total ticklers: The total number of newly created ticklers across all tickler events.
Tickler Reassignment email: The system sends an email each time an existing tickler is reassigned to a new user or tickler user group.
Note: The system sends a Tickler Reassignment email only if the Notify user/group field for the event rule associated with the tickler is selected.
To generate: An email is generated when an existing tickler is:
• reassigned to a new user or tickler user group. A tickler user can reassign ticklers currently assigned to him at the Change Tickler Screen; a tickler supervisor can reassign ticklers, regardless of who is currently assigned, at the Change Tickler screen or Reassign Ticklers Window.
• graduated to a new event rule; only ticklers for the AR, OO, and UP events are graduated. The system sends a Tickler Notification Reassignment email only if the new event rule has a different assigned to user/group from the previous event rule assigned to the tickler.
From: |
flast@EXAMPLE.EXAMPLE.COM |
To: |
eleanor.johnson@example.com |
Subject: |
Tickler # 000002923 CO# 555 (REASSIGNED) |
Tickler# 7159 OLDER THAN 5 DAYS (ARRIVAL0, SHIP VIA 2 has been assigned to KAB with a date of 10/14/02. |
|
Contents:
• From: The email address of the user that started the background async jobs.
• To: The Email address field in the User Extended table for:
• the new assigned to user.
• the user belonging to the new assigned to user group.
• Subject: Standard subject for tickler reassignment emails.
• The tickler number is the number of the tickler that has been reassigned.
• the company number is the company where the system action occurred that created the tickler.
• Message line 1: Standard message notifying the user of the reassigned tickler.
• For MN ticklers, the text defined for the Short note displays after the tickler number. The date is the assigned date defined for the tickler. The text of the line differs if the tickler is assigned to you (...assigned to you...) or one of your tickler groups (...assigned to KAB...).
• For all ticklers except MN, the description of the event rule defined for the tickler displays after the tickler number. The date is the assigned date defined for the tickler. The text of this line differs if the tickler is assigned to you (...assigned to you...) or one of your tickler groups (...assigned to KAB...).
Supervisor Notification Count email: The Supervisor Notification Count email informs the users in the tickler supervisor group that open and in process ticklers exist that are assigned to the supervisor group and have not yet been resolved. The email includes a report which displays the number of open ticklers assigned to the supervisor group that have not yet been resolved. The tickler supervisor can use the report to determine if he should reassign ticklers based on the current workload of users assigned to work with and resolve the ticklers.
To generate: An email is generated and sent to all of the users in the supervisor group when you run the Evaluate Tickler periodic function if:
• an open or in process tickler exists, and
• the tickler is assigned to a supervisor group, and
• the Next notification date defined for the tickler in the Tickler table is equal to or past the current date.
The system sends an email to the email address defined for the supervisor user group in the Tickler User Group table.
Note: If a user belongs to more than one tickler supervisor group, that user will receive a separate Supervisor Notification Count email for each tickler supervisor group that has aged ticklers.
The supervisor setting at the event rule level overrides the supervisor setting at the event level.
Once an initial Supervisor Notification Count email is sent to the supervisor group, the system sends an email each time you run the Evaluate Tickler periodic function.
• When the system creates a tickler, the system calculates the date when the supervisor should be notified and updates the Next notification date field in the Tickler table with the initial notice date. The system uses this calculation to determine the next notification date when a tickler is first created: tickler creation date + value in Number of days to notify supervisor field for the event rule that created the tickler = next notify date.
• Once an initial Supervisor Notification Count email is sent to the supervisor, the system sends an email to the supervisor group each time you run the Evaluate Tickler periodic function since the next notification date is past the current date. The system does not update the next notification date once an initial email is sent to the supervisor.
Note: The system does not use the Notify user/group setting defined for the event to determine if a Supervisor Notification Count email is sent to the supervisor.
The system continues sending an email to the supervisor as long as a tickler assigned to the supervisor group is in an open or in process status and the Next notification date is equal to or past the current date. If all ticklers assigned to the supervisor are resolved, the system no longer sends a Supervisor Notification Count email.
Sample email:
From: |
flast@EXAMPLE.COM |
To: |
eleanor.johnson@example.com |
Subject: |
SUPERVSR.TXT |
Supervisor Notification Count for CO# 555 for HOSUPER is 55. Please see attached report for more information. |
|
Contents:
• From: The email address of the user that started the background async jobs.
• To: The email address defined for the supervisor user group in the Tickler User Group table.
• Subject: Standard subject for supervisor notification count emails.
• Message line: Standard message notifying the supervisor of the supervisor notification count. The tickler count is the number of ticklers in an open or in process status that are assigned to the supervisor group and the next notification date for the tickler in the Tickler table is equal to or past the current date.
Supervisor Notification report: The Supervisor Notification report breaks by event and within event by user/user group. The report sorts in event, user/user group, created date, tickler number sequence. A total displays for each event and across all events.
10/15/02 8:11:11 KAB Co. Supervisor Notification for SUPERKAB Event: HELD ORDERS User: KAB Created Assigned Tickler# Sts Evnt Cat Rule Description/Note 9/18/02 10/15/02 3060 O HO HO 001 ORDER HOLD REASON IS AT Order# Sts Customer# Name/Email Telephone# 6261 - 001 H 11 LAST, FIRST 5085550103 flast@example.com -------------------------------------------------------------------------------------- Total ticklers for event HO 1 Event: BACKORDERS User: DDICESARE Created Assigned Tickler# Sts Evnt Cat Rule Description/Note 9/28/02 10/15/02 3263 O BO BO 003 ITEM IS AB10000 Order# Sts Customer# Name/Email Telephone# 6781 - 001 H 19 LAST, FIRST 9785550103 flast@example.com -------------------------------------------------------------------------------------- Total ticklers for event BO 1 Total ticklers . . . . . : 2 |
Contents:
• Supervisor group: The name of the supervisor group assigned to the open or in process ticklers.
• Event: The description of the tickler event associated with open or in process ticklers.
• User/user group: The user or tickler group assigned to open or in process ticklers for the event.
• Created: The date the tickler was created.
• Assigned: The date the tickler was assigned to the current user/tickler user group.
• Tickler #: The tickler number that is open or in process.
• Status: The status of the tickler; O (open) or I (in process).
• Event: The code for the tickler event associated with the tickler.
• Category: The tickler category assigned to the tickler.
• Rule: The event rule that created the tickler.
• Description/Note:
• For MN ticklers: the text from the Short note field displays. If the Short note field for the tickler is blank, the description of the MN event displays.
• For all ticklers except MN: the description of the event rule displays.
• Order#: The order and ship to associated with the tickler.
• Status: The status of the order.
• Customer#: The sold to customer associated with the tickler.
• Name: The name of the sold to customer.
• Email: The primary email address defined for the sold to customer.
• Telephone#: The telephone number defined for the sold to customer.
• Total ticklers for event: The number of open or in process ticklers assigned to the supervisor group for the tickler event.
• Total ticklers: The number of open or in process ticklers assigned to the supervisor group across all tickler events.
The Allow multiple ticklers field defines whether the system creates more than one tickler for a tickler event.
• Select this field to create a tickler for each event rule whose criteria are met by the system action.
• Deselect this field to create one tickler for the first event rule, in processing sequence order, whose criteria are met by the system action. The system does not create more than one tickler for the tickler event, regardless of whether the system action meets the criteria of more than one event rule. The Allow multiple ticklers setting must be unselected for the AR, OO, and UP tickler events.
Regardless of the Allow multiple ticklers setting:
• the system creates a separate tickler for each tickler event that qualifies. For example, if you enter an order and the order meets the criteria for a HO event rule and a SO event rule, the system creates a separate tickler for each event.
• the system does not create a tickler if a tickler already exists for the same event/order/order ship to combination. For example, if a tickler already exists for the NO tickler event, order 5988, and order ship to 1, the system does not create another tickler if you add a new order line to order 5988 for ship to 1 and it qualifies for an NO event rule.
Remember: If you allow multiple ticklers, you must think carefully before you create event rules. For example, if you create the following rules and you allow multiple ticklers, the system creates 3 ticklers, even though event rule 3 is a combination of rules 1 and 2:
• Event rule 1: Ship via is 1 (UPS)
• Event rule 2: Pay type is 1 (cash/check)
• Event rule 3: Ship via is 1 (UPS) and Pay type is 1 (cash/check)
The Note type field defines the type of tickler work notes a user enters for each tickler event; these work notes describe resolution notes and progress notes.
• A = Action notes; the user enters tickler work notes at the Edit Customer Actions Window.
• B = Bill to notes; the user enters tickler work notes at the Work with Bill To Notes Screen.
• O = Order notes; the user enters tickler work notes at the Work with Order Messages Screen.
• S = Sold to notes; the user enters tickler work notes at the Edit Customer Notes Screen.
• T = Tickler notes; the user enters tickler work notes at the Work with Tickler Notes Screen.
You can only define the tickler work notes setting at the event level. If you change the note type setting, the system does not change the note type for previously created ticklers.
The tickler priority defines the importance of ticklers created for the tickler event; you can scan for ticklers by priority at the Work with Tickler Screen (user/group view) (tickler users) and Workflow Management Screen (tickler supervisors).
You can assign a tickler priority between 1-9, where 1 is the lowest priority and 9 is the highest priority.
The tickler priority defined at the event rule level overrides the tickler priority defined at the event level.
Optionally, if you wish to group ticklers, you can assign a tickler category to ticklers.
You can scan for ticklers assigned to this category at the Work with Tickler Screen (user/group view) (tickler users) and Workflow Management Screen (tickler supervisors).
Example: To view only ticklers created for a specific HO rule, create a tickler category for each HO rule you create. This way you can view all ticklers created for HO rule 1 (paytype hold reason is AT) versus ticklers created for HO rule 2 (order hold reason is SF). In this example, tickler category for rule 1 may be HAT and tickler category for rule 2 may be HSF.
The tickler category defined at the event rule level overrides the tickler category defined at the event level.
You can create tickler categories using the Working with Tickler Category (WTCT) menu option.
Tickler resolution reasons are required when you or the system resolves a tickler; the resolution reason indicates the reason why the tickler is resolved.
You can define a tickler resolution reason for a tickler event or event rule; when the system creates a tickler for the tickler event/rule, the system updates the Resolution reason field in the Tickler table.
It is recommended you create at least 2 ticklers resolution reasons: one reason to use when the system resolves the tickler, and one reason to use when you manually resolve a tickler.
The resolution reason defined at the event rule level overrides the resolution reason defined at the event level.
You can create tickler resolution reasons using the Working with Tickler Resolution Reasons (WTRR) menu option.
For each event rule you define for a tickler event, you can define:
• whether the event rule is active; see Active Tickler Events and Rules.
• the tickler user/group assigned to work with ticklers created by this event rule and the supervisor to monitor the ticklers; see Tickler Assignment.
• if tickler users are notified when a new tickler is created and if the supervisor is notified when a tickler remains unresolved for a certain number of days; see Tickler Notification.
• the tickler category assigned to ticklers created by this event rule; see Tickler Category.
• the tickler resolution reason assigned to ticklers created by this event rule; see Tickler Resolution Reason.
• how the rules are processed; see Event Rule Processing Sequence.
• the criteria the system action must meet to create a tickler; see Event Rule Criteria.
• the procedures a user should follow to resolve the tickler; see Event Rule Procedures.
You can define event rule settings at the Create Tickler Event Rule Screen or Change Tickler Event Rule Screen.
Note: If you create or change a tickler event rule, you must restart the asyncs in the Background Job Control menu option before your updates are applied to new ticklers.
Event Rule Processing Sequence
For each event rule you create, you can define a processing sequence number. In addition, the system assigns a rule sequence number to each event rule, based on the order in which the rules were created (the first rule created is assigned rule sequence number 1, etc.).
The Processing sequence number defined for each event rule indicates the order in which the system evaluates event rules to determine if a tickler is created.
The event rule with the lowest processing sequence number is evaluated first (where 0 is the lowest number); the event rule with the highest processing sequence number is evaluated last.
If all of the event rules have the same processing sequence number, the system evaluates the rules in rule sequence order. The event rule with the lowest rule sequence number is evaluated first; the event rule with the highest rule sequence number is evaluated last.
Note: If the event rule is not active (the Active field is unselected), the system does not evaluate the event rule and instead skips the rule and evaluates the next event rule, based on processing or rule sequence order.
Remember: Give the most important rule the lowest processing sequence number and the least important rule the highest processing sequence number. This way the system evaluates the rules in the order of the most important to the least important. This is especially true if you do not allow multiple ticklers: you want the system to create a tickler for the most important rule whose criteria are met by the system action.
If you allow multiple ticklers, you do not need to define a processing sequence number since the system creates a tickler for each rule whose criteria are met.
Example: This example displays the order in which the system evaluates tickler rules based on processing sequence number and rule sequence number.
Processing seq # |
Rule seq # |
Rule active? |
Action meets criteria? |
Results |
|---|---|---|---|---|
0 |
2 |
N |
N |
The system does not create a tickler for this event rule since the event rule is not active and the system action does not qualify. |
0 |
5 |
Y |
N |
The system does not create a tickler for this event rule since the system action does not qualify. |
1 |
4 |
N |
Y |
The system does not create a tickler for this event rule since the event rule is not active. |
2 |
1 |
Y |
Y |
The system creates a tickler for this event rule since the event rule is active and the system action qualifies. |
3 |
3 |
Y |
Y |
The system creates a tickler for this event rule only if the Allow multiple ticklers field for the event is selected; see Allowing Multiple Ticklers. |
3 |
6 |
Y |
Y |
The system creates a tickler for this event rule only if the Allow multiple ticklers field for the event is selected; see Allowing Multiple Ticklers. |
For each event rule, you must define the criteria that the system action must meet to create a tickler. Different criteria display for each tickler event. You can create multiple rules for each event by defining different criteria for each rule.
You can define more than one criterion for each event rule; however, you must define at least one criterion. If you define more than one criterion for an event rule, the system action must meet all of the rule’s criteria to create a tickler.
Example: If you create an event rule whose criteria are Pay type is 1 and Ship via is 1, the system creates a tickler only if the pay type on the order is 1 and the ship via is 1. The system does not create a tickler if the ship via on the order is 1 but the pay type on the order is 4.
Remember: If you allow multiple ticklers, you must think carefully before you create event rules. For example, if you create the following rules and you allow multiple ticklers, the system creates 3 ticklers, even though event rule 3 is a combination of rules 1 and 2:
• Event rule 1: Ship via is 1 (UPS)
• Event rule 2: Pay type is 1 (cash/check)
• Event rule 3: Ship via is 1 (UPS) and Pay type is 1 (cash/check)
You can define event rule criteria at the Create Tickler Event Rule Screen.
Note: You cannot create a duplicate event rule, meaning, you cannot create 2 rules that have the same criteria or an error message indicates: Duplicate rule exists.
Important: If you create or change a tickler event rule, you must restart the asyncs in the Background Job Control menu option before your updates are applied to new ticklers.
For more information: For more information on the criteria you can define for each tickler event, see:
• BO (Backorders) Event Processing
• CO (Cancelled Orders) Event Processing
• HO (Held Orders) Event Processing
• MN (Manually Created) Event Processing
• NO (New Orders) Event Processing
• OO (Aged Open Orders) Event Processing
• SD (SVC Activation Decline) Event Processing
• SO (Soldout Orders) Event Processing
• SV (SVC Number Assignment) Event Processing
• UP (Unconfirmed Pick Tickets) Event Processing
• VP (Voided Pick Tickets) Event Processing
• WF (Remote Workflow) Event Processing
For each event rule, you can create tickler instructions for a user to follow to resolve the tickler.
You can create and modify event rule procedures at the Work with Tickler Event Rule Procedure Screen.
Example: These procedures may display for ticklers that are created when an order payment method is placed on AT (declined credit card hold) and the ship via is UPS Second Day.
1. Release order from hold.
2. Resend credit card for authorization.
3. Contact UPS to determine if they can deliver by expected arrival date.
4. If package will arrive late, notify customer of possible late delivery.
5. If customer is a valued customer, give customer 25% off coupon on next purchase.
Note: A tickler user may not complete all of the tasks required to complete the tickler. Using the example above, the first assigned to user may release the order from hold and then assign the tickler to another user to resend the credit card for authorization.
Tickler work notes: The tickler user completing some or all of the tasks associated with the tickler can enter notes regarding the steps he performed for other users and the supervisor to review. See Tickler Work Notes.
Work with Tickler Event Screen
Purpose: Use this screen to change, review, or define rules for a tickler event.
When you first advance to this screen, the system automatically creates the system delivered tickler events if the Use Workflow Management (H96) system control value is selected. However, you must still define settings for each tickler event you wish to enable. You cannot create other tickler events for the system to evaluate for tickler creation.
Note: You cannot delete a tickler event. If you do not wish to use a tickler event, set the Active field for the event to unselected.
How to display this screen: Enter WTEV in the Fast path field or select Work with Tickler Event from a menu.
Field |
Description |
|---|---|
Event |
A code that determines the system action for which the system may create a tickler. There are 11 system actions that can create ticklers. You cannot create other tickler events for the system to evaluate for tickler creation. BO: backorders; see BO (Backorders) Event Processing CO: cancelled orders; see CO (Cancelled Orders) Event Processing HO: held orders; see HO (Held Orders) Event Processing MN: manually created; see MN (Manually Created) Event Processing NO: new orders; see NO (New Orders) Event Processing OO: aged open orders; see OO (Aged Open Orders) Event Processing SD: stored value card activation decline; see SD (SVC Activation Decline) Event Processing SO: soldout orders; see SO (Soldout Orders) Event Processing SV: stored value card number assignment; see SV (SVC Number Assignment) Event Processing UP: unconfirmed pick tickets; see UP (Unconfirmed Pick Tickets) Event Processing VP: voided pick tickets; see VP (Voided Pick Tickets) Event Processing WF: remote workflow; see WF (Remote Workflow) Event Processing Alphanumeric, 2 positions; optional. |
Description |
A description of the tickler event. Alphanumeric, 40 positions; optional. |
Cat (Tickler event category) |
A code for the tickler category assigned to the tickler event. Tickler categories are used to group ticklers. Tickler categories are defined in and validated against the Tickler Category table; see Working with Tickler Category (WTCT). Alphanumeric, 3 positions; optional. |
Pty (Tickler event priority) |
The priority assigned to the tickler event, used to determine the importance of ticklers created for this event. Numeric, 1 position; optional. |
Act (Tickler event active flag) |
Indicates whether the tickler event is active. Selected = The tickler event is currently active; the system creates a tickler if the system action qualifies for an event rule. N = The tickler event is not currently active; the system does not create a tickler, regardless of whether the system action qualifies for an event rule. |
Screen Option |
Procedure |
|---|---|
Change the settings of a tickler event |
Select Change for a tickler event to advance to the Change Tickler Event Screen. |
Display a tickler event |
Select Display for a tickler event to advance to the Display Tickler Event Screen. You cannot change any information at this screen. See the Change Tickler Event Screen for field descriptions. |
Work with tickler event rules |
Select Rules for a tickler event to advance to the Work with Tickler Event Rule Screen. You cannot define event rules for the MN (manually created) or SV (SVC number assignment) tickler events. |
Purpose: Use this screen to define tickler event settings at the event level.
Important: If you change a tickler event, you must restart the asyncs in the Background Job Control menu option before your updates are applied to new ticklers.
How to display this screen: Select Change for a tickler event at the Work with Tickler Event Screen.
Field |
Description |
|---|---|
Event |
A code that determines the system action for which the system may create a tickler. There are 11 system actions that can create ticklers. You cannot create other tickler events for the system to evaluate for tickler creation. BO: backorders; see BO (Backorders) Event Processing CO: cancelled orders; see CO (Cancelled Orders) Event Processing HO: held orders; see HO (Held Orders) Event Processing MN: manually created; see MN (Manually Created) Event Processing NO: new orders; see NO (New Orders) Event Processing OO: aged open orders; see OO (Aged Open Orders) Event Processing SD: stored value card activation decline; see SD (SVC Activation Decline) Event Processing SO: soldout orders; see SO (Soldout Orders) Event Processing SV: stored value card number assignment; see SV (SVC Number Assignment) Event Processing UP: unconfirmed pick tickets; see UP (Unconfirmed Pick Tickets) Event Processing VP: voided pick tickets; see VP (Voided Pick Tickets) Event Processing WF: remote workflow; see WF (Remote Workflow) Event Processing Alphanumeric, 2 positions; display-only. |
Description |
A description of the tickler event. Alphanumeric, 40 positions; required. |
Category (Tickler category) |
A code for the tickler category assigned to the tickler event. Tickler categories are used to group ticklers. You can also define a tickler category for each event rule; the tickler category defined at the event rule level overrides the tickler category defined at the event level. Tickler categories are defined in and validated against the Tickler Category table; see Working with Tickler Category (WTCT). Alphanumeric, 3 positions; optional. |
Resolution reason |
A code for the reason why a tickler for this event is resolved. Tickler resolution reason codes are assigned to a tickler once the tickler has been resolved. You can also define a resolution reason for each event rule; the resolution reason defined at the event rule level overrides the resolution reason defined at the event level. You must define a tickler resolution reason for all tickler events except for the MN (manually created) tickler event. Tickler resolution reasons are defined in and validated against the Tickler Resolution Reason table; see Working with Tickler Resolution Reasons (WTRR). Alphanumeric, 3 positions; required except for MN tickler event. |
Priority |
The priority assigned to the tickler event, used to determine the importance of ticklers created for this event. You can assign a tickler event priority between 1-9, where 1 is the lowest priority and 9 is the highest priority. You can also define a tickler priority for each event rule; the tickler priority defined at the event rule level overrides the tickler priority defined at the event level. Numeric, 1 position; required. |
Active |
Indicates whether the tickler event is active. selected = The tickler event is currently active; the system creates a tickler if the system action qualifies for an event rule. unselected = The tickler event and its event rules are not currently active; the system does not create a tickler, regardless of whether the system action qualifies for an event rule. |
Allow mult ticklers |
Indicates if the system creates multiple ticklers for this tickler event if the system action qualifies for more than one event rule. selected = The system creates a tickler for each event rule whose criteria are met by the system action. unselected (default) = The system creates one tickler for the first event rule, in processing sequence order, whose criteria are met by the system action. The system does not create more than one tickler for the tickler event, regardless of whether the system action meets the criteria of more than one event rule. Multiple ticklers are not allowed for tickler events OO (aged open orders) or UP (unconfirmed pick tickets). |
Assign to orig user |
Indicates if ticklers created for this tickler event are assigned to the user that entered the order associated with the tickler. selected = Assign ticklers created for this tickler event to the user that entered the associated order. If this field is selected, you must also enter a user ID in the Assign to user field. unselected (default) = Do not assign ticklers created for this tickler event to the user that entered the associated order; instead, assign the tickler to the specified user or tickler user group. You must also define tickler assignment for each event rule; the tickler assignment defined at the event rule level overrides the tickler assignment defined at the event level. Note: This field defaults to selected for MN (manually created) ticklers. See Tickler Assignment. |
Notify user/group |
Indicates whether the system sends a Tickler Notification email to the assigned user or to all of the users in the assigned tickler user group when a tickler is created for this tickler event. selected = Notify the assigned user/user group when a tickler is created; use the email address defined for the user in the User Extended table. If the tickler is assigned to a user group, send a notification to each user in the group, using the email address defined for each user in the User Extended table. unselected (default) = Do not notify the assigned user/user group when a tickler is created; the user can review the ticklers in his queue at the Work with Tickler Screen (user/group view). You must also define the Notify user/group setting for each event rule; the notify user/group setting at the event rule level overrides the notify user/group setting defined at the event level. See Tickler Notification for a sample Tickler Notification email. |
Assign to user |
The user ID of the user the system assigns ticklers to for this tickler event. You must also define the Assign to setting for each event rule; the assign to setting at the event rule level overrides the assign to setting defined at the event level. You can define either an assign to user or assign to user group for each event, but not both. Users are defined in and validated against the User table; see Working with User Records (WUSR). See Tickler Assignment. Alphanumeric, 10 positions; optional. |
Assign to group |
The tickler user group the system assigns ticklers to for this tickler event. You must also define the Assign to setting for each event rule; the assign to setting at the event rule level overrides the assign to setting defined at the event level. You can define either an assign to user or assign to user group for each event, but not both. The tickler user group you enter must be defined as a user type and not a supervisor type. Tickler user groups are defined in and validated against the Tickler User Group table; see Working with Tickler User Groups (WTUG). See Tickler Assignment. Alphanumeric, 10 positions; optional. |
Supervisor group |
The tickler supervisor group the system assigns ticklers to for this tickler event. You can also define the Supervisor group for each event rule; the supervisor group at the event rule level overrides the supervisor group defined at the event level. The tickler user group you enter must be defined as a supervisor type and not a user type. Tickler groups are defined in and validated against the Tickler User Group table; see Working with Tickler User Groups (WTUG). See Tickler Assignment. Alphanumeric, 10 positions; optional. |
Notify supervisor |
Indicates when a Supervisor Notification Count email is sent to the supervisor based on the number of days since a tickler was created. The system uses this calculation to determine the next notification date when a tickler is first created: tickler creation date + value in Number of days to notify supervisor field for the event/rule that created the tickler = next notification date. The system does not update the next notification date after a tickler is created. The system sends the email to the email address defined for the supervisor user group in the Tickler User Group table. The system continues sending an email to the supervisor group as long as a tickler assigned to the supervisor group is in an open or in process status and the Next notification date in the Tickler table is equal to or past the current date. If the next notification date is a future date, the system does not send an email until the next notification date is reached. If all ticklers assigned to the supervisor are resolved, the system no longer sends a Supervisor Notification Count email. |
|
Leave this field blank if you do not want to notify the supervisor about aging ticklers; the supervisor can review ticklers using the Workflow Management (WWFM) menu option. You can also define the Notify supervisor setting for each event rule; the notify supervisor setting at the event rule level overrides the notify supervisor setting defined at the event level. If you define a number of days in this field, you must also define the supervisor group. See Tickler Notification for a sample Supervisor Notification Count email. Numeric, 3 positions; optional. |
Note type |
Indicates the type of notes you enter for ticklers created for this tickler event. A = Action notes; you use the Edit Customer Actions Window to enter tickler notes. B = Bill to notes; you use the Work with Bill To Notes Screen to enter tickler notes. O = Order notes; you use the Work with Order Messages Screen to enter tickler notes. S = Sold to notes; you use the Edit Customer Notes Screen to enter tickler notes. T = Tickler notes; you use the Work with Tickler Notes Screen to enter tickler notes. You can only define the tickler work notes setting at the event level. If you change the note type for a tickler event, the system does not change the note type for previous ticklers. Alphanumeric, 1 position; required. |
Work with Tickler Event Rule Screen
Purpose: Use this screen to create, change, and delete event rules defined for a specific tickler event. You can also create procedure notes for each event rule.
Note: Event rules display on this screen in processing sequence order, allowing you to easily see the order in which the system evaluates the rules to determine if a tickler is created; see Event Rule Processing Sequence.
How to display this screen: Select Rules for a tickler event at the Work with Tickler Event Screen.
Field |
Description |
|---|---|
Event |
The code and description of the event associated with the event rules. Code: Alphanumeric, 2 positions; display-only. Description: Alphanumeric, 40 positions; display-only. |
Proc seq # |
The processing sequence number for the event rule. The processing sequence number defines the order in which the system evaluates the rules to determine if a tickler is created, from lowest sequence number to highest. Note: The first tickler event rule that meets the criteria creates a tickler. It is important that you assign the most important tickler event rule the lowest processing sequence number. If you do not define a processing sequence number for an event rule, the system assigns the event rule a processing sequence number of 0. If all of the rules have the same processing sequence number, the system evaluates the rules in rule sequence number. See Event Rule Processing Sequence. Numeric, 3 positions; optional. |
Rule seq # |
The rule sequence number for the event rule. The system assigns a rule sequence number to each rule you create; the first rule you create is assigned a rule sequence number of 1, etc. Note: If all of the rules have the same processing sequence number, the system evaluates the rules to determine if a tickler is created in rule sequence number, from lowest rule number to highest. See Event Rule Processing Sequence. Numeric, 3 positions; optional. |
Description |
A description of the event rule, usually indicating the criteria defined for the rule. Alphanumeric, 40 positions; optional. |
Pty (Priority) |
The priority assigned to the event rule, used to determine the importance of ticklers created for the event rule. You can scan for ticklers by priority at the Work with Tickler Screen (user/group view) (tickler users) and Workflow Management Screen (tickler supervisors). You can assign a tickler event priority between 1-9, where 1 is the lowest priority and 9 is the highest priority. The priority defined at the tickler event level defaults, but you can override it. The tickler priority defined at the event rule level overrides the tickler priority defined at the event level. Numeric, 1 position; display-only. |
Act (Active flag) |
Indicates whether the event rule is active. selected = The event rule is currently active; the system creates a tickler for the event rule if its criteria are met by the system action. Remember, to create a tickler for the event rule, the Active flag at the event level must also be selected. unselected = The event rule is not currently active; the system does not create a tickler, regardless of whether the system action qualifies for the event rule. |
Cat (Tickler category) |
A code for the tickler category assigned to the event rule. Tickler categories are used to group ticklers. Tickler categories are defined in and validated against the Tickler Category table; see Working with Tickler Category (WTCT). Alphanumeric, 3 positions; optional. |
Screen Option |
Procedure |
|---|---|
Create a tickler event rule |
Select Create to advance to the Create Tickler Event Rule Screen. |
Change a tickler event rule |
Select Change for an event rule to advance to the Change Tickler Event Rule Screen. You can change all fields on this screen except Event code. See Create Tickler Event Rule Screen for field descriptions. Note: If you create or change a tickler event rule, you must restart the asynchronous jobs the Background Job Control menu option before your updates are applied to new ticklers. |
Delete a tickler event rule |
Select Delete for an event rule to delete it. Note: You can delete an event rule only if it is not associated with an open or in process tickler. |
Display a tickler event rule |
Select Display for an event rule to advance to the Display Tickler Event Rule Screen. You cannot change any information at this screen. See the Create Tickler Event Rule Screen for field descriptions. |
Create or change tickler event rule instructions |
Select Procedures for an event rule to advance to the Work with Tickler Event Rule Procedure Screen. |
Create Tickler Event Rule Screen
Purpose: Use this screen to create an event rule for a specific tickler event.
This screen is divided into 2 areas:
• The top half of the screen displays the event rule settings, such as who to notify, the tickler category, resolution reason, and processing sequence number; see Event Rule Settings.
• The bottom half of the screen displays the event rule options, or criteria, that must be met by the system action in order for the system to create a tickler. The event rule options are different for each tickler event.
For each event rule you create, you must define at least one event rule option, or criterion, the system uses to determine if a tickler should be created. If you define more than one rule criterion, the system action must meet all of the options defined for the event rule to create a tickler.
Note: You cannot create a duplicate event rule, meaning, you cannot create 2 rules that have the same criteria or an error message indicates: Duplicate rule exists.
The Processing sequence number defined for each event rule determines the sequence in which the system validates each event rule to determine if a tickler should be created, 1 being the first priority. You should assign the most important event rules a lower sequence number.
Important: If you create or change an event rule, you must restart the async jobs in the Background Job Control menu option before your updates are applied to new ticklers.
How to display this screen: Select Create at the Work with Tickler Event Rule Screen.
Field |
Description |
|---|---|
Event |
The code and description for the tickler event associated with the event rule. Code: Alphanumeric, 2 positions; display-only. Description: Alphanumeric, 40 positions; display-only. |
Rule description |
A description of the event rule, usually indicating the criteria defined for the rule. Alphanumeric, 40 positions; required. |
Category |
A code for the tickler category assigned to the event rule. Tickler categories are used to group ticklers. The tickler category at the event level defaults, but you can override it. The tickler category defined at the event rule level overrides the tickler category defined at the event level. Tickler categories are defined in and validated against the Tickler Category table; see Working with Tickler Category (WTCT). Alphanumeric, 3 positions; optional. |
Resolution reason |
A code for the reason why a tickler for this event rule is resolved. Tickler resolution reason codes are assigned to a tickler once the tickler has been resolved. The resolution reason at the event level defaults, but you can override it. The resolution reason defined at the event rule level overrides the resolution reason defined at the event level. You must define a tickler resolution reason for all tickler events except for the MN (manually created) tickler event. Tickler resolution reasons are defined in and validated against the Tickler Resolution Reason table; see Working with Tickler Resolution Reasons (WTRR). Alphanumeric, 3 positions; required except for MN tickler event. |
Active |
Indicates whether the event rule is active. selected = The event rule is currently active; the system creates a tickler for the event rule if its criteria are met by the system action. Remember, to create a tickler for the event rule, the Active flag at the event level must also be selected. unselected = The event rule is not currently active; the system does not create a tickler, regardless of whether the system action qualifies for the event rule. |
Processing seq |
The processing sequence number for the event rule. The processing sequence number defines the order in which the system evaluates the rules to determine if a tickler is created, from lowest sequence number to highest. Note: The first tickler event rule that meets the criteria creates a tickler. It is important that you assign the most important event rule the lowest processing sequence number. If you do not define a processing sequence number for an event rule, the system assigns the event rule a processing sequence number of 0. If all of the rules have the same processing sequence number, the system evaluates the rules in rule sequence number. See Event Rule Processing Sequence. Numeric, 3 positions; optional. |
Notify user/group |
Indicates whether the system sends a Tickler Notification email to the assigned user or to all of the users in the assigned tickler user group when a tickler is created for this event rule. selected = Notify the assigned user/user group when a tickler is created; use the email address defined for the user in the User Extended table. If the tickler is assigned to a user group, send a notification to each user in the group, using the email address defined for each user in the User Extended table. unselected = Do not notify the assigned user/user group when a tickler is created; the user can review the ticklers in his queue at the Work with Tickler Screen (user/group view). The notify user/group setting at the event level defaults, but you can override it. The notify user/group setting at the event rule level overrides the notify user/group setting defined at the event level. See Tickler Notification for a sample Tickler Notification email. |
Assign to orig user |
Indicates if ticklers created for this event rule are assigned to the user that entered the order associated with the tickler. selected = Assign ticklers created for this event rule to the user that entered the associated order. If this field is selected, you must also enter a user ID in the Assign to user field. unselected = Do not assign ticklers created for this event rule to the user that entered the associated order; instead, assign the tickler to the specified user or tickler user group. The assign to original user setting at the event level defaults, but you can override it. The tickler assignment defined at the event rule level overrides the tickler assignment defined at the event level. Note: See Tickler Assignment. |
Assign to user |
The user ID of the user the system assigns to ticklers for this event rule. The assign to user setting at the event level defaults, but you can override it. The assign to setting at the event rule level overrides the assign to setting defined at the event level. You can define either an assign to user or assign to user group for the event rule, but not both. Users are defined in and validated against the User table; see Working with User Records (WUSR). See Tickler Assignment. Alphanumeric, 10 positions; optional. |
Assign to user group |
The tickler user group the system assigns to ticklers for this event rule. The assign to user group setting at the event level defaults, but you can override it. The assign to setting at the event rule level overrides the assign to setting defined at the event level. You can define either an assign to user or assign to user group for each event, but not both. The tickler user group you enter must be defined as a user type and not a supervisor type. Tickler user groups are defined in and validated against the Tickler User Group table; see Working with Tickler User Groups (WTUG). See Tickler Assignment. Alphanumeric, 10 positions; optional. |
Supervisor group |
The tickler supervisor group the system assigns to ticklers for this event rule. The supervisor group setting at the event level defaults, but you can override it. The supervisor group at the event rule level overrides the supervisor group defined at the event level. The tickler user group you enter must be defined as a supervisor type and not a user type. Tickler user groups are defined in and validated against the Tickler User Group table; see Working with Tickler User Groups (WTUG). See Tickler Assignment. Alphanumeric, 10 positions; optional. |
Notify supervisor |
Indicates when a Supervisor Notification Count email is sent to the supervisor, based on the number of days since a tickler was created. The system uses this calculation to determine the next notification date when a tickler is first created: tickler creation date + value in Number of days to notify supervisor field for the event/rule that created the tickler = next notification date. The system does not update the next notification date after a tickler is created. The system sends the email to the email address defined for the supervisor user group in the Tickler User Group table. The system continues sending an email to the supervisor group as long as a tickler assigned to the supervisor group is in an open or in process status and the Next notification date in the Tickler table is equal to or past the current date. If the next notification date is a future date, the system does not send an email until the next notification date is reached. If all ticklers assigned to the supervisor are resolved, the system no longer sends a Supervisor Notification Count email. |
|
Leave this field blank if you do not want to notify the supervisor about aging ticklers for this event rule; the supervisor can review ticklers using the Workflow Management (WWFM) menu option. The notify supervisor setting at the event level defaults, but you can override it. The notify supervisor setting at the event rule level overrides the notify supervisor setting defined at the event level. If you define a number of days in this field, you must also define the supervisor group. See Tickler Notification for a sample Supervisor Notification Count email. Numeric, 3 positions; optional. |
Event rule options: For each event rule, you must define the options, or criteria, that must be met by the system action in order for the system to create a tickler. The event rule options are different for each tickler event. You must define at least one option, or criterion, for each tickler event rule. For more information on defining event rule options, see: • BO (Backorders) Event Processing • CO (Cancelled Orders) Event Processing • HO (Held Orders) Event Processing • MN (Manually Created) Event Processing • NO (New Orders) Event Processing • OO (Aged Open Orders) Event Processing • SD (SVC Activation Decline) Event Processing • SO (Soldout Orders) Event Processing • SV (SVC Number Assignment) Event Processing • UP (Unconfirmed Pick Tickets) Event Processing |
|
BO (Backorders) Event Processing
The system creates a tickler for the BO tickler event when an item on an order is placed on backorder and the order qualifies for a BO event rule.
When is the BO event evaluated? The system evaluates the BO event when you or the system place an item on backorder:
• during order entry processing
• during order maintenance processing
• during batch order entry (this includes orders received via the phone order interface and ecommerce)
• when you void and unreserve a pick ticket in order maintenance or in the Reprinting and Voiding Pick Slips (WVRP or WSVP) menu option
• when you unreserve an item during the Working with Interactive Reservation (MIRV) menu option
Allowing multiple ticklers for the BO event:
• If you allow multiple ticklers, the system creates multiple ticklers for an order that contains one or more backordered items; a separate tickler is created for each event rule whose criteria are met.
• If you do not allow multiple ticklers, the system creates only 1 tickler per order ship to that contains one or more items on backorder, regardless of whether the backordered order qualifies for more than one event rule; the system does not create a separate tickler for each transaction that backorders an item on the order.
You can define the following criteria for a BO event rule.
Note: The system creates a separate tickler for each ship to order that has a backordered item that meets the rule’s criteria, regardless of the Allow multiple ticklers setting.
Criterion |
Event rule set up |
|---|---|
An item is placed on backorder by a batch process, such as voiding and unreserving a pick ticket or unreserving an item during Interactive Reservation. |
Deselect the Initial backorder field. |
The backordered item was initially backordered in order entry/maintenance and not by some other program. |
Select the Initial backorder field. |
The life-to-date order dollars for the sold to customer (the $ orders LTD field in the Customer Sold To Order History table) on the order meets the comparison criteria on the event rule. |
Enter a comparison value (valid values are GT greater than, GE greater than or equal to, LT less than, LE less than or equal to) in the Comparison field and a dollar amount in the LTD order dollars field. You can only define a whole number for the life-to-date order dollars. You can review the life-to-date order dollars for a sold to customer at the Display Customer Order History Screen. |
The customer class for the sold to customer on the order matches the customer class on the event rule. |
Enter a customer class in the Customer class field. Note: The system does not look at the customer class defined for the ship to customer. |
The item and/or SKU on backorder matches the item and/or SKU on the event rule. |
Enter an item code in the Item field and optionally, a SKU code in the SKU field. If you define an item but not a SKU code and the item contains SKUs, the system creates a tickler for the item if any of the SKUs for the item are on backorder. If you define both an item and SKU, the system creates a tickler only if that specific SKU is on backorder. |
The item status for the item on backorder matches the item status on the event rule. |
Enter an item status in the Item status field. |
The item class for the item on backorder matches the item class on the event rule. |
Enter an item class in the Item class field. |
The ship via for the order line or order where the item on backorder is located matches the ship via on the event rule. |
Enter a ship via code in the Ship via field. The system evaluates the ship via on the detail line first, then the ship via on the order header. If you enter a Ship via, you cannot define a Ship via priority for the event rule. Note: To create a tickler for each ship to order, the ship via for the ship to must match the ship via on the event rule. |
The priority of the ship via for the order line or order where the item on backorder is located matches the ship via priority on the event rule. |
Enter a ship via priority number in the Ship via priority field. The system evaluates the ship via on the detail line first, then the ship via on the order header. If you enter a Ship via, you cannot define a Ship via priority for the event rule. Note: To create a tickler for each ship to order, the ship via priority for the ship to must match the ship via priority on the event rule. |
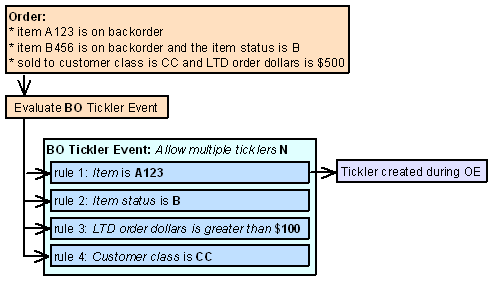
Example 1: Allow multiple ticklers is unselected for the BO event.
The following event rules are defined for the BO event, displayed in processing sequence order.
• Event rule 1: Item is A123.
• Event rule 2: Item status is B.
• Event rule 3: LTD order dollars is greater than $100.
• Event rule 4: Customer class is CC.
You enter an order and:
• item A123 is on backorder.
• item B456 is on backorder and the item status is B.
• the sold to customer’s class is CC and life-to-date order dollars is $500.
The system creates 1 tickler for rule 1: Item is A123.
In this scenario, the system creates only 1 tickler for the order containing backordered items even though the order qualified for all of the event rules.
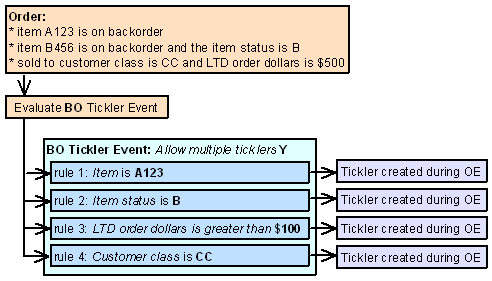
Example 2: Allow multiple ticklers is selected for the BO event.
The following event rules are defined for the BO event, displayed in processing sequence order.
• Event rule 1: Item is A123.
• Event rule 2: Item status is B.
• Event rule 3: LTD order dollars is greater than $100.
• Event rule 4: Customer class is CC.
You enter an order and:
• item A123 is on backorder.
• item B456 is on backorder and the item status is B.
• the sold to customer’s class is CC and life-to-date order dollars is $500.
The system creates 4 ticklers for the order:
• the first tickler is created for rule 1: Item is A123.
• the second tickler is created for rule 2: Item status is B.
• the third tickler is created for rule 3: LTD order dollars is greater than $100.
• the fourth tickler is created for rule 4: Customer class is CC.
In this scenario, the system creates 4 ticklers for the order containing backordered items; a separate tickler is created for each rule whose criteria are met.
A BO tickler is resolved when you or the system:
• select Resolve for a tickler at the Work with Tickler Screen (user/group view) or Workflow Management Screen.
• receive inventory for the backordered item.
• cancel the order containing the backordered item.
CO (Cancelled Orders) Event Processing
The system creates a tickler for the CO tickler event when an order is cancelled or contains an order line that is cancelled and the order qualifies for a CO event rule.
When is the CO event evaluated? The system evaluates the CO event when you or the system cancels an order or order line during:
• order maintenance
• Working with Backorders Pending Cancellation (WBPC)
• Processing Item Substitutions (PSUB)
• Working with Credit Card Cancellations (WCCC)
• Processing Auto Soldout Cancellations (MASO)
Allowing multiple ticklers for the CO event:
• If you allow multiple ticklers, the system creates multiple ticklers for an order that is cancelled or contains cancelled order lines; a separate tickler is created for each event rule whose criteria are met.
• If you do not allow multiple ticklers, the system creates only 1 tickler per order ship to that contains a cancelled order/order line, for example if 1 tickler is created during order maintenance another tickler cannot be created during Process Auto Soldout Cancellations.
You can define the following criteria for a CO event rule.
Note: The system creates a separate tickler for each ship to order that has a cancelled order line and meets the rule’s criteria, regardless of the Allow multiple ticklers setting. When you cancel an order, the system creates a separate tickler for each ship to order you cancel.
Criterion |
Event rule set up |
|---|---|
The order or order line is cancelled, regardless of whether it is by a batch process or interactively. |
Deselect the Batch process only field. |
The order or order line is cancelled by a batch process and not interactively. |
Select the Batch process only field. You can cancel an order/order line during a batch process using: • Processing Item Substitutions (PSUB) |
The life-to-date order dollars for the sold to customer (the $ orders LTD field in the Customer Sold To Order History table) on the order meets the comparison criteria on the event rule. |
Enter a comparison value (GT greater than, GE greater than or equal to, LT less than, LE less than or equal to) in the Comparison field and a dollar amount in the LTD order dollars field. You can only define a whole number for the life-to-date order dollars. You can review the life-to-date order dollars for a sold to customer at the Display Customer Order History Screen. |
The customer class for the sold to customer on the order matches the customer class on the event rule. |
Enter a customer class in the Customer class field. Note: The system does not look at the customer class defined for the ship to customer. |
The item and/or SKU on the cancelled order line matches the item and/or SKU on the event rule. |
Enter an item code in the Item field and optionally, a SKU code in the SKU field. If you define an item but not a SKU code and the cancelled item contains SKUs, the system creates a tickler for the item if any of the SKUs for the item are cancelled. If you define both an item and SKU, the system creates a tickler only if that specific SKU is cancelled. |
The item status for the item on the cancelled order line matches the item status on the event rule. |
Enter an item status in the Item status field. |
The item class for the item on the cancelled order line matches the item class on the event rule. |
Enter an item class in the Item class field. |
The cancel reason on the cancelled order line/order matches the cancel reason on the event rule. |
Enter a cancel reason code in the Cancel reason field. |
The ship via for the cancelled order/order line matches the ship via on the event rule. |
Enter a ship via code in the Ship via field. The system evaluates the ship via on the detail line first, then the ship via on the order header. If you enter a Ship via, you cannot define a Ship via priority for the event rule. Note: To create a tickler for each ship to order, the ship via for the ship to customer must match the ship via on the event rule. |
The priority of the ship via for the cancelled order/order line matches the ship via priority on the event rule. |
Enter a ship via priority number in the Ship via priority field. The system evaluates the priority of the ship via on the detail line first, then the priority of the ship via on the order header. If you enter a Ship via priority, you cannot define a Ship via for the event rule. Note: To create a tickler for each ship to order, the priority of the ship via for the ship to customer must match the ship via priority on the event rule. |
Example 1: Allow multiple ticklers is unselected for the CO event.
The following event rules are defined for the CO event, displayed in processing sequence order.
• Event rule 1: Batch process only is selected
• Event rule 2: Item is A123
• Event rule 3: LTD order dollars is greater than 500
• Event rule 4: Ship via is 1
You enter an order and:
• the ship via on the order header is 1.
• the items on the order are A123 and B456.
• the sold to customer’s life-to-date order dollars is $75.00.
• in order maintenance, you cancel order line 1 for item B456.
• in Processing Item Substitutions (PSUB), you cancel item A123.
In this scenario, the system creates 1 tickler during order maintenance for rule 4: Ship via is 1. The system does not create a tickler for the other rules whose criteria are met. The system does not create a tickler during Process Substitute Items since a CO tickler already exists for the order/order ship to.

Example 2: Allow multiple ticklers is selected for the CO event.
The following event rules are defined for the CO event, displayed in processing sequence order.
• Event rule 1: Batch process only is selected
• Event rule 2: Item is A123
• Event rule 3: LTD order dollars is greater than 500
• Event rule 4: Ship via is 1
You enter an order and:
• the ship via on the order header is 1.
• the items on the order are A123 and B456.
• the sold to customer’s life-to-date order dollars is $75.00.
• in order maintenance, you cancel order line 1 for item B456.
• in Processing Item Substitutions (PSUB), you cancel item A123.
In this scenario, the system creates 1 tickler during order maintenance for rule 4: Ship via is 1.
The system creates 2 ticklers during Process Substitute Items:
• the first tickler is created for rule 1: Batch process only is selected.
• the second tickler is created for rule 2: Item is A123.
A tickler is not created for rule 3 during Process Substitute Items because a tickler already exists for that order using that rule.
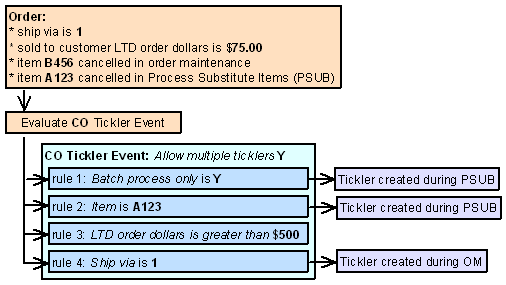
A CO tickler is resolved when you or the system select Resolve for a tickler at the Work with Tickler Screen (user/group view) or Workflow Management Screen.
HO (Held Orders) Event Processing
The system creates a tickler for the HO tickler event when an order’s order header, order ship to (recipient), or order payment method is placed on hold and the order qualifies for an HO event rule. The system does not create a tickler for an order line placed on hold.
When is the HO event evaluated? The system evaluates the HO event when you or the system place an order on hold during:
• order entry processing
• order maintenance processing
• batch order entry (this includes orders received via the phone order interface and ecommerce)
• credit card authorization (during order entry (online authorization), pick slip generation, and drop ship processing)
Allowing multiple ticklers for the HO event:
• If you allow multiple ticklers, the system creates multiple ticklers for an order or order payment method that is held; a separate tickler is created for each event rule whose criteria are met.
• If you do not allow multiple ticklers, the system creates only 1 tickler per order ship to that places an order or order payment method on hold, for example if the system creates 1 HO tickler during order entry the system will not create another HO tickler during credit card authorizations.
You can define the following criteria for an HO event rule.
Note: The system creates a separate tickler for each ship to customer order that meets the rule’s criteria, regardless of the Allow multiple ticklers setting.
Criterion |
Event rule set up |
|---|---|
The order hold reason for the held order matches the order hold reason on the event rule. |
Enter a hold reason in the Order hold reason field. This setting is used for order header holds and recipient holds. The system creates a tickler for both system and user hold reasons. |
The pay type for the held order matches the pay type on the event rule. |
Enter a pay type code in the Pay type field. |
The pay type hold reason for the held order payment method matches the pay type hold reason on the event rule. |
Enter a hold reason in the Pay type hold reason field. The system creates a tickler for both system and user hold reasons. Note: The system does not create a tickler for the CW (awaiting credit card authorization) pay type hold. |
The order total for the held order meets the order total comparison on the event rule. |
Enter a comparison value (valid values are GT greater than, GE greater than or equal to, LT less than, LE less than or equal to) in the Comparison field and a dollar amount in the Order total field. You can only define a whole number for the order total. The order total is the sum of all charges on the order, including merchandise, freight, additional freight, tax, handling, and additional charges across all recipients on the order. |
The ship via for the held order/order line matches the ship via on the event rule. |
Enter a ship via code in the Ship via field. The system evaluates the ship via on the detail line first, then the ship via on the order header. If you enter a Ship via, you cannot define a Ship via priority for the event rule. Note: To create a tickler for each ship to order, the ship via for the ship to customer must match the ship via on the event rule. |
The priority of the ship via for the held order/order line matches the ship via priority on the event rule. |
Enter a ship via priority number in the Ship via priority field. The system evaluates the priority of the ship via on the detail line first, then the priority of the ship via on the order header. If you enter a Ship via priority, you cannot define a Ship via for the event rule. Note: To create a tickler for each ship to order, the priority of the ship via for the ship to customer must match the ship via priority on the event rule. |
Example 1: Allow multiple ticklers is selected for the HO event.
The following event rules are defined for the HO event, displayed in processing sequence order.
• Event rule 1: Order hold reason is HS (sold to/ship to fraud)
• Event rule 2: Order hold reason is PT (pay type hold)
• Event rule 3: Pay type hold reason is PV (pay plan velocity hold)
You enter an order and:
• the sold to customer on the order is a fraud (F in the Hold/bypass/fraud field for the customer). The system places the order ship to customer on HS (sold to/ship to fraud).
• the order pay type on the order is credit card with deferred payment and the card has been used too many times within a specified time period with a deferred payment option. The system places the order header on PT (pay type) hold and the order pay type on PV (pay plan velocity) hold.
In this scenario, the system creates 3 ticklers:
• the first tickler is created for the order ship to hold using rule 1: Order hold reason is HS (sold to/ship to fraud).
• the second tickler is created for the order header hold using rule 2: Order hold reason is PT (pay type hold).
• the third tickler is created for the pay type hold using rule 3: Pay type hold reason is PV (pay plan velocity hold)
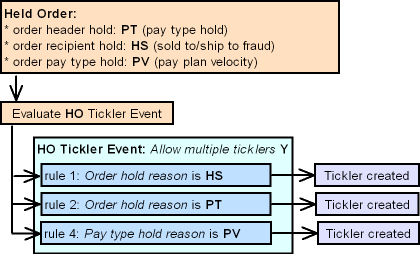
Example 2: Allow multiple ticklers is unselected for the HO event.
The following event rules are defined for the HO event, displayed in processing sequence order.
• Event rule 1: Order hold reason is HS (sold to/ship to fraud)
• Event rule 2: Order hold reason is PT (pay type hold)
• Event rule 4: Pay type hold reason is PV (pay plan velocity hold)
You enter an order and:
• the sold to customer on the order is a fraud (F in the Hold/bypass/fraud field for the customer). The system places the order ship to customer on HS (sold to/ship to fraud).
• the order pay type on the order is credit card with deferred payment and the card has been used too many times within a specified time period with a deferred payment option. The system places the order header on PT (pay type) hold and the order pay type on PV (pay plan velocity) hold.
In this scenario, the system creates 1 tickler for the order ship to hold using the first rule: Order hold reason is HS (sold to/ship to fraud). The system does not create a tickler for the other rules whose criteria are met.
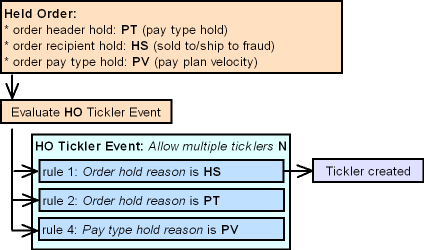
An HO tickler is resolved when you:
• select Resolve for a tickler at the Work with Tickler Screen (user/group view) or Workflow Management Screen.
• release the order from hold by selecting Release for a tickler at the Work with Tickler Screen (user/group view) or Workflow Management Screen.
• release the order from hold by selecting Release for a tickler in the Release Held Orders menu option; see Performing the Release.
• release the order from hold in order maintenance by:
• removing the order header hold reason.
• adding a pay type for a balance due hold.
• manually authorizing a held credit card pay type using the Manual Credit Card Authorization (MCCA) menu option.
MN (Manually Created) Event Processing
You can manually create a tickler at the Create Tickler Screen.
How to display this screen: You can advance to the Create Tickler screen from the:
• Workflow Management Screen (workflow supervisor)
• Work with Tickler Screen (user/group view) (workflow user)
• Work with Ticklers Screen (sold to customer view)
• Work with Ticklers Screen (ship-to customer view)
• Work with Ticklers Screen (bill-to customer view)
• Work with Ticklers Screen (order view)
• Work with Return Authorization Detail Screen
• Work with Returns for Order Screen
• Work with Email by Order Number Screen
• Work with Email by Customer Sold To Number Screen
• Work with Email by Customer Ship To Number Screen
• Work with Email by Customer Bill To Number Screen
• Display Item Availability Screen
Allowing multiple ticklers for the MN event: The Allow multiple ticklers setting does not apply to manually created ticklers.
MN event rule criteria: You cannot define event rules for the MN tickler event. However, you can associate a manually created tickler with a specific:
• order number and ship to number
• customer sold to number
• customer ship to number
• customer bill to number
• existing tickler number
Depending on how you advance to the Create Tickler screen, the system automatically associates the tickler with a specific order or customer. For example, if you advance to the Create Tickler screen from the Work with Ticklers Screen (sold to customer view), the system automatically associates the manually created tickler with the sold to customer.
A MN tickler is resolved when you select Resolve for a tickler at the Work with Tickler Screen (user/group view) or Workflow Management Screen.
NO (New Orders) Event Processing
The system creates a tickler for the NO tickler event when the status of an order line updates to open or closed and the order qualifies for an NO event rule.
The system creates a tickler for each order containing one or more order lines that are updated to open or closed; the system does not create a separate tickler for each order line that is updated to open or closed.
Soldout orders: The system will never create an NO tickler for an order that is entirely soldout; this is because none of the lines on the order are ever updated to open or closed.
Note: Even if a NO tickler exists for an order, the order can continue through the order cycle.
When is the NO event evaluated? The system evaluates the NO event when an order:
• is accepted (because the status of an order line updates from suspended to open), before creating a pre-generated pick. If a web order is placed in an error status in an order batch, the system evaluates the NO event when you edit and accept the order batch. Note: The system does not evaluate the NO event when you accept an order in order maintenance.
• is processed through the Billing Async (because the status of an order line updates to closed).
Allowing multiple ticklers for the NO event:
• If you allow multiple ticklers, the system creates multiple ticklers for an order containing one or more order lines that are updated to open or closed; a separate tickler is created for each event rule whose criteria are met.
• If you do not allow multiple ticklers, the system creates only 1 tickler for an order containing one or more order lines that are updated to open or closed, regardless of whether the order qualifies for more than one event rule; the system does not create a separate tickler for each transaction that updates or closes an order.
You can define the following criteria for an NO event rule.
The Order line status setting is used with all other criteria you define for an event rule. For example, if you define an item status, the item on the order line must match the specified item status and the status of the order line must update to open or closed (whichever order line status you specify).
Hold reason: If you enter a valid hold reason in the Hold reason field, the system places the order on hold at the user level when a NO tickler is created for the event rule. In this situation, the system removes any pick slip preparation from the order; see Preparing Orders for Pick Slip Generation.
Note: Unless otherwise noted, the system creates a separate tickler for each ship to customer on the order that has an open/closed order line that qualifies for an event rule, regardless of the Allow multiple ticklers setting.
Criterion |
Event rule set up |
|---|---|
The order line status changes to open/closed. |
Enter an order line status code in the Order line status field. blank = The order line status changes to open; for example, you enter a new order line. X = the order line status changes to closed; for example, you ship an order line. |
The ordered quantity or shipped quantity for the open/closed order line is equal to or greater than the quantity on the event rule. |
Enter a quantity in the Quantity ordered/shipped field. • the quantity represents the ordered quantity if the Order line status is blank. • the quantity represents the shipped quantity if the Order line status is X. |
The item status for the item on the open/closed order line matches the item status on the event rule. |
Enter an item status in the Item status field. |
The open/closed order line is for a first time buyer. |
Select the First time buyer field. The system considers the sold to customer a first time buyer if the Current mail type field for the customer is a value other than B (buyer). Note: The system creates one tickler for the first ship to order if the sold to customer on the order qualifies; the system does not create a tickler for subsequent ship to orders. |
The item class for the item on the open/closed order line matches the item class on the event rule. |
Enter an item class in the Item class field. |
The item and/or SKU on the open/closed order line matches the item and/or SKU on the event rule. |
Enter an item code in the Item field and optionally, a SKU code in the SKU field. If you define an item but not a SKU code and the item contains SKUs, the system creates a tickler for the item if any of the SKUs for the item are on an open/closed order line. If you define both an item and SKU, the system creates a tickler only if that specific SKU is on an open/closed order line. |
The order type on the order matches the order type on the event rule. |
Enter an order type in the Order type field. Note: A tickler is created for each ship to order whose order type matches the order type on the event rule. |
The last order date for the sold to customer (the Last order field in the Customer Sold To Order History table) on the order is past the current date by the number of days on the event rule. |
Enter a number in the Number days since field. You can review the last order date for a sold to customer on the Display Customer Order History Screen. Note: The system does not create a separate tickler for each ship to. |
The country code on the ship to order matches the country code on the event rule. |
Enter a country code in the Country field. Note: A tickler is created for each ship to order whose country code matches the country code on the event rule. If you define a country code you cannot exclude the default country. |
The country code on the ship to order must be a country other than the Default Country for Customer Address (B17). |
Select the Exclude default country field. Note: A tickler is created for each ship to order whose country code qualifies for the event rule. If you exclude the default country you cannot define a country code. |
The order total on the order meets the order dollars comparison criteria on the event rule. |
Enter a comparison value (valid values are GT greater than, GE greater than or equal to, LT less than, LE less than or equal to) in the Comparison field and a dollar amount in the Order dollars field. The order total is the sum of all charges on the order, including merchandise, freight, additional freight, tax, handling, and additional charges across all recipients on the order. You can only define a whole number for the order dollars. |
The ship via code on the order line or order header matches the ship via code on the event rule. |
Enter a ship via code in the Ship via field. Ship via codes are defined in and validated against the Ship Via table. The system evaluates the ship via on the detail line first, then the ship via on the order header. A tickler is created for each ship to order whose ship via code at the line level or header level matches the ship via code on the event rule. If you enter a Ship via, you cannot define a Ship via priority for the event rule. |
The priority for the ship via code on the order line or order header matches the ship via priority on the event rule. |
Enter a ship via priority (1-9) in the Ship via priority field. The system evaluates the ship via on the detail line first, then the ship via on the order header. A tickler is created for each ship to order whose ship via code at the line level or header level has a ship via priority that matches the ship via priority on the event rule. If you enter a Ship via priority, you cannot define a Ship via for the event rule. |
Example 1: Allow multiple ticklers is selected for the NO event.
The following event rules are defined for the NO event, displayed in processing sequence order.
• Event rule 1: Order line status is blank and Order type is I.
• Event rule 2: Order line status is X.
• Event rule 3: Order line status is blank and Exclude default country is selected.
You enter an order and:
• the order type is I.
• the country code on the order is JPY (the default country code is USA).
In this scenario, the system creates 2 ticklers when the order is processed by the Order Async:
• the first tickler is created for rule 1: Order line status is blank and Order type is I.
• the second tickler is created for rule 3: Order line status is blank and Exclude default country is selected.
You generate a pick ticket and ship the order. The system creates 1 tickler when the order is processed by the Billing Async for rule 2: Order line status is X.
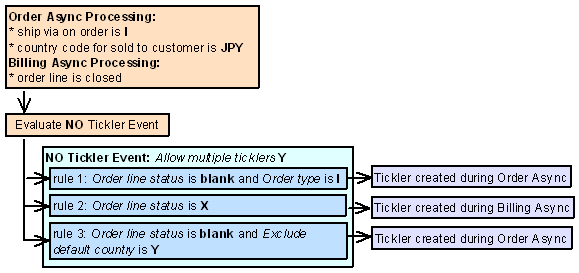
Example 2: Allow multiple ticklers is unselected for the NO event.
The following event rules are defined for the NO event, displayed in processing sequence order.
• Event rule 1: Order line status is blank and Order type is I.
• Event rule 2: Order line status is X.
• Event rule 3: Order line status is blank and Exclude default country is selected.
You enter an order and:
• the order type is I.
• the country code on the order is JPY (the default country code is USA).
In this scenario, the system creates 1 tickler when the order is processed by the Order Async for rule 1: Order line status is blank and Order type is I.
You generate a pick ticket and ship the order. The system does not create a tickler when the order is processed by the Billing Async.
A NO tickler is resolved when you:
• select Resolve for a tickler at the Work with Tickler Screen (user/group view) or Workflow Management Screen.
• use Selecting Held Orders (ERHO) to release the order from hold. The system resolves the tickler when you release the order from hold only if the reason the order was held was because of the tickler and a resolution reason is defined for the tickler event rule.
OO (Aged Open Orders) Event Processing
The system creates a tickler for the OO tickler event when an aged open order exists.
An aged open order is:
• an order whose order header is open or held, and
• the order contains one or more order lines that are open or held, and
• the order line is not reserved (Quantity reserved is 0) or is reserved but not printed (Quantity reserved is greater than 0 and Quantity printed is 0), and
• the order is older than a specified number of days, based on entered date or arrival date defined for the order lines on the order.
One tickler is created for each ship to customer on an aged open order that qualifies for an OO event rule; if an aged open order qualifies for more than 1 event rule, the system creates 1 tickler for the first event rule, in processing sequence order, that qualifies.
Note: The system does not allow multiple ticklers for the OO event (the Allow multiple ticklers field must be unselected).
When is the OO event evaluated? The system evaluates the OO event when you run the Evaluate Create/Resolve Tickler periodic function (program name PFR0072).
Graduating OO ticklers: Each time you run the Evaluate Create/Resolve Tickler periodic function, the system determines is any existing OO ticklers should be graduated.
• If an OO tickler exists for an aged open order and the aged open order qualifies for a new event rule, based on processing sequence order, the system keeps the existing tickler open and applies the new event rule to the tickler.
• If an OO tickler exists for an aged open order and the aged open order qualifies for the event rule currently assigned to the existing tickler, the system does not create a new tickler and keeps the existing tickler without any updates.
• If an OO tickler exists for an aged open order and the aged open order no longer qualifies for the current event rule and does not qualify for any other OO event rules, the system resolves the tickler; see Resolving OO Ticklers.
The system updates the existing tickler with the information related to the event rule that is now associated with the tickler:
• Rule number updates to the new event rule assigned to the tickler.
• Category updates to the category for the new event rule.
• Priority updates to the priority for the new event rule.
• Assigned to updates to the assigned to user/group for the new event rule.
• Assigned date updates to the date the tickler is graduated.
• Supervisor group updates to the supervisor group for the new event rule.
• Date to notify supervisor updates, based on the new supervisor group assigned.
• Tickler procedures updates to the procedures for the new event rule.
• if the tickler was in-process, the system changes the status back to open.
• if the Notify user/group field is selected for the new event rule, the system sends a Tickler Reassignment email; see Tickler Notification for a sample email. Note: The system sends a Tickler Reassignment email only if the new event rule has a different assigned to user/group from the previous event rule assigned to the tickler.
• the system creates a tickler history record, indicating the tickler has been graduated from one event rule to another.
You can define the following criteria for an OO event rule.
The Orders older than date setting is used with all other criteria you define for an event rule. For example, if you define a ship via, the aged open order must match the specified ship via and the order’s entered/arrival date must be older than the system date by the number of days defined.
Note: The system creates a separate tickler for each ship to order that has an order line that qualifies; the system does not create a separate tickler for each order line that qualifies.
Criterion |
Event rule set up |
|---|---|
The order line’s entered date/arrival date is older than the current date by the number of days on the event rule. |
Enter a date indicator code (E = entered date, A = arrival date) in the Date indicator field and enter a number in the Orders older than field. The system requires you to enter a date indicator and number of days. Note: The system evaluates the entered date/arrival date on the order detail line; the system does not evaluate the entered date/arrival date on the order header. |
The ship via for the aged open order matches the ship via on the event rule. |
Enter a ship via code in the Ship via field. The system evaluates the ship via on the detail line first, then the ship via on the order header. If you define a ship via for the event rule, you cannot define a ship via priority. Note: To create a tickler for each ship to order, the ship via for the ship to customer must match the ship via on the event rule. |
The priority of the ship via for the aged open order matches the ship via priority on the event rule. |
Enter a ship via priority number in the Ship via priority field. The system evaluates the priority of the ship via on the detail line first, then the priority of the ship via on the order header. If you define a ship via priority for the event rule, you cannot define a ship via. Note: To create a tickler for each ship to order, the priority of the ship via for the ship to customer must match the ship via priority on the event rule. |
The following event rules are defined for the OO event rule, in processing sequence order.
• Event rule 1: Orders older than 5 days by Arrival date and Ship via is 2
• Event rule 2: Orders older than 1 day by Arrival date and Ship via is 2
You run the Evaluate Create/Resolve Ticklers periodic function and:
• Order # 6599 qualifies for event rule 2 (an order line’s arrival date is older than 1 day and the ship via is 2)
• Order # 6601 qualifies for event rule 2 (an order line’s arrival date is older than 1 day and the ship via is 2)
The system creates an OO tickler for each order.
You run the Evaluate Create/Resolve Ticklers periodic function again and:
• Order # 6599 qualifies for event rule 1 (an order line’s arrival date is older than 5 days and the ship via is 2)
• Order # 6601 qualifies for event rule 2 (an order line’s arrival date is older than 1 day and the ship via is 2)
The system graduates the existing tickler for order # 6599 to event rule 1; the existing tickler for order # 6601 continues using rule 2.
You run the Evaluate Create/Resolve Ticklers periodic function again, and:
• order # 6599 qualifies for event rule 1 (an order line’s arrival date is older than 5 days and the ship via is 2)
• order # 6601 does not qualify for any rules (a pick has been generated)
The existing tickler for order # 6599 continues using rule 1. The system resolves the existing tickler for order # 6601.
An OO tickler is resolved when you:
• select Resolve for a tickler at the Work with Tickler Screen (user/group view) or Workflow Management Screen.
• run the Evaluate Create/Resolve Ticklers periodic function (program name PFR0072), if the tickler no longer applies to any OO event rules. For example, the order is now cancelled.
• generate a pick slip for the order. Note: When you generate a pick slip for the order, the system resolves the tickler automatically and does not wait until you run the Evaluate Create/Resolve Ticklers periodic function.
SD (SVC Activation Decline) Event Processing
The system creates a tickler for the SD tickler event when a stored value card activation request receives a declined activation response from the service bureau.
The system creates a tickler for each stored value card activation request that receives a declined response.
The tickler indicates the:
• order number and ship to number associated with the stored value card
• customer number (sold to and ship to) on the order
• stored value card item number, SKU code, and description
To activate a declined stored value card: You must call the service bureau to activate the card.
When is the SD tickler event evaluated? The system evaluates the SD tickler event when the SVC_OUT job receives a stored value card activation response from the service bureau.
Allowing multiple ticklers for the SD event: The Allow multiple ticklers setting does not apply to SD ticklers.
SD event rule criteria: You cannot define event rules for the SD tickler event.
An SD tickler is resolved when you select Resolve for a tickler at the Work with Tickler Screen (user/group view) or Workflow Management Screen.
For more information: See Stored Value Card Purchase and Activation.
SO (Soldout Orders) Event Processing
The system creates a tickler for the SO (soldout orders) event each time an item on an order is soldout and the order qualifies for an SO event rule.
When is the SO event evaluated? The system evaluates the SO event when you or the system sell out an item during:
• order entry processing
• order maintenance processing
• batch order entry (this includes orders received via the phone order interface and ecommerce)
• Processing Auto Soldout Cancellations (MASO)
Quotes: The system does not evaluate the SO tickler event for a quote until you convert it to an order.
Allowing multiple ticklers for the SO event:
• If you allow multiple ticklers, the system creates multiple ticklers for an order containing soldout order lines; a separate tickler is created for each event rule whose criteria are met.
• If you do not allow multiple ticklers, the system creates only 1 tickler per order ship to that sells out an order line, for example if the system creates 1 tickler during order entry the system will not create another tickler during auto soldout cancellations.
You can define the following criteria for an SO event rule.
Hold reason: If you enter a valid hold reason in the Hold reason field, the system places the order on hold at the user level when an SO tickler is created for the event rule unless the order is in a closed status. If the order contains more than one ship to, both ship to orders are placed on hold.
Note: The system creates a separate tickler for each ship to order that has a soldout item, regardless of the Allow multiple ticklers setting.
Criterion |
Event rule set up |
|---|---|
The order line is soldout by a batch process, such as Process Auto Soldout Cancellations, and not interactively. |
Select the Batch process only field. Note: If the Batch process only field is selected, the Interactive mode field must be blank. |
The order line is sold out interactively in order entry, order maintenance, or batch order entry (this includes orders received via the phone order interface and ecommerce). |
Enter a mode in the Interactive mode field. E = The order line is soldout interactively in order entry or batch order entry. M = The order line is soldout interactively in order maintenance. B = The order line is soldout interactively in order entry, order maintenance, or batch order entry. Note: If you enter a value in the Interactive mode field, the Batch process only field must be unselected; this means the system creates ticklers for soldout items during the specified interactive mode and during batch processing. |
The life-to-date order dollars for the sold to customer (the $ orders LTD field in the Customer Sold To Order History table) on the order meets the life-to-date order dollars comparison on the event rule. |
Enter a comparison value (valid values are GT greater than, GE greater than or equal to, LT less than, LE less than or equal to) in the Comparison field and a dollar amount in the LTD order dollars field. You can only define a whole number for the life-to-date order dollars. You can review the life-to-date order dollars for a sold to customer at the Display Customer Order History Screen. |
The customer class for the sold to customer on the order matches the customer class on the event rule. |
Enter a customer class in the Customer class field. Note: The system does not look at the customer class defined for the ship to customer. |
The item and/or SKU on the soldout order line matches the item and/or SKU on the event rule. |
Enter an item code in the Item field and optionally, a SKU code in the SKU field. If you define an item but not a SKU code and the soldout item contains SKUs, the system creates a tickler for the item if any of the SKUs for the item are soldout. If you define both an item and SKU, the system creates a tickler only if that specific SKU is soldout. |
The item status for the soldout item matches the item status on the event rule. |
Enter an item status in the Item status field. |
The item class for the soldout item matches the item class on the event rule. |
Enter an item class in the Item class field. |
The ship via for the soldout order line matches the ship via on the event rule. |
Enter a ship via code in the Ship via field. The system evaluates the ship via on the detail line first, then the ship via on the order header. If you enter a Ship via, you cannot define a Ship via priority for the event rule. Note: To create a tickler for each ship to order, the ship via for the ship to customer must match the ship via on the event rule |
The priority of the ship via for the soldout order line matches the ship via priority on the event rule. |
Enter a ship via priority number in the Ship via priority field. The system evaluates the ship via on the detail line first, then the ship via on the order header. If you enter a Ship via priority, you cannot define a Ship via for the event rule. Note: To create a tickler for each ship to order, the priority of the ship via for the ship to customer must match the ship via priority on the event rule. |
Example 1: Allow multiple ticklers is unselected for the SO event.
The following event rules are defined for the SO event, displayed in processing sequence order.
• Event rule 1: Ship via is 1
• Event rule 2: Item is A123
• Event rule 3: LTD order dollars is greater than $100
• Event rule 4: Interactive mode is M (order maintenance)
You enter an order and:
• the ship via on the order header is 1.
• the item on the order is A123 and is not soldout in order entry.
• the sold to customer’s life-to-date order dollars is $75.00.
• in order maintenance, you sell out item A123.
In this scenario, the system creates 1 tickler during order maintenance for the first rule: Ship via is 1. The system does not create a tickler for the other rules whose criteria are met.
Example 2: Allow multiple ticklers is selected for the SO event.
The following event rules are defined for the SO event, displayed in processing sequence order.
• Event rule 1: Ship via is 1
• Event rule 2: Item is A123
• Event rule 3: LTD order dollars is greater than $100
• Event rule 4: Interactive mode is M (order maintenance)
You enter an order and:
• the ship via on the order header is 1.
• the item on the order is A123 and is not soldout in order entry.
• the sold to customer’s life-to-date order dollars is $75.00.
• in order maintenance, you sell out item A123.
In this scenario, the system creates 3 ticklers during order maintenance:
• the first tickler is created for rule 1: Ship via is 1.
• the second tickler is created for rule 2: Item is A123.
• the third tickler is created for rule 4: Interactive mode is M (order maintenance).
A tickler is not created for rule 3: LTD order dollars is greater than $100, since the sold to customer’s life-to-date order dollars is less than $100.
An SO tickler is resolved when you select Resolve for a tickler at the Work with Tickler Screen (user/group view) or Workflow Management Screen.
SV (SVC Number Assignment) Event Processing
The system creates a tickler for the SV tickler event when an order containing a stored value card item is processed by billing without a number assignment. This may occur if you send a physical stored value card item to the manifesting station without first using the Working with Physical Stored Value Card Assignment (WPSA) menu option to assign a number to the card.
The system creates a tickler for each unit of the item that is not assigned a stored value card number.
The tickler indicates the:
• order number and ship to number associated with the stored value card
• customer number (sold to and ship to) on the order
• stored value card item number, SKU code, and description
• pick control number containing the stored value card item
If the stored value card is a physical card (SVC type P or E), you must call the customer, indicate the stored value card has not yet been activated, and ask for the number printed on the card.
If the stored value card is a virtual card (SVC type V), you must assign a number from the Virtual Card Number Table (FLSVCA) to the card and email this information to the recipient card holder.
When is the SV tickler event evaluated? The system evaluates the SV tickler event when an order containing a stored value card item is processed through the Billing Async.
Allowing multiple ticklers for the SV event: The Allow multiple ticklers setting does not apply to SV ticklers.
SV event rule criteria: You cannot define event rules for the SV tickler event.
An SV tickler is resolved when you select Resolve for a tickler at the Work with Tickler Screen (user/group view) or Workflow Management Screen.
For more information: See Stored Value Card Purchase and Activation.
UP (Unconfirmed Pick Tickets) Event Processing
The system creates a tickler for the UP tickler event when a pick ticket exists that has not been confirmed.
Note: You can use the UP event in place of printing the Carryover report.
The system considers a pick ticket unconfirmed if the pick control header status is blank (open), M (submitted to manifest), or O (carryover). If the pick ticket’s status is some other value, the system does not create a tickler for the pick ticket.
One tickler is created for each unconfirmed pick ticket that qualifies for a UP event rule; if an unconfirmed pick ticket qualifies for more than 1 event rule, the system creates 1 tickler for the first event rule, in processing sequence order, that qualifies.
Note: The system does not allow multiple ticklers for the UP event (the Allow multiple ticklers field must be unselected).
When is the UP event evaluated? The system evaluates the UP event when you run the Evaluate Create/Resolve Tickler periodic function (program name PFR0072).
Graduating UP ticklers: Each time you run the Evaluate Create/Resolve Tickler periodic function, the system determines is any existing UP ticklers should be graduated.
• If a UP tickler exists for an unconfirmed pick ticket and the unconfirmed pick ticket qualifies for a new event rule, based on processing sequence order, the system keeps the existing tickler open and applies the new event rule to the tickler.
• If a UP tickler exists for an unconfirmed pick ticket and the unconfirmed pick ticket qualifies for the event rule currently assigned to the existing tickler, the system does not create a new tickler and keeps the existing tickler without any updates.
• If a UP tickler exists for an unconfirmed pick ticket and the unconfirmed pick ticket no longer qualifies for the current event rule and does not qualify for any other UP event rules, the system resolves the tickler; see Resolving UP Ticklers.
The system updates the existing tickler with the information related to the event rule that is now associated with the tickler:
• Rule number updates to the new event rule assigned to the tickler.
• Category updates to the category for the new event rule.
• Priority updates to the priority for the new event rule.
• Assigned to updates to the assigned to user/group for the new event rule.
• Assigned date updates to the date the tickler is graduated.
• Supervisor group updates to the supervisor group for the new event rule.
• Date to notify supervisor updates, based on the new supervisor group assigned.
• Tickler procedures updates to the procedures for the new event rule.
• if the tickler was in-process, the system changes the status back to open.
• if the Notify user/group field is selected for the new event rule, the system sends a Tickler Reassignment email; see Tickler Notification for a sample email. Note: The system sends a Tickler Reassignment email only if the new event rule has a different assigned to user/group from the previous event rule assigned to the tickler.
• the system creates a tickler history record, indicating the tickler has been graduated from one event rule to another.
You can define the following criteria for a UP event rule.
Note: The Pick older than setting is used with all other criteria you define for an event rule. For example, if you define a pick category, the pick ticket must match the specified pick category and the pick control date for the pick ticket must be older than the system date by the number of days defined.
Criterion |
Event rule set up |
|---|---|
The Pick control date for the unconfirmed pick ticket is older than the system date by the number of days on the event rule. |
Enter a number in the Picks older than field. The system requires you to enter a number of days. |
The pick category defined for the pick ticket matches the pick category on the event rule. |
Enter a pick category code in the Picks category field. D = The pick category for the unconfirmed pick ticket is D (drop ship pick ticket). R = The pick category for the unconfirmed pick ticket is R (regular pick ticket). S = The pick category for the unconfirmed pick ticket is S (special handling pick ticket. |
The ship via for the unconfirmed pick ticket matches the ship via on the event rule. |
Enter a ship via code in the Ship via field. The system evaluates the ship via on the unconfirmed pick ticket, not the ship via on the order. If you enter a ship via for the event rule, you cannot define a ship via priority. |
The priority of the ship via for the unconfirmed pick ticket matches the ship via priority on the event rule. |
Enter a ship via priority number in the Ship via priority field. The system evaluates the priority of the ship via on the unconfirmed pick ticket, not the ship via on the order. If you enter a ship via priority for the event rule, you cannot define a ship via. |
The following event rules are defined for the UP event rule, in processing sequence order.
• Event rule 1: Pick control date is 5 days for Pick category R (regular picks)
• Event rule 2: Pick control date is 1 day for Pick category R (regular picks)
You run the Evaluate Create/Resolve Ticklers periodic function and:
• Pick ticket # 69 qualifies for event rule 2
• Pick ticket # 72 qualifies for event rule 2
The system creates a UP tickler for each pick ticket.
You run the Evaluate Create/Resolve Ticklers periodic function again and:
• Pick ticket # 69 qualifies for event rule 1
• Pick ticket # 72 qualifies for event rule 2
The system graduates the existing tickler for pick ticket # 69 to event rule 1; the existing tickler for pick ticket # 72 continues using rule 2.
You run the Evaluate Create/Resolve Ticklers periodic function again, and:
• pick ticket # 69 qualifies for event rule 1
• pick ticket # 72 does not qualify for any rules (the pick ticket has been confirmed)
The existing tickler for pick ticket # 69 continues using rule 1. The system resolves the existing tickler for pick ticket # 72.
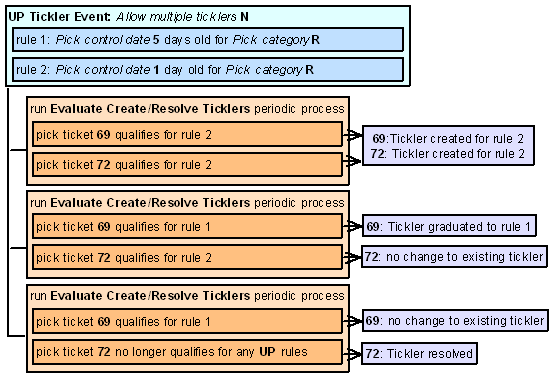
A UP tickler is resolved when you:
• select Resolve for a tickler at the Work with Tickler Screen (user/group view) or Workflow Management Screen.
• run the Evaluate Create/Resolve Ticklers periodic function (program name PFR0072), if the tickler no longer applies to any OO event rules. For example, the pick ticket has been voided or reprinted.
• confirm the pick ticket. Note: When you confirm the pick ticket, the system resolves the tickler automatically and does not wait until you run the Evaluate Create/Resolve Ticklers periodic function.
VP (Voided Pick Tickets) Event Processing
The system creates a tickler for the VP tickler event when a pick ticket is voided.
When is the VP event evaluated? The system evaluates the VP event when you void a pick ticket by:
• selecting Void or Void/Unreserve for a pick ticket in the Reprinting and Voiding Pick Slips (WVRP or WSVP) menu option or order maintenance.
• selecting Void for a pick ticket during Manually Confirming Shipments (MCON).
• selecting Void All/Cancel Order in the Reprinting and Voiding Pick Slips (WVRP or WSVP) menu option.
• selecting Void All in order maintenance.
Note: The Void Pick Batch (WSVP) option does not create VP ticklers.
Allowing multiple ticklers for the VP event:
• If you allow multiple ticklers, the system creates multiple ticklers for the voided pick ticket; a separate tickler is created for each event rule whose criteria are met.
• If you do not allow multiple ticklers, the system creates only 1 tickler for the voided pick ticket.
You can define the following criteria for a VP event rule.
Hold reason: If you enter a valid hold reason in the Hold reason field, the system places the order on hold at the user level when a VP tickler is created for the event rule. In this situation, the system removes any pick slip preparation from the order; see Preparing Orders for Pick Slip Generation.
Criterion |
Event rule set up |
|---|---|
The ship via for the order ship to associated with the voided pick ticket matches the ship via on the event rule. |
Enter a ship via code in the Ship via field. If you enter a Ship via, you cannot define a Ship via priority for the event rule. The system evaluates the ship via on the order ship to, on the ship via on the pick ticket header. |
The priority of the ship via for the order ship to associated with the voided pick ticket matches the ship via priority on the event rule. |
Enter a ship via priority number in the Ship via priority field. If you enter a Ship via priority, you cannot define a Ship via for the event rule. The system evaluates the ship via on the order ship to, not the ship via on the pick ticket header. |
The item and/or SKU on the voided pick ticket matches the item and/or SKU on the event rule. |
Enter an item code in the Item field and optionally, a SKU code in the SKU field. If you define an item but not a SKU code and the item contains SKUs, the system creates a tickler for the item if any of the SKUs for the item are on a voided pick ticket. If you define both an item and SKU, the system creates a tickler only if that specific SKU is on a voided pick ticket. |
Example 1: Allow multiple ticklers is unselected for the VP event.
The following event rules are defined for the VP event, displayed in processing sequence order.
• Event rule 1: Ship via is 1
• Event rule 2: Item is A123
• Event rule 3: Item is SKU2002 RED
You void 2 pick tickets:
• pick ticket 55 is for ship via 1 and contains 2 pick ticket lines:
• pick ticket line 1: item A123
• pick ticket line 2: item B456
• pick ticket 56 is for ship via 2 and contains 2 pick ticket lines:
• pick ticket line 1: item SKU2002 GRN
• pick ticket line 2: item SKU2002 RED
In this scenario, the system creates:
• 1 tickler for pick ticket 55 for rule 1: Ship via is 1.
• 1 tickler for pick ticket 56 for rule 3: Item is SKU2002 RED.
The system does not create a tickler for the other rules whose criteria are met.
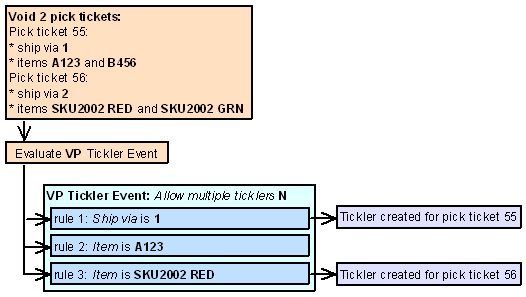
Example 2: Allow multiple ticklers is selected for the VP event.
The following event rules are defined for the VP event, displayed in processing sequence order.
• Event rule 1: Ship via is 1
• Event rule 2: Item is A123
• Event rule 3: Item is SKU2002 RED
You void 2 pick tickets:
• pick ticket 55 is for ship via 1 and contains 2 pick ticket lines:
• pick ticket line 1: item A123
• pick ticket line 2: item B456
• pick ticket 56 is for ship via 2 and contains 2 pick ticket lines:
• pick ticket line 1: item SKU2002 GRN
• pick ticket line 2: item SKU2002 RED
In this scenario, the system creates:
• 2 ticklers for pick ticket 55 for rule 1: Ship via is 1 and rule 2: Item is A123.
• 1 tickler for pick ticket 56 for rule 3: Item is SKU2002 RED.
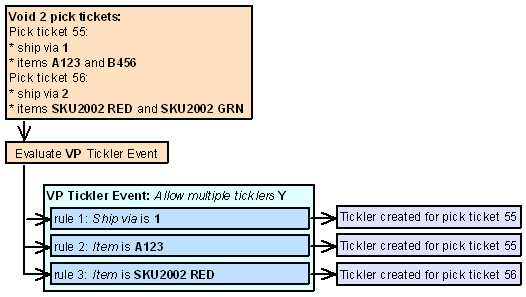
A VP tickler is resolved when you select Resolve for a tickler at the Work with Tickler Screen (user/group view) or Workflow Management Screen.
WF (Remote Workflow) Event Processing
The system creates a tickler for the WF tickler event when a CWWorkflow XML message is received into Order Management System from an outside source.
When is the WF event evaluated? The system evaluates the WF event when the Workflow Processing integration layer job receives the CWWorkflow XML message into Order Management System.
CWMessageIn web service: You can use the CWMessageIn Web Service to route CWWorkFlow messages. In this situation, the target for each inbound message must match the Inbound program name for the integration layer process queue, as specified at the Integration Layer Process Queue Screen.
Web service authentication: Use the Working with Web Service Authentication (WWSA) menu option to define a valid user for basic web service authentication, or client ID if using OAuth. You must also create a corresponding user profile in Oracle Identity Cloud Service and assign the user to the corresponding web service role defined for the Order Management application.
Allowing multiple ticklers for the WF event: The Allow multiple ticklers setting does not apply to the WF tickler event.
Generic Workflow XML Message (CWWorkflow)
For more information: See above.
Note: The XML message received into Order Management System for the remote workflow (WF) event must be named CWWorkflow. If the XML message is not named CWWorkflow, the Workflow Processing integration layer job does not process the message.
Attribute Name |
Type |
Length |
Comments |
|---|---|---|---|
|
|||
source |
alpha |
25 |
Identifies the source of the XML message. Note: The source value must match the Source field for the WF (remote workflow) tickler event or the system does not create a tickler. |
target |
alpha |
25 |
Identifies the target of the XML message. RDC indicates the XML message is sent to Order Management System. |
type |
alpha |
25 |
Identifies the type of information in the XML message. CWWorkflow indicates the message contains a tickler creation request. |
|
|||
company |
numeric |
3 |
The Order Management System company where the tickler will be created. |
priority |
numeric |
1 |
The priority of the tickler. |
category |
alpha |
3 |
The tickler category assigned to the tickler. |
assign_to_user |
alpha |
10 |
The user ID of the user assigned to work on the tickler. |
assign_to_group |
alpha |
10 |
The tickler group assigned to work on the tickler. |
short_note |
alpha |
60 |
A brief note you can enter for the tickler. |
assign_date |
numeric |
8 |
The date the tickler is assigned to the assign to user or assign to user group, in MMDDYYYY format. |
order |
numeric |
8 |
The order associated with the tickler. |
order_ship_to |
numeric |
3 |
The order ship to associated with the tickler. |
customer_sold_to |
numeric |
9 |
The sold to customer associated with the tickler. |
customer_ship_to |
numeric |
3 |
The ship to customer associated with the tickler. |
customer_bill_to |
numeric |
7 |
The bill to customer associated with the tickler. |
You can have multiple work notes for a tickler, describing the task that needs to be resolved or the steps a user must take to resolve the tickler. |
|||
note_line |
alpha |
60 |
Tickler work notes describing the task that needs to be resolved or the steps a user must take to resolve the tickler. |
You can define the following criterion for a WF event rule.
Criterion |
Event rule set up |
|---|---|
The source of the workflow XML message received matches the message source defined for the event rule. |
Enter a message source code in the Message source field. Note: The source from the CWWorkflow XML message must match the Message source for the WF event rule. |
A customer submits a question online regarding an order placed over the web storefront. The information in the customer’s inquiry is sent to Order Management System in the CWWorkflow XML message.
<Message source="IDC" target="RDC" type="CWWorkflow"> <Workflow company="555" priority="5" category="ORD" assign_to_user="KBROWN" short_note="exchange for order 5568" assign_date="091002" order="5568" order_ship_to="001" customer_sold_to="6849" <Notes> <Note note_line="Regarding order 5568," <Note note_line="I ordered the white tennis shoes (product number" <Note note_line="4958) and" want to change the ordered size from size" <Note note_line="9 to size 9.5. Please contact me at mmcstay@att.net" <Note note_line="if you cannot change the shoe size. I am hoping to" <Note note_line="exchange the shoe size before the item ships." <Note note_line="Regards, Mr. Matthew McStay" |
The Workflow Processing integration layer job receives the CWWorkflow XML message and creates a tickler in the Tickler table using the information in the message.
Create Tickler from CWWorkflow XML message: |
|
|---|---|
Tickler field... |
is updated with... |
Company |
The company value from the CWWorkflow message. |
Tickler # |
The next available number from the Tickler Number number assignment value. |
Status |
O (open). |
Priority |
The priority value from the CWWorkflow message. |
Creation date |
The date the CWWorkflow message was received into Order Management System. |
Creation time |
The time the CWWorkflow message was received into Order Management System. |
Assigned date |
The assign_date value from the CWWorkflow message. |
Assigned time |
The time the tickler is assigned to the assign to user or assign to user group. |
Next notify date |
The next date the system sends an email to the assigned supervisor, notifying the supervisor that the tickler has not yet been resolved. The system uses this calculation to determine the next notify date when a tickler is first created: tickler creation date + value in Number of days to notify supervisor field for the event rule that created the tickler = next notify date. |
Source program |
The Order Management System program that created the tickler; IDC displays. |
Note type |
The note type defined for the WF tickler event. |
Short note |
The short_note value from the CWWorkflow message. |
Event |
WF (remote workflow). |
Rule sequence number |
The sequence number defined for the event rule that created the tickler. |
Category |
The category value from the CWWorkflow message. |
Original user |
The assign_to_user value from the CWWorkflow message. |
Original group |
The assign_to_group value from the CWWorkflow message. |
Current user |
The assign_to_user value from the CWWorkflow message. |
Current group |
The assign_to_group value from the CWWorkflow message. |
Created by user |
The user ID of the user that created the tickler; this is the user ID of the user that started the Workflow Processing integration layer process. |
Supervisor group |
The supervisor group defined for the WF (remote workflow) tickler event. |
Order # |
The order value from the CWWorkflow message. |
Order ship to # |
The order_ship_to value from the CWWorkflow message. |
Customer sold to # |
The customer_sold_to value from the CWWorkflow message. |
Customer ship to # |
The customer_ship_to value from the CWWorkflow message. |
Customer bill to # |
The customer_bill_to value from the CWWorkflow message. |
Tickler note |
The note_line value from the CWWorkflow message. A separate Tickler Note record is created for each note_line. |
A WF tickler is resolved when you select Resolve for a tickler at the Work with Tickler Screen (user/group view) or Workflow Management Screen.
Work with Tickler Event Rule Procedure Screen
Purpose: Use this screen to create or change the procedures, or instructions, a user should follow when working with a tickler.
How to display this screen: Select Procedures for an event rule at the Work with Tickler Event Rule Screen.
Field |
Description |
|---|---|
Event |
The code and description for the tickler event associated with the tickler event rule procedures. Code: Alphanumeric, 2 positions; display-only. Description: Alphanumeric, 40 positions; display-only. |
Rule |
The description of the event rule associated with the event rule procedures. Alphanumeric, 40 positions; display-only. |
Procedure |
Free-form lines where you can enter procedures, or instructions, a user should follow to resolve the tickler. Alphanumeric, 60 positions; optional. |
Screen Option |
Procedure |
|---|---|
Toggle the procedure lines between add mode and change mode |
Select Add/Change to toggle the procedure lines between add mode and change mode. In add mode, you can enter new procedure lines; in change mode, you can enter new procedure lines and also change existing procedure lines. |
________________________________
Contents SCVs Reports XML Messages Glossary
Copyright © 2022, Oracle and/or its affiliates. All rights reserved.
Legal Notices