Setting Up Customer Service Values
Purpose: The Customer Service section of the System Control table defines parameters that control:
• Returns and refunds
• Credit card authorization
• Forms printing
For more information: For instructions and screen samples on how to create, change, delete, and copy a system control value, see System Control Table Components.
Quick Reference of Customer Service System Control Values
This table describes briefly each system control value for the Customer Service application area and lists the control value, a short definition, other control values to which you should refer in this section, if necessary, and a column where you can indicate the value that you assigned for your company.
If you have more than one company on your system, make a copy of this table for each company on your system.
Company: _____________________________________________________________
System Control Value |
Description |
Your Value |
|---|---|---|
Defines how to track item purchase history for new customers entered through Catalog Requests. |
Code: |
|
Defines the pay type to use to credit returned items after the grace period has expired. |
Number: |
|
Defines the number of days allowed for items to be returned in order to generate a refund. |
Number: |
|
Defines whether the system performs online credit card authorization during order entry. |
Selected/ Unselected: |
|
Indicates whether to print a gift acknowledgment card when the pick slip is printed. |
Code: |
|
Defines the system name for the gift card letter. |
Code: |
|
Indicates if you will be using the Auto Authorization Interface. |
Selected/ Unselected: |
|
Defines the default cancel reason code used for backorders canceled automatically through billing. |
Code: |
|
Defines whether to print a credit card acknowledgment if there is a refund/balance due on a credit card order. |
Selected/ Unselected: |
|
Defines the number of days to add to the expected PO receipt date to determine the expected delivery date for items with special handling. |
Number: |
|
Defines the number of days from the arrival date that drop ship items are expected to be shipped. |
Number: |
|
Defines the action to be taken with the order after the second FTC notification card has been sent. |
Code: |
|
Defines the number of days to add to the arrival date to determine the expected ship date for items without an expected ship date. |
Number: |
|
Defines the name of the program that is used to print 1-up labels for catalog requests. |
System name: |
|
Defines the name of the program that is used to print 4-up labels for catalog requests. |
System name: |
|
Defines the name of the program that is used to print backorder cards. |
System name: |
|
Defines the number of days after the second backorder notification to cancel the order if the SCV FTC-Action after Second Notification is set to CANCEL |
Number: |
|
Defines when to update the Current source code field in the Customer table. |
Code: |
|
Defines the default value for the Associate field for new customers entered through Order Entry and Catalog Requests. |
Code: |
|
Defines the default value for the Mail name flag to be assigned to new customers entered through Order Entry and Catalog Requests. |
Selected/ Unselected: |
|
Defines the default value for the Rent name field for new customers entered through Order Entry and Catalog Requests. |
Selected/ Unselected: |
|
Defines the name of the program that produces acknowledgments for a credit issued to a credit card. |
System name: |
|
Defines the name of the program that produces refund checks. |
System name: |
|
Defines whether to transmit a completely backordered order for initial authorization to determine whether it is a fraud order. |
Selected/ Unselected: |
|
Defines the default source code to use when processing catalog requests through an interface. |
Code: |
|
Defines whether recently-entered customer notes appear first. |
Selected/ Unselected: |
|
Defines the number of days to allow for purchase order receipt and order shipment before a backorder notice to the customer is required. |
Number: |
|
Defines whether to open a pop-up window when you change a Sold-to address with a permanent Bill-to account, allowing you to apply the Sold-to changes to the Bill-to address. |
Selected/ Unselected: |
|
Defines whether the system prints an alphanumeric and a numeric dollar amount on refund checks. |
Selected/ Unselected: |
|
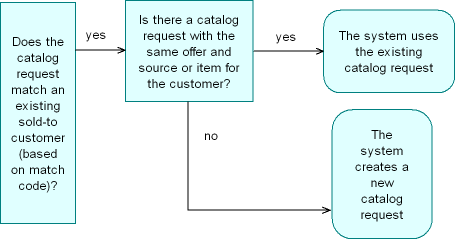
Defines whether the system checks for duplicate catalog requests when you create a new catalog request. |
Selected/ Unselected: |
|
Prompt for Mandatory Demographics in Order Maintenance (E60) |
Defines whether the system prompts you to complete a mandatory demographic profile field in Order Maintenance. |
Selected/ Unselected: |
Defines whether to hold orders more than once for address verification. |
Selected/ Unselected: |
|
FTC--Number of Days Prior to Next Backorder Date to Generate Second Notice (E67) |
Defines the number of days before a second backorder notice is due to print the notice or write the backorder record. |
Number: |
Defines whether to print second backorder notices, create records in the Backorder Cancellation Pending table, or both. |
Value: |
|
Defines the number of days to extend the next backorder date if a customer accepts a delay on a backorder pending cancellation. |
Number: |
|
Defines whether the system excludes items defined in the Working with Freight Exempt Items (WFEI) menu option from freight. |
Selected/ Unselected: |
|
Defines the maximum number of times to attempt authorization for an order. |
Number: |
|
Defines the program the system uses to print soldout notification cards. |
System name: |
|
Defines whether items flagged to suppress backorder cards ever appear on a first backorder card if another item on the order generates the card. |
Selected/ Unselected: |
|
Defines whether an exchange item is required at the time of creation or receipt of a receipt authorization. |
Selected/ Unselected: |
|
Defines whether you use the standard or streamlined return authorization process. |
Selected/ Unselected: |
|
Identifies the number of positions in the zip or postal code to consider when searching for a customer. |
Number: |
|
Defines whether the Edit Customer Actions pop-up window or an indicator that there are order messages displays in Work with Return Authorizations. |
Selected/ Unselected: |
|
Defines whether you break out customer history related to orders based on the entity associated with each order. |
Selected/ Unselected: |
|
Default Credit Card Authorization Number for Soft Declines (F93) |
Defines the credit card authorization number the system defaults to a credit card authorization that is declined, but is under a specified dollar amount. |
Code: |
Use Credit Card Vendor Response Entity Ship Via Dollar Limits (F94) |
Defines whether the system performs an edit against a credit card vendor response to determine if the dollar amount for the credit card authorization exceeds the dollar limit defined for the ship via on the order. |
Selected/ Unselected: |
Defines the vendor response code to assign to authorizations that you approve without receiving a response from the authorization service. |
Code: |
|
Defines whether to display a pop-up window indicating the estimated dollar total for the first membership order when you enter a membership item in order entry. |
Selected/ Unselected: |
|
Defines the types of order and customer service activity to trigger the system to update the Marketing Download Trigger table, which you can then use to drive an interface download. |
Code: |
|
Defines whether the Edit Customer Actions window displays in order inquiry if there are unresolved customer action notes. |
Selected/ Unselected: |
|
Defines the program to create backorder notices to send customers via email. |
Program: |
|
Defines the program to create soldout notifications to send customers via email |
Program: |
|
Defines the default value of the Opt in/Opt out field, which determines the preferred method of correspondence for storefront customers. |
Code: |
|
Defines whether they system requires an order inquiry reason code when you return to the CTI Customer Selection screen from order inquiry/maintenance. |
Program: |
|
Defines the program to generate email, rather than printed, credit card credit acknowledgements. |
System name: |
|
Defines whether the system sends an email confirmation when any order is accepted or maintained or only when a customer accepts or maintains an order on the web storefront. |
Selected/Unselected: |
|
Defines whether the system sends an email confirmation when any order or return is billed, or only for e-commerce (order API) orders. |
Selected/Unselected: |
|
Defines the program name to generate email, rather than printed, return confirmations. |
System name: |
|
Defines whether the customer class is required in order entry, catalog requests, and customer maintenance. |
Selected/ Unselected: |
|
Defines whether to search for a matching customer for an incoming email based on the email address. |
Code: |
|
Defines whether the workflow management module is enabled. |
Selected/ Unselected: |
|
Defines whether to keep a record of outbound email notifications in the Correspondence History table. |
Selected/Unselected: |
|
Defines whether to delete blank lines or paragraph spacing from inbound emails you store in Correspondence History, or to leave the spacing. |
Code: |
|
Display Alternate Shipping Charges by Via Window in OM (I02) |
Defines whether to offer the customer a choice of shippers in order maintenance. |
Selected/ Unselected: |
Include Special Handling in Alternate Shipping Charges by Via (I03) |
Defines whether to include special handling charges in the freight totals displayed in the pop-up window in order entry. |
Selected/ Unselected: |
Defines the authorization number the system automatically applies to credit card authorizations that are under one dollar. |
Code: |
|
Include All Customer Inquiry Triggers for Marketing Download (I09) |
Indicates if the system creates a record in the Marketing Download Customer Inquiry table for a CI (customer inquiry) trigger record when a corresponding OH (order header) trigger record exists in the Marketing Download Trigger table. |
Yes/No: |
Defines whether the system sends level II discounting information to the service bureau during credit card deposit. |
Selected/ Unselected: |
|
Not currently implemented. |
Selected/ Unselected: |
|
Indicates if the system sends pick control records containing physical stored value card items to billing once you assign numbers to the physical cards. |
Selected/ Unselected: |
|
Indicates if the system performs a calculation against the digits of the stored value card number to ensure that the card is valid. |
Code: |
|
Indicates the price to use as the stored value card issue amount. |
Code: |
|
Defines the service bureau used to process stored value card activation requests. |
Code: |
|
Defines the program used to generate Stored Value Card email notifications. |
System name: |
|
Defines whether stored value card activation and stored value card authorization reversal transactions are processed immediately or in batch. |
Selected/ Unselected: |
|
Defines the stored value card item the system adds to an order in order to process the stored value card refund. |
Code: |
|
Defines the price override reason code the system defaults to the order line added to the order to process the stored value card refund. |
Code: |
|
Default Pick Generation Template for SVC Refund Processing (I75) |
Defines the pick slip generation template the system uses to process the stored value card item that was added to an order during refund processing. |
Number: |
Hold Reason for Stored Value Cards with Insufficient Funds (J18) |
Defines the hold reason the system assigns to a “catch-all” stored value card pay type when a balance inquiry performed during batch authorization indicates the card amount is less than the amount to authorize. |
Code: |
Indicates whether the system performs a balance inquiry against a stored value card pay type before performing a batch authorization against the stored value card pay type. |
Selected/ Unselected: |
|
Perform Authorization Reversal during Deposit Processing (J20) |
Indicates whether the system performs a stored value card authorization reversal during deposits processing if the authorization amount is greater than the deposit amount. |
Selected/ Unselected: |
Retain Unused Stored Value Card Authorization After Deposit (J21) |
Defines whether the system automatically voids a partially deposited stored value card authorization. |
Selected/ Unselected: |
Defines whether the system removes the stored value card number from the Stored Value Card table once the stored value card has been activated. |
Selected/ Unselected: |
|
Indicates whether the background jobs should evaluate customers’ eligibility for loyalty membership programs. |
Selected/ Unselected: |
|
Loyalty Membership Activation Notification Email Program (I82) |
Indicates the program to use to generate email notifications when customers qualify for loyalty memberships. |
System name: |
Indicates the program to use to generate email notifications when customers no longer qualify for loyalty memberships. |
System name: |
|
Indicates whether to attempt to match customers on alternate customer number based on the single number specified in the Customer Sold To table (the “primary”), or to give equal priority to any of the alternate customer numbers stored in the Alternate Customer # Cross Reference table. |
Selected/ Unselected: |
|
Indicates whether to automatically assign an alternate customer to each newly created customer. |
Selected/ Unselected: |
|
Indicates the customer record to use as a guideline for which fields should retain their current values if new information is not received through the generic customer API. |
Number: |
|
Defines whether the system processes online authorizations for $1.00 for the purpose of validating the card. During batch authorizations, the system authorizes the card for the shippable dollar amount and voids the online authorization for $1.00. |
Selected/ Unselected: |
|
Disregard Soldout Controls for Non-Allocatable Warehouses (J27) |
Defines whether the system disregards soldout control rules for inventory reserved against a non-allocatable warehouse. |
Selected/ Unselected: |
Indicates the program to generate an email to the customer when a credit card is declined during pick slip generation. |
System name: |
|
Indicates the program to generate the “contact us” email to a customer on demand. |
System name: |
|
Clear Processed Records from Customer Email Updates Table (K70) |
Defines whether the system clears all records in the Customer Email Updates table after the Customer Email Updates process completes. |
Selected/ Unselected: |
Indicates the program to generate an email to the customer when you cancel a customer membership. |
System name: |
|
Indicates the program to generate an email to the customer upon cancellation of an order. |
System name: |
|
Indicates the program to generate an email to the customer upon cancellation of one or more order lines. |
System name: |
|
Indicates the cancel reason code that should not trigger the generation of an order or order line cancellation confirmation email. |
Number: |
|
Defines the deposit service that sends subsequent debit deposits (transaction type Purch action code D) for the same order number and authorization code as a Conditional Deposit (transaction type Conditional action code B). |
Code: |
|
Defines whether you replace the credit card number in the Order Management System database with a token number provided by an external system. |
Selected/ Unselected: |
|
When using credit card tokenization, defines whether the system will accept a credit card number that has not been replaced with a token. |
Selected/ Unselected: |
|
Defines the integration layer job used to transmit register token messages between Order Management System and the authorization service during the credit card tokenization process. |
Code field: |
|
Defines the program to generate order receipts. |
System name: |
|
Defines whether the system sends level III discounting information during credit card deposit processing. |
Selected/ Unselected: |
|
Defines whether to generate backorder notices when you cancel or change the due date for a purchase order. |
Selected/ Unselected: |
|
Require Last Name/Postal Code in Customer History Request (L76) |
Defines whether the Customer History Request XML Message (CWCustHistIn) must include a last_name and/or postal_code when passing a direct_order_number or alternate_order_number without a customer_number or alternate_sold_to_id. |
Selected/ Unselected: |
Defines whether billing or deposits creates records in the CC Deposit Transaction table and CC Deposit History table, based on the records in the Invoice Payment Method table. |
Selected/ Unselected: |
|
Defines whether customer API transactions should go through validation when creating or changing a customer with an original source code of XSTORE. |
Selected/ Unselected: |
|
Defines whether the Scan Return ID window displays when you create an RA detail line in Work with Return Authorizations (WRTA). This window allows you to assign a return ID to each RA detail line in order to identify the return in an external system. |
Selected/Unselected: |
|
Defines whether credit invoices are netted with debit invoices before a deposit is sent to the service bureau for an invoice associated with an exchange. |
Selected/Unselected: |
|
Defines the number of days the system holds debit and credit invoices for credit card net exchange billing. |
Number: |
|
Defines the authorization code the system uses when creating a manual authorization to allow for the netting of invoices. |
Code: |
|
Defines whether to submit an order cancel asynchronously or interactively. |
Selected/Unselected: |
|
The account ID used for communication with the AvaTax tax interface. |
Code: |
|
The license ID used for communication with the AvaTax tax interface. |
Code: |
|
Defines whether to append the ecommerce order number to the company number and invoice number sent to PayPal. |
Selected/Unselected: |
|
Defines whether the REAUTH periodic function reauthorizes expired authorizations, and processes related updates when the reauthorization attempt succeeds or fails. |
Selected/Unselected: |
|
Defines whether to create the invoice for a ship-for-pickup order line once the system receives confirmation from Order Broker indicating that the status of an order line on a ship-for-pickup order has changed to intransit or fulfilled. |
Selected/Unselected: |
|
Default Item History Tracking (B18)
Purpose: Use this screen to define how the system tracks item purchase history for customers added to the system though catalog requests, Work with Customers, or the order API.
Code field: Enter the code that defines how the system tracks item purchase history for customers added to the system automatically from a request for a catalog mailing, or that you enter through Work with Customers. The value you specify defaults into a numeric value in the Track item history field in the Customer table, but it can be overridden.
Valid values are:
• NONE = No item tracking (numeric code 1)
• SOLD TO = Item tracking only for the Sold-to Customer (who places the order or requests the catalog) level only. (numeric code 2)
• SOLD+SHIP = Item tracking for the Sold To Customer and Ship To Customer (who receives the merchandise ordered). (numeric code 3)
Sold-to vs. ship-to customer: The sold-to customer is the customer who places the order or who requested the catalog; the ship-to customer is the customer who receives the merchandise ordered (although this can be the same customer).
This feature allows you to review mail order and item history information for the ship-to customer from the sold-to customer record. Tracking ship-to customer history allows you to target future offers to ship-to customers based on the information captured by the system.
Changing the code: The system does not allow you to review item history for any customer that has a 2 in this field, but displays this message:
Item history information is not retained for this customer.
However, if you change the sold-to customer's Item history tracking value to a 3 at any time, you can review all item history for a ship-to customer.
Purpose: Use this screen to define the payment type to use after the grace period for issuing refunds for returns has passed.
Number field: Enter the payment type to use after the grace period for issuing refunds for returns has passed.
The eligible pay types display to the right of this field; you can enter a stored value card pay type (Pay category Credit Card, Card type Stored Value).
This payment type can be overridden in Return Processing. This is 2-position, numeric field.
Pay type codes are defined in and validated against the Pay Type table. See Working with Pay Types (WPAY).
Purpose: Use this screen to define the number of days allowed for items to be returned once they are shipped in order to generate a refund.
Number field: Enter the number of days (up to 7 positions, numeric) from the ship date that items are allowed to be returned. If a customer returns an item after the number of days defined for this control value, the customer receives whatever form of reimbursement your company has established as its policy for late returns.
The default type of reimbursement is defined in the Alternate Pay Type (B51) system control value.
For more information: See Managing Returns.
Purpose: Use this screen to define whether the system performs online credit card authorization during order entry.
Yes/no field: Select this field if you wish to perform online credit card authorization during order entry.
Online credit card authorization allows you to send and receive electronically the information required to authorize a credit card when the order is placed instead of when the pick slip is generated for the order.
The system performs online authorization when you select Accept to accept an order after determining if the order should go on hold. Note that online authorization still takes place even if the order is placed on hold.
When you perform online credit card authorization, the system:
1. Determines if the order is eligible for online authorization.
2. Determines the amount to authorize, based on the value defined in the Authorize Full Amount During Order Entry (G99) system control value.
3. Sends the authorization amount to the authorization service.
4. receives a response from the authorization service.
5. Displays the Select Authorization Response Option Window, based on the settings defined for the authorization response received. You can use this window to review the response received from the authorization service and any messages defined for the vendor response.
6. processes any end-of-order updates and sends the order to the Order Async.
7. creates a record in the Online Authorization table, based on the authorization response received.
8. creates a record in the Authorization History table, based on the authorization response received. You can review authorization history at the Display Authorization History Screen.
9. creates a record in the Void Authorization table, based on the authorization response received.
Note: If you do not receive an authorization response for the credit card payment method during order entry or you receive a declined authorization response, you can re-send the order for authorization during order maintenance at the Enter Payment Methods Screen in Order Maintenance, using the Performing Batch Authorization (SATH) menu option, or during pick slip generation if the Batch/online field for the authorization service contains a C (online and batch authorizations).
Performing Online Verification Only: If the Online Auth Verification Only (I96) system control value is selected, the system processes online authorizations for $1.00 for the purpose of validating the card. During batch authorizations, the system authorizes the card for the shippable dollar amount and voids the online authorization for $1.00.
For more information: See Performing Online Credit Card Authorizations for an overview on online credit card authorization and the required setup.
Leave this field unselected if you wish to perform credit card authorization during pick slip generation only. See Authorizations During Pick Slip Generation.
Purpose: Use this screen to indicate the forms the system should generate.
Automatic Generation of Gift Acknowledgement (B92)
Enter the code that defines whether to print gift acknowledgements for Gift orders (The Gift field on the order header is selected) when you generate pick slips, when you bill the orders, or not at all.
Valid values are:
• P = Print gift acknowledgments for Gift orders when you generate pick slips, provided the Gift Order Acknowledgement Print Program (B90) system control value is set to a valid program name.
• B = Print gift acknowledgments for Gift orders when you bill the orders, provided the Gift Order Acknowledgement Print Program (B90) system control value is set to a valid program name. Each gift acknowledgement prints as a separate spooled file, under the user name of the person who started the Billing ASYNC job.
• N = Do not print gift acknowledgements.
Note: The Reprinting and Voiding Pick Slips (WVRP or WSVP) function does not reprint gift acknowledgements. Provided this system control value is set to P, you can reprint both the pick slip and the gift acknowledgement for an order by first voiding the pick slip through Reprinting and Voiding Pick Slips (WVRP or WSVP) function, using releasing the order from VD (void pick) hold, and then submitting the order for pick slip generation again.
Bypass printing? If the Bypass Creation of Pick Forms during WSPS Pick Generation (K55) system control value is selected, no gift acknowledgements print through the streamlined pick slip generation process or through billing async. See that system control value for more information.
Gift Order Acknowledgement Print Program (B90)
Enter the system name of the letter that supplies the text for gift order acknowledgments. This is a 6-position, alphanumeric field. To generate gift order acknowledgment, the system control value, Automatic Generation of Gift Acknowledgement (B92), must be set to P (generate during pick slip generation) or B (generate during billing). The base graphical print program is GIFTACKG.
See the Gift Acknowledgement for a description and samples.
Use Auto Authorization Interface (C14)
Purpose: Use this screen to indicate if you will be using the Auto Authorization interface to authorize and deposit orders containing a Credit Card pay category pay type.
Yes/no field: Select this field if you will be authorizing and depositing orders using the Auto Authorization interface. Batch credit card authorization is performed during Pick Slip Generation.
• If an order receives an approved authorization, the system prints a pick slip for the order.
• If an order receives a declined authorization, the system does not print a pick slip for the order.
Once the PICK_GEN job completes, the system prints 2 versions of the Credit Card Authorization Listing; 1 report displays all of the orders that received an approved authorization, 1 report displays all of the orders that received a declined authorization.
Leave this field unselected if you will be authorizing credit card orders manually or performing online credit card authorization. See Performing Online Credit Card Authorizations for an overview on online authorization and required setup.
Note: If this system control value is unselected, the system generates a pick slip for each order containing a Credit Card pay category pay type, even if the pay type on the order does not receive an approved authorization.
Deposit processing: This system control value must be selected in order to send deposits to the service bureau for confirmation. You receive an error message when you try to advance to the Auto Deposit screen (Auto Deposit Screen) if the Use Auto Authorization Interface (C14) system control value is not selected: Info: Auto Authorization is not currently enabled.
Auto Soldout Cancel Reason (C20)
Purpose: Use this screen to define the cancellation reason code to use when canceling items automatically.
Number field: Enter the cancellation reason code identifying the reason for canceling any backordered items during billing if the order is flagged to cancel backorders.
Auto cancel backorders: If an order is flagged to cancel backorders based on the setting of the Canc B/O (Automatically cancel backorders) field, the billing background job cancels any open, unshipped order lines when it bills a shipment for the order. The setting of the Auto can B/O field can default from the customer’s setting, or you can override it when entering the order.
Note: If this system control value does not specify a valid cancel reason code, then automatic cancellation of backorders does not take place during billing.
Credit card cancellations: The Working with Credit Card Cancellations (WCCC) option uses this cancel reason when canceling orders.
Canceling drop ship purchase orders: This cancel reason is applied when you cancel a drop ship purchase order through the PO Maintenance - Change PO Detail Screen. See Cancel Purchase Order for more information.
Cancellation reason codes are defined in and validated against the Cancel Reason table; see Establishing Cancel Reason Codes (WCNR).
Print Credit Card Credit Acknowledgments (C35)
Purpose: Use this screen to define whether the system prints credit card credit acknowledgment cards if there is a refund or balance due on a credit card order.
Yes/no field: Select this field to print acknowledgment cards automatically for refund (credit) or balance due (debit) transactions against an order paid with a credit card. Credit card credits print when you select the Generate C/C credits field at the Process Refunds Screen.
If you are printing credit card credits, you must complete the Credit Card Credit Acknowledgment Print Program (D22) system control value.
This card notifies the customer of any credits against the credit card for an order.
Note: This field does not control whether you generate credit card credit email notifications; as long as you specify a valid program in the Credit Card Credit Acknowledgement E-Mail Program (H08), the emails are generated regardless of this setting.
Leave this field unselected if you do not want to print these notices.
FTC -- # of Days to Add for Special Handling (C67)
Purpose: Use this screen to define the number of days added to the expected PO receipt date for items with special handling.
Number field: Enter the number of days for the system to add to the expected PO receipt date for items with special handling. The system performs this calculation for FTC (Federal Trade Commission) notifications, which you use to advise the customer about an out of stock item and specify the date when the item will arrive. This allows the customer to cancel the order, if desired. In general, you set up the system to notify mail order customers immediately about a backordered item, while you advise customers who order by phone at the time they place their order; see Establishing Order Types (WOTY).
Example: The customer places a mail order for a trophy, which is currently backordered. Because you received the order through the mail and there is a backorder, you must send an FTC notification card to the customer.
The arrival date on this card takes into account PO layering (in which previous backorders are fulfilled before the new order) and special handling (engraving the name plate on the trophy). If the vendor is expected to ship the trophies to you on April 1st and the value in this field is 19, the date on the FTC notice will be April 20.
For more information: See Purchase Order Layering and Backorder Notifications for more information on PO layering and backorder cards.
FTC -- # of Days to Add for Drop Ships (C68)
Purpose: Use this screen to define the number of days added to the expected arrival date for drop shipped items.
Number field: Enter the number of days for the system to add to the expected arrival date for drop shipped items. A drop shipped item is an item that you sell, but do not stock in your warehouse. Instead, your vendor ships the item directly to the customer.
Use this field to define the additional time it takes for your vendor to ship a drop shipped item. The system performs this calculation for FTC (Federal Trade Commission) notifications in which you notify the customer that an item is backordered and when you expect it to arrive. This allows the customer to cancel the order, if desired.
How is the expected ship date calculated for drop ship items?
• Oracle Retail Order Broker drop ship items (the item’s default vendor has the Drop ship output set to OROB Drop Shipping): The calculation is: expected ship date = the current date + Drop Ship Lead Days (H36) + the Lead days for the vendor item
• other drop ship items, including brokered items: The calculation is: expected ship date = the current date + FTC -- # of Days to Add for Drop Ships (C68) + the Lead days for the vendor item
Note: For regular (non-drop ship) items without an expected ship date, the date is calculated by adding the current date to the FTC -- # of Days for Items without Expected Ship Date (C71).
In general, you set up the system to notify mail order customers immediately about a backordered item, while you advise customers who order by phone at the time they place their order.
Displayed where? The system displays the expected ship date on screens and includes it in notifications and reports if the Assign Drop Ship Expected Ship Date (I59) is selected. See that system control value for more information.
For more information:
• setting up the Order Type table: Establishing Order Types (WOTY)
• PO layering and backorder cards: Purchase Order Layering and Backorder Notifications
FTC -- Action after Second Notification (C70)
Purpose: Use this screen to define the next action to take after you have sent the second FTC notification card to a customer for a backordered item.
Code field: Enter one of these codes to define the action to take after the second FTC notification card is issued on an order:
• CANCEL
• CONTINUE
• STOP
CANCEL: the order appears on the Backorder Cancellation Register that the system produces when you generate backorder cards. You can cancel the backordered item through Order Maintenance, or contact the customer to suggest another item. The date that an order is eligible to appear on the Backorder Cancellation Register is based on the value in the Days after 2nd Backorder Notification to Cancel Order (D07) system control value.
For more information: See Purchase Order Layering and Backorder Notifications.
Note: You must have this system control value set to CANCEL to use the Work with Backorders Pending Cancellation menu option. See the description of the FTC--Second Notice Output (E68) system control value.
CONTINUE: the system issues another FTC notification at the appropriate time, which is:
• the same number of days as previous FTC notices, or
• when the delivery date changes, or
• when you miss the promised delivery date
STOP: the system does not issue further FTC notifications.
FTC -- # of Days for Items without Expected Ship Date (C71)
Purpose: Use this screen to define the number of days added to the expected arrival date for items with no open purchase orders.
Number field: Enter the number of days for the system to add to the expected arrival date for an item that is not in stock and for which there are no open (unreceived) purchase orders. The system performs this calculation for FTC (Federal Trade Commission) notifications in which you notify the customer that an item is out of stock and specify the date when it will arrive. This allows the customer to cancel the order, if desired.
Note: Although you can enter any value in this field, the FTC rule for this situation is 30 days maximum.
For more information:
• how purchase order layering works, and how to generate backorder cards: Purchase Order Layering and Backorder Notifications
• set items: Entering Set Information (WSET)
Label 2-Up Printing Program (C83)
Purpose: Use this screen to define the program that prints two labels per row for catalog mailings.
System name field: Enter the name of the program that prints 2-up labels for catalog requests. The standard 2-up printing program (to print “2-across” labels) is MSR0613.
This field is required if printing this type of label; otherwise, complete the Label 3-Up Printing Program (C84) system control value, in which the system prints a row consisting of 3 labels.
For more information: See Processing Catalog Requests (PCAT) for more information, including sample catalog request labels.
Label 3-Up Printing Program (C84)
Purpose: Use this screen to define the program that prints three labels per row for catalog mailings.
System name field: Enter the name of the program that prints 3-up labels. The standard 3-up printing program (to print “3-across” labels) is MSR0614.
This field is required if printing this type of label; otherwise, complete the Label 2-Up Printing Program (C83) system control value, in which the system prints two labels per row.
For more information: See Processing Catalog Requests (PCAT) for more information, including sample catalog request labels.
Backorder Card Print Program (D04)
Purpose: Use this screen to define the name of the program to prints backorder notification cards.
System name: Enter the name of the program to print backorder notification cards. The standard backorder card print program is BOCARDS.
The FTC requires you to send backorder cards to notify customers when an item is currently out of stock, and when you expect the item to arrive. Generally, you need to mail backorder cards immediately for mail orders, while you can inform customers who phone in their orders if an item is out of stock.
Backorder cards print when you run the Generate Backorder Cards option (fast path = GBOC). See Generate Backorder Notices (GBOC).
Days after 2nd Backorder Notification to Cancel Order (D07)
Purpose: Use this screen to define the number of days after the second backordered item notification that the system includes the order on the Backorder Cancellation Register.
Number field: Enter the number of days after mailing the second backorder notification to include the order on the Backorder Cancellation Register.
Complete this field only if you entered CANCEL in the FTC -- Action after Second Notification (C70) system control value.
The order containing the backordered item is included on the Backorder Cancellation Register the next time you generate backorder cards. You can cancel the item through Order Maintenance or contact the customer to suggest another item.
For more information: See Purchase Order Layering and Backorder Notifications.
Update of Current Source Code in Customer File (D08)
Purpose: Use this screen to define when the system updates the customer record with the current source code.
Code field: Enter the code indicating when to update the Current source code field in the Sold To Customer record.
Choices are:
• O = Order Entry
• H = House List; not currently implemented
• N = Do not update
Update during order entry: Enter O to update the Current source code field in the Sold To Customer record when entering an order. The system updates the Current source code field with the code you enter in the Source field on the Order Entry screen.
The source code identifies a segment of your customer base (house list) to whom you mail a catalog.
Do not update: Leave this field unselected if you do not want to update the Current source code field. If so, the Current source code field always has the same value as the Original source code field. The Original source code field is never updated because it enables you to track how you first obtained the customer name.
Purpose: Use this screen to define the value that defaults to the Associate field for new customers.
Yes/no field: Enter the value you want to load into the Associate field for new customers entered through Order Entry or Catalog Requests.
A customer identified as an “associate” receives the associate price defined for items rather than the regular price. An associate customer is typically a member who is eligible for discounted prices.
Select this field to identify all new customers as “associates;” otherwise, leave it unselected. You may override the default value, as needed.
Leave this field unselected if the operator must complete the Associate field when entering an order or a catalog request for a new customer.
Purpose: Use this screen to define the value that defaults to the Mail flag for new customers.
Yes/no field: Enter the value you want to load into the Mail flag for new customers entered through order entry or catalog requests.
The value in the Mail flag indicates whether the customer should receive future catalogs. This flag is not to be confused with the Mail code, a three-position, alphanumeric code.
Select this field to indicate that you mail catalogs to the customer; otherwise, leave it unselected. You can override the default as needed.
Leave this field unselected if the operator must complete the Mail flag when entering an order or a catalog request for a new customer.
For more information: See the First Create Sold To Customer Screen for more information on the Mail flag and the Mail code fields.
Purpose: Use this screen to define the value that defaults to the Rent field for new customers.
Yes/no field: Enter the value you want to load into the Rent field for new customers entered through order entry or catalog requests.
The value in the Rent field indicates whether you can sell the customer's name to another company for their catalog mailings.
Select this field to indicate that the customer's name can be sold; otherwise, leave it unselected. You may override the default value, as needed.
Leave this field unselected if the operator must complete the Rent field when entering an order or a catalog request for a new customer.
Credit Card Credit Acknowledgment Print Program (D22)
Purpose: Use this screen to identify the program that prints credit card acknowledgment cards.
System name field: Enter the name of the program that prints credit card acknowledgment cards, which are produced for a refund or balance due transaction against a credit card order. This card notifies the customer of any activity against the credit card for an order.
The standard program for printing credit card credit acknowledgments is program number CSR0559. Credit card credits print when you select the Generate C/C credits field at Processing Refunds (MREF).
If printing credit card credits, you must complete the Print Credit Card Credit Acknowledgments (C35) system control value.
Refund Check Print Program (D23)
Purpose: Use this screen to identify the program that prints refund checks.
System name field: Enter the name of the program that prints refund checks, which are produced for an overpayment, cancellation, sellout, or return on an order.
The standard non-graphical print program for printing refund checks is REFCHECK. The standard graphical print program for printing refund checks is REFCHECKG.
Refund checks print when you select the Generate refund checks field at Processing Refunds (MREF).
For more information: See Refund Check.
Purpose: Use this screen to define whether to transmit orders that are completely backordered for credit card authorization along with orders that are shipping. This helps you to spot fraudulent orders before you place a purchase order for these items.
Yes/no field: Select this field to send completely backordered orders up for initial credit card authorization; otherwise, leave it unselected.
If you select this field, completely backordered orders that contain at least one credit card payment method that is not associated with a manual authorization are added to the Credit Card Authorization Backorder (CCATBO) table when you accept a new order in Order Entry (Accept or Accept/Add Rcp).
Note: Orders are added to this table from Order Entry only, not from Order Maintenance.
A single record is added to the Credit Card Authorization Backorder table for each order, regardless of the number of recipients (shipping addresses) on the order. The amount to authorize is $1.00.
The CCATBO table contains orders with:
• all backordered items, and
• at least 1 credit card payment method that uses a credit card authorization service bureau. The system does not create a record in the CC Authorization B/O table if the credit card payment method is associated with a manual authorization.
• rejected authorizations for FDR (First Data Response). Rejected authorizations for this service are transmitted each time you transmit authorizations to FDR, regardless of whether there are reserved items on the order.
During Pick Slip Generation, when you select the option to generate picks, the system checks the orders in the Credit Card Authorization Backorder table to ensure that:
• the order was not canceled
• the items were not received and reserved through EBO_ASYNC (Evaluate Backorder ASYNC). This is a background processing job that matches newly received inventory to backorders, based on order date and priority.
If backordered items were reserved, the record is deleted from the CCATBO (Credit Card Authorization Backorder) table and added to the CCAT00 (Credit Card Authorization) table. However, if the order remains completely backordered, the CCATBO table is copied to the CCAT00 file and is transmitted for initial authorization.
If the credit card charge is declined, the Order status and Order hold reason code fields are updated with the vendor response; also, a credit card decline email might be generated if the Credit Card Decline Email Program (K53) is populated. Depending on the type of response, you may not place a purchase order with your vendor for these items. However, if the order receives authorization (the charge is approved), you may order the items from your vendor.
Default Source Code for Batch Catalog Requests (D37)
Purpose: Use this screen to define the batch source code to use for catalog requests that you receive through an interface.
Code field: Enter the source code to use for catalog requests that you receive through an interface, such as the catalog request interface, if a source code is not already specified.
For more information: See Working with the Catalog Request Interface (WCRU).
Display Customer Notes in LIFO Sequence (D55)
Purpose: Use this screen to define whether the most recently entered customer notes display first or whether they display in the order in which they were entered.
Yes/no field: Select this field if the latest notes entered for the customer should appear before earlier notes; otherwise, leave it unselected to display the notes in the sequence in which they were entered.
If you select this field, the notes are listed in LIFO (last-in, first-out) sequence, which means that they appear in descending date sequence.
Example:
Note |
Date |
Call customer about order #301458. |
02/12/07 |
Credit given to customer for postage. |
12/10/06 |
New customer -- discount 5%. |
05/22/06 |
If you leave this field unselected, the notes appear in FIFO (first-in, first-out) sequence, which means that they appear in ascending date sequence. This way, the notes entered first appear first. The more recent notes appear towards the bottom.
Example:
Notes |
Date |
|---|---|
New customer -- discount 5%. |
05/22/06 |
Credit given to customer for postage. |
12/10/06 |
Call customer about order #301458. |
02/12/07 |
Note: Customer notes default to FIFO (earliest-to-latest) sequence.
You can enter, change, display or delete customer notes by selecting:
• Messages in Work with Customers (fast path = WCST)
• Options from Order Entry, Order Maintenance or Order Inquiry, then selecting the Customer Messages option.
The cursor is positioned at the first blank line on the Edit Customer Notes screen. After you enter a new note, the system checks this system control value and re-displays the notes in LIFO or FIFO sequence.
Example: This example shows a customer message screen before and after you enter a new message.
Before...
Note |
Date |
|---|---|
Call customer about order #301458. |
02/12/07 |
Credit given to customer for postage. |
12/10/06 |
New customer -- discount 5%. |
05/22/06 |
Send 2 spring catalogs. |
02/14/07<-- (new message) |
After... (LIFO sequence):
Note |
Date |
|---|---|
Send 2 spring catalogs. |
02/14/07<-- (new message) |
Call customer about order #301458. |
02/12/07 |
Credit given to customer for postage. |
12/10/06 |
New customer -- discount 5%. |
05/22/06 |
OR After...(FIFO sequence):
Note |
Date |
|---|---|
New customer -- discount 5%. |
05/22/06 |
Credit given to customer for postage. |
12/10/06 |
Call customer about order #301458. |
02/12/07 |
Send 2 spring catalogs. |
02/14/07<-- (new message) |
If you enter 2 or more messages on a single day, the second message displays below the first message with no message entry date.
Example:
Note |
Date |
|---|---|
Send 2 spring catalogs. |
02/14/07<-- (new message) |
Send 2 2006 catalogs, too. |
- (second message) |
Call customer about order #301458. |
02/12/07 |
Credit given to customer for postage. |
12/10/06 |
New customer -- discount 5%. |
05/22/06 |
Number of Days to Delay Initial Backorder Notice (D89)
Purpose: Use this screen to define the number of days to delay sending backorder notices to your customers who place a mail order for merchandise that is currently out of stock.
Number field: Enter the number of days the system should delay before sending a notice to customers who ordered backordered merchandise.
The system uses this value only when calculating backorder notification dates for order types that require immediate notification (the Immediate B/O notice field in the Order Type table is selected). Typically, you would want to notify customer immediately about backordered items if they place an order through the mail or fax; you can inform customers who order by phone at the time you take their orders if an item they want is currently backordered.
The FTC requires you to notify your customers if an item they have ordered is backordered, and advise them when you expect the item to ship. You can use this system control value to build in a delay period if you do not believe it is necessary to notify your customers about out-of-stock items that you can ship within the given delay period.
Example: You print a notice on your order forms to allow 30 days for shipping, and set this system control value to 30. A customer orders an item on September 1 that is currently out of stock. The delay date for this order is October 1. You expect to receive a purchase order for this item by September 7. The system does not generate a backorder notice to the customer, because you expect to ship the item before 30 days has passed.
If the date you expect to receive this purchase order changes to October 5, or if October 1 passes and you have not received the purchase order, the system generates a backorder notice.
Similarly, if a customer orders an item on September 1 for an item on an open purchase order dated October 20, the system generates a purchase order because the expected ship date exceeds the delay date.
Set this field to 0 if you do not want to build in a delay period for generating backorder notices to your customers.
Note: You should run purchase order layering before generating backorder cards, to be sure that all information on the system regarding purchase order arrival dates and expected ship dates on related order detail lines is correct.
This system control value does not apply to drop ship items fulfilled through the integration with Order Broker’s Drop Ship Manager. See the Interface with Order Broker’s Supplier Direct Fulfillment Module: Overview and Setup for more information.
For more information: See Purchase Order Layering and Backorder Notifications for more information on generating backorder notices and running batch purchase order layering.
Update Bill-to Address with Sold-to Address Changes (E13)
Purpose: Use this screen to define whether the system prompts you when you change a Sold-to address with a permanent Bill-to account by displaying a screen where you can apply the Sold-to changes to the Bill-to address.
Yes/no field: Select this field if you want the Display/Update Bill to Screen window to open in Order Entry, Order Maintenance and Work with Customers when you change a Sold-to address that is linked to a permanent Bill-to record.
Note: Because this system control value affects interactive screens, it does not control update of the bill-to customer through e-commerce orders (order API).
Leave this field unselected if you do not want the screen to open when you update the Sold-to customer.
Sample Display/Update Bill To screen:
The Display/Update Bill to screen displays the name and address of the Sold-to customer with its changes in the upper half of the window, and its linked Bill-to record without the changes in the bottom half of the window.
These fields for the bill-to customer record are updated when you change its linked Sold-to customer:
• prefix
• first name
• middle initial
• last name
• suffix
• company
• street
• apt/suite
• address line 2
• address line 3
• address line 4
• postal code
• city
• state
• country
• delivery code
• PO box
• day phone number/extension
• evening phone number/extension
• third (fax or mobile) phone number/extension
For more information: See Creating and Updating Sold-to Customers (WCST) for more information.
You can also update bill-to address changes with sold-to address changes in the MBS Work table if the old address of the sold-to customer is an exact match of the old address of the bill-to customer. The MBS Work table contains address information from the National Change of Address (NCOA) Service.
These fields must be an exact match in order for the bill-to address to update with the sold-to address in the MBS Work table:
• Prefix
• First Name
• Middle Initial
• Last Name
• Suffix
• Company
• Street
• Apartment/Suite
• Address Line 2
• Address Line 3
• Address Line 4
• Postal Code
• City
• State
• Country
• Delivery Code
• P.O. Box
For more information: See Loading Address Updates.
Print Alpha $ Amount on Refund Check (E30)
Purpose: Use this screen to define whether the system prints refund checks with an alphanumeric and a numeric dollar amount.
Yes/no field: Select this field for refund checks to print with an alphanumeric and a numeric dollar amount.
Leave this field unselected to print refund checks with only a numeric dollar amount.
An alphanumeric dollar amount prints on a Refund Check with the base Refund Check Print Program (D23), CSR0836, and any custom programs that are set up for this feature. Refund checks print when you select the Generate refund checks field at Processing Refunds (MREF).
For more information: See Working with Refunds, Writeoffs and Balances Due (WREF).
Edit for Duplicate Catalog Requests (E46)
Purpose: Use this screen to define whether the system checks for duplicate records when you create a new catalog request.
Yes/no field: Select this field if you want the system to see if there is already an existing catalog request for the customer when you create a new catalog request using the Work with Catalog Request menu option or e-commerce catalog request process.
Checking for Duplicate Catalog Requests
Note:
• The system does not display an error message at the Create Catalog Request Screen in Work with Catalog Requests or the Change Catalog Request Screen in Work with Catalog Request Interface if the catalog request is a duplicate.
• If the existing request has already been printed, and the Edit for Duplicate catalog Requests system control value is selected, the system changes the printed status of the existing request to unselected.
• The system does increase the Quantity for the date and source code in the Catalog Request History table when the catalog request is a duplicate, even though it does not actually create an additional catalog request. This information is available for reporting purposes if you query the table directly. The number of requests mailed is included on the Campaign Performance Report; see Print Campaign Performance Reports (PCPR) for more information. See Catalog Request History Options for additional menu options related to the Catalog Request History table.
Leave this field unselected if you do not want the system to check for duplicate records when you create a new catalog request. In this case, if you enter a catalog request and a duplicate already exists, the system creates a new catalog request.
For more information:
• work with catalog requests and catalog request interface: Entering Catalog Requests (WCAT), Working with the Catalog Request Interface (WCRU).
• e-commerce catalog request process: E-Commerce Catalog Requests.
Prompt for Mandatory Demographics in Order Maintenance (E60)
Purpose: Use this screen to define whether the system prompts for completion of mandatory demographic information when you maintain an order.
Yes/no field: Select this field if you want the Work with Customer Profile Screen to appear automatically in Order Maintenance if a mandatory demographic field for the customer is blank.
You create demographic fields through Setting Up Customer Profiles (WPFL) in order to track personal information on your customers such as age, income, gender, etc. If you flag a demographic category as mandatory, and if you have not yet obtained the information for this field from the customer, the Work with Customer Profile screen appears automatically in Order Entry when you select Accept to accept the order. The screen prompts you to obtain the information from the customer, although you have the option of exiting the screen without completing the mandatory field.
Leave this field unselected if you do not want the Work with Customer Profile screen to appear automatically when you maintain an order.
Note: If you define one of the valid values for the mandatory category as a default, you do not advance automatically to the Work with Customer Profile screen in either Order Entry or Order Maintenance, instead, the system defaults the value from this field.
Credit Card Authorization AVS Hold Exemption/Bypass (E61)
Purpose: Use this screen to define whether to put an order on AVS hold a second time once it has been put on AVS hold and released.
Yes/no field: Select this field if you do not want to put an order on AVS (Address Verification Service) hold more than once.
An authorization service sends an AVS response if you need to verify that the customer's billing address is legitimate. For instance, the credit card might be authorized for the order, but there might be a discrepancy regarding part of the customer's address. To use the AVS feature, you should leave the Address verification field for the authorization service in the Work with Authorization Services menu option. You should also use this menu option to define each AVS response code.
When this system control value is selected, an order does not go on AVS hold twice if, for example, an order is authorized for a second shipment but receives the same AVS response the second time.
For more information: See Defining Authorization Services (WASV).
Leave this field unselected if you want orders to be held each time the authorization sends an AVS response.
FTC--Number of Days Prior to Next Backorder Date to Generate Second Notice (E67)
Purpose: Use this screen to define the number of days before a second backorder notice is due to generate the notice or write the backorder record.
Number field: Enter the number of days before the next backorder date to generate second backorder notices or write a record to the Backorder Cancellation Pending table (BOCANP).
You can use this system control value to:
• generate the backorder notice early enough in advance to be sure you notify the customer in time before the order is flagged for cancellation; or,
• print the card or create the record in advance, so that you can correct the backorder and ship the order without having to notify the customer. This option is practical only if you do not send email notifications.
The FTC--Second Notice Output (E68) system control value controls whether you generate second backorder notices, create a record in the table, or both.
Leave this field blank if you do not want to generate second notices in advance.
Important: The FTC -- Action after Second Notification (C70) system control value must be set to CANCEL in order for the system to generate second backorder notices or records in advance. If this system control value is not set to CANCEL, the system ignores the setting of the FTC--Number of Days Prior to Next Backorder Date to Generate Second Notice value.
FTC--Second Notice Output (E68)
Purpose: Use this field to indicate whether to generate second backorder notices, create records in a table, or both.
Code field: Enter the code representing whether to generate printed, emailed, or XML notices, create records in the Backorder Cancellation Pending table (BOCANP), or both, for second notices. Valid values are:
• FILE = The system creates records in the Backorder Cancellation Pending table when you generate second backorder notices. You can use the Work with Backorders Pending Cancellation menu option to work with these records or generate notices.
• FILE/PRINT = The system generates notices and creates records in the Backorder Cancellation Pending table when you generate second backorder notices. You can use the Work with Backorders Pending Cancellation menu option to work with these records, but not to generate notices.
• PRINT or blank = The system generates notices when you generate second backorder notices. You cannot use the Work with Backorders Pending Cancellation menu option.
Important: The FTC -- Action after Second Notification (C70) system control value must be set to CANCEL to use the Work with Backorders Pending Cancellation menu option. If this system control value is not set to CANCEL, the system ignores the setting of the FTC--Second Notice Output value.
Backorder Cancellation Pending table: When the system creates a record in the Backorder Cancellation Pending table due to a backordered item, it flags the record with a type of B. This flag distinguishes backordered records in the table from orders flagged for cancellation due to credit card decline; these orders are flagged with a type of C.
Work with Backorders Pending Cancellation: You can use this menu option to review or work with backordered items that are currently flagged for cancellation. Options include:
• generating notices (if this system control value is set to FILE only)
• accepting the delay for an order or group of orders
• printing a report of items pending cancellation
• canceling backordered items
Credit card cancellations: An order may be eligible for cancellation due to both a backordered item and a credit card decline. In this situation, the credit card cancellation takes precedence; the order is not visible through the Work with Backorders Pending Cancellation menu option.
For more information: See Working with Backorders Pending Cancellation (WBPC).
Number of Days to Add for Accepted Delays (E69)
Purpose: Use this screen to indicate the number of days to extend the next backorder date for an accepted delay.
Number field: Enter the number of days to add to the backorder date when you accept a delay through the Work with Backorders Pending Cancellation menu option.
When you accept a delay for a backordered item, the system:
• deletes the backorder record from the Backorder Cancellation Pending table (BOCANP)
• deletes the cancellation date from the order detail line
• writes an order transaction history message indicating that the customer has accepted the delay for the item
• adds the amount of days specified in this system control value to the next backorder date.
The order line is then eligible for reservation and fulfillment when you receive a purchase order containing the item; however, the order line is eligible for pending backorder cancellation again if you are not able to fulfill the order by that date.
The Work with Backorders Pending Cancellation menu option allows you to accept the delay for individual orders, or a group of orders. You might accept the delay if the customer has told you the wait is not a problem, or if you expect to receive a purchase order containing the item within enough time so that you can fulfill the backorder(s).
Leave this field blank if you do not use the Work with Backorders Pending Cancellation menu option. If you use this menu option and the system control value is blank, the next backorder date is set to the current date when you accept a delay.
Important: The FTC -- Action after Second Notification (C70) system control value must be set to CANCEL to use the Work with Backorders Pending Cancellation menu option. If this system control value is not set to CANCEL, the system ignores the setting of the value. Additionally, the FTC--Second Notice Output (E68) system control value must be set to FILE or FILE/PRINT to create records in the Backorder Cancellation Pending table.
For more information: See Working with Credit Card Cancellations (WCCC).
Use Item Freight Exemption File (E73)
Purpose: Use this screen to define whether the system excludes items defined in the Working with Freight Exempt Items (WFEI) menu option from freight.
Yes/no field: Select this field if you want the system to exclude items from freight. Any item defined as freight exempt in Working with Freight Exempt Items (WFEI) is not included in the freight calculation. This is helpful if you sell items such as memberships or subscriptions where you would not want to charge the customer for freight.
Eligible freight methods: You can exclude items from freight using these freight methods:
• Dollar chart by offer ($ Chart by Ofr) freight
• Dollar chart by source ($ Chart by Src) freight
• Percentage by source (% Source) freight
• Percentage by ship via ($ Ship VIa) freight
• Freight by order weight (Order Weight) freight
Freight Exempt hierarchy: If the item qualifies for freight exemption (see Use Item Freight Exemption File (E73) Selected?, Eligible Freight Method on Order?, and Item on Order Defined in Work with Freight Exempt Items (WFEI)?), the system uses the following hierarchy to determine how the item is exempt from freight.
1. |
Ship via level: If records exist for the item on the Select Ship Via for Exemption Screen, the item is exempt from freight only for those ship vias selected. The item is excluded from the freight calculation only if the specified ship via is defined on the order header. In addition: • If an offer is defined for the item on the Work with Freight Exempt Items Screen, the item is exempt from freight only for those ship vias selected and if the specified offer is associated with the source code on the order header. • If a source code is defined for the item on the Work with Freight Exempt Items Screen, the item is exempt from freight only for those ship vias selected and if the specified source code is defined on the order header. |
2. |
Offer level: If records do not exist for the item on the Select Ship Via for Exemption Screen, but an offer is defined for the item on the Work with Freight Exempt Items Screen, the item is exempt from freight only if the specified offer is associated with the source code on the order header. |
3. |
Source code level: If records do not exist for the item on the Select Ship Via for Exemption Screen, but a source code is defined for the item on the Work with Freight Exempt Items Screen, the item is exempt from freight only if the specified source code is defined on the order header. |
4. |
Item level: If records do not exist for the item on the Select Ship Via for Exemption Screen, and an offer or source code is not defined for the item on the Work with Freight Exempt Items Screen, then the item is always exempt from freight. |
Ship via additional charges: Any additional charges associated with a ship via, such as service charges or charges for a federal express service, are still added to an order even when the order contains only freight exempt items.
Extra recipient charges: Extra recipient charges are not added to an order if the recipient has only ordered a freight exempt item.
Handling charges: If the Include Handling in Freight Charge Calculation (D77) system control value is selected and a freight exempt item has a handling charge, the handling charge is not included in the freight calculation.
Pick slips: There are no freight charge on a pick slip, even if there are non-freight exempt items on the order, under these conditions:
• the Prorate Freight Charges (D39) system control value is unselected
• the pick slip includes only freight exempt items
• the order uses one of the Eligible Freight Methods for Freight Exemption
Leave this field unselected if you do not want to exclude items defined in the Working with Freight Exempt Items (WFEI) menu option from freight.
For more information: See:
• Working with Freight Exempt Items (WFEI) for an overview and the required setup.
• Working with Weight Tables for Order Weight (WFTB) for more information on required setup for the freight by order weight method.
Maximum Number of Retries on Credit Card Orders (E74)
Purpose: Use this screen to define the maximum number of times to attempt authorization for a credit card order.
Number field: Enter the maximum number of authorization attempts to make for an order before flagging the order for cancellation.
When you define a response code for an authorization service, you can specify the number of times to attempt authorization for that response code only. For example, when setting up a response code that indicates credit card fraud, you might specify to cancel the order after one attempt; for insufficient credit limit, you might specify to cancel after several attempts. Use this system control value to define the maximum number of times to attempt authorization for all responses combined.
The order is flagged for cancellation when the total number of responses is equal to the number you specify here. For example, if you set this field to 15, the order is flagged for cancellation when the order receives its 15th decline.
The system uses the value in the System Control table if the # authorization attempts field for the response code is blank. For this reason, you can use the system control value as the default or global maximum for vendor response codes.
Note: If the value in the System Control table is lower than the number of attempts you define at the vendor response level, the system flags the order for cancellation after the lower number of attempts.
Counter reset: If the order receives an approval and you make a shipment, the counter is reset to zero. For example, if:
• an order is declined five times
• an order is approved
• you make a partial shipment
• you receive a backordered item and submit the order for authorization again
In this situation, if the order is declined again this counts as decline number one, not decline number six.
Leave this field blank if you always want to use the limit defined at the vendor response level, or if you never want to flag orders for credit card cancellation automatically.
Online credit card authorizations: The system does not flag an order for cancellation when the total number of responses is equal to the number you specify here if you are using online authorization. See Performing Online Credit Card Authorizations for an overview and required setup.
More about credit card cancellations: When an order is flagged for cancellation due to failed authorization, the system writes a record in the Backorder Cancellation Pending table (BOCANP). These records are flagged with a type of C, to distinguish them from orders flagged for cancellation due to backorder (type B).
To cancel these orders automatically, use the Work with Credit Card Cancellations menu option (fast path = WCCC). You can also set this function up as part of your periodic processing, using the program BOR0029.
Cancel reason code: The system cancels each order using the cancel reason code associated with the vendor response code. If the order was flagged for cancellation because it reached the maximum defined in the System Control table, the system uses the cancel reason code associated with the last vendor response received. If none of the responses received by the order was associated with a cancel reason, the system uses the Auto Soldout Cancel Reason (C20) system control value.
For more information:
• setting up authorization services: Defining Authorization Services (WASV)
• processing credit card cancellations: Working with Credit Card Cancellations (WCCC)
Soldout Notification Print Program (E75)
Purpose: Use this screen to define the soldout notification print program the system uses to print soldout notification cards.
System name: Enter the program name the system uses to print soldout notification cards. The base program name defined for the soldout notification print program is SOLDOUT.
Leave this field blank if you do not want the system to print soldout notification cards. The system displays an error message when you try to print soldout cards if this system control value is blank:
No Soldout print program has been defined in SCV E75.
For more information: See Generating Soldout Notifications (MSON).
Unconditional Suppression of Backorder Card (F19)
Purpose: Use this screen to indicate whether items flagged to suppress a backorder notice ever appear on a backorder card, even if another item on the order generates the notice.
Yes/no field: Select this field if you want to exclude items or SKUs whose Suggest backorder field is selected from ever appearing on the first backorder card for an order, even if another item on the order triggers the backorder card generation.
You might use the Suppress backorder card field to flag an item such as a free gift, a promotional item, or a catalog, which should never generate a backorder card by itself.
Leave this field unselected to have these items or SKUs appear on the first backorder card if another item on the order triggers the card.
Example: |
An order includes two regular (unsuppressed) items and one item whose Suppress backorder card field is selected. One of the regular items is backordered. The suppressed item appears on the first backorder card, which was triggered by the unsuppressed item. Subsequently, the expected ship date for the regular backordered item changes. This change triggers another backorder card for the unsuppressed item; however, the suppressed item does not appear on the card. If there are no unsuppressed backordered items on an order, the suppressed item never generates a backorder card on its own. Also, suppressed items are not eligible to be canceled through Working with Backorders Pending Cancellation (WBPC), and do not appear on the Order Cancellation List by Item or the Backorder Cancellation Register. |
Require Exchange Item at Time of Receipt (F42)
Purpose: Use this screen to define whether you must enter an exchange item at the time of creating a return authorization or not until you process the receipt.
Yes/no field: Select this field to have entry of an exchange item required at the time you process the receipt of a return authorization rather than the time you create the return.
This system control value applies only when you process a return through the Work with Return Authorizations (fast path = WRTA) and Work with Return Authorization Receiving (fast path = WRAR) menu options. It does not apply when you process a return through order maintenance.
Leave this field unselected to have the exchange item always be required at the time you create a return authorization.
About return authorizations: The Work with Return Authorization menu option allows you to process the creation, receipt, and credit of a return authorization in separate steps, while order maintenance automatically processes the entire return “behind the scenes.”
Standard vs. streamlined process: If you use standard return authorization process, you must explicitly choose to perform each step of the return in the Work with Return Authorizations menu option; but if you use the streamlined process, the return authorization processes automatically as far as your authority extends.
The Use Streamlined Return Authorizations (F44) system control value controls which process you use. The secured features that control your authority to process return authorizations are described in Setting Up Secured Features.
Enter Exchange Item screen: When you enter an exchange reason code rather than a return reason code for a return authorization, you advance to the Enter Exchange Item screen, where you must identify the exchange item to ship to the customer. (In certain situations, you advance to the Enter Exchange Item pop-up window rather than the full screen; however, each field is the same.) If this system control value is selected, you do not advance to this screen automatically until you process the receipt.
If you have create authority only (streamlined process), or if you choose to create the return only but do not receive it (standard process), the Enter Exchange Item screen does not open. The screen opens when an operator with sufficient authority processes/completes the return (streamlined process) or when you choose to receive the return (standard process, or the Work with Return Authorization Receiving menu option).
For more information: See Introducing Return Authorizations (WRTA).
Use Streamlined Return Authorizations (F44)
Purpose: Use this screen to define whether you use streamlined or standard return authorization processing in the Work with Return Authorizations menu option.
Yes/no field: Select this field to use the streamlined return authorization process in the Work with Return Authorizations menu option (fast path = WRTA).
Leave this field unselected to use the standard process.
Streamlined process: When you select an order for return authorization, you advance to the Work with Returns for Order screen. This screen displays each item on the order that has been shipped and not returned by the customer, and is thus eligible for return. If a return authorization is currently in process for the item, this fact is indicated on the screen.
When you select an item on the order for return, or choose to return the entire order, the return processes automatically as far as your authority extends. The secured features that control your authority to process return authorizations are described in Setting Up Secured Features.
Standard process: When you select an order for return authorization, you advance to a screen that displays any return authorizations that are currently in progress; you can choose to process or change these returns, or create a new return authorization.
If there are currently no return authorizations in process, you can create one; then you must explicitly choose to receive and/or credit the return in separate steps.
If you attempt to perform any step in the return authorization process for which you do not have the necessary authority, the screen displays an error message.
For more information: See Introducing Return Authorizations (WRTA).
Purpose: Use this screen to indicate the number of characters in the postal code to consider when scanning for a customer.
Number field: Enter the number of positions to use for searching based on postal code (or zip) code. Any additional characters in the postal code beyond this number do not affect the sequence in which matching records are presented.
Example: Most of your customers are in the U.S., so you have this system control value set to 5. Most customers know their five-position postal code (such as 01760), but do not know the full ZIP+4 (such as 01760-1234). When you scan based on postal code, customers with the full ZIP+4 are included in the search results with customers whose postal codes are just five positions; they are not listed after the five-position postal codes.
How does the system use this system control value to control scanning by postal code? Even though the system saves the full ten positions of the customer’s postal code in the related customer table, the system does not actually use this field for searching and scanning. Instead, it uses an additional, hidden Postal code scan field in the related customer table to find customers based on postal code. This hidden field includes the number of positions of the postal code that is indicated by the system control value, with any additional positions saved as blank spaces. For example, if this system control value is set to 5, and the customer’s actual postal code is 01760, this hidden field is set to 01760 with five blank spaces.
If you set this system control value to 10, the system uses the full ten positions of the postal code for scanning. As a result, customers whose postal codes include the full ZIP+4 (such as 01760-1234) are listed after customers who use the five-position postal code (such as 01760) at a scan screen.
How to use postal code scanning based on this system control value: When searching for a customer based on postal code, your entry should not exceed the number of positions indicated in this system control value. For example, if this system control value is set to 5, enter up to five positions of the postal code to search correctly:
• Enter 017 to display postal codes such as 01701, 01702, etc.
• Enter 01760 to display postal codes such as 01760, 01761, etc.
However, at most scan screens, if you enter more than five positions when scanning, your search results begin after your entry. For example, enter 01760-1234 to display postal codes starting at 01761, etc.; 01760 and any variation (01760-1234, 01760-5678, etc.) are not included in the search results. Based on the five positions indicated by this system control value, these postal codes occur after 01760 alphanumerically.
Available for customer or address types: Scanning based on the designated postal code length is available for:
• Customer Sold To
• Customer Ship To (Address Book)
• Customer Bill To
• One Time Ship To Address
Scanning based on the designated postal code length is not available for other types of addresses, such as vendor.
Used where? The postal code length scanning applies when you search for a customer in:
• customer maintenance: see Selecting Customers
• order inquiry: see Using the Order Inquiry Scan Screens (OIOM)
• order maintenance: see Selecting an Order for Maintenance
• order entry: see Selecting Customers in Order Entry
• entering catalog requests: see Entering Catalog Requests (WCAT)
• return authorizations: see Selecting Orders for Return (WRTA)
• Generic Customer Inquiry (Search) API
Important: If you set this system control value to zero, the system does not update the Postal code scan field in any of the customer tables. As a result, you cannot scan on postal code.
Display Customer Action Notes/Messages in RA (F64)
Purpose: Use this screen to define whether the Edit Customer Actions pop-up window and an indicator that there are order messages should display when you select an order in Work with Return Authorizations.
Yes/no field: Select this field if you would like the system to display the Edit Customer Actions pop-up window, and identify whether there are any order messages, when you select an order in the Work with Return Authorizations (fast path = WRTA) menu option.
This system control value works the same way in both standard and streamlined return authorization processing. However, this system control value does not affect the Work with Return Authorization Receiving (fast path = WRAR) or Work with Return Authorization Credits (fast path = WRAC) menu options.
Edit Customer Actions pop-up window: This window displays when you select an order for return authorization processing if there are open any customer action notes for the customer.
If there are order messages: The text SEE MSGS appears in the upper right corner of the screen if there are any order messages for the order you selected. This text appears on the:
• Work with Returns for Order screen (streamlined process)
• Work with Return Authorization Detail or Work with Return Authorizations screen (standard process)
To review order messages:
• Streamlined process: select Order Inquiry to advance to order inquiry and select Messages to display the messages.
• Standard process: advance to order inquiry, select the order at a scan screen, and select Messages to display the messages.
Leave this system control value unselected if you do not want the pop-up window and message indicator to appear in Work with Return Authorizations.
For more information:
• working with return authorizations: Introducing Return Authorizations (WRTA)
• working with customer action notes: Displaying More Options in OIOM
• reviewing order messages: Reviewing Order-Level Properties
Track Customer History at Entity Level (F89)
Purpose: Use this screen to define whether to break out customer history based on the entity associated with each order.
Yes/no field: Select this field to have the system track customer history at the entity level. You might want to track history at the entity level if you offer more than one catalog with distinct identities, yet you want to share the same customer list and inventory for each.
Entity relationship: The system identifies the entity for each order based on the division defined for the source code on the order header. Each division points to an entity. Similarly, the system identifies the entity for a catalog request based on the source code defined for the catalog request.
Customer-level vs. entity-level: The system tracks information at both the customer level and the entity level if this system control value is selected.
Entity-related tables: The system uses these entity-related tables to track customer order history if this system control value is selected:
• Customer Sold To Entity
• Customer Ship To Entity
• Customer Sold To Item Class Entity
If this system control value is unselected, the system uses these tables only:
• Customer Sold To Order History
• Customer Ship To Order History
• Customer Sold To Item Class History
Screen Differences Related to Entity
Selecting this system control value produces the following screen differences.
Entity-related customer history: These additional screens are available in Work with Customers (fast path =WCST) to review customer history at the entity level:
• Display Customer Order/Entity History
• Display Customer Entity History
• Display Customer Item Class Entity
• Display Customer Item Class Entity Details
• Display Ship To Order/Entity History
• Display Ship To Entity History
For more information:
• working with customers and reviewing customer order history: Reviewing Customer History
• working with catalog requests: Entering Catalog Requests (WCAT)
• entering orders: Introducing Order Entry
• working with entities: Working with Entities (WENT)
Default Credit Card Authorization Number for Soft Declines (F93)
Purpose: Use this screen to define the credit card authorization number the system defaults when a credit card authorization is declined but is under a specified dollar amount.
Code field: Enter the credit card authorization number you wish the system to default when a credit card authorization is declined but is under a specified dollar amount.
You can use the pay type dollar limit defined for a vendor response code to force authorizations that have been declined. For example, if a credit card received a vendor response of “credit card exceeds limit,” you may want to force the authorization through anyway if the dollar amount that requires authorization is less than $50.00.
If you set up a pay type dollar limit for a vendor response code, the order receives a forced authorization if:
• the credit card on the order is declined, and
• the dollar amount that requires authorization is greater than $1.00 and is less than the pay type dollar limit that you have set up for the credit card pay type on the order.
In this situation, the order receives a forced authorization, and the system defaults the credit card authorization number defined in the Default Credit Card Authorization Number for Soft Declines system control value to the Authorization number field on the Authorization History record. The system processes the authorization through Order Management System, as if the number that defaulted from this system control value was an actual authorization number. The order is processed through pick slip generation and the system produces pick slips for the order. The system also writes an order transaction history message indicating the authorization was forced.
This process is also used during reauthorization of expired authorizations. See Reauthorizing Expired Authorizations.
Note: The system may still place the order on hold if the order does not pass AVS authorization.
An error message indicates if you try to enter an authorization number that is greater than 6 characters:
Only Six Bytes Allowed for Default CC Auth Code.
Leave this field blank if you do not wish to default a credit card authorization number when a credit card authorization is declined but is under a specified dollar amount.
Online credit card authorization: The system does not default the credit card authorization number you define here when a credit card authorization is declined but is under a specified dollar amount if you are performing online credit card authorization. See Performing Online Credit Card Authorizations for an overview and required setup.
If you do not define a credit card authorization number in this field, the order is placed on hold, using the vendor response hold reason code. If the hold reason code for the vendor response is blank, or a hold reason code has not been defined for the vendor response, the order is not placed on hold and is processed through pick slip generation.
For more information: See Defining Vendor Response Codes.
Use Credit Card Vendor Response Entity Ship Via Dollar Limits (F94)
Purpose: Use this screen to define whether the system performs an edit against a credit card vendor response to determine if the dollar amount for the credit card authorization exceeds the dollar limit defined for the ship via on the order.
Yes/No field: Select this field if you wish the system to perform an edit against a credit card vendor response to determine if the dollar amount for the credit card authorization exceeds the dollar limit defined for the ship via on the order.
You can use the ship via dollar limit to reduce the amount of credit card fraud. For example, a credit card may receive a vendor response of “all address matching”, but you may want to perform an additional check against the ship via assigned to the order and the dollar amount that requires authorization.
When you set up a ship via dollar limit, an order goes on hold if:
• the order passes AVS, but the ship to customer is different than the sold to customer, and
• the dollar amount that requires authorization is over the specified dollar limit to hold that you have set up for the ship via on the order.
In this situation, the system places the order on hold, using the hold reason code defined for the ship via dollar limit.
The system uses this information to determine if an order should go on hold due to a ship via dollar limit:
• the authorization service code
• the AVS response code from the authorization service
• the entity associated with the order
• the ship via on the order header
The system does not place an order on ship via dollar limit hold if:
• the order does not pass AVS, regardless of whether the ship to customer is different than the sold to customer, and
• the dollar amount that requires authorization is under the specified dollar limit to hold that has been set up for the ship via on the order.
In this situation, an order can pass AVS authorization even if the AVS response code causes the order to go on hold, if the order amount is under the specified dollar limit to hold.
Online credit card authorization: The system does not perform an edit against a credit card vendor response to determine if the dollar amount for the credit card authorization exceeds the dollar limit defined for the ship via on the order when you are performing online credit card authorization. See Performing Online Credit Card Authorizations for an overview and required setup.
Leave this field unselected if you do not wish the system to perform an edit against a credit card vendor response to determine if the dollar amount for the credit card authorization exceeds the dollar limit defined for the ship via on the order.
For more information: See Defining Vendor Response Codes.
Default Vendor Response for Automatic Authorizations (G10)
Purpose: Use this screen to define the vendor response code to use for authorizations that you approve without receiving a response from the authorization service.
Code field: Enter the code to use for authorizations that you approve without receiving a response from the authorization service. You might use this automatic authorization process if you are expecting a substantial delay before you receive the authorizations from your service bureau, and you consider the likelihood of receiving declined authorizations to be low.
When is automatic authorization possible? You can approve authorizations in this way only if all three of these assumptions are true:
• this system control value is set to a valid response code for the authorization service
• the Immediate response field for the authorization service is unselected
• you have the proper authority, as controlled by the Continue Authorization without Receipt (A90) secured feature
For more information:
• setting up authorization services: Defining Authorization Services (WASV)
• generating pick slips: Performing Pick Slip Generation
Display First Membership Order Total (G14)
Purpose: Use this screen to define whether to display the estimated dollar total for the first membership order scheduled for generation when you create a membership for a customer in order entry.
Yes/no field: Select this field to display the Order Total pop-up window in order entry when you select Accept to accept an order in which you have ordered a membership item, creating a customer membership.
What is a customer membership? You can use a customer membership to generate periodic orders for a customer. Typically, a membership program generates orders containing the same item(s) monthly, but you can set up memberships to generate orders at different intervals, to include a rotating selection of items, and/or to include a discount that applies to each order the customer places.
How do you create a customer membership in order entry? When you enter an item flagged as a Membership, the system displays a pop-up window in which you can select the type of membership the customer wants to purchase. Depending on the type of membership program, you may be able to override the default settings (which include items, shipment intervals, and discount percentage), or you can accept all defaults for the program. Payment information can default to the membership from the order, or you can enter a separate payment method.
Note: You can also create and work with customer memberships through the Work with Customer Memberships menu option.
How do you generate membership orders? The Generate Customer Membership Orders function reviews all active customer memberships, and creates a new order for each customer membership whose release date is on or before the current date. Once you generate a membership order, you can process and fulfill it like any other order.
What does the first order total include? The order total listed in the Order Total window includes merchandise, tax, and freight. This order total is an estimate only. The actual total when you generate the first order may vary, depending on changes to pricing, using various freight methods, including special charges, item availability, and so on.
Leave this system control value unselected if you do not want to display the Order Total pop-up window in order entry.
For more information:
• setting up and working with memberships: Working with Membership Programs (WWMP)
• creating memberships by selling membership items in order entry: Entering Customer Memberships in Order Entry
Populate Marketing Download Trigger File (G33)
Purpose: Use this screen to define what types of activity in the system should create records in the Marketing Download Trigger table.
Code field: Enter the code that indicates the types of activity that should create records in the Marketing Download Trigger table (IXMKDT).
Valid values are:
• ORDER = Order entry and order maintenance.
• CUSTOMER = Customer maintenance and catalog requests.
• ORD/CUST = Order entry, order maintenance, customer requests, and catalog requests.
Why write trigger records? You can use the records in the Marketing Download Trigger table to drive an extract process for an interface related to order and/or customer activity. The presence of the trigger record indicates that there is updated information to be collected in Order Management System. Using the trigger table enables you to schedule the update and download process at a time when there is less interactive activity, making your system usage more efficient.
Example: You would like to download current information in your house list to an external service. You could set this system control value to CUSTOMER so that each time you update a customer record in Order Management System, the system writes a trigger. You could then run a periodic function on a weekly basis, preferably at a time when system resources are more available, to retrieve each customer record that has an associated trigger, and extract the new customer information from Order Management System to your external service.
When the system creates a marketing download trigger, the trigger is assigned a trigger type based on the type of activity that was performed. The trigger type determines what fields are populated in the Marketing Download Trigger table and what extract table is populated when you run the marketing download trigger periodic function.
See Working with the Marketing Download Extract for an overview of the Marketing Download extract process.
When is the trigger record created? Each of the trigger record types indicated are created when the update in Order Management System is complete. For an interactive process, such as creating or updating a customer in order entry, the trigger record is created immediately. For an update that is handled by an asynchronous job, such as order creation, the trigger record is not created until the job processing is complete.
Leave this field blank if you do not want to populate the Marketing Download Trigger table.
Display Action Notes in Order Inquiry (G74)
Purpose: Use this screen to indicate whether the Edit Customer Actions pop-up window displays in order inquiry if there are unresolved customer action notes.
Yes/no field: Select this field to have the Edit Customer Actions Window open when you advance to the Order Inquiry Header Screen in order inquiry if there are unresolved customer action issues for the customer. The window opens only once while you are working with an order in order inquiry.
Leave this field unselected if you do not want the Edit Customer Actions window to display in order inquiry.
Note: This system control value does not affect the display of the Edit Customer Actions window in order entry; this window displays in order entry when you select OK to accept the order header information if there are unresolved customer action issues for the customer, regardless of the setting of this system control value.
Backorder Notification E-Mail Program (G95)
Purpose: Use this screen to specify the program used to create backorder notices to send to customers via email.
System name: Enter the program name to use for generating return confirmations. The standard base program is BONOTF, which generates a notification email in HTML format. Unless you are using a unique backorder notification program or the outbound email API, described below, you need to have this system control value set to BONOTF in order to generate the backorder notification email.
Leave this field blank if you do not need to send backorder notices by email.
Outbound email API: Order Management System generates a generic outbound XML message, rather than an actual email, for backorder notifications if the XML only? flag for the backorder notification template is selected and this system control value is not blank. The Outbound Email XML Message (CWEmailOut) includes additional information that is not included in the standard email notice. You might choose to generate the XML message so that you can use the additional information to produce a reformatted HTML email and include promotional information. See Outbound Email API for an overview and message details.
Company-level or entity-level email template? The system generates an email using the text from the first, second, or continue backorder notification email template, set up through the Working with E-Mail Notification Templates (WEMT) menu option. You can also set up email templates at the entity level as an override to the company-level template; see Email Setup within Order Management System for more information.
Note: The system does not generate backorder notification emails for quotes; see Entering Pre-Order Quotes for an overview.
For more information: See Purchase Order Layering and Backorder Notifications for information on generating backorder notices.
Soldout Notification E-Mail Program (G96)
Purpose: Use this screen to specify the program used to create soldout notifications to send to customers via email.
Program field: Enter the name of the program to create soldout notifications to send to customers via email. See When Does the System Generate an Email Notification? for an overview of when the system sends an email notice rather than generating a document for printing, and for information on entering the text to appear in the email. You can also set up an email template at the entity level as an override; see Email Setup within Order Management System for more information.
If the XML only? flag is selected for the email template, the system generates the Outbound Email XML Message (CWEmailOut) rather than an actual email. See Outbound Email API for background.
The base program is SONOTF. See Credit Card Credit Acknowledgement Email Sample and Contents for an example.
Leave this field blank if you do not need to send soldout notifications by email.
For more information: See Generating Soldout Notifications (MSON) for information on generating soldout notifications.
Default Opt In/Opt Out Flag (G97)
Purpose: Use this screen to define the default setting of the Opt In/Opt Out field when you create a new customer or email address. You need to set this system control value to ensure correct customer creation and update.
Code field: Enter the default setting of the Opt In/Opt Out field to use when you create a new customer or email address for the:
• sold-to customer
• sold to email
• sold to entity
• bill-to customer
Valid values are:
• O1 (All emails) = Email is the preferred method of correspondence
• O2 (Order emails) or blank = Send only order-related email correspondence
• O3 (No emails) = Email is not an acceptable method of correspondence
• O4 (Do not ask) = Do not ask the customer for his/her email address; the customer has already been asked and has declined to provide it. The system does not generate any email correspondence to the customer, even if an email address is specified.
Note: The valid settings for this field each start with the letter O rather than the number 0 (zero).
E-commerce catalog requests: If the E-Commerce Catalog Request Message (CWCatRequest) received from the web storefront does not contain a value in the bill_to_opt_in flag, the system defaults the setting of this system control value. See E-Commerce Catalog Requests for additional processing information.
Outbound email API: The opt in/opt out settings controls the generation of the Outbound Email XML Message (CWEmailOut) using the same logic as the generation of outbound emails. See Outbound Email API for an overview.
You can work with this field in customer maintenance, order entry, and when entering catalog requests.
See When Does the System Generate an Email Notification? for an overview of the part this flag plays in determining whether to send certain email notifications to customers.
Purpose: Use this screen to define whether a window displays requiring an order inquiry reason code when you return to the Customer Selection Screen after using order inquiry or order maintenance.
Yes/No field: Select this field if you want the system to display a pop-up window requiring an order inquiry reason code when you return to the Customer Selection Screen after using order inquiry or order maintenance and you do not have authority to the Bypass CTI Reason Code (B24) secured feature.
Note: Contact your Order Management System representative for information on implementing CTI.
You can use order inquiry reason codes to determine why customers are inquiring about their orders or requesting maintenance on their orders. For example, if customers are inquiring about when they can expect to receive the merchandise on their orders, you can train your order entry operators to inform the customers of the expected delivery date.
Note: You can only enter an order inquiry reason code if you advance to order inquiry or order maintenance from the Customer Selection Screen. If you advance to order inquiry from the Order Inquiry Scan Screen or you advance to order maintenance from the Select Customer Sold To For Order Screen, the system does not allow you to enter an order inquiry reason code regardless of the setting of the Require Reason in CTI (G98) system control value and Bypass CTI Reason Code Entry (B24) secured feature.
How do order inquiry reasons relate to the order? When you define an order inquiry reason code after maintaining or reviewing an order, the system does not assign the order inquiry reason code to the order. Instead, the system tracks the number of times a specific user maintained or reviewed an order or orders associated with a specific line of business for a specific date and a specific order inquiry reason. You can review order inquiry reason history at the Order Inquiry Reason History Screen.
For more information: See:
• Working with Order Inquiry Reason Codes (WORC) for information on creating and maintaining order inquiry reason codes.
• Bypass CTI Reason Code (B24) for more information on this secured feature.
Leave this field unselected if you do not want the system to require an order inquiry reason code when you return to the Customer Selection screen after using order inquiry or order maintenance.
Credit Card Credit Acknowledgement E-Mail Program (H08)
Purpose: Use this screen to specify the program to generate email, rather than printed, credit card credit acknowledgements.
Generating credit card credit acknowledgements: The system generates an email acknowledgement of a credit card credit if:
• this system control value is set to CCCNOTF or a valid program
• the customer’s Opt in/Opt out field is set to O1 or O2 (see Determining the Opt-in/out Setting), and
• the customer has an Email address
• you select Generate C/C Credits when Processing Refunds (MREF)
• the XML Only? flag is unselected in for the email template in Working with E-Mail Notification Templates (WEMT) or Working with Entities (WENT)
System name field: Enter the name of the program to generate email credit card credit acknowledgements. See When Does the System Generate an Email Notification? for an overview of when the system sends an email notice rather than generating a document for printing, and for information on entering the text to appear in the email. You can also set up an email template at the entity level as an override; see Email Setup within Order Management System for more information.
The base program is CCCNOTF.
Note: As long as you define a valid program in this field, the system still generates credit card credit email acknowledgements regardless of the setting of the Print Credit Card Credit Acknowledgments (C35) system control value.
Leave this field blank if you do not need to send credit card acknowledgements by email.
Outbound email API: You can specify to generate a generic outbound XML message, rather than an actual email, for credit card credit notifications. This XML message includes additional information that is not included in the standard email notice. You might choose to generate the XML message so that you can use the information to produce a reformatted HTML email for marketing purposes. See Outbound Email API for an overview.
For more information: See:
• Processing Refunds (MREF) for information on how to generate credit card credit acknowledgements
• Working with E-Mail Notification Templates (WEMT) for an overview on email notifications
• Outbound Email API for an overview on the outbound email API
• Email Generation Setup for system setup information and troubleshooting
E-Mail Order Confirmations for All Orders (H51)
Purpose: Use this screen to define whether the system sends an email confirmation when any order is accepted, or only when a customer on the web storefront accepts or maintains an order.
Yes/No field: Select this field if you want the system to send an email confirmation when any order, regardless of whether it originated at the web storefront, is accepted.
Generating confirmations: The system generates an email acknowledgement for all orders if:
• this system control value is selected, and
• the Email notification field for the order type is selected, and
• the customer’s Opt in/Opt out field is set to O1 or O2 (see Determining the Opt-in/out Setting), and
• the customer has an Email address
Order confirmation email program name: The system uses the program name defined in the Order Acknowledgement Program (G50) system control value for generating acknowledgment emails for orders.
Standard email or customized email? You can use the Working with E-Mail Notification Templates (WEMT) menu option to create an order confirmation email template. If you do not define a template, the system generates the standard order confirmation email. See below for examples.
Outbound email API: You can specify to generate a generic outbound XML message, rather than an actual email, for order notifications. This XML message includes additional information that is not included in the standard email notice. You might choose to generate the XML message so that you can use the information to produce a reformatted HTML email for marketing purposes. See Outbound Email API for an overview.
Email setup: See When Does the System Generate an Email Notification? for more information on the criteria required to generate an email, and see Email Generation Setup for email configuration steps.
Leave this field unselected if you do not want the system to send an email confirmation or Outbound Email XML Message (CWEmailOut) for all orders.
For more information: See When Does the System Generate an Email Notification? for an overview.
E-Mail Shipment Confirmations for All Orders (H52)
Purpose: Use this screen to define whether the system sends an e-mail confirmation when any sale order or return bills or only when an e-commerce (order API) sale order or return bills.
Yes/No field: Select this field if you want to send an email confirmation or Outbound Email XML Message (CWEmailOut) when any order or return bills, regardless of order type.
Generating confirmations: The system generates a confirmation email or Outbound Email XML Message (CWEmailOut) when you:
• process a shipment through billing if the Send Shipment Confirmation from Billing (L98) system control value is selected.
• generate shipment confirmations and return confirmations using the Send Internet Order Ship Confirmations menu option; see Sending Internet Order Ship Confirmation (ESCF)
• execute the ECSHCNF periodic function; see Working with Periodic Functions (WPER)
Additional requirements: A shipment or return confirmation email is generated only if the customer’s Opt in/Opt out field is set to O1 or O2 (see Determining the Opt-in/out Setting), and the customer has an Email address. Also, the Email notification field for the order type must be selected, and the Send email flag must be selected for the notification type at the Order Type Email Selection Screen.
Confirmation program names: The system uses the Shipment Confirmation Program (G51) and the Return Confirmation E-Mail Program (H53) to generate the confirmation emails.
Outbound email API: You can specify to generate a generic outbound XML message, rather than an actual email, for shipment or return notifications. This XML message includes additional information that is not included in the standard email notice. You might choose to generate the XML message so that you can use the information to produce a reformatted HTML email and include promotional information. See Outbound Email API for an overview.
Setup for shipment and return confirmations: See Email Setup within Order Management System for more information on setting up template text, the “from” email address, and other setup options for shipment and return confirmation emails.
Leave this field unselected if you want to send an email confirmation only for e-commerce orders. The system identifies an e-commerce if its order type matches the E-Commerce Order Type (G42) system control value.
For more information: See Shipment and Return Confirmation Emails for an overview.
Return Confirmation E-Mail Program (H53)
Purpose: Use this screen to define the program to generate email return confirmations.
System name field: Enter the program name to use for generating return confirmations. The standard base program is RtnConf, which generates a notification email in HTML format. Unless you are using a unique return confirmation program or the outbound email API, described below, you need to have this system control value set to RtnConf in order to generate the return confirmation email.
For more information: See Return Confirmation Email Sample and Contents.
Outbound email API: Order Management System generates a generic outbound XML message, rather than an actual email, for return notifications if the XML only flag for the return confirmation template is selected and this system control value is not blank. The Outbound Email XML Message (CWEmailOut) includes additional information that is not included in the standard email notice. You might choose to generate the XML message so that you can use the additional information to produce a reformatted HTML email and include promotional information.
For more information: See Outbound Email API for an overview and message details.
How to generate return confirmations: The system generates a return confirmation email or Outbound Email XML Message (CWEmailOut) when you:
• process a return through billing if the Send Shipment Confirmation from Billing (L98) system control value is selected.
• generate return confirmations using the Send Internet Order Ship Confirmations menu option; see Sending Internet Order Ship Confirmation (ESCF).
• execute the ECSHCNF periodic function; see Working with Periodic Functions (WPER).
Company-level or entity-level email template? The system generates an email using the text from the return confirmation email template, set up through the Working with E-Mail Notification Templates (WEMT) menu option. If you have not set up a template, the system emails the standard return confirmation. You can also set up an email template at the entity level as an override; see Email Setup within Order Management System for more information.
Determining when to email a return confirmation: The E-Mail Shipment Confirmations for All Orders (H52) system control value determines whether to generate a return confirmation email or Outbound Email XML Message (CWEmailOut) for all orders or only for e-commerce orders (received through the order API). See When Does the System Generate an Email Notification? for an overview.
The system generates a return confirmation email or Outbound Email XML Message (CWEmailOut) only if the customer’s Opt in/Opt out field is set to O1 or O2, and the customer has an Email address.
The system does not generate a return confirmation if the return disposition assigned to the return matches the return disposition code defined in the Return Disposition Code to Exclude in ORCE Sales Feed (M22) system control value and the Suppress refund field in the Order Payment Method table is set to Y.
Leave this field blank if you do not wish to email a return confirmation or generate the Outbound Email XML Message (CWEmailOut).
Require Customer Class in OE, WCAT, and WCST (H85)
Purpose: Use this screen to indicate whether the customer class is required when entering orders or catalog requests or maintaining customer records.
Yes/No field: Select this field to have customer class required at the following screens:
• order entry and order maintenance:
• Change Cust Sold to Name & Address Screen
• catalog requests: Create Catalog Request Screen
• customer maintenance:
• First Create Sold To Customer Screen
• First Change Sold To Customer Screen
At each of these screens, the customer class defaults as follows:
• existing customer: The customer class defaults if it has already been specified.
• new customer: The customer class defaults if the Default Customer Class in Order Entry (D63) system control value specifies a customer class.
If you fail to enter a customer class and there is no default, the system displays the following error message: Customer Class required.
Important: You can use the Maintenance of Customer Class Field (B07) secured feature to control the authority to enter or change the customer class field at all of the above screens. If you select this system control value, a user who does not have authority to the customer class field cannot enter or maintain an order or a catalog request, or perform customer maintenance for any customer that does not already have a customer class assigned. See the table below for more information.
Require Customer Class in OE, WCAT, and WCST (H85) |
Maintenance of Customer Class Field (B07) secured feature |
Result in order entry, catalog requests or customer maintenance |
|
|---|---|---|---|
not specified |
unselected |
*ALLOW |
Current setting, if any, defaults; entry is optional |
*EXCLUDE |
Current setting, if any, defaults; cannot enter or maintain customer class for new customers or customers without assigned class |
||
specified |
unselected |
*ALLOW |
Current setting, if any, defaults; class defined for system control value defaults for new customers; entry is optional |
*EXCLUDE |
Current setting, if any, defaults; class defined for system control value defaults for new customers; cannot enter or maintain customer class |
||
specified |
selected |
*ALLOW |
Current setting, if any, defaults; class defined for system control value defaults for new customers; entry is required for existing customers without assigned class |
*EXCLUDE |
Current setting, if any, defaults; class defined for system control value defaults for new customers; cannot complete order, catalog request, or customer maintenance if there is no default customer class |
||
not specified |
selected |
*ALLOW |
Current setting, if any, defaults; entry is required for existing customers without assigned class and for new customers |
*EXCLUDE |
Current setting, if any, defaults; cannot complete order, catalog request, or customer maintenance for new customers, or if there is no default customer class for existing customers |
Leave this field unselected if you do not want customer class to be required in order entry, order maintenance, catalog requests or customer maintenance.
For more information: See Setting Up the Customer Class Table (WCCL) for a discussion of customer class.
Assign Unreferenced Email (H93)
Purpose: Use this screen to indicate whether the system should search for the customer related to an incoming email based on the email address that originated the email.
Code field: Enter the code that indicates whether the system should search for a customer whose email address matches the address on an incoming email.
Why is email address search necessary? If you use the emails repository, your customer service representatives can flag an email with identifiers, such as customer number and order number, when they forward the email to Order Management System. The system automatically assigns an inbound email if it is flagged correctly and consistently. However, these identifiers would not be specified if, for example, you configured your system to forward the emails automatically into Order Management System rather than having them sent first to customer service representatives for review, or if a customer service representative does not include email identifiers when forwarding an email. When an email arrives without email identifiers, the email can be assigned either through the email search or manually, through Working with Email (WEML).
Valid codes are:
• *NODUPE = Search for a matching email address and use the search hierarchy described below.
• *DUPE = Search for a matching email address in the Customer Sold To Email and Customer Ship To tables, but put the email in error status if there is more than one matching address in all of these tables.
• *NONE = Do not search for an email address. Each email received without accurate email identifiers must be assigned through Working with Email (WEML).
Search hierarchy: If this system control value is set to *NODUPE, the system performs a search for a matching customer in by checking email addresses in the following order:
1. |
Ship-to customers: • The system selects the ship-to customer whose Email address matches, and whose sold-to number is lowest (the oldest sold-to customer). • If there is more than one ship-to customer for the same sold-to customer, the system selects the first ship-to customer by ship-to number. |
2. |
Sold-to customers: The system selects the customer whose Email address matches and has been created or updated the most recently, based on the email address’s Change date and Change time, or the Create date and Create time if the email address has never been changed. |
3. |
Bill-to customers: The system selects the bill-to customer whose Email address matches. If there is more than one bill-to customer with a matching email address, the system selects the first bill-to customer by number. If there is a single sold-to customer who has been assigned the selected bill-to customer, the system also selects the sold-to customer; otherwise, only the bill-to customer is selected. |
The system does not search for a vendor based on email address.
For more information: See:
• Email Repository Overview for an overview
• Working with Email (WEML) for information on working with emails that have not been assigned to a customer
Purpose: Use this screen to define whether the workflow management module is enabled.
Yes/No field: Select this field if you wish to use workflow management.
Workflow management allows you to automate system events, during which tasks (ticklers) are assigned to a user for action, according to a defined set to procedures, until the issues associated with the tasks are resolved.
Leave this field unselected if you do not wish to use workflow management.
For more information: See Workflow Management Overview and Setup for an overview on workflow management and required setup.
Write Outbound Email to Email Repository (H99)
Purpose: Use this screen to indicate whether to keep a record of email notifications you send to customers in the email repository.
Yes/No field: Select this field to save a copy of each outbound email notification or Outbound Email XML Message (CWEmailOut) to the Correspondence History table. Outbound email notifications include:
• order confirmations
• credit card credit acknowledgements
• soldout notifications
• shipment confirmations
• backorder notices
• return confirmations
• order update confirmations
• stored value card notifications
Reviewing outbound emails: You can review outbound email notices at the:
• Work with Email by Order Number Screen
• Work with Email by Customer Sold To Number Screen
• Work with Email by Customer Ship To Number Screen
• Work with Email by Customer Bill To Number Screen
At these screens, an outbound email has a Source of INT (internal) rather than EXT external. The Email category is NTF (notification). The subject line of the email indicates the type of notification that was sent. However, because the text of each type of outbound email does not vary from customer to customer, the system does not save the text in the Correspondence History Detail table; no text is available for review by selecting Display detail for an outbound email at any of the screens listed above.
Outbound email API: You can specify to generate a generic outbound XML message, rather than an actual email, for order, return, or shipment notifications. This XML message includes additional information that is not included in the standard email notice. You might choose to generate the XML message so that you can use the information to produce a reformatted HTML email and include promotional information. If this system control value is selected and you generate the Outbound Email XML Message (CWEmailOut), you see the same type of information for these notices at the screens listed above as you would if the system had generated an actual email notification. See Outbound Email API for an overview.
Notification email category: To save outbound emails in correspondence history, you need an email category of NTF (notification). The system automatically creates this category the first time you advance to the Work with Email Category Screen.
Note: This setting does not apply to emails generated through the Narvar Integration.
For more information: See:
• Email Repository Overview for an overview of inbound emails
• Working with E-Mail Notification Templates (WEMT) for information on when the system generates email notifications
Purpose: Use this screen to indicate whether to delete extra lines from emails stored in the emails repository.
Code field: Enter the code that indicates whether to delete extra lines from emails that you store in the email repository. Valid codes are:
• 1 or blank = include blank lines; do not delete anything.
• 2 = delete blank lines, but leave paragraph spacing.
• 3 = delete all lines and paragraph spacing so that all text wraps.
You might want to eliminate blank lines (2) or all paragraph spacing (3) to save space; however, leaving some or all of the spacing can improve readability.
Sample results:
1: include blank lines:
Please respond to this customer inquiry.
-----Original Message----- From: jdoe@example.com Sent: 08/09/2006 12:35:55 PM To: Eleanor Johnson Cc: Subject: Re: Where is my order?
Please confirm the expected shipment date for order # 12345.
Thank you,
Jane Doe |
2: delete blank lines but leave paragraph spacing:
Please respond to this customer inquiry. -----Original Message----- From: jdoe@example.com Sent: 08/09/2006 12:35:55 PM To: Eleanor Johnson Cc: Subject: Re: Where is my order? Please confirm the expected shipment date for order # 12345. Thank you, Jane Doe |
3: wrap all text:
Please respond to this customer inquiry. -----Original Message----- From: jdoe@example.com Sent: 08/09/2006 12:35:55 PM To: Eleanor Johnson Cc: Subject: Re: Where is my order? Please confirm the expected shipment date for order # 12345. Thank you, Jane Doe |
Note: This setting controls inbound emails only; the system does not retain the text of outbound email notifications. See Write Outbound Email to Email Repository (H99).
Display Alternate Shipping Charges by Via Window in OM (I02)
Purpose: Use this screen to specify whether to display a pop-up window in order maintenance to offer the customer a choice of ship vias, or to have the system automatically assign the “best way” ship via with the lowest overall shipping charges.
Yes/No field: Select this field to:
• display the Alternate Shipping Charges by Via Window in order maintenance if the ship via on the order header does not match the Best Way Ship Via for Auto-Assignment (J67), or if the Best Way Ship Via for Auto-Assignment (J67) is blank. You can use the Alternate Shipping Charges by Via window to review additional ship via choices with the customer, and allow the customer to select a different ship via based on total shipping charges or delivery date. This window opens automatically in order maintenance if no items on the order are printed or shipped.
Note: The window opens only if you have specified best way shippers for order entry for the ship via on the order. See Working with Best Way Ship Vias for an overview.
• have the system automatically select the “best way” ship via with the lowest overall shipping charges if the ship via on the order header matches the Best Way Ship Via for Auto-Assignment (J67).
Leave this field unselected if you do not want the window to open in order maintenance, or if you do not want the system to automatically select the ship via with the lowest cost in order maintenance.
Include Special Handling in Alternate Shipping Charges by Via (I03)
Purpose: Use this screen to specify whether to include any handling charges in the freight charges displayed in the Alternate Shipping Charges by Via Window, or to include these charges when selecting the “best way” ship via with the lowest overall shipping cost if you use the Best Way Ship Via for Auto-Assignment (J67).
Yes/No field: Select this field to include handling charges in the freight charges:
• displayed in the Alternate Shipping Charges by Via Window, if you do not use the Best Way Ship Via for Auto-Assignment (J67). You can use this window to review additional ship via choices with the customer, and allow the customer to select a different ship via based on total freight charges or delivery date.
• that the system uses to select the “best way” ship via with the lowest overall shipping cost, if the ship via on the order header matches the Best Way Ship Via for Auto-Assignment (J67). See that system control value for a discussion.
Freight charge examples: For example, an order includes personalization charges of $5.00. The current ship via on the order has freight charges of $10.00, and there are two alternate ship vias available with charges of $11.00 and $9.00. If the freight charges include special handling, the charges displayed in the window are or used for evaluation purposes are:
Ship via 1: $15.00
Ship via 2: $16.00
Ship via 3: $14.00
Leave this field unselected if you do not use the Alternate Shipping Charges by Via Window, or if you do not want the handling charges included in the freight charge totals. The charges displayed in the window or used for evaluation purposes are:
Ship via 1: $10.00
Ship via 2: $11.00
Ship via 3: $ 9.00
Authorization Number for Authorizations Under $1.00 (I08)
Purpose: Use this screen to define the authorization number the system automatically applies to credit cards that require authorizations that are under one dollar.
Code field: Enter the authorization number you wish the system to automatically apply to credit cards that require authorization for less than one dollar.
When you perform credit card authorization (either batch authorization during pick slip generation or on-line authorization during order entry), the system first looks at this system control value.
• If an authorization number is defined in the Authorization Number for Authorizations Under $1.00 system control value, the system does not send credit cards that require authorization for less than $1.00 to the service bureau. Instead, the system automatically applies the authorization number defined in this system control value to the credit card.
• The authorization number updates the Authorization number in the Authorization History table.
• The Vendor response, Vendor response 2, and AVS response fields in the Authorization History table remain blank.
• The CW (awaiting credit card authorization hold) is removed from the Hold reason field in the Order Payment Method table for the credit card, allowing the system to generate a pick slip.
• If an authorization number is not defined in the Authorization Number for Authorizations Under $1.00 system control value, the system sends the credit card to the service bureau for authorization, regardless of the amount that requires authorization.
Note: The authorization number in this system control value applies to all service bureaus you define in Work with Authorizations.
Deposits: When you send the credit card for deposit processing, the service bureau may decline the deposit since the original authorization was forced and not sent to the service bureau for authorization. To avoid a declined deposit:
• if the forced authorization is the only authorization associated with the order or the forced authorization amount matches the amount charged on the order, the system uses the forced authorization number for deposits.
• if the forced authorization is not the only authorization associated with the order, the system looks at the other authorization associated with the order and uses the other authorization number since this number was received from the service bureau.
Pay type dollar limits: You can set up Entity pay type dollar limits for a vendor response for each entity in your company. You can use the pay type dollar limit to force authorizations that have been declined and the dollar amount that requires authorization is greater than $1.00 and is less than the pay type dollar limit you have set up for the credit card pay type on the order. Note: If you are performing online credit card authorization, the system does not validate vendor response codes at the entity level.
Leave this field blank if you wish to always send credit cards that require authorization to the service bureau, regardless of the amount that requires authorization.
Include All Customer Inquiry Triggers for Marketing Download (I09)
Purpose: Use this screen to indicate if the system creates a Marketing Download Customer Inquiry record for a CI (customer inquiry) trigger record when there is a corresponding OH (order header) trigger in the Marketing Download Trigger table.
Yes/No field: Select this field to have the system create a record in the Marketing Download Customer Inquiry table for a CI (customer inquiry) trigger record when there is a corresponding OH (order header) trigger in the Marketing Download Trigger table.
An OH (order header) trigger record corresponds to a CI (customer inquiry) trigger record if both records are for the same company and sold to customer. Also, the entity number needs to match if the Track Customer History at Entity Level (F89) system control value is selected.
Marketing Download Trigger table |
||
|---|---|---|
Field |
OH trigger record |
CI trigger record |
Company |
555 |
555 |
Trigger type |
OH |
CI |
Customer sold to |
345 |
345 |
Entity |
222 |
222 |
The Populate Marketing Download Trigger File (G33) system control value determines what type of activity in Order Management System causes the system to populate the Marketing Download Trigger table.
The system creates a CI trigger record in the Marketing Download Trigger table when you:
• create a catalog request.
• create a new customer in order entry, even if you don’t accept the order.
• create a new customer entity record, if the Track Customer History at Entity Level (F89) system control value is selected.
The system creates an OH trigger record in the Marketing Download Trigger table when you:
• create a new order in order entry or accept an order in batch order entry. A separate record is created for each one-time to.
• add a new ship-to address (using Accept/Add Rcp) in order maintenance.
When you run the periodic function to extract the records in the Marketing Download Trigger table to the appropriate Marketing Download table, the function:
• creates a record in the Marketing Download Customer Inquiry file for each CI trigger.
• creates a record in the Marketing Download Order Header table and Marketing Download Order Detail table for each OH trigger.
The following table explains when the system creates a record in the Marketing Download Customer Inquiry table for each CI trigger in the Marketing Download Trigger table based on the setting of the Include All Customer Inquiry Triggers for Marketing Download (I09) system control value.
SCV value: |
trigger type: |
includes: |
Marketing Download table populated: |
|---|---|---|---|
selected |
OH |
Company: 555 Customer sold to #: 345 Entity: blank |
Marketing Download Order Header Marketing Download Order Detail |
CI |
Company: 555 Customer sold to #: 345 Entity: blank |
Marketing Download Customer Inquiry (even though a corresponding OH trigger record exists) |
|
unselected |
OH |
Company: 555 Customer sold to #: 345 Entity: blank |
Marketing Download Order Header Marketing Download Order Detail |
CI |
Company: 555 Customer sold to #: 345 Entity: blank |
none Marketing Download Customer Inquiry table is not populated since a corresponding OH trigger exists |
|
selected |
OH |
Company: 555 Customer sold to #: 345 Entity: blank |
Marketing Download Order Header Marketing Download Order Detail |
CI |
Company: 555 Customer sold to #: 567 Entity: blank |
Marketing Download Customer Inquiry (corresponding OH trigger does not exist) |
|
unselected |
OH |
Company: 555 Customer sold to #: 345 Entity: blank |
Marketing Download Order Header Marketing Download Order Detail |
CI |
Company: 555 Customer sold to #: 567 Entity: blank |
Marketing Download Customer Inquiry (corresponding OH trigger does not exist). |
For more information: See Working with the Marketing Download Extract for more information on extracting order, customer, source code, and vendor information from Order Management System for an external system.
Leave this field unselected to create a record in the Marketing Download Customer Inquiry table for a CI trigger record only when there is no corresponding OH trigger in the Marketing Download Trigger table for the same company, sold to customer, and entity number (if the Track Customer History at Entity Level (F89) system control value is selected).
Send Data for Level II Discounting (I12)
Purpose: Use this screen to define whether the system sends level II discounting information to the service bureau during credit card deposits.
Yes/No field: Select this field to have the system send level II discounting information to the service bureau when you process credit card deposits.
When you process deposits, the system sends level II discounting information to the service bureau if:
• the action code is:
• B = conditional deposit
• D = deposit
• R = refund
• the method of payment is:
• MC = Mastercard
• VI = Visa
• AX = American Express
• the credit card number falls within a range of credit card numbers in the Level II Bin Range table. The Level II Bin Range table identifies those credit cards that are eligible for level II discounting. It is your responsibility to populate this table with data from the service bureau.
Populating the Level II Bin Range table: The Level II Bin Range table identifies those credit cards that are eligible for level II discounting. When populating this table, make sure the number of digits defined for a level II bin range matches the number of digits in the credit cards you wish to discount. The system does not evaluate the leading digits of the credit card number against the level II bin range level. If the number of digits defined for the level II bin range does not match the number of digits defined for the credit card numbers, the credit cards are not eligible for level II discounting.
The table below indicates the number of positions for the level II bin range, based on the type of credit card you wish discount.
For Credit Card: |
Level II Bin Range must be: |
Example |
|---|---|---|
VISA |
16 positions |
Create a level II bin range where the beginning number and ending number in the range is 16 positions. For example, if the level II bin range is 4788250000000000 - 4788260000000000, any VISA credit card that falls within this range, such as 4788250000121444, receives the level II discount. |
MasterCard |
16 positions |
Create a level II bin range where the beginning number and ending number in the range is 16 positions. For example, if the level II bin range is 553150000000000 - 553160000000000, any MasterCard credit card that falls within this range, such as 553151233011234, receives the level II discount. |
American Express |
15 positions |
Create a level II bin range where the beginning number and ending number in the range is 16 positions. For example, if the level II bin range is 34333000000000 - 34334000000000, any American Express credit card that falls within this range, such as 34333210934123, receives the level II discount. |
Credit card encryption: If you use credit card encryption, the credit card number in the CC Deposit Level II Bin table will not be encrypted because the information in this table is from an external system. See the Data Security and Encryption Guide on My Oracle Support (1988467.1) for an overview.
Sending level II and III discounting information to the service bureau: When you process deposits, the system sends level II and level III discounting information to the service bureau if the credit card number falls within a range of credit card numbers in the Level II Bin Range table. The Level II Bin Range table identifies those credit cards that are eligible for level II and level III discounting. It is your responsibility to populate this table with data from the service bureau.
Level II and level III discounting in the Deposit Request message: For deposit processing using the Deposit Request XML Message (CWDepositRequest), the system sends level II and level III discounting information to the service bureau in the discountQualified tag.
• YES = The deposit is eligible for level II and level III discounting.
• NO = The deposit is not eligible for level II and level III discounting.
Level II and level III discounting via point-to-point communication: Sending level II and level III discounting to the service bureau via point-to-point communication is unique to each integration; see Processing Authorizations and Deposits Using Point-to-Point Communication.
Leave this field unselected if you do not want the system to send level II discounting information to the service bureau when you process credit card deposits.
For more information: See Processing Auto Deposits (SDEP).
Purpose: Use this screen to indicate whether to validate a customer’s prefix against the Prefix table.
Important: This system control value is not currently implemented.
Stored Value Card Processing Values (I71)
Purpose: Use this screen to specify values related to stored value card processing. See Stored Value Card Overview and Setup.
Use Streamlined Stored Value Card Billing (I23)
Indicates if the system sends pick control records containing physical stored value card items to billing once you assign numbers to the physical cards.
Yes/No field: Select this field if you wish the system to send pick control records containing physical stored value cards to billing once you assign numbers to the physical cards; this assumes you never send pick control records containing physical stored value cards to a manifesting station to wand and bill the stored value card items.
You assign numbers to physical stored value cards by pick control number using the Working with Physical Stored Value Card Assignment (WPSA) menu option. When you select Accept at the Stored Value Card Assignment Screen to assign the numbers to the stored value cards, the system sends the associated pick control records to billing.
Deselect this system control value if you typically send pick control records containing physical stored value items to your manifest station to wand and bill the stored value card items.
Note: If you change the setting of this system control value, you must stop and restart the Billing Async.
For more information: See Billing a Stored Value Card for more information on the stored value card processing the system performs when a stored value card item is billed.
Use Activation / Reversal Batch Processing (I50)
Defines whether activation and authorization reversal transactions are processed immediately or in batch.
Yes/No field: Select this field if you wish to process activation and authorization reversal transactions in batch mode.
When you activate a stored value card or process a stored value card or credit card authorization reversal, the system generates a download trigger record.
• If this system control value is selected, the system does not process the activation or authorization reversal trigger records until you submit the batch process using:
• the Transmitting Activation and Reversal Transactions (SSVC) menu option.
• the SVCACT periodic function (program name PFR0076) for activations.
• the SVCREV periodic function (program name PFR0077) for authorization reversals.
Note: When using batch procssing, the SVC Activation and SVC Reversal integration layer jobs do not need to be active.
• If this system control value is unselected, the SVC Activation and SVC Reversal integration layer jobs monitor for download trigger records to process immediately. Note: In order to monitor for new download trigger records to process, the SVC Activation and SVC Reversal integration layer jobs must be active.
Cybersource integration: Deselect this system control value if you are processing activation and authorization reversal transactions using the CyberSource Point-to-Point Integration.
For more information: See:
• Stored Value Card Purchase and Activation for more information on the processing that occurs when you activate a stored value card.
• Stored Value Card Authorization Reversal for more information on the processing that occurs when you perform a stored value card authorization reversal.
• Credit Card Authorization Reversal for more information on the processing that occurs when you perform credit card authorization reversal.
Stored Value Card Modulus Checking Method (I24)
Indicates if the system performs a calculation against the digits of the stored value card number to ensure that the card is valid.
Code field: Enter the type of modulus check you wish to perform against the stored value card number. If you define a modulus check, you can validate the stored value card number before sending the card to the service bureau for activation.
The types of modulus checks you can perform are:
• M10 = The system performs a modulus 10 check against the stored value card number.
• M11 = The system performs a modulus 11 check against the stored value card number.
• MU = The system performs a user-defined check against the stored value card number. Note: If you enter MU in this field, the system verifies that a program is defined in the User Defined Modulus Check Program (E94) system control value. If a program is not defined, an error message indicates: User defined modulus program not defined-SCV E94.
The system performs the modulus check against the stored value card number at the Stored Value Card Assignment Screen screen.
Note: The system cannot perform a modulus check against the number if the number contains spaces; for example: 411111 1111 111111. To perform a modulus check, you must enter the number without any spaces between the numbers; for example: 4111111111111111.
Leave this field blank if you do not wish to perform a modulus check against the stored value card number. The service bureau performs validation against the stored value card number during the activation process. If the stored value card number is not valid, the activation request is declined.
Stored Value Card Activation Pricing Method (I25)
Indicates the price to use as the stored value card issue amount.
Code field: Enter the price to use as the stored value card amount.
The system applies the amount to the stored value card when the stored value card item is processed through billing; see Billing a Stored Value Card.
• OFFER = the offer price is the amount applied to the stored value card.
Enter OFFER if you want the ability to discount the amount charged to purchase the stored value card, while still applying the full amount to the card. For example, you can purchase a $25.00 stored value card for $22.00 and still apply $25.00 to the card.
If you enter OFFER, make sure you define an offer price for each stored value card item. If the stored value card item you purchase does not have an offer price defined, the system uses the order line price as the amount to apply to the stored value card. If both the offer price and order line price are $0.00, the stored value card issue amount is $0.00.
• ORDER = the order price is the amount applied to the stored value card.
Enter ORDER if you do not wish to discount the amount charged to purchase the stored value card. The amount applied to the stored value card is always the order line price. For example, if the order line price is $25.00, the amount applied to the stored value card is $25.00.
However, if the order line price is $0.00, the system uses the offer price as the amount to apply to the stored value card. If both the order line price and offer price are $0.00, the stored value card issue amount is $0.00.
Leave this field blank if you wish the system to use the ORDER price as the amount to apply to the stored value card.
For more information: See Stored Value Card Purchase and Activation.
Stored Value Card Activation Authorization Service (I26)
Defines the service bureau used to process stored value card activation requests.
Code field: Enter the code for the service bureau used to process stored value card activation requests.
Enter RLT in this field if you use the Customer Engagement Stored Value Card Integration.
Leave this field blank if you do not offer stored value cards for purchase.
For more information: See Activating a Stored Value Card.
Stored Value Card Email Notification Program (I30)
Defines the program used to generate Stored Value Card Notification emails.
System name field: Enter the name of the program the system uses the generate Stored Value Card Notification emails. The base program name is SVCNOTF. This program includes the ID number assigned to a virtual stored value card in the Stored Value Card Notification Email.
The system generates a Stored Value Card Notification email when an order containing a stored value card item is billed and:
• the stored value card is a virtual card (SVC type V). The email is sent to the recipient card holder on the order, indicating the number the customer can use to purchase merchandise using the stored value card as payment.
• the stored value card is a physical card with email notification (SVC type E). The email is sent to the recipient card holder on the order, indicating the physical card is in the process of being shipped to the customer.
Leave this field blank if you do not wish to generate Stored Value Card Notification emails. If you wish to offer stored value card items for purchase, you must create the card as a physical card (SVC type P or E). An email is required for virtual stored value cards.
For more information: See Stored Value Card Notification Email for more information on defining a template for the email, and see Stored Value Card Notification Sample and Contents for a sample and details. You can also set up an email template at the entity level as an override; see Email Setup within Order Management System for more information.
Remove Stored Value Card Number After Activation (J22)
Indicates whether the system changes the stored value card number to read REMOVED BY SYSTEM in the Order Management System database once the stored value card number has been activated and the notification email generated.
Select this field to have the system change the stored value card number to REMOVED BY SYSTEM in the Stored Value Card table once the stored value card number has been activated and the Stored Value Card Notification Email generated.
If this system control value is selected, the system does not decrypt or format the card number in the email, since the customer needs to read the stored value card number for future purchases. When you advance to the Display Stored Value Cards Screen in Order Inquiry, the screen displays the words REMOVED BY SYSTEM as the card number.
Calculating hidden tax for single-use vouchers: If this field is selected, the ipm_spv_hidden_tax_amt field, indicating the hidden tax amount on an invoice, is not included in the Invoice Download XML Message (CWInvoiceOut) when a single-use voucher is billed or refunded.
Use a periodic function to replace the stored value card number: You can run the SECRISK periodic function to replace the first 12 digits of the Stored Value Card number with asterisks (*) if the cards are older than the number of days specified in the Credit Card Retention Days (K65) system control value.
Leave this field unselected to have the system retain the stored value card number in the Stored Value Card table once the card number has been activated and the email generated. You can view the stored value card number on the Display Stored Value Cards Screen in Order Inquiry.
Note:
• If you are using credit card encryption and data security and you do not remove the stored value card number after activation, the stored value card number is encrypted in the Order Management System database. If you use an external encryption service, the system replaces the credit card number in the database with a credit card alias number provided by the external encryption service.
• When you change this field, you need to stop and restart the SVC_OUT process in Working with Integration Layer Processes (IJCT) to have your change take effect.
ORCE Organization Descriptor (L50)
Use this field to specify the code that identifies the Oracle Retail Customer Engagement organization that maps to your Order Management System company.
Code field: Enter the three-position code that matches the Organization descriptor specified in Oracle Retail Customer Engagement.
The system uses the value in this field during web service calls to Oracle Retail Customer Engagement.
This entry should typically be entered in lower case.
Important: For integration with Customer Engagement 20.0+, this field now controls the web service messages structure rather than the organization descriptor, and must be set to ws.
Note: This system control value is also defined under the ORCE Integration Values (L52) umbrella system control value.
Default SVC Refund Item Number (I73)
Defines the stored value card item the system adds to an order when you process a stored value card refund.
This item represents the new stored value card that is sent to the customer for the amount of the processed refund. The system adds this item to the order at no charge and defaults the price override reason code defined in the Price Override Reason for SVC Refund Item (I74) system control value to the order line.
You can prompt on this field to display a list of available items; however, the SVC type field for the item you select must be set to P (physical stored value card) or E (physical stored value card with early notification). Additionally, the item must be a non-SKU item.
Note: The system does not generate a stored value card refund unless the stored value card refund item has available inventory. If the item does not have available inventory, the stored value card refund remains unprocessed.
The system automatically generates a pick slip for the stored value card item if you define a pick slip generation template in the Default Pick Generation Template for SVC Refund Processing (I75) system control value.
Leave this field blank if you do generate stored value card refunds. The system displays an error message at the Process Refunds Screen if you select to generate stored value card credits and this system control value is blank: Sys Con Values I73 & I74 must be populated first.
Price Override Reason for SVC Refund Item (I74)
Defines the price override reason code the system defaults to the stored value card no charge order line that is added to an order when you process a stored value card refund.
You can prompt on this field to display a list of available price override reason codes.
The Default SVC Refund Item Number (I73) system control value defines the stored value card item the system adds to an order when you process a stored value card refund. This item represents the new stored value card that is sent to the customer for the amount of the processed refund. The system adds this item to the order at no charge and defaults the Price Override Reason for SVC Refund Item to the order line.
Leave this field blank if you do not generate stored value card refunds. The system displays an error message at the Process Refunds Screen if you select to generate stored value card credits and this system control value is blank: Sys Con Values I74 & I74 must be populated first.
Default Pick Generation Template for SVC Refund Processing (I75)
Defines the pick slip generation template the system uses to automatically generate a pick slip for the stored value card item that is added to an order when you process a stored value card refund.
If you access this system control value using the Stored Value Card Processing Values (I71) umbrella system control value, you can prompt on this field in order to display a list of the available pick slip generation templates for streamlined pick slip generation (WSPS).
To create a pick slip generation template that prints a pick slip for the stored value card refund item, select the Selected items field on the Streamlined Pick Slip Generation Screen and enter the item number from the Default SVC Refund Item Number (I73) system control value on the Select Items for Pick Slip Screen.
Leave this field blank if you do not wish to automatically process a pick slip for a stored value card item that is added to an order when you process a stored value card refund. You need to advance to Streamlined Pick Slip Generation (WSPS) to generate a pick slip for the stored value card item so that the card can be picked, activated, billed, and shipped to the customer.
Perform Balance Inquiry during Batch Authorizations (J19)
Indicates whether the system performs a balance inquiry before performing a batch authorization against an active stored value card pay type during pick slip generation and drop ship processing.
Select this field if you wish to perform a balance inquiry against a stored value card pay type before performing a batch authorization against the card.
The system sends a balance inquiry request in batch format to the service bureau to determine the balance on the card.
• If the balance on the card is equal to or greater than the amount to authorize for the pay type on the order, the system continues with pick slip generation and sends a batch authorization request to the service bureau to authorize the card for the specified amount.
• If the balance on the card is less than the amount to authorize for the pay type on the order, and:
• the stored value card is the catch-all pay type on the order, the system places the order on hold, using the Hold Reason for Stored Value Cards with Insufficient Funds (J18) and does not generate a pick slip for the order. Note: If a hold reason code is not defined, a pick slip is not generated; however, the order remains in an open status.
• there is a different catch-all pay type on the order, such as a credit card, the system authorizes the stored value card for the remaining balance and authorizes the catch-all pay type for the remaining amount to authorize.
SVC Balance Inquiry process: The setting of this system control value determines whether the SVC Balance Inquiry integration layer job is an interactive job.
• If you leave this system control value unselected, the SVC Balance Inquiry integration layer job is an interactive job. You cannot change, start and stop this process.
• If you select this system control value, the SVC Balance Inquiry integration layer job in not an interactive job. You can change, start, and stop this process.
Note: When you select this system control value, it should be set consistently in all companies. Also, set the number of active sessions for the process to 1 or higher through Working with Integration Layer Processes (IJCT).
Leave this field unselected if you do not wish to perform a balance inquiry against a stored value card type before performing a batch authorization against the card during pick slip generation and drop ship processing.
Oracle Retail Customer Engagement stored value card integration: If you are using the Customer Engagement Stored Value Card Integration, select this system control value. Oracle Retail Customer Engagement will approve an authorization for an amount that is less than the required authorization amount for an order. If you do not select this system control value, you must require another credit card payment on an order.
For more information: See Batch Authorization Balance Inquiry.
Hold Reason for Stored Value Cards with Insufficient Funds (J18)
Enter the hold reason code the system uses to place an order on hold when you Perform Balance Inquiry during Batch Authorizations (J19) and the balance remaining on a catch-all stored value card pay type is less than the amount to authorize.
A list of valid hold reason codes displays to the right of this field.
Note: The system only places the order on hold if a balance inquiry response is received from the service bureau. If the system does not receive a response from the service bureau, for example, due to communication errors, the system continues with batch authorization.
Leave this field blank if you do not want the system uses to place an order on hold when you Perform Balance Inquiry during Batch Authorizations (J19) and the balance remaining on a catch-all stored value card pay type is less than the amount to authorize. Even though the order is not placed on hold, the system still does not generate a pick slip for the order since the catch-all stored value card pay type cannot cover the remaining amount to authorize.
For more information: See Batch Authorization Balance Inquiry.
Perform Authorization Reversal during Deposit Processing (J20)
Indicates whether the system performs a stored value card authorization reversal during deposit processing if the authorization amount is greater than the deposit amount.
Select this field if you wish to perform a stored value card authorization reversal during deposits processing if the original authorization amount is greater than the deposit amount.
The system places the difference between the authorization amount and the deposit amount in the reversalAmount and reversalAmountText tags in the Deposit Request XML Message (CWDepositRequest).
Example: If the original authorization amount is $50.00 and the deposit amount is $30.00, the amount in the reversalAmount field is $20.00.
Deselect this field if you do not wish to perform a stored value card authorization reversal during deposits processing if the authorization amount is greater than the deposit amount.
The reversalAmount and reversalAmountText tags in the Deposit Request XML Message (CWDepositRequest) remain blank.
Note: This option is not available for the Customer Engagement Stored Value Card Integration.
For more information: See Authorization Reversal Process During Deposits for more information.
Retain Unused Stored Value Card Authorization After Deposit (J21)
Indicates whether the system automatically voids a partially deposited stored value card authorization when you are using the Customer Engagement Stored Value Card Integration.
Select this field if you want the system to retain a stored value card authorization after it has been partially deposited. For example, if the authorization amount is 50.00 and the deposit amount is 40.00, the system retains the remaining 10.00 on the authorization.
Leave this field unselected if you want the system to void the remaining balance against the authorization. For example, if the authorization amount is 50.00 and the deposit amount is 40.00, the system voids the remaining 10.00 on the authorization. If there are multiple authorizations for the order, the system does not void the other authorizations.
When the Void auth at deposit setting is used instead: The Void auth at deposit setting defined in Defining Authorization Services (WASV) is used instead of this system control value for credit cards. Also, the External Payment Service always uses the Void auth at deposit setting for both stored value cards and credit cards.
For more information: See Void Unused Authorization After Initial Deposit for processing details.
Use Loyalty Membership Program (I81)
Purpose: Use this screen to indicate whether the background jobs should evaluate whether customers qualify for loyalty membership programs based on their order history.
Yes/No field: Select this field to have the background jobs evaluate customers for membership in loyalty programs. The ORDR_ASYNC and BILL_ASYNC background jobs evaluate the customer sold-to for each processed order to determine whether the customer qualifies for any active loyalty membership programs. Qualification for loyalty membership programs is based on the customer’s total merchandise sales or order dollars since the Effective start date of the loyalty program. You can also set a loyalty program to subtract the dollar value of cancellations, soldouts, returns, or exchanges from the total, or to disregard this activity.
About loyalty programs: You can use loyalty programs to offer an order discount and other incentives to your best customers. You have the option of setting up a series of graduated loyalty programs, in which the benefits to the customer increase as their order or sales history increases.
Activate/deactivate: If this system control value is selected, the background jobs continue to evaluate each customer associated with an order whenever there is order activity, such as entry, maintenance, or billing. The result can be to:
• activate a customer loyalty membership if the customer’s sales or order total now make the customer qualify for the program
• deactivate a customer loyalty membership if the activity makes the customer ineligible for the loyalty program, or if the customer is now eligible for a different program
• make no change to a customer’s loyalty membership if the activity did not affect the customer’s eligibility for the current loyalty membership assignment
Leave this field unselected if you do not want the background jobs to evaluate customers for loyalty membership eligibility. You might use this setting if you do not use loyalty memberships at all, or if you do not want the background jobs to change existing customers’ existing loyalty membership assignments.
The system continues to apply the discount for any active loyalty memberships, regardless of the setting of this system control value.
For more information: See Loyalty Memberships for an overview.
Loyalty Membership Activation Notification Email Program (I82)
Purpose: Use this screen to specify the program that generates notification emails when the background jobs activate a new loyalty membership for a customer.
System name field: Enter the name of the program to generate notification emails to customers when the background jobs activate new loyalty memberships. The base program is OER1359.
Email template: Use the Working with E-Mail Notification Templates (WEMT) menu option to set up the text to include in the email notification at the company level, or the Change Email Override Screen to set up an override template at the entity level.
“From” email address: You can use either the From Email Address for your company to specify the “from” email address to use for emails, or you can specify an override at the entity or entity/order type level through the Work with Entity Email Overrides Screen or Entity Email Override by Order Type Screen. However, using a different “from” email address based on entity or entity/order type might be confusing to your customers if the same customers commonly place orders in multiple entities within your company. In this situation, the “from” email address on an activation email might not match the “from” email address the customer usually sees.
Note: When a customer’s eligibility changes from one existing loyalty program to another (typically, because an increase in total order or sales dollars has “promoted” the customer to a higher loyalty program), the customer receives both an activation email for the new loyalty membership and a deactivation email for the old loyalty membership.
Leave this field blank if you do not use loyalty memberships or do not need to generate activation notification emails.
For more information: See:
• Loyalty Memberships for an overview
• When Does the System Generate an Email Notification?
• the Loyalty Membership Deactivation Notification Program (I83)
Loyalty Membership Deactivation Notification Program (I83)
Purpose: Use this screen to specify the program that generates notification emails when the background jobs deactivate an existing loyalty membership for a customer.
System name field: Enter the name of the program to generate notification emails to customers when the background jobs deactivate existing loyalty memberships. The base program is OER1361.
Email template: Use the Working with E-Mail Notification Templates (WEMT) menu option to set up the text to include in the email notification, or the Change Email Override Screen to set up an override template at the entity level.
“From” email address: You can use either the From Email Address for your company to specify the “from” email address to use for emails, or you can specify an override at the entity or entity/order type level through the Work with Entity Email Overrides Screen or Entity Email Override by Order Type Screen. However, using a different “from” email address based on entity or entity/order type might be confusing to your customers if the same customers commonly place orders in multiple entities within your company. In this situation, the “from” email address on an activation email might not match the “from” email address the customer usually sees.
Note: When a customer’s eligibility changes from one existing loyalty program to another (typically, because an increase in total order or sales dollars has “promoted” the customer to a higher loyalty program), the customer receives both an activation email for the new loyalty membership and a deactivation email for the old loyalty membership.
Leave this field blank if you do not use loyalty memberships or do not need to generate deactivation notification emails.
For more information: See:
• Loyalty Memberships for an overview
• When Does the System Generate an Email Notification?
• the Loyalty Membership Deactivation Notification Program (I83)
Display Alternate Customer Cross Reference Window (I84)
Purpose: Use this screen to indicate whether to attempt to match customers based on the single alternate customer number specified in the Customer Sold To table (the “primary”), or to give equal priority to any of the alternate customer numbers stored in the Alternate Customer # Cross Reference table.
Yes/No field: Select this field to indicate that the alternate customer number specified at the second Create/Change/Display Customer screen is the “primary” alternate customer number, and additional numbers stored in the Alternate Customer # Cross Reference table are old numbers saved for historical purposes only. If you enter a cross-reference number at a scan screen, the system displays the Alternate Customer Cross Reference window. This window indicates that your entry is out of date, and you should use the current “primary” alternate customer number to identify the customer.
Note: The alternate customer number field label displayed at this window and at other screens is defined by the Alternate Customer Number Label Description (H95).
If this system control value is selected, the system does not let you delete the customer’s “primary” alternate customer number; it is a required field.
About interfaces: When this system control value is selected and the system needs to select a customer based on alternate customer number as part of an interface, there is no opportunity to display a window or indicate that the alternate customer number is not “primary.” In this situation, the system:
• selects the customer who has alternate number specified as the “primary,” if there is only one; otherwise,
• if there are multiple customers with the same “primary,” it selects the most recently created customer (indicated by the highest customer number) with a matching “primary”; otherwise,
• if there are no customers who have the specified alternate number as the “primary,” but there are matches in the Alternate Customer # Cross Reference table, it selects the most recently created customer (indicated by the highest customer number) with a matching cross-reference number.
Matching based on alternate customer number takes place only if more specific information, such as customer number, is not provided in the message.
Alternate customer numbers created how? Alternate customer numbers can be created or assigned through:
• creating a customer by any means, if the Assign Alternate Customer # (I88) system control value is selected; in this situation, the system assigns the number
• entering a specific number at the second Create or Change Customer screen in customer maintenance
• creating or updating a customer through the Generic Order Interface (Order API); in this case, the system updates the alternate customer number with the number specified in the inbound order message, if any
• creating or updating a customer through the Generic Customer API
About the Alternate Customer # Cross Reference table: The system automatically creates a record in this table for each alternate customer number assigned to a customer, and does not automatically delete any of the cross references. See Working with Alternate Customer Number Cross-References for information on the screens you use to review or work with this table.
Leave this field unselected if you do not want to give a higher priority to the alternate customer number specified in the Customer Sold To table. When you search based on alternate customer number, the system checks all alternate customer numbers in the Alternate Customer # Cross Reference table, and displays all matching results. It does not indicate whether your entry was also found in the Customer Sold To table.
If this system control value is unselected, the system allows you to delete the customer’s “primary” alternate customer number.
About interfaces: When this system control value is unselected and the system needs to select a customer based on alternate customer number, it selects the most recently created customer (indicated by the highest customer number) with a matching cross-reference number.
Summary of Alternate Customer Number Search Options
The following table indicates how the system searches based on alternate customer number at screens and through interfaces.
Display Alternate Customer Cross Reference Window (I84) setting |
Screens |
Interfaces |
|---|---|---|
selected |
“Primary” match? |
|
If there is a single match to your entry in the “primary” alternate customer number in the Customer Sold To table, advance to a subsequent scan screen with this customer displayed as the first entry; if more than one customer has the same “primary” alternate customer number, display the most recently created customer (based on highest customer number) as the first entry at the subsequent scan screen. |
If there is a single “primary” match to the specified alternate customer number, select this customer; if there are multiple customers with the same “primary,” select the most recently created customer based on the highest customer number. |
|
|
No “primary” match? |
|
|
If there are no “primary” matches to your entry, but there is a cross-reference match, display the Alternate Customer Cross Reference window before advancing to the subsequent scan screen, displaying the customer’s current “primary” number rather than your entry; if more than one customer has the same cross-reference number, display the most recently created customer (based on highest customer number) in the pop-up window before advancing to the subsequent scan screen. |
If there is a single cross-reference match to the specified alternate customer number, select this customer; if there are multiple customers with the same cross-reference number, select the most recently created customer based on the highest customer number. |
unselected |
Advance to a subsequent scan screen displaying all customers with matching cross-reference numbers sorted in ascending numeric order by customer number. |
Select the most recently created customer (based on highest customer number) who has a matching cross-reference number. |
Scan screens: Searching by alternate customer number is available at the:
• Select Customer Sold To Screen in customer maintenance
• Order Maintenance Selection Screen
• Select Customer for Catalog Request Screen
• Select Customer Sold To For Order Screen
Interfaces: Matching based on alternate customer number is enabled through the:
• Generic Order Interface (Order API)
• Generic Customer History API
• email integration that is part of the Email Repository
• Generic Customer API: Regardless of the setting of the Display Alternate Customer Cross Reference Window (I84) system control value, this integration always looks for an alternate customer match against the Alternate Customer # Cross Reference table, even if there is a “primary” alternate customer number. See Determining the Customer to Update.
• Generic Customer Inquiry (Search) API: Regardless of the setting of the Display Alternate Customer Cross Reference Window (I84) system control value, this integration always uses the Alternate Customer # Cross Reference table for searching, even if there is a “primary” alternate customer number.
Assign Alternate Customer # (I88)
Purpose: Use this screen to indicate whether the system should automatically assign an Alt cust # whenever it creates a new customer.
Yes/No field: Select this field to have the system automatically assign an Alt cust # each time you create a new customer. The system uses the Alternate Customer # number assignment record, set up through Setting Up the Number Assignment Table (WNUM), to determine the number to use when creating each customer.
How are customers created? You can create a new customer in any of the following ways:
• customer maintenance: see Creating and Updating Sold-to Customers (WCST)
• order entry: see Entering Orders
• catalog requests: see Entering Catalog Requests (WCAT)
• catalog request interface: see Working with the Catalog Request Interface (WCRU)
• the generic order API: see Generic Order Interface (Order API)
• the e-commerce interface: see E-Commerce Catalog Requests
• the generic customer API: see Generic Customer API
If alternate number specified: If there is an alternate customer number specified in the inbound message through the Generic Customer API or the Generic Order Interface (Order API), the system uses this number and does not automatically assign an alternate customer number when creating a new customer.
Alternate customer number cross-reference: The system also creates a record in the Alternate Customer # Cross Reference table when it assigns the alternate customer number. See Working with Alternate Customer Number Cross-References for more information.
Leave this field unselected if you do not want the system to automatically assign an alternate customer number to each new customer.
Default Customer for Customer API (I90)
Purpose: Use this screen to indicate the customer record to use as a guideline indicating which fields can be overwritten with blanks when you process a customer update through the generic customer API.
Number field: Enter the customer number that identifies the default customer the Generic Customer API uses as a guideline when processing a Change request. The information specifies how to process customer updates as follows:
For each field that is not provided in the Inbound Customer Message (CWCustomerIn), the Customer API checks the corresponding field for the default customer.
• If that field contains any data in the default customer record, then the Customer API does not clear the information in that field for the customer being updated. Example: The default customer has data in the home phone number field. The Customer API receives a change request through the CWCustomerIn message. No home phone number is specified in the CWCustomerIn message, and the specified customer currently has a home phone number on record. The Customer API does not clear (blank out) the customer’s home phone number.
• Otherwise, if that field does not contain data in the default customer record, then the Customer API clears that field when updating the customer. Example: The default customer does not have data in the home phone number field. The Customer API receives a change request through the CWCustomerIn message. No home phone number is specified in the CWCustomerIn message, and the specified customer currently has a home phone number on record. The Customer API clears (blanks out) the customer’s home phone number.
Note: It does not matter what the data is in the corresponding field for the default customer record; the process simply checks to see whether there is any data.
Why use default customer? Using a default customer enables you to use the customer API to process customer updates that do not include the customer’s complete name and address. You can receive just the information that needs to change, and leave other fields with their current values.
Important: While defining a default customer is not required for the Generic Customer API, create it to avoid errors when processing a Change CWCustomerIn request.
Regular customer validation still applies: The Customer API still requires all of the same information required whenever you create or update a customer. For example, even if no city is provided through the CWCustomerIn message, the Customer API does not clear the City field for a customer.
Primary email updates: Regardless of whether the Email address field (primary email) is blank for the default customer, the Customer API does not clear an existing primary email address if no email address is passed in the CWCustomerIn message.
Suppress sales rep email: The system does not use the default customer for the cst_suppress_sales_rep_email attribute. If this attribute is not included or is invalid in a Change request, the system updates the Suppress Sales Rep Email Flag field for the sold to customer in the Customer Sold To table to Y.
Leave this field blank if you do not use the Generic Customer API to process customer updates.
For more information: See Changing a Customer using the Customer API for more information on processing an Inbound Customer Message (CWCustomerIn) Change request.
Online Auth Verification Only (I96)
Purpose: Defines whether the system processes online authorizations for $1.00 for the purpose of validating the card. During batch authorizations, the system authorizes the card for the shippable dollar amount and voids the online authorization for $1.00.
Yes/No field: Select this field if you want the system to process online authorizations for $1.00 for the purpose of validating the card.
• During batch authorizations, the system processes the card for the shippable dollar amount and voids the online authorization for $1.00.
• During deposits, the system processes the deposit for the full authorization amount.
Note: In order to perform online authorization, the On-line Authorizations (B89) system control value must be selected. See Performing Online Credit Card Authorizations for an overview and required setup.
What validation occurs during online authorization? In addition to authorizing the card for $1.00, the system may perform:
• address verification, to ensure that the billing address on the card is legitimate. See Address Verification Service (AVS) for an overview and required setup.
• card security identification, to verify that the card is present at the point of sale and to ensure that the card data from the transaction matches the data stored by the authorization service for that card. See Credit Card Security Service (CID, CVV2, CVC2) for an overview and required setup.
• card authentication, to help reduce fraud and charge back volume on card not present transactions by requiring an authentication code, indicating the cardholder is authorized to use the credit card. See Credit Card Authentication Service for an overview and required setup.
What about other card types? If the Online Auth Verification Only system control value is selected and an online authorization is processed for a card type other than a credit card, the system:
• Stored value card: Does not send stored value cards for online authorization. However, if this system control value is selected, you can still perform balance inquiry against a stored value card.
• Debit (Switch) card: Sends the online authorization request to the service bureau for $1.00. The system authorizes the card during batch authorizations for the shippable dollar amount.
Cards requiring authorizations less than $1.00: If the credit card amount to authorize is less than $1.00 and you have defined an authorization number in the Authorization Number for Authorizations Under $1.00 (I08) system control value, the system does not send the card to the service bureau for authorization and instead assigns the authorization number defined in the Authorization Number for Authorizations Under $1.00 system control value to the card. If an authorization number is not defined in this system control value, the system processes an online authorization for $1.00.
What if a $1.00 authorization already exists? If the card already has an active, online authorization for $1.00, the system does not send an online authorization for the card again for $1.00. However, if the existing $1.00 authorization has expired, the system re-sends an online authorization for $1.00 to the service bureau.
What if multiple cards exist on the order? The system sends an online authorization for $1.00 for each card on the order.
Authorize Full Amount During Order Entry (G99): If the Authorize Full Amount During Order Entry (G99) system control value is unselected, the system does not process online authorizations for $1.00 for orders that only contain:
• orders lines with a future arrival date
• order lines in a held status
• order lines on backorder, canceled, closed, or sold out
• reserved order lines that are coordinate grouped with an order line on backorder, held or with a future arrival date
Backorders: If the Preauthorize Backorders (D32) system control value is selected, in addition to processing an online authorization for $1.00 (if the Authorize Full Amount During Order Entry (G99) system control value is selected), the system authorizes a completely backordered order for $1.00 during pick slip generation if the credit card payment is not associated with a manual authorization.
Deposits: When you submit deposits, the system processes the deposit for the full authorization amount.
The system updates the Deposit amount on the Display Authorization History Screen and Authorization History Details Window against the authorization that occurred during batch authorization. You can view the full deposit amount on the following screens:
• Display Deposit History Screen
• Display Deposit History Detail Screen
• Display Invoice Pay Method Screen (Reviewing Deposit Information)
In addition, the system writes an order payment history message for the full deposit amount: Deposit confirmed $ 5.75.
Display Authorization History: The Display Authorization History screen displays the $1.00 authorization and any authorizations that occurred during batch authorization. The system voids the $1.00 authorization once the shippable dollar amount is authorized during batch authorization. During deposits, the system processes the deposit for the full authorization amount.
Leave this field unselected if you want the system to process online authorizations for the amount eligible for authorization, based on the setting of the Authorize Full Amount During Order Entry (G99) system control value.
|
Online Auth Verification Only = selected |
Online Auth Verification Only = unselected |
|---|---|---|
online authorization |
The system sends an online authorization request to the service bureau for $1.00. |
The system sends an online authorization request to the service bureau for the full authorization amount or shippable amount, depending on the setting of the Authorize Full Amount During Order Entry (G99) system control value. |
batch authorization |
The system sends a batch authorization request to the service bureau for the shippable dollar amount on the order. |
If the shippable dollar amount is already authorized, the system generates a pick slip and does not send an authorization request to the service bureau. Otherwise, a batch authorization is sent to the service bureau for the shippable dollar amount that requires authorization. |
batch deposit |
The system sends a deposit request to the service bureau for the full amount authorized on the order. |
|
Disregard Soldout Controls for Non-Allocatable Warehouses (J27)
Purpose: Use this screen to define whether the system disregards soldout control rules for inventory reserved against a non-allocatable warehouse.
Yes/No field: Select this field if you want the system to disregard soldout control rules for inventory reserved against a non-allocatable warehouse.
You can reserve inventory against a non-allocatable warehouse if the Reserve from Non-Allocatable Warehouse (J25) system control value is selected.
The system evaluates the Disregard Soldout Controls for Non-Allocatable Warehouses (J27) system control value during order entry/maintenance and auto-soldout processing.
Adding items to an order: When you add an item to an order associated with a non-allocatable warehouse, the system:
• Reserves the item against the non-allocatable warehouse, regardless of the soldout control code defined for an item.
• If the item cannot be reserved, backorders the item in the non-allocatable warehouse, or brokers the item to the Order Broker if eligible. See Brokered Backorders for an overview.
Note: You can manually sell out an item associated with a non-allocatable warehouse by selecting Sell Out for the order line during order entry or maintenance.
Changing the warehouse for an order line: If you or the system changes the warehouse for an order line and the Disregard Soldout Controls for Non-Allocatable Warehouses (J27) system control value is selected, the system reevaluates soldout control rules for the item on the order line:
• If the warehouse assigned to the order line is a non-allocatable warehouse, the system reserves the item against the non-allocatable warehouse, regardless of the soldout control code defined for the item. If the item cannot be reserved, the system backorders the item in the non-allocatable warehouse, or submits the line to the Order Broker for fulfillment if eligible (see Brokered Backorders for background).
• If the warehouse assigned to the order line is an allocatable warehouse, or the Warehouse field for the order line is blank, the system follows regular soldout control rules to determine whether to sell out the item. See Working with Soldout Controls (WSLD) for more information on how the system determines when to sell out an item.
Web orders: When you receive an order associated with a non-allocatable warehouse through the Generic Order Interface (Order API), the system reserves the item against the non-allocatable warehouse, regardless of the soldout control code defined for an item. If the item cannot be reserved, the system backorders the item in the non-allocatable warehouse.
Soldout control processing: When you perform auto-soldout control processing and the Disregard Soldout Controls for Non-Allocatable Warehouses (J27) system control value is selected, the system bypasses any order that is associated with a non-allocatable warehouse. The system considers an order associated with a non-allocatable warehouse if:
• A non-allocatable warehouse is defined for one or more lines on the order, or
• A non-allocatable warehouse is defined as the backorder warehouse for one or more lines on the order, or
• A non-allocatable warehouse is defined on the order header.
See Processing Auto Soldout Cancellations (MASO).
Leave this field unselected if you want the system to apply soldout control rules to inventory reserved against a non-allocatable warehouse.
Note: The system applies soldout control rules to inventory reserved against an allocatable warehouse, regardless of the setting of this system control value.
Prevent Storing the Customer’s Last CC# and Exp Date (J86)
Note: With update 21.0, the Prevent Storing the Customer’s Last CC# and Exp Date system control value is no longer implemented.
Credit Card Decline Email Program (K53)
Purpose: Use this screen to define the email program to notify a customer when an order is put on hold because of a credit card decline during pick slip generation.
System name field: Enter the name of the program to generate the credit card decline email as a result of batch authorizations during pick slip generation. The default credit card decline email program is CDECLNOTF. The email is generated with a subject line of Credit Card Issue -- Order # 1234 where 1234 is the order number.
Note: The system does not generate the email if the credit card is declined as a result of online authorization. Only the batch authorization function in pick slip generation generates the email notification when the order is put on hold due to a credit card decline.
See When Does the System Generate an Email Notification? for an overview of when the system sends an email notification, and for information on entering the text to appear in the email. You can also set up an email template at the entity level as an override; see Email Setup within Order Management System for more information.
Outbound email API: You can specify to generate a generic outbound XML message, rather than an actual email, for credit card decline notifications. This XML message includes additional information that is not included in the standard email notice. You might choose to generate the XML message so that you can use the information to produce a reformatted HTML email for marketing purposes. See Outbound Email API for an overview.
For more information: See:
• Working with E-Mail Notification Templates (WEMT) for an overview on email notifications
• Outbound Email API for an overview on the outbound email API
• Email Generation Setup for system setup information and troubleshooting
• Performing Pick Slip Generation for information on generating pick slips
• Defining Vendor Response Codes for information on setting up response codes and hold reasons
Contact Us Email Program (K54)
Purpose: Use this screen to define the email program to generate the “contact us” notification to a customer.
System name field: Enter the name of the program to generate email the “contact us” email. The default “contact us” email program is CTUSNOTF.
How to generate: You can generate the email by selecting the Send Contact Us Email option at the Display More Options Screen in order entry, inquiry, or maintenance. This option is available only if:
• there is an email address for the customer, and
• the customer’s opt-in/opt-out setting is O1 (email is preferred communication) or O2 (send order-related email only), and
• this system control value specifies an email program.
See When Does the System Generate an Email Notification? for an overview of when the system sends an email notification, and for information on entering the text to appear in the email. You can also set up an email template at the entity level as an override; see Email Setup within Order Management System for more information.
Outbound email API: You can specify to generate a generic outbound XML message, rather than an actual email, for “contact us” emails. This XML message includes additional information that is not included in the standard email notice. You might choose to generate the XML message so that you can use the information to produce a reformatted HTML email for marketing purposes. See Outbound Email API for an overview.
For more information: See:
• Working with E-Mail Notification Templates (WEMT) for an overview on email notifications
• Outbound Email API for an overview on the outbound email API
• Email Generation Setup for system setup information and troubleshooting
• Displaying More Options in OIOM for background on the Display More Options Screen
Clear Processed Records from Customer Email Updates Table (K70)
Use this screen to define whether the system clears all records in the Customer Email Updates table after the Customer Email Updates process completes.
Yes/No field: Select this field if you want the system to clear all records in the Customer Email Updates table after the Customer Email Updates process completes.
Deselect this field if you want the system to retain all records in the Customer Email Updates table after the Customer Email Updates process completes.
For more information: See Receiving Customer Email Status Updates From an External System for an overview and the required setup.
Membership Cancellation Email Program (K77)
Purpose: Use this screen to specify the program to generate the confirmation email for customer membership cancellation.
System name: Enter the program name to use for generating confirmation emails when you cancel a customer membership through the Working with Customer Memberships (WWCM) option. The standard base program is MEMCANNOTF, which generates a notification email in HTML format. Unless you are using a unique program or the outbound email API, described below, you should set this system control value to MEMCANNOTF in order to generate the email.
Note: The system does not generate membership cancellation emails when you cancel the customer membership by canceling the membership item in order maintenance.
Outbound email API: Order Management System generates a generic outbound XML message, rather than an actual email, if the XML only flag for the membership cancellation confirmation template is selected and this system control value is not blank. The Outbound Email XML Message (CWEmailOut) includes additional information that is not included in the standard email notice. You might choose to generate the XML message so that you can use the additional information to produce a reformatted HTML email and include promotional information. See Outbound Email API for an overview and message details.
Company-level or entity-level email template? The system generates an email using the text from the membership cancellation confirmation email template, set up through the Working with E-Mail Notification Templates (WEMT) menu option. You can also set up an email template at the entity level as an override; see Email Setup within Order Management System for more information.
Note: Cancellation emails generated when you cancel loyalty customer memberships always use the template set up through Working with E-Mail Notification Templates (WEMT), since loyalty memberships are not associated with a specific entity.
For more information: See Membership Cancellations for a discussion of when the system generates the email and how it determines the email address to use, and see Membership Cancellation Notification Sample and Contents for a sample notice and the information included.
Leave this field blank if you do not want to generate confirmations when you cancel customer memberships.
Order Cancellation Email Program (K78)
Purpose: Use this screen to specify the program that generates the confirmation email when an order is canceled.
System name field: Enter the name of the program to generate confirmation emails to customers when the background jobs process order cancellations. The base program is ORDCANNOTF.
For more information: See Order Cancellation Confirmation Email Sample and Contents.
Outbound email API: Order Management System generates a generic outbound XML message, rather than an actual email, for an order cancellation confirmation if the XML only flag for the order cancellation template is selected and this system control value is not blank. The Outbound Email XML Message (CWEmailOut) includes additional information that is not included in the standard email notice. You might choose to generate the XML message so that you can use the additional information to produce a reformatted HTML email and include promotional information.
For more information: See Outbound Email API for an overview and message details.
Order vs. order line cancellation: The system generates this email only if there are no open lines remaining on the order and there have not been any previous shipments. See the Order Line Cancellation Email Program (K79) for information on generating a confirmation for cancellation of individual order lines.
Suppressing the cancellation confirmation: If the cancellation reason code used to cancel the order (or the remaining lines on the order) matches the Cancel Reason Code to Suppress Email (L08) system control value, the system does not generate the confirmation email. See that system control value for more information.
Company-level or entity-level email template? The system generates an email using the text from the order cancellation confirmation email template, set up through the Working with E-Mail Notification Templates (WEMT) menu option. You can also set up an email template at the entity level as an override; see Email Setup within Order Management System for more information.
Determining when to email an order cancellation confirmation: See When Does the System Generate an Email Notification? for an overview.
The system generates an order cancellation confirmation email or Outbound Email XML Message (CWEmailOut) only if the customer’s Opt in/Opt out field is set to O1 or O2, and the customer has an Email address.
Leave this field blank if you do not want to email an order cancellation confirmation or generate the Outbound Email XML Message (CWEmailOut).
Order Line Cancellation Email Program (K79)
Purpose: Use this screen to specify the program that generates a confirmation email when one or more items on an order is canceled, but at least one line on the order remains open or has been shipped.
System name field: Enter the name of the program to generate the confirmation email to a customer when the background jobs process an order cancellation. The base program is ORDLCANOTF.
For more information: See Order Line Cancellation Confirmation Email Sample and Contents.
Outbound email API: Order Management System generates a generic outbound XML message, rather than an actual email, for an order line cancellation confirmation if the XML only flag for the order line cancellation template is selected and this system control value is not blank. The Outbound Email XML Message (CWEmailOut) includes additional information that is not included in the standard email notice. You might choose to generate the XML message so that you can use the additional information to produce a reformatted HTML email and include promotional information.
For more information: See Outbound Email API for an overview and message details.
If the entire order is canceled: The system generates this email only if there at least one open or held line remaining on the order or if a shipment has already taken place. See the Order Cancellation Email Program (K78) for information on generating a confirmation for cancellation of the entire order, or the last remaining open line(s) if there has not been a shipment.
Suppressing the cancellation confirmation: If the cancellation reason code used to cancel the order line matches the Cancel Reason Code to Suppress Email (L08) system control value, the system does not generate the confirmation email; or, if multiple cancel reason codes are used in a single order maintenance session, any order lines canceled using that cancel reason are omitted. See that system control value for more information.
Company-level or entity-level email template? The system generates an email using the text from the order line cancellation confirmation email template, set up through the Working with E-Mail Notification Templates (WEMT) menu option. You can also set up an email template at the entity level as an override; see Email Setup within Order Management System for more information.
Determining when to email an order line cancellation confirmation: See When Does the System Generate an Email Notification? for an overview.
The system generates an order line cancellation confirmation email or Outbound Email XML Message (CWEmailOut) only if the customer’s Opt in/Opt out field is set to O1 or O2, and the customer has an Email address.
Leave this field blank if you do not want to email an order line cancellation confirmation or generate the Outbound Email XML Message (CWEmailOut).
Cancel Reason Code to Suppress Email (L08)
Purpose: Use this screen to specify a cancel reason code that should not generate the order or order line confirmation email.
Number field: Enter the cancel reason code that indicates not to generate the order or order line cancellation confirmation email when it is applied by a user or a function. For example, you might use this system control value to specify not to generate the confirmation email when you cancel and replace items on orders using the Processing Item Substitutions (PSUB) option.
What if you cancel multiple order lines? If you use more than one cancel reason during a single session to cancel different order lines, any order lines that used this cancel reason are not included in the generated email confirmation. If you cancel all order lines using this cancel reason, no email is generated.
Setting up cancel reason codes: Use Establishing Cancel Reason Codes (WCNR).
Leave this field blank if you do not want to suppress the order or order line cancellation confirmation email.
For more information: See:
• Order Cancellation Email Program (K78)
• Order Line Cancellation Email Program (K79)
• Working with E-Mail Notification Templates (WEMT)
Deposit Service for Conditional Deposits (L13)
Use this screen to define the deposit service that sends subsequent debit deposits (transaction type Purch action code D) for the same order number and authorization code as a Conditional Deposit (transaction type Conditional action code B).
Code field: Enter the deposit service that sends subsequent debit deposits (transaction type Purch action code D) for the same order number and authorization code as a Conditional Deposit (transaction type Conditional action code B). When you process deposits for the deposit service defined in this system control value, the system evaluates Invoice Payment Method records that are associated with multiple invoices for the same order number and authorization code, and sends all subsequent debit deposits after the first transaction as a Conditional Deposit (transaction type Conditional action code B). This prevents more than one deposit transaction from using the same authorization.
Note:
• If the deposit service does not match the deposit service defined in the Deposit Service for Conditional Deposits (L13) system control value, the system sends subsequent debit deposits for the same order number and authorization code as a regular Deposit (transaction type Purch action code D).
• This system control value applies to subsequent debit deposits (transaction type Purch action code D) and not credit deposits (transaction type Return action code R).
Related system control values: In order to use this system control value, the Retain Unused Stored Value Card Authorization After Deposit (J21) system control value must be selected and the Perform Authorization Reversal during Deposit Processing (J20) system control value must be unselected.
Example 1: |
Deposit Service for Conditional Deposits (L13) = SVS |
|---|---|
|
An order contains three order lines: item A for 20.00, item B for 50.00 and item C for 30.00. |
|
You process an online authorization for the order and receive an approved authorization for 100.00: • Authorization status = Approved • Amount authorized = 100.00 • Authorization number = 184 • Transaction ID = 0667892000000184 |
|
You generate a pick slip for item A. You confirm and bill the shipment. You submit deposits for the order: • Transaction type = Purchase • Deposit amount = 20.00 • Authorization number = 184 • Transaction ID = 0667892000000184 The system updates authorization history: • Authorization status = Approved • Amount authorized = 100.00 • Amount deposited = 20.00 • Authorization number = 184 • Transaction ID = 0667892000000184 |
|
You generate a pick slip for item B. You confirm and bill the shipment. You submit deposits for the order: • Transaction type = Conditional • Deposit amount = 50.00 • Authorization number = 184 • Transaction ID = 0667892000000184 The system updates authorization history: • Authorization status = Approved • Amount authorized = 100.00 • Amount deposited = 70.00 • Authorization number = 184 • Transaction ID = 0667892000000184 |
|
You generate a pick slip for item C. You confirm and bill the shipment. You submit deposits for the order: • Transaction type = Conditional • Deposit amount = 30.00 • Authorization number = 184 • Transaction ID = 0667892000000184 The system updates authorization history: • Authorization status = Approved • Amount authorized = 100.00 • Amount deposited = 100.00 • Authorization number = 184 • Transaction ID = 0667892000000184 |
Leave this field blank to have the system send subsequent deposits for the same order number and authorization code as a regular Deposit (transaction type Purch action code D).
Example 2: |
Deposit Service for Conditional Deposits (L13) = blank or the deposit service does not match the deposit service in SCV L13 |
|---|---|
|
An order contains three order lines: item A for 20.00, item B for 50.00 and item C for 30.00. |
|
You process an online authorization for the order and receive an approved authorization for 100.00: • Authorization status = Approved • Amount authorized = 100.00 • Authorization number = 185 • Transaction ID = 0667892000000185 |
|
You generate a pick slip for item A. You confirm and bill the shipment. You submit deposits for the order: • Transaction type = Purchase • Deposit amount = 20.00 • Authorization number = 185 • Transaction ID = 0667892000000185 The system updates authorization history: • Authorization status = Approved • Amount authorized = 100.00 • Amount deposited = 20.00 • Authorization number = 185 • Transaction ID = 0667892000000185 |
|
You generate a pick slip for item B. You confirm and bill the shipment. You submit deposits for the order: • Transaction type = Purchase • Deposit amount = 50.00 • Authorization number = 185 • Transaction ID = 0667892000000185 The system updates authorization history: • Authorization status = Approved • Amount authorized = 100.00 • Amount deposited = 70.00 • Authorization number = 185 • Transaction ID = 0667892000000185 |
|
You generate a pick slip for item C. You confirm and bill the shipment. You submit deposits for the order: • Transaction type = Purchase • Deposit amount = 30.00 • Authorization number = 185 • Transaction ID = 0667892000000185 The system updates authorization history: • Authorization status = Approved • Amount authorized = 100.00 • Amount deposited = 100.00 • Authorization number = 185 • Transaction ID = 0667892000000185 |
Use Credit Card Tokenization (L18)
Purpose: Use this screen to define whether you replace the credit card number in the Order Management System database with a token number provided by an external system.
Yes/No field: Select this field to replace the credit card number in the Order Management System database with a token provided by an external system. In addition, the number will be encrypted if you have credit card encryption enabled.
To enable credit card tokenization for a service bureau in Defining Authorization Services (WASV), select the Request token field for the service bureau.
Deselect or leave this field blank to retain the credit card number in the Order Management System database; the number will be encrypted if you have credit card encryption enabled.
Credit card number scan screens: If the Use Credit Card Tokenization (L18) system control value is selected, you can scan on the last four digits of the credit card number at the following Order Management System screens:
• Order Maintenance Selection Screen
• Select Orders For Return Authorization Screen
The system scans on the last four digits of the credit card number that you enter in the Credit card number scan field. The system advances you to the Scan By CC Last 4 screen, where you can review orders that contain a credit card payment whose CC Last 4 field in the Order Payment Method table matches the last four digits of the credit card number that you entered in the scan field.
Note: In order to use the credit card scan field when the Use Credit Card Tokenization (L18) system control value is selected, you must enter only the last four digits of the card number; if you enter a full credit card number or more than four digits of the card number, the system will be unable to locate an order that matches your entry.
Credit card bin number: For data security, the system stores the bin number for a credit card number only if the credit card number has been replaced with a token.
• The system stores the bin number in the OPM Bin field in the Order Payment Method table only if the OPM Tokenized field for the Order Payment Method record is Y.
• The system stores the bin number in the CSM Bin field in the Customer Membership table only if the CSM Tokenized field for the Customer Membership record is Y.
Supported integrations: Credit card tokenization is available for the Cybersource integration with Order Management System. See CyberSource Point-to-Point Integration for processing details.
For more information: See the Data Security and Encryption Guide on My Oracle Support (1988467.1) for an overview and processing details.
Require Credit Card Token (L40)
Purpose: When using Credit Card Tokenization, defines whether the system will accept a credit card number that has not been replaced with a token.
Yes/No field: Select this field to require a token for a credit card number. This ensures that credit card numbers are never stored in the Order Management System database and follows full PCI compliance and maximum security of sensitive data.
If the Credit Card Tokenization Process is unable to replace the card number with a token, the system:
• During interactive Order Entry/Maintenance, Customer Membership, and Change Invoice Payment Method: displays an error message, requiring you to enter a different form of payment.
• During web order processing: replaces the credit card number with the text TOKENIZATION FAILED and places the order in an error status with the reason Invalid Credit Card. You can correct the credit card payment method and resend the card for tokenization in batch order entry.
Deselect or leave this field blank to allow the system to accept a credit card number that has not been replaced with a token.
Note: The system evaluates this system control value only if the Use Credit Card Tokenization (L18) system control value is selected.
Encryption: If you use Use Credit Card Encryption (I97), the system encrypts the number stored in the Credit card number field in the Order Management System database; see the Data Security and Encryption Guide on My Oracle Support (1988467.1).
For more information: See Credit Card Tokenization in the Data Security and Encryption Guide on My Oracle Support (1988467.1) for an overview and processing details.
Purpose: When using credit card tokenization via an integration layer process (IJCT), defines the integration layer job used to transmit tokenization messages between Order Management System and the authorization service during the credit card tokenization process.
Code field: Enter the Process ID for the integration layer job used to transmit Register Token messages between Order Management System and the authorization service during the credit card tokenization process. The delivered job is CC_TOKEN.
About the CC_TOKEN job: The CC_TOKEN job is a delivered interactive job used to route the Register Token messages to the correct queues and to identify how long to wait for a Register Token Response from the service bureau.
Note You can define only one set of queues (outbound and inbound) for the CC_TOKEN job, which means you can only use a single service bureau to perform credit card tokenization.
For more information: See the Data Security and Encryption Guide on My Oracle Support (1988467.1) for an overview and processing details.
Order Receipt Print Program (L46)
Purpose: Use this screen to identify the program to print order receipts.
System name field: Enter the name of the program that generates order receipts. A receipt lists all the items shipped for an order ship-to, the sold-to and ship-to names and addresses, shipment tracking information, payment methods used, and total amounts billed on the order. You can print order receipts on demand in standard or streamlined order inquiry if the customer requires a summary of the shipments billed for the order.
The standard graphical program for printing order receipts is ORDERRECG.
Printing the order receipt: The option to print order receipts is available at the:
• Display Invoices Screen (standard order inquiry) if this system control value specifies a program, and there are any invoices currently displayed on the screen. For example, if you are inquiring on ship-to #1, and there is an invoice for ship-to #2, the order receipt option is available.
• Invoices section of the Third Streamlined Order Inquiry Screen (Order Summary) if this system control value specifies a program, and there are any regular (not credit) invoices for the currently displayed order ship-to. For example, if you are inquiring on ship-to #1, and the only invoices on the order are for ship-to #2, the order receipt option is not available.
Regular (not credit) invoices only: The screens above display an error message if you attempt to print the order receipt if the only invoices for the order are credits.
For more information: See the Order Receipt.
Leave this field blank if you do not need to generate order receipts. If this field is blank, the option to print order receipts is not available at the Display Invoices Screen in standard order inquiry or at the Invoices section of the Third Streamlined Order Inquiry Screen (Order Summary).
Use Credit Card Level III Discounting (L47)
Purpose: Use this screen to define whether the system sends level III discounting information during credit card deposit processing.
Yes/No field: Select this field to have the system send level III discounting information to the service bureau when you process deposits.
Deselect or leave this field blank if you do not want the system to send level III discounting information when you process deposits.
For more information: See Processing Auto Deposits (SDEP).
FTC - Suppress Backorder Notice for Due Date Changes (L65)
Purpose: Use this screen to control whether to generate a backorder notification for an order line if the due date for the next expected purchase order changes to a later date, or if the purchase order is canceled.
Yes/No field: Select this field to prevent generation of a backorder notice for an order line when you cancel the next expected purchase order line that might be able to fulfill the order line, or change the purchase order line’s due date to a date later than the order line’s Next BO date. The system does not generate another backorder notice until the order line’s Next BO date.
Deselect or leave this field blank to have the system generate a backorder notice for an order line when you:
• cancel the next expected purchase order line that might be able to fulfill the order line, or
• change the purchase order line’s due date to a date later than the order line’s Next BO date.
Example: |
An order line is backordered, and the next expected purchase order that might be able to fulfill the order line is due 4/2. The order type has the Immediate B/O notice flag selected. The Next BO date for the order line is set to 3/23 at order creation; but, after you generate backorder notices, the Next BO date is set to 4/2. You cancel the purchase order or change its due date to 4/9. If this system control value is: • selected: the system does not generate a new backorder notice for the order line until the Next BO date of 4/2. • unselected: the system generates a new backorder notice for the order line the next time you use Generate Backorder Notices (GBOC). |
Note: Regardless of the setting of this system control value, the system does not generate a new backorder notice because you change the purchase order’s due date to an earlier date, or if you make any other changes to the purchase order.
For more information: See Purchase Order Layering and Backorder Notifications for background.
Require Last Name/Postal Code in Customer History Request (L76)
Purpose: Use this screen to define whether the Customer History Request XML Message (CWCustHistIn) must include a last_name and/or postal_code when passing a direct_order_number or alternate_order_number without a customer_number or alternate_sold_to_id.
Yes/No field: Select this field if you want the CUST_HIST process to send an “empty” response when a Customer History Request XML Message (CWCustHistIn) that passes a direct_order_number or alternate_order_number does not also pass a customer_number, alternate_sold_to_id, last_name, or postal_code. See When is the Response Message Empty? for a sample message.
Deselect or leave this field blank if you want the CUST_HIST process to provide information about a single order when a Customer History Request XML Message (CWCustHistIn) passes a direct_order_number or alternate_order_number but no customer_number, alternate_sold_to_id, last_name, or postal_code.
For more information: See Generic Customer History API.
Purpose: Use this screen to define whether billing or deposits creates records in the CC Deposit Transaction table and CC Deposit History table, based on the records in the Invoice Payment Method table.
Note: The system creates a record in the CC Deposit Transaction table only for pay types that have a deposit service defined.
Yes/No field: Select this field if you want billing to create records in the CC Deposit Transaction table and CC Deposit History table immediately after creating records in the Invoice Payment Method table.
In addition:
• If you use the CyberSource Point-to-Point Integration, the Customer Engagement Stored Value Card Integration, or the External Payment Service, the system sends the deposit transaction to the service bureau during billing. You still need to use Processing Auto Deposits (SDEP) to process credit deposits and perform the Batch Deposit Updates. Also, you will need to use the Resubmitting Rejected Deposits (SRDP) menu option to resubmit any deposits that were not completely processed during billing and deposits.
• For all other service bureaus, the system sends the deposit transaction to the service bureau when you submit deposits using the Processing Auto Deposits (SDEP) menu option.
Note:
• The system does not perform preload deposit processing for the deposit service defined in the Deposit Service for Conditional Deposits (L13) system control value. In this situation, the system uses the regular deposit process.
• If you select the Preload Deposits (L78) system control value, you cannot use Consolidated Invoice (B49).
• If both Preload Deposits (L78) and Use CC Net Exchange Billing (M23) system control values are selected, the system performs credit card net exchange processing and does not preload deposits.
• If you select the Preload Deposits (L78) system control value, the Purchases transactions to generate and Purchases amount to generate fields on the Auto Deposit Screen are display only.
Deselect or leave this field blank if you want deposits (SDEP) to create records in the CC Deposit Transaction table and CC Deposit History table prior to sending out the deposit transactions.
Important: In Order Management System 21.0 or higher, you cannot select the Consolidated Invoice system control value if it is not already selected. If the system control value is currently selected (set to Y) and you deselect it (change it to N or blank), you cannot then change it back to selected. The option to consolidate invoices will be removed at a later date.
CC Deposit Transaction Table
Preload Deposits (L78) selected |
Preload Deposits (L78) unselected |
|---|---|
Cybersource, Oracle Retail Customer Engagement Service Bureau, or External Payment Service During billing: • the system sends the debit deposit transaction to the service bureau. • When an approved response is received, the system updates the Status of the CC Deposit Transaction record to *RCVD, and the Vendor response 1, Vendor response 2, and Authorization code based on the response received from the service bureau. During deposits: • The system processes any credit deposit transactions. • The system processes Batch Deposit Updates for any credit deposit transactions and any debit deposit transactions that were sent to the service bureau during billing. • Once all updates are complete, the system deletes the CC Deposit Transaction record. Any Other Service Bureau During billing: The Status is *RDY, indicating the deposit transaction is ready to be submitted for processing. During deposits: • The system sends the deposit transaction to the service bureau and processes Batch Deposit Updates when a response is received. • Once all updates are complete, the system deletes the CC Deposit Transaction record. |
All Service Bureaus During billing: The system does not create a record in the CC Deposit Transaction table. During deposits: • The system sends the deposit transaction to the service bureau. • When an approved response is received, the system updates the Status of the CC Deposit Transaction record to *RCVD, and the Vendor response 1, Vendor response 2, and Authorization code based on the response received from the service bureau. • The system processes Batch Deposit Updates. • Once all updates are complete, the system deletes the CC Deposit Transaction record. |
CC Deposit History Table
Preload Deposits (L78) selected |
Preload Deposits (L78) unselected |
|---|---|
All Service Bureaus During billing: • Updates Deposit date with the billing transaction date. • Updates Deposit status to Net yet sent. During deposits: Updates Deposit status to C Confirmed. |
All Service Bureaus The system does not create a record in the CC Deposit History table. During deposits: The system creates a record in the CC Deposit History table, based on the information in the Invoice Payment Method and CC Deposit Transaction tables. |
For more information: See Processing Auto Deposits (SDEP).
Bypass Customer API Edit (L93)
Purpose: Use this screen to define whether customer API transactions should bypass validation when creating or changing a customer with an original source code of XSTORE.
Yes/No field: Select this field if you want customer API transactions to bypass validation when creating or changing a customer with an original source code of XSTORE.
The system bypasses all edits except:
• Duplicate Checking for Add Requests.
• Customer Does not Exist for Change requests.
Note: To recognize that a customer is coming from XStore, the system defaults XSTORE to the cst_original_source in the Inbound Customer Message (CWCustomerIn).
• If it is an Add customer transaction, the system retains the Original source as XSTORE.
• If it is a Change customer transaction, the system removes XSTORE from the Original source before updating the record.
Leave this field unselected if you want customer API transactions to go through the customer API edit, regardless of whether the original source code is XSTORE.
For more information: See:
• Generic Customer API for an overview.
• Adding a Customer using the Customer API for more information on adding a customer.
• Changing a Customer using the Customer API for more information on changing a customer.
• Inbound Customer Message (CWCustomerIn) for more information on the data passed in the message.
Display Return ID Window (L99)
Purpose: Use this screen to define whether the Scan Return ID window displays when you create an RA detail line in Work with Return Authorizations (WRTA). This window allows you to assign a return ID to each RA detail line. The return ID is a way to identify the return in an external system.
Yes/No field: Select this field if you want the system to display the Scan Return ID window when you create an RA detail line in Work with Return Authorizations (WRTA).
Use this window to assign a return ID to an RA detail line.
How to display this screen: The system advances you to this window:
• During Working with Return Authorizations: Standard Process when you:
• enter the required information on the Create RA Detail Screen and select OK.
• enter the required information on the Create RA Detail Screen (Processing Misships) and select OK.
• During Working with Return Authorizations: Streamlined Process when you:
• enter the required information on the Return/Exchange Item Screen (Creating a Return) and select OK.
• enter the required information on the Create RA Detail Screen (Processing Misships) and select OK.
Note:
• For set items:
• During Working with Return Authorizations: Standard Process, when you select the main set item to return against, the system displays the Scan Return ID window for the main set item only. To assign a separate return ID to each component, you must select each component to return against.
• During Working with Return Authorizations: Streamlined Process, when you select the main set item to return against, the system displays the Scan Return ID window for the main set item and for each of the component items, allowing you to decide whether to enter a return ID for the main set, the individual components, or both.
• The system does not display this window during any other returns processing. This includes selecting Create/Return All in Work with Return Authorizations: Streamlined Process to return all of the lines on an order.
• Once you assign a return ID to an RA detail line, you cannot change or display it on any screen.
Field |
Description |
|---|---|
Return ID |
An informational code to identify a return in an external system. Use this field to scan or enter the return ID associated with the RA detail line. Updates the Return ID field in the RA Detail table. Alphanumeric, 15 positions; optional. |
CWReturnRAOut XML message: The return ID is included for each RA detail line in the Return Authorization Outbound XML Message (CWReturnRAOut).
Leave this field unselected if you do not want to display the Scan Return ID window when you create an RA detail line in Work with Return Authorizations (WRTA).
Use CC Net Exchange Billing (M23)
Purpose: Use this screen to define whether the system holds the credit invoice for a return to net it against the debit invoice for the associated exchange in order to reduce the number of transactions that occur for an exchange. The system uses the system-created EXC Net Billing for Exchanges deferred payment option to determine how long to delay billing the customer’s credit card, based on the invoice date and the # of days for deferral defined for the EXC payment option.
Yes/No field: Select this field if you want the system to hold the credit invoice for a return to net it against the debit invoice for the associated exchange in order to reduce the number of transactions that occur for an exchange. When you select this field, the system creates the EXC Net Billing for Exchanges deferred payment option.
Examples of net exchange billing: The remaining amount after the system performs credit card netting determines whether the system charges or credits the customer’s credit card.
Even exchange |
Credit invoice for returned item = $50.00 Debit invoice for exchange item = $50.00 During deposits, the system nets the credit invoice containing the returned item against the debit invoice containing the exchange item to determine the remaining amount to deposit: 50.00 debit - 50.00 credit = 0.00 balance The system does not charge or credit the customer’s credit card. |
Uneven exchange for less expensive item |
Credit invoice for returned item = $100.00 Debit invoice for exchange item = $60.00 During deposits, the system nets the credit invoice containing the returned item against the debit invoice containing the exchange item to determine the remaining amount to deposit: 100.00 credit - 60.00 debit = 40.00 credit The system credits the customer’s credit card $40.00. |
Uneven exchange for more expensive item |
Credit invoice for returned item = $100.00 Debit invoice for exchange item = $140.00 During deposits, the system nets the credit invoice containing the returned item against the debit invoice containing the exchange item to determine the remaining amount to deposit: 140.00 debit - 100.00 credit = 40.00 debit The system charges the customer’s credit card $40.00. |
Note:
• If you select this system control value, the Preload Deposits (L78) system control value must be unselected; you cannot use preload deposit processing if you are using the Credit Card Net Exchange Billing. If both system control values are selected, the system performs credit card net exchange processing and does not preload deposits.
• In order for net exchange billing to work, you need to specify a positive number in the Hold Days for CC Netting (M24) system control value.
Leave this field unselected if you do not want the system to hold the credit invoice for a return to net it against the debit invoice for the associated exchange in order to reduce the number of transactions that occur for an exchange. When an exchange is processed, the system credits the customer’s credit card for the amount of the return item and charges the customer’s credit card for the amount of the exchange item when it is shipped.
If this field was previously selected and you change it to unselected, the EXC Net Billing for Exchanges deferred payment option is automatically deleted.
For more information: See Credit Card Net Exchange Billing for processing details.
Hold Days for CC Netting (M24)
Purpose: Use this screen to define the number of days the system holds debit and credit invoices for credit card net exchange billing.
Number field: Enter the number of days the system holds debit and credit invoices for credit card net exchange billing.
The system updates the # of days for deferral field for the EXC Net Billing for Exchanges flexible payment option record with this number.
Any existing refunds and Invoice Payment Method records are not updated with the new hold days.
Leave this field blank if you do not use credit card net exchange billing.
Note: This system control value needs to specify a positive number in order for net exchange billing to work.
For more information: See Credit Card Net Exchange Billing for processing details.
Default Auth Code for CC Netting (M25)
Purpose: Use this screen to define the authorization code the system uses when creating a manual authorization to allow for the netting of invoices during the credit card net exchange process.
Code field: Enter the authorization code the system uses when creating a manual authorization to allow for the netting of invoices during the credit card net exchange process.
Leave this field blank if you do not use the credit card net exchange billing.
For more information: See Credit Card Net Exchange Billing for processing details.
Submit O/M Cancel Asynchronously (M36)
Purpose: Use this screen to define whether to submit an order cancel asynchronously or interactively.
Yes/No field: Select this field if you want the system to submit an order cancel asynchronously.
When the Submit O/M Cancel Asynchronously (M36) system control value is selected, the Cancel all ship-tos and Recalculate freight fields do not display on the Enter Cancel Reason Window. In this situation, the Cancel all ship-tos setting defaults to selected and the Recalculate freight setting is based on the value in the Recalculate Freight Default (F62) system control value.
When you select OK at the Enter Cancel Reason window to submit the order cancel, the system:
• submits the order cancel asynchronously. The system locks the order until the cancel is complete.
• writes a message to the TRACE log when an asynchronous order cancel starts and when it ends.
Leave this field unselected if you want the system to submit an order cancel interactively.
Note: This system control value applies to canceling an order, not to canceling an order line.
For more information: See Canceling an Order through Order Maintenance.
Purpose: Use this screen to define the account ID used for communication with the Avalara AvaTax Interface.
Code field: Enter the account ID provided by AvaTax.
You must also provide the license ID in the AvaTax License (M38) system control value.
Note: If you do not define communication settings at the company level using the AvaTax Account (M37) and AvaTax License (M38) system control values, the system uses the communication settings defined in the AVATAX_ACCOUNT and AVATAX_LICENSE properties in Working with Customer Properties (PROP).
For more information: See:
• Avalara AvaTax Interface for an overview and processing details.
• Avalara AvaTax Setup for the setup required for the AvaTax integration.
Purpose: Use this screen to define the license ID used for communication with the Avalara AvaTax Interface.
Code field: Enter the license ID provided by AvaTax. The system encrypts your entry.
You must also provide the account ID in the AvaTax Account (M37) system control value.
Note: If you do not define communication settings at the company level using the AvaTax Account (M37) and AvaTax License (M38) system control values, the system uses the communication settings defined in the AVATAX_ACCOUNT and AVATAX_LICENSE properties in Working with Customer Properties (PROP).
For more information: See:
• Avalara AvaTax Interface for an overview and processing details.
• Avalara AvaTax Setup for the setup required for the AvaTax integration.
Append Ecommerce Order # to PayPal Invoice ID (M40)
Purpose: Use this screen to define whether to append the ecommerce order number to the company number and invoice number in the PayPal DoCapture Request to PayPal.
Yes/No field: Select this field if you want to append the ecommerce order number.
For example, the INVNUM passed to PayPal is formatted as 006-0000467-EC12345, where 006 is the company number, 0000467 is the invoice number, and EC12345 is the ecommerce order number.
About the ecommerce order number: The ecommerce order number identifies the order in the originating system and is passed to Order Management System in the CWOrderIn message, or in the fulfillments response message if Order Broker submitted the order. The Display Order Properties Screen displays the ecommerce order number as the Alt ord.
Leave this field unselected if you do not want to append the ecommerce order number. The INVNUM passed to PayPal includes just the company number and invoice number.
For more information: See PayPal Direct Connection Integration.
Perform Reauthorization for Expired Authorizations (M61)
Purpose: Use this screen to define whether the REAUTH periodic function reauthorizes expired authorizations, and processes related updates when the reauthorization is approved or declined.
Yes/No field: Select this field if you want the REAUTH periodic function to attempt reauthorization of expired authorizations, and process updates.
Leave this field unselected if you do not want to the REAUTH periodic function to attempt reauthorization of expired authorizations.
For more information: See Reauthorizing Expired Authorizations.
Invoice Ship For Pickup Order Once Intransit (M73)
Purpose: Use this screen to define whether to create the invoice for a ship-for-pickup order line once the system receives confirmation from Order Broker that the order line is in transit from the sourcing location to the pickup location, has been received at the pickup location, or has been fulfilled.
Yes/No field: Select this field if you want to create an invoice when the system receives a status update from Order Broker indicating that the status of an order line on a ship-for-pickup order has changed to intransit, intransit polled, or received, as well as fulfilled.
When is the invoice created? The system submits the order to the BILL_ASYNC job for processing in order to create an invoice when it receives an order status list response from Order Broker indicating that the current item status is now:
• intransit or intransit polled: The assigned sourcing location has shipped the order line to the assigned pickup location; or
• received: The assigned pickup location has received the order line
After the invoice is created, Order Management System continues to include the order in status list request until the order line is fulfilled.
Regardless of the setting of this system control value, the system submits the order to the BILL_ASYNC when the status returned from Order Broker is fulfilled.
When a fulfilling order is created in Order Management System: When Order Broker assigns the ship-for-pickup order to a warehouse in Order Management System for sourcing, and a fulfilling order is created in Order Management System, the invoice is not created until:
• Order Broker receives the status update from Order Management System for the shipment of the fulfilling order to the pickup location, and
• Order Broker then sends the status list response to Order Management System indicating that the order line is in transit.
Required settings: The option to create the invoice once the order line is in transit is enabled only with the following system control value settings:
• Use Split Order (L56) must be selected
• Send B/O to OROB (K08) must be selected
• Use OROB for Ship for Pickup Fulfillment Assignment (M34) must be set to ALWAYS
• Consolidated Invoice (B49) must be unselected
Typically, you would also have the Payment at POS for Ship for Pickup Orders (L60) system control value unselected when you have the Invoice Ship For Pickup Order Once Intransit system control value selected. Also, typically partial status updates are not enabled in Order Broker; the entire order line status is updated when the status update response is received from Order Broker.
Leave this field unselected if you do not want to create an invoice for an order line on a ship-for-pickup order until the system receives a status update from Order Broker indicating that the status of an order line on a ship-for-pickup order has changed to fulfilled.
________________________________
Contents SCVs Reports XML Messages Glossary
Copyright © 2022, Oracle and/or its affiliates. All rights reserved.
Legal Notices