Setting Up General Usage Values
Purpose: The General Usage section of the System Control table defines:
• System default values
• Forms' names
For more information: For instructions and screen samples on how to create, change, delete, and copy a system control value, see System Control Table Components.
Quick Reference of General Usage System Control Values
This table describes briefly each system control value for the General Usage application area and lists the control value, a short definition, other control values to which you should refer in this section, if necessary, and a column where you can indicate the value that you assigned for your company.
If you have more than one company on your system, make a copy of this table for each company on your system.
Company: ______________________________
System Control Value |
Description |
Your Value |
|---|---|---|
Defines the output queue name the system defaults to the RPT Output Queue field when it automatically creates a record in the Report Control table. |
System name: |
|
Defines the number the system defaults to the RPT Copies field when it automatically creates a record in the Report Control table. |
Number: |
|
Defines the hold setting the system defaults to the RPT Hold field when it automatically creates a record in the Report Control table. |
Selected/Unselected: |
|
Defines the save setting the system defaults to the RPT Save field when it automatically creates a record in the Report Control table. |
Selected/Unselected: |
|
Defines the Bill To Customer number to which all cash receipts post if you are posting directly to Cash Receipts. |
Number: |
|
Defines whether to retrieve the warehouse address from the Warehouse table and print it on pick slips. |
Selected/Unselected: |
|
Defines whether custom special handling instructions you enter in Order Entry are in upper and lower case, or upper case only. |
Selected/Unselected: |
|
Defines whether the system creates an extract table of custom special handling information when you generate pick slips. |
Selected/Unselected: |
|
Defines whether to calculate special handling charges in Order Entry by the number of order lines or by the item quantity. |
Selected/Unselected: |
|
Defines whether the system checks a user's authority to individual vendors when the user operates certain functions. |
Selected/Unselected: |
|
Defines whether the system supports processing orders in multiple currencies, requiring you to specify the currency for each offer. |
Selected/Unselected: |
|
Defines whether the system calls a user-defined program to validate phone numbers outside of Order Management System. |
Selected/Unselected: |
|
Defines the number of billing async jobs to start when you start the background ASYNC jobs. |
Number: |
|
Defines whether the system displays basic system control values only when you select Control Values for an application area in Work with System Values/Features. |
Selected/Unselected: |
|
Defines the alphanumeric retrieval code that triggers a search of the Customer Source Finder table when you enter it in the Source code field in order entry, allowing you to retrieve the customer’s most recent source code based on mail history, even if the customer does not know the source code. |
Code: |
|
Default Miscellaneous Source Code for Existing Customers (H83) |
Defines the miscellaneous source code to select for existing customers when you are using the source code retrieval option. |
Code: |
Defines the miscellaneous source code to select for new customers when you are using the source code retrieval option. |
Code: |
|
Defines how often, in hour intervals, the Threshold Monitor Async submits the Batch Order Control job to update the Order Control Summary table, update the actual values in the Threshold Values table, and monitor for breached threshold values. |
Number: |
|
Defines whether the system encrypts the credit card number in the Order Management System database, providing additional security of credit card data. |
Code: |
|
Defines how the system masks the credit card data in log files when credit card encryption is enabled. |
Selected/Unselected: |
|
Defines the number of days to retain credit card data in closed and cancelled orders before the data is eligible for credit card replacement. |
Number: |
|
Evaluate Pending Deposits and Refunds for Credit Card Purge (L83) |
Defines whether the SECRISK periodic process skips the refund and deposit check when looking to purge credit card information. |
Selected/Unselected: |
Defines whether the system generates shipment and return confirmations during billing. |
Selected/Unselected: |
Purpose: Use this screen to define the output queue name the system defaults to the RPT Output Queue field when it automatically creates a record in the Report Control table.
System Name field: Enter the output queue name you want the system to default to the RPT Output Queue field when it automatically creates a record in the Report Control table.
The first time you generate a report the system checks the Report Control table to see if report controls are already defined; if a record does not exist in the Report Control table for the report, the system creates one using the settings from this system control value along with the following system control values:
Note: These system control values are informational only and are not used to control the processing of reports.
Leave this field blank if you do not want the system to default a queue name to the RPT Output Queue field when it automatically creates a record in the Report Control table.
For more information: See Working with Report Control (WRPT).
Purpose: Use this screen to define the number of copies the system defaults to the RPT Copies field when it automatically creates a record in the Report Control table.
Number field: Enter the number you want the system to default to the RPT Copies field when it automatically creates a record in the Report Control table.
The first time you generate a report the system checks the Report Control table to see if report controls are already defined; if a record does not exist in the Report Control table for the report, the system creates one using the settings from this system control value along with the following system control values:
Note: These system control values are informational only and are not used to control the processing of reports.
Leave this field blank if you do not want the system to default a number to the RPT Copies field when it automatically creates a record in the Report Control table.
For more information: See Working with Report Control (WRPT).
Purpose: Use this screen to define the hold setting the system defaults to the RPT Hold field when it automatically creates a record in the Report Control table.
Yes/No field: Select this field if you want the system to default Y to the RPT Hold field when it automatically creates a record in the Report Control table.
The first time you generate a report the system checks the Report Control table to see if report controls are already defined; if a record does not exist in the Report Control table for the report, the system creates one using the settings from this system control value along with the following system control values:
Note: These system control values are informational only and are not used to control the processing of reports.
Deselect or leave this field blank if you want the system to default N to the RPT Copies field when it automatically creates a record in the Report Control table.
For more information: See Working with Report Control (WRPT).
Purpose: Use this screen to define the save setting the system defaults to the RPT Save field when it automatically creates a record in the Report Control table.
Yes/No field: Select this field if you want the system to default Y to the RPT Save field when it automatically creates a record in the Report Control table.
The first time you generate a report the system checks the Report Control table to see if report controls are already defined; if a record does not exist in the Report Control table for the report, the system creates one using the settings from this system control value along with the following system control values:
Note: These system control values are informational only and are not used to control the processing of reports.
Deselect or leave this field blank if you want the system to default N to the RPT Save field when it automatically creates a record in the Report Control table.
For more information: See Working with Report Control (WRPT).
Purpose: Use this screen to define the default Bill To Customer number to which cash posts when you key checks directly into Cash Receipts for Deferred Liability.
Number field: Enter the Bill To Customer number to which cash posts when you batch prepaid orders and key the check totals directly into Cash Receipts. The default cash customer number is used as a summary account when using the CASH RCPT method of posting to Deferred Liability.
You must define the default Bill To Customer account in the Bill To Customer table.
The Post Deferred Liability pop-up window appears automatically when you enter the deposit total during Cash Receipts to post the cash to deferred liability. This is where you type the default Bill To Customer number to post the cash.
For more information: See Creating and Updating Bill-to Customers (WCBT).
Print Warehouse Address on Pick Slips (D60)
Purpose: Use this screen to define whether the system should print the address of the shipping warehouse on pick slips.
Yes/No field: Select this field if you want the system to retrieve the address of the shipping warehouse from the Warehouse table and print it on pick slips. This might be useful if you are in a multi-warehouse environment and it is easier to use pick forms without a preprinted warehouse address.
Printing the warehouse address works only if you are using a pick slip printing program that supports this function.
Leave this field unselected if you do not want the system to print the warehouse address.
For more information:
• See Creating and Maintaining Warehouses (WWHS).
• See Performing Pick Slip Generation.
Enter Custom Special Handling in Upper and Lower Case (D65)
Purpose: Use this screen to define whether you can enter custom special handling instructions in upper and lower case, or in all upper case only.
Yes/No field: Select this field if you would like to enter custom special handling instructions in Order Entry in upper and lower case. This might be useful if you offer personalization or inscriptions, which can be case-sensitive, as custom special handling on certain items.
Custom special handling differs from standard special handling in that you can define entry fields, valid and default responses, and pricing by individual features. You associate the custom special handling format with an item by defining an additional charge code for the special handling format, and entering that additional charge code in the Item/Offer or Item/SKU/Offer table.
Leave this field unselected if you would like this screen to accept only upper case entries in the custom special handling input fields.
For more information:
• Working with custom special handling formats and additional charge codes: Establishing Custom Special Handling Formats (WSHF).
• Working with Item/Offers and Item/SKU/Offers: Assigning Items/SKUs to Offers and Creating Item/SKU Offers (MISO).
• Working with custom special handling items in Order Entry: Working with Items on the Order.
• Contact Center order entry: Modern View online help.
Generate Custom Special Handling File (D66)
Purpose: Use this screen to define whether to create extract tables containing information on items to receive custom special handling. The system creates these tables when you generate pick slips for the items, as long as the Extract? field for the custom special handling format is selected.
Yes/No field: Select this field if you want to generate tables containing information on items to receive custom special handling. The system generates two tables, which you can use to convey customer information and special handling instructions to on outside service for processing.
Bypass printing? If the Bypass Creation of Pick Forms during WSPS Pick Generation (K55) system control value is selected, the streamlined pick slip generation process does not generate the extract. See that system control value for more information.
Leave this field unselected if you do not want the system to generate the tables.
The system does not generate extract tables for items to receive standard special handling. See Enter Custom Special Handling in Upper and Lower Case (D65) for more information on custom special handling.
Custom Special Handling Table Layouts
The system creates these tables when you generate pick slips for items with custom special handling if the Generate Custom Special Handling File (D66) system control value is selected. The Extract? field for the individual custom special handling format must also be selected. The information in the tables is extracted from the Order, Special Handling Format, and Pick Control Header and Detail tables.
Custom Special Handling Header Extract Table (OECSHP) |
|
|---|---|
Field |
Attributes |
Company Code |
3 positions, numeric |
Pick Control Header |
7 positions, numeric |
Pick Control Detail Sequence Number |
5 positions, numeric |
Sequence Number |
7 positions, numeric |
Order Number |
8 positions, numeric |
Order Detail Sequence Number |
5 positions, numeric |
Customer Sold To Number |
9 positions, numeric |
Customer Sold To Prefix |
3 positions, alphanumeric |
Customer Sold To First Name |
15 positions, alphanumeric |
Customer Sold To Initial |
6 positions, alphanumeric |
Customer Sold To Last Name |
25 positions, alphanumeric |
Customer Sold To Suffix |
3 positions, alphanumeric |
Customer Sold To Street Address |
32 positions, alphanumeric |
Customer Sold To Address Lines 2, 3 and 4 |
32 positions each, alphanumeric |
Customer Sold To Apartment Number |
10 positions, alphanumeric |
Customer Sold To Company Name |
30 positions, alphanumeric |
Customer Sold To City |
25 positions, alphanumeric |
Customer Sold To State |
2 positions, alphanumeric |
Customer Sold To Postal Code |
10 positions, alphanumeric |
Customer Sold To PO Box Code |
1 position, alphanumeric |
Customer Sold To Delivery Code |
1 position, alphanumeric |
Customer Ship To Number |
9 positions, numeric |
Customer Ship To Prefix |
3 positions, alphanumeric |
Customer Ship To First Name |
15 positions, alphanumeric |
Customer Ship To Initial |
6 positions, alphanumeric |
Customer Ship To Last Name |
25 positions, alphanumeric |
Customer Ship To Address Lines 1, 2, 3 and 4 |
32 positions each, alphanumeric |
Customer Ship To City |
25 positions, alphanumeric |
Customer Ship To State |
2 positions, alphanumeric |
Customer Ship To Postal Code |
10 positions, alphanumeric |
Customer Ship To Apartment Number |
10 positions, alphanumeric |
Customer Ship To Company Name |
30 positions, alphanumeric |
Customer Ship To Suffix |
3 positions, alphanumeric |
Customer Ship To PO Box Code |
1 position, alphanumeric |
Customer Ship To Delivery Code |
1 position, alphanumeric |
Item Code |
12 positions, alphanumeric |
SKU Code |
14 positions, alphanumeric |
Item Description Note: Extracting an item with a description longer than 40 positions is not currently implemented. |
120 positions, alphanumeric |
Quantity Ordered/Printed |
7 positions, numeric |
Price |
13 positions with a 2-place decimal, numeric |
Order Special Handling Format File Sequence Number |
3 positions, numeric |
Order Special Handling Format Detail File Sequence Number |
3 positions, numeric |
Date Extracted |
7 positions, numeric (You can update this field at the time you run an extract.) |
Custom Special Handling Detail Extract Table (OECSDP) |
|
|---|---|
Field |
Attributes |
Company Code |
3 positions, numeric |
Pick Control Number |
7 positions, numeric |
Pick Control Detail Line Number |
5 positions, numeric |
Custom Special Handling File Sequence Number |
7 positions, numeric |
Custom Special Handling Detail File Sequence Number |
7 positions, numeric |
Special Handling Cost |
13 positions with a 4-place decimal, numeric |
Special Handling Input Field Label |
15 positions, alphanumeric |
Special Handling Input |
45 positions, alphanumeric |
Special Handling Charge |
13 positions with a 2-place decimal, numeric |
For more information:
• working with custom special handling formats and additional charge codes: Establishing Custom Special Handling Formats (WSHF).
• working with Item/Offers and Item/SKU/Offers: Assigning Items/SKUs to Offers and Creating Item/SKU Offers (MISO).
• working with custom special handling items in Order Entry: Working with Items on the Order.
• generating pick slips: Performing Pick Slip Generation.
Evaluate Special Handling Charges by Order Line (D67)
Purpose: Use this screen to define whether to multiply special handling charges on orders by the number of order lines or by unit quantity.
Yes/No field: Select this field if you want to charge the customer for special handling based on the number of order lines regardless of unit quantity. For example, if you charged $5.00 for special handling on item A1000, special handling charges would be computed like this on a sample order:
Line 1: Item A1000 in blue, quantity 1: special handling charges = $5.00
Line 2: Item A1000 in red, quantity 5: special handling charges = $5.00
Total special handling charges = $10.00
Leave this field unselected if you want to charge the customer for special handling based on the total unit quantity. For example, on an order for item A1000, special handling charges would be computed like this:
Line 1: Item A1000 in blue, quantity 5: special handling charges = $25.00
Line 2: Item A1000 in red, quantity 1: special handling charges = $5.00
Total special handling charges = $30.00
Check User Class/Vendor Authority (D88)
Purpose: Use this screen to define whether to check a user's authority to vendors when the user works with certain menu options.
Yes/No field: Select this field if you want the system to check which vendors the user has authority to when using certain functions. If the user does not have authority to a particular vendor, the system will not permit the user to display, change, or print any information related to that vendor. This option may be useful if you want to grant outside parties, such as individual vendors, limited access to your system.
Leave this field unselected if you do not want the system to check vendor authority for a user.
Defining vendor authority by user class: You define a user's vendor authority by assigning the user to a user class. The system allows you to set a user class's authority to *EXCLUDE for individual vendors. (You must define a default company for the user class so the system will know which company you want to restrict the class's access to.) The user then "inherits" the authorities defined for the user class. You cannot define alternate authority settings for an individual user.
The default authority for each vendor is always *ALLOW unless you change it; you define a user class's vendor authority by selecting which vendors it does not have access to.
Menu options affected by vendor authority restriction by user class:
Menu Option |
Fast Path |
|---|---|
Work with Item/SKUs |
MITM |
Inventory Inquiry |
DINI |
Enter/Maintain POs |
MPOE |
Purchase Order Inquiry |
MPOI |
Print Purchase Order |
MPRP |
Purchase Order Receipts |
PORC |
Work with Vendors |
WVEN |
Work with Vendor Item |
WVNI |
Work with Inventory Transactions/Immediate |
WITI |
Types of restrictions:
• the vendor record
• any purchase orders for the vendor
• any items that are assigned to this vendor by having the vendor number defined in the Item table
• any vendor items defined for the vendor (but not necessarily the item itself).
If you attempt to work with a record that you do not have authority to, the system displays an error message, such as:
Not authorized to purchase order.
Not authorized to vendor.
Not authorized to item/SKU.
When you scan in any of the affected menu options, the system simply disqualifies any restricted records from the scan. For example, when you scan on the Work with Items screen, any items that have a restricted vendor defined in the Item table do not display.
For more information: Setting Up User Classes (WUCL), for information on defining vendor restrictions for a user class. See Working with User Records (WUSR) for information on defining vendor restrictions for a user.
Purpose: Use this screen to define whether the system supports processing orders in multiple currencies.
Yes/No field: Select this field if you want to take orders in more than one currency. The system will support your defining one or more foreign currencies for offers, and restrict each order to only one currency. The system will also track the currency conversion rates for each order at entry and billing, and convert order values to your local currency for tracking demand.
Leave this field unselected if you accept orders in your local currency only or do not want to enable multi-currency conversion and tracking.
Selecting this field will have these effects:
Currency of offer. The system will require that you define the currency of each offer. When a customer places an order, the system defaults the offer associated with the source code you enter on the order header to the order detail lines as usual. However, the system searches for an item price only among offers in the same currency. If the item is not available in an offer in that currency, the system displays a message:
Price (.00) cannot be zero for item (AA100).
In addition, the currency code associated with the offer displays on the order header screen in Order Entry, Order Maintenance and standard Order Inquiry.
Conversion of order values. The system converts the order values to your local currency (defined in the Local Currency Code (A55) system control value) when you enter the order (for prepaid orders) and when the order is billed. Order billing history for the customer is stored in your local currency, although the order itself remains on your system in the currency of the offer.
Cash receipts. The system requires that you define an entity and a bank when you enter cash receipts. This information tells the system which division is receiving the cash, which in turn indicates the source code and offer. As a result, the system identifies the currency of the receipts, and makes the necessary conversion to your local currency.
Processing refunds. The system generates refunds in the currency on the order, using the conversion rate currently in effect.
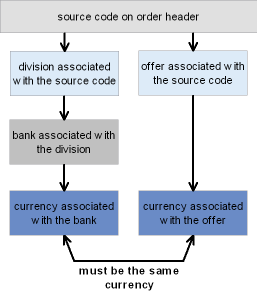
This chart demonstrates the relationships that must be in place for you to implement multi currency in your company.
Setup requirements for each currency:
• Create a shadow entity (Working with Entities (WENT)).
• Assign the shadow entity to the currency (Working with Currency (WCUR)). Note: the shadow entity cannot be associated with a division.
• Select a bank for the currency (Working with Banks (WBNK)).
• Create offer(s) for the currency (Working with Offers (WOFR)).
• Create records of each item/offer or item/SKU/offer (See Assigning Items/SKUs to Offers).
• Create source code(s) for each offer(s) (Working with Offers (WOFR)). The offer and division must both point to the same currency.
• Create each foreign pay type (Working with Pay Types (WPAY)).
• Select the Track Invoice Currency (D68) system control value.
Screen differences: You will notice these differences based on the value in this field:
Menu Option |
If field is selected |
If field is unselected |
|---|---|---|
Work with Currency (fast path = WCUR) |
Shadow entity appears (required) |
Shadow entity does not appear |
Work with Offers (fast path = WOFR) |
Currency of offer appears (required) Conversion rate appears (display-only) |
Currency of offer and Conversion rate do not appear |
Work with Source Codes (fast path = WSRC) |
Division and Offer must point to the same currency |
No validation |
Work with Banks (fast path = WBNK) |
Currency code appears (required) |
Currency code does not appear |
Enter/Maintain Orders (fast path = OEOM) |
Currency code appears on order header screen after you enter source code |
Currency code does not appear |
standard Order Inquiry (fast path = OIOM) |
Currency code appears on order header |
Currency code does not appear |
Report differences:
• Refund Due List by Order Number (fast path = MRDU): sorts by bank if the system control value is selected (the Refund Due List by Type sorts by bank regardless of how the system control value is set, although the final totals sort by bank only if the system control value is selected)
• Sales Journal (fast path = PDSJ) sorts and totals by currency if the system control value is selected
• Sales Journal by Pay Type (fast path = PSJP) sorts and totals by currency if the system control value is selected
Invoice Download XML Message: The ihd_invoice_currency_code is included in the Invoice Download XML Message (CWInvoiceOut) when this system control value is selected.
For more information:
• working with entities, divisions, banks, pay types, and currencies, and on how currency fluctuation works: Setting Up the Accounting Tables.
• processing refunds: Processing Refunds (MREF).
• working with offers and source codes: Working with Offers (WOFR).
External Validation for Phone Number (E64)
Purpose: Use this screen to define whether the system calls a user-defined program to validate phone numbers outside of Order Management System.
Yes/no field: Select this field to have the system call a user-defined program to validate phone numbers outside of Order Management System. You can define the validations that occur for phone numbers under the program MSR0912. The system provides a “hook” to the program when an operator selects OK on a screen containing a phone number associated with a country.
This program can be used to validate phone number rules for a specific country, for example, if a phone number for a country should only contain 6 numbers and more than 6 numbers are entered, the program passes an error message back to Order Management System:
Invalid Phone Number Format
Once the program completes, Order Management System returns to normal processing.
Phone numbers that are not associated with a country, for example, phone numbers in the Bank, Salesman, Ship Via and Warehouse tables, are not validated.
The program validates phone numbers based on these parameters:
• Company
• Country
• State
• City
• Phone Number
Leave this field unselected if you do not want the system to call the user-defined program to validate phone numbers outside of Order Management System.
Number of Billing Async Jobs to Start (F08)
Purpose: Use this screen to define the number of billing async jobs to start when you start the background ASYNC jobs.
Number field: Enter the number of billing async jobs you wish to start when you start the background ASYNC jobs. The background ASYNC jobs are started when you select Start for the CNTL_ASYNC job. See Working with the CNTL_ASYNC Job.
The system determines how many billing async jobs to start by searching across all companies and using the greatest value defined for this system control value. If the greatest value is 0, the system runs one billing async. The greatest number of billing async jobs that can run at one time is 9.
Note: Set this system control value to a number greater than 1 only if you are unable to process all billing records in one day.
Leave this field blank or enter 1 or 2 to start one or two billing async jobs when you start the background ASYNC jobs.
Delay billing updates: If the Number of Billing Async Jobs to Start (F08) system control value is a number greater than 1, you should also select the Delay Billing Updates (K85) system control value in order to achieve greatest system performance. The Delay Billing Updates (K85) system control value defines whether the Billing Async defers certain updates until the Delay Billing Update Process is run. See this system control value for more information. ac
Set consistently in all companies: The setting of this system control value and of the Delay Billing Updates (K85) system control value should be consistent in all companies in your environment:
• If all companies have this system control value set to 1, then all companies should have the Delay Billing Updates (K85) system control value unselected.
• If all companies have this system control value set higher than 1, then they should all be set to the same number, and all companies should have the Delay Billing Updates (K85) system control value selected.
For more information: If all companies do not have these two system control values set consistently as described above, the system starts a single billing async job and generates a System Alert Email when you start the async jobs. See Order Management System Support Notifications for background.
For more information: See Working with the BILL_ASYNC Job.
Display Basic Install Values Only (F22)
Purpose: Use this screen to define whether the system displays basic system control values only when you select Control Values for an application area in Work with System Values/Features.
Yes/No field: Select this field if you want the system to display basic system control values only when you select Control Values for an application area in Work with System Values/Features.
The system identifies system control values as basic if they contain a setup level of 3.
System control values in a higher group are defined as basic if the higher SCV is set up as basic regardless of how each of the system control values in the group is set up.
Leave this field unselected if you want the system to display all system control values when you select Control Values for an application area in Work with System Values/Features.
When you select SCV/Code on the Work with System Values/Features screen, the system displays all system control values regardless of the value defined in Display Basic Install Values Only system control value.
For more information: See System Control Table Components.
Source Code Auto Retrieval Value (H82)
Purpose: Use this screen to define the alphanumeric retrieval code that triggers a search of the Customer Source Finder table when you enter it in the Source code field in order entry; this table allows you to retrieve the customer’s most recent source code based on mail history, even if the customer does not know the source code.
Code field: Use this field to specify the alphanumeric retrieval code to indicate that your entry in the Source code field in order entry does not represent an actual source code; instead, it indicates that your entry represents a search for a matching record in the Customer Source Finder table based on the offer code that you enter following the retrieval code. Using this table, you can default the customer’s most recent source code to the order based on mail history, even if the customer does not know the source code.
Important: Your alphanumeric retrieval code should be a single character, such as * or #. Also, make sure that you do not use a character that begins the name of any source code in your company.
About the Customer Source Finder table: You can use this table to keep a record of source codes for a customer, representing the customer’s recent mail history. If the customer does not know the correct source code while you are entering an order, you can enter the retrieval code plus the correct offer code, and the system will retrieve the most recent source code for the customer from the Customer Source Finder table.
Example: |
The alphanumeric retrieval code defined with this system control value is *. In order entry, the customer does not know the correct source code for the catalog, so you enter *OF1 in the Source code field, where OF1 represents the current offer code. There is a record in the Customer Source Finder table for this customer and source code SOURCE1. Since SOURCE1 is associated with OF1, this record represents a match, and the system defaults SOURCE1 to the Source code field in order entry. |
Defaulting the source code using the retrieval code works at the Work with Order Screen.
How does a Customer Source Finder record match? In addition to being associated with the offer code you enter in order entry, the source code in the Customer Source Finder table must be unrestricted (the Restricted field must be unselected).
Source matching hierarchy: When determining which source code to retrieve in order entry, the system also uses the Default Miscellaneous Source Code for Existing Customers (H83) and the Default Miscellaneous Source Code for New Customers (H84) system control values, as follows:
Which Source to Use? |
Sample Message in Order Entry |
|
|---|---|---|
1. |
Use the record in the Customer Source Finder table that has the most recent Mail date that is not in the future, that matches the customer and the specified offer, and that includes a valid, unrestricted source; otherwise, |
Source Defaulted from Customer Source finder |
2. |
If there is not a qualifying record in the Customer Source Finder table, use the miscellaneous source code (the Type = U) associated with the specified offer, as long as it is not restricted; if there is more than one miscellaneous source code for the offer, use the first one alphanumerically; otherwise, |
Source Defaulted to Misc Source for offer OFR |
3. |
If there is not a miscellaneous source code for the offer and the customer is not new, use the Default Miscellaneous Source Code for Existing Customers (H83) if specified; otherwise, |
Source Code CCCS Defaulted for Existing Customer |
4. |
If there is not a miscellaneous source code for the offer and the customer is new, use the Default Miscellaneous Source Code for New Customers (H84) if specified; otherwise, |
Source Code DDDS Defaulted for New Customer |
5. |
No source code will default; you must enter a source code in order entry. |
Source code () is invalid, restricted or missing. |
You can vary the hierarchy by omitting certain levels, such as the Default Miscellaneous Source Code for Existing Customers (H83) and Default Miscellaneous Source Code for New Customers (H84); however, you must enter the source code auto retrieval code to use the source matching logic.
Searching without specifying an offer: You can also enter just the retrieval code without specifying an offer in order entry to simply retrieve the Default Miscellaneous Source Code for Existing Customers (H83) or the Default Miscellaneous Source Code for New Customers (H84), as appropriate. For example, if the retrieval code is #, you enter just # without including an offer code. However, if the appropriate default miscellaneous source code system control value is blank, then entering the retrieval code by itself will not work.
Maintaining the Customer Source Finder table: There is no menu option available to maintain the Customer Source Finder table, so you will need to find another means to create records in this table. When creating new records for the same customer, it is best to insert records with the most recent mail date first, to improve system efficiency when searching for a match in order entry.
Note: The system reads the Mail date field in the Customer Source Finder table in YYYMMDD format, so that a value of 1060124 indicates a date of January 24, 2006.
You can also create records in the Customer Source Finder table with mail dates that are in the future; the system will not select these records until the current system date is the same as or later than the mail date. For example, if you create a record with a mail date of February 28, 2006, the system will not select this record until it is February 28 or later.
Additional setup requirements: In addition to specifying a retrieval code with this system control value, you can set up the following:
• Miscellaneous source codes for each offer: Type = U and Restricted = unselected. If there is more than one qualifying miscellaneous source code for the offer, the system selects the first qualifying source code alphanumerically.
• Source codes: Make sure that none of the source codes in your company start with the retrieval code specified with this system control value. For example, if you use a retrieval code of *, you could not create a source code of *123. In this case, the * indicates to the system that the remaining characters you enter in the Source code field represent an offer rather than a source code.
• Additional system control values:
• Default Miscellaneous Source Code for Existing Customers (H83)
• Default Miscellaneous Source Code for New Customers (H84)
Leave this field blank if you are not using the Customer Source Finder table to retrieve the correct source codes for customers in order entry.
Default Miscellaneous Source Code for Existing Customers (H83)
Purpose: Use this screen to specify the miscellaneous source code to select for existing customers when you are using the source code retrieval option.
Code field: Enter the source code to assign to an order for an existing customer in order entry if you are using the Source Code Auto Retrieval Value (H82), if the system does not find a source code in the Customer Source Finder table, and there is no miscellaneous (Type = U) source code for the specified offer. See the description of the Source Code Auto Retrieval Value (H82) for a complete discussion and a description of the hierarchy the system uses to retrieve the correct source code.
Note: The default miscellaneous source code does not need to be associated with the offer that you specify when you search using the retrieval code in order entry.
Default Miscellaneous Source Code for New Customers (H84)
Purpose: Use this screen to specify the miscellaneous source code to select for new customers when you are using the source code retrieval option.
Code field: Enter the source code to assign to an order for a new customer in order entry if you are using the Source Code Auto Retrieval Value (H82), if the system does not find a source code in the Customer Source Finder table, and there is no miscellaneous (Type = U) source code for the specified offer. See the description of the Source Code Auto Retrieval Value (H82) for a complete discussion and a description of the hierarchy the system uses to retrieve the correct source code.
Note: The default miscellaneous source code does not need to be associated with the offer that you specify when you search using the retrieval code in order entry.
Use Alternate Currency Pricing (H89)
Note: With update 21.0, the Use Alternate Currency Pricing system control value is no longer implemented. The Multi Currency by Offer (E03) can be used instead.
Threshold Monitor Interval (H90)
Purpose: Use this screen to define how often, in hour intervals, the Threshold Monitor Async submits the Batch Order Control job to update the Order Control Summary table, update the actual values in the Threshold Values table, and monitor for breached thresholds.
Number: Enter the hour interval the Threshold Monitor Async uses to submit the Batch Order Control job.
The system stores the hour interval you define in this system control value for the Threshold Monitor Async in seconds. For example, if you enter 2 in this system control value, indicating the Threshold Monitor Async submits the Batch Order Control job in 2 hour intervals, the system stores the delay interval for the Threshold Monitor Async as 7200 seconds (2 hours x 60 minutes = 120 minutes; 60 seconds x 120 minutes = 7200 seconds).
The Threshold Monitor Async is started and ended when you start or end the Control Async; see Working with the CNTL_ASYNC Job.
Important: The system uses the interval time defined for this system control value for the first company that has a value defined. For example, if company 4 has a 2 hour interval defined and company 555 has a 1 hour interval defined, the system uses the 2 hour interval for both companies.
The Batch Order Control job:
• updates the Order Control Summary table; see Updating Operations and Merchandising Summary Totals.
• updates the actual values in the Threshold Values table and monitors for breached thresholds; see Updating Threshold Actual Values.
The system does not automatically run the Batch Order Control job for any company that does not have a value defined in this system control value.
Leave this field blank if you do not want to define an interval when the Batch Order Control job is automatically submitted by the Threshold Async.
You can submit the Batch Order Control job manually by:
• selecting Update current totals in the Reviewing Operations Control Summary (FLSH) menu option.
• submitting a periodic process that includes the Order Summary (ORDSUM) periodic function (program name PFR0062).
For more information: See Working with Threshold Values (WTHR) for more information on system delivered thresholds and how to define your own thresholds.
Use Credit Card Encryption (I97)
Purpose: Use this screen to define whether the system encrypts the credit card number in the Order Management System database for this company, providing additional security of credit card data.
Overview: See the Data Security and Encryption Guide on My Oracle Support (1988467.1) for an overview on credit card encryption and data security standards.
Important: This system control value is automatically updated during credit card encryption installation and setup; see the Data Security and Encryption Guide on My Oracle Support (1988467.1) for installation instructions.
Code field: Valid values are:
Value |
Description |
|---|---|
unselected |
Credit card encryption is not enabled. Credit card numbers in the Order Management System database are not encrypted. |
Y |
Credit card encryption is fully enabled. All credit card numbers in the Order Management System database are encrypted. If you use credit card tokenization, the encrypted number may be a token rather than the actual credit card number. You should only update this system control value to Y after you have completed ALL credit card encryption installation and setup. |
C |
Credit card encryption is partially enabled. All credit card numbers in non-order related tables are encrypted. However, credit card numbers in order-related tables are in the process of being encrypted. When you select to work with an order, the system must first determine if the credit card number on the order has already been encrypted. The system compares the selected order number against the CC Order Encryption table to determine if the credit card number on the order is encrypted. • If the Use order level enc flag for the order is Y, the credit card number on the order has been encrypted. • If the Use order level enc flag for the order is N, the credit card number on the order has not been encrypted. The system will automatically encrypt the credit card number when you select to work with the credit card on the order. • If the system cannot find the order number in this table, the system assumes the order is a new order and encrypts the credit card number in the Order Management System database. See Credit Card Encryption Initial Setup in the Data Security and Encryption Guide on My Oracle Support (1988467.1) for step-by-step instructions. |
S |
Credit card encryption has been enabled; however, a new encryption key has been generated and credit card numbers in order-related tables are in the process of being encrypted with the new encryption key. When you select to work with an order, the system must first determine if the credit card number on the order has already been encrypted with the new encryption key. The system compares the selected order number against the CC Order Encryption table to determine if the credit card number on the order is encrypted. • If the Use order level enc flag for the order is Y, the credit card number on the order has been encrypted with the new encryption key. • If the Use order level enc flag for the order is N, the credit card number on the order has not been encrypted with the new encryption key. The system will automatically encrypt the credit card number using the new encryption key as you select to work with the credit card on the order. • If the system cannot find the order number in this table, the system assumes the order is a new order and encrypts the credit card number in the Order Management System database with the new encryption key. See Encryption Key Switch Process in the Data Security and Encryption Guide on My Oracle Support (1988467.1) for step-by-step instructions. |
Warning window: The system displays a warning window if you change this system control value from blank or N to C, Y, or S and vice versa.
• If you have not performed the required credit card encryption installation and setup, select Exit to exit the window without updating this system control value. See Credit Card Encryption Initial Setup in the Data Security and Encryption Guide on My Oracle Support (1988467.1) for more information on the steps you must perform in order to enable credit card encryption.
• If you have performed the required credit card encryption initial setup, select Accept to update this system control value.
Additional credit card security: Regardless of the setting of this system control value, to further secure credit card data:
• Use credit card tokenization to replace the credit card number in the Order Management System database with a token provided by the authorization service.
• You can set up a credit card number format to control which digits of the credit card number are masked on Order Management System screens and reports using a special character, such as an asterisk (*). See Credit Card Number Format for an overview.
• The system writes a record to the Credit Card Audit table (MSCCAU) whenever a user with authority to view credit card numbers displays a screen or window that includes the credit card number field. See Logging Credit Card Data Access in the Data Security and Encryption Guide on My Oracle Support (1988467.1) for an overview.
See the Guidelines for Data Security in the Security document for a checklist of recommended security settings.
Display Partial Credit Card Number in Logs (J16)
Purpose: Use this screen to define how the system masks the credit card data in log files when credit card encryption is enabled.
If credit card encryption is enabled and an XML message provides a credit card number or card security number, Order Management System masks the credit card data in the log files based on the setting of the Display Partial Credit Card Number in Logs (J16) system control value.
Yes/No field:
• Select the Display Partial Credit Card Number in Logs (J16) system control value in any company to have the system display the last four digits of the credit card number in the logs; for example ************1234. If the credit card number is 4 digits or less, the entire credit card number will display as ****.
• Leave the Display Partial Credit Card Number in Logs (J16) system control value unselected in every company to have the system replace the credit card number in the logs with the word CHANGEDBYLOGGER.
Note:
• As long as one Order Management System company has the Use Credit Card Encryption (I97) system control value set to Y, C, or S Order Management System masks the credit card number and card security value for every Order Management System company that is located in the same environment.
• If you use credit card tokenization, the credit card number in the logs may be a token rather than the actual credit card number.
• The credit card number and card security value will display unencrypted in the actual XML message until the message is transmitted to the external system. To ensure security of the credit card data during data transmission to and from Order Management System, you should configure a secure socket over your queues.
For more information: See the Data Security and Encryption Guide on My Oracle Support (1988467.1) for an overview and required setup.
Credit Card Retention Days (K65)
Purpose: Use this screen to define the number of days to retain credit card data on closed or cancelled orders.
Number field: Enter the number of days to retain credit card data on closed or cancelled orders. Once this number of days has passed since an order was updated, the order is eligible to be updated by the Purge Security Risk Information (SECRISK) periodic function.
The SECRISK function:
• Deactivates the payment method.
• Removes the expiration date. Note: Require an expiration date for all credit card pay types (pay category 2) to make the SECRISK function run most efficiently.
• Sets the Risk purge date on the Order Header to the current date.
Note:
• If any subsequent activity reopens the order, the system clears the Risk purge date.
• If you perform a return against an order whose credit card pay type has already been deactivated by the SECRISK function, and add a new pay type to the order, the system clears the Risk purge date.
• If the function finds an order whose payment method was already deactivated, it sets the Risk purge date to 999999.
• Replaces the first 12 digits of the credit card numbers with the characters specified for the credit card number format, typically asterisks (*).
Note: If no format is set up for the pay type, the default masking character is asterisks.
Which tables are affected? The periodic function updates:
• Invoice Payment Method
• Order Payment Method
• CC Deposit History
• Stored Value Card (activated cards only)
• Customer Membership (updates completed or cancelled memberships, including those without an order number)
• On Line Authorization: The system uses the authorization date to determine whether the record has exceeded the Credit Card Retention Days (K65). The system deletes any records associated with a closed order whose authorization date exceeds the credit card retention days and that do not have an authorization date defined.
Rules for replacing credit card numbers: The Purge Security Risk Information periodic function performs the updates described above if:
• the order status is closed (X) or cancelled (C), and
• the pay type on the order is a credit card (pay category 2), and
• the Order Payment Method has an expiration date that is not 0, or is for a pay type that is not flagged to require expiration date, and
• the most recent Order Transaction History record with a transaction type of S (shipment or return) for the order is at least as old as the number of days specified in the Credit Card Retention Days (K65) system control value, and
• there are no return authorizations for the order that have not yet been received or credited, and
• there are no pending pick slips for the order whose status is not V Void, or unapproved authorizations for the order, and
• the Risk purge date on the Order Header table does not specify a date, and
• there are no records for the order in the Pick Stored Value Card table or Billing Async data queue, indicating the order did not bill correctly.
• In addition, if the Evaluate Pending Deposits and Refunds for Credit Card Purge (L83) system control value is selected, there can be no:
• unprocessed refund records with a status of N, H, O, or W (see Work with Refunds Screen for background).
• pending credit card deposits or rejected deposits for billed credit card orders. These records are identified by the fact that they use pay category 2, are not flagged to suppress deposit (the Suppress Deposit flag in the Invoice Payment Method table is blank or set to N), and have not been deposited (the Deposit Created Date in that table is set to 0 for a pending deposit and to 999999 for a rejected deposit).
The function does not evaluate orders that have been purged.
Scheduling the SECRISK periodic function: You can include the SECRISK periodic function as part of your daily periodic processing. See Working with Periodic Functions (WPER) and Working with Periodic Processes (WPPR).
Tracked in Job History: The Job History table tracks the total number of records evaluated and processed. See Display Job History (DJHY) for background.
Leave this field blank if you do not want to replace credit card data.
Stopping and Restarting the SECRISK Periodic Function
If you need to stop the SECRISK Periodic Function and defer processing to a later time when system resources are available, you can use the Purge Active Procedures Across Users (MACX) option:
• Find the listing for the periodic function at the Purge Active Procedures Screen. The Workstation is SECRISK, and the Type is QZ.
• Delete the active procedure.
When the SECRISK periodic function runs, it checks periodically to see if the SECRISK active procedure record still exists. If this active procedure no longer exists. the function creates a record in the Report Generic table, and then ends processing.
Each time you run the SECRISK periodic function, it checks the Report Generic table for a record. If there is a Report Generic record, the SECRISK periodic function uses that record to determine the next order to process, and then deletes the Report Generic record.
You can stop and restart the SECRISK periodic function multiple times, if needed.
Note: You can also use the Purging Active Procedures (MACP) option to stop the function.
For more information: See:
• Working with Pay Types (WPAY) for information about the methods of payment for orders
• the Data Security and Encryption Guide on My Oracle Support (1988467.1) for best practices about credit card encryption and data security
• Credit Card Number Format for an overview of the formats that can be applied to credit card numbers to restrict how they are viewed
• Processing Auto Deposits (SDEP)
• Introducing Return Authorizations (WRTA)
Evaluate Pending Deposits and Refunds for Credit Card Purge (L83)
Purpose: Use this screen to define whether the SECRISK periodic process skips the refund and deposit check when looking to purge credit card information.
Yes/No field: Select this field to have the SECRISK periodic process include the refund and deposit check when determining if the system replaces the first 12 positions of the credit card number with asterisks (*), deactivates the pay type, and removes the expiration date.
Deselect or leave this field blank to have the SECRISK periodic process skip the refund and deposit check when determining if the system replaces the first 12 positions of the credit card number with asterisks (*), deactivates the pay type, and removes the expiration date.
For more information: See Credit Card Retention Days (K65) for a complete description of the SECRISK process.
Send Shipment Confirmation from Billing (L98)
Purpose: Use this screen to define whether the system generates shipment and return confirmations during billing.
Yes/No field: Select this field if you want the system to generate shipment and return confirmations during billing.
Regardless of the setting of this system control value, the system generates a shipment or return confirmation email or Outbound Email XML Message (CWEmailOut) when you:
• generate shipment confirmations and return confirmations using the Send Internet Order Ship Confirmations menu option; see Sending Internet Order Ship Confirmation (ESCF)
• execute the ECSHCNF periodic function; see Working with Periodic Functions (WPER)
Note: If you use the Narvar Integration, Narvar generates shipment confirmation emails to the customer based on an order request message sent through billing, and the shipment confirmation is not generated through the process described above.
Special considerations:
• If the Delay Billing Updates (K85) system control value is selected, the system generates shipment and return confirmations during initial billing processing.
• If you generate shipment confirmations during billing, the system generates a separate shipment confirmation email for each shipment for the order billed on a given date.
• If you generate shipment confirmations during billing and a shipment splits into more than one carton, the system sends a shipment confirmation when the first carton ships and goes through billing, but does not send a shipment confirmation for the other cartons (since billing has already been processed for the shipment). In this situation, the shipment confirmation contains the tracking number for the first carton but, depending on processing time, may not contain the tracking number for the other cartons.
• If you use Consolidated Invoice (B49), in order to prevent the generation of multiple copies of the same shipment confirmation, you should leave the Send Shipment Confirmation from Billing (L98) system control value unselected and always wait until the day’s billing is complete to generate shipment and return confirmation emails. If you consolidate invoices:
• the system sends a shipment confirmation for the first shipment that goes through billing and sends a shipment confirmation for each subsequent shipment that goes through billing on that same day. In this situation, each subsequent shipment confirmation contains all of the information across shipments (since the shipments are consolidated into one invoice).
• you do not have the option of Stopping and Restarting Shipment and Return Confirmation Emails because the system does not keep track of the last confirmation email generated, so there is no way to prevent the process from generating multiple copies of the same email. See Sending Internet Order Ship Confirmation (ESCF) for an overview on generating shipment and return confirmation emails.
Important: In Order Management System 21.0 or higher, you cannot select the Consolidated Invoice system control value if it is not already selected. If the system control value is currently selected (set to Y) and you deselect it (change it to N or blank), you cannot then change it back to selected. The option to consolidate invoices will be removed at a later date.
Confirmation program names: The system uses the Shipment Confirmation Program (G51) and the Return Confirmation E-Mail Program (H53) to generate the confirmation emails.
Outbound email API: You can specify to generate a generic outbound XML message, rather than an actual email, for shipment or return notifications. The Outbound Email XML Message (CWEmailOut) includes additional information that is not included in the standard email notice. You might choose to generate the XML message so that you can use the information to produce a reformatted HTML email and include promotional information. See Outbound Email API for an overview.
Determining when to email a shipment or return confirmation: See Shipment and Return Confirmation Emails for more information on the criteria required to generate an email shipment or return confirmation or Outbound Email XML Message (CWEmailOut).
Setup for shipment and return confirmations: See Email Setup within Order Management System for more information on setting up template text, the “from” email address, and other setup options for shipment and return confirmation emails.
Order history message: When a shipment or return confirmation email or Outbound Email XML Message (CWEmailOut) is sent, Order Management System creates an order history message such as Retrn Conf to kbrown@example.com. You can review order history messages at the Display Order History Screen.
Leave this field unselected if you do not want the system to generate a shipment or return confirmation during billing. The system will still generate a confirmation email or Outbound Email XML Message (CWEmailOut) when you:
• generate shipment confirmations and return confirmations using the Send Internet Order Ship Confirmations menu option; see Sending Internet Order Ship Confirmation (ESCF)
• execute the ECSHCNF periodic function; see Working with Periodic Functions (WPER)
For more information: See:
• Shipment and Return Confirmation Emails for an overview.
• Shipment Confirmation Email Sample and Contents for a sample shipment confirmation.
• Return Confirmation Email Sample and Contents for a sample return confirmation.
________________________________
Contents SCVs Reports XML Messages Glossary
Copyright © 2022, Oracle and/or its affiliates. All rights reserved.
Legal Notices