- DSR Cloud Installation Guide
- Application Configuration
- Create iDIH Virtual Machines - KVM/OpenStack
5.7 Create iDIH Virtual Machines - KVM/OpenStack
This procedure creates the iDIH Oracle, Mediation, and Application guest. This
is an optional procedure.
Prerequisites
Material required: iDIH Oracle OVA, iDIH Mediation OVA, and iDIH Application OVA
- Add the iDIH Oracle OVA to KVM/OpenStack.
- Copy the OVA file to the OpenStack control
node.
$ scp oracle-8.6.x.x.x.ova admusr@node:~ - Log in to the OpenStack control
node.
$ ssh admusr@node - In an empty directory, unpack the OVA file using
tar.$ tar xvf oracle-8.6.x.x.x.ova - One of the unpacked files has a
.vmdksuffix. This is the VM image file that must be imported.oracle-8.6.x.x.x-disk1.vmdkNote:
The OVA format only supports files with a max size of 8GB, so a vmdk file larger than that is split. You should be able to concatenate the files together to merge them back into one file:$ cat ORA-80_x_x.vmdk.000000000 ORA-80_x_x.vmdk.000000001 > ORA-80_x_x.vmdk - Source the OpenStack admin user
credentials.
$ . keystonerc_admin - Select an informative name for the new image. For example:
ORA-8.6_x_x - Import the image using the glance utility from the command
line.
$ glance image-create --name oracle-8.6.x.x.x-original -–visibility public --protected false --progress --container-format bare --disk-format vmdk --file oracle-8.6.x.x.x-disk1.vmdkThis process takes about 5 minutes depending on the underlying infrastructure.
Note:
Optional – Steps h and i are not needed if VMDK is used. - Convert VMDK to QCOW2 format.
Use the qemu-img tool to create a
qcow2 imagefile using this command.
For example:qemu-img convert -f vmdk -O qcow2 <VMDK filename> <QCOW2 filename>
Install the qemu-img tool (if not already installed) using thisqemu-img convert -f vmdk -O qcow2 DSR-82_12_0.vmdk DSR-82_12_0.qcow2yumcommand.sudo yum install qemu-img - Import the converted qcow2 image using the
glanceutility from the command line.
This process take about five minutes depending on the underlying infrastructure.$ glance image-create --name dsr-x.x.x-original --is-public True --is-protected False --progress --container-format bare --disk-format qcow2 --file DSR-x.x.x-disk1.qcow2
- Copy the OVA file to the OpenStack control
node.
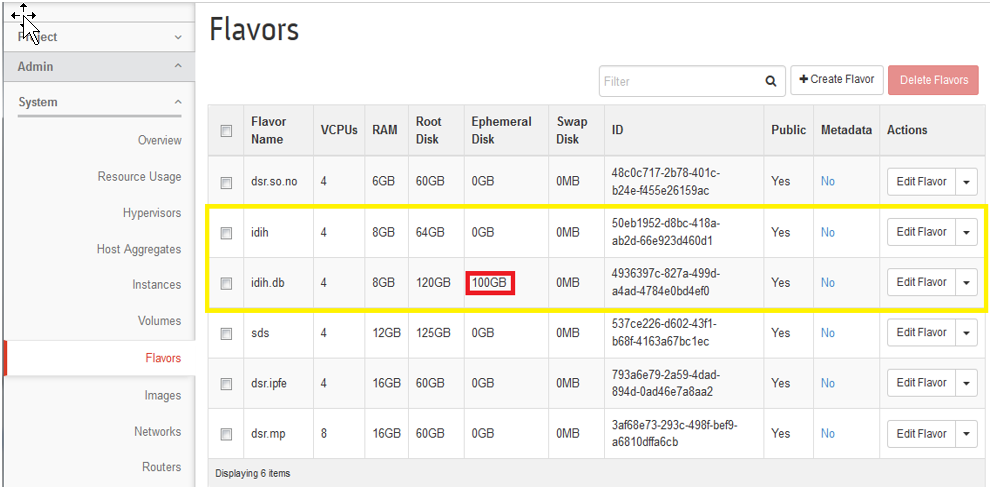
- Create flavors for iDIH.Examine the storage recommendations in the resource profiles defined in DSR Cloud Benchmarking Guide. A block storage must be created and attached for the Oracle VM. For example, create an
idih.dbfor the Oracle database with a 100GB ephemeral disk.
- Create network interfaces.Examine the network interface recommendations defined in DSR Cloud Benchmarking Guide. Network ports must be created for each recommended interface.
For example:

- Create and boot the iDIH VM instance from the glance image.
- Get the following configuration values.
The image ID
$ glance
                                image-list
The flavor ID
$ nova flavor-listThe network ID(s)
$ neutron
                                    net-list
An informative name for the instance.- iDIH-Oracle
- iDIH-Mediation
- iDIH-Application
- Create and boot the VM instance.
The instance must be owned by the DSR tenant user, not the admin user. Source the credentials of the DSR tenant user and issue the following command. Use one --nic argument for each IP/interface. Number of IP/interfaces for each VM type must conform with the interface-to-network mappings defined in DSR Cloud Benchmarking Guide.
Note:
IPv6 addresses should use the v6-fixed-ip argument instead of v4‑fixed-ip.For Oracle VM Only
Create the ephermeral storage for only the Oracle VM.$ nova boot --image <image ID> --flavor <flavor id or name> --nic net-id=<xmi network id>,v4-fixed-ip=<xmi ip address> --nic net-id=<int network id>,v4-fixed-ip=<int ip address> --ephemeral size=100 -–config-drive true <instance name>For example:$ nova boot --image 7e881048-190c-4b66-b26e-dc5b9dc3c07f --flavor idih.db --nic net-id=e96cb10a-9514-4702-b0c5-64fc99eb3fdd,v4-fixed-ip=10.250.65.161 --nic net-id=674b8461-ffed-4818-8dea-7544f9c06e5f,v4-fixed-ip=10.254.254.2 --ephemeral size=100 –config-drive true iDIH-OracleFor Application VM Only$ nova boot --image <image ID> --flavor <flavor id or name> --nic net-id=<xmi network id>,v4-fixed-ip=<xmi ip address> --nic net-id=<int network id>,v4-fixed-ip=<int ip address> -–config-drive true <instance name>For example:$ nova boot --image 7e881048-190c-4b66-b26e-dc5b9dc3c07f --flavor idih.db --nic net-id=e96cb10a-9514-4702-b0c5-64fc99eb3fdd,v4-fixed-ip=10.250.65.161 --nic net-id=674b8461-ffed-4818-8dea-7544f9c06e5f,v4-fixed-ip=10.254.254.4 –config-drive true iDIH-AppFor Mediation VM Only
For Mediation, add the IMI interface as the IMI interface.$ nova boot --image <image ID> --flavor <flavor id or name> --nic net-id=<xmi network id>,v4-fixed-ip=<xmi ip address> --nic net-id=<int network id>,v4-fixed-ip=<int ip address> --nic net-id=<imi network id>,v4-fixed-ip=<imi ip address> –config-drive true <instance name>For example:$ nova boot --image f548c2cd-1ddd-4c56-b619-b49a69af8801 --flavor idih --nic net-id=e96cb10a-9514-4702-b0c5-64fc99eb3fdd,v4-fixed-ip=10.250.65.162 --nic net-id=674b8461-ffed-4818-8dea-7544f9c06e5f,v4-fixed-ip=10.254.254.3 --nic net-id=3d9b9da8-96ad-4f29-9f82-98b00ea30446,v4-fixed-ip=192.168.99.3 –config-drive true iDIH-Mediation - View the newly created instance using the nova
tool.
The VM takes approximately 5 minutes to boot and may be accessed through both network interfaces and the Horizon console tool.$ nova list --all-tenants
- Get the following configuration values.
- Verify configured interface.If DHCP is enabled on the Neutron subnet, VM configures the VNIC with the IP address provided in step 4. To verify, ping the XMI IP address provided with the nova bootcommand from step 4:
$ ping <XMI-IP-Provided-During-Nova-Boot>If successfully pinging, ignore step 6 to manually configuring the interface.
- Manually configure interface, if not already done.This is an optional step.
Note:
If the instance is already configured with an interface and has successfully pinged (step 5), then ignore this step to configure the interface manually.- Log in to the Horizon GUI as the DSR tenant user.
- Go to the Compute/Instances section.
- Click the Name field of the newly created instance.
- Select the Console tab.
- Log in as the admusr user.
- Configure the network interfaces, conforming with the
interface-to-network mappings defined in DSR Cloud Benchmarking
Guide.
$ sudo netAdm add --onboot=yes --device=eth0 --address=<xmi ip> --netmask=<xmi net mask>$ sudo netAdm add --onboot=yes --device=eth1 --address=<int ip> --netmask=<int net mask>$ sudo netAdm add --route=default --device=eth0 --gateway=<xmi gateway ip>An additional interface eth2 needs to be configured ONLY for Mediation VM. To configure the eth2:$ sudo netAdm add --onboot=yes --device=eth2 --address=<imi ip> --netmask=<imi net mask> - Reboot the VM. It takes approximately 5 minutes for the VM to complete
rebooting.
The new VM should now be accessible using both network and Horizon consoles.$ sudo init 6
- Repeat steps 1 through 4 for the following VMs. Use unique labels for the VM names: iDIH-Application and iDIH-Mediation.