Setting Up Resume Templates
To set up resume templates, use the Setup Resume Template (HRS_RES_TEMPLATE) component.
|
Page Name |
Definition Name |
Usage |
|---|---|---|
|
HRS_RES_TMPL1 |
Define basic information for resume templates. |
|
|
HRS_RES_TMPL2 |
Define resume template steps, including substeps and sections. |
|
|
HRS_RES_TMPL3 |
(NIR) Define whether the application process collects community background information for Northern Ireland |
|
|
HRS_RES_TMPL4 |
Define prescreening for applicants who apply without a job opening using this resume template. |
|
|
HRS_RES_ANSWER_SEC |
Review the answers to a prescreening question and assign points to each answer. |
|
|
HRS_RES_TMPL5 |
Define default Skills and Employment questions for job openings that use this resume template. |
Resume templates define and organize the information that Candidate Gateway collects from applicants during the online job application process.
The Online Application Process
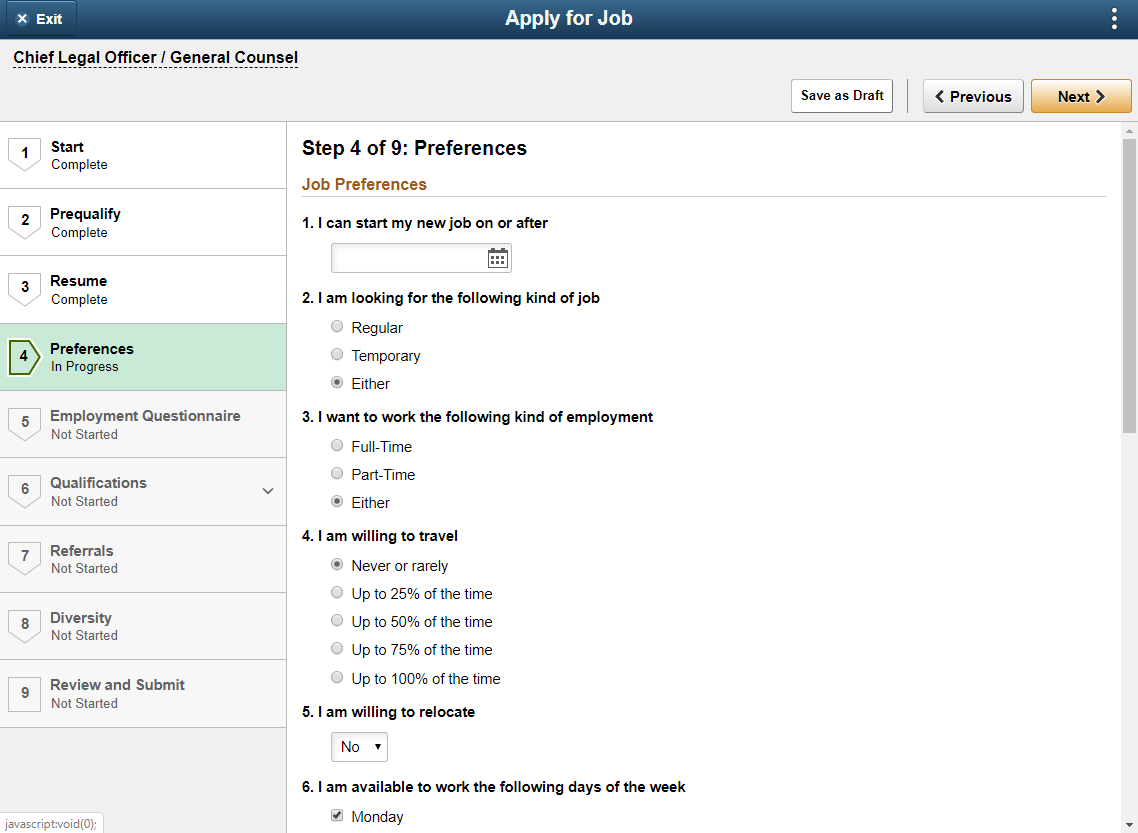
Candidate Gateway provides applicants with a guided application process. In Classic Candidate Gateway, the process is represented by a horizontal bar that displays the steps in the application process. In Fluid Candidate Gateway, the process is represented by an activity guide.
This example illustrates the Classic Candidate Gateway guided application process. Because the process is configurable, the steps shown here are only an example.

This example illustrates the Fluid Candidate Gateway activity guide. Because the process is configurable, the steps shown here are only an example.
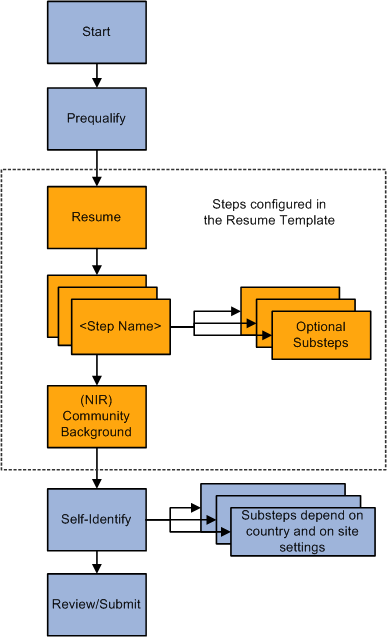
The general flow of the online application process is the same regardless of the settings in the resume template. This flow includes:
Start step for notices and terms & agreements, if applicable.
Terms and conditions and other start step content are enabled on the Site Setup Page. Prequalification notices also appear on the Start step; these come from the screening level definition.
Prequalify step for prescreening, if applicable.
Prescreening for job openings is configured within the job opening. The default resume template for a site includes prescreening settings for applicants who apply without a job opening.
Resume step, if enabled in the resume template.
Use the resume template to choose whether this step includes resume options, cover letter options, or both.
A varying number of additional application steps (with optional substeps) that are configured in the resume template.
In the example above, the resume template includes three such steps: Preferences, Employment Questionnaire Qualifications, and Referrals. The Qualifications step has multiple substeps.
(NIR) Community Background step for Northern Ireland, if activated in the resume template.
This step is not shown in the example above.
Self-Identify step (not controlled by the resume template))
This step, which is for external applicants only, includes up to three substeps for voluntary self-identification: Disability, Veteran, and Diversity.
Note: If only one self-identification substep is relevant to an application, then that page is promoted from a substep to a main step, taking the place of the Self-Identify step.
The Diversity substep is not configurable; it always appears if the job opening's recruiting location is associated with a company location in the U.S. or, if the applicant applied without a job opening, if the applicant has a U.S. address. The Disability and Veteran substeps are configured on the Site Setup page. Disability, like Diversity, appears only for US job applications.
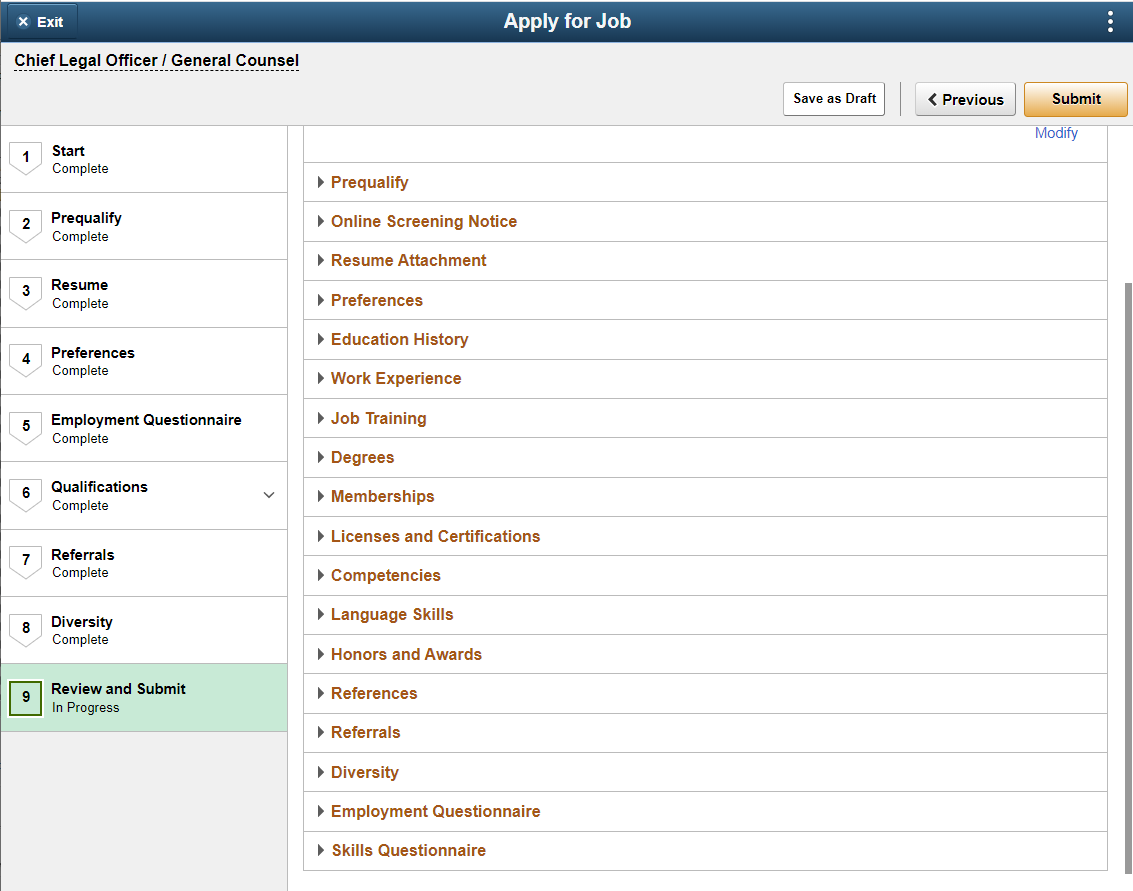
Review/Submit step.
Review and Submit step
This diagram illustrates the online job application process and identifies the steps that are controlled by the resume template.
Note: If the applicant applies without a job opening, prescreening settings in the resume template control whether the Prequalify step appears.
The Resume Step
Within the resume template, you choose whether to show the Resume step in the online application process. The resume step includes two sections:
Resume options.
Cover letter options.
For resume options, choose whether applicants can:
Upload a file attachment.
Choose from a list of previously-submitted resumes.
This option is visible only to applicants who have previously submitted resumes.
Apply without a resume.
For cover letter options, choose whether the applicants can:
Upload a file attachment..
Apply without a cover letter.
For both resumes and cover letters, if you don’t include any of the available options, the corresponding section does not appear on the Resume step.
The settings that allow applicants to apply without a resume or a cover letter control whether the applicant can continue past the Resume step without completing the corresponding section. If you don’t allow applicant to apply without providing a resume or cover letter, the word Required appears in the corresponding section title in Candidate Gateway. If you do allow applicants to apply without a resume or cover letter, applicants do not need to explicitly state that they are doing so, they can simply continue past the Resume step without completing the optional section.
Additional Steps From the Resume Template
When you use a resume template to define a step, you:
Choose a step name from the text catalog.
Enter a step sequence.
Optionally define substeps.
Substeps also require a sequence number and a name from the text catalog.
List the sections to include on the step.
If you create substeps, each section must be associated with a substep.
There are two types of sections that are available to use in the resume template.
Sections that correspond to the profile content types in the primary person profile type.
Oracle delivers several such sections, including competencies, language skills, degrees, and so forth. You can also configure additional content types. If you do, your custom content types are also available for selection.
Note: Within the recruiting system, use the Content Section Configuration – <Content Type> Page to configure content types for use in recruiting. In particular, use the Content Section Configuration component to configure whether applicants can add content items to a job application or whether they are limited to providing ratings for content items (such as competencies) that are already associated with the job opening.
Sections for these predefined types of recruiting data:
Attachments (for non-resume attachments)
This section is not intended for resumes or cover letters, which are uploaded on the Resume step. Applicants must associate the files that they upload to this section with an attachment type that has a processing type of References or Other. Attachment types are configured on the Attachment Type Setup Page.
Education History (the applicant’s highest level of education)
(USF) Federal Preferences
(USF) Federal Priority Placement
Skills Questionnaire
Employment Questionnaire
Personal Information
Preferences
References (people who can provide personal or professional references)
Referrals (how the applicant learned about the job opening)
Training
Work History
When an applicant applies for a job, each step shows its sections in a predefined order. This is the order in which sections appear on a step or substep:
Attachments section.
Preferences section.
(USF) Federal Preferences section.
Education History section.
Work Experience section.
Job Training section.
(USF) Priority Placement section.
Profile-Related sections.
All profile content type sections are grouped together. They appear in the order in which they are listed in the resume template.
References section.
Personal Information section.
Application Questionnaire section. (This can include the Skills and Employment questionnaires)
Referrals section.
These sections are all discussed in the topics Applying for Jobs and Using Fluid Candidate Gateway to Apply for Jobs.
Note: Within a recruitment template, the resume template needs to coordinate with the job opening template. For example, if a job opening template includes a section for screening questions, the resume template must also include the Online Questionnaire section so that applicants can see and answer the questions.
(NIR) Community Background Information for Northern Ireland
The Fair Employment Act 1989 requires companies in Northern Ireland with 11 or more employees to collect community background information from applicants. Applicants must enter community background information before submitting applications for job openings in Northern Ireland because an employer in Northern Ireland cannot consider job applications that do not comply with the legislation.
If you select the Use Community Background option on the Country Specific page in the resume template, an application that uses this template will include the Community Background step. Applicants must provide their community background information before they can continue to the next step.
Note that the system does not consider the location of the job opening when determining whether to collect community background information. To prevent the system from collecting community background information for job openings outside of Northern Ireland, be sure that resume templates where the community background option is active are used only for job openings in Northern Ireland.
When you hire an applicant, the system transfers community background information to employee data.
Recruiting administrators can manually enter community background information for applicants in the Create Applicant or Manage Applicant page in Talent Acquisition Manager. Community background information fields are on the Create Applicant page: Eligibility & Identity Tab, under the United Kingdom flag.
Prescreening Settings
In addition to defining the steps for an online job application, a resume template can also include a prescreening definition.
If an applicant applies without selecting a job opening, the system invokes the Default Questions from the default resume template for the site.
This is a handy data entry shortcut when you have a standard set of prescreening questions for broad categories of job openings.
See Understanding Prescreening and Online Screening.
Note: When an applicant applies for a job opening, the prescreening definition in the resume template is not used. Instead, the screening settings within the job opening control prescreening
Resume Template Selection During the Application Process
When an applicant applies for a job opening online, the system uses the resume template that is associated with the job opening’s recruitment template.
If an applicant applies without a job opening, or if the job opening is not associated with a resume template, the system uses the Default Questions tab in the resume template specified on the Site Setup Page.
If an applicant applies to multiple job openings that have different associated resume templates, the system merges the associated resume templates so that all possible sections are included in the new resume template and no sections are duplicated.
During the merge process, the system:
Determines all of the associated resume templates for all job openings to which an applicant applies for a given apply online session.
Determines the number of sections in each resume template.
Determines the resume template with the highest number of sections, and uses that resume template as the base template for the applicant's session.
Determines which sections from the remaining templates are not on steps in the base template.
Creates a new application step called Additional Information and adds the sections that are not in the base template to that step.
Before setting up resume templates, use the Assign Profile Type Defaults Page to choose a primary person profile type. The primary person profile type controls which profile content types are available for use in resume templates.
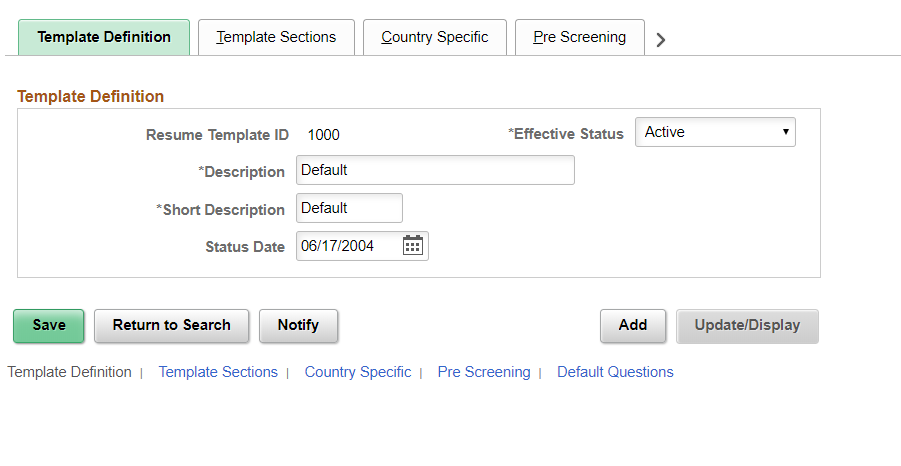
Use the Template Definition page (HRS_RES_TMPL1) to define basic information for resume templates.
Navigation:
This example illustrates the Template Definition page.
Field or Control |
Description |
|---|---|
Resume Template ID |
The system assigns the Template IDs when the template is first saved. |
Effective Status and Status Date |
Indicate whether the definition is Active or Inactive, and specify the date that the status was assigned. Only active templates are available for selection in recruitment templates. The system displays a warning if you attempt to inactivate a template that is used in a recruitment template. |
Description and Short Description |
Enter an identifying name for this template A descriptive name helps you when you reference the template from within a recruitment template or site definition. |
Use the Template Sections page (HRS_RES_TMPL2) to define resume template steps, including substeps and sections.
Navigation:
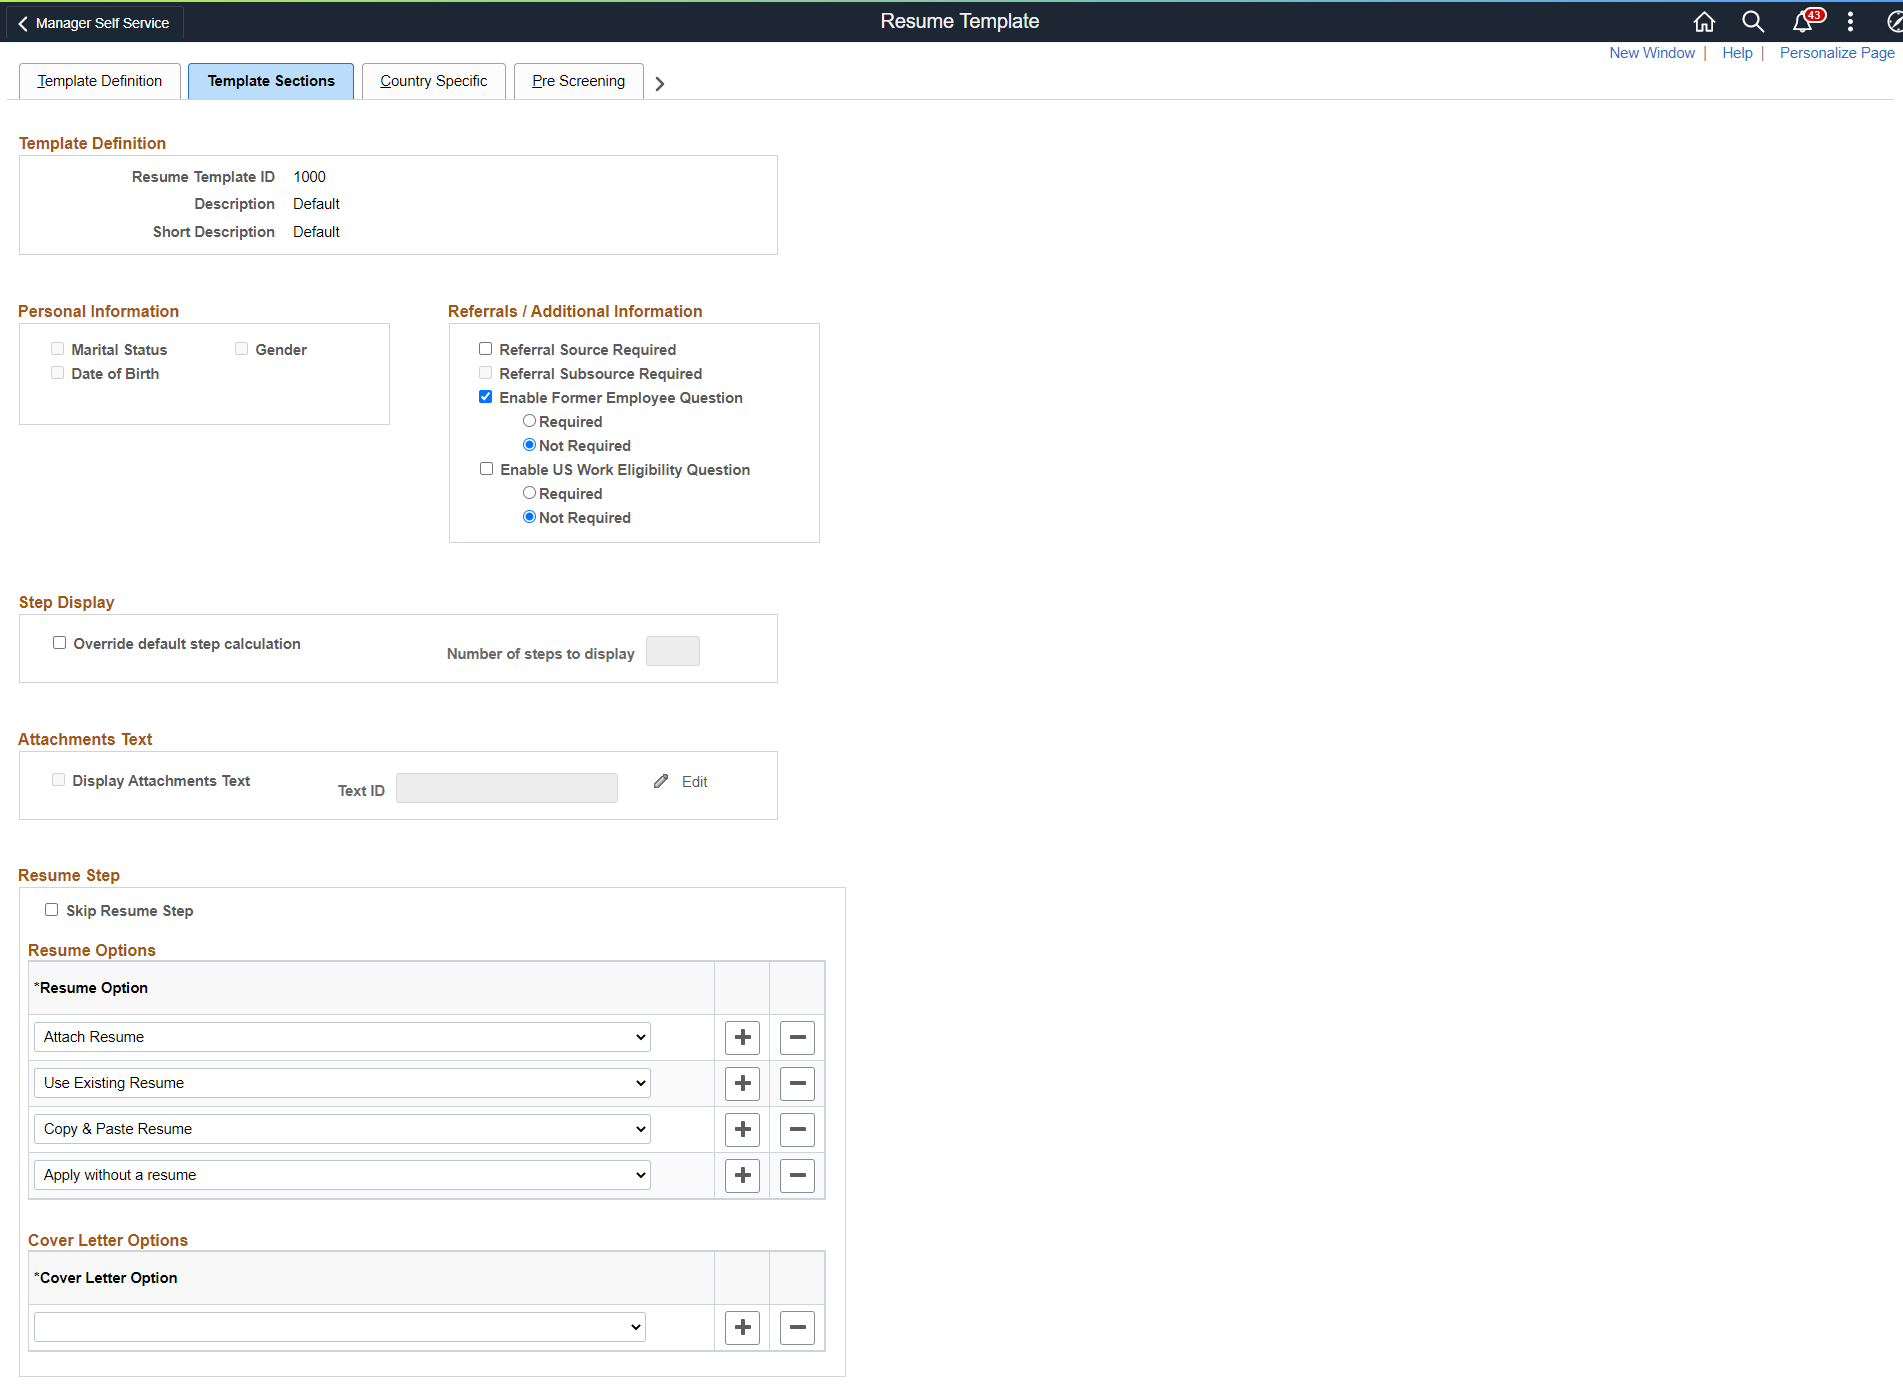
This is the first of two examples illustrating the Template Sections page.
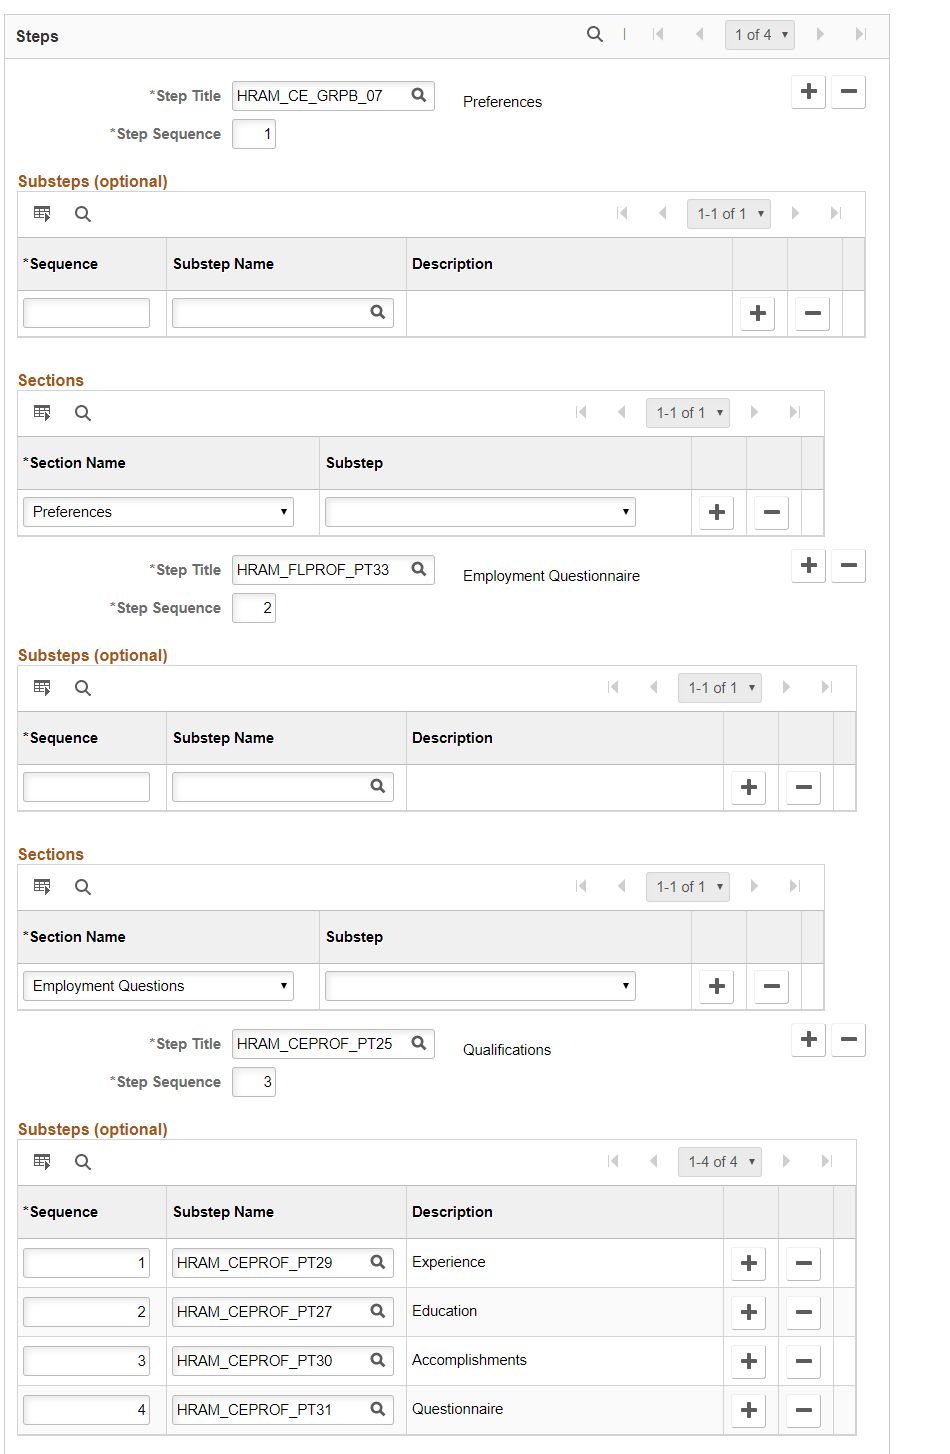
This is the second of two examples illustrating the Template Sections page.
Personal Information
Use this group box to select the types of personal information that you want applicants to enter when they apply for jobs online
Field or Control |
Description |
|---|---|
Marital Status, Date of Birth, and Gender |
If you include the Personal Information section in the template, select one or more of these check boxes to indicate which types of personal information to collect from applicants. Normally, country or regional statutes and regulations determine which options you select. Note: Do not select the Gender option in templates for jobs in the United States. When applicants apply for United States jobs, the application process includes a Diversity page where applicants can enter gender and ethnicity information. These check boxes are available only if the Personal Information section is included in the template. If you remove the section, the system deselects the check boxes, and you will need to re-select at least one if you later add the section back to the template. |
Note: When these options are selected, the data is collected as part of the application form, not as part of the USA-specific self-identification details (gender and ethnicity) that are collected at the end of the application process for U.S. jobs. However, the field used to collect gender data is the same in both places, so if the field appears in both places during the application process, changes to the value in one step carry over to the other step.
Referrals
If you include the Referrals section in the template, use these check boxes to control the fields in the Referrals section. These check boxes are available only if the Referrals section is included in the template. If you remove the section, the system deselects the check boxes. Adding the section back does not restore the check boxes to their previous state.
Field or Control |
Description |
|---|---|
Referral Source Required |
Select this check box to make it mandatory for applicants to specify a referral source when completing an application using this template. If an applicant tries to continue past the step with the Referrals section without entering the required information, the system forces the applicant to either enter the missing information, save the application as a draft, or exit the application. |
Referral Subsource Required |
Select this check box to make it mandatory for the applicants to specify a referral subsource in addition to the source. This check box is available only when the Referral Source Required check box is selected. The system does not validate the existence of valid subsource data when you select this check box. However, even if this check box is selected, the system will allow an applicant to submit an application without a subsource if there are no subsources for the selected referral source. |
Enable Former Employee Question |
Select the check box to display the ‘Are You a former Employee?’ field in the Referrals section of the Job Application page. Note: This field applies only to External Applicants and is not displayed in the Referrals step for Internal Applicants. |
Required |
Select this option to set the ‘Are You a Former Employee’ as a mandatory field. Once selected, the applicant has to answer the question ‘Are You a Former Employee?’ when completing an application using this template. If an applicant tries to continue past the step with the Referrals section without entering the required information, the system forces the applicant to either enter the missing information, save the application as a draft, or exit the application. |
Not Required |
Select this option to set the ‘Are You a Former Employee’ as a non-mandatory field when an applicant completes an application using this template. |
Enable US Work Eligibility Question |
Select the check box to display the ‘Eligible to Work in US’ field in the Referrals section of the Job Application page. |
Required |
Select this option to set the ‘Eligible to Work in US’ as a mandatory field. Once selected, the applicant has to answer the question ‘Eligible to Work in US Work’ when completing an application using this template. If an applicant tries to continue past the step with the Referrals section without entering the required information, the system forces the applicant to either enter the missing information, save the application as a draft, or exit the application. |
Not Required |
Select this option to set the ‘Eligible to Work in US’ as a non-mandatory field when an applicant completes an application using this template. |
Note: Any change to ‘Are You a Former Employee’ and ‘Eligible to Work in US’ fields in Resume Template will be reflected only in the new Job Openings created using the updated Resume Template and not the existing/old job openings.
Step Display
Field or Control |
Description |
|---|---|
Override Default Step Calculation |
During the online application process, the system positions the steps along the horizontal bar using paging algorithms that are based on the length of the step labels. Depending on the number of steps and the length of their labels, the horizontal bar might not be able to display all of the steps at once. In this case, the horizontal bar displays paging controls that enable applicants to scroll to the overflow steps . Select the Override Default Step Calculation check box to make the Number of Steps to Display field editable so that you can choose a fixed number of steps to display rather than using the system’s paging algorithms. This setting affects the main application steps only—it does not impact the display of substeps. Also, the system ignores the override if multiple resume templates are merged when an applicant applies for multiple jobs at once. |
Number of Steps to Display |
Enter the number of steps that the horizontal bar should display. |
Important! Oracle recommends that you do not use the override option. If you do use it, be sure to test your settings thoroughly to ensure that your override does not cause overlapping step labels, broken connector lines, or other display issues.
Attachments
The fields in this group box are disabled if the template does not include the Attachments section. If you remove the Attachments section from the template, these fields are cleared.
Field or Control |
Description |
|---|---|
Display Attachments Text |
Select this check box if you want the Attachments section in the online job application to include instructional text. Note that this setting is for the general-purpose Attachments section. It is not related to resume or cover letter attachments that applicants upload on the Resume step. |
Text ID |
If you selected the Display Attachments Text check box, specify the text catalog entry that contains the instructional text to be displayed. Keep in mind that the same text catalog entry is used for all job applications that use this resume template. If your attachment requirements vary for different jobs, the best practice is to include the attachment requirements in the job description and use the instructional text to direct the applicant to the job description for these detailed requirements. Oracle delivers text catalog entry HRAM_ATTACH_INSTR for this purpose. |
Edit |
If you entered a text ID, click the Edit link to view or edit the specified text catalog entry on the Maintain Text Catalog page. |
Resume Step
Field or Control |
Description |
|---|---|
Skip Resume Step |
Select this check box to prevent the Resume step from appearing in the guided application process. Skipping the resume step means that the guided application process will not include either the Resume section or the cover letter section. If you do not select this check box, be sure to configure resume options, cover letter options, or both. Otherwise applicants will see a blank resume step. Note: This setting does not apply to the Refer a Friend process In Classic Candidate Gateway. It does, however, apply to the Refer a Friend process in Fluid Candidate Gateway. |
Resume Options |
List the resume options that you want to offer to applicants. The options are:
The options that you choose here are used for applicants’ own applications and for applications that are created using the Refer a Friend process. However, the Use Existing Resume option is not valid during the Refer a Friend process. If this grid is empty, the Resume section does not appear on the Resume Step in the guided application process. If this grid does not include the Attach Resume option, the Resume step does not appear during the Fluid Candidate Gateway process for referring a friend. This is because Attach Resume is the only valid option for referrals in Fluid Candidate Gateway. In Classic Candidate Gateway, the Resume step always appears during the Refer a Friend process. Therefore, if you use Classic Candidate Gateway, you should always include a resume option. If you don’t want applicants to see the resume step in the guided application process, select the Skip Resume Step check box after you enter the resume options to use for the Refer a Friend process. |
Cover Letter Options |
List the cover letter options, if any, that you want to offer to applicants.
If you leave this grid empty, the cover letter section does not appear on the Resume Step in the guided application process. The Refer a Friend process does not include a cover letter section, so the options you choose here are only relevant to applicants’ own applications. |
Steps
Use this scroll area to define steps and their sequence. Use the grids within this scroll area to define the substeps and sections that make up the step.
Field or Control |
Description |
|---|---|
Step Title |
Select a text catalog entry to use as the title of the step. Only text IDs with HRAM (RS Applicant Manager) as the object owner identifier are available for selection. Note: The text catalog entered for Step Title and Sections – Substep should have different usage values. For example, the usage of text catalog for Step title and Section – Substep can be Page Title and Page Instructions. To know more on text catalogs, see Text Catalogs. |
Step Sequence |
Enter a sequence number to control the order that the steps appear in the Candidate Gateway guided application process. |
Substeps (Optional)
Optionally define substeps to be rendered under the main step. Substeps, like steps, require both a sequence number and a name that comes from the text catalog.
Field or Control |
Description |
|---|---|
Sequence |
Enter a sequence number to control the order that the substeps appear on the step. |
Substep Name |
Select a text catalog entry to use as the title of the substep. Only text IDs with HRAM (RS Applicant Manager) as the object owner identifier are available for selection. |
Description |
Displays the default text for the selected text catalog entry. |
Sections
Field or Control |
Description |
|---|---|
Section Name |
Select the sections to be included on this step. Sections cannot be added to a resume template more than once, even on different steps or substeps. PeopleSoft delivers several predefined sections in addition to the profile-related sections that are based on the primary person profile type. Sections on a step or substep appear in a predefined order, regardless of the order they are listed in the resume template. All profile-related sections are grouped together, but within that grouping, they appear in the order they are listed in the resume template. For information about sections and about the predefined order for sections on a step, see Understanding Resume Templates. |
Required |
Select this check box if you require applicants to provide at least one row of data for a section. This check box is visible only for sections that correspond to grids, including Attachments, Work History, Training, References, and all profile-related sections. Selecting the Required check box for the Attachments section forces applicants to upload at least one attachment. If you select this check box, be sure to use the Attachments Text fields on this page to set up informational text to help applicants understand what documents to upload. Do not make the Attachments section required unless the Attachment Type Setup Page is configured to allow job applications to include at least one attachment with a processing type of References or Other For profile-related sections, consider whether applicant data will be transferred to the HR system during hire processing and whether the content type is marked as required for employees on the Profile Types - Content Page. If a content type that is transferred during the hire process is required for employees but not for applicants, you can encounter hire processing errors for applicants who do not have at least one row of data for the required content type. Making the content type required for applicants can help you avoid this problem. If you choose not to make the content type required in the resume template, a recruiter can manually enter a row in Talent Acquisition Manager before hiring an applicant. Note: The system ignores the Required setting for any profile content items where the Applicant May Add Items check box on the Content Section Configuration – <Content Type> Page is deselected. This configuration prevents applicants from adding rows to the grid, so it is not possible to require the applicant to provide data. |
Substep |
If a step has substeps, then associate every section with a substep. Note: The text catalog entered for Step Title and Substep should have different usage values. For example, the usage of text catalog for Step title and Substep can be Page Title and Page Instructions. To know more on text catalogs, see Text Catalogs. |
Use the Country Specific page (HRS_RES_TMPL3) to define whether the application process collects community background information for Northern Ireland
Navigation:
This example illustrates the Country Specific page.

Field or Control |
Description |
|---|---|
Use Community Background |
Select this check box to make the Community Background step appear in the guided application process. The Community Background step appears after the last of the steps that you define on the Template Sections page. |
Use the Pre Screening page (HRS_RES_TMPL4) to define prescreening for applicants who apply without a job opening using this resume template.
Navigation:
This example illustrates the Pre Screening page.
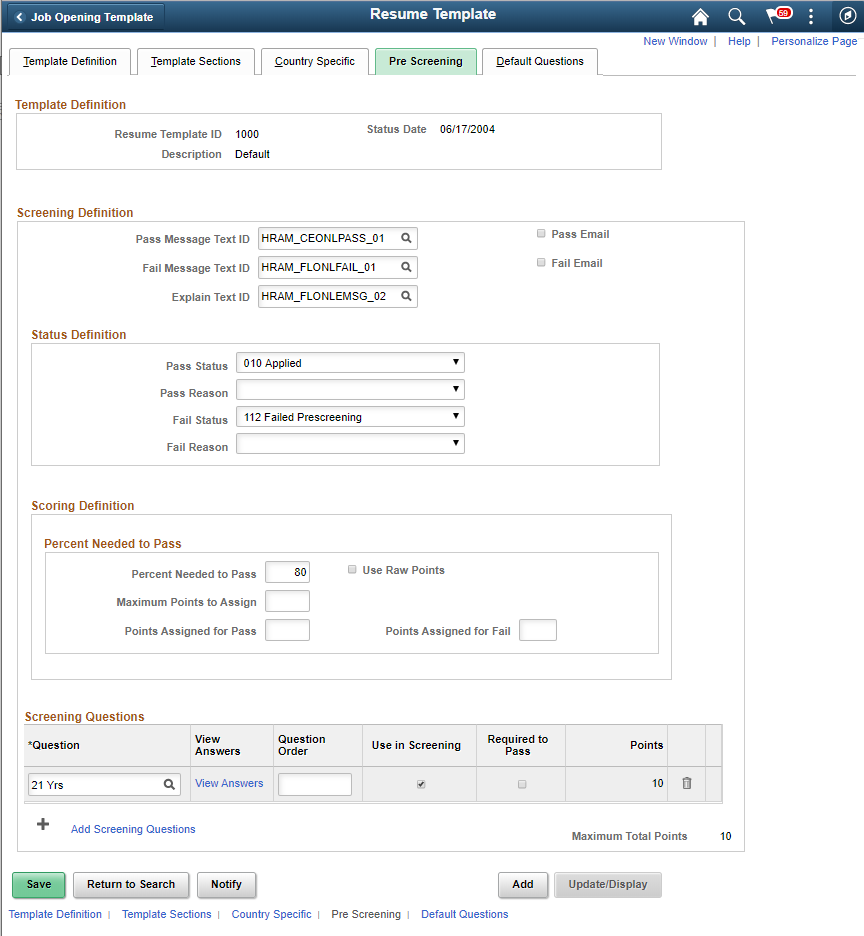
Understanding Resume Template Prescreening Configuration
Prescreening for specific job openings is defined within the job opening. However, if an applicant applies without selecting a job opening, the system uses the questions defined in the Pre Screening tab from the default resume template of the site. The prescreening questions in this situation must be general questions (employment questions), not job-specific questions, intended for all applicants who use the site. For example, for a country-specific site, you might ask applicants if they can legally work in that country.
Important! When an applicant applies for a job opening, prescreening settings in the job opening (and not the prescreening settings on the resume template) determine whether prescreening occurs.
Screening Definition Messages
If you add any prescreening questions to the resume template, the three text ID fields in this section are required.
Field or Control |
Description |
|---|---|
Pass Message Text ID and Fail Message Text ID |
Select the IDs for the messages that Candidate Gateway presents to applicants who pass and who fail this screening level. To create your own message, you can modify the delivered text catalog entries or create your own. If you create your own, use the following conventions to make the text catalog entries available for selection:
|
Explain Text ID |
Select a message for the system to display in the Prescreening Notices section of the application Start step. This message should explain what the applicant is being asked to do. To create your own message, you can modify the delivered text catalog entries or create your own. If you create your own, use the following conventions to make the text catalog entries available for selection:
|
Pass Email Flag and Fail Email Flag |
Select these check boxes to make the system send the pass and fail messages to applicants by email (in addition to showing the message in Candidate Gateway). The system sends the message to the applicant’s primary email address. |
Status Definition
If you add any prescreening questions to the resume template, both a pass status and a fail status are required.
Field or Control |
Description |
|---|---|
Pass Status and Pass Reason |
Select the disposition (and, if desired, an associated reason) to assign to applicants who pass this prescreening process. The selected disposition is not applied until the application is submitted, at which point this disposition overrides the default disposition that would otherwise be assigned to new applications. Typically, the pass status is Applied. |
Fail Status and Fail Reason |
Select the default disposition (and, if desired, an associated reason) to assign to applicants who fail this prescreening process. Typically, the fail status is Failed Prescreening. |
Scoring Definition and Percent Needed to Pass
Use this group box defines the rules for determining whether the applicant passes or fails prescreening.
Field or Control |
Description |
|---|---|
Percent Needed to Pass |
Enter the minimum percentage amount of the total possible points that an applicant needs in order to pass the screening level. If the applicant must correctly answer all prescreening questions, enter 100%. |
Use Raw Points, Maximum Points to Assign, Points Assigned for Pass, and Points Assigned for Fail |
Use these fields to assign an applicant points for the screening level. These fields are the same as those on the Screening Definition Page. |
Screening Questions
Field or Control |
Description |
|---|---|
Question |
Select the questions to include in the prescreening questionnaire. (Prescreening questions must not be open-ended because the system cannot evaluate answers to open-ended questions.) |
View Answers |
Click to access the Answers to Screening Questions Page, where you can review the possible answers to the question, see which answers are correct, and update the correct answer / Where Clause and point values for the answers. |
Question Order |
Enter sequence numbers for each question to establish the order in which they appear in the questionnaire. Because this field accepts only integers, consider using non-consecutive numbers to make it easier to insert additional questions between existing questions. Note: If the Randomize Screening Questions field on the Recruiting Installation – Jobs Page is set to Yes, then the system disregards the question order and presents questions to applicants in random order. |
Use in Screening |
Select to include the question in the prescreening questionnaire for candidates who apply without a job. This page lists only the questions that you use for prescreening, so you must select this check box for all of the questions in the grid. |
Required to Pass |
Select to indicate that a correct answer to the question is required in order for the applicant to pass the screening process. An applicant who does not provide the correct answer for a required to pass question fails the screening level regardless of whether the applicant has an otherwise passing score. Note: This setting does not force applicants to supply an answer. To force applicants to answer all questions, select the Require Answers to Questions check box on the Site Setup Page. or mark the questions as required at job opening level. |
Points |
Displays the point value of the correct answer or, if the question has more than one correct answer, the sum of the point values for all correct answers. To ensure correct processing, make sure that each question has a point value. Use the View Answers link if you need to assign or update point values. |
Maximum Total Points |
Displays the sum of the point values for all questions in the Screening Questions grid. |
Add Screening Questions |
Click to add another row to the Screening Questions grid. |
Use the Answers to Screening Questions page (HRS_RES_ANSWER_SEC) to review answers to a prescreening question, and assign points to each answer.
Navigation:
Click the View Answers link on the Pre Screening page.
This example illustrates the Answers to Screening Questions page.
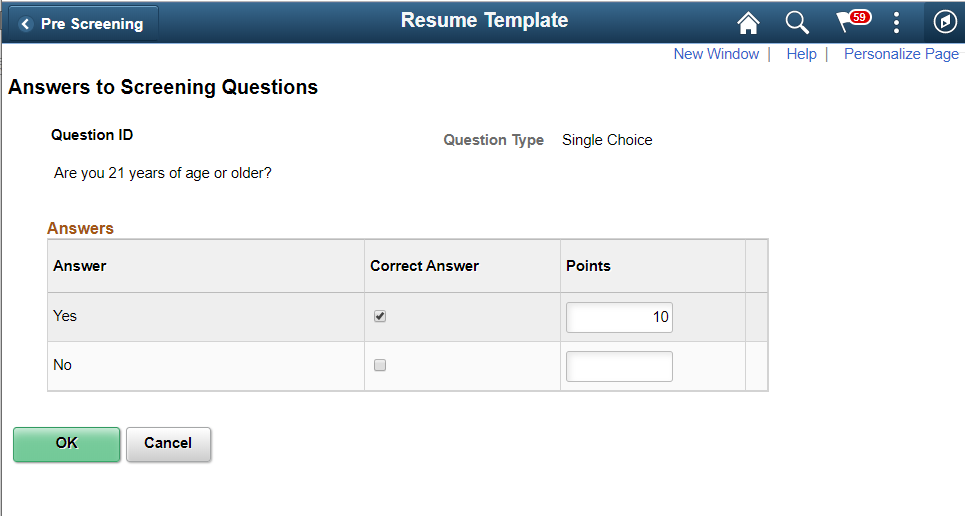
Field or Control |
Description |
|---|---|
Answer and Correct Answer |
The Answers grid lists all possible answers for the question. The Correct Answer check box is selected to indicate the correct answer or answers. Review and update the correct answer if required. |
Points |
Review and optionally override the point value for each possible answer to the question. Default point values come from the question definition. You can assign points for both correct and incorrect answers. |
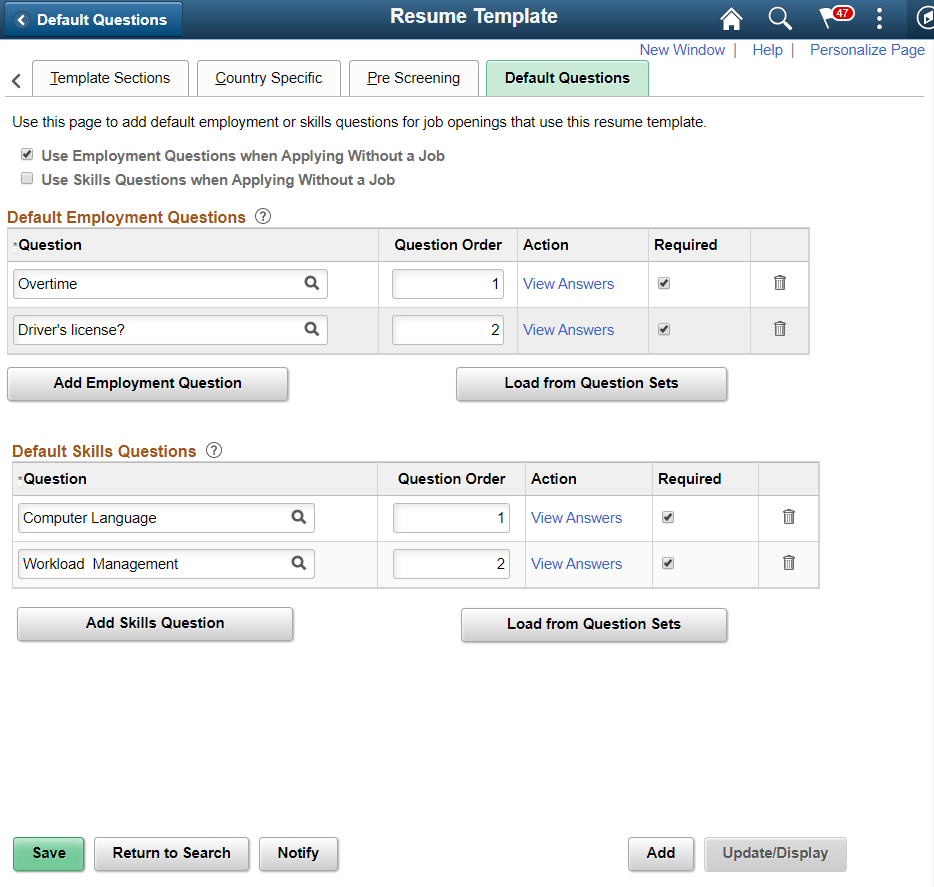
Use the Default Questions page (HRS_RES_TMPL5) to define default skills and employment questions for job openings that use this resume template.
Navigation:
Default Questions page.
Field or Control |
Description |
|---|---|
Use Employment Questions when Applying Without a Job |
Select this option if you want to display the employment questions to candidates who apply without a job. |
Use Skills Questions when Applying Without a Job |
Select this option if you want to display the skills questions to candidates who apply without a job. |
Question |
Choose the question from the list of saved questions. |
Question Order |
Choose the order in with the questions should be displayed. |
View Answers |
Use the View Answers link to view the question and answer and the points assigned to it. You can edit the correct answer and points if the question is not already in use in any of the job openings. |
Required |
Choose this option to make the question mandatory. |
Add Skills Question or Add Employment Question |
Use this button to add a new row for the skills or employment questions section. You cannot choose the same question for both Skills Question and Employment Question |
Load from Question Sets |
Use this button to load questions from a question set. Open ended questions will not be loaded. |