Applying for Jobs
This topic discusses the pages that applicants use to complete an online job application.
Note: This feature has been replaced by the job application functionality in Fluid. For more information, see Using Fluid Candidate Gateway to Apply for Jobs.
Note: External applicants must sign in before starting a job application. The system prompts applicants to sign in if necessary.
|
Page Name |
Definition Name |
Usage |
|---|---|---|
|
The Guided Application Process (common element on pages used to apply for jobs) |
n/a |
A graphical representation of the application process appears at the top of each step in the application process. Applicants use the guided application process to view the overall step sequence and navigate between numbered steps. |
|
HRS_CE_START |
Review notices and accept any terms and agreements. If none exist, this page does not appear. |
|
|
HRS_JOB_DTL_SEC2 |
Review job opening details. |
|
|
HRS_APP_JOPRESCRN (for applications with a job opening) HRS_APP_PRESCREEN (for applications without a job opening) |
Answer prescreening questions. |
|
|
HRS_CE_JOSCR_RSLT2 |
Review prescreening results. |
|
|
HRS_RESUME_OPTION |
Supply a resume and cover letter as part of a job application. |
|
|
HRS_APPLY_RESUME |
Enter resume text into a rich text field, and provide a resume title and language. |
|
|
HRS_RESUMES_SEC |
Choose a resume from a list of previously-submitted resumes. |
|
|
<Step Name> Page (as configured on the resume template) |
HRS_CE_PROFILE |
Enter application data using steps that are defined on the resume template. These are the sections that can be configured to appear: |
|
HRS_CE_D_ATTACH |
Select an attachment type and initiate the file selection process. |
|
|
HRS_CE_G_D_PP |
Enter priority placement information. |
|
|
HRS_CE_D_WRK_EXP |
Enter work experience information. |
|
|
HRS_CE_D_TRAINING |
Enter job training information. |
|
|
HRS_CG_APP_DETAIL (when adding a new profile item) HRS_CG_APP_DTL_SEC (when editing an existing profile item) |
Enter details about a profile-based qualification. |
|
|
HRS_CE_D_REFERENCE |
Enter name and contact information for a person who can supply a professional or personal reference. |
|
|
HRS_APP_CB2 |
Enter community background information for Northern Ireland. |
|
|
HRS_CE_DISABILITY |
Enter self-identified disability information. This page supports compliance with regulations from the U.S. Department of Labor’s Office of Federal Contract Compliance Programs (OFCCP). |
|
|
HRS_CE_VETERAN |
Enter self-identified veteran status. This page supports compliance with OFCCP regulations from the U.S. Department of Labor. |
|
|
HRS_CE_SELF_IDENT |
Enter gender and ethnicity information for equal employment opportunity reporting in the United States. |
|
|
Ethnic Group Page or Race page |
HRS_CE_DIV_EXPLAIN |
Displays explanatory text to help applicants answer the questions “Are you Hispanic or Latino?” and “What is your race?” These questions appear on the Diversity page when the system is configured to collect ethnicity and race information using a two-part question. To access this page, applicants click the Explain link next to either of the questions on the Diversity page. The page title and content depend on which Explain link is clicked. |
|
HRS_CE_REVIEW |
Review application data, and submit an application. |
|
|
HRS_APP_PRFILE_SEC |
External applicants use this page to review and update name contact information. Internal applicants can review this information, but they cannot make any changes because the information comes from HR records. |
|
|
HRS_CE_CONFIRM |
View a confirmation that an application has been successfully submitted, and review online screening results for job openings that include pass and fail messages for online screening. |
|
|
HRS_CE_REVIEW |
Review a submitted application. |
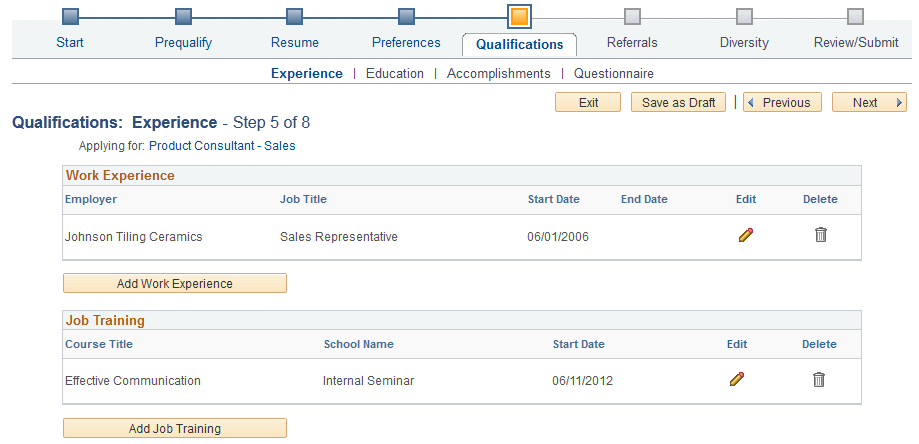
The Candidate Gateway guided application process includes the following elements that appear on all steps:
A navigation bar showing the overall sequence of steps.
A row of navigation buttons that appears below the horizontal bar and also at the bottom of the step.
A page title and step count (for example, step 5 of 8).
An Applying For link listing the job opening(s) that the applicant is applying for.
This example illustrates common elements in the guided application process. In this example, the horizontal navigation bar includes eight steps. The icons for the first four steps are blue, indicating that the applicant has already visited those steps. The icon for the next step is orange, indicating that it is the step currently being viewed. The current step (Qualifications) also has substeps for Experience, Education, and Accomplishment. These are shown under the main navigation bar. The icons for the final three steps in the process are gray, indicating that the applicant has not yet visited those steps.

Navigation Bar
Field or Control |
Description |
|---|---|
<Step> |
The navigation bar shows an applicant all of the steps in the online job application process. An applicant must navigate through all of the steps to complete the application. On the final Review/Submit step, the applicant can submit the application. Steps are represented by both a label and an icon. The icon for the current step is orange. Unvisited steps have gray icons, and the icons for completed steps are blue. Depending on the resume template configuration, some steps may have substeps. Substeps have a label, but no icon. They are visible only when the applicant is on the parent step. Applicants can return to already-visited steps and substeps by clicking the icon or the label in the navigation bar. However, applicants cannot use the navigation bar to access steps that they have not yet visited. Instead, applicants use the Next button to navigate to unvisited steps and substeps in sequence. When an applicant moves to a different step (regardless of the method), the system validates that all required information is present on the current step. If any required information is missing, a message appears, and the applicant must provide the missing information before continuing. |
|
If an application has more steps or substeps than the navigation bar can display at one time, these overflow icons appear at the edges of the navigation bar. Applicants can use these icons to view the additional steps. The number of steps that the navigation bar displays at one time is based on the length of the step labels. (Resume templates include a setting for overriding the number of steps to display, but Oracle recommends against using this option.) |

Buttons
Field or Control |
Description |
|---|---|
Exit |
Clicking this button exits the application process. If the applicant has not moved past the Start step, the system does not save the application. Otherwise, the system saves the application in draft status (that is, with the Draft disposition) before exiting. Draft applications show the status as Not Submitted in the Applications grid on the My Activities page. When an applicant accesses an unsubmitted application, the system normally restarts the application on the last saved step. However, if there have been changes to the terms and agreements shown on the Start step, or if there have been changes to steps controlled by the resume template, the system returns the applicant to the Start step. The applicant’s previously entered data is preserved, but the applicant must still revisit each step. |
Save as Draft |
Clicking this button saves an in-progress application without submitting it. This button is not visible on the Start step. |
Previous |
Clicking this button saves changes to the current step and navigates to the previous step. The button is disabled for the first step in the application process. |
Next |
Clicking this button saves changes to the current step and navigates to the next step. If any required information is missing on the current step, a message appears, and the applicant must provide the missing information before continuing to the next step. On the last step of the application process (the Review/Submit step), the next button is replaced by a Submit Application button. |
Submit Application |
This button appears only on the Review/Submit step. An applicant clicks this button to submit the application. Applicants cannot make any further changes to an application that has been submitted. To provide an updated application, the applicant can re-apply. Applications that have been submitted have the status Submitted in the Applications grid on the My Activities page. |
Page Title and Step Number
Field or Control |
Description |
|---|---|
<Title Text> |
Displays a page title that includes both the step name and the step number, such as Start - Step 1 of 8 |
Job Openings in Application
Field or Control |
Description |
|---|---|
Applying For |
Displays the posting titles of all job openings included in the application. This text is a link that the applicant can click to open the Job Details Page. If the applicant applied without selecting a job, this field displays the text You have not selected a job. If an applicant fails prescreening for a subset of the jobs in a multi-job application, the system removes that subset of jobs from the list of job openings. Applicants can also manually remove jobs from an application on the Review/Submit page. Applicants cannot, however, add jobs to an application. |
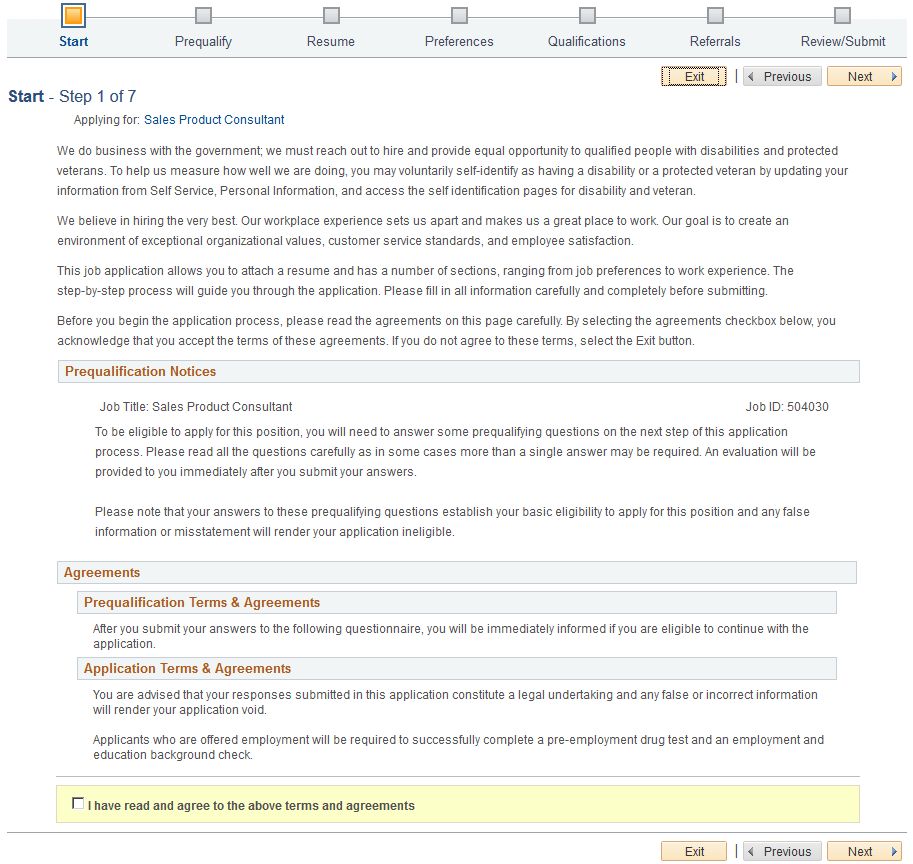
Applicants use the Start page (HRS_CE_START) to review notices and accept any terms and agreements.
This page appears if the site definition is configured to show start step content or if the application includes prescreening.
Navigation:
Begin a job application. To do this:
Click the Apply button on the Job Description page.
If applications for multiple jobs are allowed, click the Apply for Selected Jobs button on the Job Search page or the My Favorite Jobs page.
If applying without a job is allowed, click the Apply Without a Job Opening link on the Job Search page.
This example illustrates the Start page with sample text. Oracle delivers these sample text examples.
This illustration of the Start page replaces the sample notices with descriptions of each notice and the text catalog ID for each notice.
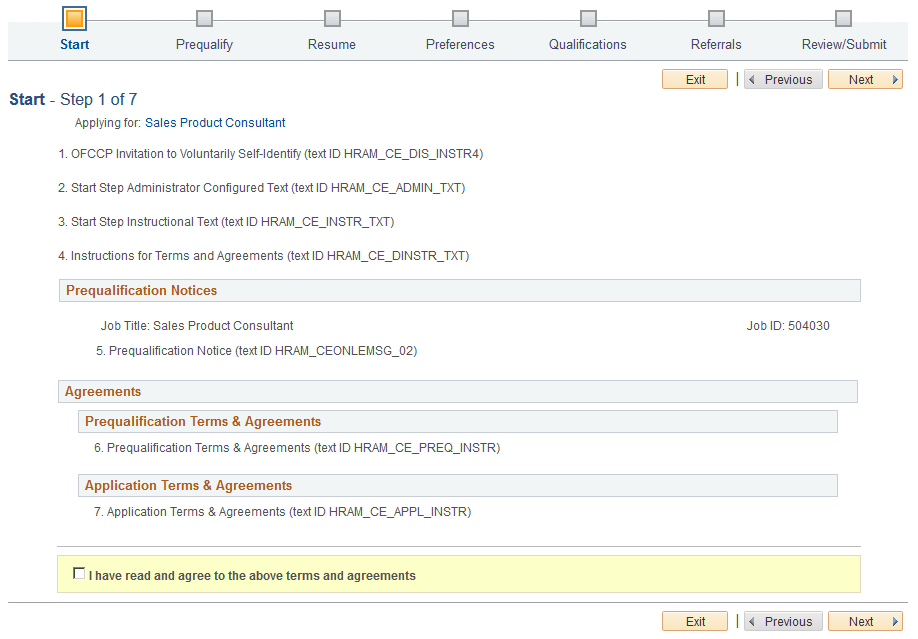
Note: The following text elements appear on the Start step without labels, but the illustration above identifies these text elements on the page.
Field or Control |
Description |
|---|---|
1. OFCCP Invitation to Voluntarily Self-Identify |
Appears only for internal applicants, and only if the OFCCP Self-Identify field on the Site Setup Page page is configured to request veteran or disability self-identification from applicants. This notice (text catalog ID HRAM_CE_DIS_INSTR4) informs internal applicants that they can use HR self-service to voluntarily self-identify as having a disability or a protected veteran status. This notice is shown to internal applicants in lieu of collecting self-identification information during the application process. |
2. Start Step Administrator Configured Text |
Appears only if the Display Start Step Administrator Configured Text check box is selected on the Site Setup page. This notice (text catalog ID HRAM_CE_ADMIN_TXT) can serve any purpose. For example, use it to introduce your organization, make announcements, and so forth. |
3. Start Step Instructional Text |
Appears only if the Display Start Step Instructional Text check box is selected on the Site Setup page. This notice (text catalog ID HRAM_CE_INSTR_TXT) is intended for general instructions related to the application process. It should not be used for instructions related to terms and agreements, as a separate text block exists for that purpose. |
4. Instructions for Terms and Agreements |
Appears only if the applicant must agree to any terms and agreements. This occurs if the Display Application Terms and Agreements check box is selected on the Site Setup page or, for jobs with prescreening, if the Display Prequalification Terms and Agreements check box is selected on the Site page. This notice (text catalog ID HRAM_CE_DINSTR_TXT) instructs applicants to read the terms and agreements and explains that they must agree to the terms before continuing. |
Prequalification Notices
Field or Control |
Description |
|---|---|
5. Prequalification Notice |
Appears only if the application includes a Prequalify step. You cannot disable prequalification notices. The notice text comes from the Explain Text ID field in the job opening’s prescreening setup (or, if there is no job opening, from the prescreening setup on the resume template). The relevant job title and job ID appear before the notice. If the application includes multiple jobs with prescreening, notices for jobs that use the same Explain Text ID are consolidated. That is, the titles and job IDs for all jobs using a particular notice are listed before the notice. If jobs use different Explain Text IDs, the notices appear sequentially under the appropriate job titles and IDs. |
Agreements
Field or Control |
Description |
|---|---|
6. Prequalification Terms & Agreements |
Appears only if the application includes prescreening and the Display Prequalification Terms and Agreements check box is selected on the Site Setup page. This text element (text catalog ID HRAM_CE_PREQ_INSTRU) presents terms and agreement related to the prescreening process. |
7. Application Terms & Agreements |
Appears only if the Display Application Terms and Agreements check box is selected on the Site Setup page This text element (text catalog ID HRAM_CE_APPL_INSTR) presents general terms and agreements related to the submission of any job application. |
Consent to Terms and Agreements
Field or Control |
Description |
|---|---|
I have read and agree to the above terms and agreements |
Appears only if the Site Setup page is configured to show either application terms & agreements or prequalification terms & agreements. Applicants must select the check box to indicate consent to the terms and agreements before they can continue to the next step. |
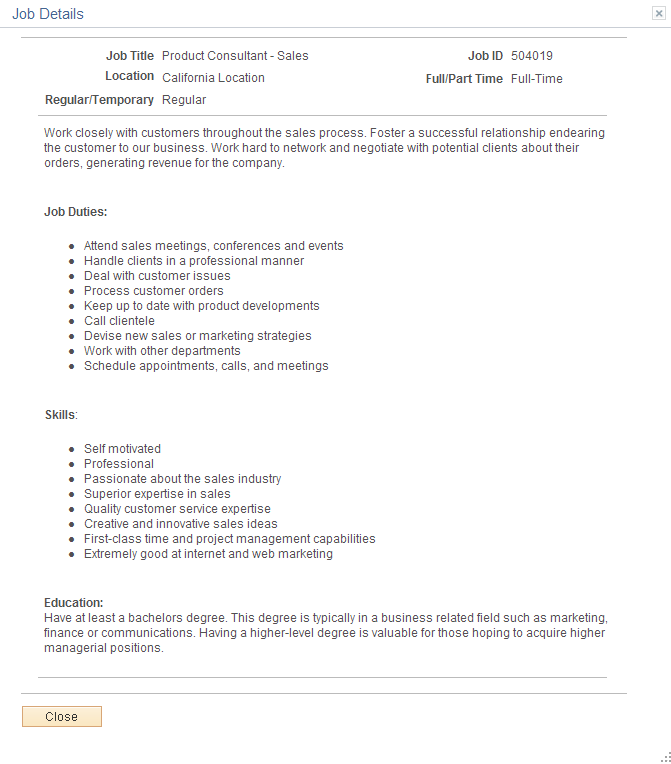
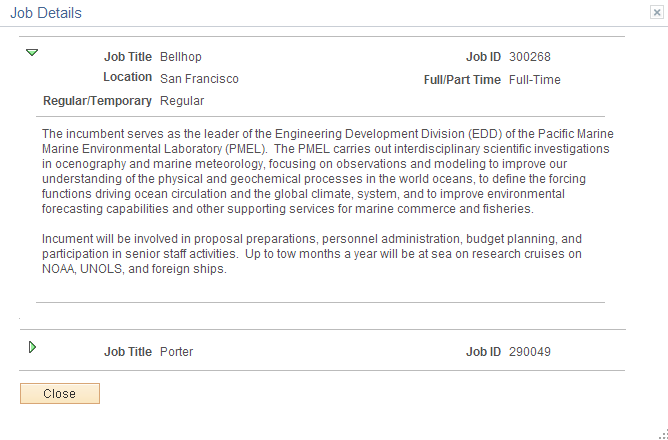
Applicants use the Job Details page (HRS_JOB_DTL_SEC2) to review detailed posting information for the jobs included in the application. For a multi-job application, the page lists all jobs in collapsible sections.
Navigation:
Click the job title(s) in the Applying For field that appears on every step of the application.
This example illustrates the Job Details page when the application includes a single job opening.
This example illustrates the Job Details page for a multi-job application. The page includes collapsible sections for each job. Initially, the section for the first job is expanded and the sections for all other jobs are collapsed.
Field or Control |
Description |
|---|---|
Close |
Clicking this button closes the Job Details page and returns the applicant to the guided application process. |
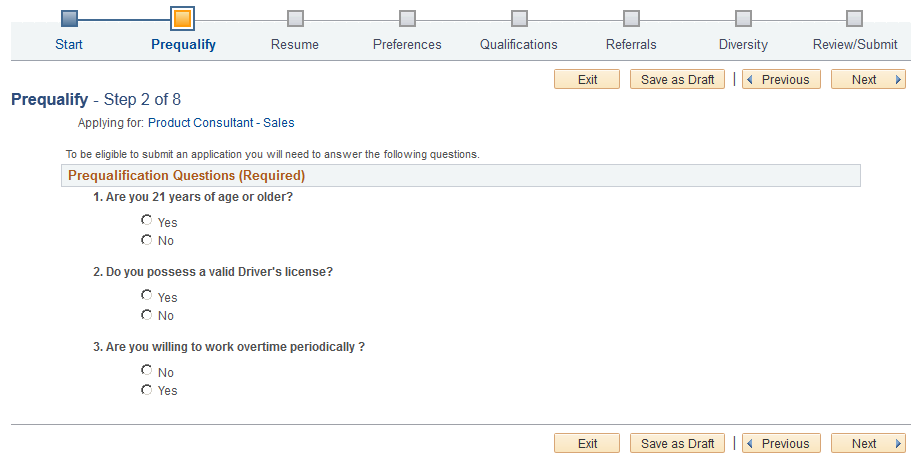
Applicants use the Prequalify page (HRS_APP_JOPRESCRN for applications with a job opening, or HRS_APP_PRESCREEN for applications without a job opening) to answer prescreening questions.
Navigation:
Click the Next button on the Start step.
This example illustrates the Prequalify page.
Field or Control |
Description |
|---|---|
Prequalification Questions |
This section displays a numbered list of questions. These questions come from the prescreening definition on the job opening (or, for applications without a job opening, from the prescreening definition on the resume template). In a multi-job application, prescreening questions for all jobs are consolidated into one list. Prescreening questions never have default answers, even if the applicant previously applied for the job. Radio buttons indicate that the question has one correct answer. Check boxes indicate that the question has multiple correct answers. Prescreening questions cannot be open-ended. If the Require Answers to Questions check box on the Site Setup Page is selected, the section title includes the word (Required), and applicants must supply answers to all questions before continuing. When the applicant clicks the Next button to continue, the system immediately evaluates the answers and determines whether the applicant passes prescreening. Note: After passing prescreening and continuing to the next step, applicants can return to the Prequalify step to review the questions and answers, but in this mode, the questions are read-only. |
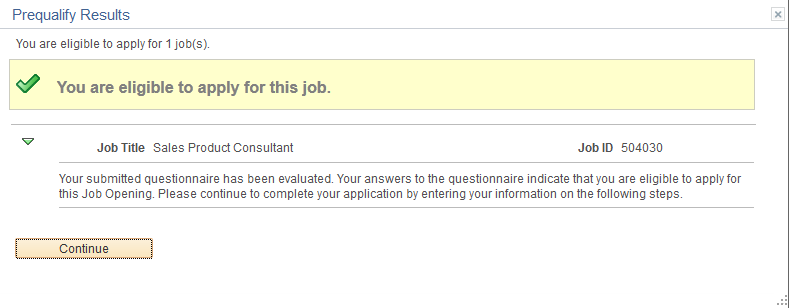
Applicants use the Prequalify Results page (HRS_CE_JOSCR_RSLT2) to review prescreening results.
Navigation:
Click the Next button on the Prequalify step.
This example illustrates the Prequalify Results page when the applicant applies for a single job and passes prescreening.
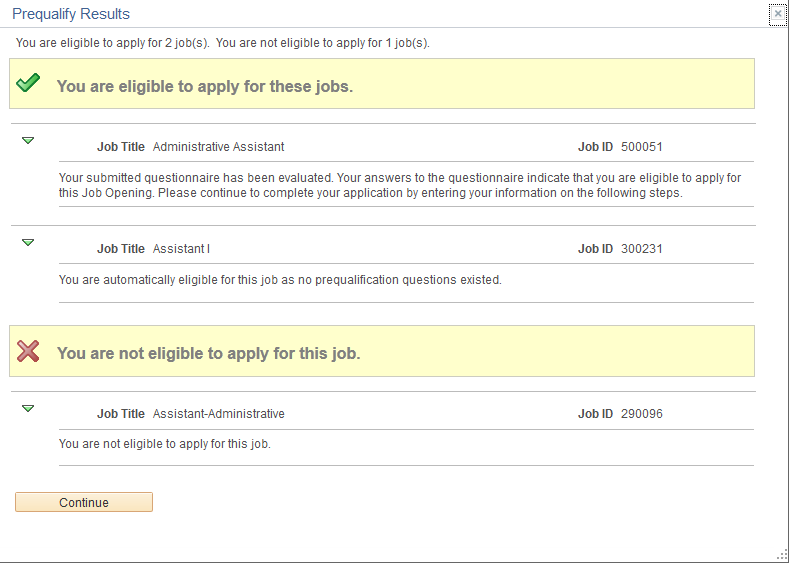
This example illustrates the Prequalify Results page when the applicant applies for multiple jobs. In this example, the applicant passed prescreening for one job and failed prescreening for another job. A third job in the application did not have any prescreening questions, so it is included in the list of jobs for which the applicant is eligible to apply.
Prescreening Summary
Field or Control |
Description |
|---|---|
You are eligible to apply for <number of> job(s) and You are not eligible to apply for <number of> job(s) |
One or both of these messages appear at the top of the page to summarize the number of jobs that the applicant is eligible and ineligible to apply for. If prescreening occurs in a multi-job application, any jobs without prescreening are included in the count of eligible jobs. |
Prescreening Details
Field or Control |
Description |
|---|---|
You are eligible to apply for <this job / these jobs> and You are not eligible to apply for <this job / these jobs> |
One or both of these sections appear depending on the prescreening results. Within each section, there is a list of the eligible or ineligible jobs. Each job appears in a collapsible section that shows the job title, the job ID, and the pass or fail message from the prescreening setup. |
Continue or Close
Field or Control |
Description |
|---|---|
Continue |
Clicking this button displays the next step in the application process. This button appears if the applicant is eligible to apply for at least one job. |
Close |
This button appears only when the applicant is not eligible to apply for any jobs. Clicking this button closes the application and returns the applicant to the Job Search page. |
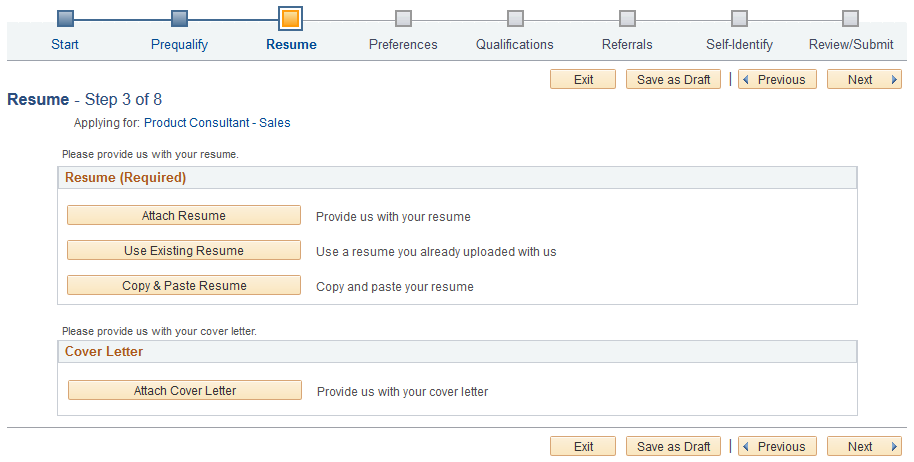
Applicants use the Resume page (HRS_RESUME_OPTION) to supply a resume and cover letter as part of a job application.
The application process includes a Resume step unless the resume template is configured to skip this step.
Navigation:
Click the Next button on the Start Step page.
If the guided application process does not include the Start step, the Resume page is the first page in the guided application process.
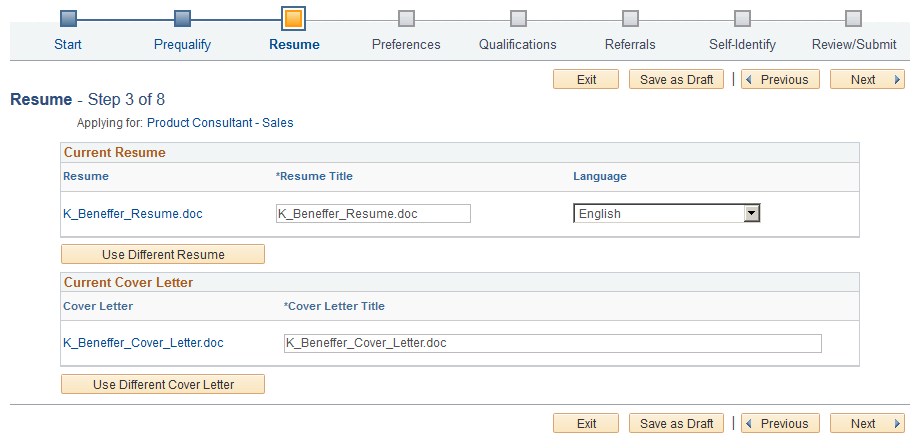
This example illustrates the Resume page before the applicant supplies a resume or cover letter. In this example, the resume template is configured so that a resume is required and a cover letter is optional.
This example illustrates the Resume page after an applicant attaches a resume and a cover letter.
Note: If resume parsing is active, it occurs as soon as an applicant uploads a resume. Parsing is used only for attached resumes, not for resumes that are entered using the Copy & Paste Resume option.
Resume
The Resume group box appears if the applicant has not yet selected a resume.
The resume template controls which options are available and whether a resume is required. If the word Required appears in the group box header, applicants cannot continue to the next step without supplying a resume. If the resume is not required, applicants do not need to explicitly indicate that no resume will be supplied. Instead, they can simply continue to the next step.
The resume template also controls which of the following options are available:
Field or Control |
Description |
|---|---|
Attach Resume |
Clicking this button displays the File Attachment dialog so that the applicant can upload an attachment. PeopleTools manages the physical storage locations of file attachments using the URL Maintenance page (PeopleTools > Utilities > Administration > URLs). Settings for the HRS_APP_ATCH_CG URL identifier determine whether there are any file type restrictions for resumes that applicants upload. The URL identifier settings also control the physical storage location for the attached file, which must match the location for the HRS_APP_ATCH URL identifier used for attachments that are uploaded in PeopleSoft Talent Acquisition Manager. |
Use Existing Resume |
Clicking this button displays the Use Existing Resume page, where applicants choose an already-submitted resume to reuse. This button is hidden if the applicant does not have any already-submitted resumes. Applicants can view all of their submitted resumes in the Resumes grid on the My Activities page. |
Copy & Paste Resume |
Clicking this button displays the Copy & Paste Resume page, where applicants can enter formatted resume text in a rich text field. |
Current Resume
The Current Resume group box appears after an applicant supplies a resume.
Field or Control |
Description |
|---|---|
View Resume |
Clicking this link opens the resume. For attached resumes, this link text is the file name. Clicking the link opens the resume in a new window. For copy/pasted resumes, the link text is the resume title. Clicking the link opens the Copy & Paste Resume page in read-only mode. |
Resume Title |
This field appears only for attached resumes. Applicants use this field to label the resume with a title that is not subject to file name restrictions. If an resume is used in more than one application (because the applicant selected the Use Existing Resume option), a title change is reflected in all applications that use the same resume. |
Language |
Applicants use this field to select the language of their resume. This field is informational only. |
Use Different Resume |
Clicking this button removes the current resume from the application. The Resume step returns to its initial appearance, displaying the Resume Options group box instead of the Current Resume group box. |
Cover Letter
If the resume template is configured to include cover letters, the Cover Letter group box appears when the applicant has not yet uploaded a cover letter.
Field or Control |
Description |
|---|---|
Attach Cover Letter |
Clicking this button displays the File Attachment dialog so that the applicant can upload a cover letter. Although there are multiple options for supplying a resume, there is just one option (uploading a file attachment) for supplying a cover letter. |
Current Cover Letter
The Current Cover Letter group box appears after the applicant supplies a cover letter.
Field or Control |
Description |
|---|---|
Cover Letter |
Displays the file name of the cover letter. Clicking this link opens the file. |
Cover Letter Title |
Applicants use this field to enter a descriptive title for the cover letter. |
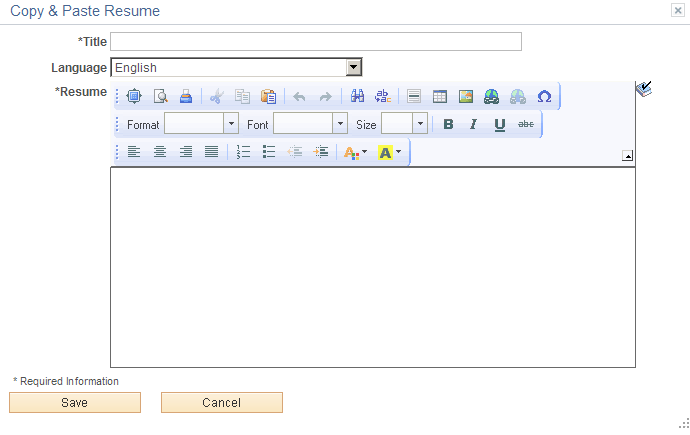
Applicants use the Copy & Paste Resume page (HRS_APPLY_RESUME) to enter formatted resume text into a rich text field.
Navigation:
On the Resume page, click the Copy & Paste Resume button, or click the View Resume link for a resume that was already copied and pasted.
This example illustrates the Copy & Paste Resume page.
Field or Control |
Description |
|---|---|
Title |
Applicants use this field to enter a resume title. This title becomes the link text in the Current Resume section of the Resume page. It also identifies the resume on other Candidate Gateway pages, including the My Activities page and the Use Existing Resume page. |
Language |
Applicants use this field to select the language of their resume. This field is informational only. |
Resume |
Applicants can type or paste resume text into the Resume rich field, and then use the available formatting tools and spell check to further manage the presentation of the resume text. |
Save |
Click to save the resume and return to the Resume step. |
Cancel |
Click to return to the Resume step without saving changes. |
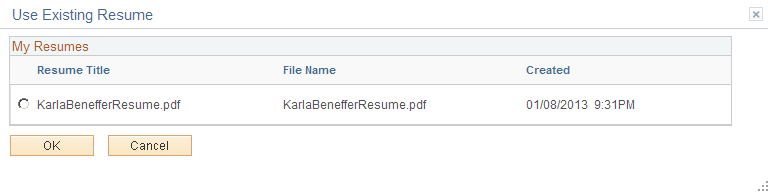
Applicants use the Use Existing Resume page (HRS_RESUMES_SEC) to select a previously-submitted resume to associate with the job application.
Navigation:
Click the Use Existing Resume button on the Resume page. This button is hidden if no resumes have been previously submitted.
This example illustrates the Use Existing Resume page.
Field or Control |
Description |
|---|---|
My Resumes |
This grid lists all of an applicant’s previously submitted resumes. To use a resume in the current application, the applicant selects the radio button next to the resume and then clicks the OK button. |
Applicants use the <Step Name> pages (HRS_CE_PROFILE) to enter additional application information. The step names and the sections that appear for each step are controlled by the resume template(s) for the application.
Navigation:
In the guided application process, click the Next button until you reach the steps that display sections defined in the resume template.
This example illustrates the <Step Name> page for a step with no substeps.
This example illustrates the <Step Name> page for a step that has substeps.
Using a resume template, implementers define steps and optional substeps for the application process, along with the sections that appear on each step or substep.
These are the sections that can appear on these steps:
Profile-Related Sections (for example, competencies or languages)
Note: This list reflects the section order when multiple sections appear on the same step or substep. To change the order, implementers must place the sections on separate steps and order the steps as needed.
Applicants use the Attachments section to manage attachments in a job application.
Navigation:
In a Candidate Gateway job application, access a step that is configured to include the Attachments section.
This example illustrates the Attachments section.
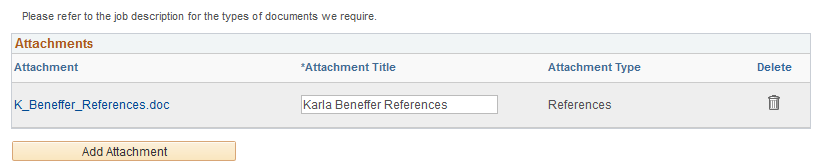
Note: This example shows instructional text before the Attachments grid. The instructional text is configured in the resume template. Note that the sample text refers applicants to the job description for more information. This text is appropriate only if job descriptions actually provide the necessary information.
Field or Control |
Description |
|---|---|
Attachment |
Displays the file name of the attachment. Click to open the file. |
Attachment Title |
Applicants use this field to enter a descriptive title for the attachment. |
Attachment Type |
Displays the attachment type that the applicant selected at the time the file was uploaded. Because this value is read-only, an applicant who wishes to change the attachment type must delete the existing attachment and re-upload the file. |
Add Attachment |
Clicking this button opens the Add Attachment page, where the applicant chooses an attachment type and selects a file to upload. |
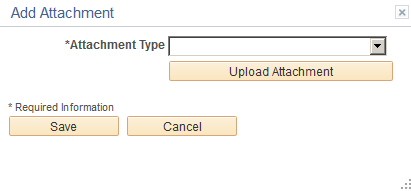
Use the Add Attachment page (HRS_CE_D_ATTACH) to select an attachment type and initiate the file selection process.
Navigation:
On a step that shows the Attachments section, click the Add Attachment button.
This example illustrates the Add Attachment page before a file has been uploaded
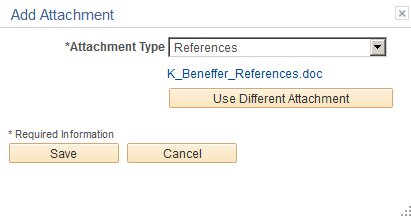
This example illustrates the Add Attachment page after a file has been uploaded
Field or Control |
Description |
|---|---|
Attachment Type |
Applicants must select an attachment type before uploading an attachment. The available values are the attachment types where the Attachment Type Setup Page has a Max Occurrences Within a Job Application value of one or more. The system does not check whether the job application has already reached the specified maximum for the attachment type until the applicant clicks the Upload Attachment button. After the applicant uploads a file, the file name appears after the Attachment Type field. Click the file name to open the file. |
Upload Attachment or Use Different Attachment |
Clicking the Upload Attachmentbutton initiates the process of selecting and then uploading a file. After an attachment is uploaded, the button name changes to Use Different Attachment. If the Attachment Type field is blank, clicking this button displays a message instructing the applicant to select an attachment type first. If the job application already contains the maximum allowable number of attachments for the selected Attachment Type, clicking this button displays a message explaining the restriction. |
Save |
After uploading an attachment, an applicant clicks this button to close the page and add the attachment to the job application. |
Cancel |
Clicking this button closes the page without adding an attachment to the job application. If the applicant has already clicked the Upload Attachment button and completed the upload process, the uploaded file remains in the file repository for Candidate Gateway attachments, but it is not visible in either Candidate Gateway or Talent Acquisition Manager. |
Note: The step where this section appears is defined in the resume template.
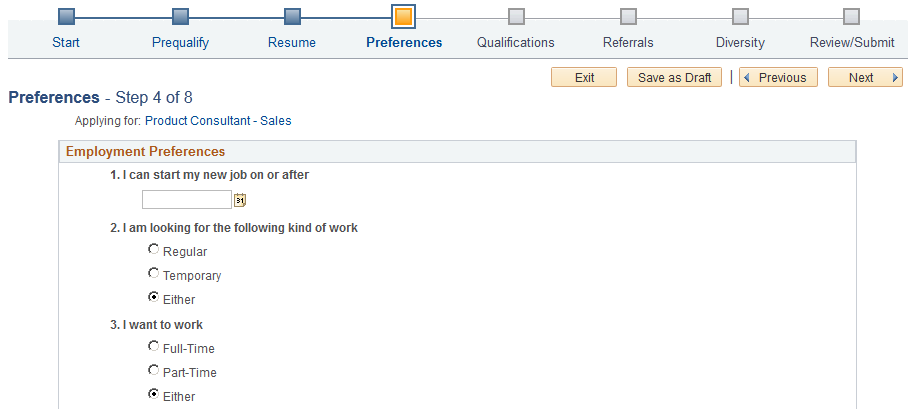
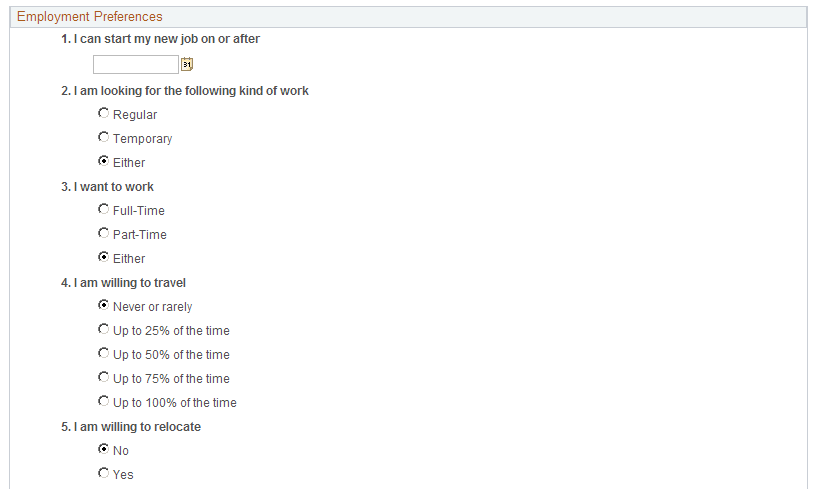
Applicants use the Employment Preferences section to enter general work preferences.
Navigation:
Access a step that is configured to include the Employment Preferences section.
This is the first of two examples illustrating the Employment Preferences section that can appear on a resume template step.
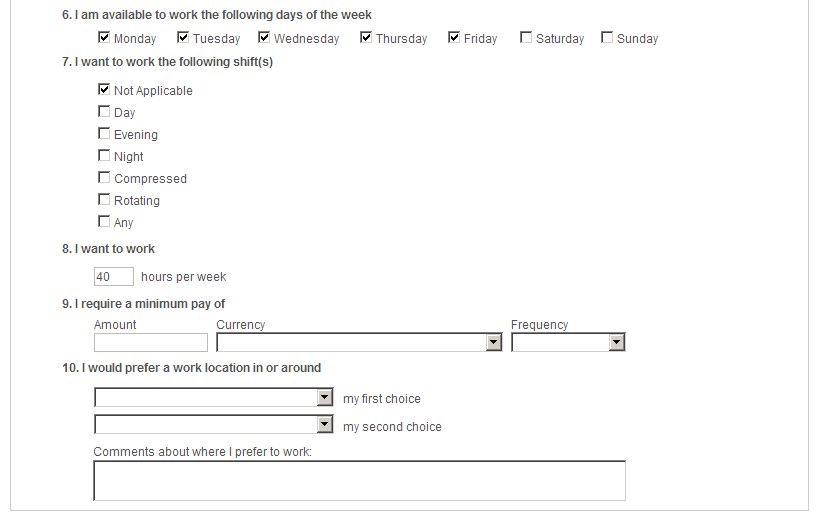
This is the second of two examples illustrating the Preferences section that can appear on a resume template step.
Field or Control |
Description |
|---|---|
1. I can start my job on or after |
Applicants use this field to enter the first day that they are available to work. During screening, the system checks that this date is on or before the date in the job opening’s Desired Start Date field. |
2. I am looking for the following kind of work |
Applicants use this field to specify whether they will accept regular work, temporary work, or either type of work. When screening based on this preference, the system checks that the applicant will accept the type of work that is specified in the job opening’s Regular/Temporary field. The default value is Either unless the applicant selected a different value in the last saved application. |
3. I want to work |
Applicants use this field to specify whether they will accept full-time work, part-time work, or either. When screening based on this preference, the system checks that the applicant will accept the type of work that is specified in the job opening’s Schedule Type field. The default value is Either unless the applicant selected a different value in the last saved application. |
4. I am willing to travel |
Applicants use this field to indicate the maximum amount of travel they will accept. When screening based on this preference, the system checks that the applicant will travel at least the amount that is specified in the job opening’s Travel Percentage field. The default value is Never or rarely unless the applicant selected a different value in the last saved application. |
5. I am willing to relocate |
Applicants use this field to indicate if they are willing to relocate. This field is not used to screen applicants. The default value is No unless the applicant selected a different value in the last saved application. |
6. I am available to work the following day(s) of the week |
Applicants use this field to indicate which days of the week they can work. This field is not used to screen applicants. The default selections are Monday through Friday unless the applicant selected different values in the last saved application. |
7. I want to work the following shift(s) |
Applicants use this field to indicate which shifts they are available to work. When screening based on this preference, the system checks that the applicant is available to work the shift that is specified in the job opening’s Shift field. The default value is Not Applicable. |
8. I want to work <number of> hours per week |
Applicants use this field to indicate how many hours per week they are willing to work. When screening based on this preference, the system checks that the applicant is willing to work at least the number hours that is specified in the job opening’s Hours field. The default value is 40 unless the applicant selected a different value in the last saved application. |
9. I require a minimum pay of |
For this question, applicants use the Amount, Currency, and Frequency fields to specify their minimum acceptable salary. When screening based on this preference, the system checks that the applicant will accept the maximum salary specified in the job opening. |
10. I would prefer a work location in or around |
Applicants use the “my first choice” and “my second choice” fields to indicate their preferred work locations. These fields are drop-down list boxes if there are up to 75 values. They are prompt fields if there are more values. The available recruiting locations are the those that are valid for the business unit(s) of the job opening(s). If the applicant applied without a job opening, the available recruiting locations the those that are associated with the default setID identified on the Site Setup Page. If the site does not have a default setID, the system uses the setID specified in the primary permission list for the user ID. (Remember, external applicants use a guest user ID to access Candidate Gateway.) If neither the site nor the primary permission list have a default setID, the location drop-downs do not show any values. When screening based on this preference, the system checks that at least one of the applicant’s choices is a valid recruiting location for the job opening. The system does not consider the relationships between recruiting locations for this purpose. For example, if the Western Region recruiting location lists the Headquarters recruiting location as one of its sub-locations, an applicant whose first choice location is Western Region is not considered a match for a job in the Headquarters region. |
Note: The step where this section appears is defined in the resume template.
Applicants use the Federal Preferences section to enter information that is specific to US Federal implementations.
Navigation:
Access a step that is configured to include the Federal Preferences section.
This example illustrates the Federal Preferences section that can appear on a resume template step.
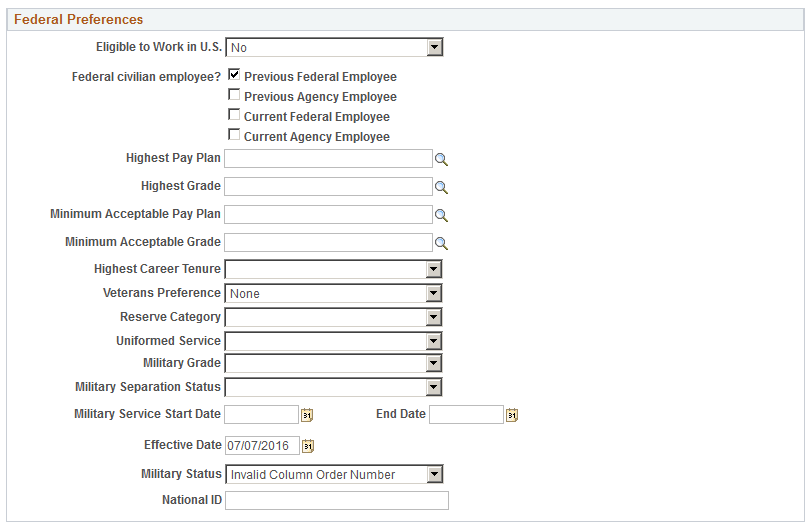
Federal Preferences
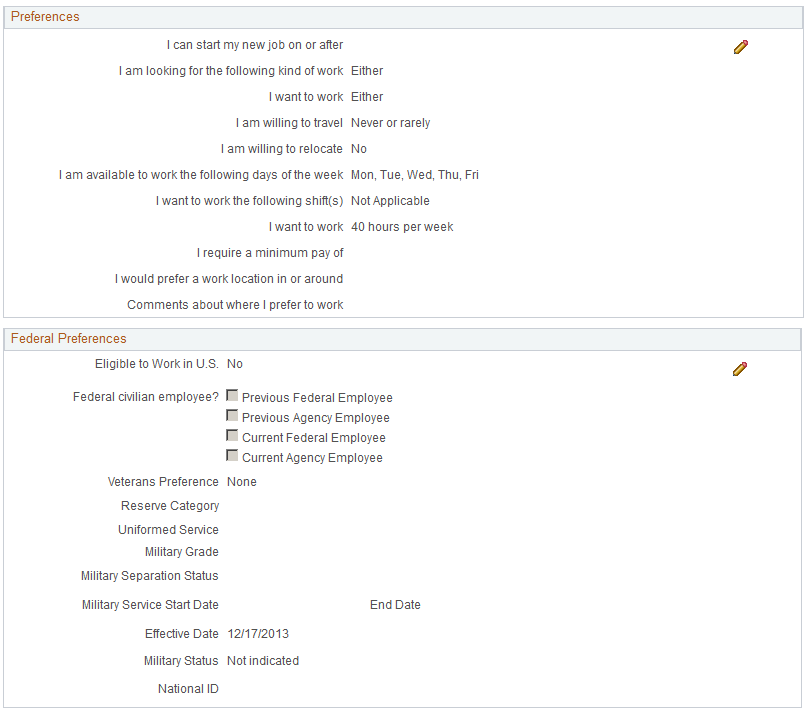
The fields in the Federal Preferences section correspond to similarly-named fields in the Federal Preferences group box on the Application Details Page.
In Candidate Gateway, the following fields are visible only when the applicant selects at least one of the Federal Civilian Employee check boxes:
Highest Pay Plan
Highest Grade
Minimum Acceptable Pay Plan
Minimum Acceptable Grade
Highest Career Tenure
Note: The step where this section appears is defined in the resume template.
Applicants use the Priority Placement section to provide information about their US Federal priority placement standing.
Navigation:
Access a step that is configured to include the Priority Placement section.
This example illustrates the Priority Placement section that can appear on a resume template step.

Note: Within the resume template, the Priority Placement section can be marked as required, forcing applicants to supply at least one row of data.
Priority Placement
Applicants use this section to enter their priority placement standing. The Priority Placement process uses this information, along with the salary grade and level for the job opening, to identify any applicants that have an entitlement to priority placement consideration.
Applicants use the Priority Placement page (HRS_CE_G_D_PP) to enter priority placement information.
Navigation:
On a step that shows the Priority Placement grid, click the Add Priority Placement button or click the Edit icon on an existing row of data.
This example illustrates the Priority Placement page. When adding new priority placement data, the page title is Add Priority Placement.
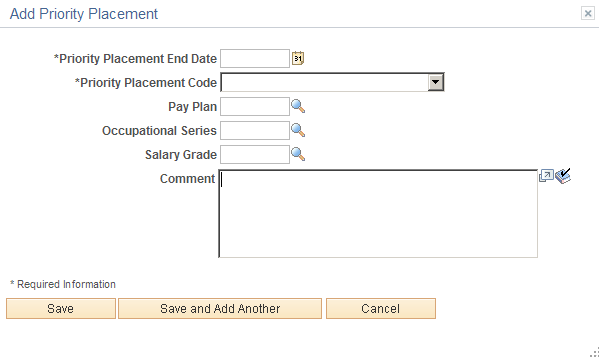
This is the same (USF) Priority Placement Page that Talent Acquisition Manager users access from the Application Details Page.
Note: The step where this section appears is defined in the resume template.
Applicants use the Education History section to indicate their highest level of education.
Navigation:
Access a step that is configured to include the Education History section.
This example illustrates the Education History section that can appear on a resume template step.

Education History
Field or Control |
Description |
|---|---|
Highest Education Level |
Applicants use this field to indicate their highest education level. The selected value, in conjunction with work experience data, is used during screening to determine whether the applicant has the number of years of relevant work experience that are required of applicants with the specified level of education. |
Note: The step where this section appears is defined in the resume template.
Applicants use the Work Experience section to enter information about their work history.
Navigation:
Access a step that is configured to include the Work Experience section.
This example illustrates the Work Experience section that can appear on a resume template step.

Note: Within the resume template, the Work Experience section can be marked as required, forcing applicants to supply at least one row of data.
Work Experience
This grid displays summary information about work experience that the applicant has entered on the Work Experience Page.
For internal applicants, the system brings in prior work experience from employee’s Human Resources records (as seen on the Prior Work Experience Page). The applicant can add or remove work experience in the application without affecting the Human Resources data.
Unlike other types of application data, work experience that an internal applicant adds in an application is not carried forward to subsequently created applications, which will show only the data from the Human Resources system.
Field or Control |
Description |
|---|---|
|
An applicant clicks this icon to view or modify work experience details on the Work Experience page. |
Add Work Experience |
An applicant clicks this button to open the Work Experience page and enter a new row of work experience. |

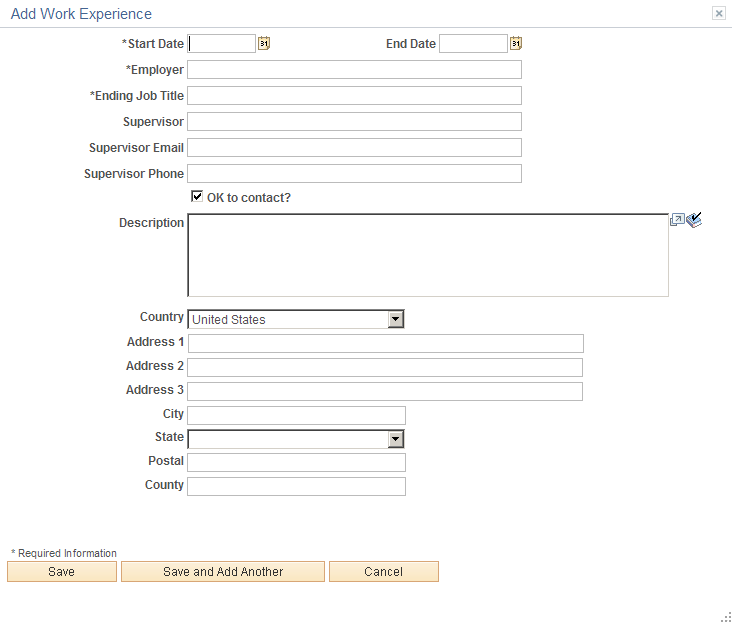
Applicants use the Work Experience page (HRS_CE_D_WRK_EXP) to enter information about their work history.
Navigation:
On a step that shows the Work Experience grid, click the Add Work Experience button or click the Edit icon on an existing row of data.
This example illustrates the Work Experience page. When adding new work experience data, the page title is Add Work Experience.
Field or Control |
Description |
|---|---|
Start Date and End Date |
These dates determine the number of years of experience represented by this entry. When the end date is blank, work experience is calculated through the current date. When work experience and education are used as screening criteria, the system uses an applicant’s total years of experience (across all work experience entries) to determine whether the applicant has the number of years of relevant work experience that are required of applicants with the specified level of education. |
Save |
An applicant clicks this button to save the current work experience data and return to the guided application process. |
Save and Add Another |
An applicant clicks this button to save the current work experience data and clear the page. The applicant can then enter an additional row of work experience. The Work Experience grid (which is visible behind the dialog box) does not display the saved data until the applicant closes the dialog box. |
Cancel |
An applicant clicks this button to close the dialog box and return to the guided application process without saving the current data. Work experience data that was previously saved using the Save and Add Another button is not canceled. |
Note: The step where this section appears is defined in the resume template.
Applicants use the Job Training section to enter information about job training that they have received.
Navigation:
Access a step that is configured to include the Job Training section.
This example illustrates the Job Training section that can appear on a resume template step.

Note: Within the resume template, the Job Training section can be marked as required, forcing applicants to supply at least one row of data.
Job Training
This grid displays the job training information that the applicant has entered on the Job Training Page.
Field or Control |
Description |
|---|---|
|
An applicant clicks this icon to modify training details on the Job Training page. |
Add Job Training |
An applicant clicks this button to open the Job Training page and enter a new row of training. |
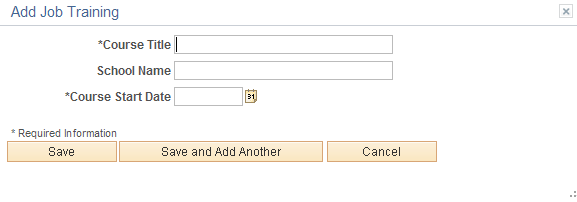
Applicants use the Job Training page (HRS_CE_D_TRAINING) to enter job training information.
Navigation:
On a step that shows the Job Training grid, click the Add Job Training button or click the Edit icon on an existing row of data.
This example illustrates the Job Training Page. When adding new training data, the page title is Add Job Training.
Field or Control |
Description |
|---|---|
Save |
An applicant clicks this button to save the current job training data and return to the guided application process. |
Save and Add Another |
An applicant clicks this button to save the current job training data and clear the page. The applicant can then enter an additional row of job training. The Job Training grid (which is visible behind the dialog box) does not display the saved data until the applicant closes the dialog box. |
Cancel |
An applicant clicks this button to close the dialog box and return to the guided application process without saving the current data. Job training data that was previously saved using the Save and Add Another button is not canceled. |
Note: The steps where profile-related sections appear are defined in the resume template.
Applicants use profile-related sections to enter various types of information that the system captures as profile data.
Navigation:
Access a step that is configured to include a profile-related section.
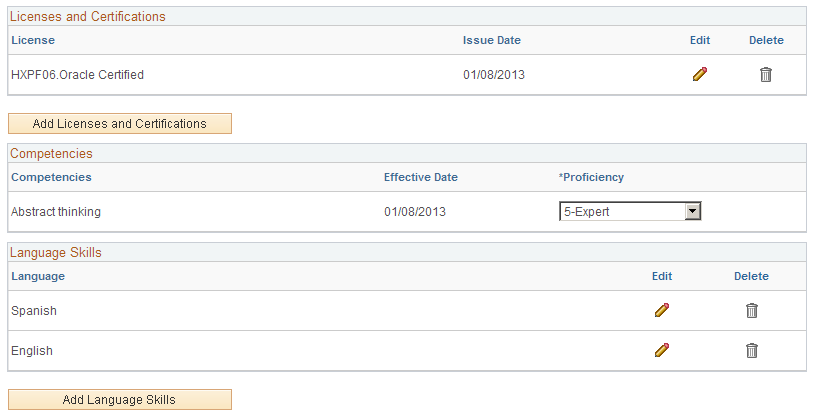
This example illustrates a few of the profile-related sections that can appear on resume template steps. The resume template controls if and where each profile-related sections appears.
Note: Within the resume template, profile-related sections can be marked as required, forcing applicants to supply at least one row of data.
Field or Control |
Description |
|---|---|
<Content Type> |
All profile-based qualifications (such as competencies, language skills, or licenses & certificates) are rendered as grids. The Content Section Configuration – <Content Type> Page in Talent Acquisition Manager controls which fields appear in the grid. It also controls whether applicants can add rows to a grid and delete rows from a grid. When the applicant cannot add and delete rows, the grid is prepopulated with items that are associated with the job opening, and the applicant can provide details related to those items. The Competencies grid is delivered with this configuration, so applicants can rate themselves with regard to the competencies in the job opening, but they cannot add or remove competencies. Note: If an applicant cannot add items to a grid and the job openings do not have any items to load into the grid, the section is hidden. If the hidden grid is the only section on a step or substep, the entire step or substep is removed from the guided application process. |
|
An applicant clicks this icon to view or modify details for a specific profile content item. This icon is not visible in grids that are configured to prevent applicants from adding rows. |
Add <Content Type> |
An applicant clicks this button to open a details page and add new content for a particular profile content type. This button is not visible for grids that are configured to prevent applicants from adding rows. |
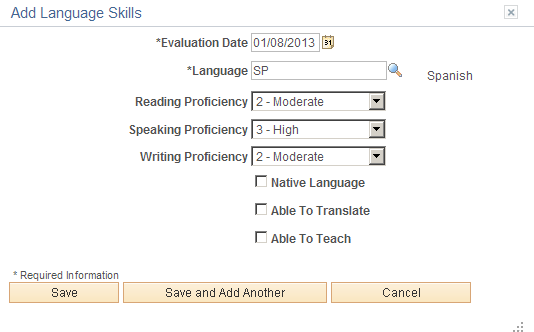
Applicants use the <Profile Content Type> page (HRS_CG_APP_DETAIL when adding a new profile item, or HRS_CG_APP_DTL_SEC when editing an existing profile item) to enter details about a profile-based qualification.
Navigation:
On a page that shows a profile-related grid, click the Add <content type> button or click the Edit icon on an existing row of data.
This example illustrates the <Profile Content Type> page. When adding new profile data, the page title is Add <Profile Content Type>.
Page Title and Fields
All of the profile-based qualifications use the same detail pages, but the page title and content vary according to the specific qualification. For example, when you access the page from the Language Skills grid, the title is Language Skills (or Add Language Skills, if you are in add mode), and the page displays fields that have been defined as part of the Language Skills profile content type.
Although your profile configuration determines the fields that are part of each content type and the valid values for prompt fields, settings on the Content Section Configuration – <Content Type> Page page in Talent Acquisition Manager control which fields applicants can see on this detail page.
Effective-Dated Key Fields for Content Items
The detail page where you enter a content item always includes a field for the content item identifier (for example, the language code or the competency code). The values for this field are controlled by an effective date. The label for the effective date can vary.
For example, in the illustration above, the effective date field is labeled Evaluation Date, and the value shown is January 8, 2013. The valid values for the Language field are the language codes that are active as of that date.
Buttons
Field or Control |
Description |
|---|---|
Save |
An applicant clicks this button to save the current profile data and return to the guided application process. |
Save and Add Another |
An applicant clicks this button to save the current profile data and clear the page. The applicant can then enter an additional row of profile data. The related grid (which is visible behind the dialog box) does not display the saved data until the applicant closes the dialog box. |
Cancel |
An applicant clicks this button to close the dialog box and return to the guided application process without saving the current data. Profile data that was previously saved using the Save and Add Another button is not canceled. |
Note: The step where this section appears is defined in the resume template.
Applicants use the References section to supply the names of people who can provide personal or professional references.
Navigation:
Access a step that is configured to include the References section.
This example illustrates the References section that can appear on a resume template step.

Note: Within the resume template, the References section can be marked as required, forcing applicants to supply at least one row of data.
Field or Control |
Description |
|---|---|
|
An applicant clicks this icon to view or modify details for a specific reference. |
Add Reference |
An applicant clicks this button to open the References page and enter a new reference. |
Applicants use the Reference page (HRS_CE_D_REFERENCE) to enter information for a reference.
Navigation:
On a page that shows the References grid, click the Add References button or click the Edit icon on an existing row of data.
The References grid can appear in two places: on an application step, and on the Applicant References Page.
Applicants access the Applicant References page from the Candidate Gateway notification that is generated when a Talent Acquisition Manager user sends a request for references. The request for references is triggered from the Create Applicant Page: References Tab.
This example illustrates the References page. When adding new references, the page title is Add Reference.
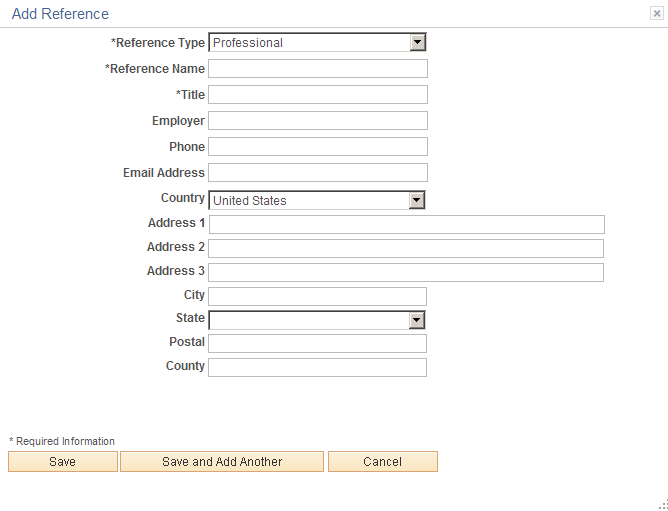
Applicants use this page to provide name and contact information for people who can be contacted to supply professional or personal references.
Buttons
Field or Control |
Description |
|---|---|
Save |
An applicant clicks this button to save the reference and return to the guided application process. |
Save and Add Another |
An applicant clicks this button to save the current reference and clear the page. The applicant can then enter an additional reference. The References grid (which is visible behind the dialog box) does not display the saved data until the applicant closes the dialog box. |
Cancel |
An applicant clicks this button to close the dialog box and return to the guided application process without saving the current data. References that were previously saved using the Save and Add Another button are not canceled. |
Note: The step where this section appears is defined in the resume template.
Applicants use the Personal Information section to enter marital status, birth date, and gender information.
Navigation:
Access a step that is configured to include the Personal Information section.
This example illustrates the Personal Information section that can appear on a resume template step.

A resume template that includes the Personal Information section also specifies which of the three personal information fields to display.
The applicant’s gender is stored in the same record regardless of whether it is collected in the Personal Information section or on the (USA) Diversity Page. Changes to the data on one page are reflected on the other page as well.
Note: The step where this section appears is defined in the resume template.
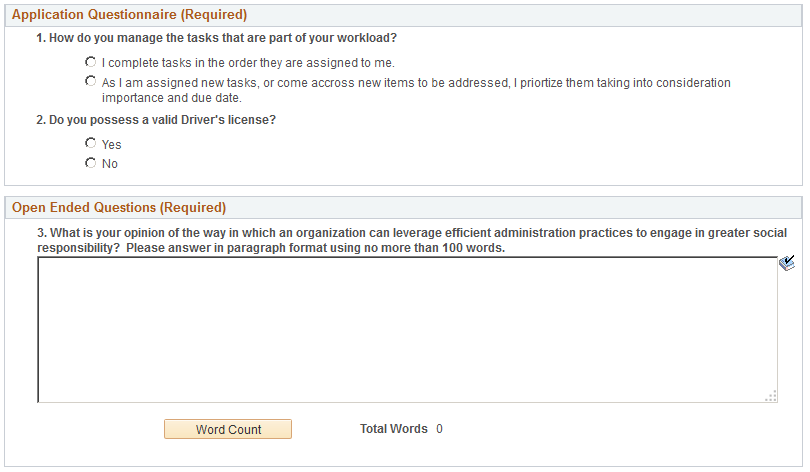
Applicants use the Application Questionnaire section to answer questions.
Navigation:
Access a step that is configured to include the Application Questionnaire section.
This example illustrates the Application Questionnaire section that can appear on a resume template step.
Note: If the job openings do not have any questions other than prescreening questions, this section is hidden. If it is the only section on a step or substep, the entire step or substep is removed from the guided application process.
Field or Control |
Description |
|---|---|
Application Questionnaire |
This group box displays a numbered list of questions. The list includes all questions from the job opening except for open-ended questions and questions that were used for prescreening. In a multi-job application, questions for all jobs are consolidated into one list. Radio buttons indicate that a question has one correct answer. Check boxes indicate that a question has multiple correct answers. Settings on the Recruiting Installation – Jobs Page page control whether questions appear in a random order or in the order specified on the job opening(s). An additional installation setting controls whether each questions’ answers appear in random order or in the order specified in the question definition. |
Open Ended Questions |
This group box displays any open-ended questions from the job openings. |
Word Count |
An applicant clicks this button, which appears under each open-ended question, to obtain a current word count for the answer. The word count appears in the Total Words field. |
Note: If the Require Answers to Questions check box on the Site Setup Page is selected, the section title includes the word (Required), and applicants must supply answers to all questions before continuing.
Note: The step where this section appears is defined in the resume template.
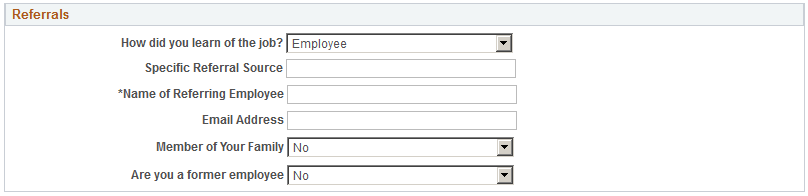
Applicants use the Referrals section to indicate how they learned about the job.
Navigation:
Access a step that is configured to include the Referrals section.
This example illustrates the Referrals section that can appear on a resume template step. In this example, the applicant was referred by an employee, so several employee-specific fields are visible.
Field or Control |
Description |
|---|---|
How did you learn of the job? |
Applicants use this field to select a referral source. The available values are recruitment sources where the source type is Marketing or Employee. For information about recruitment sources, see Setting Up Recruitment Sources. If the applicant selects an employee recruitment source, several additional fields appear. This field is required if the resume template is configured to require applicants to enter a referral source. |
Additional Information |
This field appears only if the referral source is a marketing recruitment source for which subsources have been defined. Applicants use the field to select from the list of predefined subsources. A resume template that requires applicants to enter a referral source can also require applicants to enter a subsource. If the selected source does not have any subsources, this requirement is ignored. |
Specific Referral Source |
Applicants use this field to enter freeform text with additional information about the referral source. |
Name of Referring Employee |
This field appears only if the referral source is an employee recruitment source. Applicants are required to enter the name of the referring employee. Recruiters use this information when looking up the employee ID of the referring employee. |
Email Address |
This field appears only if the referral source is an employee recruitment source. Applicants use this field to enter the email address of the referring employee. The system uses this email address to send the referring employee a notification requesting verification of the referral. Only verified referrals are eligible for awards under an employee referral program. |
Member of your Family |
This field appears only if the referral source is an employee recruitment source. Applicants use this field to indicate whether the referring employee is a family member. Depending on an employee referral program’s rules, family member referrals may not be eligible for referral awards. |
Are you a former employee |
Applicants use this field to indicate whether they are former employees. This information is of interest to recruiters. It can also affect a referring employee’s eligibility for a referral award. |
Applicants use the Community Background page (HRS_APP_CB2) to enter community background information for Northern Ireland.
Note: The Community Background step appears only if it is activated in the resume template.
Navigation:
In the guided application process, click the Next button until you reach this step.
This example illustrates the Community Background Page.
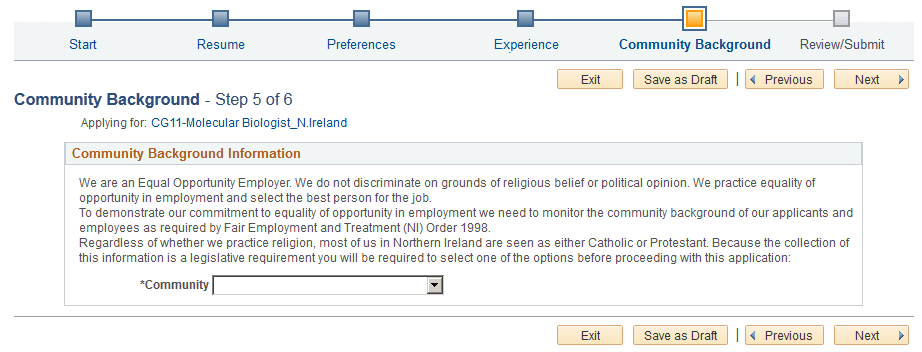
Applicants cannot continue to the next step without supplying community background information.
If an applicant supplies information and then exits the application without submitting, community background information is not saved. When resuming the application, the applicant is returned to this step and must enter community background data again before continuing.
Field or Control |
Description |
|---|---|
Community |
Applicants must supply select Catholic, Protestant, or Undetermined/Other before continuing to the next step in the application process. |
Applicants use the Disability page (HRS_CE_DISABILITY) to enter self-identified disability information. This page supports compliance with OFCCP regulations from the U.S. Department of Labor.
Navigation:
In the guided application process, click the Next button until you reach this step. This page appears only if all of these conditions are met:
The OFCCP Self-Identify field on the Site Setup Page is either Disability and Veteran, or Disability.
The applicant is external.
The job opening is in the USA, or if the application does not have a job opening, the applicant’s address is in the USA.
This example illustrates the Disability page.
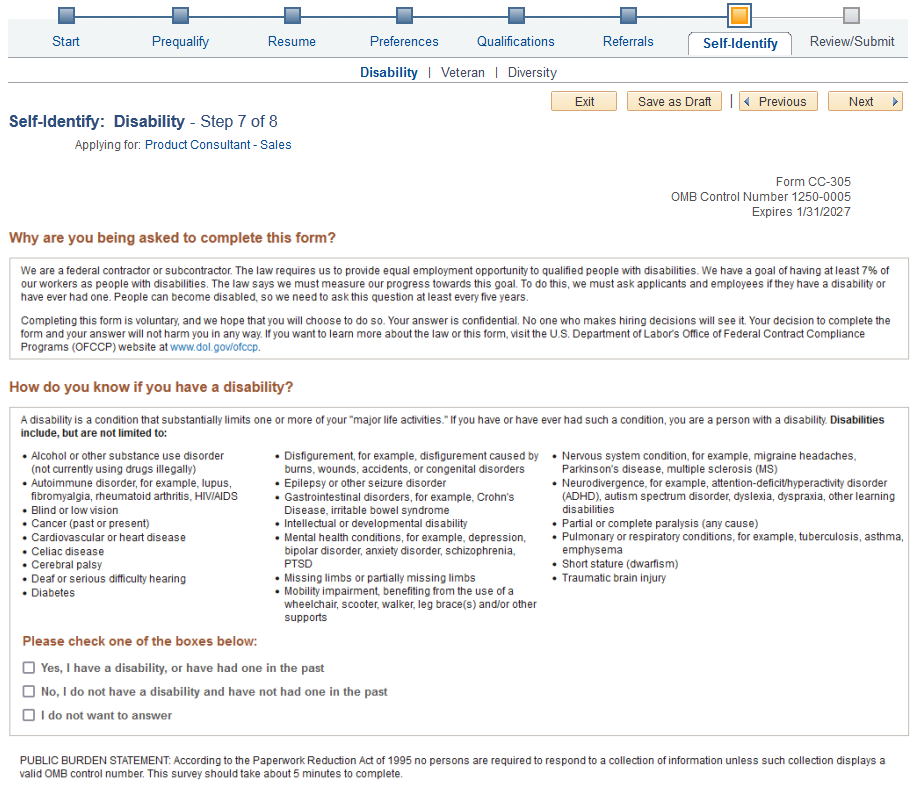
Note: The text on this page comes from the Text Catalog. If the OFCCP changes the required wording for disability self-identification, update the relevant Text Catalog entries.
If an applicant supplies information and then exits the application without submitting, disability information is not saved. When resuming the application, the applicant is returned to this step and must enter the information again before continuing.
Field or Control |
Description |
|---|---|
Please select one of the options below |
The applicant can optionally select from the three choices given. There is no default selection, even if the applicant has previously selected an option. The explanatory text on the page provides the applicant with information to help make a choice. An applicant who chooses not to answer can click the Next button to move to the next page without selecting any of the radio buttons. If the applicant does not answer, or chooses the I do not want to answer option, the system does not update the applicant’s existing disability data. Otherwise, the system updates the applicant’s Section 503 data in the Applicant Disability group box of the Create Applicant page: Eligibility & Identity Tab . |
Your Name and Today’s Date |
The system enters the applicant’s name and the current date in these read-only fields. The fields appear only after the applicant selects one of the disability options. They represent the applicant’s electronic signature. The signature and date are not displayed on the Eligibility & Identify section of the Manage Applicant page, but they are stored in the PS_HRS_APP_DIS record. If a recruiting user updates the applicant’s disability information on the Manage Applicant page, the system clears the stored name from the HR_EE_SIGNATURE field. The system also updates the HRS_ROW_UPD_OPRID field with the user ID of the user who made the update. |
Applicants use the Veteran page (HRS_CE_VETERAN) to optionally provide veteran status. This page supports compliance with OFCCP regulations from the U.S. Department of Labor.
Navigation:
In the guided application process, click the Next button until you reach this step. This page appears only if all of these conditions are met:
The OFCCP Self-Identify field on the Site Setup Page is either Disability and Veteran or Veteran.
The applicant is external.
If the application includes job openings, at least one job opening is in the USA; if the application does not have a job opening, the applicant’s address is in the USA.
Note: There are two versions of the Veteran page, a standard version and a simplified version. Settings on the Site Setup page determine which version appears.
This is the first of two examples illustrating the standard version of the Veteran page.
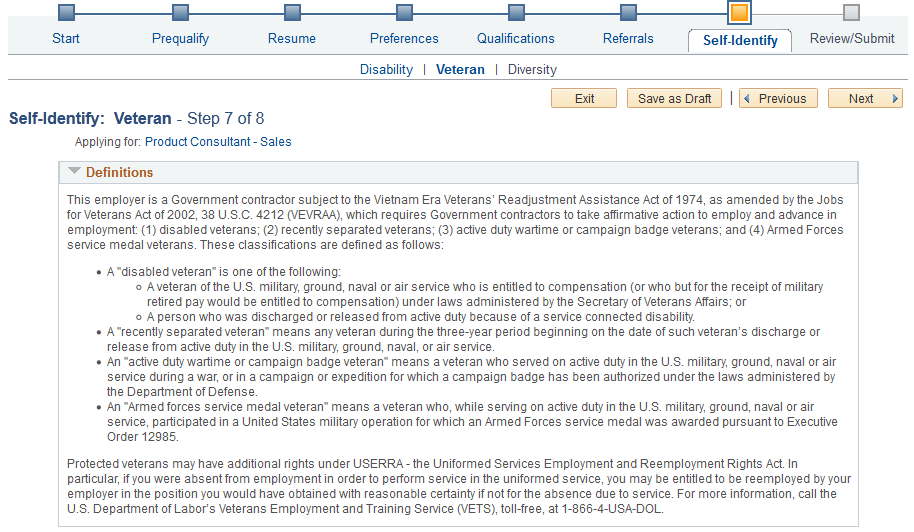
This is the second of two examples illustrating the standard version of the Veteran page.
This example illustrates the Self-Identification section om the simplified Veteran page. (The rest of the simplified Veteran page is identical to the standard version of the page.)

The text on both versions of the Veteran page comes from the Text Catalog. If the OFCCP changes the required wording for veteran self-identification, update the relevant Text Catalog entries.
If an applicant supplies information and then exits the application without submitting, veteran information is not saved. When resuming the application, the applicant is returned to this step and must enter the information again before continuing.
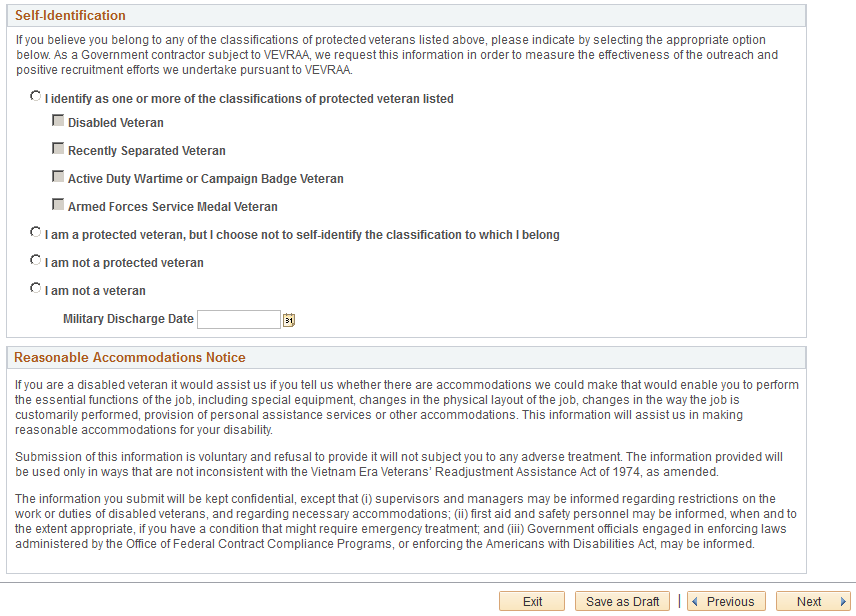
Self-Identification
Self-identification options depend on whether the site is configured to show the regular or simplified version of the Veteran page.
The regular version of this page includes a full set of self-identification options and a Military Discharge Date field.
Selecting the “I identify as one or more of the classifications of protected veteran listed” radio button causes four check boxes representing specific classifications become enterable. The applicant must select at least one of the specific classifications.
The Military Discharge Date field is enterable if the applicant selects any option except the “I am not a veteran” option.
The simplified version of this page offers only two self-identification options: protected veteran or not a protected veteran. Applicants cannot select specific classifications, nor can they enter a military discharge date.
For both versions of the page, the explanatory text in the Definitions group box provides the applicant with information to help make a choice. Data from previous applications appears on this page by default.
Reasonable Accommodations Notice and Custom Text
Organizations can add their own additional text (such as affirmative action program text) below the Reasonable Accommodations Notice section on this page. Add this text in Text Catalog entry HRAM_CE_VET_INSTR4, which is shipped empty as a placeholder.
This example shows the layout of the Reasonable Accommodations Notice group box and the space reserved for custom text. In this example, Text Catalog IDs appear instead of the text from the catalog. The HRAM_CE_VET_INSTR4 Text Catalog ID is for your custom text.

Corresponding Fields in Talent Acquisition Manager
An applicant’s veteran information is visible in Talent Acquisition Manager on the Manage Applicant page: Applicant Data tab.
The system automatically maps veteran self-identification data from Candidate Gateway into these Eligibility & Identity fields:
In the Veteran group box in the main USA section of the Eligibility & Identity page:
The Military Status field displays the applicant’s overall military status.
The Disabled Veteran check box indicates whether the applicant is a disabled veteran in addition to any other military status shown.
In the Veteran group box in the USA Disability section of the Eligibility & Identity page, the Military Discharge Date shows when the applicant left the military.
Mapping Simplified Self-Identification Options to Talent Acquisition Manager
The following table shows how options on the simplified Veteran page in Candidate Gateway map to Talent Acquisition Manager:
|
Veteran Option in Candidate Gateway |
Talent Acquisition Manager Fields |
|---|---|
|
I identify as one or more of the classifications of protected veteran listed |
Military Status is Protected, Not Classified. |
|
I am not a protected veteran |
Military Status is Not a Protected Veteran. |
Mapping Regular Self-Identification Options to Talent Acquisition Manager
The following table shows how options on the regular Veteran page in Candidate Gateway map to Talent Acquisition Manager:
|
Veteran Option in Candidate Gateway |
Talent Acquisition Manager Fields |
|---|---|
|
I identify as one or more of the classifications of protected veteran listed |
|
|
I am a protected veteran, but I choose not to self-identify the classification to which I belong. |
Military Status is Protected, Not Classified. |
|
I am not a protected veteran |
Military Status is Not a Protected Veteran. |
|
I am not a veteran. |
Military Status is Not a Veteran. |
|
Military Discharge Date |
Military Discharge Date shows the same value that was entered in Candidate Gateway. |
Detailed Mapping for Protected Veteran Classifications
The following table lists how the four protected veteran classifications in Candidate Gateway map to Military Status values in Talent Acquisition Manager:
|
Candidate Gateway Classification Check Box(es) |
Talent Acquisition Manager Military Status |
|---|---|
|
Disabled Veteran |
Protected, Not Classified |
|
Recently Separated Veteran |
Recently Separated Veteran |
|
Active Duty Wartime or Campaign Badge Veteran |
Active Duty/Campaign Badge Vet |
|
Armed Forces Service Medal Veteran |
Armed Forces Service Medal Vet |
|
Multiple values:
|
Separated & Active Duty Vet |
|
Multiple values:
|
Separated & Service Medal Vet |
|
Multiple values:
|
Service Medal & Active Duty |
|
Multiple values:
|
Separated/Srvc Medal/Active |
|
Multiple values:
|
Based on the selected check boxes other than the Disabled Veteran check box. When used in combination with other classifications, the Disabled Veteran check box does not affect the Military Status field. When the Disabled Veteran check box is the only selected check box, the Military Status is Protected, Not Classified. |
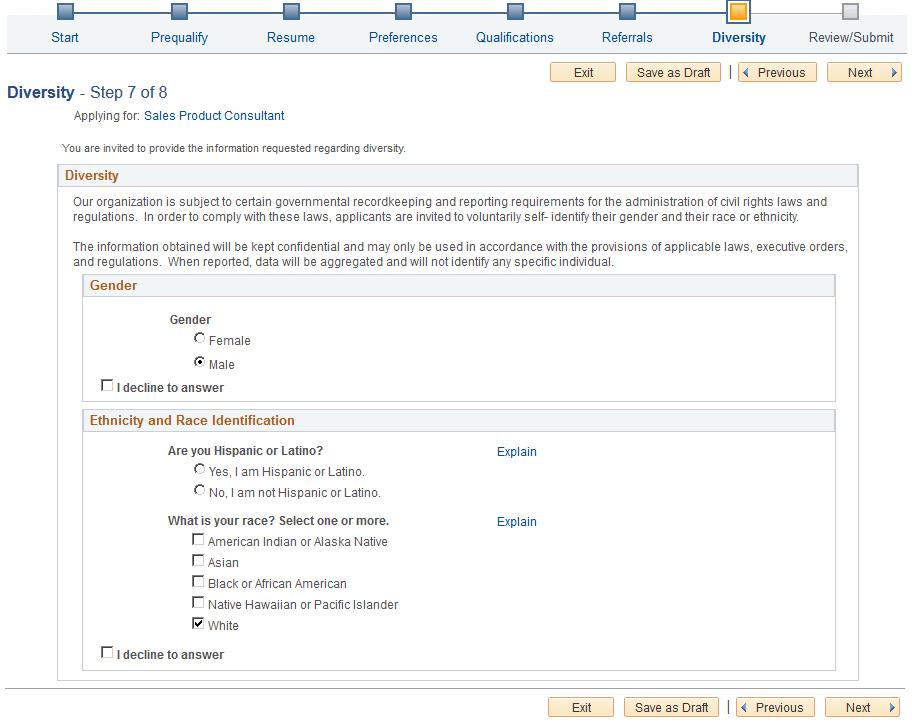
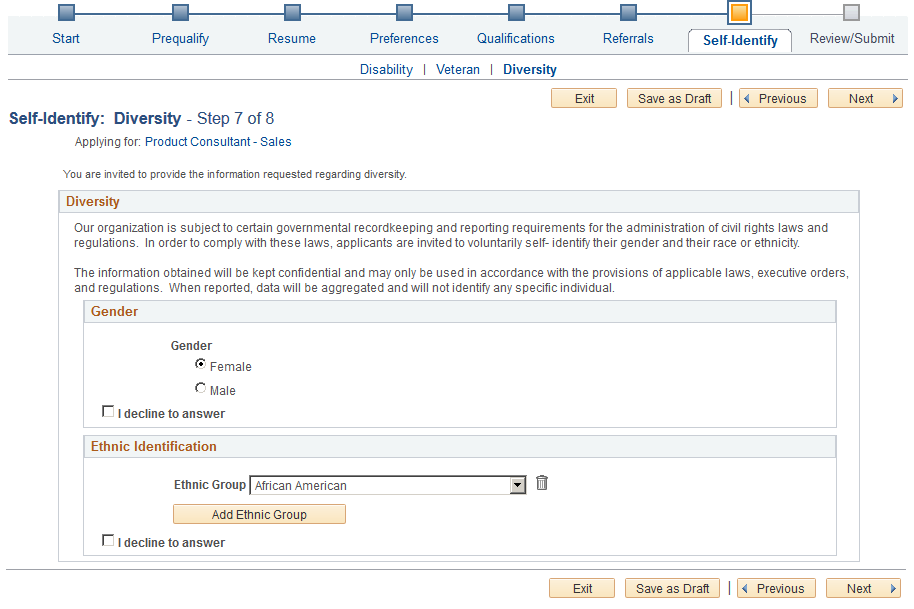
External applicants use the Diversity page (HRS_CE_SELF_IDENT) to enter gender and ethnicity information for equal employment opportunity reporting in the United States. Internal applicants do not see this page.
Navigation:
In the guided application process, click the Next button until you reach this step. This page appears only if both of these conditions are met:
The applicant is external.
The job opening is in the USA, or if the application does not have a job opening, the applicant’s address is in the USA.
This example illustrates the Diversity page when the system is configured to use two questions to collect ethnicity and race information. In this example, there are no other self-identification steps, so the step for the Diversity page is labeled Diversity.
This example illustrates the Diversity page when the system is not configured to use the two-question format to collect ethnicity data. In this example, the application process includes three self-identification pages, so the Diversity page appears as a Diversity substep under the Self-Identification step.
Applicants cannot continue to the next step without either supplying diversity information or explicitly declining to answer questions. Applicants can provide one type of information while still declining to provide the other.
Default answers come from the applicant’s most recently submitted application. Questions that the applicant declined to answer in the most recently submitted application do not have default answers.
If an applicant supplies information and then exits the application without submitting, the settings on this page are not saved. When resuming the application, the applicant is returned to this step and the default values reappear.
Gender
Field or Control |
Description |
|---|---|
Gender |
The applicant selects a radio button to answer Female or Male. |
I decline to answer |
Applicants select this check box if they do not want to identify themselves as male or female. If this check box is not selected, the applicant must select one of the gender options before continuing to the next step. Selecting this check box clears any previous gender selection and makes the Gender radio buttons read-only. Subsequently clearing the check box does not restore any previous selection. |
Ethnicity and Race Identification (Two-Question Format)
If the Two-Question Format (Ethnicity) check box is selected on the Country Specific Page, this group box appears.
Field or Control |
Description |
|---|---|
1. Are you Hispanic or Latino? |
The applicant selects a radio button to answer Yes or No. |
2. What is your race? Select one or more. |
The applicant selects one or more of these check boxes:
|
I decline to answer |
Applicants select this check box if they do not want to answer either of the ethnicity and race questions. If this check box is not selected, the applicant must answer at least one of the ethnicity and race questions before continuing to the next step. Selecting this check box clears any answers that were previously supplied for the ethnicity and race questions and makes those questions read-only. Subsequently clearing the check box does not restore any previous answers. |
Ethnic Identification (One-Question Format)
If the Two-Question Format (Ethnicity) check box is not selected on the Country Specific Page, this group box appears.
Field or Control |
Description |
|---|---|
Ethnic Group |
The applicant can choose a value from the ethnic groups that are defined on the Ethnic Groups Page. The list of ethnic groups is based on the regulatory region that is associated with the primary permission list for the user ID that was used to access the page. For external applicants, this is the guest user ID that is used to bypass the PeopleSoft sign in. The primary permission list for a user ID is established in the User Profile component in PeopleTools. The regulatory region for the primary permission list is established on the Org Defaults by Permission Lst - Defaults Page. On the Regulatory Region Page, you can view the setID that controls which ethnic groups are valid for the regulatory region. |
Add Ethnic Group |
An applicant who identifies as belonging to more than one ethnic group can click this button to add additional Ethnic Group drop-down list boxes to the page. |
I decline to answer |
Applicants select this check box if they do not want to select an ethnic group. If this check box is not selected, the applicant must select at least one ethnic group before continuing to the next step. Selecting this check box removes all ethnicity information and makes the Ethnic Group field read-only. Subsequently clearing the check box does not restore any previous data. |
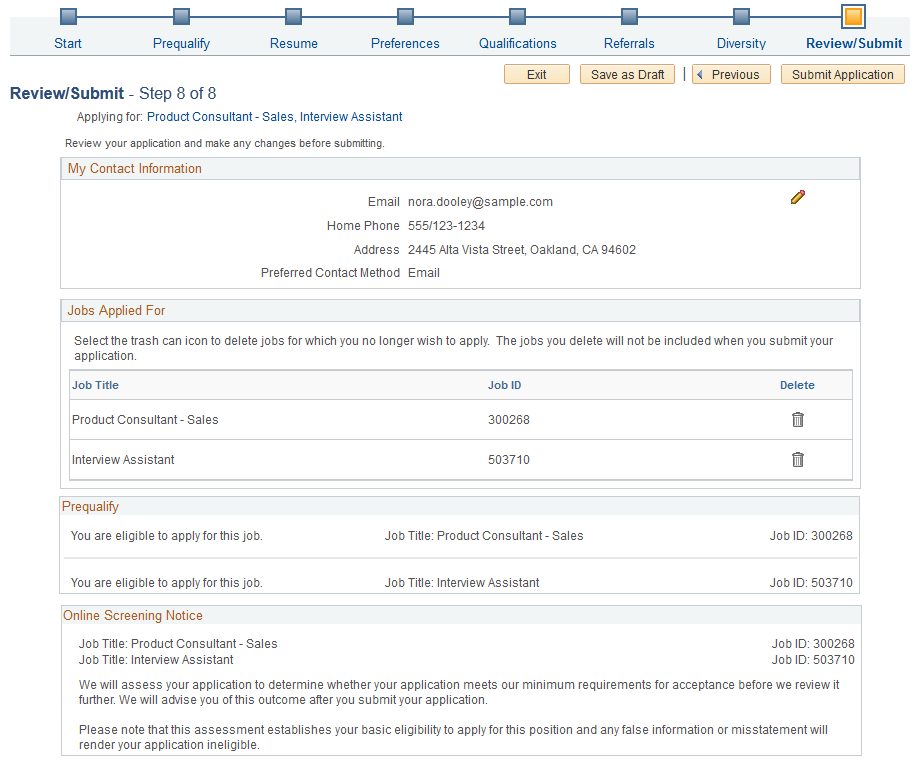
Applicants use the Review/Submit page (HRS_CE_REVIEW) to review application data and to submit an application.
Navigation:
In the guided application process, click the Next button until you reach this step.
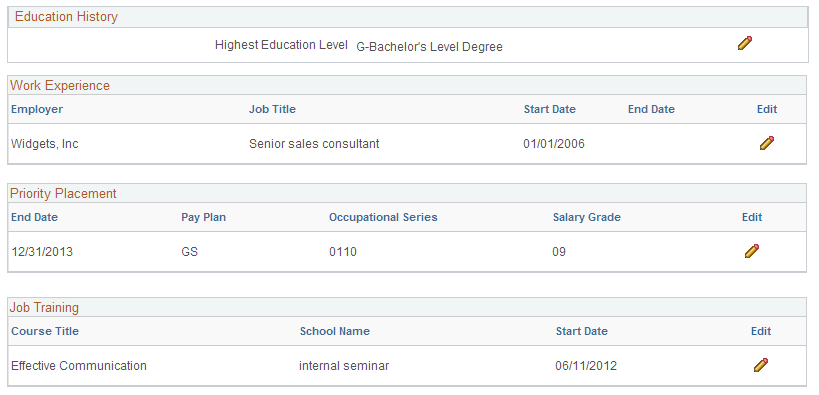
This is the first of seven examples illustrating the Review/Submit page.
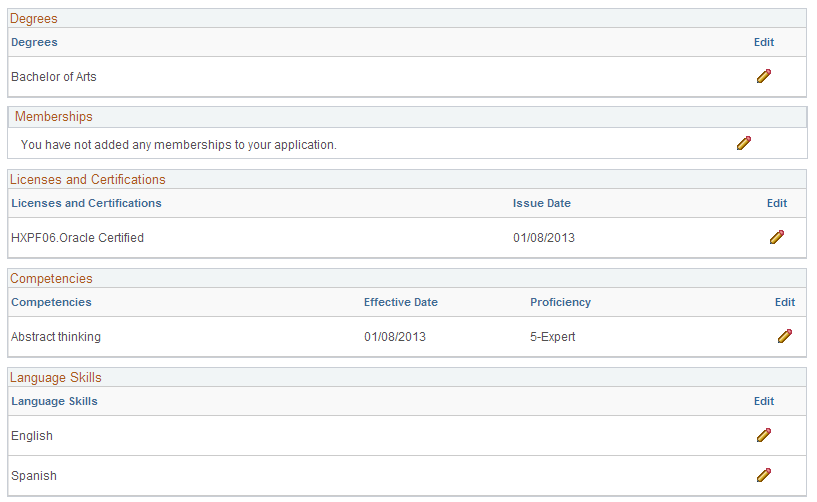
This is the second of seven examples illustrating the Review/Submit page.
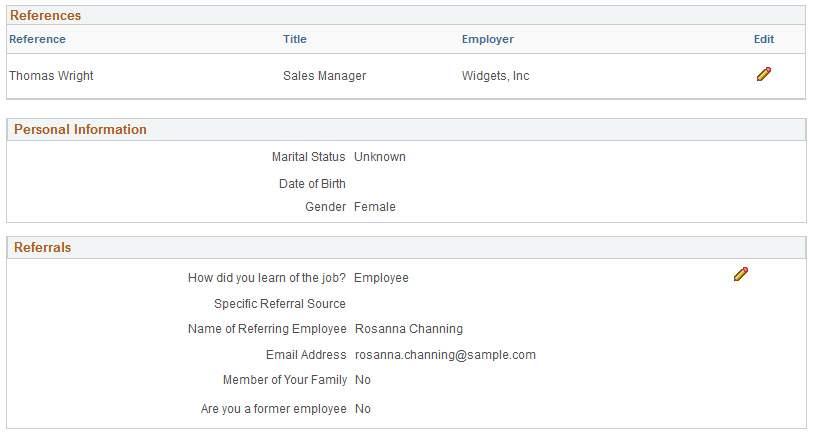
This is the third of seven examples illustrating the Review/Submit page.
This is the fourth of seven examples illustrating the Review/Submit page.
This is the fifth of seven examples illustrating the Review/Submit page.
This is the sixth of seven examples illustrating the Review/Submit page.
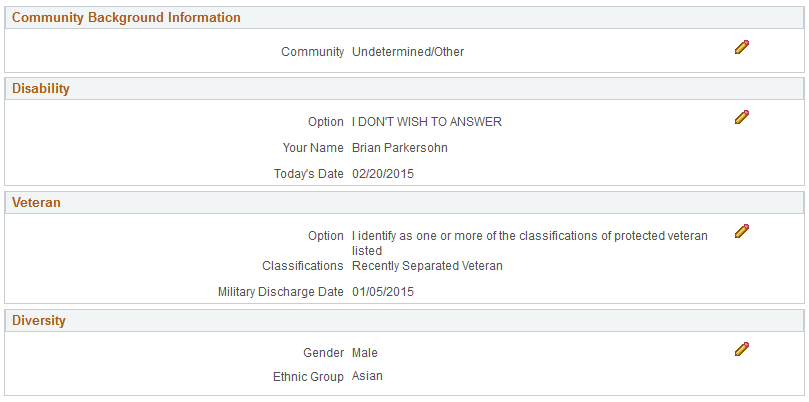
This is the seventh of seven examples illustrating the Review/Submit page. In this example,
The Veteran section includes fields that appear only if the applicant saw the regular (non-simplified) version of the Veteran page.
This section does not display the Military Discharge Date field if the applicant saw the simplified Veteran page, nor does it display the Classifications field if the applicant did not choose any classifications.
The Diversity section shows the one-question format for ethnicity.
The Review/Submit step provides a read-only summary of application data.
Buttons
Field or Control |
Description |
|---|---|
Submit Application |
On the Review/Submit page, the Submit Application button replaces the Next button. When the applicant clicks the Submit Application button, the system performs online screening, if applicable, then displays the Application Confirmation page. Applicants cannot make any further changes to an application that has been submitted. To provide an updated application, the applicant must re-apply. Applications that have been submitted have the status Submitted in the Applications grid on the My Activities page. They also appear as submitted applications in the My Activities group box on the Job Search page. If the job opening is no longer open at the time the user attempts to submit the application, an error message informs the user that the job is no longer available and that the application cannot be submitted. |
General-Purpose Sections
Field or Control |
Description |
|---|---|
My Contact Information |
An applicant’s contact information is general to the applicant (and not specific to an individual application), but the Review/Submit page displays contact information so that the applicant can verify the data. Clicking the Edit icon opens the My Contact Information Page in a modal window where external applicants can update their contact information. Contact information for internal applicants comes from the HR system and cannot be updated in Candidate Gateway. |
Jobs Applied For |
This section appears only for multi-job applications. It lists the jobs that are included in the application, and provides a delete option so that the applicant can remove jobs. Removing a job from an application is not reversible. Jobs that were removed from the application because the applicant did not pass prescreening are not listed here. |
Prequalify |
The Prequalify group box appears only if the application included prescreening. It lists all job openings that were originally included in the application, even if some job openings were subsequently removed because the applicant failed prescreening. For each job, the grid displays a message stating whether the applicant is eligible or ineligible to apply. |
Online Screening Notice |
This group box appears only if online screening is active and if the online screening definition includes an Explain Text ID identifying the online screening notice. The relevant job title and job ID appear before the notice. If the application includes multiple jobs with online screening, the notices for jobs that use the same Explain Text ID are consolidated. That is, the titles and job IDs for all jobs using a particular notice are listed before the notice. If jobs use different Explain Text IDs, the notices appear sequentially under the appropriate job titles and IDs. |
Summary of Application Data
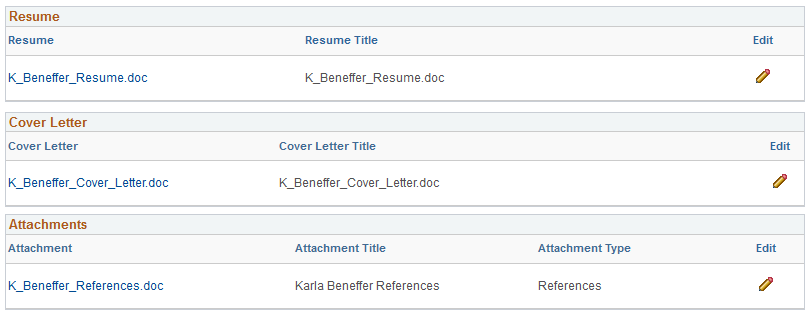
The following sections display read-only summaries of the application data:
Resume
Cover Letter
Attachments
Preferences
(USF) Federal Preferences
Education History
Work Experience
(USF) Priority Placement
Job Training
<Profile Sections>
References
Personal Information
Referrals
Community Background Information
Disability
Veteran
The format for the Veteran section depends on whether you collect information using the regular form or simplified form.
Diversity
The format for the Diversity section depends on whether you collect ethnicity information using the two-question format or using a list of ethnicities.
Note: The Review/Submit page does not display questionnaire data.
Modifying Data
Field or Control |
Description |
|---|---|
|
An Edit icon enables applicants to easily access any data that they want to modify.
|
External applicants use the My Contact Information page (HRS_APP_PRFILE_SEC) page to review and update name and contact information.
Internal applicants use this page to review name and contact information, but they cannot change this data because it comes from HR records. The only change an internal applicant can make is to the preferred contact method.
Navigation:
Click the Edit icon in the My Contact Information section of the Review and Submit page.
This example illustrates the My Contact Information page. This is a partial illustration that does not show the email and phone sections of the page or the Save button at the bottom of the page.
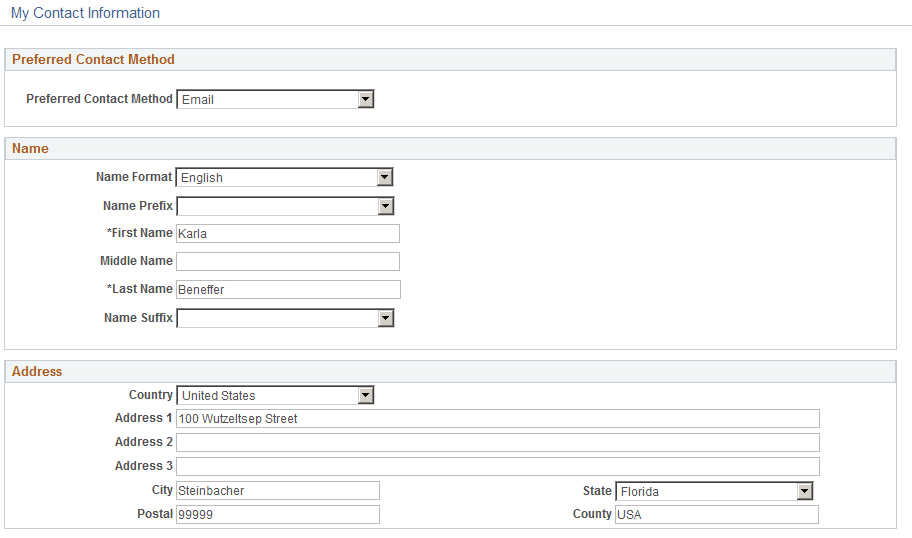
The fields on this page are the same as those on the My Account Information Page for external users or the My Contact Information Page for internal users, except that external users do not see their user names, nor do they see the link for changing a password.
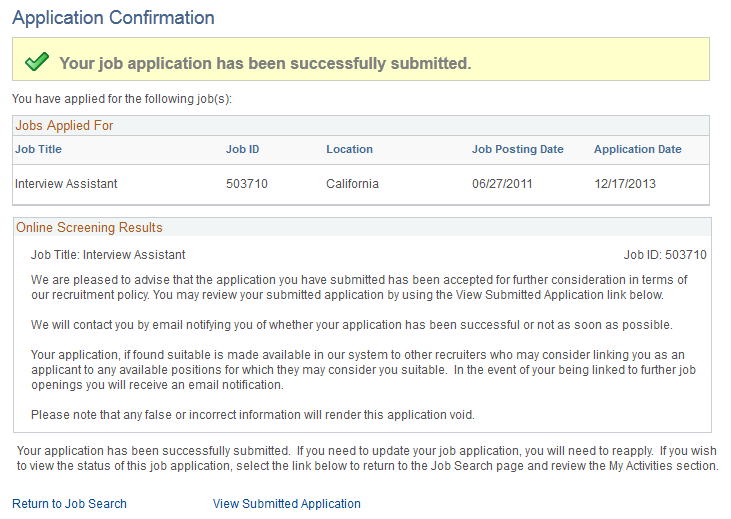
Applicants use the Application Confirmation page (HRS_CE_CONFIRM) to:
Receive confirmation that an application has been successfully submitted.
Review online screening results for job openings that include pass and fail messages for online screening.
Navigation:
Click the Submit button on the Review and Submit page.
This example illustrates the Application Confirmation page.
Field or Control |
Description |
|---|---|
Job Applied For |
This grid lists the jobs that were included in the submitted application. The grid does not show jobs that were removed from the application because the applicant failed prescreening. |
Online Screening Results |
This group box appears if any there are any online screening pass or fail notices for the applicant. Pass and fail messages are optional for online screening. The relevant job title and job ID appear before the notice. If the application includes multiple jobs with online screening, the notices for jobs that use the same Explain Text ID are consolidated. That is, the titles and job IDs for all jobs using a particular notice are listed before the notice. If jobs use different Explain Text IDs, the notices appear sequentially under the appropriate job titles and IDs. |
Use the Application Summary page (HRS_CE_REVIEW) to review a submitted application.
Navigation:
Click the My Activities link in the navigation bar that appears on pages throughout Candidate Gateway.
In the Applications grid, click the link for an application with the status Submitted.
This example illustrates part of the Application Summary page.
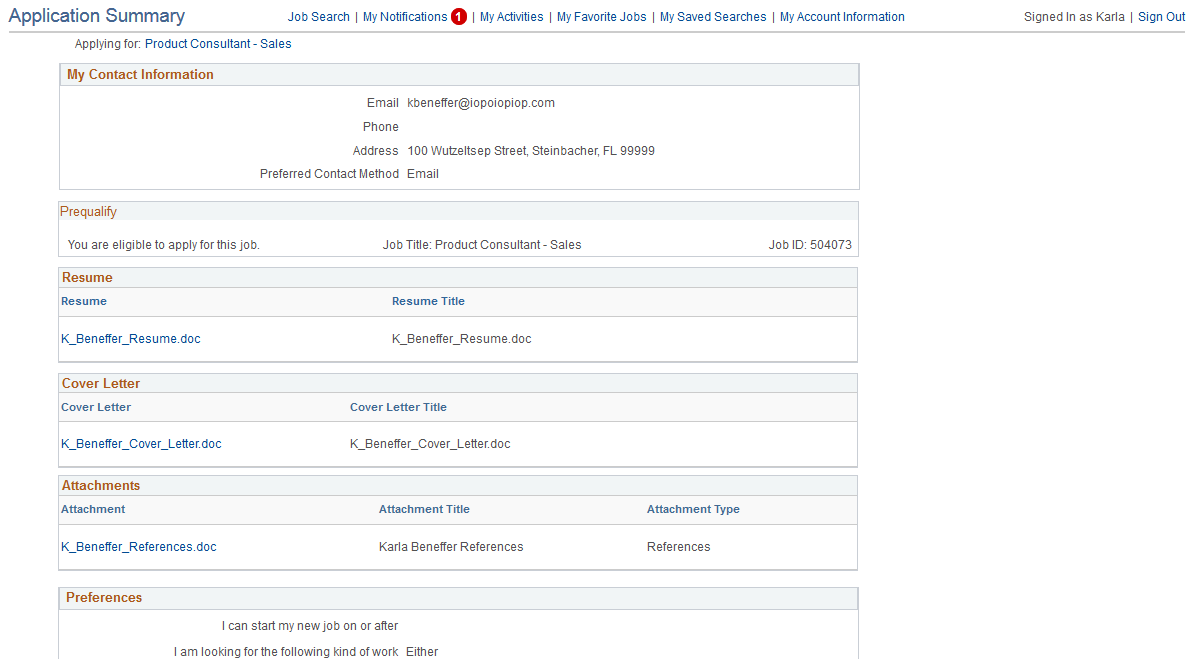
The Application Summary page is a read-only version of the Review/Submit Page, rendered without the guided application process.