Using OnBoarding Pages
The OnBoarding feature uses the PeopleSoft Fluid User Interface to provide employees and contingent workers with a comprehensive list of tasks that should be completed as part of their OnBoarding experience. OnBoarding takes advantage of existing pages in the system and gives employees and contingent workers access to these pages and tasks from one location instead of accessing several components separately.
The following video provides a demonstration of how to use OnBoarding:
Video: PeopleSoft Fluid OnBoarding
This topic discusses those pages specific to the OnBoarding process. Information regarding those pages specific to a product or business process are documented elsewhere and are accessible through the links provided here:
Standard OnBoarding Steps: Completing the Standard OnBoarding Activity Guide
Canadian OnBoarding Steps: (CAN) Completing OnBoarding Activity Guides for Canadian Workers
U.S. OnBoarding Steps: (USA) Completing OnBoarding Activity Guides for US Workers
|
Page Name |
Definition Name |
Usage |
|---|---|---|
|
HC_HR_OBD_ACTIVITY_LAUNCHER_FL (this is the cref for the tile) |
Launch an activity guide that enables you to perform actions and tasks required for a new job. |
|
|
HR_OBD_ACTIVITY_FL |
View your progress and launch the OnBoarding template. Note: The system displays this page if you are hired for multiple jobs and are assigned multiple OnBoarding templates. |
|
|
The Activity Guide Composer Framework for OnBoarding (common elements on pages used to complete OnBoarding tasks) |
N/A |
The Activity Guide Composer frameworks lets you define OnBoarding templates that can be instantiated to execute steps pointing to OnBoarding specific tasks. Activity guides display application steps in either the left panel or across the top of the page as part of the guided process. A corresponding page to the current step you have selected appears in the main panel. They also provide navigation buttons in the page banner for navigating through the steps. |
|
AGC_VIDEO_FL |
Learn how to navigate the OnBoarding activity guide. |
|
|
AGC_VIDEO_FL |
Watch a video or read a transcript welcoming you to the organization. |
|
|
HR_OBD_ATT_DNLD_FL |
View, acknowledge, or upload documents provided by the organization. |
|
|
HR_OBD_ATT_UPLD_FL |
Upload copies of additional documents, such as certificates or identification information. |
|
|
HR_OBD_PHOTO_FL |
Upload a photo of yourself to be stored in the HR system and enter any preferred names for yourself. |
|
|
AGC_SUMMARY_FL |
View a summary of your OnBoarding activities, mark individual steps a complete, return to a specific step, or mark this OnBoarding process as complete. |
Use the OnBoarding Activities tile to launch an activity guide that enables you to perform actions and tasks required for a new job.
Navigation:
Click the OnBoarding Tile from the Employee Self Service fluid home page (or any other home page with the tile).
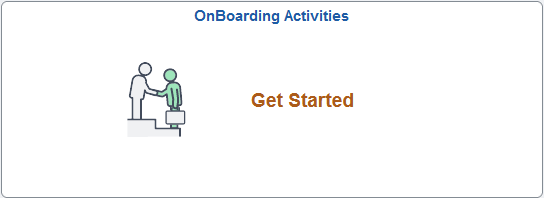
This example illustrates the OnBoarding Activities tile when a user first accesses the activity guide.
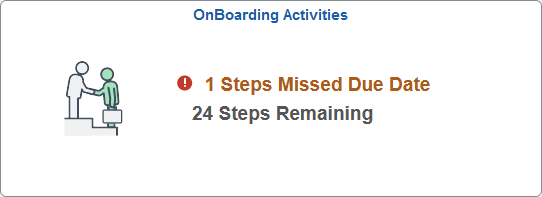
This example illustrates how the OnBoarding Activities tile may appear after a user has previously accessed the activity guide.
If you have not yet accessed the OnBoarding activity guide, the tile will display the text Get Started.
When you have already started the activity guide process, the tile shows the total number steps remaining. If a step has passed it’s due date, the tile will also display a warning message and number count of how many steps have exceeded the due date.
When the OnBoarding template has been marked complete, you will see the message Completed and you will no longer be able to access the activity guide.
Click the tile to access the OnBoarding activity guide to begin or continue completing the OnBoarding steps.
Use the OnBoarding Activities page (HR_OBD_ACTIVITY_FL) to view your progress and launch the OnBoarding template.
Note: The system displays this page if you are hired for multiple jobs and are assigned multiple OnBoarding templates.
Navigation:
Click the OnBoarding Activities Tile when you have been assigned multiple jobs.
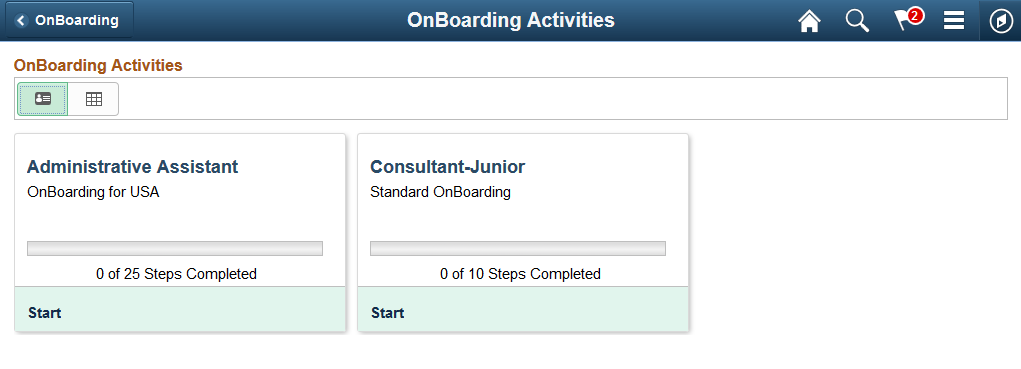
This example illustrates the card view on the OnBoarding Activities page.
This example illustrates the grid view on the OnBoarding Activities page.
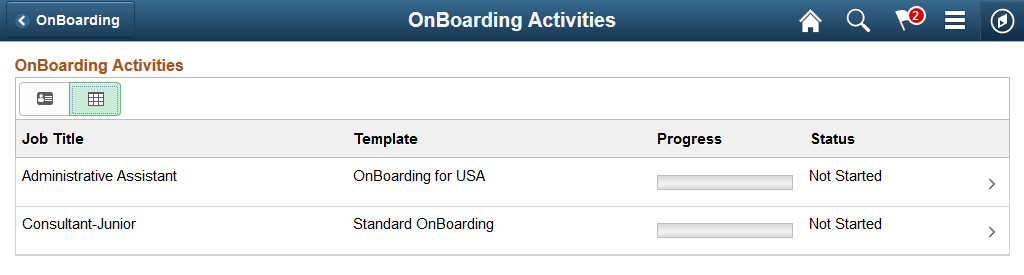
Employees and contingent workers with multiple jobs begin the OnBoarding event process by navigating to the OnBoarding Activities Page (for Workers) and then selecting the appropriate job transaction. The OnBoarding Activities page is displayed only if the employee has multiple jobs and needs to execute multiple OnBoarding templates. If the employee has only one job (or uses the same OnBoarding template for the multiple jobs) the OnBoarding Activities tile on the dashboard will directly launch the activity guide.
The page displays job title that initiated the trigger for the OnBoarding process. You will also see the OnBoarding template name you will be completing along with your progress and status in the process.
Field or Control |
Description |
|---|---|
|
Click the Card View icon button to display information in a card or tile-like format. The card view is the default mode. |
|
Click the Grid View icon button to display the template process in a grid format. The grid shows the same information as the card. |
 (Card View)
 (Grid View)
Click a card or row to access the Activity Guide for this OnBoarding template.
The Activity Guide Composer frameworks lets you define OnBoarding templates that can be instantiated to execute steps pointing to OnBoarding specific tasks.
Activity guides display application steps in either the left panel or across the top of the page as part of the guided process. A corresponding page to the current step you have selected appears in the main panel. They also provide navigation buttons in the page banner for navigating through the steps.
To set up templates using the Activity Guide Composer, see the Understanding the Activity Guide Composer documentation.
This example illustrates the layout for the OnBoarding pages for a large form factor device.

This example illustrates the layout of the OnBoarding pages on a small form factor device. In the first image, the left panel is hidden. In the second image, the left panel is exposed.

Note: During runtime, PeopleTools manages the execution of the activity guide. Throughout this topic, the page illustrations show the page sections of the OnBoarding process without the context of the activity guide steps. Even though the framework is not illustrated, remember that all steps appear within that framework.
Page Banner
The top of PeopleSoft pages is called the page banner.
On most pages, users see the standard set of banner icon buttons.
Field or Control |
Description |
|---|---|
|
Click this button to exit the OnBoarding activity guide. If you have not clicked the Complete button on the Summary page before exiting, you can resume this OnBoarding data entry at a later time. |
 or
or  Exit button
Header (Sub-Banner)
A gray area under the main page banner displays contextual information that is specific to the activity guide, including the person’s name and action buttons.
Field or Control |
Description |
|---|---|
|
Click this button to navigate to the previous step or substep. When configured to use the Auto Save feature, clicking this button will save changes to the current step before moving to the next. If it is not configured to use auto save, then the system will issue a message prompting the user to save the page first. The button is not visible on the first step in the request. |
|
Click this button to navigate to the next step or substep. When configured to use the Auto Save feature, clicking this button will save changes to the current step before moving to the next. If it is not configured to auto save, then the system will issue a message prompting the user to save the page first. On the last step of the request (the Summary step), the Next button does not appear. The page displays a Complete button on the Summary page to complete the OnBoarding transaction. |
|
This button appears on the Summary step page only. Click this button to mark the OnBoarding activity guide complete. Note: Once the activity guide has been marked as Complete, the OnBoarding dashboard tile will no longer be visible. |
|
Select the Mark Complete menu item (prior to PeopleTools 8.57) or button in the sub banner (PeopleTools 8.57 or higher) to change the status of a step. See the Step List Format section that follows for more information on step statuses. |
 or
or  Previous button
 or
or  Next button
 Complete button
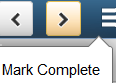

Step List Format
Depending on the setup of the template, the Activity Guide Composer framework can list steps in the following formats:
Vertical Non Sequential: This activity guide will display unnumbered steps vertically in the left panel of the page.
Vertical Sequential: This activity guide will display numbered steps vertically in the left panel of the page.
Horizontal Sequential: This activity guide will display the steps horizontally across the top of the page.
The delivered OnBoarding templates are set up using the Vertical Non Sequential activity guide type. Therefore, this topic will discuss the layout of the delivered templates. The PeopleSoft application delivers the following OnBoarding templates:
(USA) OBDUSA1 – OnBoarding for USA
(CAN) OBDCAN1 – OnBoarding for CAN
OBDSTND – Standard OnBoarding
Your organization may define templates that require the user to follow a prescribed order or use a horizontal display. In these cases, the steps are numbered and labeled. To define sequential steps for a vertical or horizontal display, see the Activity Guide Composer - Activity Guide Type Page documentation.
The delivered activity guide type templates include a left panel that lists the steps in the OnBoarding process. This panel appears on the left of larger devices. On a small form factor such as phone, the panel is initially hidden. Click the Item/Sub-Item Section tab to expand and view the steps and navigate to other step pages.
Field or Control |
Description |
|---|---|
<Step or Substep Name> |
The left panel has individual steps that are labeled. The delivered OnBoarding templates do not require a sequential order to completing steps. Some steps will have substeps. Steps with substeps are indicated by an expand/collapse icon before to the step name. The step is automatically expanded when you reach it. You can also click the parent step at any time to expand or collapse it. The page will highlight the current step or substep. Note: For a list of delivered OnBoarding steps for Canadian or US users, see (CAN) Completing OnBoarding Activity Guides for Canadian Workers and (USA) Completing OnBoarding Activity Guides for US Workers topics. |
|
This icon appears before a step label and represents that the step is required. You cannot complete an OnBoarding transaction until all required steps are completed. |
<Step Status> |
Each step and substep has a status. These statuses include:
Users can return to steps and substeps by clicking the step, using the navigation buttons in the banner, or from the Summary Page and clicking the Go to Step button. |
 Required icon
For more information on how to display steps and selecting and organizing steps, see the Activity Guide Composer - Activity Guide Type Page, Activity Guide Composer - Select Steps Page, and Activity Guide Composer - Organize and Configure Steps Page.
<Transaction Name> Pages
During activity guide execution, the right or main panel displays the page for the current step in the transaction.
Field or Control |
Description |
|---|---|
<Title Text> |
Displays a page title that includes the step name. For substeps, the page title includes both the step and substep name, separated by a hyphen. For example, Payroll - Tax Withholding indicates that the step title is Payroll and the substep title is Tax Withholding. |
Use the Before You Start page (AGC_VIDEO_FL) to learn how to navigate the OnBoarding activity guide.
Navigation:
Click the OnBoarding Activities Tile from the dashboard or select the respective card on the OnBoarding Activities Page (for Workers).
Click the Before You Start step from the activity guide navigation, or use the Previous button, as needed.
This example illustrates the Before You Start page.
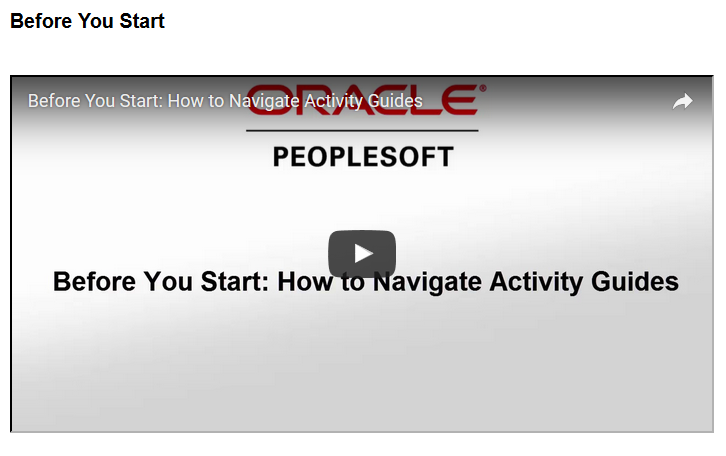
Use this page to watch a video of how to navigate activity guides.
Use the Welcome page (AGC_VIDEO_FL) to watch a video or read a transcript welcoming you to the organization.
Navigation:
Select the Welcome step from the activity guide navigation, or use the Next and Previous buttons to navigate to the page.
This example illustrates the Welcome page.
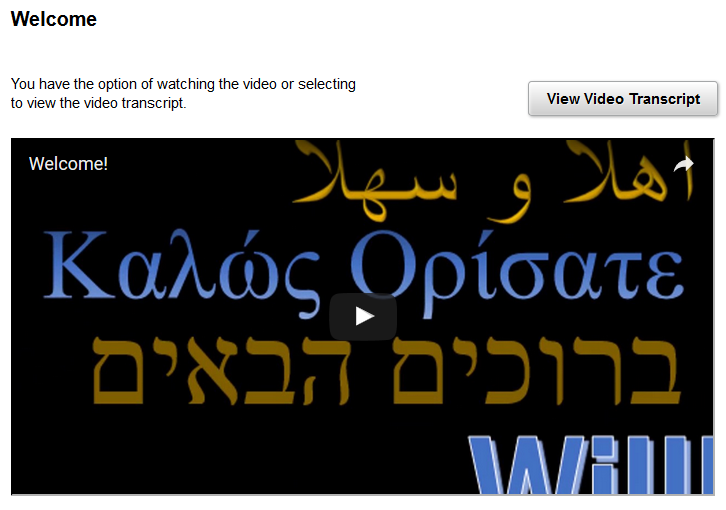
This page may contain custom information about your organization.
Play a video welcoming you to the organization, or click the View Video Transcript button to read the printed text from the video.
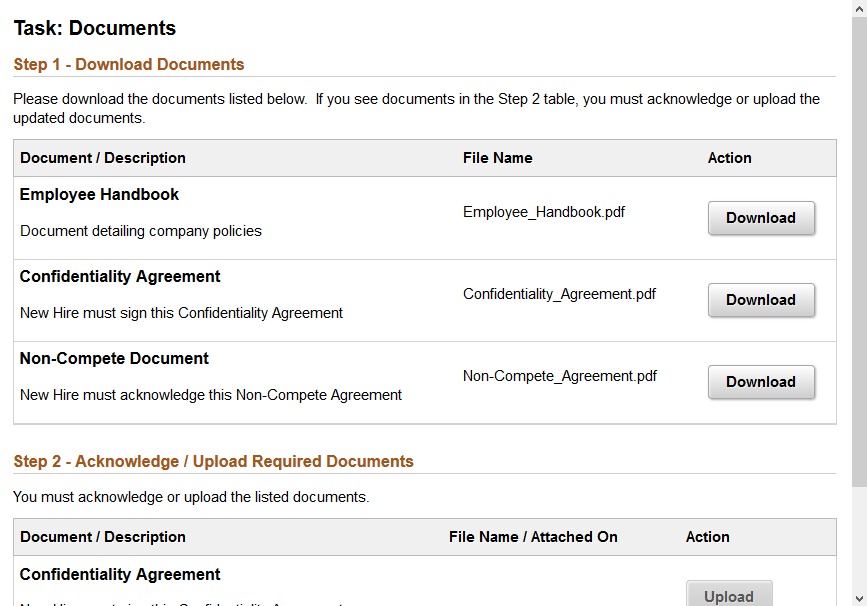
Use the Documents page (HR_OBD_ATT_DNLD_FL) to view, acknowledge, or upload documents provided by the organization.
Note: You can configure your activity guides to use document groups and filter your documents by categories. This enables you to display like documents in different steps. For more information on this, see Understanding Document Groups.
Navigation:
Select the Documents step from the activity guide navigation, or use the Next and Previous buttons to navigate to the page.
This example illustrates the Documents page for a tablet.
This example illustrates the Documents page for a smartphone.
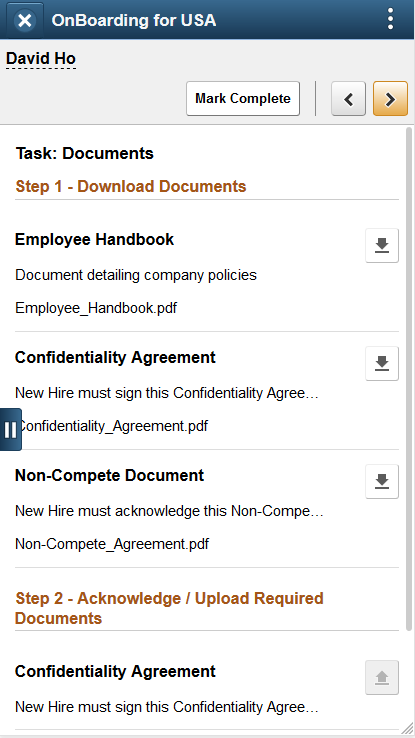
Use this page to view the documents for this OnBoarding process. Available documents are defined on the Configure Documents - Templates Page. Administrators define documents using one of these three options:
Administrators will access the uploaded files on the Employee Documents Page.
None: These documents are available within the Step 1 - Download Documents section of this page. No further action is required from the worker other than to view or download the document.
Acknowledge Document: These documents are available within the Step 1 - Download Documents section of this page as well as the Step 2 - Acknowledge / Upload Required Documents section, where it is followed by an Acknowledge button. You must acknowledge these documents prior to completing the OnBoarding process.
Upload Document: These documents are available within the Step 1 - Download Documents section of the Documents page, as well as the Step 2 - Acknowledge / Upload Required Documents section, where it is followed by an Upload button. These documents require you to upload a document, which will be available to the OnBoarding administrator.
Step 1 - Download Documents
This section displays all documents provided for this template. When a document requires the worker to acknowledge that he or she has read the document, a corresponding row will appear in the Step 2 - Acknowledge / Upload Required Documents section displaying an Acknowledge button. When a document requires the worker to upload an updated version, such as the signed form, a corresponding row will appear in the Step 2 - Acknowledge / Upload Required Documents section displaying an Upload button. Not all documents will require an action.
Field or Control |
Description |
|---|---|
Document / Description and File Name |
Displays the name of the file in bold and a short description. The file name that will download to your machine appears in the File Name field. |
Download or |
Click this button to view and download the document attachment and, when an action is required for a document, enable the Upload or Acknowledge button for the corresponding document row in the Step 2 - Acknowledge / Upload Required Documents section. When you have downloaded a document, a check mark will appear for that row to indicate that you have downloaded the attachment. The system will also issue a message letting you know what actions you need to take in the Step 2 - Acknowledge / Upload Required Documents section. |

Step 2 - Acknowledge / Upload Required Documents
This section displays all documents for this template that require an action. Not all documents in the Step 1 - Download Documents section will require an action and will therefore not have corresponding rows in this section.
Field or Control |
Description |
|---|---|
Acknowledge or |
This button is available when you have clicked the Download button from the corresponding document in the Step 1 - Download Documents section. Click this button to acknowledge that you have received and read the corresponding document available in the Step 1 - Download Documents section of this page. |
Upload or |
This button is available when you have clicked the Download button from the corresponding document in the Step 1 - Download Documents section. Click this button to open the File Attachment page and upload the file. After you have selected and uploaded the file, click Done to return to this page. The uploaded file will appear as an active link in the File Name / Attached On row accompanied by the date and time the file was uploaded. |
Delete or |
This button is available after you have uploaded a file. Click to remove the uploaded file. Once all required actions have been completed by the employee and the step is marked complete, the Delete button will be disabled. |


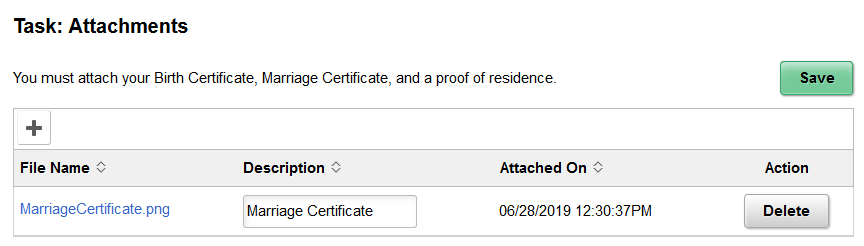
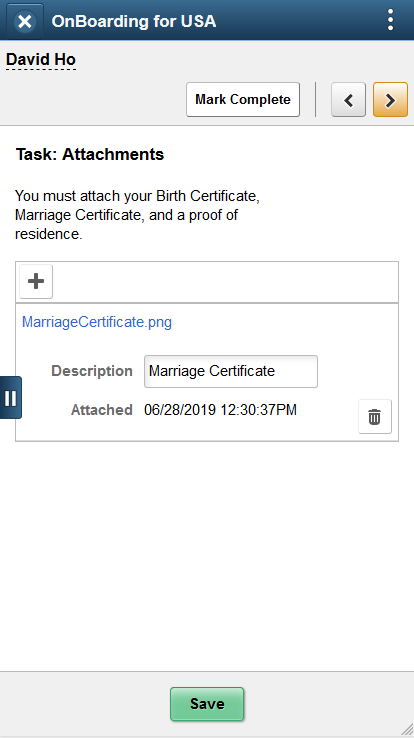
Use the Attachments page (HR_OBD_ATT_UPLD_FL) to upload copies of additional documents, such as certificates or identification information.
Navigation:
Select the Attachments step from the activity guide navigation, or use the Next and Previous buttons to navigate to the page.
This example illustrates the Attachments page for the tablet.
This example illustrates the Attachments page for the smartphone.
Field or Control |
Description |
|---|---|
Add Attachment or |
Click this button to open the File Attachment page and upload a file. After you have selected and uploaded the file, click Done to return to this page. The uploaded file will appear as an active link in the File Name field. The page will display the date and time the file was uploaded. When you add a file, the data is automatically saved for this page. |
Description |
Enter up to 50 characters as a description for the file. You will need to select the Save button to save this data. |
Delete or |
Click this button to remove the file from the page. The system will ask for confirmation that you want to delete this file. Click Yes to delete the file. This will automatically save the page with your deletion of the file. |
Save |
Click this button to save the description you have added or for the file. Administrators will access the uploaded files on the Employee Documents Page. |
 Add button
Use the Personal Details - Photo page (HR_OBD_PHOTO_FL) to upload a photo of yourself to be stored in the HR system and enter any preferred names for yourself.
Navigation:
Select the Personal Details step, then the Photo substep from the activity guide navigation, or use the Next and Previous buttons to navigate to the page.
This example illustrates the Personal Details - Photo page.

Photo
Field or Control |
Description |
|---|---|
Update Photo |
Note: The Update Photo link is available only when the Allow Employee to Upload Photo option is enabled on the Installation Table - HCM Options Page. Select this link to upload or select an image of yourself. If there is no HR photo and you have not uploaded your own image, then the dummy photo will be displayed. The photo will be displayed in self service transactions. |
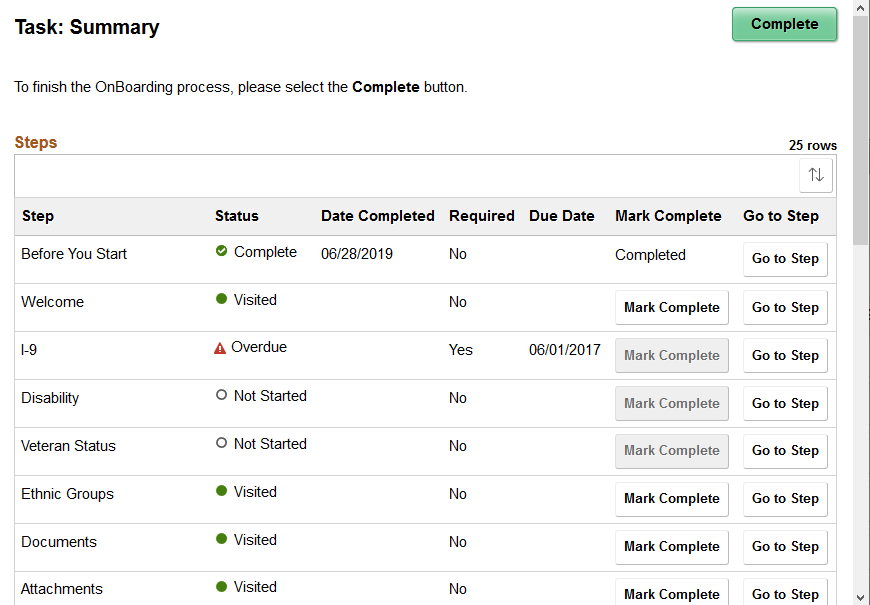
Use the Summary page (AGC_SUMMARY_FL) to view a summary of your OnBoarding activities, mark individual steps a complete, return to a specific step, or mark this OnBoarding process as complete.
Note: Oracle recommends that you add the Summary step as the last step in the activity guide process.
Navigation:
Select the Summary step from the activity guide navigation, or use the Next button to navigate to the page.
This example illustrates the Summary page for the tablet.
This example illustrates the Summary page for the smartphone.
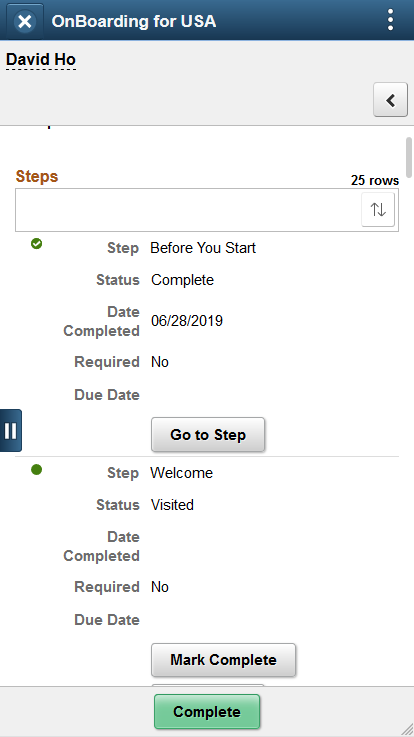
View a summary of the steps you have visited and completed. Additionally, view custom information about any additional tasks that you need to do related to this OnBoarding event.
Use the Steps section to view a summary of the statuses of each step in this process and what is required and when.
Field or Control |
Description |
|---|---|
Status |
Displays the status of the step. |
Complete Date |
Displays the date you completed this step. If you have not completed any steps, this field will be hidden. To mark a step Complete, click the Actions Menu icon in the banner and select the Mark Complete action item. Or, click a Mark Complete button for a step on this Summary page. In some instances, the system will automatically mark the step as Complete where the system can correctly infer that the task for the step is done. |
Required |
If a step is required, this field will display Yes. |
Due Date |
Displays the due date by when you should complete this step. If none of your steps has a due date, then this field will be hidden. |
Mark Complete |
This field will display one of the following options:
|
Go to Step |
Click this button to easily navigate back to a step. If you have completed a step, this button is not available. |
Complete |
Click this button to mark this OnBoarding activity guide complete. The system will verify that all the required steps have been completed and displays a message if any are incomplete. This closes the OnBoarding activity guide transaction process. Note: Once the activity guide has been marked as Complete, the OnBoarding dashboard tile will no longer be visible. |