Managing OnBoarding
To manage OnBoarding, use the OnBoarding Installation (HR_OBD_INSTALL), Document Groups (HR_OBD_DOC_GRP), Configure Documents (HR_OBD_CFG_DOC), Employee Documents (HR_OBD_EMP_DOCS), Manage OnBoarding Event (HR_OBD_EMP_TMPLS), OnBoarding Status (HR_OBD_ADMIN_FL), Document Groups (HR_OBD_DOC_GRP), Configure Documents (HR_OBD_CFG_DOC), and Employee Documents (HR_OBD_EMP_DOCS) components.
Note: Both OnBoarding and OffBoarding use the Document Groups (HR_OBD_DOC_GRP), Configure Documents (HR_OBD_CFG_DOC), and Employee Documents (HR_OBD_EMP_DOCS) setup components, which pertain only to the Documents and Attachments steps of these types of activity guides. Other pages where attachments are available use the Attachments Framework and do not use these setup and file management components.
These topics give an overview of OnBoarding triggers and handlers, document groups, and discuss how to set up OnBoarding tables.
|
Page Name |
Definition Name |
Usage |
|---|---|---|
|
HR_OBD_INSTALL |
Identify the OnBoarding role, notification template, activity guide category, attachment location, default template or template assignment definition. |
|
|
HR_OBD_DOC_GRP |
Define document groups for organizing your documents. |
|
|
HR_OBD_CFG_DOC |
Set up document configuration for activity guides (i.e.- OnBoarding and OffBoarding), such as the types of documents to view or upload, if an employee needs to take action on the document, and attach documents. |
|
|
HR_OBD_CFG_DOC_TMP |
Identify which templates should display this document. |
|
|
HR_OBD_EMP_DOCS |
View the documents that workers have acknowledged or uploaded Note: This is only for Attachments and Documents steps and not for attachments uploaded in other steps. |
|
|
HR_OBD_EMP_TMPLS |
Add a trigger for a person who is missing a job assignment trigger or correct an incorrect template assignment. |
|
|
HR_OBD_STATUS_FL |
View and take action on a worker’s progress for an OnBoarding process as an administrator. |
Note: You will need to assign the delivered OnBoarding Administrator role to users to grant them access to these pages.
The handler, CreateTriggerOBD, is part of the Event Manager AssignmentAdded event (). The AssignmentAdded event is raised for the following Job Data actions:
Employee:
Hire
Additional Job
Rehire
Contingent Worker:
Add Contingent Worker
Renewal
Note: OnBoarding is not available for persons of interest (POIs).
The handler will do three things:
Add the OnBoarding role, as defined on the OnBoarding Installation Page, to the person’s user profile provided a user ID was assigned to the person before the assignment was added.
Add or update a trigger on the Manage OnBoarding Event Page.
Note: This page enables HR administrators to access triggers, update the template ID, delete the trigger and OnBoarding process, or add a trigger, if necessary. An administrator would not normally access this page except in rare cases to correct invalid template assignments or to add a trigger that got missed.
Send a notification to the email address stored on the person’s user profile, if there is one. This will use the OnBoarding notification template defined on the OnBoarding Installation Page.
Important! The PeopleSoft system delivers the Event Manger OnBoarding handler (HR_OBD_EM_HANDLER) for the AssignmentAdded and AssignmentTerminated events as inactivate. If your organization is implementing the OnBoarding feature, you will need to set the status to Active for these handlers.
For information on the Event Manager and handlers, see the documentation for Events and Notifications Framework.
Document groups combine like documents into separate categories that you can then associate with different steps within your activity guide processes (i.e.- OnBoarding and OffBoarding). For example, say you want to differentiate your documents into two different groups. The application delivers the DOCGROUP1 and DOCGROUP2 groups for this purpose. You then associate the DOCGROUP1 - Document Group 1 group to company handbook-related files, and the DOCGROUP2 - Document Group 2 group you link to documents related to other materials needed for employment.
You link a document to a group using the Configure Documents - Templates Page for each document that should be associated with a group. To have these appear as two different steps within activity guide process, groups must be associated with steps within the category.
Note: The system delivers the ONBOARDING category with the DOC_DOWNLOAD1 step already associated with the DOCGROUP1 group and the DOC_DOWNLOAD2 step already associated with the DOCGROUP2 group.
If you want to create your own document groups, you will need to do the following:
Create your own groups using the Document Groups Page.
Link groups to each document type on the Configure Documents - Templates Page.
Use the AG Composer Categories - Steps Page to enter the each group as a Data Field value under the Related Data section for the corresponding step.
Note: If you are linking them to the delivered DOC_DOWNLOAD1 and DOC_DOWNLOAD2 steps that are part of the ONBOARDING category, update the Data Field values to reflect these new groups.
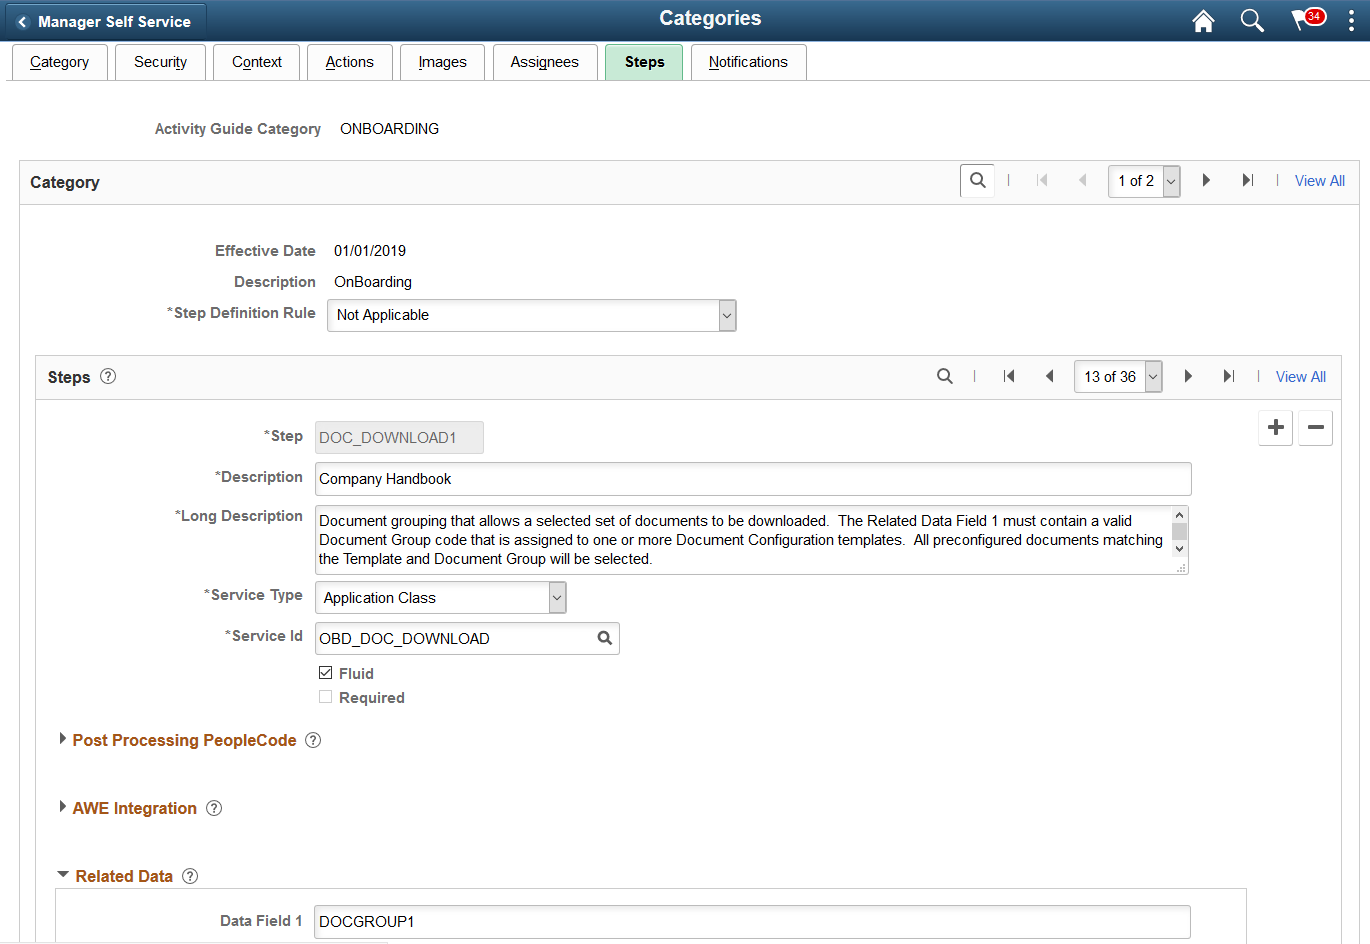
This example demonstrates how the AG Composer Categories - Steps Page, Related Data section, displays the DOCGROUP1 group as the Data Field 1 value for the DOC_DOWNLOAD1 Steps row. Note that the step description was updated for purposes of this example to reflect what you might want to display to the end user as the activity guide process step.
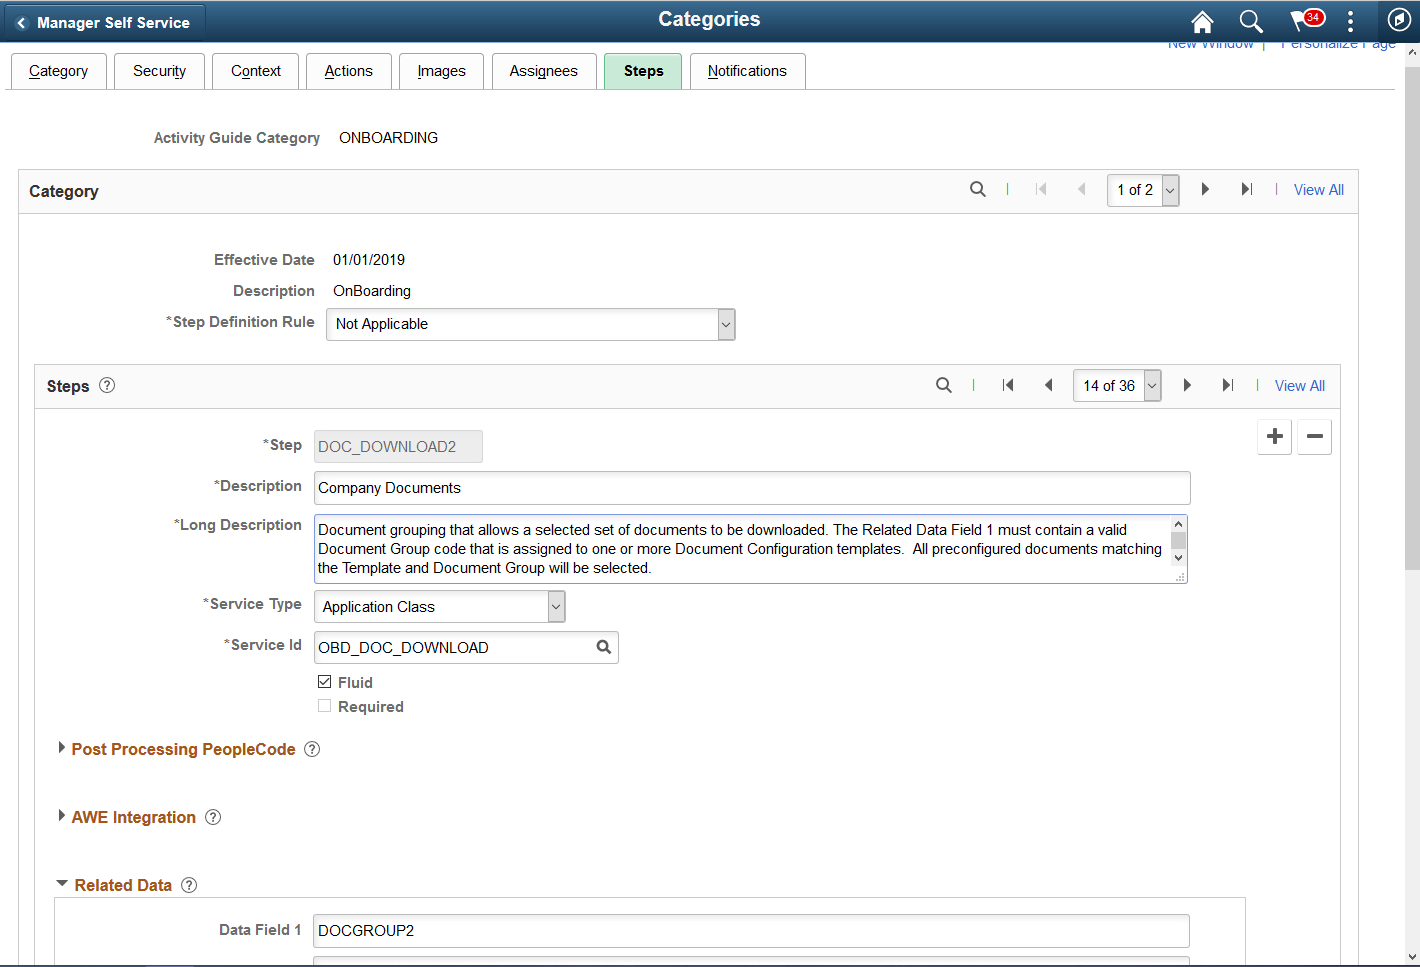
On the DOCGROUP2 Steps row, the group value DOCGROUP2 is the Data Field 1 value. Note that the step description was updated for purposes of this example to reflect what you might want to display to the end user as the activity guide process step.
Because each step is associated with a different group, when you create and deploy activity guide templates using both steps, the system will display two different steps, each showing only those documents tied to the group in that step.
Note: If a Document Group value is not specified in the Data Field for the category step, then all documents configured for the template will be included, regardless of the Document Group link configuration on the Configure Documents - Templates Page.
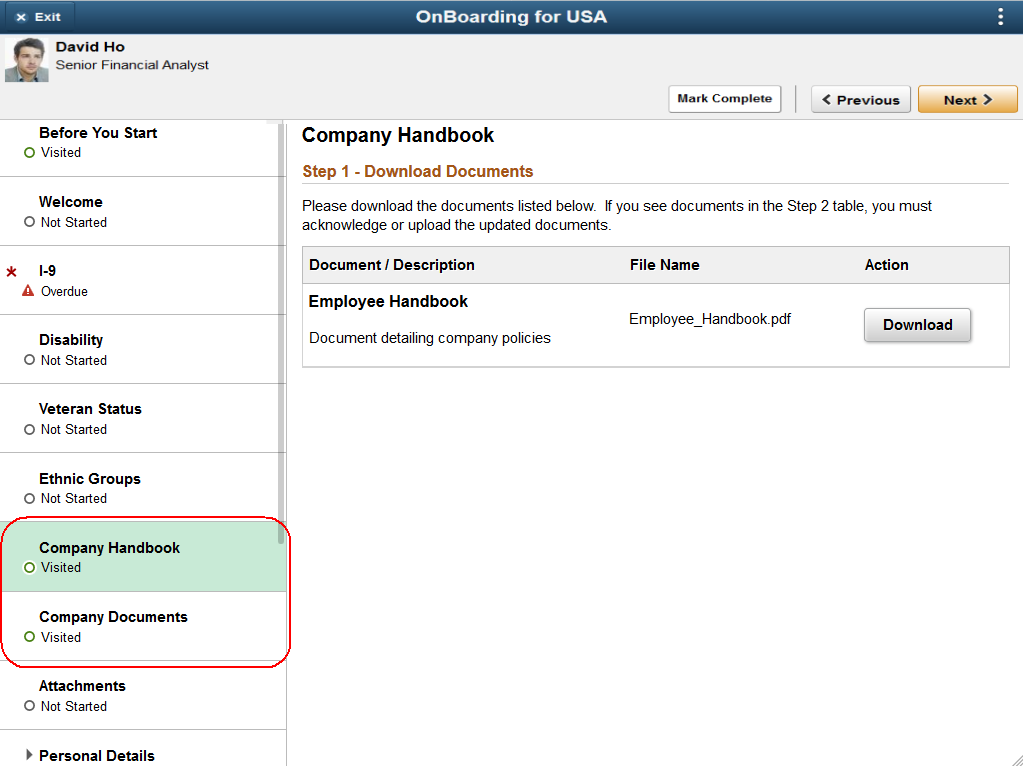
When an employee accesses the activity guide process pages, he will see the two different steps, as shown here. Each steps shows only those documents linked to the group that is specified in the category step. In this scenario, the employee will see only the handbook documents (those in document group DOCGROUP1) on the Company Handbook step.
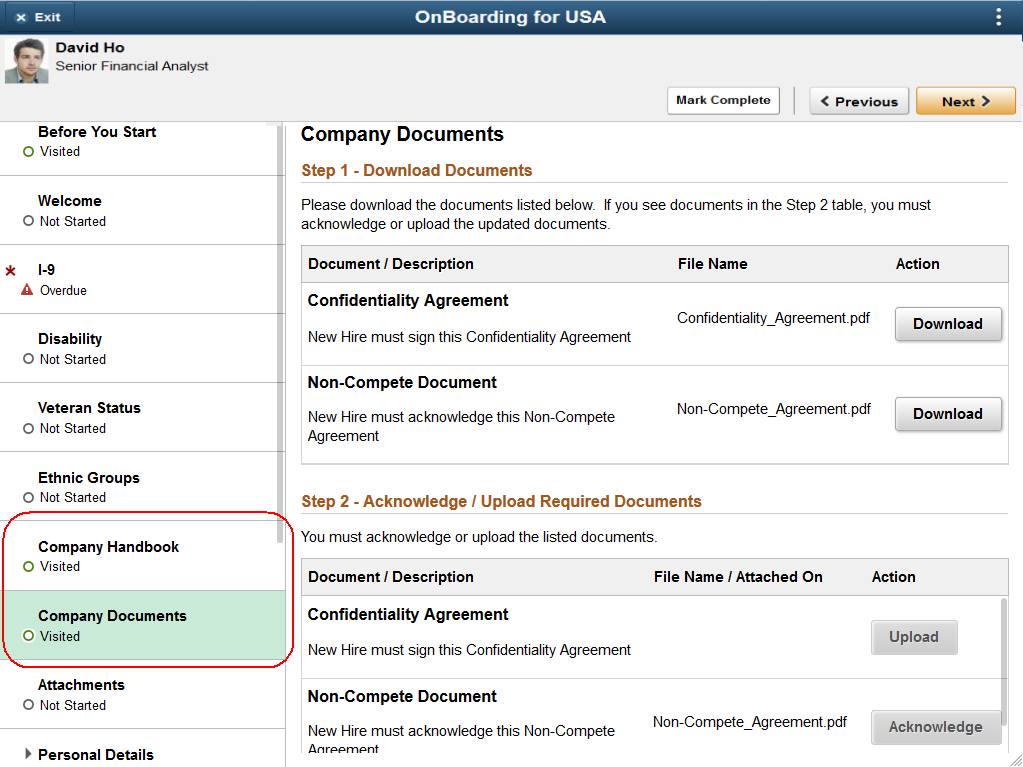
However, the Company Documents step displays those documents and requirements linked to the DOCGROUP2 document group.
Use the OnBoarding Installation page (HR_OBD_INSTALL) to identify the OnBoarding role, notification template, activity guide category, attachment location, default template or template assignment definition.
Navigation:
From the Workforce Administrator Homepage in fluid, click the HR Administration Tile, then select OnBoarding, then the OnBoarding Installation page item tab from the left panel.
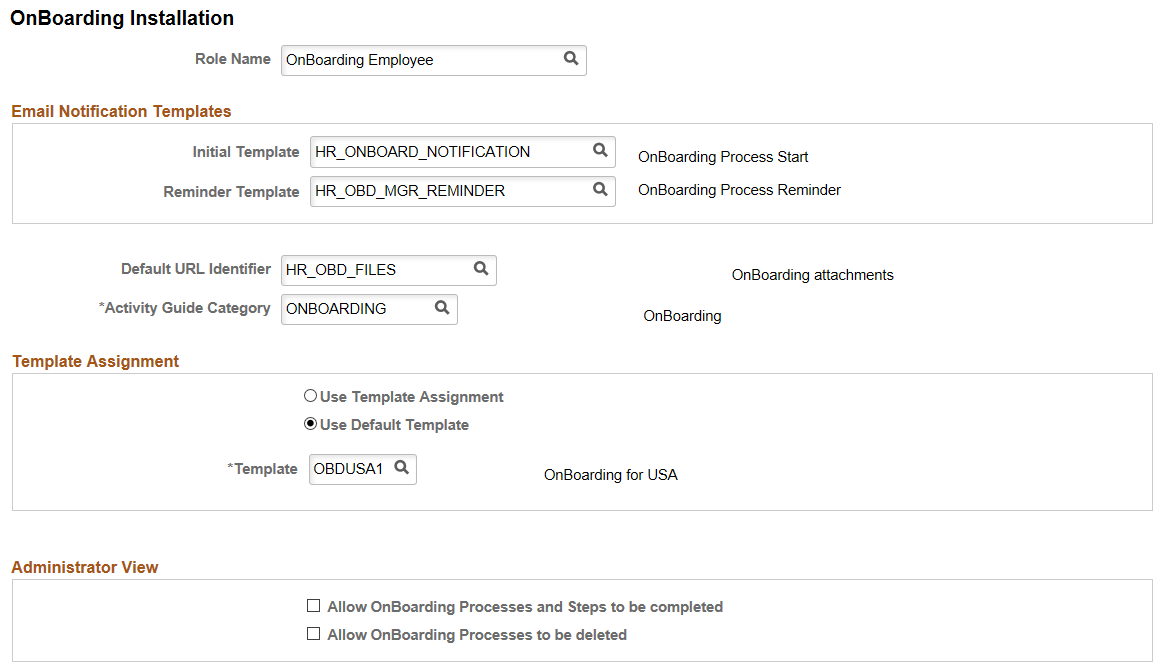
This example illustrates the fields and controls on the OnBoarding Installation page.
Field or Control |
Description |
|---|---|
Role Name |
Define the OnBoarding role that should be assigned to employees when an event trigger is initiated from Job Data. The PeopleSoft application delivers the OnBoarding Employee role to access the OnBoarding pages. You can also create and enter your own role to access the OnBoarding page. This role is needed to access the OnBoarding tile and some of the OnBoarding components. To take advantage of the auto assignment functionality, you must:
Important! If you do not create a user ID prior to adding a job assignment, you will need to manually add the OnBoarding Employee role to the user profile. Roles for a template are assigned on the Activity Guide Composer - Security Page. Note: The role name that is assigned to the user profile must match the role that is specified for the End User security type on the Activity Guide Composer - Security Page. |
Email Notification Templates
Note: Oracle PeopleSoft delivers Notification Composer Framework to manage the setup and administration of all notifications in one central location.
Once you have adopted the Notification Composer feature, you must use it to create new notifications and manage your existing notifications.
Notifications delivered with HCM Image 47 or later must use Notification Composer.
For more information about Notification Composer Framework, see Understanding Notification Composer.
If you have enabled EO Notification Composer, the Email Notification Templates section will be hidden on this page and OnBoarding will leverage the following notification events defined in Notification Composer:
OnBoardingStart - OnBoarding Process Start
OnBoardingReminder - OnBoarding Process Reminder
Field or Control |
Description |
|---|---|
Initial Template |
Identify the initial template to be used to send email notification to workers and inform them that they can begin the OnBoarding process. The PeopleSoft application delivers the HR_ONBOARD_NOTIFICATION template but you can create and add your own template here. |
Reminder Template |
Identify the email template that will be used to send a reminder to the employee when a manager or administrator clicks the Remind Employee button on the OnBoarding Status Page (for Managers) or OnBoarding Status Page (for Administrators). You can use or update the delivered HR_OBD_MGR_REMINDER template per your organization’s requirements, or you can create a template of your own and enter it here. This video demonstrates setup to support the notification feature on the OnBoarding Activities page for managers: Video: Image Highlights, PeopleSoft HCM Update Image 24: Addition of Manager View of OnBoarding |
Default URL Identifier |
Enter the default URL identifier that will be used by the document configuration process (Configure Documents - Documents Page) to store OnBoarding downloadable documents and attachments. The PeopleSoft application delivers the HR_OBD_FILES URL identifier to store OnBoarding attachments in the HR_OBD_FILES record. |
Activity Guide Category |
Indicate the Activity Guide Composer category that should be used for OnBoarding. Only those templates that use this category will be available when assigning templates to a worker. The PeopleSoft application delivers the ONBOARDING category and the delivered templates are assigned to this category. The category is assigned to a template on the Activity Guide Composer - General Information Page. |
Template Assignment
Field or Control |
Description |
|---|---|
Use Template Assignment and Template Assignment |
When you select the Use Template Assignment option, the Template Assignment field appears. Select this option to indicate that the system should automatically determine the template that should be assigned to a worker using the Template Assignment engine. The system will use the Template Assignment ID you enter here, which defines the rules for automatically assigning templates to workers. For more information on the Template Assignment process, see the AG Composer Tmplt Asgnmt - Template Assignment Page. |
Use Default Template and Template |
When you select the Use Default Template option, the Template field appears. Select this option to indicate a default template that should be assigned to all workers when an event triggers the process. The PeopleSoft application delivers ODBUSA1 (OnBoarding for USA) as the default template, but you can change this value. For additional information on OnBoarding triggers, see the Understanding OnBoarding Triggers and Handlers topic. |
Administrator View
Use this section to define which buttons should be available on the OnBoarding Status Page (for Administrators).
Field or Control |
Description |
|---|---|
Allow OnBoarding Process and Steps to be completed |
Select this check box to enable the administrator to mark individual steps or an entire OnBoarding process as Complete. When selected, the Complete button will appear at the top of the page and a Mark Complete button for each step when an OnBoarding process has a status of In Progress. These buttons will not be available for OnBoarding processes with a status of Complete or Not Started. |
Allow OnBoarding Process to be deleted |
Select this check box to enable the administrator to delete an OnBoarding process for an employee. When selected, the Delete button will appear for OnBoarding processes with a status of Complete or In Progress. The Delete button will not be available for OnBoarding processes with a status of Not Started. |
Use the Document Groups page (HR_OBD_CFG_DOC) define document groups for organizing your documents.
Navigation:
From the Workforce Administrator Homepage in fluid, click the HR Administration Tile, then select OnBoarding or OffBoarding, then the Document Groups page item tab from the left panel.
This example illustrates the fields and controls on the Document Groups page.
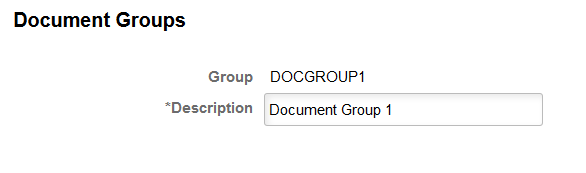
Use this page to identify document group names. You can then associate documents to these groups on the Configure Documents - Templates Page.
Note: The PeopleSoft application delivers the DOCGROUP1 and DOCGROUP2 document groups. These values are associated with the DOC_DOWNLOAD1 and DOC_DOWNLOAD2 steps respectively under the Related Data section, Data Field 1 field on the AG Composer Categories - Steps Page of the ONBOARDING category.
If you create and use different document groups then the ones that are delivered, you will need to update the data field values on the Categories - Steps Page based on the document groups you create.
For more information on using document groups, see the Understanding Document Groups section in this documentation.
Use the Configure Documents - Documents page (HR_OBD_CFG_DOC) to set up document configuration for activity guide processes (i.e. - OnBoarding and OffBoarding), such as the types of documents to view or upload, if an employee needs to take action on the document, and attach documents.
Navigation:
From the Workforce Administrator Homepage in fluid, click the HR Administration Tile, then select OnBoarding or OffBoarding, then the Configure Documents page item tab from the left panel.
This example illustrates the fields and controls on the Configure Documents - Documents page.
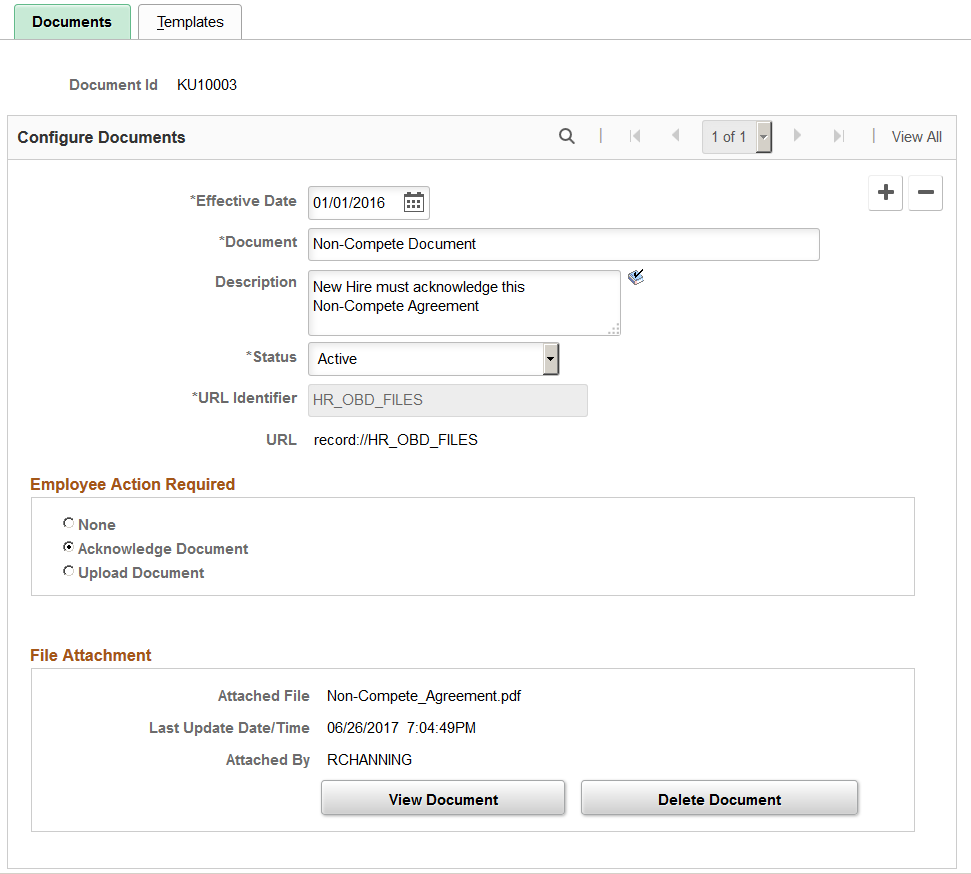
Use this page to define the types of documents you will provide for the worker or that a worker may need to upload. You will assign documents to your templates on the Configure Documents - Templates Page. This information will be used when a worker accesses the document steps (see also Documents Page) during the activity guide process.
Field or Control |
Description |
|---|---|
Document |
Enter the name of the document. This will appear as the heading of the row that appears for the worker on the documents page. |
Description |
Enter a description of the document type. This description will appear under the document header (see the Document field) and will clarify the purpose of the document. |
URL Identifier and URL |
This value defaults form the OnBoarding Installation Page but you can override this value. After you save, this field is no longer available for edit. Enter the URL identifier that will be used to store activity guide downloadable documents and attachments for this document type. The PeopleSoft application delivers the HR_OBD_FILES URL identifier to store activity guide attachments in the HR_OBD_FILES record. |
Employee Action Required |
Select one of the following worker actions that a worker should take from the Documents Page:
|
Add Document |
This button is available for new or documents where the file has been deleted. Click to upload the document that should be available in the system. The standard PeopleTools file attachment dialog box appears. After uploading a document, the page will display the file name, date the file was added, and the user ID of the person who added it. Use the Configure Documents - Templates Page to identify which templates should display this document. |
View Document |
Click this button to open and view the file you have previously entered. |
Delete Document |
Click this button to remove the file. |
Use the Configure Documents - Templates page (HR_OBD_CFG_DOC_TMP) to identify which templates should display this document.
Navigation:
From the Workforce Administrator Homepage in fluid, click the HR Administration Tile, select OnBoarding or OffBoarding, then select the Configure Documents page item tab in the left panel, then select the Templates page tab.
This example illustrates the fields and controls on the Configure Documents - Templates page.

Field or Control |
Description |
|---|---|
Category |
Indicate the Activity Guide Composer category to narrow the template search. Only those templates that use this category will be available when assigning templates on this page. This field is not required but if you do not select a category, all active templates, regardless of category, will be available for selection from the Template field. |
Template |
Enter the templates that should display this document on their Documents Page step. |
Document Group |
(Optional) Identify a document group to link documents. Document groups are defined on the Document Groups Page. By associating documents with a group, you are able to group documents under different steps within the activity guide process. For more information on linking documents to different steps, see Understanding Document Groups at the beginning of this topic. |
Use the Employee Documents page (HR_OBD_EMP_DOCS) to view the documents that workers have acknowledged or uploaded.
Note: This is only for Attachments and Documents steps within OnBoarding and OffBoarding activity guides and not for attachments uploaded in other steps.
Navigation:
From the Workforce Administrator Homepage in fluid, click the HR Administration Tile, then select OnBoarding or OffBoarding, then select the Employee Documents page item tab from the left panel.
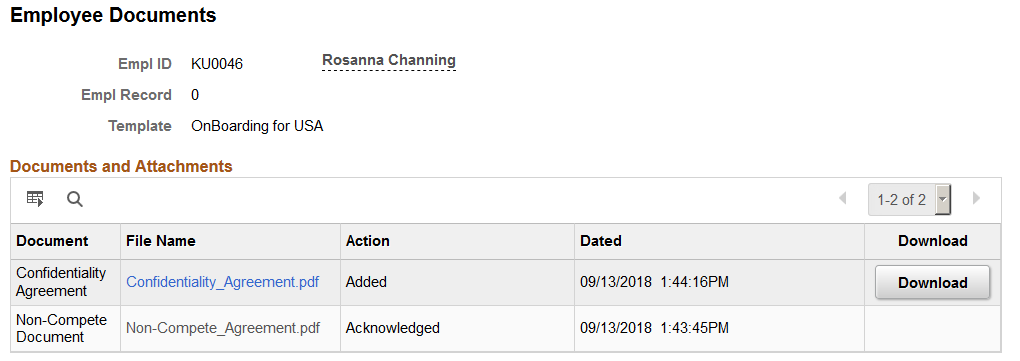
This example illustrates the fields and controls on the Employee Documents page.
Field or Control |
Description |
|---|---|
File Name |
Displays as an active link when the person uploaded a document. Click the link to view the file. |
Action |
View the action the employee took regarding this document. Options are Added or Acknowledged. |
Download |
Click this button to download and save the file. |
Use the Manage OnBoarding Event page (HR_OBD_EMP_TMPLS) to add a trigger for a person who is missing a job assignment trigger or correct an incorrect template assignment.
Navigation:
From the Workforce Administrator Homepage in fluid, click the HR Administration Tile, then OnBoarding, then select the Manage OnBoarding Event page item tab from the left panel.
This example illustrates the fields and controls on the Manage OnBoarding Event page.
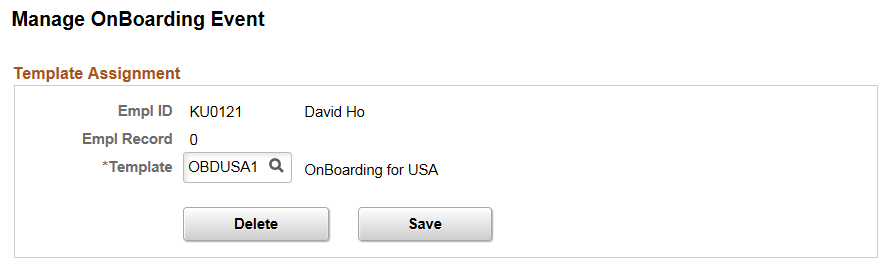
Note: This page enables HR administrators to access trigger rows, update the template ID, delete the trigger, or add a trigger, if necessary. An administrator would not normally access this page except in rare cases to correct invalid template assignments or to add a trigger that got missed. For additional information on OnBoarding triggers, see the Understanding OnBoarding Triggers and Handlers topic.
Field or Control |
Description |
|---|---|
Template |
The template value is provided by default from the Template Assignment configuration method selected on the OnBoarding Installation Page. These are:
If necessary, enter or update the template. Select from a list of valid templates associated with the Activity Guide Category value defined on the OnBoarding Installation Page. Note that AGC template administrators will use the Activity Guide Composer - General Information Page to associate categories to a template. Note: You can change the template without warning for a job assignment where the OnBoarding process has not started. However, if you change the template for a job assignment where an OnBoarding process is in progress, the system will issue a warning that an OnBoarding process already exists for this template and the process will be deleted. |
Delete |
This button is available only if a trigger entry already exists. Click this button to delete an existing trigger.
The PeopleSoft application delivers a handler where once a job assignment is terminated, the Event Manager handler will delete the trigger for job assignment automatically. |
Save |
Click this button to save the trigger changes. When a new trigger is created, the OnBoarding tile and pages will present the correct OnBoarding process to the employee. Note that the employee must be granted the OnBoarding Employee role to have access to the tile. |
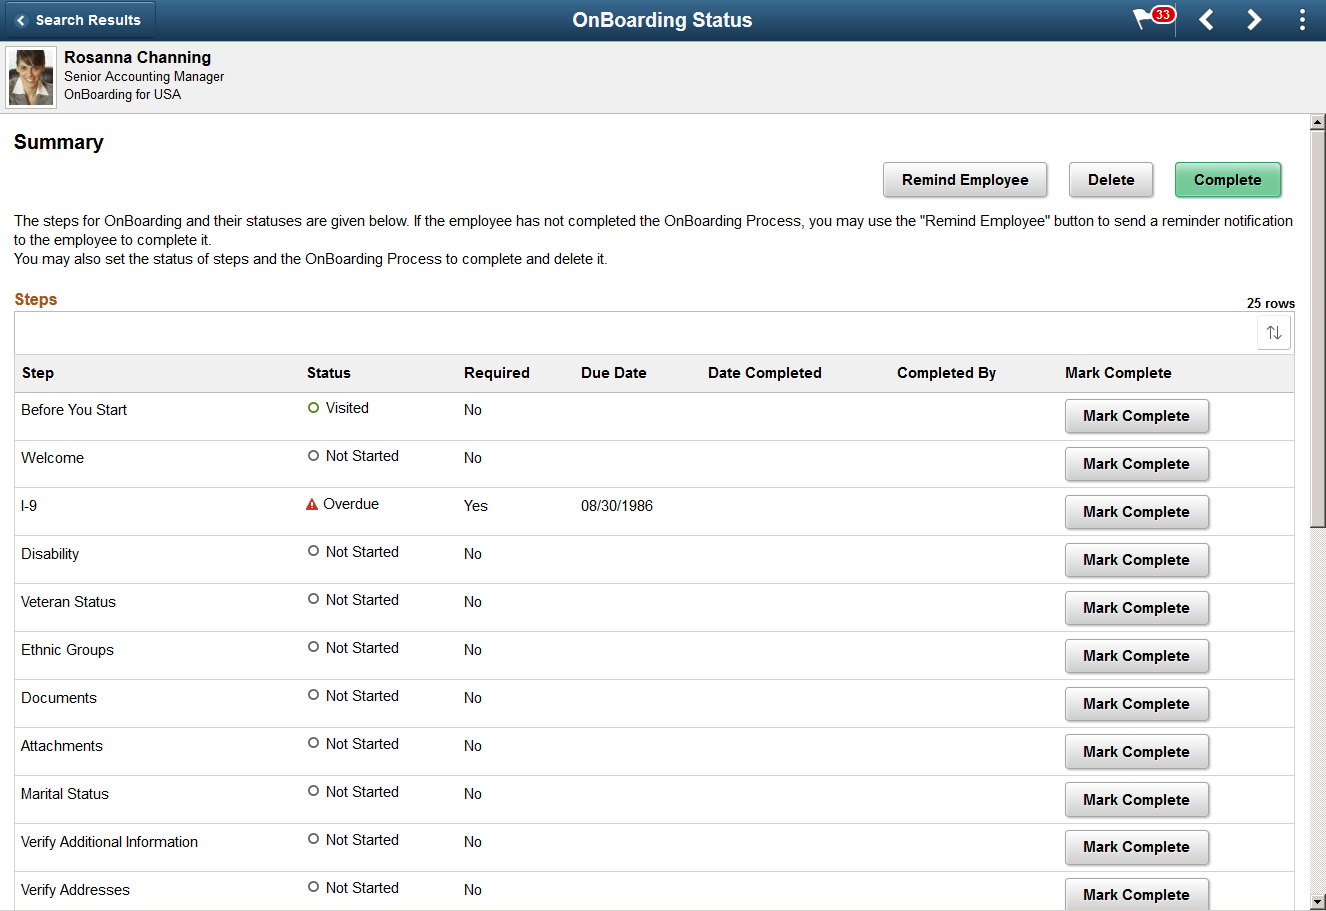
Use the OnBoarding Status page (HR_OBD_STATUS_FL) to view and take action on a worker’s progress for an OnBoarding process as an administrator.
This video demonstrates the administrator view of OnBoarding statuses:
Video: Image Highlights, PeopleSoft HCM Update Image 28: Administrator View of OnBoarding
Navigation:
From the Workforce Administrator Homepage in fluid, click the HR Administration Tile, then OnBoarding, then select the OnBoarding Status page item tab from the left panel.
This example illustrates the fields and controls on the OnBoarding Status page for administrators when using a large form factor such as a tablet or workstation.
This example illustrates the fields and controls on the OnBoarding Status page for administrators when using a smartphone.
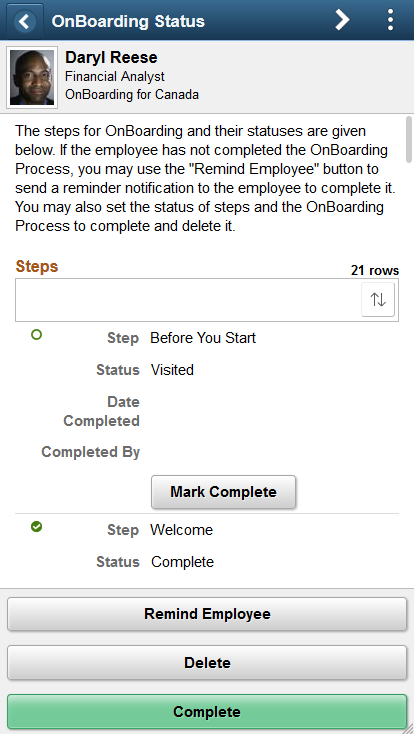
The header of the page displays the employee and OnBoarding template for the job he or she is starting.
Use this page to view a summary of the steps the employee has visited, completed, not started, or steps that may be overdue. Further action can be taken, based on the following information.
Summary
Buttons and the introductory text on this page will vary based on the configuration defined on the OnBoarding Installation Page, Administrator View section and the employee’s OnBoarding process status.
OnBoarding process statuses include:
Complete
In Progress
Not Started
Field or Control |
Description |
|---|---|
Remind Employee |
This button is available for OnBoarding processes with a status of In Progress or Not Started. Click this button to send a notification to the employee to remind him or her to complete the OnBoarding process for this transaction. The notification reminder template sent to the employee is defined on the OnBoarding Installation Page. |
Delete |
This button is available for OnBoarding processes with a status of Complete or In Progress when the Allow OnBoarding Processes to be deleted option is selected on the OnBoarding Installation Page. Click this button to delete the OnBoarding process for this employee. |
Complete |
This button is available for OnBoarding processes with a status of In Progress when the Allow OnBoarding Processes and Steps to be completed option is selected on the OnBoarding Installation Page. Click this button to mark this OnBoarding process as complete. |
Status |
This field is available for OnBoarding processes with a status of Complete or In Progress. Displays the employee’s status for a step after the employee has started the OnBoarding process. |
Required and Due Date |
Displays these columns when a step is required or has a due date. These are defined on the Configure Attributes Page of the activity guide template. Steps that are past the due date will display the Overdue icon in the Status column. |
Mark Complete |
This button appears for steps when the processes has a status of In Progress and the Allow OnBoarding Processes and Steps to be completed option is selected on the OnBoarding Installation Page. Click this button to mark an individual step as complete. When you or the employee has already marked a step complete, the button for that step is unavailable for selection and the Date Completed and Completed By fields display who marked the step as complete and when. Note: You cannot mark the OnBoarding process complete without completing all required steps first. |
Managers use the OnBoarding Status Page (for Managers) to view the status of a worker’s OnBoarding process and send reminders. Unlike administrators, manager do not have the ability to mark individual steps as Complete or delete or complete an entire OnBoarding process.