Understanding Time and Labor Implementation
To implement Time and Labor, you must set up the following tables, processes, and features:
Human Resource tables.
Benefits tables.
Time Zone Offsets table.
Concurrent online processing.
Time periods.
Periods and period instances.
Overtime limits.
Calendars.
Manager time calendar views.
Compensatory time plans.
Exceptions.
PeopleSoft Application Engine sections.
Validation criteria.
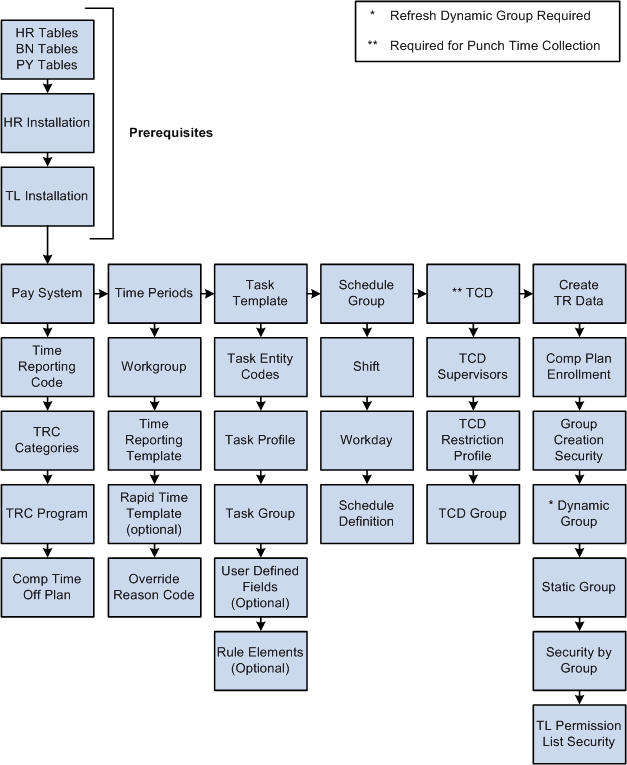
This example illustrates the tables and pages required to implement PeopleSoft Time and Labor
The Time and Labor system uses Human Resources Management (HR) tables to extract all the basic information about your company that will be used during Time and Labor processing. You must set up these tables before you establish any other tables in the system. HR tables and data used by Time and Labor include the Company, Location, Department, Compensation Rate, Job Code, and Pay Group tables.
The following table shows how Time and Labor uses data extracted from Human Resources.
Term |
Definition |
|---|---|
Business Units |
Used for task reporting in Time and Labor and to resolve SetID for other fields. |
SetIDs |
Used to resolve values for reporting on job code, location, and department by using the business unit. |
Company |
Used for task reporting in Time and Labor. |
Location |
Used for task reporting in Time and Labor. |
Department |
Used for task reporting in Time and Labor. |
Job Code |
Used for task reporting in Time and Labor. |
Pay Group |
Used in distribution to define parameters for payment of payable time. |
Comp Rate Code Table |
Used for elapsed time reporting with time reporting codes (TRCs). |
Holiday Schedule |
Used for scheduling and rule processing. |
Benefits tables store leave plans and accrual balances. Time and Labor uses benefits tables for determining leave accrual balances. These tables include the Benefits Plan and Leave Plan tables. Set up these tables, in the following order, before setting up your Time and Labor tables.
Define all benefit plans by plan type, with vendor and group information.
Define the accrual rules for that plan on the Leave Plan table.
Leave Plan Table
To set up your leave plan, use the Leave Plan Table page. The Leave Plan table contains the service and accrual processing rules for a leave plan. The following steps must occur:
Selected Time and Labor on the Installation table.
If required by your organization, select the Allow Negative Balance check box on the Manual Accrual Processing section of the Leave Plan Table page.
The Max Negative Hours Allowed field becomes available.
Enter the number of negative hours you will allow for this plan in the Max Negative Hours Allowed field.
The Max Negative Hours Allowed field and the active association of time reporters to a leave plan is important for the Leave Validation processes within Time and Labor.
Note: Any changes you make to the Allow Negative Balance or the Max Negative Hours Allowed check boxes will trigger referential integrity processing to ensure that unpaid leave time is not invalidated. Similarly, any additions or changes you make to the plan type, coverage election, or benefit plan on the Leave Plan page will trigger referential integrity processing to ensure that unpaid leave time is not invalidated.
PeopleTools stores time/date information in only one time zone—the "Base Time Zone" you select at the time of installation. The base time zone may be set to the time zone of the company's headquarters, or perhaps to Greenwich Mean Time (GMT)—also known as UTC (Universal Coordinated Time).
When employees enter the hours they have worked in Time and Labor, they report time according to the local time zone and PeopleTools stores the information in the base time zone. The Time Administration process then converts the base time back to the local time for rules processing. To do this, it needs to know the time zone "offsets," or the differences between the local time and base time.
Two circumstances can occur when punch time is reported across a daylight saving boundary. These relate to either the transition to or from daylight saving. When transitioning to daylight saving, clocks are advanced by a fixed amount at a fixed time. Transitioning back from daylight saving clocks are put back by a fixed amount at a fixed time.
Let's look at an example:
For the transition from daylight saving at 2:00AM, the clocks will be put back one hour. This means that an employee starting work at 11:00PM the previous day and finishing at 7:00AM on the day that daylight saving occurred, will have really worked for an elapsed period of 9 hours, not the 8 hours indicated by the clock times.
For the transition to daylight saving at 2:00AM, the clocks will be put forward one hour. This means that an employee starting work at 11:00PM the previous day and finishing at 7:00AM on the day that daylight saving occurred, will have really worked for an elapsed period of 7 hours, not the 8 hours indicated by the clock times.
The following procedure explains how to select the base time zone and create time zone offsets.
To select the base time zone and create time zone offsets:
Select the base time zone on the PeopleTools Options page.
In the Base Time Zone field, select the time zone for storing all reported time.
Change the default settings on the Time Zone Data page and Daylight Savings page, if applicable.
The Time Zone Data page and Daylight Savings page display the default time zone settings delivered with PeopleTools. You can change the settings on these pages if you need to customize the information for your organization.
Create time zone offsets using the Time Zone Data page.
Click the Generate Query Offsets button on the Time Zone Data page to populate the time zone offsets table with values that represent the differences between the local and base time zones.
Using PeopleTools, you can control the number of batch application engine processes—such as the Time Administration batch process—that can run concurrently.
To increase the number of concurrent batch processes, use the Process Scheduler's Server Definition page to update the Max Concurrent field for Application Engine. (Navigation: PeopleTools, Process Scheduler, Servers.) You may also need to update the MAX API Aware field. The PeopleTools PeopleBook provides instructions for updating these fields.
See the product documentation for PeopleTools PeopleSoft Process Scheduler
In addition to the Time Administration process, which runs in batch mode, Time and Labor includes the following online processes that are invoked from PeopleCode with the Call AppEngine function:
|
Online Process |
Page and Button or Field That Invokes Application Engine Processing |
|---|---|
|
Apply Online Rules |
Timesheet page; Apply Rules button |
|
Submit Time |
Rapid Time page; Submit button |
|
Resolve Exceptions |
Manage Exceptions; Clean Up Exceptions button |
|
Load Dates |
Time and Labor Installation – Configurations page; Load Dates button |
|
Comp Plan Assignment Update |
Create Time Reporter Data; Workgroup field change Maintain Time Reporter Data; Workgroup field change Workgroup Page, Comp Time Plan change |
|
Forecast Payable Time |
Time and Labor Launch Pad; Forecast Payable Time button |
Multiple users can run online processes concurrently. The maximum number of concurrent processes depends on how many instances or images of the temporary tables are dedicated to online processing. Using the PeopleTools Options page (navigation: PeopleTools, Utilities, Administration, PeopleTools Options), you specify:
The total number of instances you want the system to create for each temporary table (default = 3)
The number of temporary table instances to create for online processes (default = 3)
Note: Application Engine programs are delivered to share temp tables; online processing requires dedicated temp tables.
When selecting the number of temporary table instances, keep in mind that a higher number increases the number of simultaneous users, but can also increase the consumption of disk space considerably.
Example
Assume that you use the default settings for the temporary tables, as previously described. According to these settings, three users can run online processes concurrently. So what happens if five users launch online processes simultaneously? The system runs the processes for the first three users, and as soon as temporary tables dedicated to online processing become available, runs the fourth, and then fifth processes.
You can define five types of periods in Time and Labor: daily, weekly, monthly, complex, and repeating. Although all period types are defined using the same set of pages, not all period types are used in the same way. For example, daily, weekly and monthly period types are used to create time reporting periods, but complex and repeating periods have no application to time reporting—their only purpose is to define periods for rules processing. This section discusses the different uses of periods in the system, and contains important information on when you can use each period type. Periods have the following uses in the Time and Labor system:
Time Reporting
Define periods for time reporting purposes; for example, employees in your company might report time for a day, a week, or a month at a time. Align these time periods to your pay period, billing cycle, or fiscal period. Although you can define as many as five different types of periods using the Time Period pages, only three types of periods are for time reporting purposes: daily, weekly, and monthly. Two additional periods' types—complex and repeating—are for rules creation. These time periods can be associated on the Maintain Time Reporter Data page, or the Workgroup page to derive the time period display on the Timesheet page.
Determining Periods to Process
Time and Labor uses time periods, identified by the time period ID on each time reporter's workgroup, to help determine the correct time periods to process (and pass to Payable Time) when you run the Time Administration process. To determine the correct weekly periods to process, Time and Labor looks to the period ID associated with the time reporter's workgroup.
Determining Rule Application
Time periods determine the range of dates to which a rule applies. For example, for a rule program containing a daily, weekly, and monthly rule, build a calendar containing the periods to which each of these rules applies. For each rule period (daily, weekly, and monthly), define the corresponding calendar period containing the data needed to process the rule.
When defining calendar periods to correspond to rule periods, use the same period types used in time reporting (daily, weekly, monthly). In addition, define repeating and complex period types to use in connection with complex and repeating rule periods. For example, consider the following complex rule that looks at time reported on the last Sunday in April.
Example: If a time reporter works on the last Sunday in April, the employee will automatically receive four hours plus the time he or she actually reports for the day.
For this rule to work, identify the last Sunday in April by creating a complex period. Otherwise, the system will not know which day to look at.
Tracking Attendance
For attendance tracking in Time and Labor, specify the time periods for which to track absences, late punches, early departures, and so forth (for example, late punches in a day, absences per week). Use the three time-reporting period types for tracking attendance.
Determining Overtime Limits
For evaluating overtime balances, specify the time periods to track if time reporters are exceeding the amount of overtime that can be taken within a given period. Use the three time-reporting period types for tracking overtime balances.
Determining Current and Prior Period Time
Periods help the system distinguish between prior, current and future time (time entered for periods that have been processed as opposed to time for the current period). To determine whether time reporters are entering time for the current period or a prior one, the system looks at the current date for which time reporters report time and compares this date to the current period start and end dates on the time period calendar. The system first looks for a time period on the Maintain Time Reporter Data page for the time reporter and, if one is not defined there, uses the time period on the workgroup to distinguish current from prior period time.
All time period definitions include the period length (for example, you could define a weekly period to have a length of one week, two weeks, and so on) and the frequency of the time period. The definition of time and frequency is separate from the time period calendar to make reusing time periods easy and to provide maximum flexibility during setup.
To define a time period:
Define the different period types to use for time reporting, tracking attendance, or processing rules.
Note: Each time you create a time period using one of the time period pages described in this section, the system generates a time period ID. This ID uniquely identifies the time period.
Begin Date
End Date
Frequency
1 July
1 July
Daily
1 July
7 July
Weekly
1 July
30 July
Monthly
1 July
15 July
Semi-Monthly
1 July
31 September
Quarterly
Generate period instances.
Generate actual "instances" of period types on a calendar by running the Build Time Period Calendar Process. For example, a defined weekly period begins on Monday and ends on Sunday. This period doesn't exist in the system until instances of it are generated on a calendar. To create periods based on your period definition:
Define the start and end dates of your calendar. (for example, 1 February 2000 to 1 February 2001).
Specify the period types to include (daily, weekly, monthly, and so on).
Generate actual periods by running the Build Time Period Calendar process.
Define additional components.
Time Periods Used in the Definition of:
Where Used:
Workgroups
If the period is a time reporting period, link the period, by its time period ID, to a workgroup on the Workgroup page. Or, enter a time reporting period for individual time reporters on the Maintain Time Reporter Data page. If you do so, this period ID overrides the reporting period associated with the time reporter's workgroup.
Rules
If the period is used to define a time segment for rules processing, link it, by its time period ID, to the rule on the Define Rule Header page.
Attendance Tracking
If the period is an attendance-tracking period, link it, by its time period ID, to the definition of the attendance program on the Attendance Program page.
The basic overtime functionality of Time and Labor requires no special setup—employees can enter requests for overtime and managers can accept or deny requests. The following optional features require setup:
Track overtime balances by period.
Establish overtime limits that trigger a warning, when exceeded, on the manager's approval page.
Base overtime limits on months of service.
Enable workflow so that employees and managers are automatically notified when overtime requests are submitted, approved, or denied.
You assign overtime limits to workgroups, consequently, the same overtime limits apply to all employees in the same workgroup.
After defining time periods, launch the Build Time Period Calendar process to create instances of these periods for a week, a month, or years. The Build Time Period Calendar process:
Builds time period calendars using the specified start and end dates.
These dates do not have to correspond to pay period begin and end dates.
Enables you to select the time periods to be included in the calendar build process.
Provides the option to rebuild calendars to change or delete your time period definitions.
Enables you to update an existing calendar to expand (or contract) the calendar range (that is, to change the start and end dates of the calendar while preserving existing time period definitions).
Before running the calendar build process, define the start and end dates of the calendar that will include the periods defined earlier using the period definition pages. Specify the period types or period ID's to include in (or exclude from) the calendar build. For example, you could use all the defined period types or just one, specific period. To do this, use the Build Time Period Calendar page.
Time and Labor provides many options and combinations for viewing time management calendar information. The Calendar View Options page assists in determining what will be displayed on the time calendar pages. Use the Calendar View Options page to define the time reporting codes, using TRC Value lists, which will display on the manager time calendar views, as well as associate color coding to the TRC lists and other time related data.
Each TRC or time-related event defined on the Calendar View Options page appears on the time calendar pages when applicable. The time appears in the grid associated to the time reporter who reported the time, overlaying the color associated with the particular time event. The symbols are optional, both in defining them and also using them on the time calendar pages.
The Calendar View Options page is divided into two primary sections — the Reported/Payable Time section and the Scheduled Time and Exceptions section.
Time and Labor enables you to define compensatory time plans. Compensatory time plans provide the ability to administer time off instead of pay. Unlike other leave accruals, where Time and Labor uses the employee's leave balance records maintained in Human Resources, Base Benefits to determine leave availability, compensatory time is administered entirely within Time and Labor. The system maintains each instance of a time reporter's earned compensatory time and the quantity and date earned. This gives you the ability to set expiration periods for individual instances of earned compensatory time.
For example, you may have one compensatory time plan for overtime and another compensatory time plan for meeting or exceeding a deadline. You can establish as many different plans as your organization requires and you can assign a time reporter to one or more compensatory time plans. When compensatory time is entered, the system adds to or deducts from a time reporter's compensatory time balance according to the established rules. If the time entered is within allowed limits, the balance is adjusted and maintained automatically. You do not have to manually change employee's compensatory time balances. The Time Administration process processes compensatory time plans during post-rules processing.
Exceptions are user- and system-defined warnings and errors to indicate a problem with a time reporter's time or a problem in the system. Exceptions are tied to the Time and Labor message sets in the message catalog. Defining exception conditions gives control over time reporting messages and warnings. You can keep an audit trail on resolved exceptions for problems, such as how many times an employee is tardy. If you choose to have the exception archived, you can run a query on resolved exceptions to track trends. By making exceptions allowable, you can track low-severity exceptions, and the system will create payable time without the need to make changes to reported time.
The system creates exceptions based on rules, which are defined in Time Administration, or errors that have been generated as a result of reporting time (specifically in the Time Validation process).
Almost all of the system-delivered exceptions have an exception severity of High and are defined as Not Allowable. These exceptions must be resolved before the Time Administration process creates payable time. You can change the severity and the allowable flag for system-delivered exceptions.
Exceptions that begin with TLX work with delivered attendance tracking and validations. The exceptions for attendance tracking are of a low severity, whereas the exceptions for validation are of high severity. These include validations for task reporting, time reporting codes, compensatory and leave time validations, and time reporter status validations.
The system-delivered validation sets are ST_SUBMIT, ST_TA and ST_ALL. If you don't want to have all the validations in this set run during processing, create a validation set and define which validation definitions to include. The ST_TA validation set represents all validations selected to run in Time Administration but not Submit Time. The ST_SUBMIT validation set represents all validations selected to run in Submit Time, but not in Time Administration. The ST_ALL validation set has all validations selected to run in both Submit Time and Time Administration. Each validation is configurable as to whether it is run in Submit Time, Time Administration, neither or both.
Establishing exceptions is the first part of setting up validation criteria so that the Time Validation process can generate exceptions correctly. You also need to set up PeopleSoft Application Engine sections and validation definitions in order for the system to generate exceptions through the Submit Time process. Validation definitions tie the SQL and exception information together to provide the system with a reference and a way to execute exceptions.
This graphic illustrates the areas that need to be set up so that the system can generate exceptions and perform validations during processing.

To establish user-defined exceptions, set up Time and Labor messages in the message catalog using PeopleTools. See the product documentation for PeopleTools: PeopleSoft Application Designer Developer's Guide.
After you've defined exceptions, you define your PeopleSoft Application Engine sections. Application Engine is a feature of PeopleTools that allows you to write software to perform SQL and PeopleCode processing against the data. An Application Engine program is composed of one or more Application Engine sections. Each Application Engine section typically does one discrete piece of work and is akin to a subroutine, paragraph, procedure of function in a more traditional programming language. Application Engine sections can include referential integrity or validation processing. For each Application Engine section you create, you'll specify which kind of processing should occur.
For the validation process, the system determines the validations to be processed and retrieves the related PeopleSoft Application Engine section names. Each validation definition specifies the Application Engine section name that implements the validation. Control is returned to the Process Validations function upon completion and the system calls the next PeopleSoft Application Engine section.