Entering and Managing Self-Service Invoices Using PeopleSoft Fluid
eSettlements Fluid Self Service Invoice pages allow external Supplier users of eSettlements the capability to create, view, delete, print, and correct invoices using Fluid pages.
|
Page Name |
Definition Name |
Usage |
|---|---|---|
|
MY_INV_FL |
View the invoices list. |
|
|
EM_SSI_SUMMARY_FL |
Create a new invoice. |
|
|
EMSSI_VIEWINV_FL |
View an invoice entered in the system. |
|
|
EMSSI_VIEWINV_FL |
Delete an invoice entered in the system. |
|
|
EMSSI_PRNTINV_SCF |
View and print an invoice. |
|
|
EMSSI_CORRINV_FL |
View and correct an invoice with errors. |
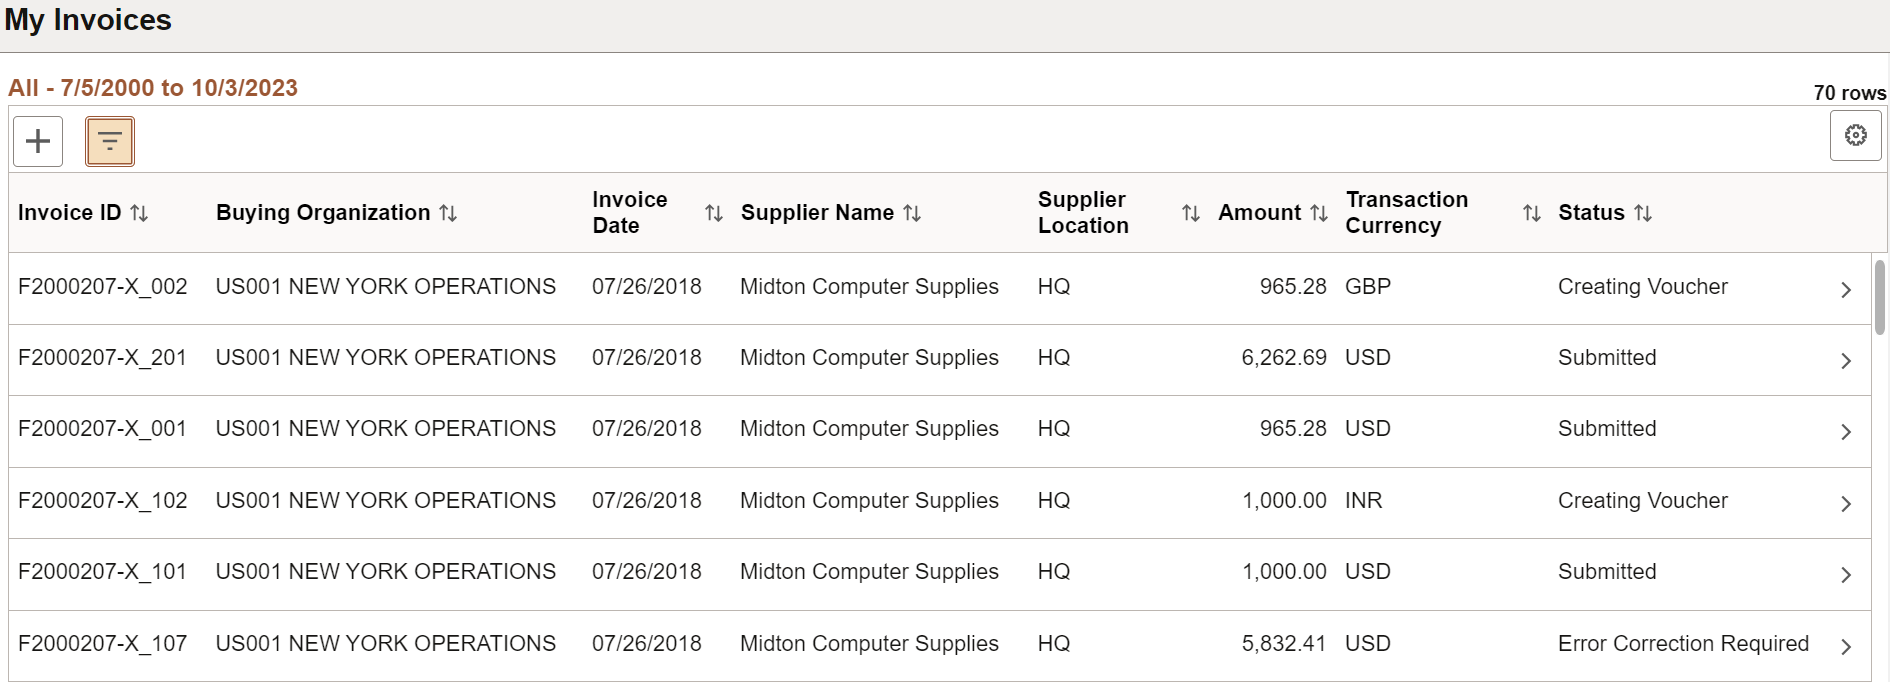
Use the My Invoices page (MY_INV_FL) to view the invoices list.
Navigation:
.
This example illustrates the fields and controls on the My Invoices page. You can find definitions for the fields and controls later on this page.
Note: The Invoices page can also be rendered on small form factor devices such as a smartphone; the columns that are displayed are optimized on small form factors.
Field or Control |
Description |
|---|---|
|
Select to launch the Fluid Activity Guide to create a new invoice. |
|
Select to access the My Invoices Filter page and search for invoices based on invoice date or other criteria The filter options for By Invoice Date are:
Note: If there are no Transaction limits set up, then you can view the invoices for up to 90 days. To set up Transaction limits, see the section Transaction Age in Review Buyer Details - Registration Page The filter option By Additional Filter contains additional search parameters to help you return the desired list of invoices. |
|
Select to access the Recent Messages page to review the messages on the invoices. For more information see, Recent Messages Page The counter on the Messages icon indicate the number of active messages awaiting Supplier review. The message will be active until:
Note: A comment icon displays on the Invoices list if one or more message(s) have been entered on an invoice. This icon redirects you to the Review Messages Page. |
|
|
You can use the Personalize icon on each grid to reorder/ hide columns and sort columns by order. For more information, see PeopleTools Applications User’s Guide, “Working With the PeopleSoft Fluid User Interface", Working with Fluid Pages and Controls. |


Use the Self Service Invoice — Create Invoice page (EM_SSI_SUMMARY_FL) to create a new invoice.
Navigation:
Select the + icon to launch the Fluid Activity Guide to create a new invoice.
This example illustrates the fields and controls on the Self Service Invoice - Create Invoice page. You can find definitions for the fields and controls later on this page.
Note: The Self Service Invoice — Create Invoice page can also be rendered on small form factor devices such as a smartphone; the fluid pages that will be displayed are optimized for small form factors.

The Self Service Invoice — Create Invoice page activity guide provides a step by step approach to guide the Supplier user through the creation of a new invoice.
A summary of the invoice information is displayed in Step 1. The fields Buyer, Supplier, Location, Invoice Date, and Currency fields are populated based on the default settings set up in the Supplier User Details page. For more information see, Review User Profiles - Supplier User Details Page. The default Supplier can be setup using the Supplier User Page. A default Buyer can be set up using the Review Agreement Details - Buyer Page.
Field or Control |
Description |
|---|---|
Invoice ID |
Specify the Invoice ID. |
Invoice Date |
Displays the current date as the invoice date. |
Requester |
Enter the user name of the person requesting the invoice. The system uses this field for routing to the user who must perform invoice verification of the invoice. |
Supplier VAT Country |
Displays the country configured for Supplier VAT. To set up VAT for a Supplier, see Review Supplier Details - Registration Page |
Exit |
Select the Exit button at any time to exit out of the Create Invoice activity guide. The data that you have entered will not be saved in the system. |
Next |
Select Next button to move to the next step in the activity guide. |
|
Select Save for Later to save your entries and complete the invoice creation activity at a later time. Select Home to return to the Homepage. |
Accounting tag |
Displays the default values as entered on the Review Agreement Details - Buyer Page. |
Attachments |
Select the Attachments button to upload any additional information to the invoice from your device. See Installation Options - Multiple Attachments Page to define the maximum attachment upload limit for various products. |

Step 2 within the activity guide helps you create one ore more invoice lines.
This example illustrates the fields and controls on the Self Service Invoice - Create Invoice page. You can find definitions for the fields and controls later on this page.

Invoice lines can be created as ad hoc, copied from a purchase order, or copied from a packing slip (receipt).
Field or Control |
Description |
|---|---|
Add Line |
Select to add new invoice lines. |
Copy Purchase Order |
Select to search for POs or PO Lines to copy back to the invoice to create new invoice lines. Use the search criteria such as purchase order business unit, purchase order number, purchase order date, item ID, description, and UPN ID to search for POs or PO Lines. The Search Results display the POs and PO Lines. Select a PO to view line detail results. The PO line displays essential information such as Item ID , Price, Quantity, Manufacturer ID, Manufacturer Item ID, UPN Type, and UPN ID. Select the PO line's corresponding check box, and then select Done button to copy the information to the invoice. |
Copy Packing Slip |
Select to search and select Receipts or receipt lines to copy back to the invoice to create new invoice lines. Use the search criteria such as receipt unit, packing slip, receipt number, receipt date, item ID, description, and UPN ID to search for Receipts or Receipt lines. The Search Results display the Receipts or Receipt lines. Select a Receipt to view line detail results. The Receipt line displays essential information such as Item ID , Price, Quantity, Manufacturer ID, Manufacturer Item ID, UPN Type, and UPN ID. Select the Receipt line's corresponding check box, and then select Done button to copy the information to the invoice. |
When creating new invoice lines, you also have the option of entering Accounting Details (distributions) and comments.
After an invoice line has been created, either from ad hoc entry or by copying from a PO and/or Receipt, you can view the invoice line details by selecting a line from the list of invoices. You can make changes to the line details depending on the status of the invoice. If the invoice line was copied from a PO, select the PO Details button to view PO line details. The Receipt Details button helps you view Receipt line details if copied from a Receipt.
The UPN Details button helps you view the UPN information. The UPN details are rendered as display-only in the Invoice Line UPN Details page based on Item ID and UOM entered in Source document. The UPN details are updated if you make any changes to the Item ID or UOM.
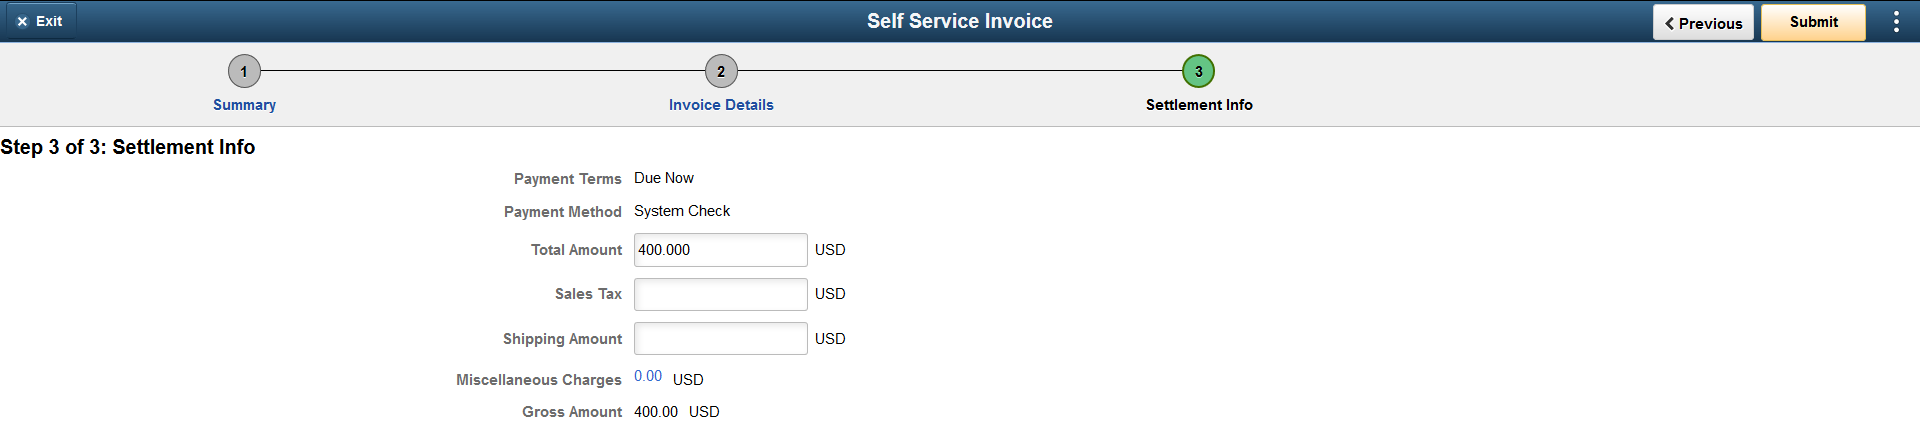
Step 3, the final step in the activity guide, is the Settlement Information. In this page the total of the invoice has been accumulated as a Total Amount. You can also add any sales tax, shipping charges, and/or miscellaneous charges that might apply.
The Submit button saves the invoice, and then submits the invoice for review by the internal buying organization.
This example illustrates the fields and controls on the Self Service Invoice - Create Invoice page. You can find definitions for the fields and controls later on this page.
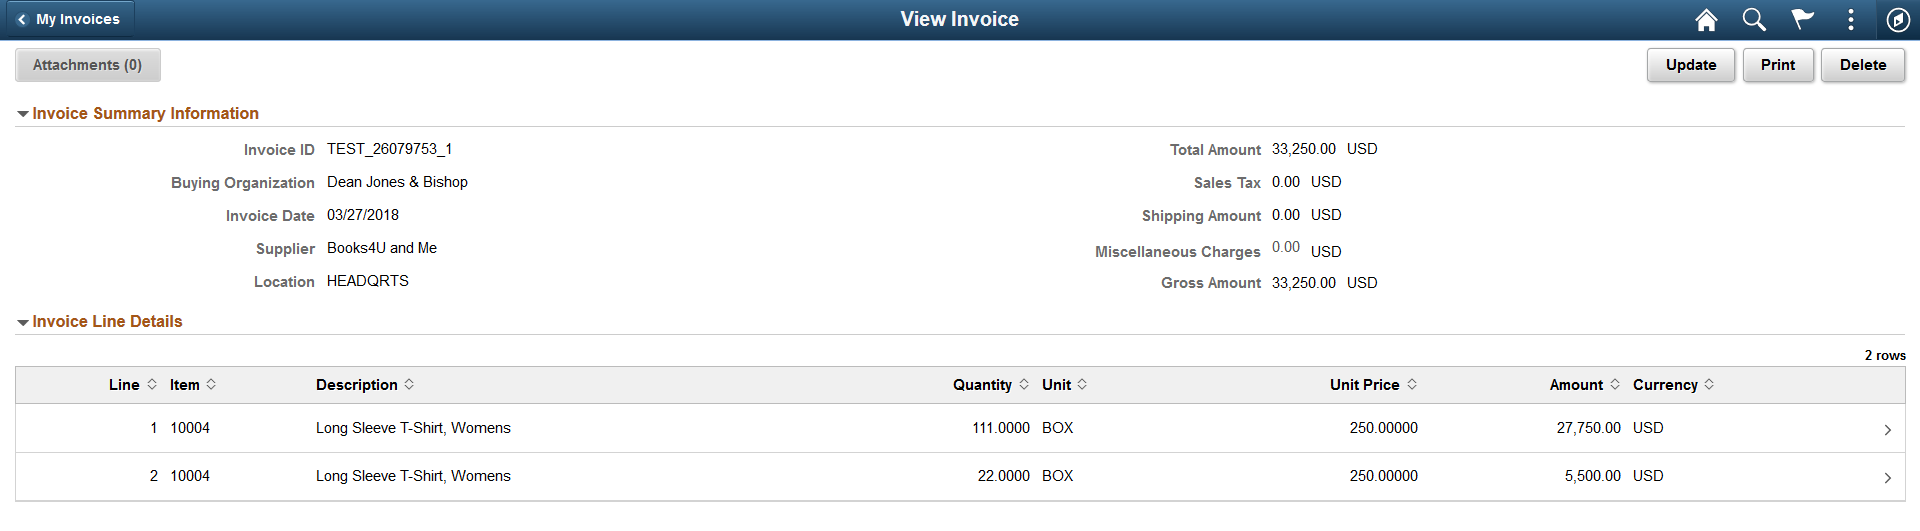
Use the Self Service Invoice — View Invoice page (EMSSI_VIEWINV_FL) to view an invoice entered in the system.
Navigation:
. Select an invoice from the Invoices list.
This example illustrates the fields and controls on the Self Service Invoice — View Invoice page.
Note: The Self Service Invoice — View Invoice page can also be rendered on small form factor devices such as a smartphone; the fluid pages that will be displayed are optimized for small form factors.

Once an invoice has been entered and submitted in the system, you can only view the details of that invoice, and no edits can be made. However, if an invoice has been Saved for Later, you can edit the invoice.
Use the Update button to edit the invoice. Editing an invoice routes you to the activity guide of the Self Service — Create Invoice page.
Note: You can only update or delete an invoice if the status is set to Save for Later. All other statuses prevents you from updating and deleting an invoice.
If you are viewing the invoice on a Laptop or a Desktop, the Print button displays to print the invoice.
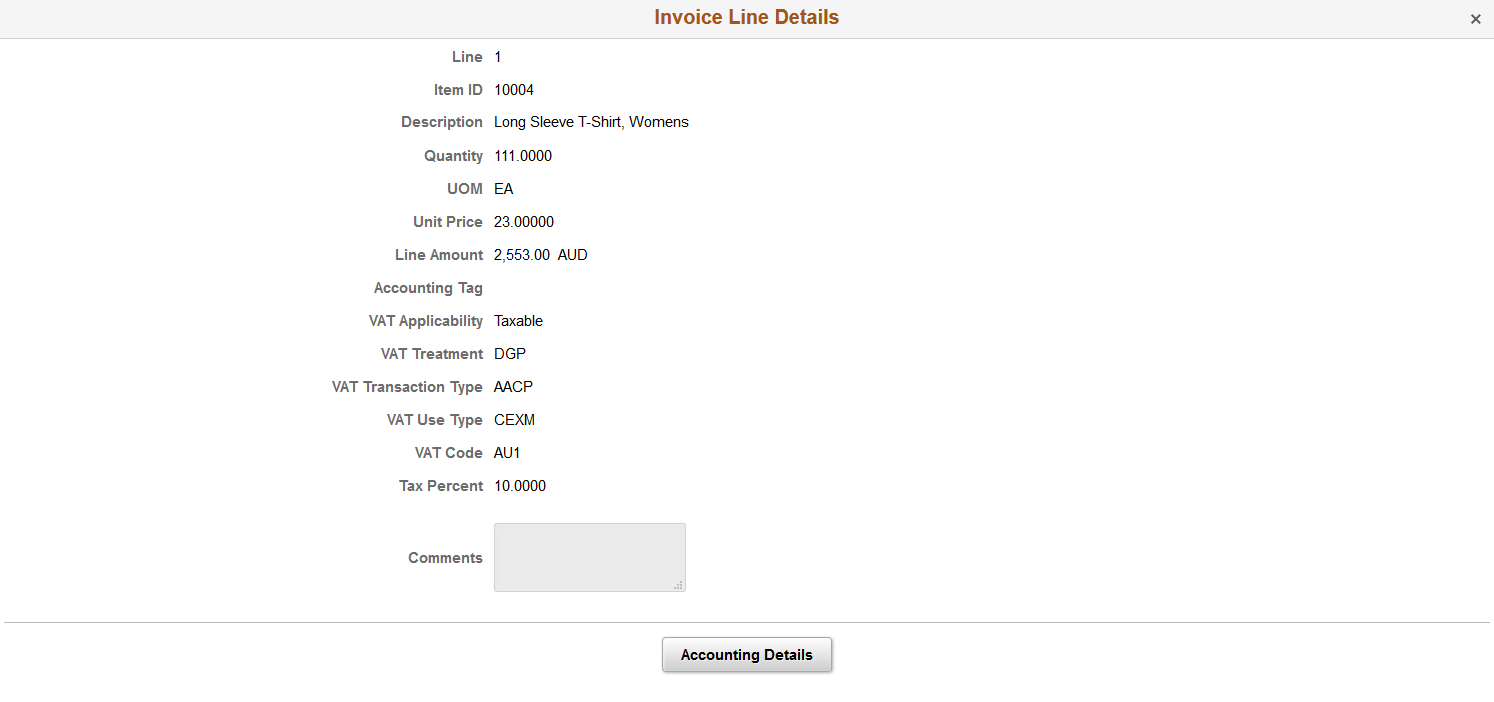
To view the line details in an invoice, select a line.
Invoice Line Details Page
Use the Invoice Line Details page (EMSSI_VWINV_LN_SCF) to view additional invoice line details, comments, Accounting details, PO details, and Receipts details.
Navigation:
. Select an invoice from the Invoices list, and then select a line under Invoice Line Details.
This example illustrates the fields and controls on the Invoice Line Details page.
Note: The Invoice Line Details page can also be rendered on small form factor devices such as a smartphone; the fluid pages that will be displayed are optimized for small form factors.
Use the Self Service Invoice — View Invoice page (EMSSI_VIEWINV_FL) to delete an invoice entered in the system.
Navigation:
. Select an invoice from the Invoices list.
This example illustrates the fields and controls on the Self Service Invoice — Delete Invoice page. You can find definitions for the fields and controls later on this page.
Note: The Self Service Invoice — Delete Invoice page can also be rendered on small form factor devices such as a smartphone; the fluid pages that will be displayed are optimized for small form factors.
You can delete only those invoices which have been Saved for Later. Use the Delete button to delete the invoice.
Use the Self Service Invoice — Print Invoice page (EMSSI_PRNTINV_SCF) to view and print an invoice.
Navigation:
. Select an invoice from the Invoices list.
This example illustrates the fields and controls on the Self Service Invoice — Print Invoice page.
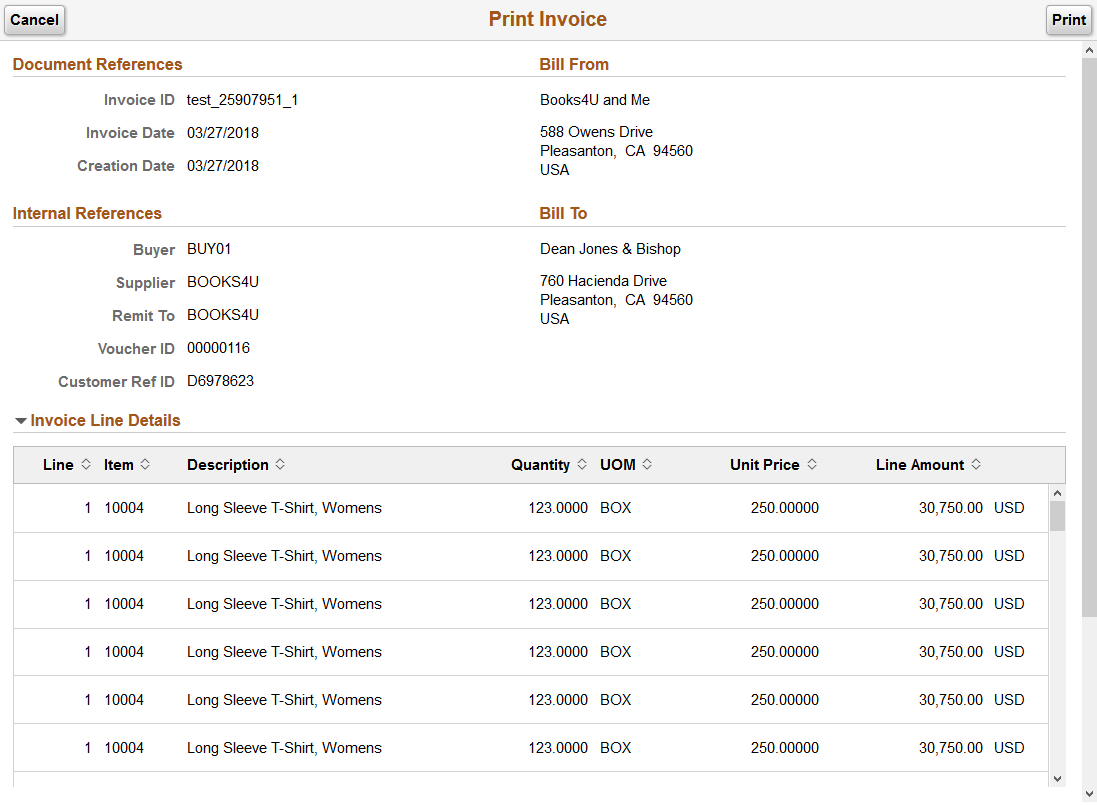
From the Self Service Invoice — View Invoice page, select the Print button to print an invoice.
Note: The Print button displays only on devices such as a Desktop or a Laptop.
Use the Self Service Invoice — Correct Invoice page (EMSSI_CORRINV_FL) to view and correct an invoice with errors.
Navigation:
. Select the invoice that you want to correct from the My Invoices list.
This example illustrates the fields and controls on the Correct Invoice page. You can find definitions for the fields and controls later on this page.
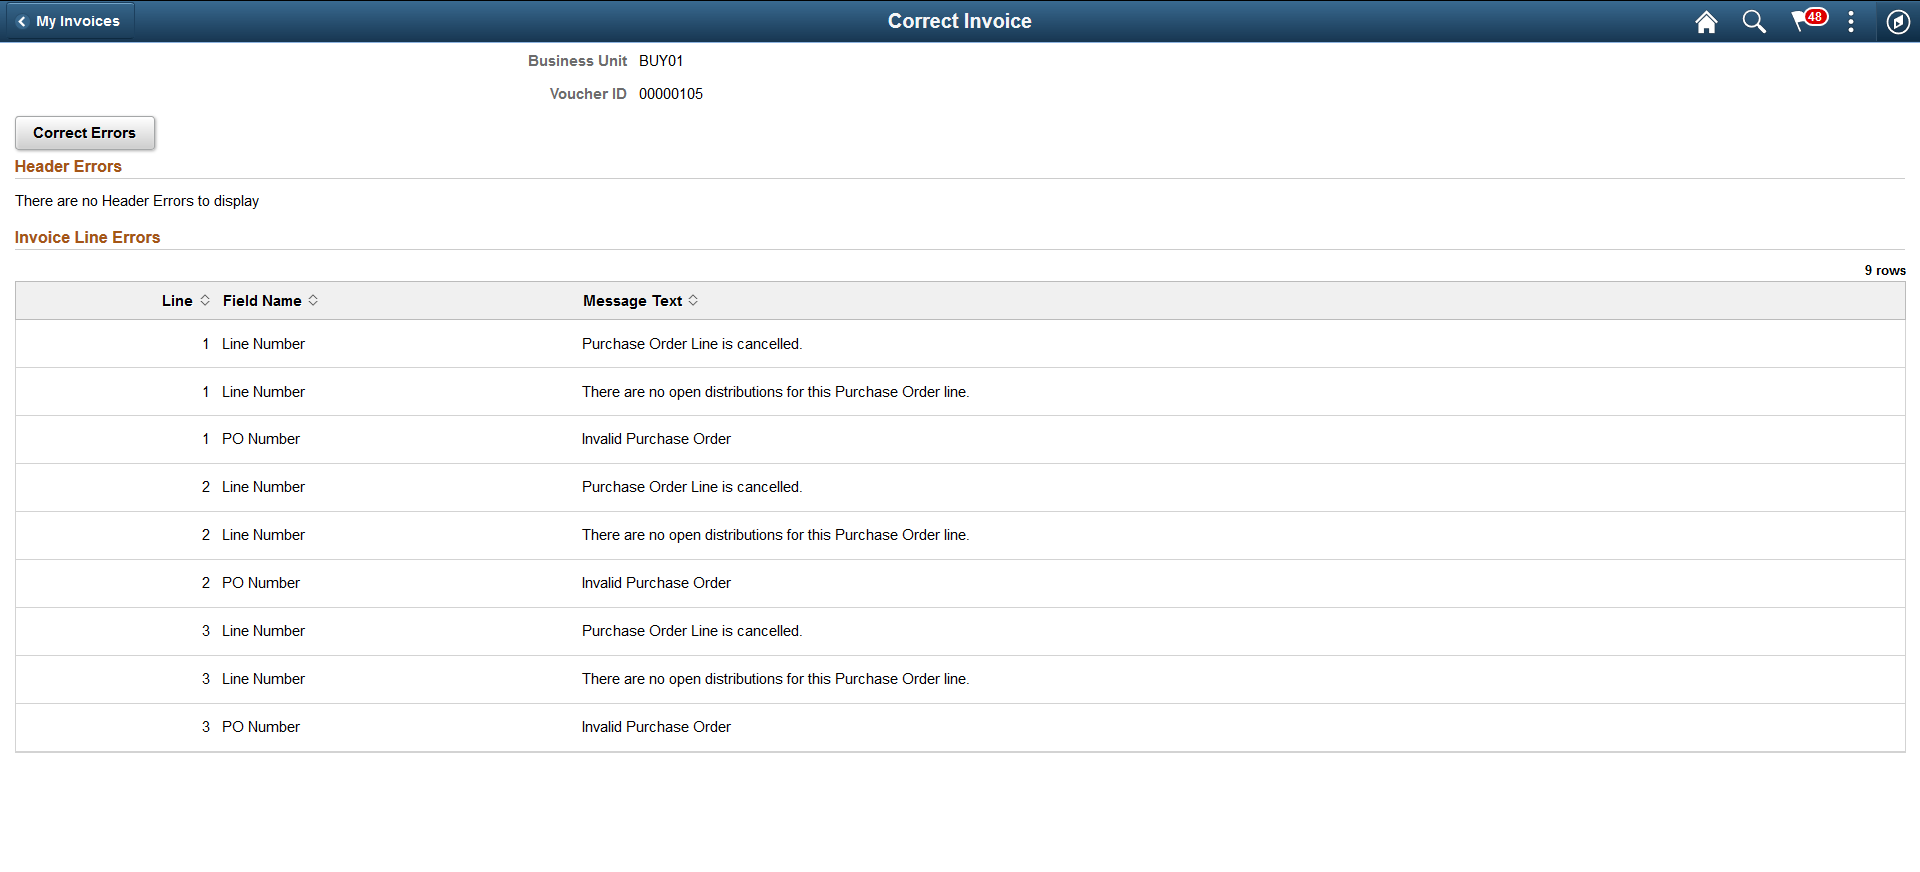
The Self Service Invoice — Correct Invoice page displays pre-edit errors that exist for an invoice. Errors may be reported at the Header level, line level, or both.
Note: The Correct Errors button displays only for Supplier users who are Administrators. The Correct Errors button when selected redirects the Administrator to the activity guide in the Self Service — Create Invoice page where they can view the invoice and then correct the errors on the invoice.