Creating Suppliers
To create a supplier, use the following components:
Review Supplier Details - Inquiry (EM_SELLER_INQUIRY)
Review Supplier Details - Registration (EM_SELLER_REGISTER)
Define Supplier Notifications (EM_S_NOTIFY_SETID)
This section provides overviews of financial sanctions validation and supplier notifications, lists prerequisites, and discusses how to create new suppliers, register suppliers, enter address information, enter contact information (Optional), enter location information, enter bank information, and specify supplier location notifications.
The system administrator creates supplier IDs that are used as identifiers when accessing transactions throughout the system. The SetID value appears by default from the system administrator's preferences in the Buyer Direct model, or from the exchange host's preferences in the Business Service Provider model.
|
Page Name |
Definition Name |
Usage |
|---|---|---|
|
EM_SELLER_ADD |
Begin creating a new supplier. |
|
|
EM_SELLER_REG_PG1 |
Enter supplier subscription, system access, payment extract, value-added tax (VAT) and business ID, and logo information. |
|
|
Review Supplier Details - Addresses Page |
EM_SELLER_ADDR_LST |
View established addresses. |
|
EM_SELLER_ADDR |
Enter supplier address information. |
|
|
Review Supplier Details - Contacts Page |
EM_SELLER_CNT_LST |
View established contacts. |
|
EM_SELLER_CNTCTS |
Enter supplier contact information. |
|
|
Review Supplier Details - Locations Page |
EM_SELLER_LOC_LST |
View established locations. |
|
EM_SELLER_OPRTG_RL |
Enter supplier location information. |
|
|
EM_SELLER_BANK |
Define the bank accounts into which the supplier wants to have electronic payments deposited. |
|
|
Define Supplier Location Notifications - Define Notification Types Page |
EM_S_NOTIFY |
Set up supplier email notifications. |
|
Review Supplier Details - Define Notification Types Page |
EM_LOCATION_NOTIFY |
Set up supplier location email notifications. |
PeopleSoft eSettlements provides validation of your suppliers against financial sanctions lists (for example, the Specially Designated Nationals (SDN) list). The system validates suppliers against financial sanctions lists:
When you attempt to save the supplier.
This capability exists if you enable financial sanctions at the installation level, and select the SDN Validation at save check box on the Supplier Set Control page.
On a dynamic basis on the Review Supplier Details - Registration page.
This capability exists if you enable financial sanctions at the installation level, and do not select the SDN Validation at save check box on the Supplier Set Control page.
By running the Financial Sanctions Validation Application Engine process (AP_SDN_VAL).
You can schedule the Financial Sanctions Validation process to run on a predefined schedule using the Process Scheduler, or you can run it on an ad hoc basis.
Note: If you enable financial sanctions at the bank level, you need to run the Financial Sanctions Validation process to validate at the supplier level.
How the system validates your suppliers is dependant upon how you set up financial sanctions validation options. The system updates the supplier's financial sanctions status on the Supplier Information component (VNDR_ID). Access the Supplier Information component to change the financial sanctions status, if appropriate.
When you create a new supplier when financial sanctions validation is enabled, the system allows you to save the supplier if it has a financial sanctions status of Review or Blocked. However, the system does not allow payments to suppliers with a financial sanctions status of Review or Blocked.
Note: If financial sanctions validation is enabled, and you are using PeopleSoft Payables functionality, the system performs validations similar to those performed during the PeopleSoft Payables process.
Financial sanctions validation is discussed in detail in PeopleSoft Source to Settle Common Information.
When setting up notifications at the supplier SetID level, the system administrator defines the notification types and specifies the roles to route the email notifications. These values then default to the supplier location. The supplier administrator can then specify other roles, user IDs, or both for these notification types by overriding them at either the supplier location level or at the agreement level.
Note: If the user selected does not have access to the supplier, the user will not receive the email notifications. You enable business unit access on the user profile.
If a notification is internal, it means only the supplier roles as specified on the Role Configuration page, or the user IDs created referencing those supplier roles, receive the notification.
|
Type |
Internal or External |
|---|---|
|
Payment Create and Cancel |
Internal |
|
Invoice Extract – Supplier |
Internal |
|
Cash Collections |
External – Business Service Provider model only |
|
Invoice Load – No Errors |
Internal |
|
Invoice Load – Errors |
Internal |
Note: The Invoice Load - Errors notification type is sent when a buyer denies an invoice using the Self-Service Invoice feature.
You must set up supplier SetID controls before you can use a SetID.
Use the Create a New Supplier page (EM_SELLER_ADD) to begin creating a new supplier.
Navigation:
This example illustrates the fields and controls on the Create a New Supplier page. You can find definitions for the fields and controls later on this page.
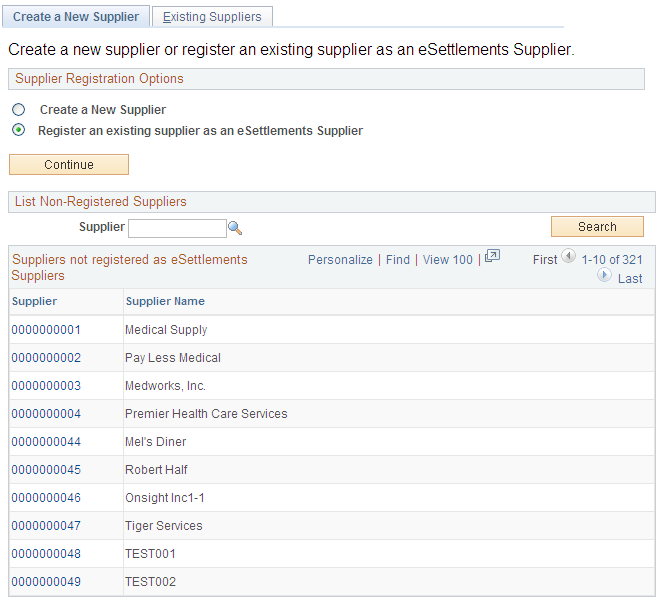
You can create a new supplier or use an existing supplier to create a new user.
Field or Control |
Description |
|---|---|
Create a New Supplier |
Select this option to establish a new supplier. Click the Continue button, enter the SetID and a unique Supplier ID, and click the Add button to access the Review Supplier Details - Registration page. |
Register an existing supplier as an eSettlements Supplier |
Select this option to establish a new supplier using an existing supplier. Click the Continue button and enter the Supplier ID or click the Search button to view a list of available suppliers. Click the Supplier link to access the Review Supplier Details - Registration page. Note: If financial sanctions validation is enabled and the PeopleSoft Payables supplier has a financial sanctions status of Review or Blocked, the system displays a warning message that the supplier selected is currently under financial sanctions review. You can proceed with creating the supplier. However, the system does not allow payments to suppliers with a financial sanctions status of Review or Blocked. |
Use the Review Supplier Details - Registration page (EM_SELLER_REG_PG1) to enter supplier subscription, system access, payment extract, value-added tax (VAT) and business ID, and logo information.
Navigation:
Select a supplier registration option and enter a SetID and Supplier ID or Supplier ID and click Add on the Create a New Supplier page.
Click a Supplier link on the Existing Suppliers page.
This example illustrates the fields and controls on the Review Supplier Details - Registration page (1 of 2). You can find definitions for the fields and controls later on this page.
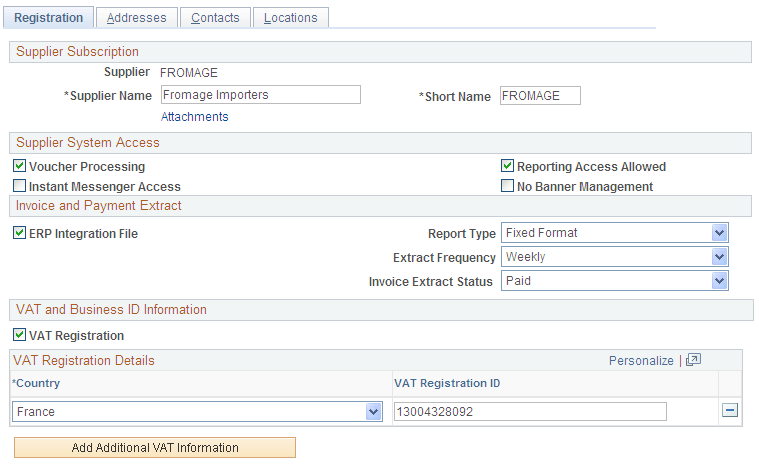
This example illustrates the fields and controls on the Review Supplier Details - Registration page (2 of 2). You can find definitions for the fields and controls later on this page.

If you enable financial sanctions at the installation level, the system validates the supplier upon saving the supplier or on a dynamic basis by clicking the Financial Sanctions edit button. If you enable financial sanctions at the bank level, no validation occurs at the supplier level unless you run the Financial Sanctions Validation process.
When you create a new supplier when financial sanctions validation is enabled, the system allows you to save the supplier if it has a financial sanctions status of Review or Blocked. However, the system does not allow payments to suppliers with a financial sanctions status of Review or Blocked.
See Understanding Financial Sanctions Validation.
Supplier Subscription
Because the Supplier Name appears throughout the system, ensure that it is unique.
Field or Control |
Description |
|---|---|
Financial Sanctions edit |
Click to validate the supplier against financial sanctions lists (for example, the SDN list). This button only appears if financial sanctions is enabled at the installation level, and the SDN Validation at save check box is not selected on the Supplier Set Control page. Also, this button only appears for suppliers with a financial sanctions status of Cleared or Valid. |
Attachments (0) |
Click this link to access the Attachments page and to attach documents to this supplier. See Installation Options - Multiple Attachments Page to define the maximum attachment upload limit for various products. |
Supplier System Access
Field or Control |
Description |
|---|---|
Voucher Processing |
Select to enable the supplier's invoices to be loaded into the system. |
Reporting Access Allowed |
Select to subscribe to report processing. There is no PeopleSoft processing logic currently applied to this. This function is used for the Business Service Provider model, enabling the host to charge for subscription. |
Instant Messenger Access |
Select to enable this supplier to use instant messaging to discuss payment installment dispute resolution with buyers. Note: Selecting this check box enables access to all the instant messaging suppliers; there is no specific security for a given provider at the supplier level. However, there is access at the PeopleTools level, and users with an instant messaging ID from a given provider will have access only to that provider's network. For example, if a user has only an ID set up with Sametime, that user cannot view users that have only a Yahoo! ID. |
No Banner Management |
Select to prevent host-defined banners from appearing on each web page. |
Withholding |
Select this check box to enable withholding for this supplier. This check box is only visible if you select the Withholding check box on the eSettlements Installation Options page. |
Invoice and Payment Extract
These functions are described in the section in which how to define buyer processing preferences is detailed.
See Creating Buyers.
VAT and Business ID Information
Field or Control |
Description |
|---|---|
VAT Registration |
Select this check box if the supplier operates in a VAT country. |
VAT Registration Details
Field or Control |
Description |
|---|---|
Country and VAT Registration ID |
Select a country and enter a VAT ID number. |
Add Additional VAT Information |
Click this button to enter another country and ID number. This link appears for existing addresses. |
Business ID Number
The information in this group box is optional.
Field or Control |
Description |
|---|---|
ID Type and ID Number |
Associate the supplier with a reporting entity from the ID types available. If you do so, also enter the ID Number provided by the reporting entity. |
Add ID |
Click this button to add additional numbers. |
Proposal Options
Field or Control |
Description |
|---|---|
Expiration Days |
Enter the number of days beyond the creation date of the proposal or offer for the expiration date of the proposal or offer. For example: a proposal is created on August 13, 2009 and the Expiration Days parameter is set to 7 days, 7 days will be added to the creation date and the proposal expiration date will be set to August 20, 2009. These dates can later be overridden by the supplier or buyer if required. |
Payment Terms ID |
Select the payment terms to default into a new proposal or offer. You can add as many payment terms as needed to the grid, but you can only select one to default to the proposal. |
Transaction Age
Field or Control |
Description |
|---|---|
Transaction Count |
User can select the default count or specify a new transaction count. |
Activate Transaction Limits |
Select the check box to activate transaction limits. |
Transaction Age |
Enter the age of the transactions to be selected in Years, Months and Days. |
Supplier Logo
Click Add Logo to store a logo in the database and present it on the HTML invoice. Logos are optional.
Note: Supplier logo images must be in JPEG format.
Field or Control |
Description |
|---|---|
Un-Register Supplier |
Click this button to unregister this supplier. This button will not be available if any invoices have been created for this supplier. |
To access the Review Supplier Details - Addresses Page, select the Addresses tab on the Review Supplier Details - Registration page.
To access the Review Supplier Details - Contacts Page, select the Contacts tab on the Review Supplier Details - Registration page.
To access the Review Supplier Details - Locations Page, select the Locations tab on the Review Supplier Details - Registration page.
Use the Maintain Addresses - Address Information page (EM_SELLER_ADDR) to enter supplier address information.
Navigation:
Click the Add a New Address button on the Review Supplier Details - Addresses page.
Field or Control |
Description |
|---|---|
Description |
Enter a description and any other relevant address information. |
Country |
Enter the country for this address. Changing the country may change the appearance of the page. You may then need to select the Update this Address link on the page to enter the address fields. |
Add a Future Address |
Click this link to add future address information. |
Phone Information
You may add phone information, but it is not required.
Field or Control |
Description |
|---|---|
Type |
Select the type of number, such as: Business, Campus, Cellular, FAX, Pager 1, or Telex. |
Add a New Phone Number |
Click this button to add additional supplier phone numbers. |
Note: You must establish at least one supplier address and corresponding payment terms before proceeding to the Review Supplier Details - Locations page. Doing so is also required in order to save the registration and create the new PeopleSoft eSettlements supplier.
Use the Maintain Contacts - Contact Information page (EM_SELLER_CNTCTS) to enter supplier contact information.
Navigation:
Click the Add a New Contact button on the Review Supplier Details - Contacts page.
Contact Information
Field or Control |
Description |
|---|---|
Description, Contact Name, and Email Address |
Enter information for this contact. |
URL (uniform resource locator) |
Enter a web address for this contact's organization. |
Address |
Select the location for this contact. The only locations that appear are those currently established for the supplier. If the supplier is new and no locations have been established yet, then none appear. |
Contact Type |
Select the most appropriate contact type, such as Accounts Payable, Billing Contact, or External Contact. |
Use the Maintain Locations - Location Information page (EM_SELLER_OPRTG_RL) to enter supplier location information.
Navigation:
Click the Add a New Location button on the Locations page.
Note: If locations are already set up, a description and current invoicing address appear on the Review Supplier Details - Locations page, along with a Notifications button. Click this button to view the SetID-level default notification setup for the respective location. You can override the SetID level setup on this page. If you want to override the SetID-level notification setup for a new supplier location or a new effective-dated location, you must do so on this page.
Location and Location Details
Field or Control |
Description |
|---|---|
Supplier Location and Description |
Enter a location, such as HEADQTRS (headquarters) or EAST, and a description of the location for this supplier. Note: Because PeopleSoft eSettlements displays the description you enter here throughout the system, ensure that the name is unique. |
Default Location |
Select this check box to define the current location as the supplier default. |
Currency Code |
Enter a currency code to use as the default currency on self-service invoices. |
Invoicing Address and Remitting Address |
Select an address for this supplier, such as Primary. Note: If the address established in the previous steps is the only address established for this supplier, it appears by default in the Invoicing Address and Remitting Address fields. |
Payment Terms and Remitting Options
Locations enable you to designate that payments be made to a supplier other than the primary supplier.
Field or Control |
Description |
|---|---|
Payment Terms |
Select terms to govern transactions with this supplier, such as 10N, EOM, or Split. |
Update Bank Information |
Click to access the Supplier Bank Information - Maintain Supplier Banks page and enter bank details for this supplier location. |
Remit to Location |
Select this option to have payments made to the location that appear in the Remitting Address line. Note: The option text for this option reads Remit to This Location if you are setting up a new supplier and have not yet saved it. |
Remit to this Supplier but a different Location |
Select to have payments sent to an alternate location for this supplier. |
Remit to Location and Remitting Address |
Select a remit to location if you selected the Remit to this Supplier but a different Location option. The available choices are those that you previously established for this supplier. The associated remitting address appears. |
Remit to a different Supplier |
Select this option to have payments made to a different supplier. |
Remit Supplier |
Select the supplier to receive payments. |
Remit to Location and Remitting Address |
Select the location of the different supplier. The associated address appears. |
Global/1099 Withholding |
Click this link to access the Withholding Supplier page and define withholding information for this supplier. |
Attachments (0) |
Click this link to access the Attachments page and to attach documents to this location. See Installation Options - Multiple Attachments Page to define the maximum attachment upload limit for various products. |
Add Invoices |
Click this link to access the Attachments page and to attach invoices to this supplier. Upload a file of type CXML that can contain multiple invoices and click Save. Run the Load Attachment Invoices process to load the CXML invoices and then run the Voucher Build process from the Voucher Build page by selecting the XML Invoice (eSettlements) as the Voucher Build Interface. |
Update this Location |
Select this link to modify existing location details. |
Add a Future Location |
Select this link to specify a location that will take effect on a date that you designate. This link appears for existing locations. Note: If you select this link to set up a future location, you must specify a date in the Location effective as of field. |
To access the Review Supplier Details - Define Notification Types Page, click the Notifications button on the Locations page.
Use the Supplier Bank Information - Maintain Banks page (EM_SELLER_BANK) to define the bank accounts into which the supplier wants to have electronic payments deposited.
Navigation:
Click the Update Bank Information link on the Maintain Locations - Location Information page.
Accessible Bank Accounts
Field or Control |
Description |
|---|---|
Default |
Select to set the current information as the default bank for this supplier. |
Bank Name and Branch Name |
The values that you enter here appear in the payment file notification and on the HTML invoice. |
Country and Bank ID Qualifier |
Select the destination country code, which also determines the selection of available Bank ID Qualifier values. Then, specify a qualifier that determines which edit algorithm the system uses to check the bank ID number sequence. Enter one of each to identify the Bank ID and Bank Account Number field format. Note: You must enter this information in the system before you can transfer money to the account. |
IBAN Digit (international bank account number digit) |
Enter the two-numeral check digit code for the country and click View IBAN. If the DFI qualifier for the specified country is IBAN enabled and the system successfully validates the check digit, then the IBAN for this account appears. This field and the View IBAN button appear only if the IBAN Enterable field is not selected on the IBAN Formats page. Note: If transacting with the United Kingdom and the Netherlands, you must enter Swift ID in the DFI Qualifier field to validate the IBAN entry. See Understanding IBAN. See IBAN Formats Page. |
BIC (bank identifier code) |
Enter a BIC code for this supplier bank. This code is based on the ISO standard (9362), which is the universal method used to identify the financial institutions that enable automated processing of payments. A BIC code is used to route cross-border and some domestic payments to a bank branch or payments center. SEPA requires the use of BIC and IBAN codes to uniquely identify the creditor's and debtor's banks and bank accounts in all Euro cross-border payments. It is imperative that the IBAN and BIC codes are correct to avoid repair fees that the bank charges due to processing errors, and to avoid delays in processing payments and collections due to the time-consuming correction of these errors. Once you enter a BIC code, the system validates the length and layout of the characters, and then validates the BIC country code against the country code set up for the bank branch. |
Use the Define Supplier Notifications - Define Notification Types page (EM_S_NOTIFY) to set up supplier email notifications.
Navigation:
Note: Because you establish SetIDs at such a high level, the system administrator can specify only the roles to which to route notifications. Users can later override these routings at lower levels, such as at the supplier location and agreement levels.
Five possible notification types appear on this page:
Invoice Load - Errors
Invoice Load - No Errors
Payment Create and Cancel
(Business Service Provider model) Cash Collections
Invoice Extract - Supplier
Proposal Accepted
Proposal Denied
1099 Report
Note: There is also supplier notification override at the agreement level, however since a supplier can have multiple agreements with different buyers and this 1099 report only applies to the supplier, no override will be allowed at the agreement level.
The routings and definitions from the SetID level appear here by default. Click the Specify Overrides button to change the routings or to add additional routings.
Before creating email notifications for each supplier location, you must have already created notifications at the SetID level.
Note: In either model, at the SetID level only the system administrator can enable and define routings. At the location level only the administrator can enable routings, and both the system administrator and the supplier administrator have the authority to define routings.
The default routings set up at the SetID level appear on this page. You can override and specify different routings for each location. If the administrator has enabled routings, the supplier administrator can define roles or user IDs to receive notifications.
Each notification type contains common fields. If you elect to change the default routings, you must specify the values for each field.
As with roles, when specifying user IDs, those that appear are internal users. The exception is the Cash Collections notification. This notification, which is available only in the Business Service Provider model, allows you to select external users (users outside of the supplier's organization).