Entering and Managing Self-Service Invoices
|
Page Name |
Definition Name |
Usage |
|---|---|---|
|
EM_QV_HOME |
Access pages to create and manage self-service invoices. |
|
|
EM_QV_ENTRY |
Enter supplier invoice details, create self-service invoices, review and modify invoices already created, and correct invoices containing pre-edit and edit errors. Pre-edit errors can be corrected by the supplier administrator. Edit errors can only be corrected by the system administrator. |
|
|
Create Invoice - Invoice Entry Page |
EM_VCHR_LINE_CMNTS |
Enter additional comments regarding the invoice line. |
|
Create Invoice - Invoice Entry Page |
EM_QV_LINE_DIST |
View and modify accounting ChartFields for the invoice lines. |
|
VCHR_MISC_QV |
Allocate the miscellaneous charges for the invoice at a more detailed level. |
|
|
Self Service Invoice Attachment Page |
VCHRHDR_ATT_SEC |
Add attachments to the invoice. |
|
EM_QV_SRCH |
Enter search parameters to view invoices that have not yet become vouchers in the system. |
|
|
EM_QV_SRCH |
Enter search parameters to view invoices that have been entered into the system, but have not yet become vouchers in the system. |
|
|
EM_QV_SRCH |
Enter search parameters to view invoices to print. |
|
|
Print Invoice - Pro Forma Invoice Page |
EM_QV_DISPLAY |
View and print a pro forma version of an invoice. |
|
EM_QV_SRCH |
Search for, view a list of, and access invoices that have not yet become vouchers in the system. Only host and buyer roles can access this page. |
|
|
EM_QV_ENTRY |
Review invoice details and release for processing or deny invoices. |
|
|
Review Invoices - Deny Invoice Page |
EM_QV_DENY |
Enter comments or reasons for denying the invoice, to be included in the text of the subsequent email notification. |
|
EM_QV_SRCH |
Search for invoices with errors. Pre-edit errors can be corrected by the supplier administrator. Edit errors can be corrected by the system administrator only. |
|
|
Voucher Build Error Detail Page |
VCHR_BATCHERR_PG |
Displays the errors created during the Voucher Build Application Engine process (AP_VCHRBLD) |
|
Invoice Information Page |
VCHR_EXPRESS1 |
Correct invoices containing pre-edit and edit errors. The Correct Errors link for edit errors is only available to the system administrator role type. It is available to both the system administrator and the supplier administrator for pre-edit errors. |
|
EM_VCHR_LK_QV |
Select a purchase order from the search results to copy to an invoice. |
|
|
EM_VCHR_PS_QV |
Select a receipt from the search results to copy to an invoice. |
This section discusses:
Invoice entry.
Invoice processing.
Invoice routing and verification.
ChartField defaulting logic.
Note: If financial sanctions validation is enabled, the system does not consider the financial sanctions status of the supplier, nor does it validate the supplier against any financial sanctions lists (for example, the Specially Designated Nationals (SDN) list) during self-service invoice entry. Therefore, you can create self-service invoices for any supplier with a financial sanctions status of Review or Blocked. However, the Pay Cycle Application Engine process (AP_APY2015) does not select invoices for a supplier that has a financial sanctions status of Review or Blocked. You cannot pay these invoices until the financial sanctions status of the supplier is set to Cleared or Valid.
See Understanding Financial Sanctions Validation.
Invoice Entry
You can create an invoice by copying purchase orders, purchase order lines, or information from a packing slip, receipt, or receipt lines. However, only users assigned system administrator and supplier administrator role types can create invoices by copying invoice information from a purchase order or packing slip, or by adding invoice lines.
Because some amounts are only estimates at the time a purchase order is created, the system does not copy these specific amounts onto the self-service invoice. This means that users must enter the actual amounts when they become known (for example, when the goods are shipped) for the following amounts:
Sales tax
Use tax
Value-added tax (VAT)
Freight
Miscellaneous charges
If an item-supplier relationship and pricing have been established for the supplier, then the supplier can select items from the item master, set up in PeopleSoft Purchasing. This restricts suppliers to access items associated with their organization only. If ChartFields have been set up for an item, then they appear by default on the distribution line, along with unit pricing and unit of measure (UOM) information. Users can change this information. If an item-supplier relationship has not been established, then suppliers are not able to select items from the item master, but can still complete description, quantity, UOM, and unit price information.
Invoice Processing
Online invoices go through processes similar to those described in the previous Loading Invoices section. Online transactions are picked up by the Voucher Build process, in the same way as the XML invoice messages are picked up from external systems.
See Loading Invoices.
If email notifications have been established for invoice load errors, then the supplier receives an email if errors exist and are available for review. The supplier then notifies the system administrator of corrections that need to be made and can also request that a voucher be deleted so that it can be re-entered. The system administrator verifies voucher transactions after each process, to ensure that each transaction is error-free.
Just as with invoices submitted electronically, you must ensure that the PeopleSoft Payables business unit is set up for invoice auto-numbering.
You can review invoices before they pass through the Voucher Build process and become vouchers in the system. Duplicate invoice checking will be done when a self service invoice is saved. This prevents duplicate invoices before the voucher build process. You can also make changes to the accounting associated with an invoice.
Invoice Routing and Verification
The system marks invoices designated for ChartField completion and review with a Voucher Build status of N (none). This status prevents the invoice from being selected by the Voucher Build process. Invoices with a status of N require verification of buyer-specified details by the requester or other buyer user for ChartField accuracy and completeness before being processed by the Voucher Build process. You set up invoice verification routing at the agreement level, and it is dependent upon the type of invoice (such as purchase order or non-purchase order), and the buyer-supplier location combination. During this invoice verification, the buyer adds ChartField values, if necessary, then releases the invoice for processing by clicking the Release for Processing button. This changes the invoice Voucher Build status to B (to build) and enables the Voucher Build process to pick it up.
When creating invoices, suppliers can save their work and then later review, correct, change, or add invoice details. At this point the Voucher Build status is I (initiated). Once the supplier is satisfied with the invoice, the Voucher Build status is N marking it for invoice verification, or B, enabling it to be picked up by the Voucher Build process.
Note: When the system routes notifications by role, all users associated with a given role receive the invoice verification notification. Similar to invoice header approval, when the first user in the correct role verifies the invoice and releases it for processing, the system sets the invoice Voucher Build status to B for selection by the Voucher Build process.
When the system routes notifications by multiple user IDs, roles, and requesters, the first of these users to access and release an invoice for processing sets the Voucher Build status to B.
If an invoice has the requester ID populated, then that user (the requester), if set up for it, receives the email notification. If an invoice does not have the requester ID populated then the system obtains the default requester (or role) from the email setup (agreement or buyer SetID level). These users or roles receive notification and can perform the invoice verification.
ChartField Defaulting Logic
This section discusses how the system populates ChartField values on an invoice, depending on the invoice type.
For self-service, XML, and OAG invoices, the system uses the following logic (outlined in the table) to retrieve ChartField values. This table is ordered from the highest level (Level 1, the buyer template) to the lowest level (Level 4, the item ID value).
|
Level |
ChartFields Specified |
Processing Logic |
|---|---|---|
|
1. Buyer template |
ACCOUNT, which is the only required ChartField for an invoice. |
Any ACCOUNT ChartField values specified at the lower three levels override this level's value. |
|
2. Agreement |
All ChartFields |
Any values specified at this level are automatically populated onto the invoice. |
|
3. Requester |
All ChartFields |
Values specified at Level 3 do not override values specified at Level 2. This means that any values specified at this level are automatically populated onto the invoice, unless the value is already defined on Level 2. |
|
4. Item ID |
|
ACCOUNT, ALT_ACCOUNT, or PRODUCT values specified at this level override any value specified at a higher level. |
If an invoice is copied from a PO or receipt, the ChartFields are obtained from the PO or receipt. When an invoice is not created by copying a PO or receipt, and when ChartFields provide default values for self-service and XML invoices where a PO is not associated with the invoice line, the ChartFields are obtained as stated in the above table. The general ledger business unit is derived from the requester if populated; otherwise from the PeopleSoft Payables Business Unit table (BUS_UNIT_TBL_AP).
If suppliers are able to enter ChartFields based on the agreement setup, then they can enter one distribution line per invoice line only. However, during the invoice review step, the buyer can add additional distribution lines.
The account definition is obtained from the Line/Distribution/Project/GLElement/NameValue field. However, for OAG invoices you must specify ACCOUNT as the node name for the NameValue field.
You specify the ability to view or edit ChartFields at the installation level, then at the buyer registration level, and further at the agreement level. Buyers specify whether a supplier can see the ChartFields, regardless of what the buyer has set up on buyer registration. When entering self-service invoices, suppliers can only view ChartFields, if access to them has been enabled by a given buyer.
Use the Create Invoice - Invoice Entry page (EM_QV_ENTRY) to enter supplier invoice details, create self-service invoices, review and modify invoices already created, and correct invoices containing pre-edit and edit errors.
Navigation:
Click the Create Invoice link on the Self-Service Invoice - Invoice Actions page.
Click the Invoice ID link on the Self-Service Invoice - View Invoice page.
To access Invoice Line comments, select the Additional Information tab on the Create Invoice - Invoice Entry page (EM_QV_ENTRY).
Click an Invoice Line Comments button on an invoice line.
To access the Accounting Details, select the Additional Information tab on the Create Invoice - Invoice Entry page (EM_QV_ENTRY).
Click an Accounting button on an invoice line.
To access the Self Service Invoice Attachment Page, click the Attachments button on the Create Invoice - Invoice Entry page.
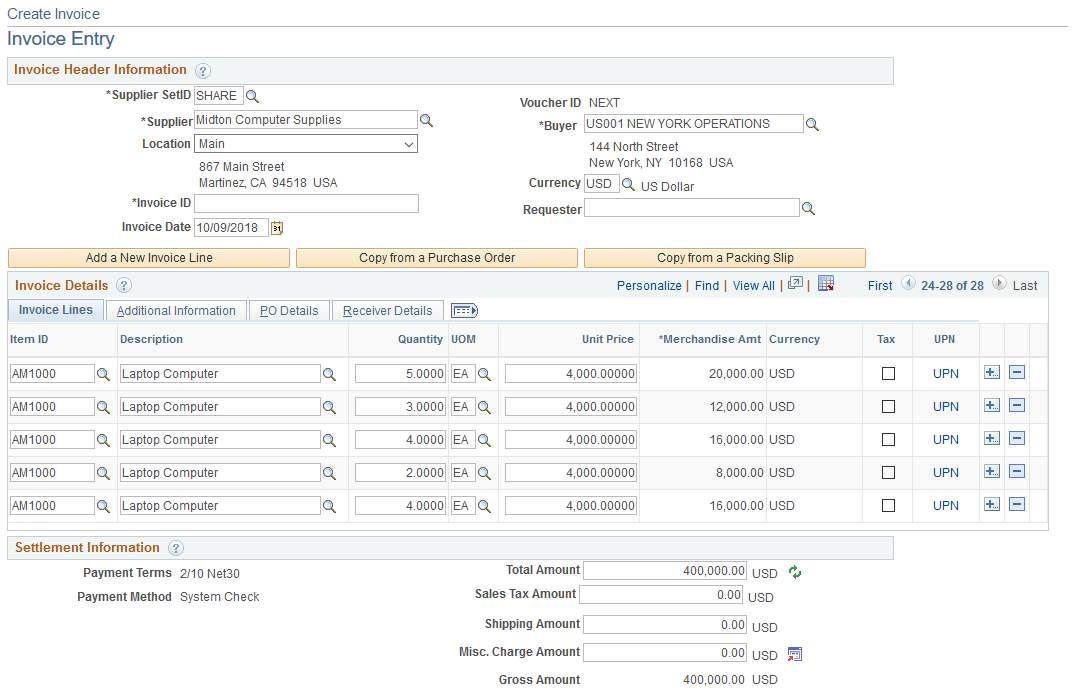
This example illustrates the fields and controls on the Create Invoice - Invoice Entry page. You can find definitions for the fields and controls later on this page.
Note: If financial sanctions validation is enabled, the system does not consider the financial sanctions status of the supplier, nor does it validate the supplier against any financial sanctions lists (for example, the Specially Designated Nationals (SDN) list). Therefore, you can create self-service invoices for any supplier with a financial sanctions status of Review or Blocked. However, the Pay Cycle Application Engine process (AP_APY2015) does not select invoices for a supplier that has a financial sanctions status of Review or Blocked. You cannot pay these invoices until the financial sanctions status of the supplier is set to Cleared or Valid.
See Understanding Financial Sanctions Validation.
Invoice Header Information
Field or Control |
Description |
|---|---|
Currency and Invoice Date |
Displays the values for currency and invoice date (these appear by default). |
Requester |
Enter the user name of the person requesting the invoice. The system uses this field for routing to the user who must perform invoice verification of the invoice. Note: The system automatically defaults ChartField values established for the requester onto the invoice. However, these values do not overwrite any ChartField values established at the agreement level, or account, alternate account, or product ChartField values established at the item level. See Understanding Self-Service Invoice Entry and Management. |
SpeedChart Key/ Accounting Tag |
Displays the speedchart/Accounting Tag code based on the user roles and permissions. The SpeedChart Key/Accounting Tag is also displayed on the invoice line level. If any Speedchart Value/Accounting Tag is populated at the Header Level, then subsequent addition of Invoice Lines will also have the same value of Speedchar/Accounting Tag. You can override this speedchart/Accounting Tag value at the invoice line level. The Speedchart Key/Accounting Tag field is displayed on the Invoice Entry page only if the Expose ChartFields to Supplier check box is selected on the Review Agreement Details page (eSettlements, Buyer Information, Review Agreement Details). If a SpeedChart/Accounting Tag value is entered on the Review Agreement Details page, then that speedchart/Accounting Tag value is populated by default on the Invoice Entry page. |
Copy from a Purchase Order |
Click to look up purchase order information, which you can then copy to the invoice that you are creating. |
Copy from a Packing Slip |
Click to look up packing slip or receipt information, which you can then copy to the invoice that you are creating. |
Invoice Details
Field or Control |
Description |
|---|---|
Item ID, Description, UOM (unit of measure),Unit Price, and Amount |
Enter information in these fields, and view the information copied from purchase orders or packing slips. Note: If an item supplier relationship has not been established, suppliers cannot select items from the item master. |
Quantity |
Enter a quantity for the item. Note: Only one distribution line is permitted when a supplier creates a self-service invoice, but if a purchase order containing multiple distribution lines is copied onto the self-service invoice, the system copies and will display all lines of the purchase order on the invoice. However, since the supplier can change the quantity and the price on the invoice line before the invoice is subject to invoice verification, if the invoice is routed for invoice verification and there are distribution and line discrepancies, the buyer must correct any line quantity and amount and distribution quantity and amount discrepancy before the invoice can be saved. If the invoice is not routed for invoice verification, it will stay in Recycled status until a buyer user corrects any discrepancy. |
Tax |
Select this check box if the line item is tax applicable. Note: If sales tax is not applicable for the buyer, this check box does not appear. |
UPN |
Select to access the Invoice Line UPN Information page to view the UPN details of the item. The UPN link displays when you create an invoice by copying from a purchase order or a packing slip. UPN details are also available when you view or review an invoice. The UPN details are rendered as display-only in the UPN Details page based on Item ID and UOM entered in Source document. The UPN details are updated if you make any changes to the Item ID. Note: When the Inventory Item ID, or any other fields are cleared, the UPN details are also cleared. After the Voucher Build process is run, the UPN fields reverts to the default information from the Source document. When there are any changes to the Item or to the UOM, the UPN details reverts to the default information based on the Item ID and UOM entered. The UPN Link is available in the Invoice Line if:
The UPN Link is not available in the Invoice Line if: A Self-service Invoice has a voucher source as XML. A Self-service Invoice has source as XLS. A Self-service Invoice created online as Ad hoc without PO or Packing slip information. |
Additional Information
Select the Additional Information tab.
Field or Control |
Description |
|---|---|
VAT Code, Tax Percent, and VAT Amount |
Select the VAT code value. The system calculates the VAT amount based on the amount of the line. The VAT code prompts contain the percentage for the VAT code. Note: These fields only appear if the buyer operates in a VAT country. |
|
Click the Invoice Line Comments button to enter comments about the line. |
Accounting Tag |
Displays by default the value entered on the Review Agreement Details - Buyer page. Note: When you are creating a Self-Service Invoice, the Accounting Tag values appear both in the header level as well as in the invoice level. However, if you are reviewing a Self-Service Invoice, both the header line and the invoice line level Accounting Tag fields are blank. This is because the Accounting Tag is designed as a work record field. |
|
Click the Accounting button to view and modify ChartFields for the invoice line. Note: If an XML-sourced invoice line is associated with a purchase order or a receiver, this button is inactive and you cannot edit the accounting distribution information. |


PO Details
Select the PO Details (purchase order details) tab.
View the PO unit, PO number, line, and schedule number information.
Receiver Details
Select the Receiver Details tab.
View the receipt unit, receipt number, line, and schedule information.
Settlement Information
View the payment terms and method, and the various amounts for the invoice.
You can also enter a sales tax amount, shipping amount, and miscellaneous charge amount.
Field or Control |
Description |
|---|---|
|
Click the Refresh button to update the amounts. |
|
Click the Transfer to Misc Chrg Detail button to access the Miscellaneous Charges page. |
Save and Submit |
Click this button once you have completed your data entry, to submit the invoice to the buying organization. After you click this button, you can view the invoice but cannot edit or delete it. |
Save For Later |
Click this button to set the Voucher Build status to I (initiate), to save the work you've done on this invoice, and enable you to return to it afterward. Clicking this button does not submit the invoice to the buying organization. |
Attachments |
Click this button to add attachments to the invoice. Attachments are for information only. No processing is done on these attachments. See Installation Options - Multiple Attachments Page to define the maximum attachment upload limit for various products. |


Use the Create Invoice - Invoice Entry page (EM_VCHR_LINE_CMNTS) to enter additional comments regarding the invoice line.
Navigation:
Select the Additional Information tab on the Create Invoice - Invoice Entry page (EM_QV_ENTRY).
Click an Invoice Line Comments button on an invoice line.
Click the Accounting button on the Additional Information tab on the Create Invoice - Invoice Entry page to access this page. Modify the ChartField values for each invoice line.
Note: Any ChartField values you define here for Account, Alternate Account, or Product fields overwrite any values established at the agreement or requester level.
See Understanding Self-Service Invoice Entry and Management.
Use the Create Invoice - Look Up a Purchase Order page (EM_VCHR_LK_QV) to select a purchase order from the search results to copy to an invoice.
Navigation:
Click the Copy from a Purchase Order button on the Create Invoice - Invoice Entry page (EM_QV_ENTRY).
Search Criteria
Field or Control |
Description |
|---|---|
Search Results Display |
Select Header or Detail, and then click the Search button to return results by invoice header or by line detail, respectively. |
You can enter additional search criteria, such as purchase order unit, purchase order number, purchase order date, item ID, UPN ID, and description, if necessary, but the buyer and supplier values appear by default.
Search Results
Field or Control |
Description |
|---|---|
Select |
|
Use the Create Invoice - Look Up a Packing Slip page (EM_VCHR_PS_QV) to select a receipt from the search results to copy to an invoice.
Navigation:
Click the Copy from a Packing Slip button on the Create Invoice - Invoice Entry page (EM_QV_ENTRY).
Search Criteria
Field or Control |
Description |
|---|---|
Search Results Display |
Select the Header or the Detail search option, and then click the Search button to return results by invoice header or by line detail, respectively. |
You can enter additional search criteria, such as receipt unit, packing slip, receipt number, receipt date, item ID, UPN ID, and description, if necessary, but the supplier value appears by default.
Search Results
Field or Control |
Description |
|---|---|
Select |
|
Note: Clicking the Copy To Invoice button actually copies a receipt or packing slip. You can select one or many packing slips to copy, and one or many lines from one or many packing slips. You can also copy information from packing slips not associated with a purchase order.
Use the Miscellaneous Charges page (VCHR_MISC_QV) to allocate the miscellaneous charges for the invoice at a more detailed level.
Navigation:
Click the Transfer to Misc Chrgs Detail button on the Create Invoice - Invoice Entry page.
This example illustrates the fields and controls on the Miscellaneous Charges page. You can find definitions for the fields and controls later on this page.
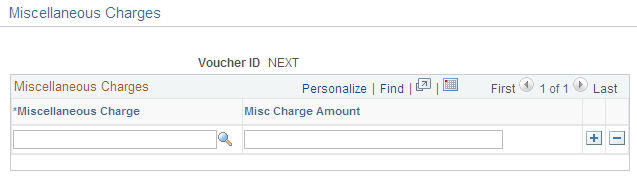
Field or Control |
Description |
|---|---|
Miscellaneous Charge |
Enter a miscellaneous charge code for this invoice. If the Miscellaneous Charge Code field is blank on the business unit, you must enter a value here. |
Misc Charge Amount |
Enter the amount to be applied to this miscellaneous charge code. |
Use the Create Invoice - Invoice Entry page (EM_QV_ENTRY) to enter supplier invoice details, create self-service invoices, review and modify invoices already created, and correct invoices containing pre-edit and edit errors.
Navigation:
Click the Create Invoice link on the Self-Service Invoice - Invoice Actions page
Click the Invoice ID link on the Self-Service Invoice - View Invoice page.
Note: Transfer to this page occurs when you click the Select button on either the Create Invoice - Look Up a Purchase Order or the Create Invoice - Look Up a Packing Slip page.
Complete the invoice by entering a location (if different from the default location), an invoice ID, and a requester (if applicable).
The Payment Terms and Payment Method field values appear by default according to the supplier entered.
You can also change the invoice date and the currency. You can enter a sales tax amount, shipping amount, and a miscellaneous charge amount.
Note: The currency is the type designated at the supplier location level. Otherwise, in the Buyer Direct model, the PeopleSoft Payables default hierarchy determines the currency type. The payment terms appear by default from the agreement level.
If value-added tax (VAT) is applicable, then sales tax does not appear, and you can enter the VAT amount.
Use the Self-Service Invoice - View Invoice page (EM_QV_SRCH) to enter search parameters to view invoices that have not yet become vouchers in the system.
Navigation:
Click the View Invoice link on the Self-Service Invoice - Invoice Actions page.
Invoices
Field or Control |
Description |
|---|---|
Invoice ID |
Select a link in this column access the Create Invoice - Invoice Entry page where you can view and modify the invoice. |
Note: You can edit only those invoices which have not been released for processing—invoices with a Voucher Build status of I (initiated).
Use the Self-Service Invoice - Delete Invoice page (EM_QV_SRCH) to enter search parameters to view invoices that have been entered into the system, but have not yet become vouchers in the system.
Navigation:
Click the Delete Invoice link on the Self-Service Invoice - Invoice Actions page.
Invoices
Field or Control |
Description |
|---|---|
Select |
Select the corresponding check box and click the Delete button to delete an invoice or invoices. Note: The Voucher Build process deletes the invoices from the system. You can delete only those invoices which have not been released for processing—invoices with a Voucher Build status of I (initiated). |
Use the Self-Service Invoice - Print Invoice page (EM_QV_SRCH) to enter search parameters to view invoices to print.
Navigation:
Click the Print Invoice link on the Self-Service Invoice - Invoice Actions page.
To access the Print Invoice - Pro Forma Invoice Page, click an Invoice ID link on the Self-Service Invoice - Print Invoice page.
Invoices
Field or Control |
Description |
|---|---|
Invoice ID |
Click the associated Invoice ID link to access the Print Invoice - Pro Forma Invoice page where you can then print the displaying invoice. |
|
Click the Print button to print all selected invoices. An administrator can set up the XMLP format by removing the fields which they do not require. This will be a one time task for the administrator. User has the option to choose the output format and the option can be specified when defining the report definition. |
Use the Self-Service Invoice - Review Invoice page (EM_QV_SRCH) to search for, view a list of, and access invoices that have not yet become vouchers in the system.
Only host and buyer roles can access this page.
Navigation:
Click the Review Invoice link on the Self-Service Invoice - Invoice Actions page.
You can enter search criteria.
Field or Control |
Description |
|---|---|
Invoices to Verify |
Select All or My Pending. |
Invoice ID |
Click the associated Invoice ID link to review all invoice information. This transfers you to the Review Invoices - Invoice page, where you can click the Release for Processing button to enable the invoice to pass to the next step. |
|
Click this icon to post a message to the supplier for an invoice. This icon will be rendered blank when there are no comments on the invoice. |

You can modify the accounting information for any invoice lines that are subject to invoice verification.
Messages Page
Use the Message page (EM_CONVER_PG) to post messages to the supplier for an invoice.
Navigation:
Click the View Messages icon on the Self-Service Invoice - Review Invoice page.
This example illustrates the fields and controls on the Messages page. You can find definitions for the fields and controls later on this page.
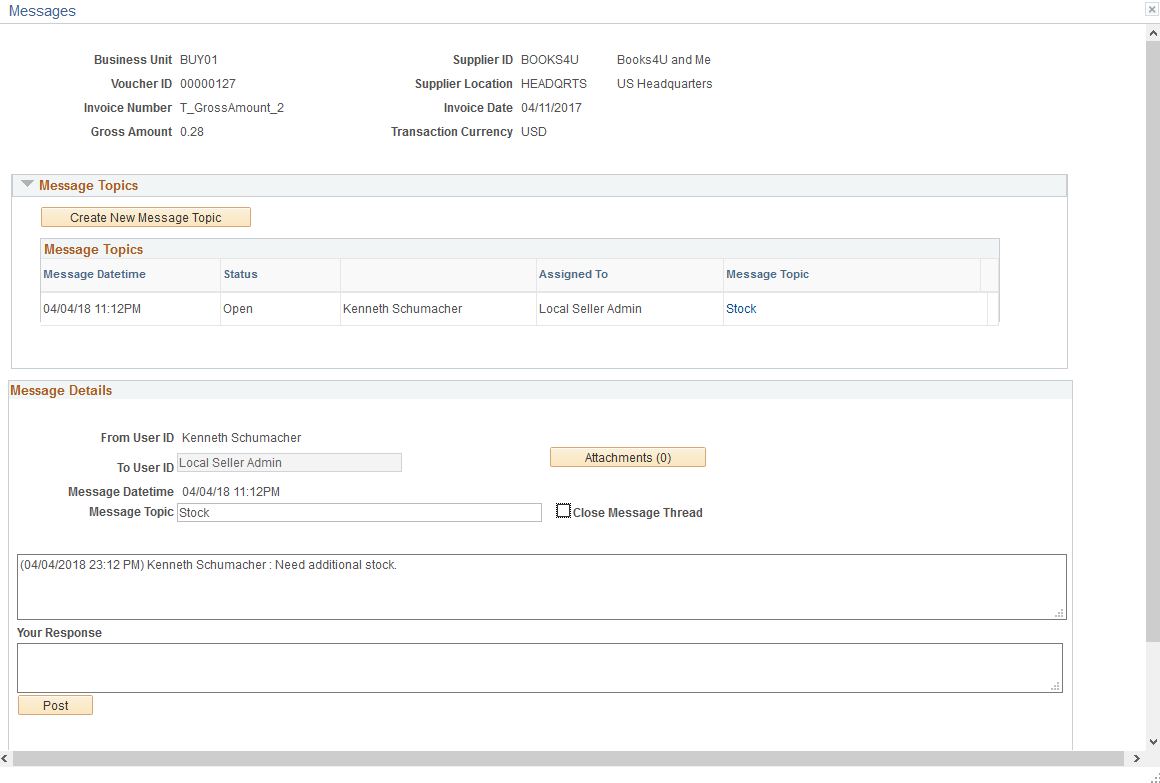
Field or Control |
Description |
|---|---|
Create New Message Topic |
Click this button to start a new message topic. |
Message Topic |
Displays the current message topic. |
Close Message Thread |
Click this check box to close the message thread. This check box is visible only for the internal buyer. This check box can be deselected if the buyer user needs to re-open the topic. When a message thread is closed, the Message topic is rendered as Display-only. |
Your Response |
Use this box to enter your messages to the supplier. |
Use the Review Invoices - Invoice page (EM_QV_ENTRY) to review invoice details and release for processing or deny invoices.
Navigation:
Click an Invoice ID link on the Self-Service Invoice - Review Invoice page.
Click the Deny Invoice button on the Review Invoices - Invoice page.
Review invoice header and detail information.
Field or Control |
Description |
|---|---|
Release for Processing |
Click this button to release the invoice and enable it to be picked up by the Voucher Build process. |
Deny Invoice |
Click this button to prevent the invoice from being picked up by the Voucher Build process, and to access the Review Invoices - Deny Invoice page to enter required comments regarding the denial. The system sends email notification to the user who created the invoice, if it is a self-service invoice, or an XML invoice with the user ID populated. If neither of the former is true, the system sends email to the roles and users set up for error notification. If no users are set up for error notification, the system warns the user who denies the invoice. |
Attachments |
Click this button to upload an attachment for the invoice. The counter for the Attachments will be updated with the number of files uploaded. |
Messages |
Click this button to post a message to the supplier for an invoice. The counter for the Messages will be updated with the number of messages posted to the supplier. |
Use the Self-Service Invoice - Correct Invoice Errors page (EM_QV_SRCH) to search for invoices with errors.
Pre-edit errors can be corrected by the supplier administrator. Edit errors can be corrected by the system administrator only.
Navigation:
Click the Correct Invoice link on the Self-Service Invoice - Invoice Actions page.
To access the Voucher Build Error Detail Page, click the Invoice ID link on the Self-Service Invoice - Correct Invoice Errors page.
To access the Invoice Information Page, click the Correct Errors link on the Voucher Build Error Detail page.
Invoices
Field or Control |
Description |
|---|---|
Invoice ID |
Click the associated Invoice ID link to access the Voucher Build Error Detail page where you can view details regarding the errors that the invoice contains. |
Note: You can only view and correct invoice errors after the Voucher Build process has run.
Depending on the nature of the errors, when you click the Correct Errors link on the Voucher Build Error Detail page, the system transfers you to either the Invoice Information page in PeopleSoft Payables (for edit errors), or the Create Invoice - Invoice Entry page in PeopleSoft eSettlements (for pre-edit errors).
Only the system administrator users—not suppliers—can correct edit errors. Suppliers can, however, correct pre-edit errors. All errors must be corrected before the invoice can be resubmitted.