Creating and Approving Funds Transfer Templates
|
Page Name |
Definition Name |
Usage |
|---|---|---|
|
TR_WR_TEMPLATE_FR |
Enter template origin information. Set up the template for withdrawing funds from an account to transfer those funds. |
|
|
Category Purpose Page |
CAT_PURP_EFT_TPL |
Identify the high-level purpose of the payment instruction based on a set of pre-defined categories as per ISO 20022 external code list or a proprietary scheme name. See the Enter Transfer Templates - Origin Page for more information. |
|
TR_WR_PRENOTE |
Enter parameters for creating a template for prenotification requests. |
|
|
WR_TEMPLATE_FR |
Specify template destination information. Set up templates to send wire transfers repeatedly to particular parties. |
|
|
Identification Information Page |
TR_WR_TPL_OID_SP |
Provide other identification for Name1, Bank, and/or Bank Account values, respectively. See the Enter Transfer Templates - Destination Page for more information. |
|
EFT Options Page |
TR_EFT_OPT_SEC |
Configure template EFT handling options. Values specified at the template level cannot be overwritten at the request level. See the Enter Transfer Templates - Destination Page for more information. |
|
TR_INTR_TBL_SEC |
Define template intermediary bank routings. Set up multiple routing information for a funds transfer. |
|
|
TR_WR_DESC_SEC |
Enter any of your in-house notes for the funds transfer. This information is not transmitted to the recipient. |
|
|
STL_ADDENDA2_SP |
Enter addenda information. This information is transmitted to the recipient. |
|
|
WR_TEMPLATE_ADR |
Set up address information for the recipient of the funds transfer. |
|
|
WR_TMPLT_FLDLST |
Select the active fields in your template, choose whether to enable accounting or to allow settlement instructions. |
To define transfer templates, use the Enter Transfer Templates component (TR_WIRE_TEMPLATES).
Use the pages in this component to do the following:
Enter template origin information.
Specify template destination information.
Configure template EFT handling options.
Define template intermediary bank routings.
Enter template transfer addenda.
Add template internal notes.
Record template beneficiary address information.
Define template field security.
Your organization may benefit from setting up transactions in advance with parties with which you conduct regular, specific transactions. For example, using template transactions can streamline the process of distributing quarterly payouts to clients or monthly or annual payments to suppliers.
You set up the template, specifying whether it is for bank account transfers or EFTs. You can then further specify if the template is a repetitive transfer or drawdown transfer. Page values established at the template level for repetitive and drawdown transfers cannot be changed by a user at the transfer request level. In addition, you can specify security at the field level for the template.
Note: Pages and fields in the funds transfer template become available or unavailable for entry, depending on the selected transfer class.
To create a funds transfer template:
Select the Add a New Value tab on the Funds Transfer Templates search page.
Enter a SetID and Transfer Template ID, and specify a Transfer Class of Bank Transfer or EFT Transfer.
Complete the Origin, Destination, Beneficiary Address, and Template Field Security pages of the funds transfer template pages.
Use the Enter Transfer Templates - Origin page (TR_WR_TEMPLATE_FR) to enter template origin information.
Set up the template for withdrawing funds from an account to transfer those funds.
Navigation:
This example illustrates the fields and controls on the Enter Transfer Templates - Origin page.
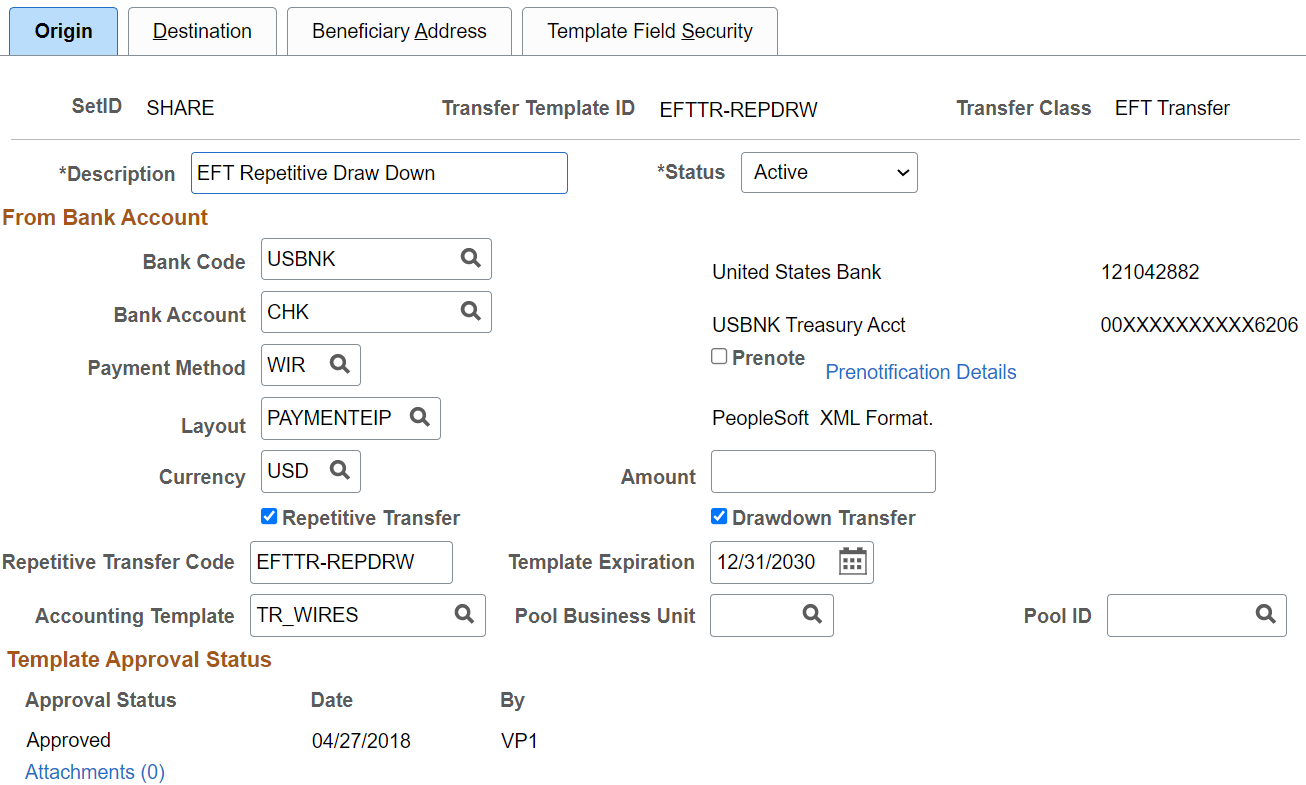
All available fields on this page are required. They contain relevant information about the account from which you are transferring funds. Available fields depend on the selected transfer class.
Field or Control |
Description |
|---|---|
Status |
Select Active or Inactive. If you mark a template Inactive, it is not available for use (it does not appear in the funds transfer pages). |
Template Expiration |
Enter a date that the repetitive transfer template expires. If you select an expired template for use—meaning, if the template status is set to Active and the system date is past the date entered in this field—the system displays a warning message that you have selected an outdated template. |
Pool Business Unit and Pool ID |
If this bank account is used for holding investment pool funds, enter the business unit and identifier of the pool. |
Payment Method |
Available payment methods are determined by the values that you define in the Bank Code and Bank Account fields. |
Prenote |
Select to create a prenotification. |
Prenotification Details |
Click to access the Prenotification Details page to set prenote status and confirmation parameters if the template being created is for a prenote. |
Repetitive Transfer Code |
Enter the repetitive transfer code that the bank assigned to this transfer. This field is required because the code is necessary to initiate the transfer process with the bank. |
Repetitive Transfer |
Select if this template is for a repetitive transfer. |
Drawdown Transfer |
Select if this template is for a drawdown transfer. |
Accounting Template |
For transfers of an EFT Transfer transfer class, specify the accounting template from which to generate accounting entries. |
Approval Status |
Displays Pending as the value when you first create a transfer. The status changes as activity occurs later in the workflow—for example, when a supervisor approves the entered funds. |
Category Purpose |
Click this link to access the Category Purpose page (CAT_PURP_EFT_TPL), where you can where you can identify the high-level purpose of the payment instruction based on a set of predefined categories as per ISO 20022 external code list or a proprietary scheme name. |
|
Attachments |
Click to view/ add attachments. See Installation Options - Multiple Attachments Page to define the maximum attachment upload limit for various products. |
Use the Prenotification Details page (TR_WR_PRENOTE) to enter parameters for creating a template for prenotification requests.
Navigation:
Click the Prenotification Details link on the Enter Transfer Templates - Origin page.
Field or Control |
Description |
|---|---|
Prenotification Status |
Defaults to New for first-time prenotes. If an initial prenote was rejected using this template, the status be changed to "Rejected." You can change the prenote status from here, however, if you modify the template, the system will recreate the prenote and a new settlement will be processed. |
Confirm Prenote After [number of] Days |
Select the number of calendar days that must transpire after the prenote is sent to Financial Gateway before the prenote status changes to Confirmed by the system if no ACH Return file is received back from Financial Gateway. The default setting is seven (7) days. |
View Prenote |
Click to access the EFT Request - Origin page and view the details of the prenote created using this template. |
Use the Enter Transfer Templates - Destination page (WR_TEMPLATE_FR) to specify template destination information.
Set up templates to send wire transfers repeatedly to particular parties.
Navigation:
This example illustrates the fields and controls on the Enter Transfer Templates - Destination page. You can find definitions for the fields and controls later on this page.
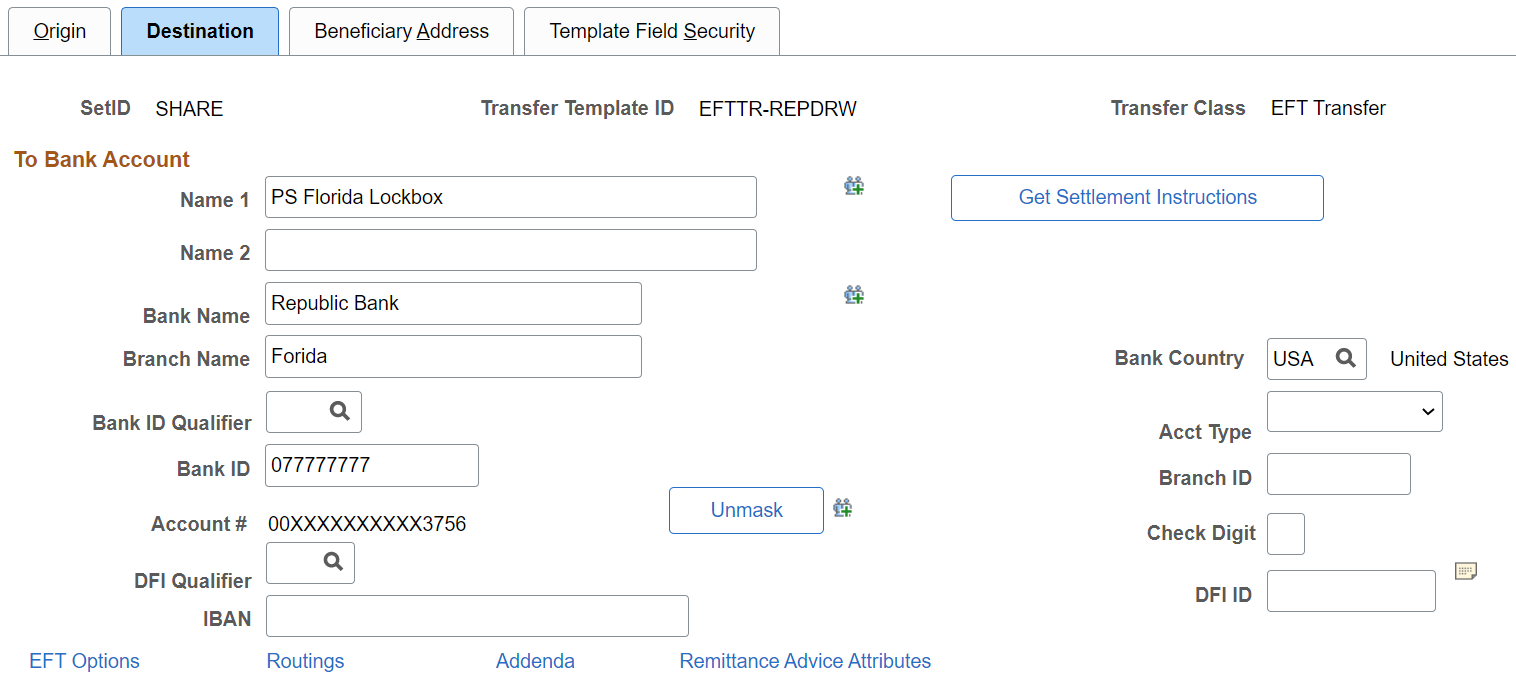
For Bank Transfer templates, only the Bank Code and Bank Account fields are available for entry.
Complete all applicable and available fields for EFT Transfer classes.
Field or Control |
Description |
|---|---|
Get Settlement Instructions |
Click to select settlement instructions and automatically populate fields. All page fields are overwritten with the settlement instruction information, including fields on the Beneficiary Address, EFT Options, Routings, and Detailed Description pages. Also, if a field is blank in the settlement instruction, the corresponding field on this page is also blank. |
Name 1 and Name 2 |
Enter the recipient's name and other significant identifying information, for example, a company name, a DBA (doing business as), or joint payees. |
|
Click this icon to access the Identification Information page (TR_WR_TPL_OID_SP), where you can where you can provide other identification for Name1, Bank, and/or Bank Account values, respectively. Available only for a Partner Instructions/Pay Into settlement type. |
Country |
Select the destination country code, which also determines the selection of available Bank ID Qual (bank ID qualifier) values. Then specify a qualifier that determines which edit algorithm the system uses to check the bank ID number sequence. |
Bank ID |
Enter the routing number of your recipient's financial institution. |
Branch ID |
Enter the recipient's branch number. |
Acct Type (account type) |
Select the destination account type:
|
Account # (account number) |
Enter the account number that you are funding with this transaction. If you set up bank account encryption, account numbers are masked when you save the page. For more information about bank account number encryption and the National Automated Clearing House Association (NACHA) data security requirements, see Understanding Bank Account Encryption and Setting Up Bank Account Encryption. |
|
Unmask |
Select to unmask the bank account number and IBAN. |
Check Digit |
This field is conditional and depends on the country that you selected. |
|
Click the View Description icon to add internal notes about the funds transfer. These notes are not transmitted to the recipient. |
IBAN Digit |
Create an IBAN for this template to facilitate automated processing of cross-border transactions. See Understanding IBAN. Enter the check digit and click View IBAN. If the DFI qualifier for the specified country is IBAN enabled, and the system successfully validates the check digit, the IBAN for this account appears. This field and the View IBAN button appears only if the IBAN Enterable field is not selected on the IBAN Formats page. See IBAN Formats Page. |
IBAN (international bank account number) |
Enter the IBAN. This field appears only if the IBAN Enterable field is selected on the IBAN Formats page. See IBAN Formats Page. |
DFI Qualifier (depository financial institution qualifier) |
Select to identify the bank and enter the associated DFI ID (depository financial institution ID), if required. If you use intermediary routings, this bank represents the final bank into which funds are transferred. The DFI qualifier indicates what format—how many characters and numerics—are in the bank's DFI ID. Note that each type has a specific number of digits that you can enter. Values are: Transit Number: Exactly 9 numeric characters, plus check digit calculation. Swift ID: Once you select 02 for the DFI Qualifier, you can enter the BIC code in the DFI ID field, which can be 8 or 11 characters, where positions 5 and 6 must be a valid 2-character country code. CHIPS Participant ID (Clearing House Interbank Payments System participant ID): 3 or 4 numeric characters. CHIPS Universal ID (Clearing House Interbank Payments System universal ID): 6 numeric characters. Canadian Bank Branch/Institute: No validation. Mutually Defined: No validation. |
EFT Options |
Click the EFT Options link to access the EFT Options page (TR_EFT_OPT_SEC). Define specifics for EFT transmissions when using these settlement instructions. |
Routings |
Click the Routings link on the Enter Transfer Templates - Destination page to access the Routings page. |
Addenda |
Click the Addenda link on the Enter Transfer Templates - Destination page to access the Enter Transfer Templates - Addenda page. |
Remittance Advice Attributes |
Click the Remittance Advice Attributes link to access the Remittance Advice Attributes page. |


Use the Enter Transfer Templates - Bank Routings page (TR_INTR_TBL_SEC) to define template intermediary bank routings.
Set up multiple routing information for a funds transfer.
Navigation:
Click the Routings link on the Enter Transfer Templates - Destination page.
Values specified at the template level can not be overwritten at the request level.
Field or Control |
Description |
|---|---|
Seq (sequence) |
Enter a sequence number for the routing row. This sequence number determines in which order the system routes the message. |
Routing |
Select from Bank or DFI. |
Use the Enter Transfer Templates - Addenda page (STL_ADDENDA2_SP) to enter addenda information.
This information is transmitted to the recipient.
Navigation:
Click the Addenda link on the Enter Transfer Template - Destination page.
Values specified at the template level cannot be overwritten at the request level.
For funds transfers, direct debits, and treasury wires, this page consists of four 35-character lines. For Automated Clearing House transactions, this page is a free form, 80-character field.
Use the Enter Transfer Templates - Detailed Description page (TR_WR_DESC_SEC) to enter any of your in-house notes for the funds transfer.
This information is not transmitted to the recipient.
Navigation:
Click the View Description button on the Enter Transfer Templates - Destination page.
Values specified at the template level can not be overwritten at the request level.
Information recorded in the Descr (description) field is not transmitted with the funds transfer.
Use the Enter Transfer Templates - Beneficiary Address page (WR_TEMPLATE_ADR) to set up address information for the recipient of the funds transfer.
Navigation:
Use the Enter Transfer Templates - Template Field Security page (WR_TMPLT_FLDLST) to select the active fields in your template, choose whether to enable accounting or to allow settlement instructions.
Navigation:
This example illustrates the fields and controls on the Enter Transfer Templates - Template Field Security page. You can find definitions for the fields and controls later on this page.
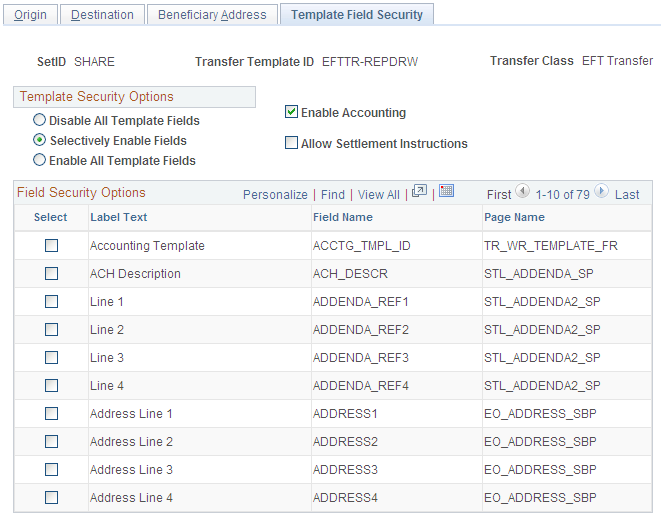
Template Security Options
Field or Control |
Description |
|---|---|
Disable All Template Fields |
If selected, deselects all check boxes in the Field Security Options grid. |
Selectively Enable Fields |
If selected, more than one field security option is selected. |
Enable All Template Fields |
If selected, all field security options are selected. |
Enable Accounting |
Select to activate accounting from a template. |
Allow Settlement Instructions |
Select to leverage the EFT request into settlement instruction data. |