Adding Prospects Through the Create/Update Prospects Component
The Prospect Data component is the first of three similar components:
Create/Update Prospects component.
Add Application component.
Maintain Applications component.
Create/Update Prospects and Add Application have Biographical Details, Regional, and Personal pages. All three components have other pages with similar names, such as Prospect Academic Program Data page and Application Program Data page. Use these components to enter or maintain similar information at different points in time during the admissions process.
The 3C buttons are common to multiple pages within this component: Add a New Communication, Add a New Checklist, and Add a New Comment.
Note: The system automatically populates many of the values in this component according to your user defaults. These fields are indicated in the documentation by the phrase (user defaults).
This section discusses how to enter and update the following information for prospects:
Biographical details
Regional data
Personal information
Academic career data
Academic program data
School and recruiting data
Event attendance
Event meeting information
Communications, checklists and comments
|
Page Name |
Definition Name |
Navigation |
Usage |
|---|---|---|---|
|
Prospect Career Data |
ADM_PRSPCT_CAR |
|
Enter prospect career data. Store additional prospect information that you define by using the Common Attribute Framework. |
|
Prospect Program Data |
ADM_PRSPCT_PROG |
|
Enter information about programs, plans, or subplans in which a prospect has expressed interest. |
|
Prospect School/Recruiting |
ADM_PRSPCT_RECRUIT |
|
Enter recruiting information for a prospect. This page stores information such as the last school that a prospect attended and the recruiting region to which this prospect belongs. |
|
Attendee Events |
EVENT_ATTENDEE_SEC |
Click the Events link on the Prospect School/Recruiting page. |
Register a prospect for events or to record events that the prospect attended. |
|
Attendee Meetings |
EVENT_MEETING_SEC |
Click the Meetings button on the Attendee Events page to open the Attendee Meetings page. |
Record information regarding meetings that are associated with an event. |
Use the Biographical Details and Addresses pages to enter or update any personal, demographic, or address information for the prospect.
Use the Regional page to view, enter, and update prospect regional information.
Access the Personal page ().
Use the Personal page to enter or update other biographic details such as gender or sexual orientation. This information is stored separately from the rest of the applicant’s data. This page appears when you select at least one field from the Biographic Details page.
For more information about:
Setting up the Personal page, see Reviewing or Defining Installation Settings For Biographic Fields.
The Personal page, see Entering Personal Information.
Access the Prospect Career Data page ().
This example illustrates the fields and controls on the Prospect Career Data page . You can find definitions for the fields and controls later on this page.
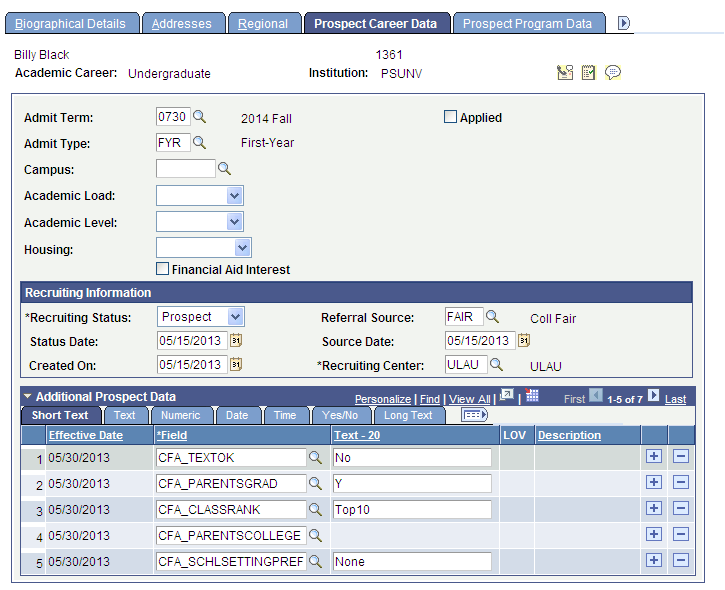
You can create multiple academic career records for a prospect by adding prospect records for each academic career. The Prospect Biographical Details page and the Regional page are the same for each academic career because the data on those pages is shared. The data on the remaining pages in the Create/Update Prospects component is unique to each academic career. Prospects are tracked at the academic career level.
Field or Control |
Description |
|---|---|
Admit Term |
Enter the admit term for the prospect's career. Define admit terms on the Term Table page. (user defaults) |
Admit Type |
Enter the prospect's admit type for this career. Define admit types on the Admit Type Table page. (user defaults) |
Campus |
Enter a campus to associate the prospect to a specific campus. Define campuses on the Campus Table page. (user defaults) |
Academic Load |
Select the appropriate academic load for this career. Values for this field are delivered with your system as translate values. You can modify these translate values. |
Academic Level |
Select the academic level for this career. Values for this field are delivered with your system as translate values. You can modify these translate values. (user defaults) |
Housing |
Select any housing interest that this person indicated. Values for this field are delivered with your system as translate values. You can modify these translate values. Values are (none), Commuter, Off Campus, and On Campus. This field is for informational purposes. (user defaults) |
Financial Aid Interest |
Select to indicate that this prospect has an interest in financial assistance. This field is for informational purposes only. (user defaults) |
Applied |
The system automatically updates this check box when the prospect applies to your institution if, on the Installation Defaults - AD page, you set up the system to update prospect records when prospects become applicants. |
Recruiting Status |
Select the person's recruiting status. The recruiting status indicates the level of interest, at the academic career level, that your institution has in the prospective student. For example, you might consider a person who attended an on-campus event a suspect (someone who you suspect is interested in your institution). Conversely, you might consider a person who sends a prospect card a prospect (someone who you know is interested in your institution). This field is also helpful for targeting mass mailings. Values for this field are delivered with your system as translate values. These translate values can be modified. Values are Applicant, Inactive, Inquiry, Prospect, and Suspect. |
Status Date |
Enter the date, if different than the default date, on which you entered or updated the recruiting status. The default date is the system date on the day the record was added. |
Created On |
Enter the date, if different than the default date, on which this prospect record was created. The default date is the system date on the day the record was added. |
Referral Source |
Enter the appropriate referral source for this prospect. A referral source indicates how this person became a prospect. The referral source is a high level indicator of how your institution came into contact with the person. For example, a referral source could be Drop-In, Campus Event, or College Fair. Although this is a way to track your first contact with this person, record subsequent contacts with the Communications pages. Define referral sources on the Referral Source Table page. |
Source Date |
Enter the date, if different than the default date, on which you entered this referral source. The default date is the system date on the day the record was added. |
Recruiting Center |
Enter the recruiting center that is responsible for this prospect's career. Define recruiting centers on the Recruiting Center Table page. The values depend on the academic career that you select and are subject to user security established for recruiting centers. (user defaults) |
Go |
Click this button to go to another component for this prospect record. |
Note: To enter an additional career for a prospect, re-enter the component by selecting Add and enter the new academic career when prompted by the system.
Additional Prospect Data
This section enables you to store additional prospect data that does not have a home in the core prospect records. Populate this section with values for common attributes defined within the Common Attribute Framework. Attributes can be manually added on this page or can also be populated from the Prospect/Admissions Data Load process. The prompts in the Field column will display attributes associated on the record context for ADM_PRSPCT_CAR.
Access the Prospect Program Data page ().
This example illustrates the fields and controls on the Prospect Program Data page. You can find definitions for the fields and controls later on this page.
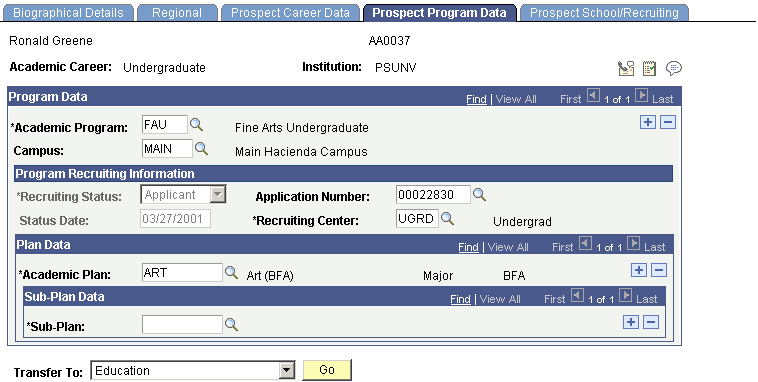
Although you are required to enter prospect career data, you are not required to enter prospect program data because you might not have that information at this stage in the process. Your institution has several options for tracking prospects (for example, by programs under a career, by academic plans under programs, and by subplans under academic plans).
Note: Prospect records use the Last Prospect Date to determine if the program, plan, or subplan should appear in the prompts. If the Last Prospect Date is populated on the Academic Program Table (ACAD_PROG_TBL), Academic Plan Table (ACAD_PLAN_TBL), or Academic SubPlan Table (ACAD_SBPLN_TBL) and the date is less than or equal to the current date, the system does not display the value in the prompt.
Field or Control |
Description |
|---|---|
Recruiting Status |
Select the recruiting status for this program. Depending on your settings on the Installation Defaults - AD page, the system can update the recruiting status when the person applies to your institution. Values for this field are delivered with your system as translate values. You can modify these translate values. Values are Applicant, Inactive, Inquiry, Prospect, and Suspect. By tracking recruiting information at the academic program level, you can designate a recruiting status that is different than the status that is designated at the academic career level. |
Status Date |
The status date is the system date on the day that you last modified the Recruiting Status field. |
Application Number |
If the prospect applies to this academic program, the system automatically updates the application number. |
Recruiting Center |
Enter the recruiting center that is responsible for this particular program for the prospect. Define recruiting centers on the Recruiting Center Table page. (user defaults) |
Academic Plan and Sub-Plan |
Enter an academic plan and subplan, if known. You can enter multiple academic plans for a program and multiple subplans under an academic plan. Define academic plans in the Academic Plan Table component and academic programs in the Academic Program Table component (user defaults). |
Note: You can enter multiple program data records or a prospect because a person might be interested in multiple programs within one academic career. Additionally, a prospect can have multiple plans and subplans. Add rows to accommodate additional programs, plans, and subplans.
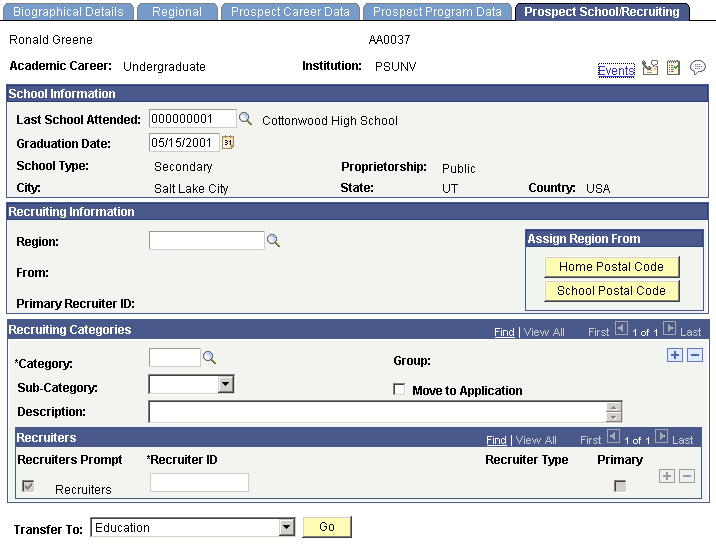
Access the Prospect School/Recruiting page ().
This example illustrates the fields and controls on the Prospect School/Recruiting page. You can find definitions for the fields and controls later on this page.
Field or Control |
Description |
|---|---|
Events |
Click this link to record the events that this prospect attended to which this prospect was invited. The Attendee Events Page appears. |
School Information
Field or Control |
Description |
|---|---|
Last School Attended |
Enter the prospect's last school attended. Since a person might attend several schools in his or her external academic career, it is helpful to know which school the person attended most recently. You can use this information to target that school for recruiting visits. Define schools on the Organization Table page. (user defaults). |
Graduation Date |
Enter the graduation date from the last school that the person attended. (user defaults). |
Recruiting Information
Field or Control |
Description |
|---|---|
Region |
You can assign a recruiting region manually or automatically. To manually assign a region, click the prompt on the Region field and enter as value. Define regions on the Region Table page. |
Home Postal Code |
Click this button to automatically assign the recruiting region, based on the home postal code of the prospect. Assigning recruiting regions based on home address postal codes requires that you define the region tree. |
School Postal Code |
Click this button to automatically assign the recruiting region, based on the postal code of the primary location of the prospect's last school attended. Assigning recruiting regions based on school postal codes requires that you define the region tree. |
From |
This display-only field shows you how this region was defined: Region Tree appears if you manually assigned a region. Address appears if you assigned the region when you click the Home Postal Code button. School appears if you assigned the region when you click the School Postal Code button. See Defining Recruiters. |
Recruiting Categories
Field or Control |
Description |
|---|---|
Category |
Enter a recruiting category for the prospect within this career. In our example, the prospect's sibling attended the institution. Define recruiting categories on the Recruiting Category Table page. Use categories to target and report on students. You can enter multiple recruiting categories and prospect supporting information for each career. Note: If you plan to assign a regional recruiter to this prospect, you must enter a category of REGN (region). |
Sub-Category |
Select a recruiting subcategory, if known. Subcategories can indicate the priority of this recruiting category. Values for this field are delivered with your system as translate values. You can modify these translate values. Values are (none), High, Low, and Medium. |
Group |
The system automatically populates this field from the Recruiting Category Table page after you enter a recruiting category in the Category field. |
Move to Application |
Select this check box to copy the information in the Recruiting Categories group box to the application record when the prospect applies to your institution. The system selects this check box if you set up the system to copy prospect data to the application by selecting the Copy Data and Recruiting Categories check boxes on the Installation Defaults - AD page. |
Recruiters
Recruiter assignment is tied to recruiting categories. If you entered a recruiting category, the Recruiters group box becomes available. Use this section to assign one or more recruiters to this prospect that are relevant to this category. You can add multiple recruiters under all categories that you entered.
When selecting recruiters, you might want to see all of the recruiters in your system or only recruiters that are linked to the current recruiting category. The system uses various methods to specify the selection of recruiters when you click the prompt on the Recruiter ID field.
Field or Control |
Description |
|---|---|
Recruiters Prompt |
Select this check box if you want all recruiters to be available when you prompt on the Recruiter ID field, regardless of the recruiting category to which recruiters are assigned. Clear this check box to view only those recruiters who are assigned to the current recruiting category to be available when you click the prompt on the Recruiter ID field. The REGN (region) category works differently. If you are adding recruiters for the recruiting category REGN, you select only from recruiters in the region that you selected on the Prospect School/Recruiting page. You can enter a region on the Prospect School/Recruiting page manually or automatically. The list of regional recruiters vary, depending on how you defined the region. If you defined the region according to the last school that the prospect attended, the Recruiters Prompt field displays the recruiters for the school's region. If you click the prompt on the Recruiter ID field, the system displays a list of recruiters that are assigned to that school. If no recruiters are assigned to that school, then you must select a recruiter who is assigned to the region. If you entered the region according to the prospect's home address, the Recruiters Prompt field displays the recruiters for the address region. If you click the prompt on the Recruiter ID field, the system displays a list of recruiters who are assigned to the region. If you manually assigned the region from the region tree, the system displays a list all recruiters who are assigned to a recruiting category of REGN when you click the prompt on the Recruiter ID field. Click the prompt on the Recruiters field to view the recruiters for the category. To override the system defaults, select the Recruiters Prompt check box. All recruiters for the academic career are available when you click the prompt on the Recruiter ID field. |
Recruiter ID |
Enter the ID of the person to assign to this prospect. You can assign multiple recruiters for any recruiting category to a prospect. |
Recruiter Type |
The recruiter type appears automatically, based on the recruiter ID. |
Primary |
Select this check box if this is the primary recruiter for this academic career. This ID appears on the Prospect School/Recruiting page in the Primary Recruiter ID field. You can also enter both primary and non-primary recruiters using this option. |
Go |
Click this button to go to another component for this prospect record. |
Access the Attendee Events page (Click the Events link on the Prospect School/Recruiting page).
Field or Control |
Description |
|---|---|
Event ID |
Enter the ID for the event that the prospect is attending (or attended). |
Description, Event Type, and Attendee |
The system displays the description, event type, and attendee when you select the event ID. |
Meeting |
Click this button to access the Attendee Meetings Page and view a list of meetings or sessions that are associated with this event. |
Access the Attendee Meetings page (Click the Meetings button on the Attendee Events page).
Field or Control |
Description |
|---|---|
Event Mtg (event meeting), Description, Meeting Date, Meeting Start Time, and Meeting End Time |
Enter the event meeting number. The system then displays the event description, meeting date, meeting start time, and meeting end time. |
Status |
Select the attendee's status regarding this meeting. Values for this field are delivered with your system as translate values. You can modify these translate values. Values are (none), Attended, Invited, Not Attend, and Will Attend. |
The Communication, Checklist and Comment buttons appear next to the Institution field on the Prospect Career Data, Prospect Program Data and Prospect School/Recruiting.
By using the Communication, Checklist and Comment buttons from this component, A new window is opened for the entry pages for communication, checklist, and comments and initiate recruiting and admissions related items.
|
If the Communication, Checklist or Comments Pages are Accessed From the: |
The Variable Data for the Following Administrative Function is Supplied: |
Data that is Transferred |
|---|---|---|
|
Prospect Program Data page |
PROP Prospect Program |
ID, academic career. academic program, recruiting center. |
|
Prospect Career Data page |
PROS Prospect |
ID, academic career. |
|
Prospect School/Recruiting page |
EVNT Event |
ID. |