Reviewing or Defining Campus Community Installation Settings
Note: If you implement Campus Solutions and a separate instance of PeopleSoft Human Capital Management, read the relevant documentation about CS-HCM integration to understand the setup, functional, and technical implementation considerations. See:
Monitoring Integrations Using the Integrity Utility
Information Center: CS-HCM Integration for PeopleSoft Enterprise Campus Solutions in My Oracle Support (Doc ID 2091799.2)
To review Campus Community installation settings, use the Campus Community Installation component (INSTALLATION_CC).
This section lists prerequisites and discusses how to:
Review or define default installation settings for events, relationships, SEVIS, checklists, national IDs and communication preferences.
Review or define default installation settings for name and address types.
(NZL) Review or define default installation settings for National Student Index processing.
Configure consumer access to notification administration.
Review or define installation settings for biographic details.
For documentation about the Notification Consumer Admin page, see Setting Up Security for Admin Notifications.
Some tables are delivered with predefined values in them so that default installation values can be established. If you must change default settings (for example for event types, salutations, address types, and so on) and the values that you desire are not available, you can modify or add values to those tables.
|
Page Name |
Definition Name |
Navigation |
Usage |
|---|---|---|---|
|
Installation Default - CC |
INSTALLATION_CC |
|
Review or define Campus Community default installation settings for events, relationships, checklists, SEVIS, national IDs, communication preferences, and Fluid. |
|
Names / Addresses |
SCC_INSTALL_CC2 |
|
Review or define Campus Community default installation settings for names and addresses. |
|
Extensions |
SCC_INSTALL_EXT |
|
Review or define Campus Community default installation settings for New Zealand's National Student Index (NSI). |
|
Notification Consumer Admin |
SCC_NTF_INSTCON |
|
Configure Notification administration access for consumers. For information, see Setting Up Security for Admin Notifications. |
|
Biographic Fields |
SCC_BIOCFG_INSTALL |
|
Review or define Campus Community installation settings for biographic fields displayed on the Personal page in Add/Update a Person. |
Access the Installation Default - CC page ().
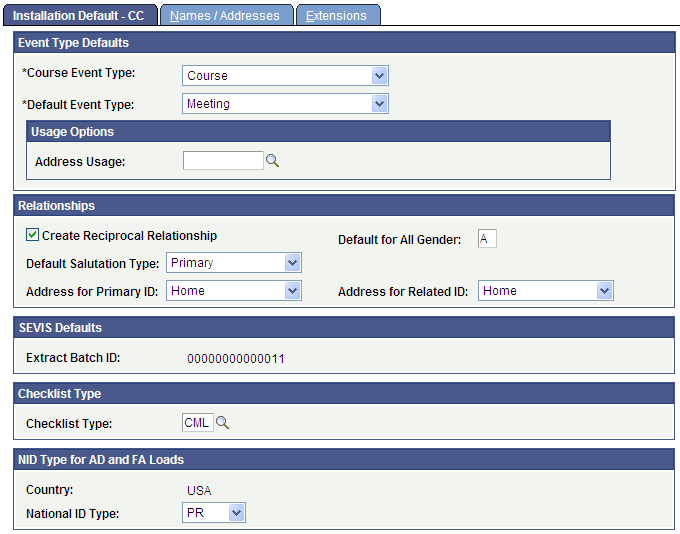
This example illustrates the fields and controls on the Installation Default - CC page (1 of 2). You can find definitions for the fields and controls later on this page.
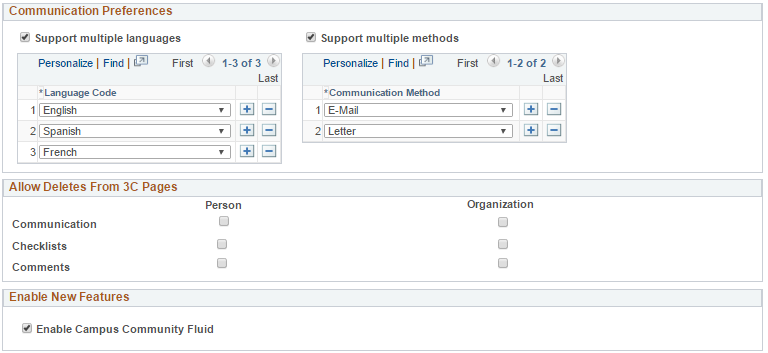
This example illustrates the fields and controls on the Installation Default - CC page (2 of 2). You can find definitions for the fields and controls later on this page.
Event Type Defaults
Field or Control |
Description |
|---|---|
Course Event Type |
The default value is Course. Do not change this value. PeopleSoft Student Records treats courses as events. Therefore, the Course Event Type field must be set to Course so that you can schedule classes. |
Default Event Type |
The default value is Meeting. You can override this value (using the Events component) if your institution wants to set a different default value for the type of event. |
Address Usage |
Select an Address Usage. Note: This field is required if you are integrating with Oracle Student Financial Planning Cloud Service. See Setting Up Integration with Oracle Fusion Cloud Student Financial Planning |
Relationships
Field or Control |
Description |
|---|---|
Create Reciprocal Relationship |
The system selects this check box by default. When it is selected, the system automatically creates the reciprocal relationship between the related ID and the primary ID when you create a relationship on the Relationships page between a primary ID and another ID (the related ID) within the system. For example, if you create a relationship between Mary Smith (the primary ID, as the mother) and Denise Strauss (the related ID, as the daughter), the system automatically creates the reciprocal relationship for Denise Strauss, identifying her as daughter with a relationship to Mary Smith, as mother. If you clear this check box, only Mary Smith's record reflects the mother/daughter relationship. |
Default for All Gender |
The default value is A(all). Do not change this value. The system uses the value in this field to create the reciprocal relationship. Changing the value here changes genders throughout your system, which you might not intend to do. |
Default Salutation Type |
The default value is Primary. The system displays and uses this value, which appears by default from the Joint Salutation Type page, as the salutation for two people with a relationship that are set up to receive joint communications on the Relationships page. |
Address for Primary ID |
The default value is Home. When you create a relationship between two individuals on the Relationship page, the system uses this value to display an address for the primary ID individual on the Relationship Address page. For example, with the default value set to Home, the system displays the home address for the primary ID as defined on the Addresses page, unless otherwise instructed. |
Address for Related ID |
The default value is Home. When you create a relationship between two individuals on the Relationships page, the system uses this value to display an address for the related ID individual on the Relationship Address page. For example, when the value is Home, the system displays the home address for the related ID as defined on the Addresses page, unless otherwise instructed. |
SEVIS Defaults
Field or Control |
Description |
|---|---|
Extract Batch ID |
The system displays the batch number used in the SEVIS XML file produced during the SEVIS Export process. The SEVIS Export process controls and sequentially numbers the extract batch ID value with each new run. |
Checklist Type
Field or Control |
Description |
|---|---|
Checklist Type |
Enter the checklist type that you want to use for associating a checklist with a communication. This checklist type is the only type that can be associated with a Comm Key. You associate the checklist type with a communication in the Checklist Table page. |
NID Type for AD and FA Loads
National ID (NID) types and their formats are defined on the National ID Type Table page.
See Defining National ID Types.
If the Default check box for an NID type is selected on the National ID Type Table page, the system uses that NID type as the default for the National ID Type field required when creating new people in your system. You can choose to set or not set a default NID type to use to populate this field when creating new people.
Because the NID Type field is required when creating new people in your system, the delivered Admission data load processes (such as ACT, ADA, AP, and so on) and the Financial Aid load processes (Financial Aid PROFILE, Need Access Process or Financial Aid ISIR) require a default National ID type. Use the National ID Type field in this group box to set a default National ID type for these processes to use if no default National ID type is selected on the National ID Type Table.
Field or Control |
Description |
|---|---|
Country |
The system displays the installation country specified on the Installation Table component (INSTALLATION_TBL3) page. |
National ID Type |
Enter the default value for Admissions and Financial Aid processes to use in the National ID Type field when no default value is selected on the National ID Type Table page. An NID value here is relevant only if your institution:
|
Communication Preferences
Use this group box only if your institution supports multiple languages or multiple methods or both multiple languages and multiple methods for communications, and you want to give administrators and self-service users the opportunity to specify the language or method by which a student prefers to receive communications from you.
Warning! Only communications generated by the Communication Generation process can use communication preferences. No other delivered processes are configured to consider either language or method preferences.
This table lists the pages and page elements affected by the selections that you make in the Communication Preferencesgroup box.
Note: Pages whose object names that begin with SCC are administrator pages and pages whose object names begin with SS_CC are self-service pages.
|
Page |
Page Elements |
|---|---|
|
Communication Preferences page (SCC_COMM_PREF) |
The Preferred Language field appears on this page when the Support multiple languages check box is selected on the Installation Default - CC page. The Preferred Communication Method field appears on this page when the Support multiple methods check box is selected. Note: If you do not take advantage of the communication preferences options, do not give your administrators security access to the administrative Communications Preferences page. |
|
Campus Preferences page (SCC_PREF_CONFIG_FL) |
The Communication Preferences group box appears on this page if either Support multiple languages or Support multiple methods is selected on the Installation Default - CC page. |
|
Languages page (SCC_LANGUAGES) |
The Set Preferred Communication Language link appears when the Support multiple languages check box is selected on the Installation Default - CC page. The link transfers the administrative users to the Communication Preferences (SCC_COMM_PREF) page. |
|
Communication Preferences page (SS_CC_COMM_PREF) |
The Preferred Language field appears on this page when the Support multiple languagescheck box is selected on the Installation Default - CC page. The Preferred Communication Method field appears on this page when the Support multiple methods check box is selected on the Installation Default - CC page. Note: If you do not take advantage of the communication preferences options, do not give your self-service users security access to the self-service Communication Preferences page. |
|
Languages page (SS_CC_LANGUAGES_L) |
The Set Preferred Communication Language link appears on this page when the Support multiple languages check box is selected on the Installation Default - CC page. The link transfers the self-service user to the self-service Communication Preferences (SS_CC_COMM_PREF) page. |
|
User Preferences (SS_CC_USER_PREF) |
The Set Communication Preferences link appears on this page when either the Support multiple languages or Support multiple methods check box is selected or when both check boxes are selected on the Installation Default - CC page. The link transfers the self-service user to the self-service Communication Preferences (SS_CC_COMM_PREF) page. |
|
Personal Data Summary (SSS_PRSNLDATA_SUMM) |
The Set Communication Preferences link appears on this page when either the Support multiple languages or Support multiple methods check box is selected or when both check boxes are selected on the Installation Default - CC page. The link transfers the self-service user to the self-service Communication Preferences (SS_CC_COMM_PREF) page. |
Field or Control |
Description |
|---|---|
Support multiple languages and Language |
Select the Support multiple languagescheck box only if your institution sets up and supports more than one language for communications. Enter each language that your system is set to support. |
Support multiple methods and Communication Method |
Select the Support multiple methodscheck box only if your institution sets up and supports more than one method of communications. Enter each method. Note: As of the date of this publication, the Communication Generation process supports the methods of letters and emails only. |
Allow Deletes from 3C Pages
Select the Person or Organization check boxes in this group box to allow users to delete individual communications, comments, and checklists for people, organizations, or both. To delete individual communications, comments, and checklists, click the trash can icon on the appropriate pages. Note that batch deletion is not affected by these settings and will delete items regardless of them.
See:
Enable New Features
Field or Control |
Description |
|---|---|
Enable Campus Community Fluid |
Select to indicate that fluid features for Campus Community self service has been adopted. This check box is for informational purposes only. See Understanding PeopleSoft Fluid User Interface Homepages. |
Access the Names / Addresses page ().
This example illustrates the fields and controls on the Names / Addresses page. You can find definitions for the fields and controls later on this page.
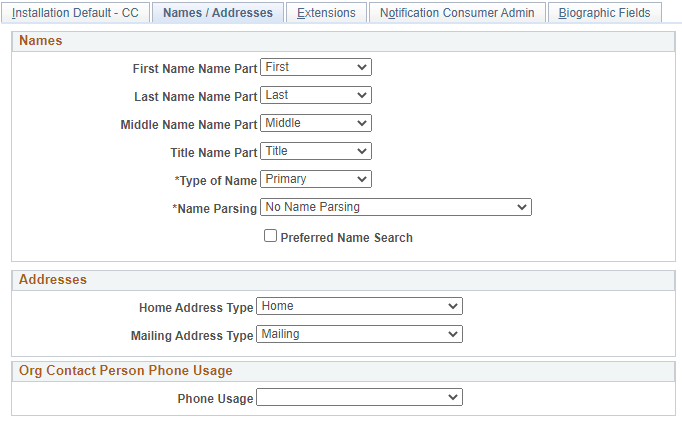
Search/Match setup, Type Control functionality, various reports, and other functions throughout PeopleSoft Campus Solutions rely on values in the fields on this page, especially Type of Name, Home Address Type, and Mailing Address Type.
Names
Field or Control |
Description |
|---|---|
Type of Name |
Select the name type that is the most important for your business processes to use as an individual's name. |
|
Preferred Name Search |
By default, this is not selected. If you select this, PEOPLE_SRCH will consider preferred name records as well as primary name records. Otherwise, only primary name records are included in the search results. |
Addresses
Field or Control |
Description |
|---|---|
Home Address Type |
Select the address type that is the most important for your business processes to use as an individual's home address. |
Mailing Address Type |
Select the address type that is the most important for your business processes to use as an individual's mailing address. |
Access the Extensions page ().
This example illustrates the fields and controls on the Extensions page. You can find definitions for the fields and controls later on this page.
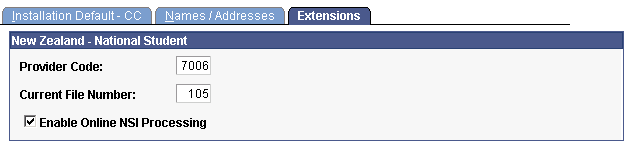
In addition to setting installation values for NSI in Campus Community, you must turn on New Zealand functionality for Student Administration on the Installation Student Administration page.
See Selecting Country-Specific Features and Enabling CRM for Higher Education Feature.
New Zealand – National Student
Field or Control |
Description |
|---|---|
Provider Code |
Enter the code granted by Ministry of Education. |
Current File Number |
This number is used to create a unique extract file name to send to NSI. It is also tied to all individuals whose data needs to be sent to NSI. NSI Suspense Table, the Extract, Load, Post NSI Data batch processes and the Purge NSI Suspense Table process use this number. Note: Every time the Extract NSI Data process is run, this number increases by increments of one. See the Extracting NSI Data section for more information on how the file number works. |
Enable Online NSI Processing |
Your institution must inform the MOE of changes made to student records in your database that have an NSN. By selecting this check box, PeopleCode triggers an insert action in the NSI Suspense table every time you make a change to these student's records to either their first name, last name, middle names, gender, date of birth, residential status, or to the verification fields for name/DOB or residential status. Then, the next time the Extract NSI process runs, it will extract the changed records and submit them to MOE. Note: You must select this check box if your institution is required to report changes to individual NSI records. Those records with changes are sent as part of the NSI process, Update Insert Request. |
If you select at least one field from this Biographic Fields page for inclusion, a Personal tab is added to the Add/Update a Person page, allowing biographic fields to be secured independently of the rest of a person’s data. Access to the personal page in the SCC_BIO_DEMO component is added to the HCCPCSSA1000 permission list. See Adding or Updating Biographical Details Data.
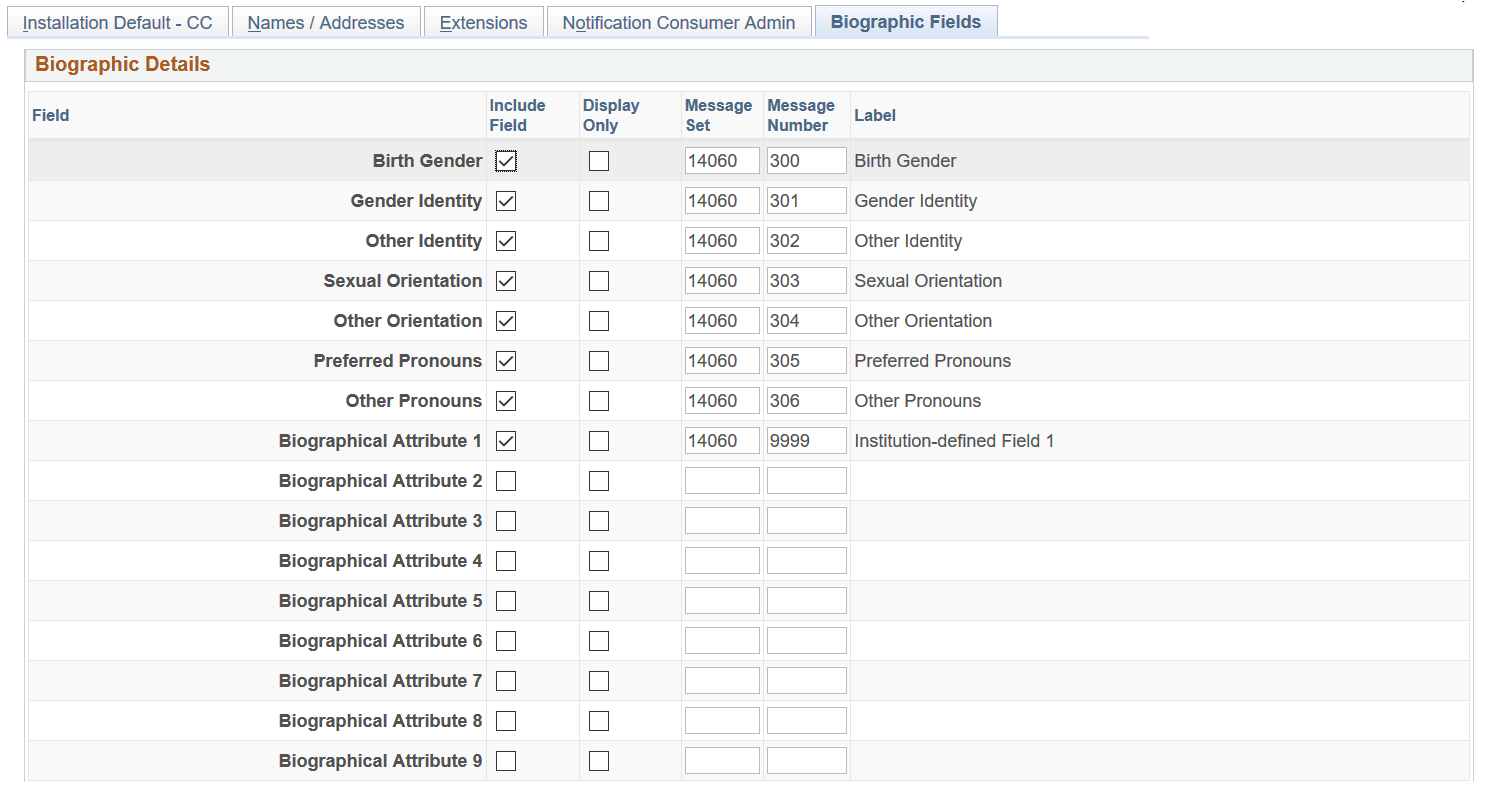
Access the Biographic Details page ().
The Biographic Fields page lists biographic fields for configuration- their inclusion, display, messages and labels.
Field or Control |
Description |
|---|---|
Include Field |
Select the check box to include it on the administration page. If selected, Message Set and Message Number become required values, and the default message for the field is displayed. |
Display Only |
Select this check box to make a field read-only for all users irrespective of their access. You can define some fields as Display Only while allowing other fields to be updated on the page. You can use it to allow users to view but not update values that students have added through self-service. |
Message Set and Message Number |
Default messages assigned to a field. You can update them, or customize message catalog entries and update default values. Default messages are not delivered with the Biographical Attribute fields. Note: The same default messages appear in the Personal Details Configuration for the Fluid Biographic Details page. |
Label |
View the message text from the selected message. A maximum of 30 characters is recommended for labels. |
By default, none of the fields are selected for inclusion.
For the Gender Identity, Sexual Orientation and Preferred Pronouns fields, you can choose to include a coded field that uses a list of translate values or an Other field that accepts free text, or both. The text field appears on the page if you include both the coded field and text field, and select Other for the coded field.
If you want to use only the Other ... text fields, clear the inclusion setting for the coded field and use its associated delivered message for the text field instead. For example, you can clear the Include Field setting for Gender Identity and include the Other Identity field while using the delivered message 14060,301 for Gender Identity.
Note: If only the Other text field is included, saving a text value causes the value of the coded field in the record to be set to Other (OT).
If a coded field (Gender Identity, Sexual Orientation, Preferred Pronouns) is set to Display Only and the corresponding text field (Other Identity, Other Orientation, Other Pronouns) is also being included, then the corresponding text field should also be set to Display Only.
Translate values of Other, Prefer not to say and Unknown are delivered for:
Birth Gender (SCC_BIRTH_GENDER)
Gender Identity (SCC_GENDER_ID)
Sexual Orientation (SCC_SEXUAL_ORT)
Preferred Pronouns (SCC_PRONOUNS)
Institutions can create their own values to meet their data capture requirements. The Biographical Attribute fields (SCC_BIO_ATTRIB_1 to 9) are delivered with a single translate value Unknown. To use a Biographical Attribute field, institutions should add their own translate values as required and define a message catalog entry to be used as the field label.
Note: You can set up the Fluid Biographic Details page using Personal Details Configuration, which is separate from this configuration of the Personal administration page. See Configuring Profile Information for PeopleSoft Fluid User Interface for more information.