Configuring Profile Information for PeopleSoft Fluid User Interface
This section discusses how to set up profile pages for PeopleSoft Fluid User Interface.
|
Page Name |
Definition Name |
Navigation |
Usage |
|---|---|---|---|
|
Personal Details Configuration |
SCC_PERSON_DTLS_FL |
|
Define which details appear on the Personal Details and Biographic Details pages. |
|
Country Exclusions |
SCC_CNTRY_EXCL_FL |
|
Define the exclusion of Country and State values from Address prompts. |
|
National ID Type |
NID_TYPE_TABLE |
|
Set up the National ID Type. |
|
Type Control |
TYPE_CNTL_SETUP |
|
Define which records appear and whether users can update the records. For more information, see Setting Up Type Control. |
|
Org Defaults by Permission Lst |
OPR_DEF_TBL_HR |
|
Define defaults according to the user’s primary permission list. When a new address is added, Country is used as a default and when a new name is added, the Name format is used. |
|
Maintain Text Catalog |
HR_SSTEXT_TEXT |
|
Set up associated messages for various fields in the Text Catalog. |
|
FERPA Control |
FERPA_CONTROL |
|
Review or make additional directory data and other information available to FERPA privacy control. |
|
Self Service Ethnicity Setup |
SCC_SS_ETHSTUP_USA |
|
Allow and configure entry of ethnicity data on self service pages including the Profile functional area. |
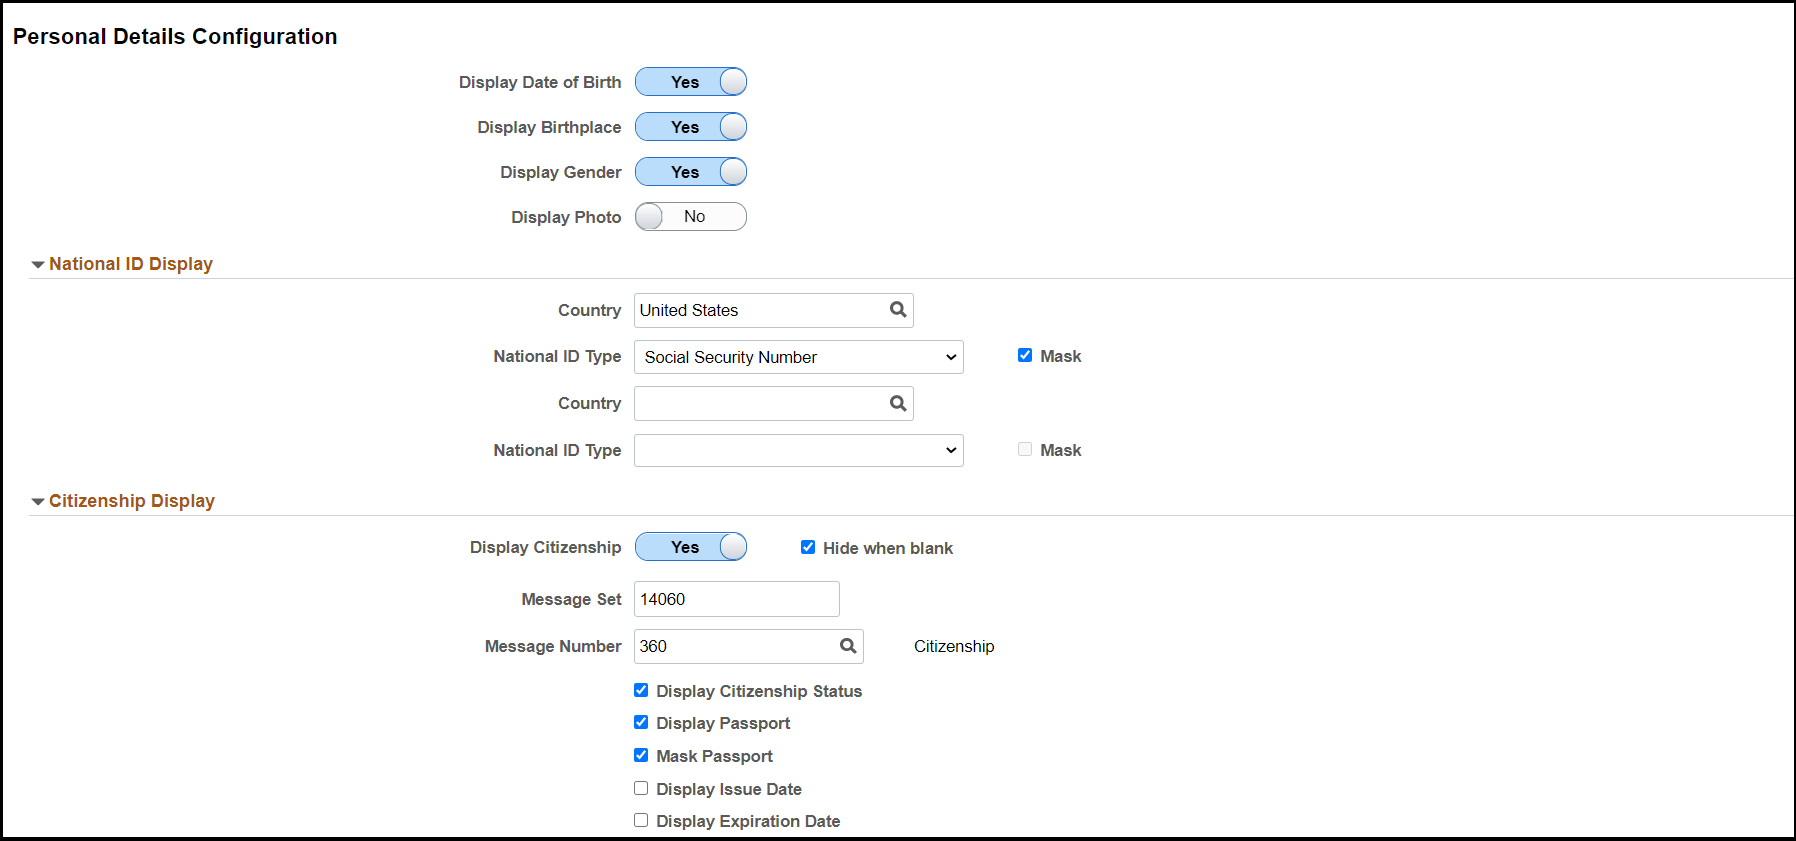
Access the Personal Details Configuration page ().
This example illustrates the fields and controls on the Personal Details Configuration page 1 of 2.
This example illustrates the fields and controls on the Personal Details Configuration page 2 of 2.
You can use this page to configure how data is displayed on the Personal Details and Biographic Details pages.
Use the toggle switch to select these fields to be displayed: Date of Birth, Birthplace, Gender, or Photo fields.
Note: If you select Yes for Birthplace, the birth location, state, and country values are displayed on the Personal Details page.
Empl ID always appears on the pages. You can configure Gender as a read-only field on the Personal Details page or as a read-only or updatable field on the Biographic Details page.
National ID Display
Field or Control |
Description |
|---|---|
Country and National ID Type |
Select the Country and the National ID Type to be displayed on the Personal Details page. The National ID fields are not displayed on the Personal Details page if a National ID Type is not defined, or if the user does not have an ID of the type defined. Note: You can configure two National IDs. For more information, see: |
Mask |
Select the check box to mask the first five characters of the National ID on the Personal Details page. By default, the check box is cleared and is enabled only if National ID Type has a value. |
Citizenship Display
Field or Control |
Description |
|---|---|
Hide when blank |
If selected, the region is hidden on the Personal Details page if there are no records to display |
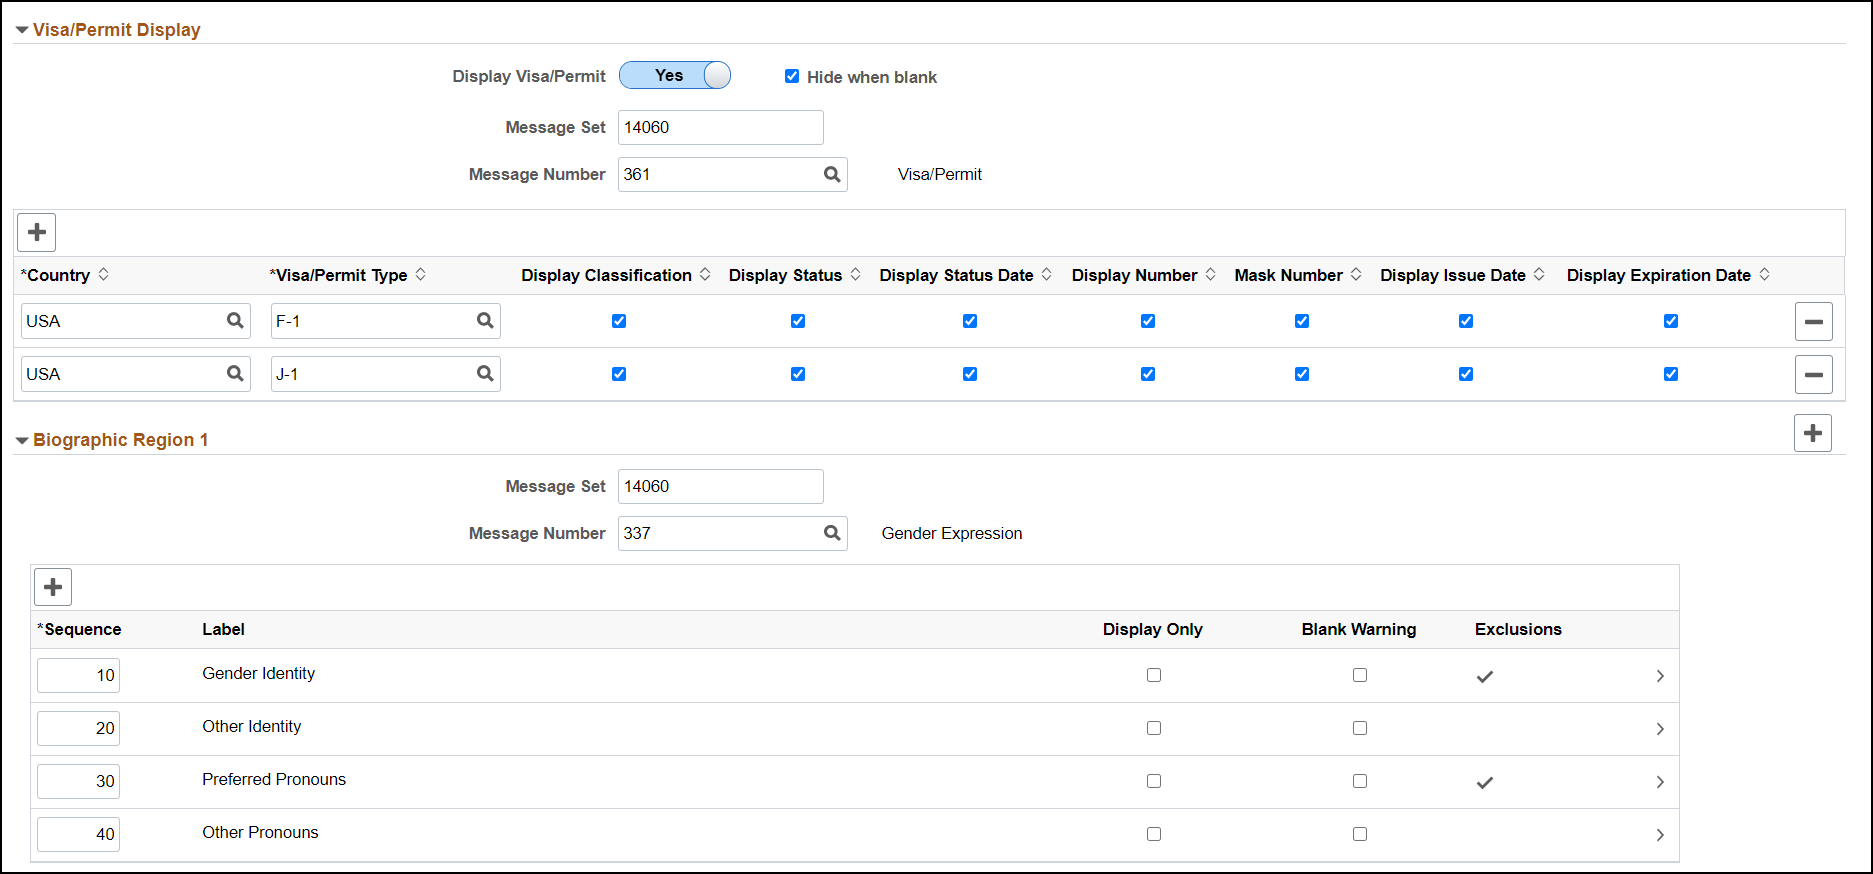
Visa/Permit Display
Field or Control |
Description |
|---|---|
Hide when blank |
If selected, the region is hidden on the Personal Details page if there are no records to display |
Note: Only records for defined Visa/Permit Types are displayed on the Personal Details page.
Biographic Regions
You can configure fields to appear in up to 12 Biographic Regions on the Fluid Biographic Details page. By default, only one region appears on the page. Click Add Field (plus sign icon) to add more regions, and the Delete row (minus sign icon) button to remove a region.
Use the Fields grids to define and organize the fields to be displayed. The fields available for display are: Birth Gender, Gender Identity, Other Identity, Preferred Pronouns, Other Pronouns, Sexual Orientation, Other Orientation, Biographical Attribute 1 to 9, Gender, Marital Status, Military Status, and Religious Preference.
A Biographic Region only appears on the Biographic Details page if at least one field is defined in it. If none of the regions have fields defined for them, the Biographic Details page is not displayed.
Define a Message Set, Message Number and Message Text field for each region.
Field or Control |
Description |
|---|---|
Message Set |
Define the Message Set number for the field label. This is a required setting if at least one field is defined in the grid. |
Message Number |
Define the Message Number for the field label. This field is only enabled if the Message Set field is defined. |
Message Text |
View the message text for the region label that appears on the Biographic Details page; for example, Gender Expression. Two sample messages are provided: 14060, 337 Gender Expression and 14060, 338 Demographic Information. |
Add Field (plus sign icon) |
Select the icon to add new fields. The icon only appears if there are fields available for selection in the particular region. A field cannot be used in more than one region. |
Sequence |
Assign a unique two–digit number that controls the display of the field. This is a required value. |
Label |
View the message text from the message catalog entry defined for the field. The maximum text limit is 100 characters but we recommend that you use 30 characters to avoid word truncation in the display. |
Display Only |
Select the check box to make the field read-only on the Biographic Details page. If the Display Only, check box is selected, the Blank Warning check box is cleared. |
Blank Warning |
Select the check box to determine whether a warning is displayed on the Biographic Details page if a field value is blank. You can select the check box only if the Display Only option is not selected. |
Exclusions |
Indicate whether exclusions have been defined for the field- where a value is not available for selection by students on the Biographic Details page. This allows values that are valid for use on the Personal page for administrative users, for example Unknown, to be excluded from the list of values available on the self-service page. A check mark indicates exclusions. |
Editing a Field Setting
Select any row in the grid to edit a field setting. You can edit the Message Set, Message Number and Sequence values. You can also change the setting of the Display Only and Blank Warning check boxes, which are by default, not selected. You can save changes or delete the field from the grid.
Click the Add Exclusions button to add exclusions for a field—translate values to be excluded from the list of available values for selection on the Biographic Details page. The Add Exclusion button does not appear if there are no active translate values associated with the field. If exclusions have been added for a field, they appear in a grid and you can click the plus button to add another exclusion. You can also delete exclusions using the minus button.
Note: For the Citizenship, Visa/Permit, Biographic Regions, the region titles on the Self-Service Profile pages are derived from the Message Text field in the Message Catalog setup. You can create, view, and make changes to the Message Catalog using the PeopleTools Message Catalog component (PeopleTools > Utilities > Administration > Message Catalog).
Note: If the Other text field is included with the coded field, for example, both Gender Identity and Other Identity are included; then both should be included in the same region and the sequence values should be defined so that the fields appear together on the Biographic Details page. Ensure that the Display Only value is the same for both fields for consistent display.
You can configure Campus Community installation values for biographic fields for use on the Personal administration page. For more information, including details on setting up translate values and the setup required to use Biographic Attribute fields, see Reviewing or Defining Campus Community Installation Settings.
See Also
Using Self-Service Addresses, Names, Phones, and Demographic Data
PeopleTools: Applications User's Guide, “Working With Fluid Pages and Controls”
Access the Country Exclusions page ().
Use this page to exclude any country or state value from Address prompts. The Country Exclusions grid is prepopulated with Netherlands Antilles (ANT) and Yugoslavia (YUG), with the Address Exclusion check box selected.
This example illustrates the fields and controls on the Country Exclusions page- Lookup feature.

You can add or delete a row from the grid using the plus and minus icons. When adding a country or state, you can use the Lookup page to search for the value to add. The Country Lookup prompt displays all records in the Country Table minus any Country values already defined in the Country Exclusions grid. Similarly, the State Lookup excludes any values set up in State Exclusions with Exclude from Addresses selected.
Note: In the State Lookup, existing filters for USA and CAN also apply. For USA, records without a numeric code are excluded; with the exceptions of AA, AE, AP, AS, GU, MP, PR, and VI. For CAN, records without a numeric code are excluded. Since these values are already excluded from the State Lookup prompt, you do not need to specifically set them up as exclusions.
Access the Type Control page ().
Use this page to set up the Name, Address, Phone, and Email types that users can view, modify, or delete.
Note: Address types not defined as Do Not Display appear in a separate grid on the Addresses page.
Access the Maintain Text Catalog page (). Use Text ID ETHN to create descriptions for the Ethnicity Information icons.
See Defining Text Catalogs for Text Catalog setup details.
Text catalogs are delivered blank. If the message text is not defined, the information icon does not appear on the Profile page. You can define text for the Ethnic Background page based on whether or not the page can be updated. If the page is display-only (based on Self Service Ethnicity Setup), you can provide a hyperlink to contact the appropriate person/office.
See Setting Up Self-Service Ethnicity Reporting for details.
Access the FERPA Control page () to organize the Fluid Privacy Restrictions page. Use Text ID FERPA to create descriptions for the Privacy Restrictions Information icons.
See Making Data Available for FERPA Privacy Control for details.
On the Privacy Restrictions page, you can configure the personal information to be restricted. You can create exceptions to the configured restrictions for Names, Addresses, Phones and Biographic Fields. See Configuring Biographic Details for more information.
Access the Maintain Text Catalog page ().
If you set up associated messages for a field in the Text Catalog, an Information icon appears beside the field. A user can select the icon to read relevant information. You can define Text catalog messages for the following fields in the Profile page:
Note: Text Catalog messages are associated with different Text IDs within the PRFL Sub ID: Ethnicity text catalog messages under ETHN, Privacy Restrictions under FERPA and the other catalog messages under MAIN. The Text ID TASKS, contains catalog messages for the Tasks pages.
|
Page Name |
Component Name |
Panel Name |
Field Name |
|---|---|---|---|
|
Personal Details Names |
SCC_PERSON_DTLS_FL |
SCC_PERS_DTLS_FL |
SCC_PRFL_HLPIMG1 SCC_PRFL_HLPIMG2 |
|
View Name |
SCC_PERSON_DTLS |
SCC_NAMES_SCF |
|
|
Contact Details Phone |
SCC_CONTCT_DTLS_FL |
SCC_CONTACT_DTL_FL |
SCC_PRFL_HLPIMG1 SCC_PRFL_HLPIMG2 SCC_PRFL_HLPIMG3 |
|
Addresses |
SCC_ADDR_DTLS_F |
SCC_ADDRESS_DTL_FL |
SCC_PRFL_HLPIMG1 |
|
Add Address |
SCC_ADDR_DTLS_F |
SCC_ADDRESS_SCF |
SCC_PRFL_HLPIMG2 |
|
Emergency Contacts |
SCC_EMERG_CNTCT_FL |
SCC_EMERG_CNTCT_FL |
SCC_PRFL_HLPIMG1 |
|
Ethnicity IPEDS Ethnicity IPEDS First Question IPEDS Second Question Ethnic Background |
SCC_ETHNIC_US_FL |
SCC_ETHNIC_US_FL |
SCC_PRFL_HLPIMG1 SCC_PRFL_HLPIMG2 SCC_PRFL_HLPIMG3 SCC_PRFL_HLPIMG4 |
|
Privacy Restrictions Exceptions |
SCC_FERPA_RES_FL |
SCC_FERPA_RES_FL |
SCC_PRFL_HLPIMG1 SCC_PRFL_HLPIMG2 |
|
Biographical Details Gender Birth Gender Gender Identity Other Identity Sexual Orientation Other Orientation Preferred Pronouns Other Pronouns Marital Status Status Date Military Status Religious Preference Attribute 1 to Attribute 9 |
SCC_PERSON_DTLS_FL |
SCC_BIOG_DTLS_FL |
SCC_PRFL_HLPIMG3 SCC_PRFL_HLPIMG5 (GE) SCC_PRFL_HLPIMG5 (BG) SCC_PRFL_HLPIMG5 (GI) SCC_PRFL_HLPIMG6 (GJ) SCC_PRFL_HLPIMG5 (SO) SCC_PRFL_HLPIMG6 (SP) SCC_PRFL_HLPIMG5 (PP) SCC_PRFL_HLPIMG6 (PQ) SCC_PRFL_HLPIMG5 (MA) SCC_PRFL_HLPIMG4 SCC_PRFL_HLPIMG5 (MS) SCC_PRFL_HLPIMG5 (RP) SCC_PRFL_HLPIMG5 (XA to XI) |
|
To Do List |
SCC_TASKS_TODOS_FL |
SCC_TODO_LIST_FL |
SCC_PRFL_HLPIMG1 |
|
Holds |
SCC_TASK_HOLDS_FL |
SCC_HOLDS_LIST_FL |
SCC_PRFL_HLPIMG1 |
|
Completed Agreements |
SCC_TM_VW_AGREE_FL |
SCC_TM_VW_AGREE_FL |
SCC_PRFL_HLPIMG1 |
For more information, see Create Text Message Category Functions.