Adding or Updating Biographical Details Data
To create a personal information record, you must enter biographical data about that individual on the Biographical Details page. To update biographical data, you can return to the Biographical Details page or you can access pages described in the Managing Biographical Data section to edit or update specific information. When you save information on either the Biographical Details page or the specific information pages, the system writes it to the relevant maintenance tables and updates that information both places.
This section lists prerequisites and discusses how to:
Enter biographical details.
Enter regional specific data.
Before entering or updating basic biographical data, you must design and set up names, addresses, and other foundational elements of Campus Community. You must also set up basic elements for personal data management.
|
Page Name |
Definition Name |
Navigation |
Usage |
|---|---|---|---|
|
Biographical Details |
SCC_BIO_DEMO_PERS |
|
Enter or update an individual's name and other basic biographical data. |
|
Birth Information |
SA_BIRTH_DETAIL |
Click the Birth Information link on the Biographical Details page. |
Enter or review an individual's birth location data. |
|
Edit Address |
EO_ADDR_USA_SEC |
Click the Edit Address link on the Biographical Details page. |
Edit an individual's address data. If you have enabled address validation on the Address Format page, the system validates the address that you enter when you click OK. The system validates the address by comparing it to the county, state, and city as defined on the Valid Address page. If your address does not contain a valid county, state, and city for the selected country you will receive an error. |
|
Address Search |
EO_ADDRESS_SRCH |
Click the Address Search link on the Edit Address page. |
Search for cities within the selected country. This link appears when you change the country by clicking the Change Address link. Enable address search on the Address Format page. |
|
Visa/Permit Data |
VISA_PERMIT_DETAIL |
Click the Visa/Permit link on the Biographical Details page. |
Enter or review an individual's visa and permit data, including country type, date of issue, duration, issuing authority, and other visa and permit information. |
|
Citizenship |
SA_CITIZENSHIP_DTL |
Click the Citizenship link on the Biographical Details page. |
Enter or review an individual's citizenship and passport detail data, including country, citizenship status, passport number, issue date, expiration date, and other relevant information. |
|
Regional |
SCC_BIO_DEMO_REG |
|
Enter regional specific information for an individual. |
|
Personal |
SCC_BIO_DEMO |
|
Enter biographic details separately from the rest of the person’s data. This tab becomes available if a field is selected for inclusion on the Biographic Fields page. |
Access the Biographical Details page ().
This example illustrates the fields and controls on the Biographical Details page. You can find definitions for the fields and controls later on this page.
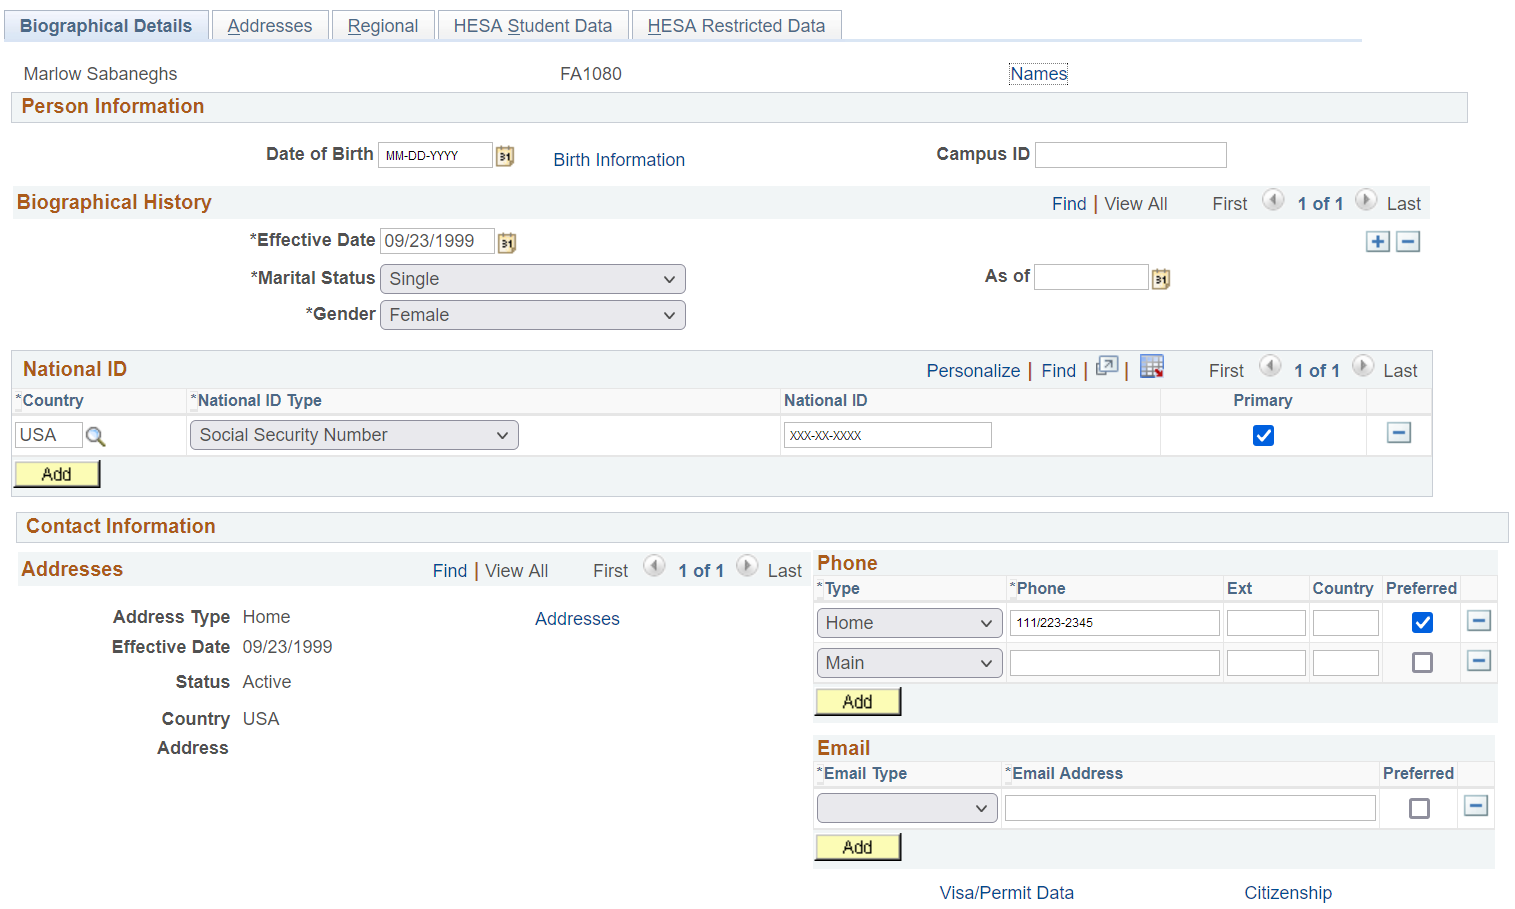
When you add a new person and are using system-generated IDs, the field at the top of the page displays the value NEW until you save the record. When you access the record after having saved it, the field displays the ID that the system assigned to this individual.
Person Information
Field or Control |
Description |
|---|---|
|
Format Using |
This field considers the default value defined in the user's primary permission list. If a default value isn't defined in Org Defaults by Permission Lst, this field is set to English. It also controls which name fields are available. |
Date of Birth |
Enter the individual's date of birth. |
Birth Information |
Click this link to access the Birth Information Detail page, on which you can enter or edit the individual's birth location, country, and state. |
Campus ID |
Enter the campus ID with which this person is most closely associated. |
Biographical History
Field or Control |
Description |
|---|---|
Effective Date (Required) |
Enter the date when the marital status and gender should be effective in your system. Note: If you are changing the individual's marital status, you must enter an effective date. Note: If you change the individual's name prefix, first, middle, or last name, suffix, or marital status, you must enter an effective date. |
Marital Status (Required) and As of |
Specify the individual's marital status (such as single, married, or divorced) and the date (if known) on which the associated marriage or divorce took place. Values for the Marital Status field are delivered with your system as translate values. Do not modify these values in any way. Any modifications to these values could require substantial programming effort. |
Gender (Required) |
Values for the Gender (Sex) field are delivered with your system as translate values. |
National ID
Field or Control |
Description |
|---|---|
Country |
Enter or confirm the country of this individual's national ID. If the individual has more than one national ID, you can add them here. |
National ID Type (national ID type) |
The system enters the value that you establish for this country on the National ID Type Table page. You can override this default value. |
National ID |
Enter the individual's national ID number. Enter the number (with or without spaces and dashes). When you exit the field, the system formats the number based on the country and NID type selected. |
Primary |
Select this check box to indicate the primary national ID number to use for this individual. You must indicate a primary national ID. |
(CAN) Verifying Social Insurance Numbers for Canadian Employees
Invoke a modulus 10-check digit formula to verify an individual's Social Insurance Number (SIN), if needed. The formula follows federal standards for using the ninth digit in an employee SIN to verify the number.
If you enter an SIN that doesn't match the check digit that is calculated by the formula, an error message appears.
Note: To use the check digit routine for Canada NID, you must modify the national ID format within the National ID Table to 999-999-998. This is the true default for the check digit routine for Canada and will enable the routine to pass and the page to be saved.
(NLD) Verifying Social Security IDs for Dutch Employees
The Dutch National ID is commonly called the SoFi (Social/Fiscal) number. You can invoke the 11-check digit formula to verify a Dutch employee's SoFi number. The 11-check formula is a mathematical formula that evaluates the entry for the employee's Social Security ID and verifies that the result of the calculation is 11, to determine whether the national insurance/social security ID has a valid format.
(USA) When the Social Security Number is Unknown
When the Social Security number is missing, the system enters the default number that is defined on the National ID Type table, which is usually all nines (9s).
Contact Information
Field or Control |
Description |
|---|---|
Address Type |
Select the type of address to enter, view, or update. The system displays Home as the default address type and displays the data, if any, for that address type. |
Edit Address |
Click this link to access the Edit Address page, on which you can enter or edit address data for the address type selected. When you click OK on the Edit Address page, the data that you entered appears on the Biographical Details page when you return to the page. |
Phone |
Select a phone type and enter the individual's phone number for that type. |
|
Select an email type and the individual's email address for that type. |
|
Visa/Permit Data |
Click this link to access the Visa/Permit Data page, on which you can enter or update the individual's visa and permit data. |
Citizenship |
Click this link to access the Citizenship page, on which you can enter or update the individual's citizenship and passport data. |
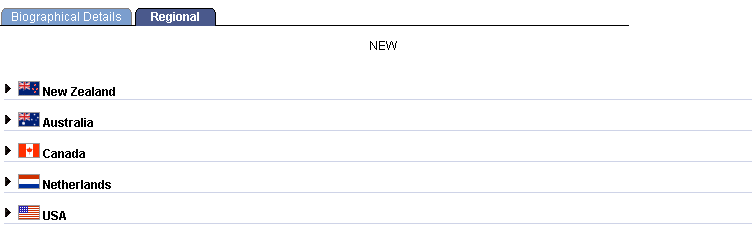
Access the Regional page ( and the area of the page that is specific to your region.
This example illustrates the fields and controls on the Regional page (with areas collapsed; 1 of 7). You can find definitions for the fields and controls later on this page.
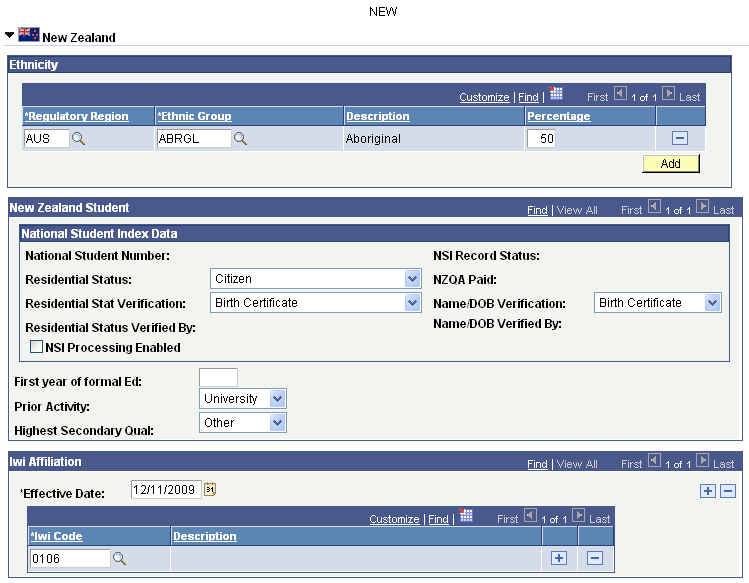
(NZL) New Zealand
The following information is specific to users with an installed country of New Zealand.
This example illustrates the fields and controls on the Regional page (2 of 7), New Zealand. You can find definitions for the fields and controls later on this page.
Field or Control |
Description |
|---|---|
Ethnic Group |
This field allows you to select multiple ethnic backgrounds. Click the Add button to add more than one ethnic group. |
National Student Number |
Displays the individual's unique number if received from the NSI database. |
Residential Status |
Enter the individual's residential status. Values include: Au citizen (Australian citizen) Citizen Overseas Perm Resid (permanent resident) Unknown These translate values should not be modified. |
Residential Stat Verification (residential status verification) |
Indicates the method used to verify the student's residential status. Values include: BDM – Used only by the Ministry of Education Other Primary ID Birth certificate Passport Unverified These translate values should not be modified. |
Residential Status Verified By |
The Post NSI Data process displays the provider code of the institution that verified the residential status data. |
NSI Record Status |
The Post NSI Data process displays and updates the status of the record in the NSI database. Values include: Inactive: The record is made inactive following the receipt of notification from a provider or Department of Internal Affairs (DIA) of a student's death or as an update from a provider that a record was created for a nonexistent student. Active: The record contains all of the required fields and both verifiable fields (name/date of birth pair and residential status) as Verified. Partial: The record is missing one or more of the required fields or one or both of the verified indicators set to Unverified. These translate values should not be modified. |
NZQA Paid |
The Post NSI Data process indicates whether the student's NZQA fee is paid. Values include: Yes No Unknown – not applicable or unknown Note: When set to Yes, the NSN is cloned to the external system ID table for the NZQA ID Upload process to load as a external system value of NZQA. When the NZQA exists, it indicates that NZQA fees are paid. |
Name/DOB Verification (name/date of birth verification) |
Enter the method used to verify the name and date of birth. Values include: BDM – Used only by the Ministry of Education Birth certificate Other Primary ID Passport Unverified These translate values should not be modified. |
Name/DOB Verification By (name/date of birth verification by) |
The Post NSI Data process displays and updates the provider code of the institution that verified the name and date of birth data. |
NSI Processing Enabled |
Select to automatically update NSI data when changes are made to NSI fields. When selected, the system updates the data if the individual has a National Student Number (NSN) in your database or if the individual does not have an NSN but has been selected by mass change (NSN App Engine process CCNSIRQN) to request an NSN from the National Student Index (NSI) and appears on the Outgoing Page of the NSI Suspense Table waiting to request an NSN from NSI. NSI fields include: First Name, Last Name, Middle Names, Gender, Date of Birth, and Residential Status fields, the verification fields for Name/DOB, and residential status fields The system automatically clears the check box when the Purge Mass Change Results process runs and the record has not yet been extracted by the Extract NSI Data process (the record is still in Ready for Extraction status). Note: If you manually select the check box and save the page, the check box becomes permanently unavailable. Manually select it only if you decide that an individual record that does not meet the criteria in your mass change definitions should be sent to NSI. |
See:
(AUS) Australia
The following information is specific to users with an installed country of Australia.
This example illustrates the fields and controls on the Regional page (3 of 7), Australia. You can find definitions for the fields and controls later on this page.
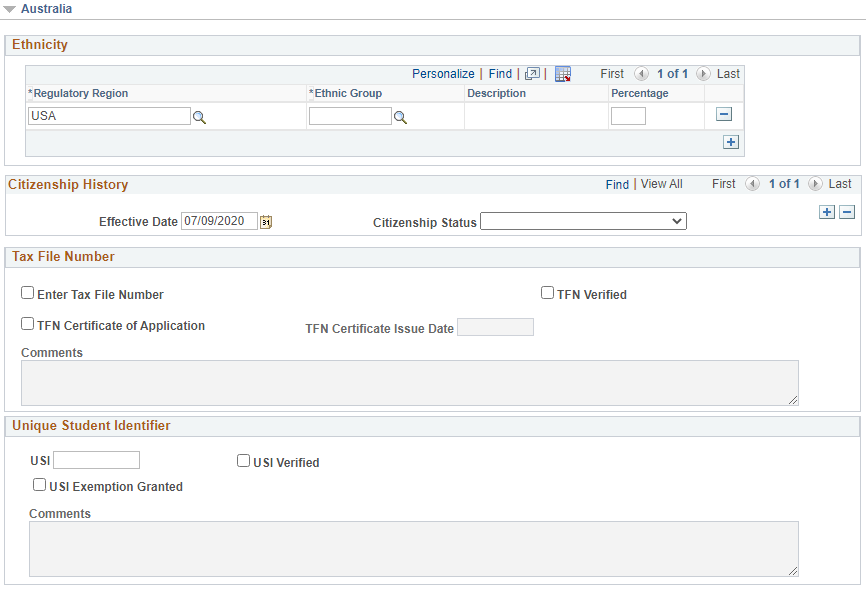
Note: The Australian Tax File Number (TFN) is a number that is issued to a person by the Commissioner of Taxation. It is used to verify client identity and establish income levels. The number is an eight or nine digit number without any embedded meaning, and is based on a check digit algorithm set by the Commissioner of Taxation. You cannot view a TFN once it has been entered and saved in your PeopleSoft database.
Field or Control |
Description |
|---|---|
Ethnic Group |
This field allows you to select multiple ethnic backgrounds. Click the Add button to add more than one ethnic group. |
Enter TFN (enter tax file number) or Re-enter TFN (re-enter tax file number) |
The Enter TFN check box appears only if no tax file number exists in the database for the individual. Select to display the Tax File Number field where you can enter the TFN. The Re-enter TFN check box appears only if a tax file number has been previously saved in the database for the individual. Select to re-enter and overwrite the individual's TFN. |
TFN Verified |
Select the check box to indicate whether the TFN has been verified by HEIMS and the ATO. If a TFN is updated or re-entered, this check box is reset to unverified. |
TFN Certificate of Application |
Select to indicate that students have applied for a tax file number (TFN), but have not received one. Instead, students are using a Certificate of Application until they receive a TFN. |
TFN Certificate Issue Date |
Select the date when the student received the TFN Certificate of Application. |
Comment |
Enter additional information related to the TFN Certificate of Application. |
USI (Unique Student Identifier) |
Enter the student’s unique ID. This value is verified to ensure that it meets the check digit algorithm and only has valid characters. |
USI Verified |
Only for information. Reserved for future functionality. |
USI Exemption Granted |
Select to indicate that a USI exemption has been granted to the student. When you select this check box, the Comments field is enabled. |
Comments |
This field is enabled when you select USI Exemption Granted. |
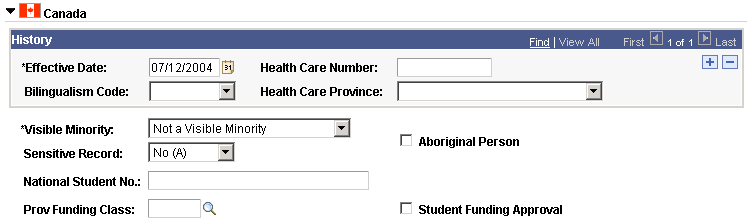
(CAN) Canada
The following information is specific to users with an installed country of Canada.
This example illustrates the fields and controls on the Regional page (4 of 7), Canada. You can find definitions for the fields and controls later on this page.
Field or Control |
Description |
|---|---|
Bilingualism Code |
Enter the appropriate code for the person. If the Official Languages Act applies to the organization, use the bilingualism code as part of the Official Languages reports (PER102CN and PER108CAN) that you submit to the government. |
Health Care Number and Health Care Province |
Enter a number and select the health care province. |
Visible Minority |
Select a code to indicate whether the person's ethnic background is apparent based on physical appearance. |
Aboriginal Person |
Select this check box to indicate that the person is a Canadian aboriginal person. |
Sensitive Record |
Indicate whether the individual's record is sensitive, and for which the system should exclude from Statistics Canada's mail or telephone surveys. |
National Student No. (national student number) |
Enter the Canadian national student number for the student. |
Prov Funding Class (provincial funding classification) |
Enter the funding classification by citizenship for grant purposes. This field prompts against the CAN_PROV_FUN record defined for the business unit. |
Student Funding Approval |
Select this check box to indicate that the student is approved for funding. |
(NLD) Netherlands
The following information is specific to users with an installed country of the Netherlands.
This example illustrates the fields and controls on the Regional page (5 of 7), Netherlands. You can find definitions for the fields and controls later on this page.
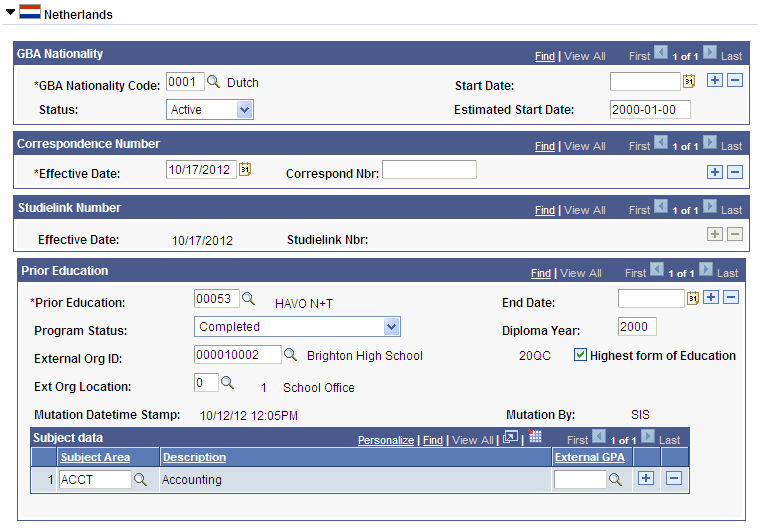
This example illustrates the fields and controls on the Regional page (6 of 7), Netherlands. You can find definitions for the fields and controls later on this page.
Dutch schools receive funding from the Dutch Government for each student who complies with a predefined set of rules. To qualify for these funding schemes, schools must adhere to strict rules about the way that students are allowed to enter the admissions and registration process and about what information is registered and in what way. The Dutch Government requests that specific information about a student's prior curriculum and test results, language skills, and personal data are stored in the student administration application that is used.
GBA (Gemeentelijke Basis Administratie), the register of all Dutch citizen data, requires the registration of a student's nationality as kept by the different city councils.
Field or Control |
Description |
|---|---|
GBA Nationality Code (Gemeentelijke Basis Administratie nationality code), Start Date, and Status |
Enter the GBA nationality code, start date, and status. If a person's nationality changes, add a new row. Enter the new GBA nationality code and start date, with a status of Active. The new nationality becomes active and the old nationality row is set to status of Inactive. This enables you to maintain GBA code history. |
Correspond Nbr (correspondence number) |
In specific cases a correspondence number of a student may change. Add a new row and enter the new number with a status of Active. To track the data exchanged, you must store both the old and the new numbers. |
Prior Education |
Enter data for all known prior education for the student. When all prior education is entered, the administrator can combine relevant schools (external organization IDs) and all subjects with relevant grade point averages. |
Program Status |
Enter the status of the prior education specified. Values are: Completed Completed Running |
External Org ID (external organization ID) |
Enter the ID of the education institution where the prior education took place. |
Ext Org Location (external organization location) |
Select a Sub BRINcode. |
End Date |
Enter the date on which the prior education was completed. |
Diploma Year |
Enter a Diploma Year in place of diploma end date if exact date is unknown. |
Highest form of Education |
Select this check box if this is the highest level of education attained by the student. |
External Subject Area and External GPA (external grade point average) |
Enter the specific course subject and corresponding grade. |
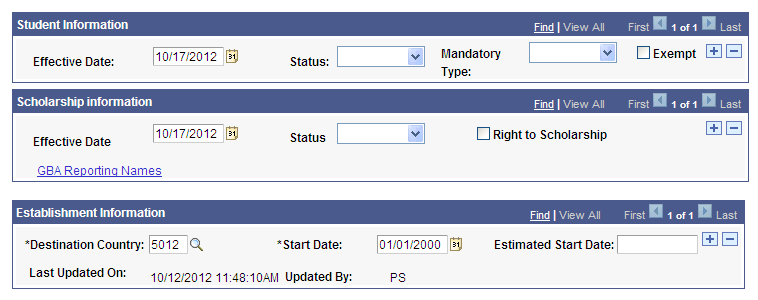
GBA Reporting Names (Gemeentelijke Basis Administratie reporting names) |
Click this link to access the Names page. |
Mandatory Type or Exempt |
Enter a value to indicate the degree to which the type of education that your institution provides is, by Dutch law, mandatory for the student. Mandatory Type field values are: Complete Exempt Fully Mandatory Not Mandatory Partial Exempt Partial Mandatory If no level of education is mandatory for the student, select the Exempt check box. |
Right to Scholarship |
Select this check box if the student is eligible for a government scholarship. |
Destination Country |
Enter a Country code if the student has taken up residency outside of the Netherlands. |
Note: Mandatory Type and Right to Scholarship values are used for the registration of Base Register Education, Basis Register Onderwijs (or BRON) related data.
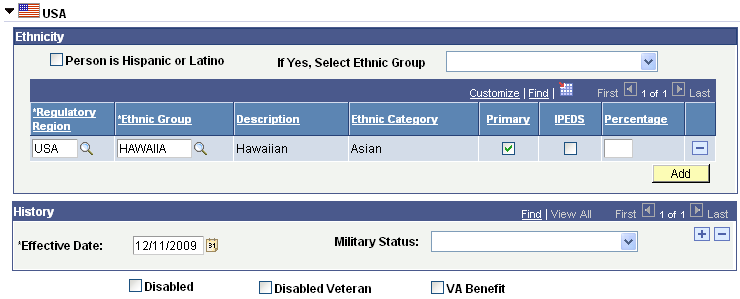
(USA) United States
The following information is specific to users with an installed country of USA (United States of America).
This example illustrates the fields and controls on the Regional page (7 of 7), USA. You can find definitions for the fields and controls later on this page.
Field or Control |
Description |
|---|---|
Person is Hispanic or Latino |
Select this check box to indicate whether the person is of Hispanic or Latino origin. For further information on guidelines for defining if person is Hispanic or Latino, see http://nces.ed.gov/statprog/2002/std1_5.asp. Note: You must select this check box if a row exists in the grid that indicates Hispanic origin. |
If yes, Select Ethnic Group |
If you selected the Person is Hispanic or Latino check box, then select an ethnic group code to further refine the person's ethnicity. When you select a value, row changes occur as follows:
|
Ethnic Group |
This field allows you to select multiple ethnic backgrounds. Click the Add button to add more than one ethnic group. |
Ethnic Category |
The system populates this field based on the value in the EEO Ethnic Group field for U.S. regulatory region ethnic groups or the Ethnic Category for ethnic groups tracked for other regulatory regions. For any ethnic group codes with a regulatory region of USA, this field should always map to one of these five races:
For more information on the guidelines for mapping ethnic group codes to the five races, visit the National Center for Education Statistics website. |
Primary |
Select this check box to indicate with which ethnic group the person most directly identifies. |
IPEDS |
Select this check box to indicate that the data has been submitted by a reliable source, such as application data or self service, in response to the IPEDS questions. |
Percentage |
Indicate the share of 100 of which this person derives his or her ethnicity. The system displays a warning if you enter an amount over 100. |
Military Status |
Select the value that describes this person's current military status. |
Disabled |
Select this check box to indicate that the individual is disabled and might be covered by the Americans with Disabilities Act (ADA). |
Disabled Veteran |
Select this check box to indicate that the individual is a veteran who was disabled in the line of duty and might be entitled to certain U.S. Veteran's benefits as well as being covered by the ADA. |
VA Benefit (Veterans Administration benefit) |
Select this check box to indicate that the individual currently receives veteran benefits from your institution. Navigate to Veterans Benefit Reporting to complete enrollment certifications and tuition calculations. |
Note: When you save the page, the system records the operator ID and the last updated date and time, although the fields do not appear here.
The Personal tab appears if at least one field is selected for inclusion on the Biographic Fields page in the Campus Community installation settings. The page is secured by permission list security (HCCPCSSA1000). If configured as Display Only in the installation settings, a field is read-only on the Personal page for all users irrespective of their permissions. For information, see Reviewing or Defining Campus Community Installation Settings.
Access the Personal page ().
Field or Control |
Description |
|---|---|
Birth Gender |
Select a birth gender from the list of values, if permitted. The field label is defined as message text on the Biographic Fields page. |
Gender Identity |
Select a gender identity from the list of values, if permitted. The field label is defined as message text on the Biographic Fields page. If you select Other, and the Other Identity field is included, the Other Identity field appears. |
Other Identity |
Enter a description with a maximum of 120 characters. The field label is defined as message text on the Biographic Fields page. This field appears if Gender Identity is included on the page and is set to Other, or if Other Identity is included but Gender Identity is not. However, if an Other Identity value is saved and Gender Identity is not included on the page, the Gender Identity value in the underlying record is set to Other (OT). |
Sexual Orientation |
Select a sexual orientation from the list of values, if permitted. The field label is defined as message text on the Biographic Fields page. If you select Other, and the Other Orientation field is included, the Other Orientation field appears. |
Other Orientation |
Enter a description with a maximum of 120 characters. The field label is defined as message text on the Biographic Fields page. This field appears if Sexual Orientation is included on the page and is set to Other or if Other Orientation is included but Sexual Orientation is not. However, if an Other Orientation value is saved and Sexual Orientation is not included on the page, the Sexual Orientation value in the underlying record is set to Other (OT). |
Preferred Pronouns |
Select preferred pronouns from the list of values, if permitted. The field label is defined as message text on the Biographic Fields page. If you select Other, and the Other Pronouns field is included, the Other Pronouns field appears. |
Other Pronouns |
Enter a description with a maximum of 120 characters. The field label is defined as message text on the Biographic Fields page. This field appears if Preferred Pronouns is included on the page and is set to Other or if Other Pronouns is included but Preferred Pronouns is not. However, if an Other Pronouns value is saved and Preferred Pronouns is not included on the page, the Preferred Pronouns value in the underlying record is set to Other (OT). |
Attribute Label 1 through 9 |
Select a value from the list of values, if defined. Field labels are defined on the Biographic Fields page. |
You can set up an Attributes sub-page on the Personal page using the Common Attribute Framework, by defining at least one attribute in the Record Context (SCC_PERS_BIOG).