Constructing Rules
This section discusses how to:
Use Rules Engine Search.
Use Rule Engine Groups Search.
Create Functional Rules.
Add Variables to a Rule.
Add Criteria to a Rule.
Define Rule Groups.
Define Rule Triggers.
You create all Rules, including Functions and Triggers, using the Rules Engine Manager. Functionality available to create Rules is determined by:
Skill Level (Expert or Developer)
Rule Usage (Rule, Function, or Trigger)
Rule Category
Rule Group
Depending on user security as set up in Rule Category Security, the Rules Engine Manager can be accessed using different Skill Levels. Skill Levels that can be selected are Expert or Developer, with Developer having ability to create Rules where the logic is defined in Application Class PeopleCode. Experts create Rule logic in the Rules Engine Manager Define Rule Page.
Note: Currently, the Rules Engine Manager can only be used by users with a Skill Level of Expert or Developer.
An Example Rule
To help describe the process of creating a new Rule, an example scenario of creating a new academic progression Rule is used throughout this documentation. This Rule evaluates data in the Academic Progress Tracker (APT). The example assumes that the Rule is run as part of a batch process at the end of a specific Academic Year; targeting all students in a specific Academic Program (Bachelor of Psychology) and student cohort. The purpose of the Rule is to find out whether students have obtained enough credits to progress to the from Year 1 to Year 2 of their academic program. The Rule is setup to run for a particular student.
|
Page Name |
Definition Name |
Navigation |
Usage |
|---|---|---|---|
|
Rule Search |
SCC_RULE_SRCH_SEC |
, select the Search for a Rule radio button and click Next. |
Search for existing Rules. You can also save Searches. |
|
Rule Group Search |
SCC_RULEGRSRCH_SEC |
, select the Search for a Rule radio button and click Next. |
Search for existing Rule Groups. You can also save Searches. |
|
Define Rule |
SCC_RULE_GOV |
, select the Search for a Rule radio button and click Next. Enter Search criteria, click the Search button, select a Rule from the results and click Next. , select the Add a New Rule radio button and click Next. , select the Create a Rule from a Rule radio button and click Next. , select the Create a Rule from a Rule radio button and click Next. Enter Search criteria, click the Search button, select a Rule Group from the results, and click Next. |
Define Rules. |
|
Add a New Variable |
SCC_RULE_VARD_SEC |
Click the Add a New Variable button on the Define Rule page. |
Add Variables to a Rule. |
|
Rule Groups Categories |
SCC_RULEGR_CAT |
, select the Search for a Rule Group radio button and click Next. Enter Search criteria, click the Search button, select a Rule Group from the results, and click the Categories tab. , select the Add a New Rule Group radio button, click Next and click the Categories tab. , select the Create a Rule Group from Group radio button and click Next. Enter Search criteria, click the Search button, select a Rule Group from results, and click the Categories tab. |
Define valid Rule Categories for a Rule Group. |
|
Define Rule Groups Definition |
SCC_RULEGR_MGR |
, select the Search for a Rule Group radio button and click Next. Enter Search criteria, click Search button, select a Rule Group from results. , select the Add a New Rule Group radio button and click Next. , select the Create a Rule Group from Rule radio button and click Next. Enter Search criteria, click the Search button, and select a Rule from the results. , select the Create a Rule Group from Group radio button and click Next. Enter Search criteria, click the Search button, and select a Rule Group from the results. |
Define Rule Groups. |
|
Rule Groups Cross Reference |
SCC_RULEGR_MGR |
, select the Search for a Rule Group radio button and click Next. Enter Search criteria, click the Search button, select a Rule Group from results, click the Cross Reference tab. , select the Add a New Rule Group radio button, click Next, and click the Cross Reference tab. , select the Create a Rule Group from Rule radio button and click Next. Enter Search criteria, click Search button, select a Rule from results, and click the Cross Reference tab. , select the Create a Rule Group from Group radio button and click Next. Enter Search criteria, click Search button, select a Rule Group from results, click the Cross Reference tab. |
View Rules associated with the Rule Group. |
|
Define Rule Triggers |
SCC_RULE_TRIG |
|
Define Rule Triggers to determine from where in the system a Rule can be called. |
Rules Engine Search is the starting point for the following activities:
Searching for Rules.
Adding new Rules.
Creating a new Rule from an existing Rule.
Creating a new Rule for a Rule Group.
Access the Rules Engine Search page ().
This example illustrates the fields and controls on the Rules Engine Manager Search page. You can find definitions for the fields and controls later on this page.
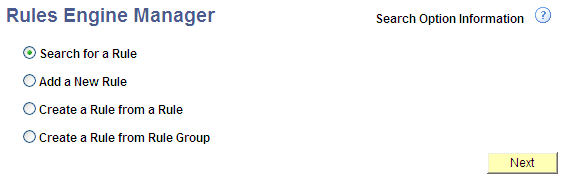
Searching for a Rule
In the Rule Engine Manager search page, select Search for a Rule and click on the Next button to open Rules Search options page.
This example illustrates the fields and controls on the Rule Search Options page. You can find definitions for the fields and controls later on this page.
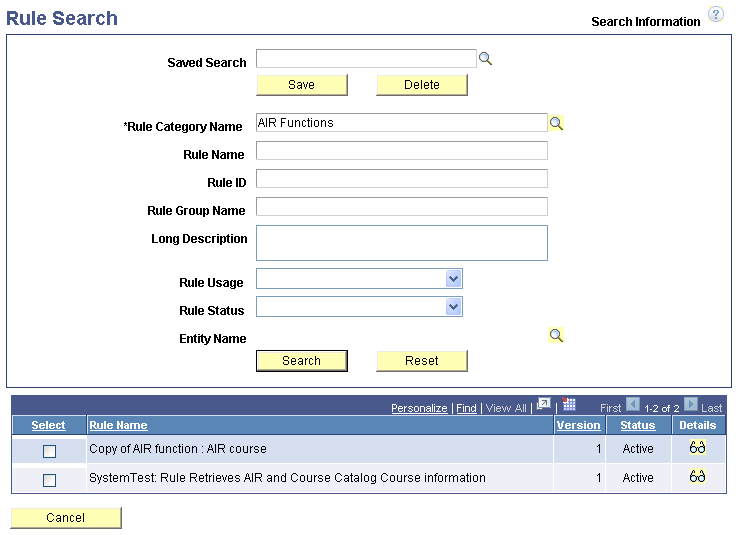
Rule Category Name is a required field. If a unique Rule ID is known and the user has access to the Rule Category, the Rule Category is automatically selected and not required.
The following fields can be used with wildcard search option “%” and are case-sensitive:
Rule Name
Rule Group Name
Long Description
Click the Search button and any results are displayed in a grid below the Search fields. If there are no results, a message appears.
Click the Reset button to clear the Search fields.
Click the Cancel button to return to the Rules Engine Manager search page.
To save the Search, enter a name in the Saved Search field and click the Save button.
To delete a Saved Search, enter the name in the Saved Search field and click the Delete button.
In the Search results grid, select the Select check box or click on the Details icon to select a Rule. Clicking the Details icon also displays a panel below the Search results grid displaying the Long Description, Rule Category, Rule Group Name, Rule Usage, and Entity Name of the Rule.
Click the Next button to open the selected Rule in the Rules Engine Manager and edit your Rule.
Click the Previous button to return to the Rules Engine Manager search page.
Adding a New Rule
In the Rules Engine Manager search page, select Add a new Rule and click on the Next button to open the Rules Engine Manager page where you can define the parameters of your new Rule.
For more information, see Constructing Rules.
Creating a New Rule from an Existing Rule
In the Rules Engine Manager search page, select Create a Rule from a Rule and click on the Next button to open the Rule Search page.
When you have found the Rule you want to clone, click Next to open the Create New Rule from Rule page and provide a New Rule Name and/or Long Description.
This illustrates the Create New Rule From Rule page.
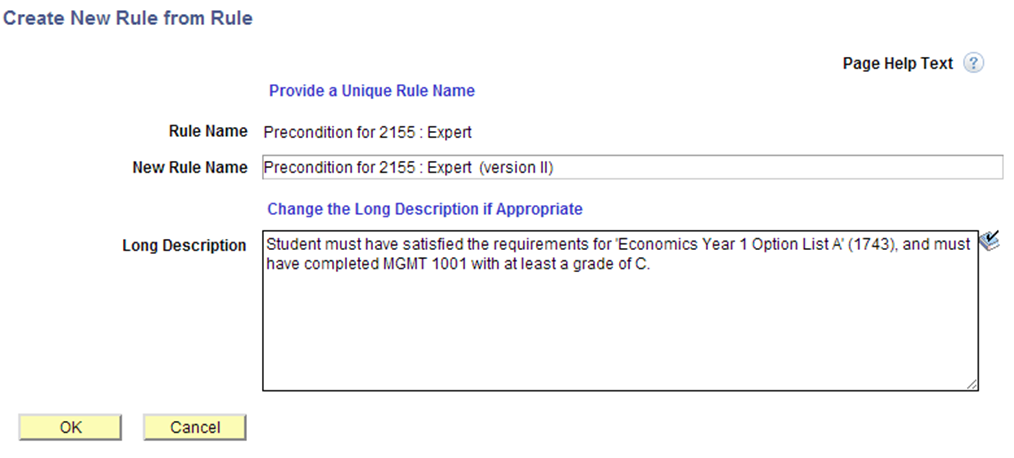
A new Rule is created with Rule Status In Progress , and it inherits all the Variables, Criteria, and evaluative statements from the Rule you selected to clone
Field or Control |
Description |
|---|---|
New Rule Name |
Enter a name for the new Rule. The New Rule Name must be different from the original Rule Name. |
Long Description |
The Long Description of the original Rule populates this field and can be edited for the new Rule. |
Creating a New Rule from a Rule Group
In the Rules Engine Manager search page, select Create a Rule from a Rule Group and click on the Next button to open the Rule Group Search page, which is similar to the Rule Search page.
When you have found the Rule Group to which you want to add a Rule, click Next to open the Create a New Rule from Rule Group page and provide a New Rule Name and/or Long Description. A new Rule is created with Rule Status In Progress, and it has inherited the Input and Output Variables, Entity Profile, Rule Category Name, Rule Usage, Entity name, and Skill Level of the Rule Group to which it has been added. This means that the Rule Category Name, Rule Group Name, Rule Usage, Entity Name, and Skill Level are predetermined and cannot be altered for this new Rule.
Additional Rule Search Options
Access the Rule Definition page (, select Search for a Rule, search for and select a Rule, Define Rule).
This example illustrates the fields and controls on the Rule Search Results and Select Action Options Example. You can find definitions for the fields and controls later on this page.
Field or Control |
Description |
|---|---|
Search Result |
Click this button to return to the Rule Search Options Page. Search results are displayed from last executed search, and the last selected Rule is highlighted. The Search Results button is only available when the search actions Search for a Rule or Create Rule from Rule are used. |
Select Actions |
Click this button to return to the Rules Engine Manager to select a new search action: Search for a Rule, Add a new Rule, Create Rule from Rule, or Create a Rule from Rule Group. |
Rule Groups Search is similar to Rules Engine Search and is the starting point for the following activities:
Searching for a Rule Group.
Adding a new Rule Group.
Creating a new Rule Group from an existing Rule.
Creating a new Rule Group from an existing Rule Group.
Access the Define Rule Groups Search page ().
Searching for a Rule Group
In the Rule Group search page, select Search for a Rule Group and click on the Next button to open Rule Group Search options page.
This example illustrates the fields and controls on the Rule Group Search Options page. You can find definitions for the fields and controls later on this page.
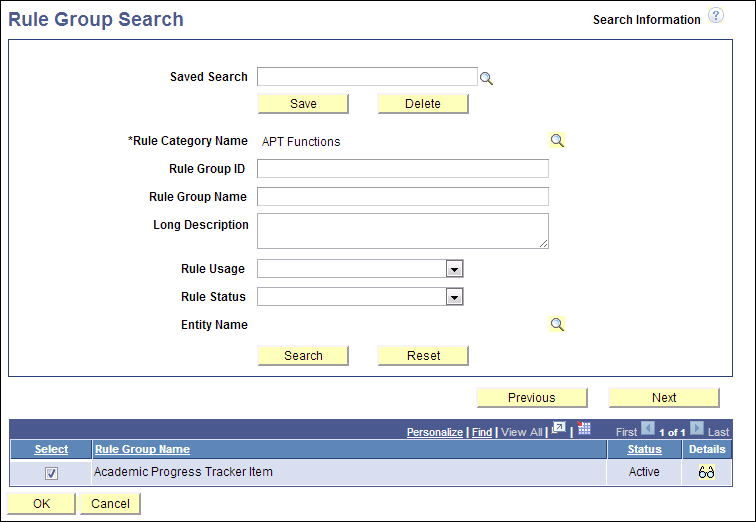
Rule Category Name is a required field. If a unique Rule Group ID is known and the user has access to the Rule Category, the Rule Category is automatically selected and not required.
The following fields can be used with wildcard search option “%” and are case-sensitive:
Rule Category Name
Rule Name
Rule Group Name
Long Description
Click the Search button and any results are displayed in a grid below the Search fields. If there are no results, a message appears.
Click the Reset button to clear the Search fields.
Click the Cancel button to return to the Define Rule Groups search page.
To save the Search, enter a name in the Saved Search field and click the Save button.
To delete a Saved Search, enter the name in the Saved Search field and click the Delete button.
In the Search results grid, select the Select check box or click on the Details icon to select a Rule. Clicking the Details icon also displays a panel below the Search results grid displaying the Long Description, Rule Category Name, Entity Name, Rule Usage, and all Input and Output variables as they are key features of the Rule Group Template.
Click the Next button to open the selected Rule Group in the Rule Groups Manager and edit your Rule Group.
Click the Previous button to return to the Define Rule Groups search page.
Adding a New Rule Group
In the Define Rule Groups page, select Add a New Rule Group and click on the Next button to open the Rules Groups Definition page where you can define the parameters of your new Rule Group.
For more information, see Defining Rule Groups.
Creating a New Rule Group from an Existing Rule
In the Define Rule Groups search page, select Create a Rule Group from Rule and click on the Next button to open the Rule Search options page.
When you have found the Rule you want to base your new Rule Group on, click Next to open the Rule Groups Manager component. A new Rule Group is created with Rule Group Status In Progress, and it has inherited all the Variables, Entity Name, Skill Level and Rule Usage from the Rule you selected.
Note: The Rule Name is also copied. As a first step, you should rename the Rule Group Name to avoid confusion.
Creating a New Rule Group from an Existing Rule Group
In the Define Rule Groups search page, select Create a Rule Group from Group and click on the Next button to open the Rule Group Search page, which is similar to the Rule Search page.
When you have found the Rule Group that you want to clone for a new Rule Group, click Next to open the Rule Group Manager component. A new Rule Group is created with Rule Group Status In Progress, and it has inherited the Input and Output Variables, Entity Profile, Rule Category Name, Rule Usage, Entity Name, and Skill Level of the Rule Group chosen to clone.
Note: The Rule Group Name is also copied from the selected Rule Group. As a first step you should rename this Rule as to avoid confusion.
For more information on how to create and edit Rules, see Defining Rule Groups.
Additional Rule Group Search Options
Access the Rule Definition page (, select Search for a Rule Group, search for and select a Rule Group, Definition).
This example illustrates the fields and controls on the Rule Group Search Results and Select Action Options Example. You can find definitions for the fields and controls later on this page.
Field or Control |
Description |
|---|---|
Search Result |
Click this button to return to the Rule Groups Search Options page. Search results are displayed from last executed search, and the last selected Rule Group is highlighted. The Search Results button is only available when the search actions Search for a Rule Group or Create Rule Group from Group are used. |
Select Actions |
Click this button to return to the Define Rule Groups search page to select a new search action: Search for a Rule Group, Add a New Rule Group, Create a Rule Group from Rule, or Create a Rule Group from Group. |
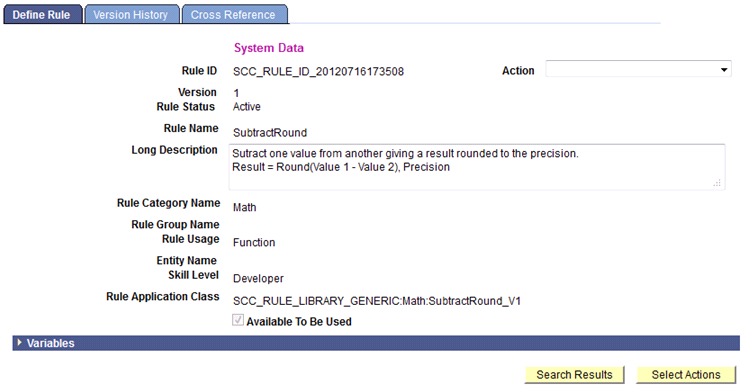
The section describes how to create functional Rules.
Access the Rules Engine Manager Define Rule page (, select Add a New Rule, Define Rule).
This example illustrates the fields and controls on the Define Rule page. You can find definitions for the fields and controls later on this page.
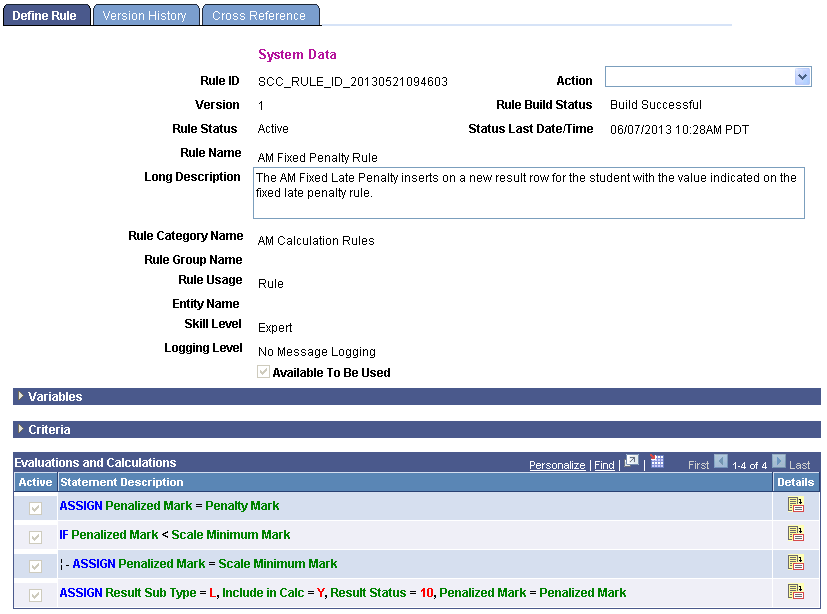
Note: For Rules delivered with the system and that have System Data displayed in the Rules Engine user interfaces, only the Long Description can be modified.
Field or Control |
Description |
|---|---|
Rule ID |
Displays a unique ID generated by the system. When adding a new value the default value is NOID. The unique ID is generated when the Rule is saved. The Rule ID is created by combining prefix SCC_RULE_ID_ with the system date and time stamp in format YYYYMMDDHHMMSS. |
Action |
Note: The list of available Actions is dynamic depending upon the Rule Status. Note: For System-delivered Rules, only the Build Rule, Create New Group from Rule, Create New Rule from Rule, and Update Status Information (if Rule Status is Not Built) Actions are available. Select an Action for this Rule Group:
|
Version |
Displays the Version number of the Rule. Rules are automatically versioned. The first version of a Rule is 1. Only one version of a Rule can be active at any given time. The Action drop down can be used to inactivate an Active Rule and to create a new Rule Version. When creating a new Version, the previous Version automatically becomes Inactive. |
Rule Status |
Displays the Rule Status
|
Rule Build Status |
Displays the Rule Build Status. Values are:
|
Status Last Date/Time |
Displays the Last Date/Time of the Rule Build Status in native format including an indication of time zone. This field does not display until after an attempt to build this Rule. |
Rule Name |
Enter a Rule Name. The Rule Name is used when searching for a Rule and for display. |
Long Description |
Enter descriptive text explaining the function of the Rule. |
Rule Category Name |
Enter the Rule Category Name. The Rule Category restricts access to Rule Usages, Rule Categories, and Entities. Available Rule Categories are limited to those for which you have been authorized. This is determined by a Role or our User ID. If you have access to multiple Rule Categories, you should choose the Rule Category that is most appropriate considering the data that the Rule needs to access and any Functions that the Rule may need to call. Functional Expert users who create Rules may not necessarily be familiar with how to create Rule Categories so should be provided with instructions by Rules Engine Administrators about the Rule Categories for which they have been authorized. For example, depending on your institution's policy, Functional Experts may only be authorized to use a single Rule Category. |
Rule Group Name |
Enter a Rule Group Name if this Rule needs to conform to a specific template with predefined input and output Variables and a predetermined Base Entity. Note: Oracle recommends adding a Rule Group Name directly after you have created your Rule or Function and before adding Entity Profiles, Rule Usages, or Variables as they may conflict with those that are defined in the Rule Group. If you select a Rule Group that has Variables, a Rule Usage, or Base Entity that conflicts with the Rules you are creating, a warning message appears and the Rule Group is not added. |
Rule Usage |
Select a Rule Usage of Function, Rule, or Trigger. The available Rule Usages are limited to those for which the user has been authorized through Rule Category setup. The selected Rule Usage impacts availability of Rules Engine Manager functionality as follows:
Selection of Rule Usage needs to consider how this Rule is used and what tasks it needs to perform.
|
Entity Name |
Enter the Entity to use as the Base Entity for the Rule. The Base Entity controls which application data you have access to when creating a Rule, Function, or Trigger. The Entities available are limited to those for which user has been authorized by attaching Entity Profiles to Rule Categories in the Rule Category setup. Identifying which data to use by designating the Base Entity can be considered the “starting point” of the creation of a functional Rule. Further, using the designated Base Entity with the Rule Criteria makes it possible to identify the exact record to use in the Rule. For a Function that uses a Base Entity, the exact data needed is passed from caller to called Function using Contextual Reference. In this example, a Rule is being created that look at Student Progression; therefore, the Rule needs to access Student Results Data as stored in the Academic Progress Tracker (APT) records. The APT data is represented in the Entity APT Header. By selecting the APT Header as the Base Entity, you can access all of the data associated with the APT Header Entity Tree. This means that you have access to all logical child Entities in that Tree structure like APT Program of Study, APT Course List, and APT Course as well as other data associated with those Entities. As with Rule Categories, Functional Expert users should be provided with instructions on selecting Base Entities. Also consider that since the available Base Entity is determined by the selected Rule Category, it could be that only one Base Entity is presented for selection. For more information, refer to Defining Rule Category Security and Understanding Contextual Referencing. |
View Entity Hierarchy |
Click this link to display the Entity Hierarchy view for the Base Entity attached to the Rule. |
Skill Level |
Select the Skill Level required for creating this Rule:
In this example, a functional Rule is being created and there is no “coding” occurring. Therefore, a Skill Level of Expert is being used to demonstrate the Statement, Operator, Function, and Variable features. |
Rule Application Class |
Note: This field is available and required when Skill Level is Developer. Enter or select a Rule Application Class. A Rule Application Class can be selected from a list of Extension Application Classes. Warning! Developer Rules should be built by Developers/Programmers who have extensive experience with Application Package/Class PeopleCode programming. Developers working with the Rules Engine should be familiar with Entity Registry concepts. |
Entity Data Load Option |
Note: This field is available and required when the Rule Usage is Rule and an Entity Name has been entered. Select the Data Load Option when creating a Rule.
|
Logging Level |
Select the Logging Level to use when testing this Rule:
Note: Oracle recommends using the Trace Logging option to see correct trace results when testing Rules. |
Available To Be Used |
Select this check box if you want to allow this Rule or Function to be available for use by other Rules or feature functionality. If you do select this check box, it is recommended that you do so after adding Variables and Criteria to the Rule and finalizing the functionality for your Rule. |
Note: Save the Rule after completing the first portion of the Definition tab (everything above the Available in Other Rules check box) and before adding Variables and Criteria. At this point the Rule Status is In Progress, and the Rule can still be changed and retested.
Note: You cannot version Rules with a Rule Usage of Rule or Function that are delivered with the System and that have System Data displayed in the Rules Engine user interfaces. These Rules must be copied (cloned) and a new Rule or Function created.
You can version Rules with a Rule Usage of Trigger that are delivered with the System and have System Data displayed in the Rules Engine user interfaces.
Once Rule options are defined, you can add the Variables you want to use in the Rule. The Variables grid on the Rules Engine Manager Definitions tabs is display-only. The grid shows whether variables are in use and whether they are used as input, output or required. Variables can be created before starting to incorporate evaluations or calculations or added on the fly.
Since the object of this example Rule is to determine whether students may or may not progress from Year 1 to Year 2 within an Academic Program, you already know that you want to return the Progression Status as output. You also know that you want to ensure that the process that calls this Rule can pass the correct parameters to retrieve a specific student. That is our input.
To add a Variable, access the Add a New Variable page (click the Add a Variable button on the Rule Definition page).
This example illustrates the fields and controls on the Add a New Variable page. You can find definitions for the fields and controls later on this page.
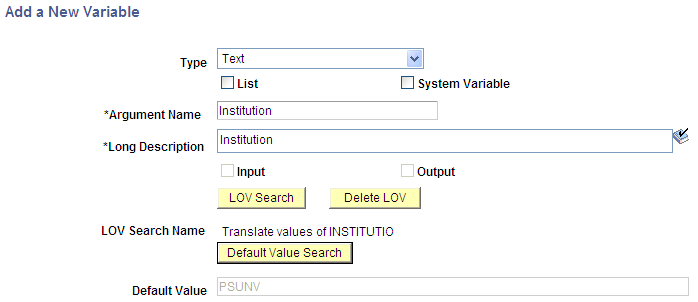
Field or Control |
Description |
|---|---|
Type |
Select the Variable Type that you want to add:
Type is displayed in the Variables grid and can be selected when viewing or adding Variables. |
List |
Select this check box if the variable is a List variable which can contain multiple values. Use this option in combination with Type to obtain a list of specific values. List is displayed in the Variables grid and can be selected when viewing or adding Variables. Selecting this check box activates the Default Values button and the Default List Values field. |
System Variable |
Select this check box if the variable is a System Variable predefined in setup outside of this Rule. System Variable is displayed as System in the Variables grid and can be selected when viewing or adding Variables. Selecting this check box activates the System Variable Search button and the System Variable Name field. |
Argument Name |
Enter an Argument Name for Variable. The Argument Name is used when searching for a Variable and for display. |
Long Description |
Enter descriptive text explaining the function of the Variable. |
Input |
Select this check box if the variable is an Input Variable. Input is displayed in the Variables grid and can be selected when viewing or adding Variables. |
Required |
Select this check box if the variable is required. Required is displayed in the Variables grid and can be selected when viewing or adding Variables. |
Output |
Select this check box if the variable is an Output Variable. Output is displayed in the Variables grid and can be selected when viewing or adding Variables. |
Default Value |
Click this button to open the Create Default List Values page. Add List Values in the Value column and click the OK button. Note: This button is available when the List option is selected. To remove a List Value, select the corresponding Remove check box for a Value and click the Remove Selected Values button. Note: If the List option is not selected, Default Value is an edit field. A Default Value can be entered here for this Variable. |
Default List Values |
Displays values for this Variable created using the Create Default List Values page. |
System Variable Search |
Click this button to open the Prompt for Rules Engine System Variables page. This button only appears when System Variable is selected above. |
System Variable Name |
Displays the selected System Variable Name. This field only appears when System Variable is selected above. |
LOV Search |
Click this button to open the Prompt for LOV Searches page. Search on a Field Name of Description, Dropdown Prompt Filed, Edit Table, LOV Context, or LOV Unique ID. Results display a Descr (description) link. Click the link to select an LOV. This returns you to the Add a New Variable page with the LOV Search Name displayed. Note: LOV Search results display a list of all available LOV values. The list is not limited to those LOV values which have been created specifically for the Rules Engine. |
Delete LOV |
Click this button to remove an LOV. This button becomes visible when a LOV has been attached to the variable |
LOV Search Name |
Displays selected LOV. |
Default Value Search |
Click this button to open the Prompt for (selected LOV) page. Search on a Field Name of Description or Value. Results display a Values link. Click the link to select a Default Value. This returns you to the Add a Variable page with the Default Value displayed. |
Default Value |
Displays Default Value. |
Clear Default Value |
Removes default value from Variable. |
Adding a Data Set Variable to a Rule
When a Data Set variable Type is selected, there are different options to select.
This example illustrates the fields and controls on the Add a New Variable – Data Set Option. You can find definitions for the fields and controls later on this page.

Field or Control |
Description |
|---|---|
Data Set Search |
Click this button to open the Prompt for Entity page. Search on a Field Name of Data Set ID, Entity Name, or Entity Profile Name. Results display a Entity Profile link. Click the link to select an Entity. This returns you to the Add a New Variable page with the Data Set Name and the Data Set Properties grid displayed. The Data Set Properties grid displays the Property Type and Label of each Variable in the Data Set |
Data Set Name |
Displays the Data Set Name. |
Clear Data Set Value |
Click this button to remove the Data Set from the Variable. |
Edit Data Set |
Click this button to open a secondary page to add default values to the Data Set. |
Once Rule options are defined and Variables are added for a Rule Usage of Rule, you can add Criteria to identify data from the chosen Base Entity. In the example being followed in this documentation, you want to add all criteria needed to identify and select the correct APT instance record for a particular student.
Note: If you are creating a Rule with a Rule Usage of Function, there is no option to add Criteria. For more information, see Understanding Contextual Referencing.
To add Criteria, expand the Criteria group box by clicking the arrow to the left of Criteria in the group box header.
This example illustrates the fields and controls on the Criteria Grid – Initial Row. You can find definitions for the fields and controls later on this page.

Then, click the Search icon to the right of the Label field to open the Prompt for page where you can select an Entity Property.
This example illustrates the fields and controls on the Prompt for page. You can find definitions for the fields and controls later on this page.
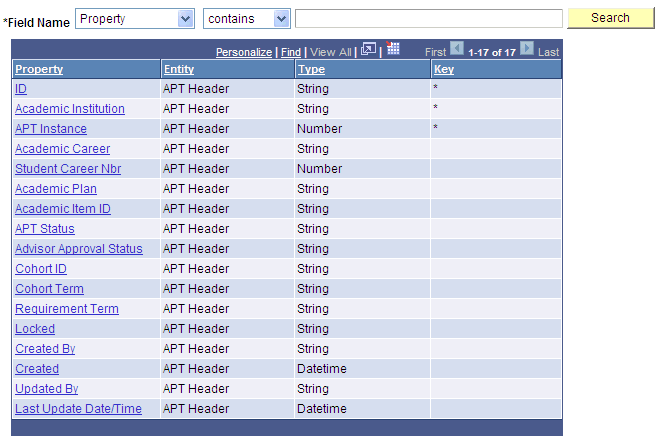
Click the Academic Institution link to select it as a Property. The Prompt for page closes, and you return to the Criteria grid with the Label column in the first row populated with Academic Institution. The Operator you want to use is = and the Variable Type you want to use is Variable, both of are already populated by default in this case. Since Type Variable is selected, the Search icon appears to the right of the Object field.
This example illustrates the fields and controls on the Example of Criteria Grid – Label Populated. You can find definitions for the fields and controls later on this page.

Click the Search icon to the right of the Object field to open the Add/Select Variable page.
This example illustrates the fields and controls on the Add/Select a Variable page. You can find definitions for the fields and controls later on this page.
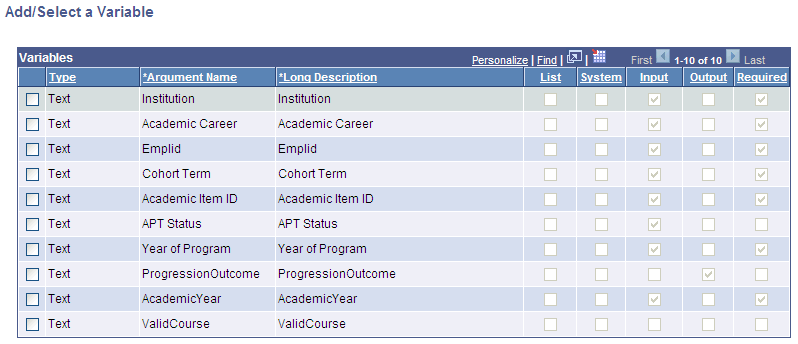
Select the check box next to the Variable you want to add, and click the Add button.
Once you've selected all the Criteria you want to add, the Criteria grid looks something like this:
This example illustrates the fields and controls on the Example of Criteria Grid. You can find definitions for the fields and controls later on this page.

In this example, there is an assumption that a batch process is responsible for supplying the correct Variables to our Rule. This is why the Variables selected for the Criteria grid are Input Variables.
Here is more information about fields in the Criteria grid:
Field or Control |
Description |
|---|---|
Label |
Displays the name of the Property. Clicking the Search icon to the right of the Label field opens the Prompt for page where you can select from a list of properties from the Base Entity that is added in field Entity Name on the Rule Definition page. |
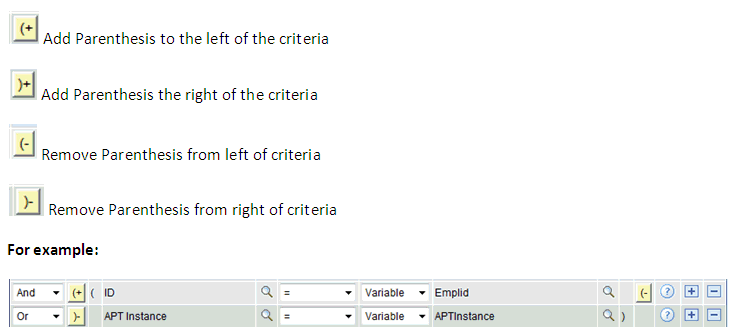
Connectors and Parentheses |
In the left-most columns of the Criteria grid are the AND/OR connectors and parenthesis. Select these to create complex (nested) Select Criteria. |
This example illustrates the fields and controls on the Example of Connectors and Parentheses. You can find definitions for the fields and controls later on this page.
Field or Control |
Description |
|---|---|
Operator |
Select an Operator to relate the Property Label to the Type/Variable. The Operator is a symbol or function used to express a mathematical function or logical action. The following Operators can be used when adding a Criteria line:
|
Type |
Select the Type of Object Property to be compared to the Label Property. The chosen Operator controls what Types are available. For the Operators Exists and Not Exists, no Type can be chosen. For the Operators In and Not In, only Variables of Type List can be chosen. Here are the available types:
|
Object |
The Object field behaves differently depending on which Type or Operator is chosen. The Object field is an open edit field except in the following cases:
|
Help |
Hover your cursor over the Help icon (question mark) to open a popup window for information on how to use the selected Type and/or Operator. |
Here are possible options for Types and Objects in the Criteria grid:
|
Label |
Operator |
Type |
Object |
|---|---|---|---|
|
Numeric Property |
= <> > >= < <= |
Variable or Number |
Open field or Prompts on Number Variables. |
|
String Property |
= <> > >= < <= |
Variable or Text |
Open field or Prompts on Text Variables. |
|
Date(time) Property |
= <> > >= < <= |
Variable or Date(time) |
Open field or Prompts on Date(time) Variables. |
|
Date Property and field name is Effective Date |
Asofdate |
Variable |
Variable Special handling exists for selection of Effective Date. For Entities with an Effective Date, you can choose to have the system automatically select the maximum Effective Date. |
|
Number Property and field name is Effective Sequence |
FirstSeq LastSeq |
No value available |
Special handling exists for selection of Effective sequence. For entities with an effective sequence the user can choose to have the system automatically select the maximum or minimum effective sequence.
Can be used in combination with the Asofdate option. |
|
List Property |
In Not In |
Variable |
List Variable which matches property Type |
|
Text Property |
Like Not like |
Variable Text |
Open field or Text Variable |
|
Property of any type |
Exists Not exists |
No value available |
<no value> If the Property is a Date or Date(time), any value not equal to Null exists. If the Property is a Number, any number unequal to 0 (zero) exists. If the Property is a String, any value unequal to space (blank) exists. |
This section covers defining Rule Groups.
Understanding Rule Groups
Rules that share the functional purpose and have similar functionality, input and output can be grouped together in a Rule Group. For Rules to share the same Rule group, they must:
Be based on data in the same Entity Tree and use the same Entity Registry item as the basis for that Rule. This Entity is known as the Base Entity.
Share the same required input parameters.
Share a subset of non-required input parameters.
Share the same output parameters and can pass back required output.
Belong to the same Rule Category, giving them the same security Rules.
One advantage of combining Rules in Rule Groups is that it allows you to call all Rules associated with a Rule Group dynamically. You would not have to know before the fact which Rules you are calling. Rule Groups that have been created can be called from other Rules, Triggers or Functions in the Rules Engine Manager using the “CALL DYNAMIC RULE GROUP” Statement. In short, by allowing Rules to call Rules from Rule Groups dynamically without specifying Rules or Functions directly, it is possible to dynamically call one or more Rules with similar functionality.
For example, an institution has created an Academic Item Registry program with courses from which the student can choose. For all those courses that require a prerequisite, a functional Rule is created that takes the course selected as input and checks whether the student meets the prerequisite requirement. When students select courses to add to their Academic Progress Tracker (APT), the prerequisite is checked, and, based on the outcome, a message is displayed to the student indicating whether or not he or she may add the course to their APT.
Example Rules for this scenario could be:
Students must have completed Introduction to Calculus or Elementary Algebra before attempting Advanced Calculus
Students must have completed Introduction to Psychology and have completed 10 credits from the “Human Studies” Course List before attempting Advanced Psychology.
Another advantage to creating Rules in the same Rule Group is the ability to control that the input and output for all Rules in the Rule Group is the same.
Each of these Rules needs to take the selected Course as input as well as information from the program of study and the student. All Rules above would return a similar outcome of true or false as well as a message that can be displayed. The Rules can be grouped together in the same Rule Group.
Note: Rule Groups should be created by Rules Engine Experts or Developers. The settings used in Rule Groups are enforced for any Rule added to the Rule Group. Once a Rule has been added to a Rule Group, the Rule's input and output parameters cannot be altered; however, it is still be possible to add to and alter Statements in the Evaluations and Calculations grid. Also, Rule Groups with Active Rules attached cannot be changed.
You may find it challenging to define a new Rule Group with input and output variables and specifications for the Base Entity if you have not built the actual Rule that will be using the Rule Group . When building Rules, some experimentation is in order, and it is not always clear before the fact what exactly the input and the output of a Rule needs to be. Rule logic is optimized during the build process, and input or output Variables may need to be added based on new specifications or insights. Therefore, it may not be possible to define a template for input and output before any Rule has been built.
Rule Groups can also be created from Active Rules using the Rules Engine Manager Action Create Rule Group. Rule Groups can also be created using one of the available Rules Engine Search options.
Defining New Rule Groups
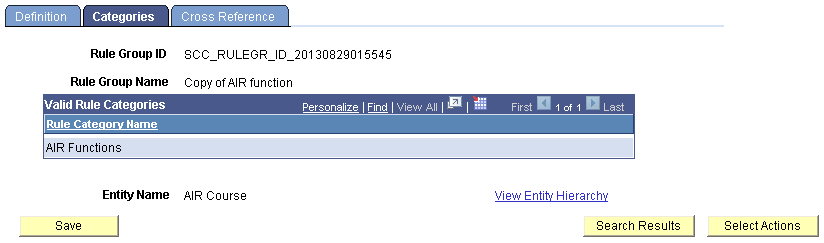
Access the Rule Groups Manager Categories page (, select Add a New Rule Group, select the Categories tab).
This example illustrates the fields and controls on the Define Rule Groups Categories page. You can find definitions for the fields and controls later on this page.
Note: For Rule Categories delivered with the system, only the Long Description on the Definition page and Rule Groups and Security pages can be modified
Field or Control |
Description |
|---|---|
Rule Category |
Enter the Rule Categories for this Rule Group. Rule Groups are tied to one or more Rule Category Names. Note: Assign categories first before selecting a Base Entity in the Definition tab. |
Entity Name |
Enter the Entity for the Rule Group. The Entity entered here is the Default Base Entity for any Rules added to this Rule Group. The Base Entity controls which application data You have access to when building the Rule, Function, or Trigger. |
View Entity Hierarchy |
Click this link to display the Entity Hierarchy view for the Base Entity attached to the Rule Group. |
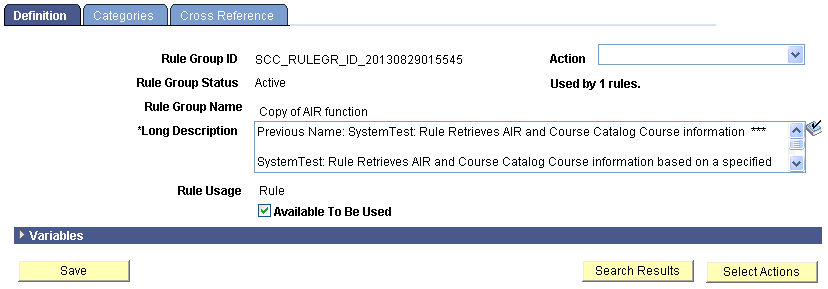
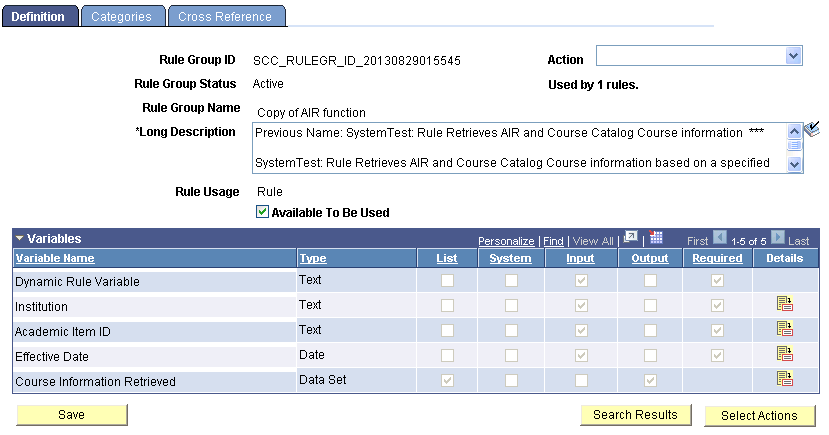
Access the Rule Groups Manager Definition page (, select Add a New Rule Group, select the Definitions tab).
This example illustrates the fields and controls on the Define Rule Groups Definition page. You can find definitions for the fields and controls later on this page.
Field or Control |
Description |
|---|---|
Action |
Note: For System-delivered Rule Groups, only the Create Rule from Rule Group and Create Rule Group from Group Actions are available. Select an Action for this Rule Group:
Note: The Inactivate Rule Group and Delete Rule Group actions are not available for Rule Groups with Active Rules attached. |
Rule Group ID |
Displays a unique ID generated by the system. When adding a new value the default value is NOID. The unique ID is generated when the Rule Group is saved. The Rule Group ID is created by combining prefix SCC_RULEGR_ID_ with the system date and time stamp in format YYYYMMDDHHMMSS. |
Rule Group Status |
|
Used By X Rules |
Displays the number of Rules associated with this Rule Group; includes Active and Inactive Rules. |
Rule Group Name |
Enter a Rule Group Name. The Rule Group Name is used when searching for a Rule Group and for display. |
Long Description |
Enter descriptive text explaining the function of the Rule Group. |
Rule Usage |
|
Available To Be Used |
Select this check box if you want this Rule Group to be available for use by the statement CALL DYNAMIC RULE GROUP. Note: If the Allow Changes to Active Rules check box on the Rule Engine Install Options page is not selected, the Available in Dynamic Rules check box cannot be selected here. |
Dynamic Rule Variable |
A Dynamic Rule Variable is always created when a Rule Group is created. This Variable is used when calling Rules using the Dynamic Rule Group statement to call the required Rule ID. |
Add a Variable |
Select this button to open the Add a New Variable page. For more information, see Adding Variables to a Rule. |
Access the Rule Groups Manager Cross Reference page (, search for a Rule Group and select the Cross Reference tab).
This example illustrates the fields and controls on the Define Rule Groups Cross Reference page. You can find definitions for the fields and controls later on this page.
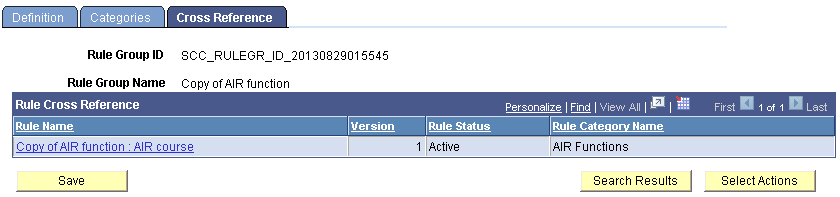
This page shows Rules and Rule Groups associated with this System Variable.
Field or Control |
Description |
|---|---|
Rule Name |
Displays to authorized users links for Rules attached to this Rule Group. If a user is not authorized, the link is disabled. Click a link to transfer out of the component and to the referenced object. Warning! Make sure you have saved any data that you need to before confirming you want to transfer to the referenced object in a new component. If no objects use the Rule Group, a notification is shown in place of the object details; for example, “This Rule Group is not used by any Rules”. |
Version |
Displays the Rule Version Number. |
Rule Status |
Displays the status of the Rule (In Progress, Active, In-active). |
Rule Category Name |
Displays the Rule Category Name in which the Rule has been created. |
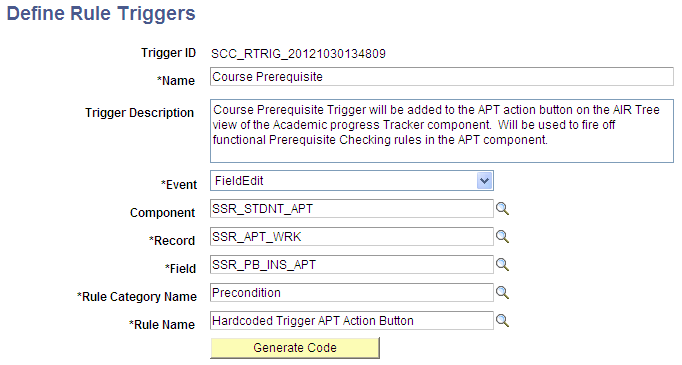
After a Trigger Rule is defined, a Trigger Definition can be created. Trigger Definitions allow you to associate the Trigger Rule to a Component Event or an Entity Method and generate PeopleCode that can be added to the associated component, record, or field event specified on the Define Rule Triggers page using the Generate Code button.
Note: The component helps to generate Template PeopleCode but does not automatically add this code to the specified event. You may want or need to adjust generated code to add institution specific business logic.
Access the Define Rule Triggers page ().
This example illustrates the fields and controls on the Define Rule Triggers page. You can find definitions for the fields and controls later on this page.
Field or Control |
Description |
|---|---|
Trigger ID |
Displays a unique ID generated by the system. When adding a new value the default value is NOID. The unique ID is generated when the Rule Trigger is saved. The Trigger ID is created by combining prefix SCC_RTRIG_ with the system date and time stamp in format YYYYMMDDHHMMSS. |
Name |
Enter a Trigger Name. The Trigger Name is used when searching for a Trigger and for display. |
Trigger Description |
Enter descriptive text explaining the function of the Trigger. |
Event |
Note: This field is only available if the Trigger Type is Online Application. Choose the PeopleCode Component Event to add to the Trigger:
|
Component |
Note: This field is only available if the Trigger Type is Online Application. Select from a list of available Components in the environment by Component Name or Description. |
Record |
Note: This field is only available if the Trigger Type is Online Application. Select from a list of available records for the selected Component or any record in the system if no Component is selected by Record Name or Description. |
Field |
Note: This field is only available if the Trigger Type is Online Application. Select from a list of available fields for the selected Record selected by Field Name or Description. |
Rule Category Name |
Select from a list of Rule Categories for which the “Allow Trigger” option has been selected on the Define Rule Categories definition page by Rule Category Name or Long Description. |
Rule Name |
Select a Rule to associate with the Trigger. |
For information about integrating the Rules Engine with a user interface, see Integrating User Interfaces with the Rules Engine