Applying Payments Using Payment Worksheets
|
Page Name |
Definition Name |
Usage |
|---|---|---|
|
PAYMENT_IDENT_IC |
Create a new worksheet, modify an existing one, and select items to include in the worksheet. |
|
|
Filter Items Page |
WS_ITEMSRCH_SEC |
Enter advanced selection criteria for items to include in the worksheet. See the Payment Worksheet Selection Page for more information.. |
|
PAYMENT_REF_DET2 |
Create deductions, pay or write off all or part of an item, create on-account payments or prepayments without first building the worksheet. |
|
|
Items NOT open on ITEM table Page |
PAYMENT_REF_DET3 |
Click the Item Status link on the Worksheet Selection page or the Detail Reference Information page to display items that are not open on the Item table (PS_ ITEM). Use to list items that have been selected on the Detail Reference Information page but have already been paid or that do not exist on the Item table to determine whether to delete items on the Detail Reference Information page. See the Payment Worksheet Selection Page. |
|
PAYMENT_WS_IC |
Apply payments to selected items. |
|
|
Currency Conversion Page |
EU_CUR_CNV_WS_SEC |
Click the Disp Curr Conversion Worksheet (display currency conversion worksheet) icon on the Worksheet Application page to select the currency code, rate, and date of conversion for the display currency on the worksheet. The values that you enter determine the currency and amount for the Conversion Amount - Currency field. See the Payment Worksheet Application Page. |
|
Worksheet Application Detail View Page |
PAYMENT_WS_IC_DTL |
Click the View Detail button on the Worksheet Application page to view or update details about a selected item on a worksheet or copy, write off, or edit items. |
|
Currency Exchange Aid Page |
CURR_EXCHG_AID_SEC |
Click the Currency Exchange Aid link on the Worksheet Application Detail View page to use as an aid in converting the payment amount to the currency of a selected item making a partial payment. |
|
Multiple Revenue Line Distribution Page |
AR_MRL_SEC |
Click the Revenue Distribution link on the Worksheet Application page to distribute amounts for multiple revenue lines for control budgets. |
|
VAT Header Page |
PAYM_ITEM_VAT_HDR |
Click the Add VAT Information link on the Worksheet Application Detail View page to view VAT header defaults. Manually override values if applicable. |
|
VAT Detail Page |
PAYM_ITEM_VAT_LN |
Click the VAT Detail Page link on the VAT Header page to view VAT line defaults including the VAT amounts. Manually override values if applicable. If the VAT declaration is at the accounting date, then the user cannot modify the VAT declaration date. |
|
Item Activity Detail Page |
ITEM_ACTIVITY_DRILL |
Click the Item Activity link on the Worksheet Application Detail View page to view all activities for an item. |
|
Item in Other Groups Page |
ITEM_PGROUP_SEC |
Click the Item in Other Groups link on the Worksheet Application Detail View page to view other worksheet groups that have the selected item or any pending item groups that are not posted that have the item. |
|
Additional Customer Information Page |
CUST_INFO_SEC |
Click the Additional Cust Information (additional customer information) link on the Worksheet Application Detail View page to view additional customer information. |
|
PAYMENT_ACTION_IC |
Select posting options for the payment applied on the payment worksheet, including entry events and worksheets that the Payment Predictor process generated. If approval workflow is enabled, you submit workflow for approval on this page. |
A payment worksheet is a cash application tool; it is an alternative to applying payments through express deposit or with the Payment Predictor process. Payment worksheets use information about customers and items to apply payments. You match items with payments and make any necessary adjustment (prepayments, on-account payments, write-offs, and deductions). The system creates one worksheet for each payment, not one for each deposit.
You can process items with multiple currencies, and the payment and items do not have to be in the same currency. The worksheet enables you to work with different item entry, item base, payment entry, and payment base currencies.
Working with a payment worksheet consists of these high-level steps:
Use the Worksheet Selection page to select the items that you want to work with and build the worksheet.
If you add items to an existing worksheet, the system adds the new items that you selected and does not delete any items that are already on the worksheet.
Use the Worksheet Application page to apply the payment to items.
Use the Worksheet Action page to select a posting action for the worksheet or to create accounting entries online.
You can copy selected or deselected items on a payment worksheet.
You can delete the worksheet, or you can save your work and complete the worksheet later. You can also select and deselect a range or all of the items and discount rows on a worksheet, as well as highlight all duplicate rows.
Note: You run the Receivables Update process to post the payments, create accounting entries, and update the item balance due amount. In a production environment, Oracle recommends that you use Receivable Update to create accounting entries rather than creating accounting entries online.
Use the Payment Worksheet Selection page (PAYMENT_IDENT_IC) to create a new worksheet, modify an existing one, and select items to include in the worksheet.
Navigation:
This example illustrates the fields and controls on the Payment Worksheet Selection page. You can find definitions for the fields and controls later on this page.

Field or Control |
Description |
|---|---|
Payment Predictor |
Select to apply the payment automatically the next time that you run the Payment Predictor process. If you select Payment Predictor and then attempt to build a worksheet, the system clears the Payment Predictor check box. Note: The Payment Worksheet Selection page and the Payments page in regular and express deposit entry both have the Payment Predictor check box. If you select the option on either of these pages, the system automatically selects the check box on the other page. Set the default for the Payment Predictor process using the bank account on the External Accounts page. |
Selecting Customer and Item Reference Criteria
The information that you enter about customers and items determines the information that appears on the worksheet. The more information that you provide, the more focused your worksheet will be. For example:
If you enter only customer information, the worksheet lists all open items for the customer.
If you enter only item information, the worksheet lists all open items that match your item criteria for all customers.
If you enter both customer and item information, the worksheet lists all the open items that match any of the customer or item criteria that you select.
Note: If you enter no customer or item information, the system creates a blank worksheet.
Customer Criteria
The Customer Reference fields and the Item Reference fields work together depending on how you choose the criteria. In the Customer Reference group box, you can select items based on Customer, and selection on the worksheet will be restricted to the specified Customer ID.
If you choose Customer Criteria = None, no items for the customer will be on the worksheet.
If you choose Customer Criteria = Customer Items, you only need to enter a Customer ID to build the worksheet with all items for the specified customer, regardless of business unit. If you enter a business unit, the selection is restricted to items with the Customer ID and Business Unit combination.
If you choose Customer Criteria = Corporate Items or Remit from Items, you must include a Business Unit as well as a Customer ID. The business unit will determine the SetID used in the Corporate or Remit customer part of the search. First, the selection will return all open items for the Customer ID and Business Unit specified. Second, the selection will also return any open items for all customers that are Corporate or Remit customers of the specified Customer ID and SetID combination (remember, SetID is determined by the specified Business Unit).
Note: The items built onto the Worksheet from Customer Reference criteria will be added but not automatically selected on the worksheet.
Field or Control |
Description |
|---|---|
Customer Criteria |
Select the type of customer that you want to include in the worksheet: Corporate Items, Customer Items, or Remit From Items. If you select None, the system creates a worksheet based on the other selection criteria and does not limit items to specific customers. You can also select None and enter a customer ID and business unit. In this case, the system uses the customer reference criteria in conjunction with the item reference criteria to choose only items that match both criteria. |
Customer ID and Business Unit |
Enter the customer ID and business unit. Note: If you select Corporate Items or Remit From Items in the Customer Criteria field, you must enter a business unit. The system needs a business unit to determine the SetID of corporate and remit from customers. The resulting worksheet displays all open items having the specified corporate or remit from customer across all business units, not just the business unit that you select. |
MICR ID |
(Optional) Enter the customer's MICR ID (magnetic ink character recognition ID). |
Link MICR |
Click to link the customer's MICR ID to other customers who have the same MICR ID. |
Reference Criteria
The information that appears on the Worksheet Selection page comes from the Regular Deposit - Payments page or the Express Deposit - Payments page, or from payment information received from a payment interface, such as Electronic Data Interchange) (EDI) or a lockbox. If you did not enter information on the Payments page, enter it on the Worksheet Selection page.
The Customer Reference fields and the Item Reference fields work together depending on how you choose the criteria.
The Item Reference grid is used to add and select items not found by the Customer Reference criteria onto the worksheet. Or, if the item is already found using the Customer Reference criteria, it will be automatically selected on the worksheet.
If you choose Reference Criteria = Specific Value or Range of References, the Restrict to field becomes active. You can restrict the Item search to:
Customer Only - Selects items matching the Item Reference values for only the customer(s) specified in the Customer Reference fields.
All Customers - Ignores any specified customer(s). The worksheet is built from items matching the Item Reference values, for all customers regardless of customers listed in the Customer Reference fields.
Corporate Cust Only - Selects items matching the Item Reference values for only the Customers listed in the Customer Reference fields and all Corporate Customers associated with those Customers by business unit.
Remit Cust Only - Selects items matching the Item Reference values for only the Customers listed in the Customer Reference fields and all Remit Customers associated with those Customers by business unit.
Note: The only instance in which you can use reference criteria independently of customer criteria is when the Restrict to field is All Customers.
Field or Control |
Description |
|---|---|
Reference Criteria |
Specify whether to use a Specific Value, None, or a Range of References. If you select either Range of References or Specific Value, you enter information in the Item Reference fields. If you click the Detail Reference link to enter reference information, the Reference Criteria field displays Detailed References. |
Restrict to |
Select to qualify items by customer. Values are All Customers, Corporate Cust Only, Customer Only, and Remit Cust Only. |
Match Rule |
If you select Specific Value in the Reference Criteria field, specify whether the item information is an Exact Match or a Like Match. A Like Match enables you to use a percent (%) wildcard to identify the reference, as long as you provide the beginning letters or numbers. For example, if you enter a purchase order number of 24% and select Like Match, the worksheet will contain all items with purchase order numbers beginning with 24xx, but will not include a purchase order number of x24x. |
Reference and To Reference |
|
Qual Code (qualifier code) |
Enter the type of reference, such as documents, items, purchase orders, or any other criteria that you set up on the Reference Qualifier page. |
Detail Reference |
Click this link to access the Detail Reference Information page (PAYMENT_REF_DET2), where you enter a list of items to which you are applying the payment. This page works like a worksheet, and enables you to quickly enter items and specify the payment amount and enter some of the available entry types for processing the items. |
Item Status |
Click the Item Status link on the Worksheet Selection page or the Detail Reference Information page to view the Items NOT open on ITEM table page (PAYMENT_REF_DET3), which displays items that are not open on the Item table (PS_ ITEM). Use to list items that have been selected on the Detail Reference Information page but have already been paid or that do not exist on the Item table to determine whether to delete items on the Detail Reference Information page. |
Item Inclusion Options
Field or Control |
Description |
|---|---|
All Items, Deduction Items Only, or Items in Dispute Only |
Select one of these options to indicate the type of items to include in the worksheet. |
Exclude Collection Items, Exclude Deduction Items, and Exclude Dispute Items |
If you select All Items, you can also select one or more of the check boxes to exclude collection, deduction, and dispute items. |
Advanced Inclusion Options |
Click this link to access the Filter Items secondary page (WS_ITEMSRCH_SEC), where you can create, edit, and save selection criteria for items to include in the worksheet. You can filter items using values in the following categories:
|
Worksheet Action
Field or Control |
Description |
|---|---|
Build |
Click to create a new worksheet or to add items meeting your selection criteria to an existing worksheet. The following may occur if the payment is out of balance or there are duplicate payments:
|
Clear |
Click to remove all items from an existing worksheet. |
In the following scenarios, it is assumed that these open items are already on the database. The first two items listed are delivered as sample data with PeopleSoft Receivables. The last two items listed must be added to the database in order to work these scenarios.
Business Unit US001, Customer ID USA01, Item 0000678528
Business Unit US001, Customer ID USA01, Item 0000678524
Business Unit US001, Customer ID 1000, Item 0000678528
Business Unit US001, Customer ID USA02, Item 0000678524
Note: Notice that the item ID and business unit are the same for two different Customer IDs.
Scenario 1
Scenario 1
This scenario shows how to build a worksheet for all items under a specific customer USA01, with business unit US001:
Customer Criteria = Customer Items.
Customer ID = USA01.
Business Unit = US001.
Build the worksheet.
The worksheet shows the items for Customer USA01, none of which are selected.
Scenario 2
This scenario builds a worksheet of all items meeting the reference values entered for all customers:
Customer Criteria = None.
Customer ID = USA01.
Business Unit = US001.
Reference Criteria = Specific Value.
Restrict to = All Customers.
Add Item References. For example, add 0000678524 and 0000678528 with the Qual Code = I (Item).
Build the worksheet.
In this case, the worksheet shows all items matching the entered reference values, regardless of what is listed under Customer Reference. No additional items come from the customer because Customer Criteria = None. Using the sample data, you would get four items on the worksheet—all selected—from different Customer IDs, for example, USA01, USA02, and 1000.
Scenario 3
This scenario builds a worksheet for all items meeting the reference values entered only for a specified customer:
Customer Criteria = None.
Customer ID = USA01.
Business Unit = US001.
Reference Criteria = Specific Value.
Restrict to = Customer Only.
Add Item References. For example, add 0000678524 and 0000678528 with the Qual Code = I (Item).
Build the worksheet.
The items on the worksheet match the reference values entered only for the customer or customers listed in the Customer Reference section, in this case USA01, because the Restrict to value is Customer Only. The worksheet would show only items—all selected—from the specified customer, in this example, USA01.
Use the Detail Reference Information page (PAYMENT_REF_DET2) to enter a list of items to which you are applying the payment.
Navigation:
Click the Detail Reference link on the Payment Worksheet Selection page.
To view and change information:
(Optional) Click Get Pay Amounts to display the amount of the items from the previous entries.
This button is available only if amounts are not displayed.
Enter the item ID, such as an invoice number and a sequence number.
The system populates the other fields from the current item information if the item ID is a preexisting item.
Change the payment amount, entry type, and entry reason as needed.
These entry types are valid for existing items:
Field or Control
Description
PY
Pay an item.
Note: The Entry Reason field is not available when the entry type is set to PY.
WO
Write-off.
DED
Deductions.
Note: To partially write off an item, use the write-off option and change the payment amount.
These entry types are valid for new items:
Field or Control
Description
OA
On account (negative amount).
PR
Prepayment (negative amount).
DED
Deductions (positive amount).
Enter discount information:
For earned discounts, the system automatically selects the Disc (discount) check box and populates the Disc Amt (discount amount) field.
Change the discount amount if needed or deselect the Disc check box if you do not want to allow the discount.
For unearned discounts, the Disc check box is not available unless you accessed the page from the Regular Deposit - Payments page and you selected the Payment Predictor check box.
To enable the Payment Predictor process to take an unearned discount, select the Disc check box and enter the discount amount. If you are applying the payment on the payment worksheet, you take unearned discounts on the Worksheet Application page.
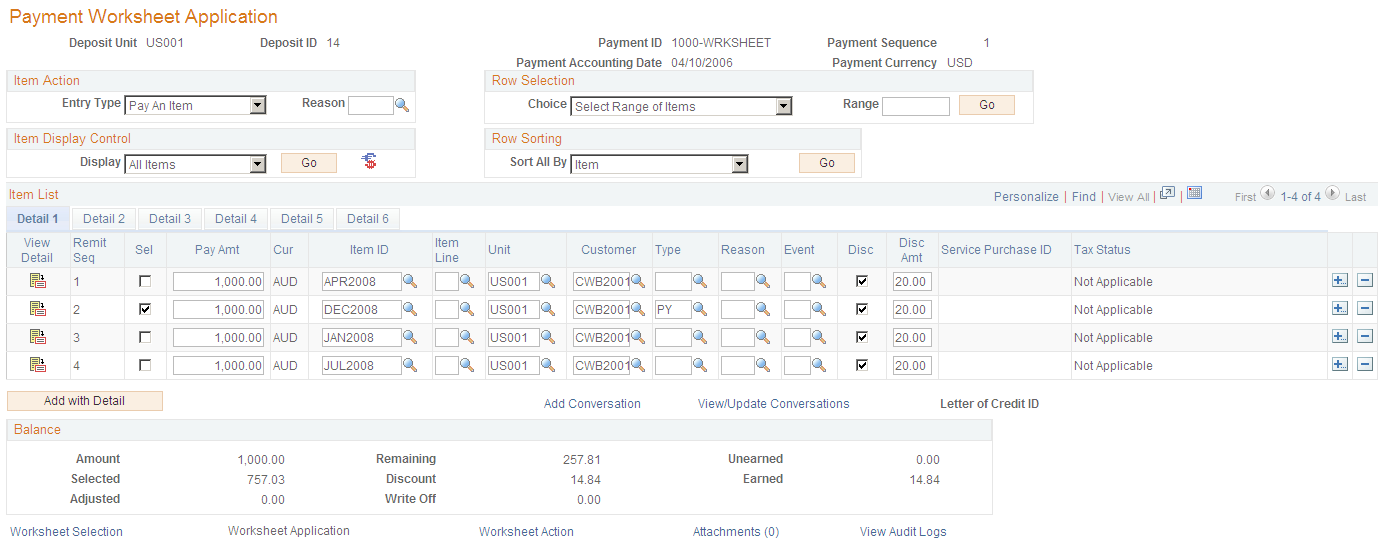
Use the Payment Worksheet Application page (PAYMENT_WS_IC) to apply payments to selected items.
Navigation:
This example illustrates the fields and controls on the Payment Worksheet Application page. You can find definitions for the fields and controls later on this page.

To use the payment worksheet, follow these steps:
Use the item display or sort controls to adjust the view.
Select the items to pay.
Handle underpayments, overpayments, and discounts.
Check the information in the Balance group box to determine whether you have used the entire payment.
You cannot post a worksheet until the entire amount of a payment is accounted for, either applied to an item, deemed a prepayment, held on account, deducted from the customer's balance, or considered an adjustment.
Field or Control |
Description |
|---|---|
Payment Accounting Date |
Displays the accounting date for the payment activity. |
Selecting an Item Action
The Item Action group box enables you to select a specific Entry Type and Entry Reason to apply to the items displayed in the Item List grid.
Field or Control |
Description |
|---|---|
Entry Type and Reason |
Select the entry type for the activity that you want to perform for the selected items. You must enter a valid entry reason in the Reason field if you specified that entry reasons are required when you set up the entry type that you entered in the Entry Type field. Valid entry types are: PY (Pay an Item): Select to apply the payment to all the selected items. WO (Write off an Item): Select to write off selected items. The system issues a message if you try to write off more than the write-off tolerances permit. If approval framework is activated, then the system requires the approval of write-off amounts entered on the worksheet that are below the write-off tolerances but above the approval-needed limit. DED (Create a Deduction): Select to create a deduction item for the selected items. Note: If you select an item that is in use, you get an error message. A setting on the Installation Options - Receivables page, No Mult Pending Item Selection (no multiple pending item selection), determines whether the system checks groups to determine whether an unposted pending item exists for the item that you selected or whether the item has been selected in another group. To see where the item is in use, select Items in Other Groups on the Worksheet Application Detail View page for the item. |
Defining Row Selection Criteria
Use the Row Selection group box fields to determine whether the Sel (select) check box is selected or not selected in the Item Display grid based on a selected
Field or Control |
Description |
|---|---|
Choice |
Select one of these values to select or deselect the Sel, Disc, or Discount check box for the rows that appear in the Item List grid.
|
Go |
Click this button to apply your selection to the Item List grid and update worksheet balances. |
Selecting Item Display Control Criteria
Use the fields in the Item Display Control group box to adjust the view and contents of the Item List grid.
Field or Control |
Description |
|---|---|
Display |
Select one of these values to display all of the items in the Item List grid or modify the display of items in the Item List grid:
|
Go |
Click to refresh the list of items in the grid. |
|
Click the Disp Curr Conversion Worksheet (display currency conversion worksheet) button to access the Currency Conversion page (EU_CUR_CNV_WS_SEC), where you select a display currency for the Conversion Amount - Currency column and specify whether to use today's date, the accounting date for the item, or a date that you specify to determine which exchange rate to use. |

Selecting Row Sorting Criteria
Use the Row Sorting group box to sort the rows that appear in the Item List grid based on the value that you specify. This feature sorts all items in the worksheet and not just the items that are displayed in the scroll area.
Click the arrows to view different chunks of data. For better performance, you can limit the number of rows that appear in the scroll area on the Installation Options - Receivables page. Oracle recommends a maximum chunk size of 100 rows, although larger chunks may perform satisfactorily.
Field or Control |
Description |
|---|---|
Sort All By |
Click the dropdown arrow to enable you to select one of these sort values:
|
Reviewing Item List Summary Information
Each of the detail tabs in the Item List grid are described in six separate sections.
See Reviewing Item List Detail 1 Summary Information.
This button and these links appear below the Item List grid:
Field or Control |
Description |
|---|---|
Add with Detail |
Select this button to add an item to handle overpayments, underpayments, and write-offs. If a new item was created in error, clear the item by clearing the Sel (select) column, or delete the item. |
Revenue Distribution |
Click this link to manually distribute amounts for control budgets across multiple revenue lines if you are making a partial payment. This link is available only if you have enabled commitment control processing and you have enabled input of multiple revenue lines for the business unit. |
Add Conversation |
Click this link to access the Conversations page, where you can add a new conversation. The SetID, Business Unit, and Customer ID fields are populated based on the selected customer. You can add new conversation entries by clicking the Add Conversation Entry button on the Conversation page. |
View/Update Conversations |
Click this link to access the Conversations page, where you can view and update existing conversations for the customer. If there are multiple conversations for the customer, you can select the conversation you want to view or update on the View/Update Conversations search page. You can also add, delete, or edit existing conversation entries on the Conversations page. This link is visible only when at least one conversation exists for the customer. |
Reviewing Balance Information
When you select open items, you need to check the information in the Balance group box. The system updates the amounts whenever you click the Refresh button. If the remaining amount is not 0, you need to adjust the payment amounts or select additional items.
Handling Exact Payments
Select items that match the payment. If a customer has no items in the worksheet, you can still put a payment on account or treat it as a prepayment.
Handling Underpayments
To apply an underpayment, do one of the following procedures:
Treat the entire amount as a partial payment against an item.
Then change the amount for the item to the amount of the payment.
Pay off the item and create an adjustment or a deduction item for the difference between the item amount and the payment amount by creating a new item and entering a positive amount for the difference.
For deductions, enter the item ID of the paid item as the document ID for the new deduction on the Worksheet Application Detail View page. This ties the purchase order number, bill of lading, and document information for the referenced item to the new deduction. Regular deductions create new items in the system. The Deduction Due Date field on the Receivables Options - Payment Options page enables you to determine whether the due date of the new item is the payment accounting date or the due date of an existing item. If you specify that the due date is from an existing item, you must enter the item ID of the existing item as the document ID on the Worksheet Application Detail View page. After the Receivables Update process runs, the new deduction appears in the system.
Until you know why the customer underpaid, place the entire amount on account (without referencing any items) by creating a new item and entering a negative amount for the amount of the payment.
Do not use the same item ID for the on-account item as an existing item. If you want the on-account item to be associated with an existing item, either add a prefix or suffix to the ID or use the same item ID with a different line number.
Partially pay for an item and write off the remaining item balance by selecting the split item and changing the entry type to WO. The system issues a message if you try to write off more than the write-off tolerances permit. Workflow is launched if the write-off amount requires approval.
Important! If the item is a rebate claim that originated in PeopleSoft Purchasing or a claimback that originated in PeopleSoft Order Management, do not write off the remaining balance. Use the Claims Management Workbench in PeopleSoft Purchasing or PeopleSoft Order Management to handle write-offs. This enables the system to determine whether the write-offs meet the write-off tolerances for claim processing.
Handling Overpayments
To apply an overpayment, do one of the following procedures:
Pay off the item and create a new on account, adjustment, or prepay item with the remainder by creating a new item and entering a negative amount for the overpayment amount.
Note: If invoices exist that reflect a prepayment (that is, the on-account item and the item have the same document number), be careful not to match those items with another item that does not have a matching value in the Document field.
Pay off one or more items entirely and treat the remainder as a partial payment on another item by changing the amount for the item to the remaining amount of the payment.
Until you know why the customer overpaid, place the entire amount on account (without referencing any items) by creating a new item and entering a negative amount for the amount of the payment.
Pay off one or more items and write off the remaining balance by creating a new item and entering a negative amount for the overpayment payment amount.
Handling Remaining Amounts
If you do not find an open item to which you can apply the remaining payment, add an item to the worksheet and write off the remaining balance by selecting either the Write-off an Overpayment or Write-off an Underpayment entry type.
The system issues a message if you try to write off more than the write-off tolerances permit. Workflow is launched if the write-off amount requires approval. You can write off an amount only up to the user's authorized limit, over the lifetime of an item (not per transaction). Check these amounts on the User Preferences - Receivable Data Entry 2 page. The system compares the item amount to the user's write-off limit in the format currency selected on the Receivables Data Entry 2 page.
Note: If you selected the Partial Payment Disabled check box on the Receivables Options - Payment Options page, no partial payments can be processed.
This example illustrates the fields and controls on the Payment Worksheet Application page - Detail 1 tab.
Use the Customize link to sort by column and to reorder, hide, and freeze columns. This enables you to put the key fields that you want to review on the Detail 1 tab and sort your data.
Field or Control |
Description |
|---|---|
|
Click the View Detail icon to view or update details for a selected item on a worksheet and to copy or write off the item. |
Remit Seq (remit sequence number) |
This sequence number relates to the order in which the items were entered on the Worksheet Selection page. Initially, the items appear in this order. If you sort the worksheet based on the value in another column, the number stays with the item, but the grid order changes. Use this column to sort the worksheet in the original order. |
Sel (select) |
Select each check box for applying payments. You can control the rows that are selected with the Row Selection group box at the top of the page. |
Pay Amt (payment amount) |
Initially displays the open amount for the item. Change the amount to make a partial payment. |
Cur (currency) |
Displays the currency applied used for this payment. |
Item ID |
Enter or the system displays the item associated with this payment. You can also select a different or new item. |
Item Line |
Enter or the system displays the line number that applies to this item. You can split an item, which adds another line for the same item. For example, you may want more than one item line for overdue charges. This field value appears only when data was entered in the Item, business Unit, Customer ID, Payment Amount, Discount Taken fields when entering payments on a worksheet. |
Unit |
Enter or the system displays the business unit associated with the customer. |
Customer |
Enter or the system displays the customer associated with the payment of this item. |
Type and Reason |
Enter the entry type and reason. Some entry types are valid for existing items and some are valid only for new items. Note: If you are applying a payment to a vendor rebate claim or claimback item from PeopleSoft Purchasing or PeopleSoft Order Management and the business unit for the item requires VAT, then you must split the item by entering the base amount of the item in the Pay Amt (payment amount) field for one row and the VAT amount for the item in the Pay Amt (payment amount) field for the other row. Use the PY (Pay an Item) entry type for each item. You must enter the appropriate entry reason for each row to indicate whether the amount is the base amount or the VAT amount. You also must enter the reference number for the claim item in the Document field on the Worksheet Application Detail View page. |
Event |
U.S. federal financial systems require supplemental accounting entries. Enter the entry event code to generate the appropriate supplemental accounting entries for the payment activity for the item. |
Disc (discount) |
Select to take an unearned discount. |
Disc Amt (discount amount) |
Override the amount of an earned discount or enter an amount for an unearned discount. The system calculates item discounts using the payment terms code and discount grace days that are posted with the item. A discount is earned if the payment accounting date falls within the period of discount days plus discount grace days. For example, if the terms code for the item specifies discount terms of 10 days and the discount grace days is 3, then the discount is earned if you received the payment within 13 days. Any changes made to discounts must meet the discount tolerance requirements defined on the User Preferences - Receivable Data Entry 2 page. |
Calculate GST on Advance |
Calculate India GST taxes for advance payments and access the GST Taxes page, where you can review the calculations. You must calculate GST to save changes on the worksheet. See India GST in PeopleSoft Receivables and Working with India GST in PeopleSoft Receivables. |
Add with Detail |
Select this button to add an item to handle overpayments, underpayments, and write-offs. If a new item was created in error, clear the item by clearing the Sel (select) column, or delete the item. |
Revenue Distribution |
Click to manually distribute amounts for control budgets across multiple revenue lines if you are making a partial payment. This link is available only if you have enabled commitment control processing and you have enabled input of multiple revenue lines for the business unit. |

This example illustrates the fields and controls on the Payment Worksheet Application page - Detail 2 tab.

Field or Control |
Description |
|---|---|
Item Accounting Date |
Displays the accounting date entered for online and external pending items. The date determines the fiscal year and accounting period used to post the item for both PeopleSoft Receivables and PeopleSoft General Ledger. |
As of Date |
Displays the date, which is usually the same as the accounting date that is entered for entering online and external pending items. You can also use this date to record the invoice date used to calculate payment terms. |
Due Date |
Displays the payment due date. If the due date falls on a bank holiday, the system adjusts it automatically. This field is required for the Aging Application Engine process (AR_AGING). |
Discount Date |
Displays the date on which you can apply a payment and receive a discount. You can set up default discount terms on the Payment Terms page for an item You can also enter discount terms on the |
Discount Date 1 |
Displays a second date closer to the payment due date on which you can apply a payment and receive usually a smaller discount. For example, if a payment is due on May 1, 2008 and the item details indicate that if a customer makes a payment on or before April 25, 2008, the customer receives a 5% discount. You also set up a second discount date (Discount Date 1) so that if the payment is made after April 25 but on or before April 28, the customer will receive a 2% discount. |
Days Late |
Displays the number of days that a customer is late in making a payment on this item. |
Customer Name |
Displays the customer's name associated with this customer's profile. |
SubCust1(subcustomer 1) |
Displays a subcustomer1 based on the setup on the Installation Options – Overall page and the set up of subcustomer 1 on the SubCustomer Qualifier 1 page (Set Up Financials/Supply Chain, Product Related, Receivables, Customers, SubCustomer Qualifier 1, SubCustomer Qualifier 1) |
SubCust2(subcustomer 2) |
Displays a subcustomer2 based on the setup on the Installation Options – Overall page and the set up of subcustomer 2 on the SubCustomer Qualifier 2 page (Set Up Financials/Supply Chain, Product Related, Receivables, Customers, SubCustomer Qualifier 2, SubCustomer Qualifier 2). |
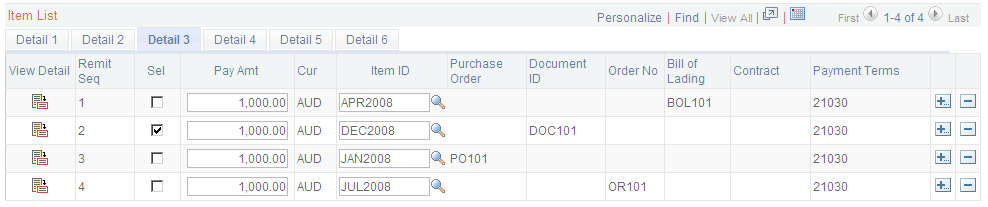
This example illustrates the fields and controls on the Payment Worksheet Application page - Detail 3 tab.
Field or Control |
Description |
|---|---|
Purchase Order |
Displays a purchase order ID associated with the original invoice if a purchase order was used to purchase this item if you integrate with PeopleSoft Purchasing. If you enter a value that matches an existing item ID, the system automatically populates this field. |
Document ID (document identification) |
Displays a user-defined reference value, which is entered on the maintenance, payment, or draft worksheet to help identify the claim in the Claim Management workbench. If the document reference ID for deduction items in the Item table matches the document reference field for credit items in the Item table, the Automatic Maintenance process matches items for all customers associated with the remit from customer. |
Order No (order number) |
Displays the number of the PeopleSoft Inventory order number associated with the item on the original invoice. If you enter a value that matches an existing item ID, the system automatically populates this field. |
Bill of Lading |
This is the bill of lading associated with this item. A bill of lading lists all items in a shipment destined for a particular ship to location. If you enter a value that matches an existing item ID, the system automatically populates this field. |
Contract |
Displays the contract number associated with the original invoice if you integrate with PeopleSoft Contracts. If you enter a value that matches an existing item ID, the system automatically populates this field. |
Payment Terms |
Defines payment terms for this payment. The payment term is selected on the Pending Item 1 page The selected payment term specifies the rules for calculating an item due date and the discount terms. |
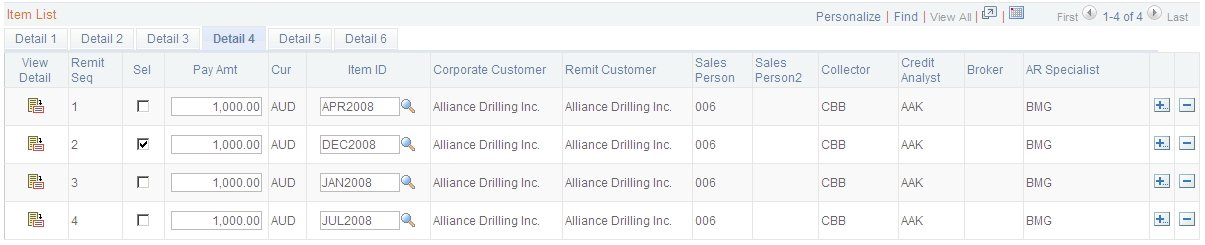
This example illustrates the fields and controls on the Payment Worksheet Application page - Detail 4 tab.
Field or Control |
Description |
|---|---|
Corporate Customer |
Displays the name of the corporate customer defined on the Customer General Information page (Customers, Customer Information, General Information). |
Remit Customer |
Displays the name of the customer making the payment, which is defined on the General Info (information) page (Customers, Customer Information, General Information). |
Sales Person |
Displays the ID of the primary sales person associated with selling this item to this customer. This information can be selected on the Pending Item 2 page or on the Item Details - Detail 1 page |
Sales Person 2 |
Displays the ID of a second sales person associated with selling this item to this customer. This information is derived from values enter in the Detail 1 page |
Collector |
Displays the ID of the individual assigned to collecting a payment from the customer, which is defined on the Bill To Options page (Customers, Customer Information, General Information). |
Credit Analyst |
Displays the ID of the credit analyst assigned to this customer, which is defined on the Bill To Options page (Customers, Customer Information, General Information). |
Broker |
Displays the broker ID assigned to this customer. The customer can be selected as the broker on the General Info page (Customers, Customer Information, General Information). |
AR Specialist |
Displays the name of the AR Specialist assigned to this customer, which is defined on the Bill To Options page (Customers, Customer Information, General Information). |
This example illustrates the fields and controls on the Payment Worksheet Application page - Detail 5 tab.

Field or Control |
Description |
|---|---|
Deduction Reason |
Displays the default reason code entered for the AR business unit or you can select a unique reason based on the entry reason for the deduction. If you want to use unique reasons for entry reasons, you must create deduction reason codes that are the same as the entry reason codes for the deduction (DED) entry type. |
Deduction Date |
Displays the date based on the default setting in on the Receivables Options – Payment Options page. This date will either be the accounting date or the item date depending on your selection on the Payment Options page. This date You can override the default date in this field. Note: You can also override the Receivables Options deduction fields in the View Update/Item Details - Detail 1 page. Warning! If you mark an item as a deduction using the Deduction check box rather than creating a deduction (WS-08 item) using the payment worksheet, you do not generate any accounting entries or close the original item and create a new deduction item. Once you select this check box and save the page, you cannot deselect your selection. |
Dispute Reason |
Displays a default value based on values that you set up in the Customer Relations group box on the Detail 1 page (Accounts Receivable, Customer Accounts, Item Information, View/Update Item Details) for a selected customer. If security was set up for you to set up these values in the View/Update Item Details component, then you can add, update, and delete the default dispute reason, dates, and values that appear in the worksheet. When you apply a partial payment to an item based on a dispute in the payment worksheet and every item row appears once, you can enter dispute information for each item. If an item row appears more than once on the worksheet, then you must enter the same dispute information for each row. If you enter the dispute information for an item row, and then enter a partial payment row for the same item, the dispute information that you entered on the first row will also appear in the partial payment row. However, if you enter the partial payment row first and enter the dispute information in that row, you must also enter the dispute information for the original item row. See View/Update Item Details - Detail 1 Page. See Dispute Reason Page. |
Dispute Date |
Displays the default date that you entered on the View/Update Item Details – Detail 1 page. You can override this date on the worksheet. |
Dispute Amount |
Displays the amount that you entered on the View/Update Item Details – Detail 1 page. You can override this date on the worksheet. |
Claim Number |
Displays the debit memo number that the customer sent you for a deduction. This number is entered on the View/Update Item Details – Detail 1 page. |
Claim Date |
Displays the date on which the customer created the debit memo for a deduction. This number is entered on the View/Update Item Details – Detail 1 page. |
Reference Reason |
Displays the reference reason which is associated with an item on the Reason Maintenance page (). You can select Reference Criteria when you build a payment worksheet. See Applying Payments: Building a Payment Worksheet |
This example illustrates the fields and controls on the Payment Worksheet Application page - Detail 6 tab.

Field or Control |
Description |
|---|---|
Letter of Credit ID |
Displays an ID if a letter of credit is associated with this the payment of the item. |
AG Number (acceptgiro reference number) |
Displays the acceptgiro (AG) reference number assigned to the item or invoice when you ran the Statements process (AR_STMTS) or the AR Dunning process (AR_DUNNING) for business units enabled for acceptgiro processing. It also displays the acceptgiro reference number assigned to the invoice when you printed the invoice in PeopleSoft Billing. |
Region |
Displays the code for the team members that are assigned to the item. This code is selected when entering a pending item. |
Declaration Point |
Displays the point at which you report VAT to the tax authorities—at the accounting date, at invoice time, at delivery, or at the time of payment. Values only appear in this field if VAT is enabled for this customer. See Invoice, Delivery, Accounting Date, or Payment Declaration Point. |
Doubtful |
Indicates that you transferred the item to a Doubtful Receivables account using the transfer worksheet. |
Balance - Base Currency |
Displays the open amount for the item in the entry currency and the base currency. The base amount appears only if the balance differs from the base currency for the business unit. |
Invoice |
Displays the number of the related invoice associated with the item. |
Invoice Business Unit |
Displays the business unit associated with the invoice. |
Collection Code |
Displays a collection code indicating that one or more payments have not been made for this item or by this customer. |
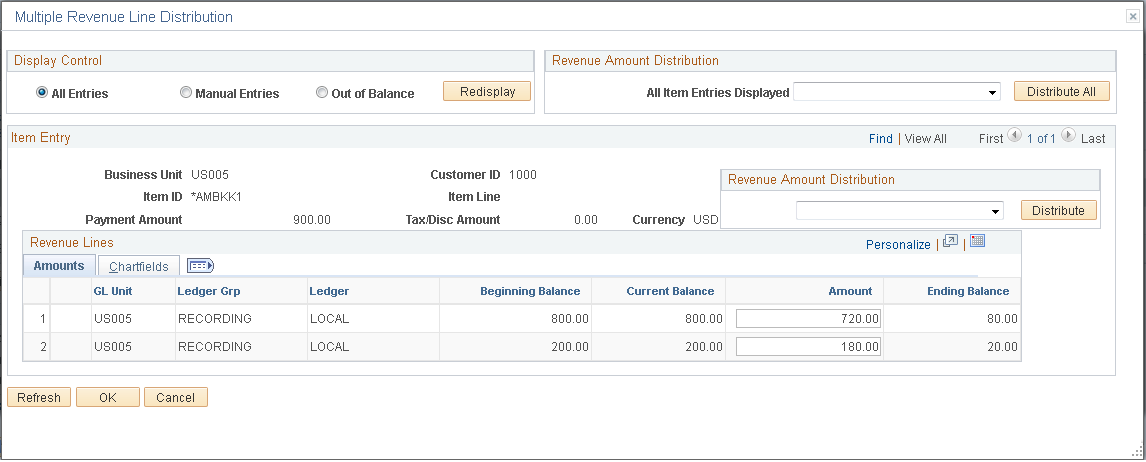
Use the Multiple Revenue Line Distribution page (click the Revenue Distribution link on the Worksheet Application page) to distribute amounts for multiple revenue lines for control budgets.
This example illustrates the fields and controls on the Multiple Revenue Line Distribution page - Amount tab.
This example illustrates the fields and controls on the Multiple Revenue Line Distribution page - Chartfields tab.
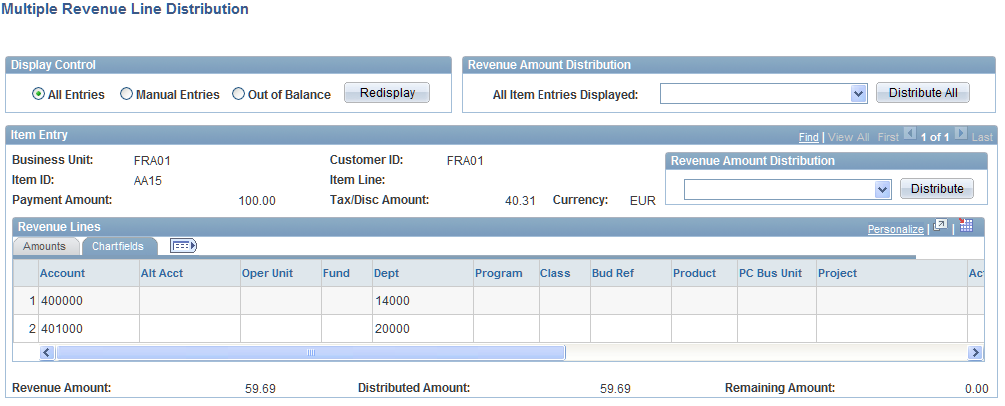
The only item entries that appear on the page are ones for which you are making a partial payment.
Field or Control |
Description |
|---|---|
Display Control |
If you are viewing all item entries, select an option to limit the list of item entries and click Redisplay. Options are: All Entries: Displays all item entries. Manual Entries: Displays only item entries that the user is changing manually. Out of Balance: Displays only item entries that have a remaining amount. |
Revenue Amount Distribution |
Specify how to distribute the revenue. Enter the instruction for an individual item entry by completing the Revenue Amount Distribution field for the item entry and clicking Distribute. Enter the instruction for all items displayed in the scroll area by completing the All Item Entries Displayed field and clicking Distribute All. Options are: System Distribution: This is the default. The Revenue Estimate Application Engine process (AR_REV_EST) calculates the revenue distribution amount for each line by prorating the revenue balance for all lines. If you have selected a manual method, select this option to enable the process to calculate the amounts. Reset to Zero: Select to reset all the amounts to 0. Weighted Open Balance: Select to have the system prorate the revenue amounts based on the revenue balance for each distribution line. Then readjust the amounts as needed. Even Across Revenue Lines: Select to distribute the revenue amount evenly across all lines for the item entry. Then readjust the amounts as needed. |
Revenue Amount |
Displays the total revenue amount for the item entry. |
Distributed Amount |
Displays the total of the revenue amount that has been entered for the revenue lines. |
System Distribution |
Select to have the Revenue Estimate process calculate the revenue distribution amounts. |
Remaining Amount |
Displays the difference between the total revenue amount for an item entry and the amount entered. The amount must be 0 to post the worksheet. Click the Refresh button to update the totals. |
Use the Worksheet Application Detail View page (click the View Detail button on the Worksheet Application page).
This example illustrates the fields and controls on the Worksheet Application Detail View page. You can find definitions for the fields and controls later on this page.
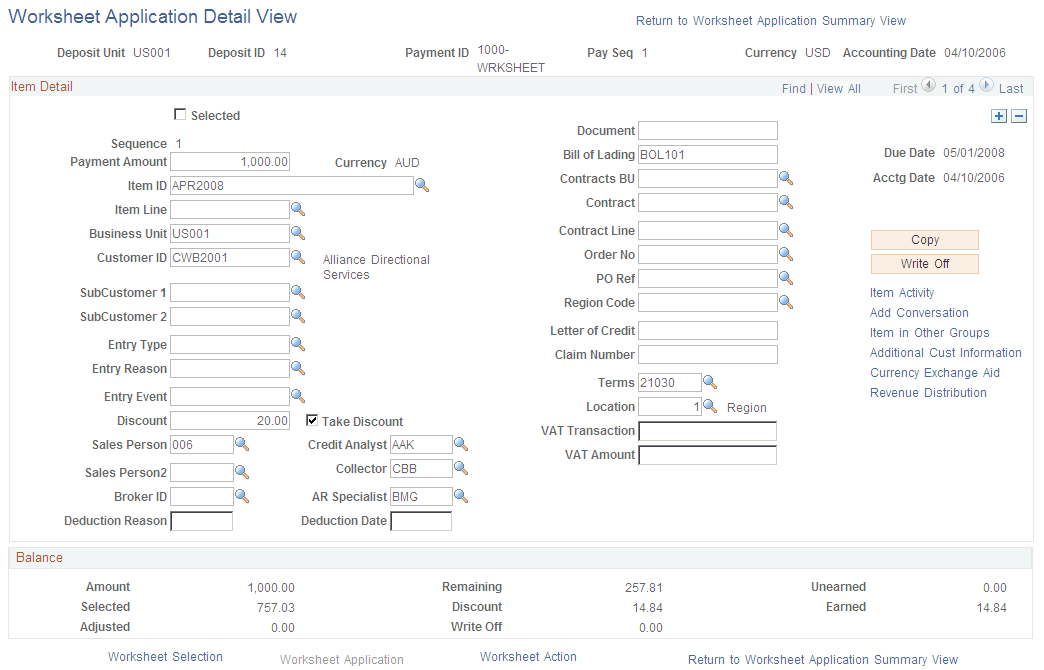
View item details to identify an item or change the details as needed.
Field or Control |
Description |
|---|---|
Deduction Reason |
If you are creating a new deduction, enter the reason why the customer took the deduction. You define reason codes on the Deduction Reason page. |
AR Specialist (accounts receivable specialist) |
The system populates the AR Specialist field for deduction items based on the default specialist that you assigned to the business unit. If you overrode the default specialist for the deduction reason or customer, the system uses that value. |
Document |
If you enter a value that matches an existing item ID, the system automatically populates the Bill of Lading, Order No (order number), PO Ref (purchase order reference), Contract # (contract number), Letter of Credit ID, and Due Date fields with the values for the existing item when you save or refresh the page. If you receive different information for these fields with the payment, override those values. If you are applying the payment to a vendor rebate claim item or claimback item from PeopleSoft Purchasing or PeopleSoft Order Management, you must enter a reference ID. When you run the Rebate Notification process, it sends the reference ID to PeopleSoft Purchasing and PeopleSoft Order Management to use to reconcile the claims on the claims management workbench. This field is available for entry for existing items only if you enter entry reasons on the AR Integration page. |
Location |
Enter the address sequence number for new items. You must enter a value in this field to include the item in correspondence if you selected the Item Address option for the correspondence customer on the Correspondence Options page. |
Copy |
Click to copy selected and unselected items on the payment worksheet to a new row to the worksheet. This enables you to create deductions and other adjustments to lines that have already been selected for payment. You must add the amount and entry type to the new row. |
Write Off |
For a new item, click this button to write off an overpayment or underpayment amount. |
Dispute |
Click to access the Dispute Status Tracking page and view dispute status information for an item. This link appears only when dispute tracking data exists for the item. |
Note: To save your changes on this page, return to the Worksheet Application page.
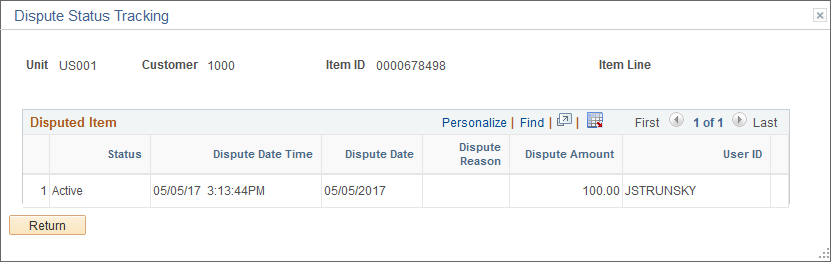
Dispute Status Tracking Page
Use the Dispute Status Tracking page (ITEM_DISP_T) to view dispute status information for an item.
This example illustrates the fields and controls on the Dispute Status Tracking page.
Use the Currency Exchange Aid page (CURR_EXCHG_AID_SEC) as an aid in converting the payment amount to the currency of a selected item making a partial payment.
The Currency Exchange Aid page can only be used with items that have been selected with an entry type of payment.
Navigation:
Click the Currency Exchange Aid link on the Worksheet Application Detail View page.
This example illustrates the fields and controls on the Currency Exchange Aid page.
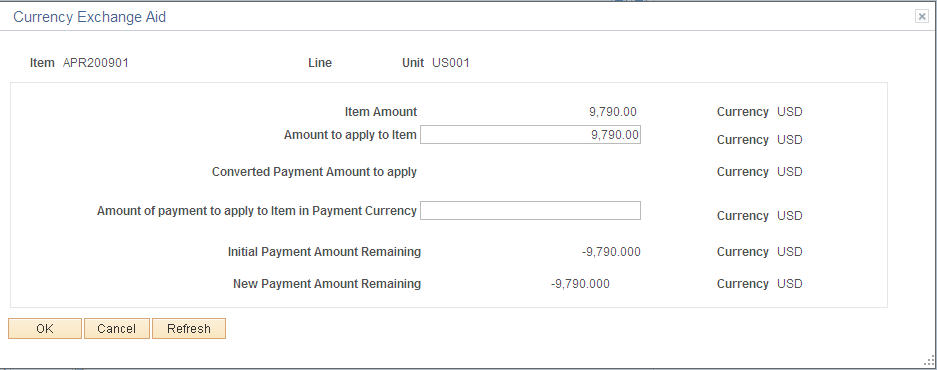
The Amount to apply to Item field initially displays the amount from the Worksheet Application page in the entry currency. If you want to partially pay the item, you have two options:
Change the amount to pay using the item currency in the Amount to apply to Item field.
When you press the Tab key to exit the field, the system updates the Amount of payment to apply to Item in Payment Currency field with the amount of the payment that you will apply to the item in the payment currency.
Enter the amount of the payment to apply to the item in the payment currency in the Amount of payment to apply to Item in Payment Currency field.
When you press the Tab key to exit the field, the system changes the item amount (the amount of the item you will pay) in the Amount to apply to Item field.
Each time that you change one of these amounts, the system updates the New Payment Amount Remaining field so that you can track how much of the initial payment remains.
Use the Payment Worksheet Action page (PAYMENT_ACTION_IC) to initiate workflow after entering a write-off amount needing approval.
If your worksheet contains a write-off needing approval, you cannot set the worksheet to post. In the Posting Action group box, submit the write-off amount to workflow by selecting the Submit to Workflow value in the Action field and click the OK button. The workflow notification is sent to the approver and the Post Action Status field on the Worksheet Action page is changed to Pending Approval.
Navigation:
Click the Worksheet Action link on the Worksheet Selection page or the Worksheet Application page.
Field or Control |
Description |
|---|---|
Delete Worksheet |
Click to delete the entire worksheet, plus any accounting entries created for the worksheet. |
Delete Payment Group |
Click to delete the accounting entries that you create but leave the worksheet intact. |
Action |
Select a posting action for the group and click OK to carry out the action. Values are: Submit to Workflow: Displays only if Approval Workflow is set up. Approval workflow is controlled by the Approval Framework feature in PeopleSoft Enterprise Components. The user is not able to set the worksheet to post until the write-off amount is approved. Both the approver and the worksheet user can set the worksheet to post after approval is granted Pending Approval: Displays only if Approval Workflow is set up and the Submit to Workflow action has been completed. Once any write-offs have been approved, then the approver and the worksheet user can set the worksheet to post. See Approving Write-Off Amounts Using Workflow. Do Not Post: Saves the changes to the group, but no posting occurs. Select this option to change the posting option for a group set to Batch Standard if the group has not been processed yet. Post Now: Runs the Receivables Update process immediately. If the user enabled the notification feature, the system displays a message when the process finishes. Post Now to GL: Runs the Receivables Update process immediately and runs processes to create and post journals to the general ledger. If the user enabled the notification feature, the system displays a message when the process finishes. Batch Priority: Runs the Receivables Update process the next time a priority scheduled job runs or the next time a standard scheduled job runs if that occurs first. This option is not intended for large jobs. Batch Standard: Runs the Receivables Update process the next time a standard scheduled batch job runs. This may occur once a day depending on how often the organization schedules standard jobs. Note: The posting options that are available depend on the options that you select for the user on the Define User Preferences - Process Group page. Use the Post Now and Post Now to GL options only for small groups or when an immediate need exists to post the transaction. The system issues a message if another user or scheduled process is posting transactions for the same business unit and customer combination at the same time. If the Payment Predictor process created the worksheet and an item is selected for a business unit to which you do not have security access, you cannot post the payment until you deselect the selection. |
Create/Review Entries |
Click this button to create or review accounting entries. Use this option only if you need to review or modify the accounting entries. Otherwise, use one of the posting actions to create the accounting entries. |
Note: If the worksheet does not have a zero balance, but you need to stop working with the worksheet, save the work, and select Do Not Post for the posting action.
You can handle returned payments in a variety of ways according to your organization's policies and the conditions surrounding the return.
Reversing the Original Payment
If you have already run the Receivables Update process to post a payment, you must unpost the payment group to reverse the payment.
To unpost a payment:
(Optional) View control information on the Payment Control page.
(Optional) Select an unpost reason on the Options page.
Select Batch Priority or Batch Standard in the Action field on the Action page and click OK.
Handling Uncollectible Payments
A variety of solutions exist for handling uncollectible payments. The solution that you select depends on:
Whether the payment is permanently uncollectible and whether the totals should be included in the control tables.
Whether the payment is temporarily uncollectible and whether the totals should be included in the control tables.
To handle permanently uncollectible payments when the amount is not included in the control totals:
Unpost the original payment.
Reapply the original payment as an on-account payment on the payment worksheet.
Write off the on-account payment on the maintenance worksheet.
To handle permanently uncollectible payments when the amount is included in the control totals:
Unpost the original payment.
Reapply the original payment as an on-account payment on the payment worksheet.
Apply the returned check to the on-account item that you created for the payment.
To handle temporarily uncollectible payments when the amount is not included in the control totals:
Unpost the original payment to open the items and leave the payment unapplied.
When the check clears, reapply the payment using the original payment.
To handle temporarily uncollectible payments when the amount is included in the control totals:
Create a debit item to record the return.
When the check clears, create a new worksheet and apply the payment to the new debit item.