Creating Contract Line Information
|
Page Name |
Definition Name |
Usage |
|---|---|---|
|
CNTRCT_HDR |
Enter line and item information for the contract. If you have PeopleSoft Services Procurement installed, the contract line can also be a services procurement role type. |
|
|
CNTRCT_ITEM_DESCR |
Enter and view descriptions for a specific item. |
|
|
ORD_BY_ITEM_CAT |
Search for and select items to order from a catalog. |
|
|
ITM_CAT_DETAIL |
View catalog item details. |
|
|
ITM_CAT_VNDR |
View qualifying suppliers that are preapproved to provide selected items. |
|
|
ITM_ALIAS |
Set up an alias for the selected item so that you don't need the supplier's ID or description each time you order the part. These aliases are stored according to user ID so that each user can have a different alias for the same item. |
|
|
ITEM_SEARCH_SP |
Search for items. |
|
|
ITM_VNDR_PRTY_HC |
View qualifying suppliers that are preapproved to provide selected items. |
|
|
CNTRCT_PRC_UOM_SEC |
View details for the contract line. |
|
|
Comments for Line Page |
CNTRCT_CMNTS_SEC |
View and enter line comments for the contract. See Contract Page |
|
Include Item Specifications Page |
PO_ITEM_SPEX |
Include standard item specifications as they appear, or modify them to meet the requirements of the transaction comment. The item for which you are viewing comments must be associated with item specifications on the Item Specifications page. See Contract Page |
|
CNTRCT_PRC_ADJ_SEC |
Enter price adjustments for fixed items that apply only to the specific line item. You can use this page for order releases only. |
|
|
CNTRCT_DSTRBPO_SEC |
Enter contract line-level distribution defaults. This enables you to maintain unique sets of purchase order distribution defaults for each business unit. You can use the distribution entries as default values during the contract release process, based on the affected purchasing business unit. |
|
|
CNTRCT_LN_VAT_SEC |
Set sales and use tax options for a contract line. |
|
|
CNTRCT_DSTRB_SEC |
Set up one or more distribution lines for each contract line. When a contract line is released to a voucher, the distribution lines are copied to the voucher line. You can use this page for voucher releases only. |
|
|
Contract Item Line Agreement Assignments Page |
CS_AGREE_CLN |
View and maintain contract line agreements. The button is available when you are using PeopleSoft Supplier Contract Management. See Contract Page |
|
CNTRCT_MILESTN_SEC |
Divide a voucher or order contract line into milestones and set up rules for the milestones. This page is available for lines that are defined as Amount Only. In addition, you must have entered a merchandise amount for the selected line. |
|
|
Milestone Line Description Page |
CNTRCT_DESCR_MLSTN |
Enter and view descriptions of milestone lines. |
|
CAT_PARENTAGE_SEC |
View information about where a category resides in the entire catalog tree hierarchy. |
|
|
CAT_SEARCH_SEC |
Search for and select an appropriate category ID for the item when entering an ad hoc item. You search for the category ID using a category hierarchy tree. |
Use the Contract page (CNTRCT_HDR) to enter line and item information for the contract.
Navigation:
Select the Search for Contract Lines link.
This example illustrates the fields and controls on the Contract Entry - Contract page, Search for Contract Lines.
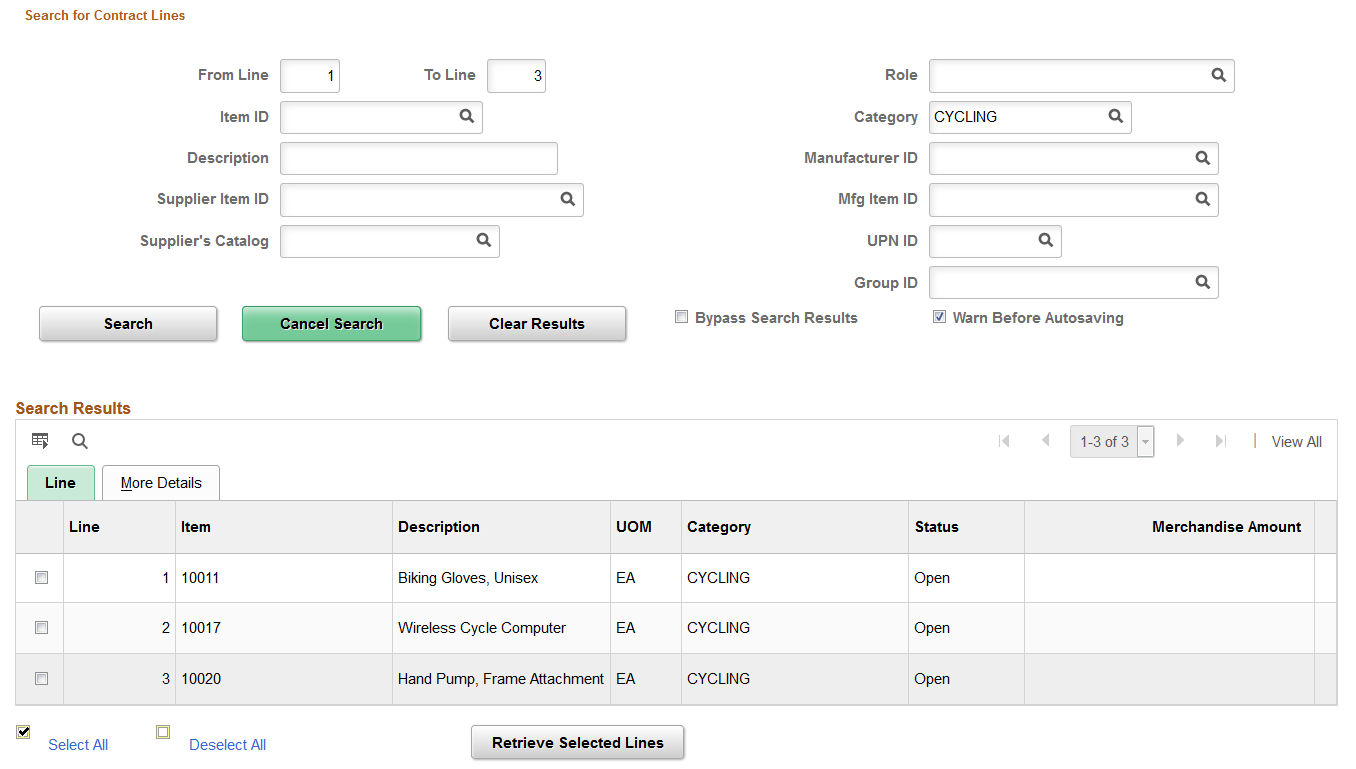
When you are working with a large contract that contains many lines, this search page provides better control and flexibility over which lines the system retrieves from the contract. The Search for Contract Lines box automatically appears on the Contract page when the number of rows on a contract exceeds the maximum number of rows predefined value. This value is determined by the number entered in the Contracts field for Purchasing installation options. See Installation Options - Purchasing Page.
You can retrieve lines by item, description, line number ranges, or any of the other parameters on the page. Each time you enter new criteria and click the Search button, the system appends the additional results to the Search Results grid. Select the lines in the search results that you want to work with and click the Search button to load the lines into the contract page.
Note: Instead of searching for selected contract lines, you can click the Load All Contract Lines link to load all contract lines associated with the contract. This link appears next to the Search for Contract Lines link before you perform a search. You can use the link instead of performing the search. If the Warn Before Autosaving check box has been selected in a previous search, the system displays a message indicating that the load action will force a system save.
Field or Control |
Description |
|---|---|
From Line andTo Line |
Enter a single line for both fields to retrieve one contract line item. Enter a range of line numbers to retrieve multiple lines with the from line being the lowest number. |
Item ID |
Select a single item ID on which to base a contract line search. |
Category ID |
Select a category ID on which to base a contract line search. When you click the Look Up Category button, the system provides a list of values that contains all of the categories associated with the contract. When you select the category, the search results provide all contract lines for that category. |
Description |
Enter an item description on which to base the search. This field is case-sensitive. |
Manufacturer ID, Supplier Item ID, Mfg Item ID(manufacturer item ID), UPN ID, Supplier Catalog and Group ID |
Select one of these options on which to base a search. You can select multiple options to reduce the results. For example, you can select a supplier item ID on which to base a contract line search. All contract lines that contain the supplier item ID and that meet other search criteria you enter are returned in the search results. |
Search |
Click to search for items that meet the search criteria. If you do not enter criteria, the system returns all contract lines associated with the contract. Note: Chunking is a process in which the system places a small subset of transaction lines in a buffer. Sample data delivered with PeopleSoft Purchasing sets chunking at the maximum rows in contracts to 50. When performing searches, the system amends the previous search with the results of the current search unless you click the Clear Search button. |
Cancel Search |
Click to exit the Search for Contract Lines group box and cancel the search criteria that you entered. If you select to bypass the search results, the Cancel Search button is not available. |
Clear Results |
Click to remove the previous search results from the Lines grid box. This enables you to initiate a new search, otherwise, the system amends the previous search results with those of the current search. |
Bypass Search Results |
Select to bypass viewing returned search results. Instead of populating the Search Results grid, the system navigates directly to the Lines grid with the search results, making it quicker to work with contract lines. |
Warn Before Autosaving |
Select to enable messaging where the system provides a warning message that an action will force a save. When the message appears, click the OK button to save and continue. If you do not want to save, click the Cancel button to return to the Contract page with the unsaved changes. The system automatically saves all changes to the database when the Warn Before Autosaving check box is not selected and you:
|
Select All |
Select all contract lines returned by the system search. When you click the Retrieve Selected Lines button, the system displays the lines for review and maintenance. Select individual check boxes to select specific lines to retrieve. |
Deselect All |
Select to deselect all contract lines in the search results. |
Retrieve Selected Items |
Click to retrieve the contract lines that you selected. After retrieving the lines, you can review and maintain individual lines. The system displays a warning when you do not select contract lines to retrieve. If the Warn Before Autosaving check box is selected, the system displays a message indicating that the retrieve action will force a system save. |
Search Results
This grid displays the contract lines returned by the search. The Line and More Details tabs provide a summary of the search criteria used in the search and details about the contract line.
Navigation:
To adjust VAT on the voucher line after it has been created from the contract, use the Voucher Line VAT Information page on the voucher.
Details
Field or Control |
Description |
|---|---|
Item |
Select the ID for the item that is being purchased on the contract line. Only items that have an item-supplier relationship established are available for selection. Entering an item ID is not required for voucher contracts and ad hoc item (description-only) purchase order contracts. |
Description |
Base language item description for the line item. You can enter an ad hoc item description, or override the current description. This is required for voucher and order contracts. |
UOM (unit of measure) |
Select the unit of measure (UOM) for the item on this line. This is required for order contracts. If you enter an item ID, the UOM appears automatically from the default item supplier UOM and cannot be changed. This UOM is used as a base for determining quantities such as minimum and maximum quantities and line quantities released. |
Category |
Select the category of the item. This is a required field for order contracts and recurring purchase order voucher contracts. |
Cancel |
Click to cancel a contract line. When you cancel a contract line, you cannot perform any further processing against the contract line. |
Merchandise Amt (merchandise amount) |
Enter the merchandise amount on the line expressed in the contract header currency. This is required for voucher and amount-only contract lines. Note: You can use negative contract amounts for the Voucher contract processing option only. |
Include for Release |
Select to release the line. If you want to release this line as a milestone, select the Release as Milestone check box. You can create a milestone line without selecting the Include for Release check box. However, for you to release the line as a milestone line, the Include for Release and Release as Milestone check boxes must both be selected. If the Release as Milestone check box is not selected, but the Amt Only check box is selected, the line is released as an amount-only line for the full amount. When you release lines, milestone lines cannot be released with nonmilestone lines. Each milestone can have only one release. For example, a 20 percent completion milestone on a construction project is paid using one milestone release when 20 percent of the project is complete. The remaining 80 percent of the project will need to be paid by other milestones, each with one release payment. For recurring purchase order vouchers, this check box is applicable only for the voucher releases and is available only after the contract line exists on the purchase order. The purchase order releases are generated in the background when a contract line has not yet been released to a purchase order. Therefore, the Include for Release check box is not accessible for purchase order releases of recurring purchase order vouchers. |
Status |
Displays the status of a contract line item. Values include: Active: Indicates that the line item is available. This is the normal status for a line. Cancelled: Indicates that the line has been canceled. Inactive: Indicates that the line is inactive. The next field descriptions describe system behavior for canceling and reactivating line items. |
|
Click to reactivate a contract line that has been canceled. While the contract is in a Draft version, you can reactivate a line. If you inactivate a line, it still appears, but the system protects all fields for the line, and the Reactivate button is still enabled. See the Cancel button description next for more information about using the Reactivate button. |
|
Click to cancel a contract line. If you have the authority to cancel contracts, in some cases, the system allows cancellation or inactivation of the line and the Cancel button (a red X) appears for you to perform these actions. Cancellation authority is set up by means of the Cancel Contract check box on the Contract Process page. Select The next lists provide information about canceling line items when the contract is in a Current version or Draft version. The discussions assume that you are authorized to cancel a line item. When working with the Current contract version that is in an Open status, consider these rules:
When working with the Draft contract version, which is always in an Open status, consider these rules:
|
|
Click to add a single line item or multiple line items to this contract. This button is not available if the contract is in an Approved status. When you select to add a row or multiple rows, the system inserts the new rows below the current row. |
|
Click to delete a single line item from this contract. This button is not available if the contract is in an Approved status. Note: You cannot delete rows when a corresponding row is on the Current version for which an agreement exists. This prevents you from monitoring the agreement's compliance. |


Order By Amount
Select the Order by Amount tab.
Field or Control |
Description |
|---|---|
Amt Only (amount only) |
Select this check box if the contract line is to be received by amount. This check box must be selected for you to enable the milestone functionality. Amount-only functionality is not available when you select the Release to Single PO Only contract process option on the Contract page. This check box is selected and unavailable for entry for recurring PO voucher contracts. If this check box is selected:
|
Release as Milestone |
Select to designate a milestone line. Milestones are not applicable when you select the Release to Single PO Only contract process option on the Contract page. The Amount Only check box must be selected for you to use milestone functionality. If the Release as Milestone check box is not selected, but the Amt Only check box is selected, the line is released as an amount-only line for the full amount. When you release lines, milestone lines cannot be released with nonmilestone lines. Each milestone can have only one release. For example, a 20 percent completion milestone on a construction project is paid using one milestone release when 20 percent of the project is complete. The remaining 80 percent of the project must be paid based on other milestones, each with one release payment. |
Item Information
Field or Control |
Description |
|---|---|
UPN Type |
Select the applicable UPN Type. |
UPN ID (Universal Product Number Identifier) |
Select applicable universal product number that is defined by a unique combination of item ID, manufacturer ID, manufacturer item ID, and Unit of Measure. On selecting the UPN ID, the item line information associated with the selected UPN ID will be populated. Note: For description only items, users will not have the option to select UPN Type and UPN ID from the prompt. They will have to enter the values. Note: If multiple lines are defined in the UOM/Pricing section, UPN ID and UPN Type fields of the default UOM/Pricing row will be display only fields. An icon to launch the UOM/Pricing page will be available next to the UPN ID field. |
Note: When adding a new contract, the fields UPN Type Code and UPN ID appears only after selecting the supplier or supplier ID for the contract.
Default Schedule
Select the Default Schedule tab.
Field or Control |
Description |
|---|---|
Use Contract Base Price |
For Ad Hoc Line Items, this option is already selected and cannot be edited. However, for Item ID Line Items, this option can be selected or deselected. |
Base Price |
This field is available for entering a base price when the Use Contract Base Price is check box is selected. For lines with Item ID, the Base price is derived from the item's Purchasing Attributes page. |
Currency |
Enter a currency that applies to the item price. |
Release Amounts
Select the Release Amounts tab.
Note: Released amounts are not version controlled. The released amounts displayed reflect current released amounts to date on all contract versions.
Field or Control |
Description |
|---|---|
Total Line Released Amount |
Displays the total amount released to date for the line that is expressed in the contract header currency. This value is updated by the PO Calculations process, online purchase order entry, or PeopleSoft Payables Batch Voucher process. |
Release Quantities
Select the Release Quantities tab.
Field or Control |
Description |
|---|---|
Total Line Released Quantity |
Displays the total quantity released to date for the line expressed in the contract line unit of measure. This value is updated by the PO Calculations process or online purchase order entry. |
Line Groupings
Select the Line Groupings tab.
The tab provides information about line groups that you can copy to a contract or that exist for a contract. A line group is a bundle of items that buyers use in PeopleSoft Strategic Sourcing to obtain better pricing for items.
When a Strategic Sourcing event is awarded to a contract, the system establishes a line grouping reference for the contract line. You can also create the line grouping manually by selecting a single contract line or multiple contract lines to add to a new group. After creating a line group, you can add items to the line group or remove items from the group. When you select items against which to perform a line group action, the Add Selected Lines to New Group field appears. Using this field, you can select the type of action that you want to perform for the contract's line items. The contract must be in an Open status to insert or delete line group items.
When you copy a contract, the system also copies line groups that are associated with contract line items to the new contract. You can remove contract line items that originate from a PeopleSoft Strategic Sourcing event. When you remove an item, you must remove all items for the line group. Also, you cannot change or add a line group for these items. You cannot change items or quantities sourced from an event.
When a line grouping is awarded to a purchase order, the purchase order line's Detail tab displays an indicator that the item belongs to a line grouping. If you attempt to change a line associated with an event, the system displays a warning message. If you continue with the change, all items in the line group are removed from the purchase order and placed back in the event to be awarded again. For more information about purchase order line items that belong to a line group, see the documentation PeopleSoft Purchasing .
See Maintain Purchase Order - Purchase Order Page
Note: When you are performing line group actions, the system does not perform the action until you click the OK button.
Field or Control |
Description |
|---|---|
Select for Grouping |
Select to add the items that you select to an existing line group, add them to a new group, or remove them from a group. |
Add Selected Lines to Group |
Select an action to perform against the line items that you selected using the Select for Grouping check box. Values that appear in the list of values include:
|
Group ID |
Displays the line group to which a contract item belongs. If the item is not a part of a line group, the field is blank. |
Spend Thresholds
Select the Spend Thresholds tab.
Field or Control |
Description |
|---|---|
Notify on Spend Threshold |
Indicates whether the buyer is to be notified when the spend threshold is met or exceeded. If the check box is selected, the system notifies the buyer. When you select this check box, the buyer becomes required for the contract. You can define the buyer using either the Contract Maintenance page or on the Thresholds & Notifications page. |
Threshold Notification Amount |
Displays the amount at which the system notifies buyers and interested parties that the spend threshold has been met or exceeded. This is a required field if the Notify on Spend Threshold check box is selected. |
Total Line Released Amount |
Displays the amount that has been released for the contract line. |
Use the Details for Line page (CNTRCT_PRC_UOM_SEC) to view details for the contract line.
Navigation:
Click the line details button Line Details button on the Contract page.
Line Details
Field or Control |
Description |
|---|---|
Physical Nature |
Indicates whether the object is a physical good or service. Values are Goods and Services. |
Release Amounts/Quantities
Field or Control |
Description |
|---|---|
Minimum Line Amount |
Enter a minimum amount that must be met when you are defining a release for this line. This is the minimum line amount per contract line per release. For example, if the supplier requires a minimum dollar value when creating a purchase order, you would specify that here. This value is expressed in the header currency. |
Maximum Line Amount |
Enter the maximum amount that is allowed for this particular line of the contract for all releases against this contract line. The total amount for all the releases cannot exceed the amount that you define here. This value is expressed in the header currency. This value is used for the purchase order line amount for recurring purchase order voucher contracts. |
Minimum Line Quantity |
If you specify a minimum line quantity, the system does not enable you to create a release that is below the minimum quantity. For example, the supplier does not process orders unless you order at least five bicycles at one time. This value appears by default from the Supplier's UOM & Pricing Info page, but it can be overridden here. This value is expressed in the default line unit of measure. This value may appear automatically from RFQ award quantity, and it can be changed. |
Maximum Line Quantity |
Enter the maximum line quantity that the supplier enables you to order for this particular line for all releases against this contract line. For example, the supplier might agree to sell you 10 bikes at a special price, but when you have purchased the 10 bikes, the supplier does not enable you to order additional bikes at this special price. This information appears by default from the Supplier's UOM & Pricing Info page, but it can be overridden here. This value is expressed in the default line unit of measure. When creating a blanket order, use this field to enter a maximum line quantity. This value may appear automatically from RFQ award quantity, and it can be changed. |
Pricing Information
Field or Control |
Description |
|---|---|
Use Contract Base Price |
Select to use the base price on the contract rather than the price on the Supplier's UOM & Pricing Info (supplier's unit of measure and pricing information) page as the base price when calculating the purchase order price for the item. The Base Price field becomes available for entry when you select this check box. For ad hoc items, this check box is selected and unavailable for entry because a base price value is required for ad hoc items. |
Price Can Be Changed on Order |
Select to be able to change the calculated price on purchase orders. If you select a specific contract line, the system will check the setting at the line level. The value is applicable whether you are creating releases from the contract, whether the contract is manually selected on the purchase order, or whether sourcing finds it. If you do not select this check box, the system-calculated price for the item is a protected field on the purchase order. |
Price Date |
Select the date that the system uses to calculate purchase order prices for the item. Options are PO Date and Due Date. |
Price Qty (price quantity) |
Select either the line quantity or the schedule quantity as the quantity that the system uses to calculate purchase order prices for the item. |
Qty Type (quantity type) |
Select the quantity type. Options are Quantity to Date and Current Order Quantity. If you select quantity to date, the cost per item is based on a cumulative quantity ordered. If you select current order quantity, each order stands on its own. |
Use Vndr Price UOM Adjustments (use supplier price unit of measure adjustments) |
Select to use the UOM-based supplier price adjustments, if any, when pricing the item. |
Use Supplier Price Shipto Adjust (use supplier price shipto adjustments) |
Select to use the ship-to-information-based supplier price adjustments, if any, when pricing the item. |
Adjust |
Select whether the system calculates supplier price adjustments before or after the contract price adjustments. This option applies only if the calculation type is Increment Adjustments . Options are: After Contract Adjustments: Select to have supplier price adjustments calculated after the contract price adjustments. Before Contract Adjustments: Select to have supplier price adjustments calculated before the contract price adjustments. Note: If both a supplier adjustment and contract adjustment exists with the same sequence number and different calculation types, the system uses the calculation type from the last adjustment. |
Order By Amount
Field or Control |
Description |
|---|---|
Amount Only |
Select this check box if the contract line is to be received by amount. |
Merchandise Amount |
Enter the merchandise amount on the contract line. If the Amount Only check box is selected, this becomes a mandatory field. |
Example Illustrating the Difference Between Selecting Quantity to Date and Current Order Quantity
Here is an example to illustrate the difference between selecting quantity to date and current order quantity.
Suppose that you have a contract to purchase 100 desks. One desk is delivered every day for 100 days. The base price per desk is 200.00 USD.
|
Quantity |
Base Price |
|---|---|
|
Qty 1–2 |
200.00 USD each |
|
Qty 3–4 |
175.00 USD each |
|
Qty 5–100 |
130.00 USD each |
If you select the Quantity to Date quantity type, the quantity on each release of the contract (each purchase order) is cumulative. The first two deliveries are charged at 200.00 USD each. The third through fourth deliveries are charged at 175.00 USD each, and the fifth through hundredth deliveries are charged at 130.00 USD each.
If you select the Current Order Quantity quantity type, each order stands on its own. No price break is available under this structure and each delivery of one desk is charged at 200.00 USD.
Schedule Defaults - UOM/Pricing
The valid combinations of price location, UOM, and currency are defined as the item-supplier combinations in the Purchasing Attributes component. These are the only combinations that are available for non-ad hoc (not description-only) orders, but you can change the price as needed.
Field or Control |
Description |
|---|---|
Release Default |
Select to determine the default price, UOM, supplier location, and currency on the releases for this contract line. One default UOM row is required for generating releases. You must specify a default UOM price in the Base Price field. Note: The row that is selected as the default row is used to create releases from the contract. |
Price Loc (price location) |
Select the supplier price location to use for pricing on this contract line. This field is required for order contracts. |
UOM |
Select the unit of measure to be used on the purchase order. The system generates the default unit of measure from the Supplier's UOM & Pricing Info page. When you order by description, all UOMs are available. When you order by item ID, only valid UOMs are available. |
UPN Type Code |
Select applicable UPN Type Code. |
UPN ID (Universal Product Number Identifier) |
Select applicable universal product number that is defined by a unique combination of item ID, manufacturer ID, manufacturer item ID, and Unit of Measure. On selecting the UPN ID, the item line information associated with the selected UPN ID will be populated. Note: For description only items, users will not have the option to select UPN Type and UPN ID from the prompt. They will have to enter the values. |
Base Price |
Displays the base price to be used as the system-calculated purchase order price for the contract item. This base price appears by default from the Supplier's UOM & Pricing Info page, and it can be changed if you select the Use Contract Base Price check box. If you enter an adjustment on the PO Price Adjustments for Line page using the Match Ship or General Adjustment check box, the base price on the line is the price upon which the adjustment is performed. This field is required for order contracts and must be entered manually for order-by-description items. |
Curr (currency) |
Select the currency to use for this contract line item. This currency can be different from the currency that is specified at the overall contract level. The currency on the release must be the same as the currency on the UOM line that is selected as the default. Only currencies that are defined on the Supplier's UOM & Pricing Info page are available for selection in this field. However, when you order by description, all currencies are available. This field is required for order contracts. If the Allow Multicurrency PO check box is not selected at the contract header, this value appears automatically from the contract header and cannot be changed here. |
Use the Item Description page (CNTRCT_ITEM_DESCR) to enter and view descriptions for a specific item.
Navigation:
Click the Description button or item name link on the Contract page.
The item name link consists of the first 30 characters of the item's base language description in the Transaction Item Description text box on the Item Description page.
The item description appears in the base language in the Transaction Item Description text box. The item description appears in the preferred language in the display-only Preferred Language Item Descr (preferred language item description) text box. The preferred language is the language preference that you specify when you sign in to the system.
The item descriptions in the preferred language are defined in the Purchasing Attributes component. This component is capable of storing certain field values in the base language, as well as in preferred languages.
For example, if the base language for the system is French, but you sign in with a preferred language of Dutch, certain fields, including item descriptions, in the Purchasing Attributes component are available for entry in the preferred language of Dutch. If you enter an item description in the preferred language of Dutch, when you sign in to the system with the preferred language of Dutch and access the Item Description page, the Preferred Language Item Desc text box displays the item description that you entered in the preferred language. The Transaction Item Description text box retains the item description that is entered in the base language.
If an item description in the preferred language does not exist, or if the base and preferred languages are the same, the base-language item description appears in the Preferred Language Item Descr text box.
You can modify the item description in the Transaction Item Description text box on the transaction line for RFQs, contracts, and purchase orders. This item description cannot be modified for requisition and receipt items that are defined on the Purchasing Attributes page. For all other scenarios, the Transaction Item Description group box is not available for entry.
Use the Description text box on the transaction line to enter ad hoc items on RFQs, requisitions, contracts, and purchase orders. The description that you enter becomes available on the Item Description page. The preferred language option is not applicable in this scenario.
Use the Voucher Tax Info for Line (voucher tax information for line) page (CNTRCT_LN_VAT_SEC) to set sales and use tax options for a contract line.
Navigation:
Click the voucher tax info buttonVoucher Tax Info button that is located in the line area of the Contract page.
Field or Control |
Description |
|---|---|
AP Business Unit (PeopleSoft Payables business unit) |
Displays the PeopleSoft Payables business unit that is defined as the default on the Voucher Distribution Information for Line page. The values that are defined on this page appear by default on the release only if this business unit matches the release business unit. Otherwise, the Voucher Build process (APVCHRBLD) and the Voucher Edit process provide the default values. |
Ship To |
Select the ship to destination. The ship to information appears by default from the value in the AP Business Unit field, or else the system determines it during the Batch Voucher process if it is not specified here. The shipto default value is determined according to the PeopleSoft Payables control hierarchy: supplier, origin, group, and business unit. |
Withholding
Field or Control |
Description |
|---|---|
Withholding Applicable |
Select to designate a withholding that is applicable to the supplier. This field is used on voucher contracts but not on order contracts. |
Withholding Code |
If withholding is applicable on this line, enter the withholding code. This field is used on voucher contracts but not on order contracts. |
Sales/Use Tax Line Information
Field or Control |
Description |
|---|---|
Tax Destination |
Select the location code on which the sales and use tax (SUT) calculation for the voucher should be based. The system uses this as the tax basis. |
SUT Excptn Cert (sales and use tax exception certification) |
Select to indicate that the line is an SUT exception. Values are:
|
Tax Code SUT (tax code sales and use tax) |
Select the tax code for the line. A tax code consists of a group of tax authorities. For example, if a certain locality has a city tax, trade use tax, county tax, and state tax, you can create four tax authorities and group them into a single tax code. |
SUT Apply (sales and use tax apply) |
Select the SUT applicability rule for the line. Options are:
|
Ultimate Use Code |
Select an ultimate use code to override the default tax rate for a location. In most cases, the sales tax is computed as a use tax based on the tax code that is applicable to the ship to or use destination. However, how merchandise is ultimately used may also result in a different tax rate within the same ship to or use destination. |
Use the Milestones for Line page (CNTRCT_MILESTN_SEC) to divide a voucher or order contract line into milestones and set up rules for the milestones.
This page is available for lines that are defined as Amount Only. In addition, you must have entered a merchandise amount for the selected line.
Navigation:
Click the Milestones button that is located in the line area of the Contract page. This button is located on the Order by Amount tab.
Field or Control |
Description |
|---|---|
Control Total |
Displays the total amount that is controlled by milestones. This is the merchandise amount from the contract line. |
Milestone Criteria
Field or Control |
Description |
|---|---|
Include for Release |
Select to release the milestone line. If the contract is for a recurring purchase order voucher, you can select this check box only after the contract line exists on the associated purchase order. |
Status |
Displays the milestone status. Options are:
|
% Complete (percent complete) |
Enter the completion percentage that is necessary for the milestone line to take effect. The total of the milestone line percentages must equal 100. This value is used to calculate the released amount. |
Amount |
Enter the amount to be paid on the milestone line. The total of the milestone line amounts must equal the value in the Control Total field. |
Target Date |
Enter the target completion date for the milestone line. This is for your reference only. |
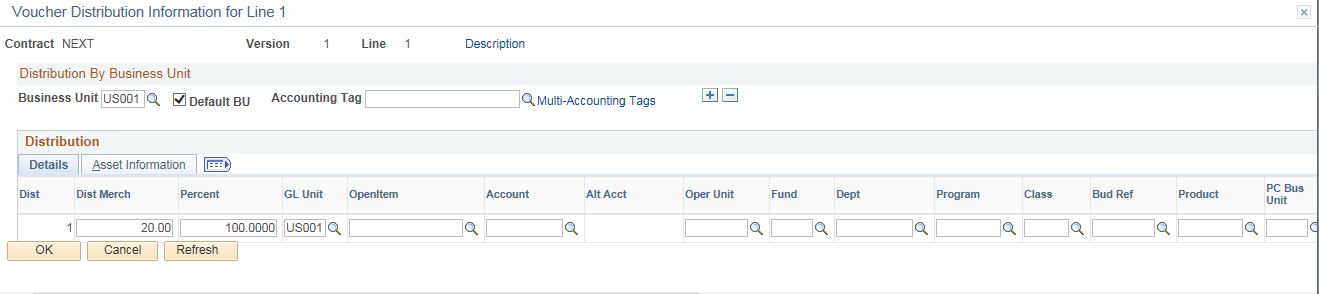
Use the Voucher Distribution Information for Line page (CNTRCT_DSTRB_SEC) to set up one or more distribution lines for each contract line.
When a contract line is released to a voucher, the distribution lines are copied to the voucher line. You can use this page for voucher releases only.
Navigation:
Click the voucher distribution button Voucher Distrib button that is located in the line area of the Contract page.
This example illustrates the fields and controls on the Voucher Distribution Information for Line page. You can find definitions for the fields and controls later on this page.
Field or Control |
Description |
|---|---|
Business Unit |
Select the business unit to which to apply the defined distribution. The business unit on the first business unit row appears by default from the Contract page or the User Preferences - Overall Preferences page. This business unit becomes the default voucher-release business unit. If more than one business unit row is entered per contract line, you can select a different default business unit by selecting the Default BU check box for the business unit row. The default business unit that you select on the Voucher Distribution Information for Line page is used on the Voucher Tax Info for Line page and applies to all contract lines. Therefore, if you change the default business unit for one line, it becomes the default business unit for all lines. Only voucher business units that are set up on this page are eligible for release. For example, if you define the business unit for line 1 but not line 2 of a release on the Create Releases page, only line 1 can be released. For every business unit row on the Voucher Distribution Information for Line page, the total in the Dist Merch (distribution merchandise) field must equal the line amount, and every distribution line must have an account entered. Suppose that on one line you set up business units US001 and FRA01. When you insert a second line, these same business units are inserted into the business distribution rows for this second line. If you then delete one of the business unit rows from one of the lines, the business unit row on the other line is not deleted. For every business unit row, the total distribution amount must equal the line amount, and every distribution line must have an account entered. |
SpeedChart |
Select a SpeedChart code to assign preset distributions to the line. Note: The field is enabled only when the default option is set to override. Accounting Tags appear in lieu of Speedcharts when the Accounting Tag check box is selected for Purchasing on the Accounting Tag Registration page. See Setting Up Accounting Tags |
Accounting Tag |
Enter an Accounting Tag that will be used to populate ChartFields on transaction distribution lines. The system automatically prorates the amount of an accounting line according to the proration percentages defined on the Accounting Tag. Note: Accounting Tags appear in lieu of Speedcharts when the Accounting Tag check box is selected for Purchasing on the Accounting Tag Registration page. See Setting Up Accounting Tags |
Multi Accounting Tag |
Click to access the Multi Accounting Tag page, where you can append and override accounting tags for the distribution lines. Note: Multi Accounting Tag link appears only if amount only check box is selected on the Contract line details page. Note: Accounting Tags appear in lieu of Speedcharts when the Accounting Tag check box is selected for Purchasing on the Accounting Tag Registration page. See Setting Up Accounting Tags |
Details
Field or Control |
Description |
|---|---|
Percent |
Enter the distribution percentage. This percentage is calculated based on the amount on the voucher distribution. The total percentage must equal 100. |
Asset Information
Select the Asset Information tab.
Note: The fields on this page do not appear by default from the item definition for an asset item. If you are associating an asset item with the contract, you need to enter the fields on this page.
Field or Control |
Description |
|---|---|
Business Unit and Profile ID |
If you consider an item to be an asset and plan to pass it on to the PeopleSoft Asset Management application through the PeopleSoft Receiving business process, you must complete both the Business Unit (PeopleSoft Asset Management business unit) field and the Profile ID field. If both fields contain values, the system writes data to the PeopleSoft Asset Management staging tables. Both fields must be completed for the system to treat the item as an asset. If only one of the fields is completed, the system does not treat the item as an asset. All of the information that you enter on this page is passed to PeopleSoft Asset Management. |
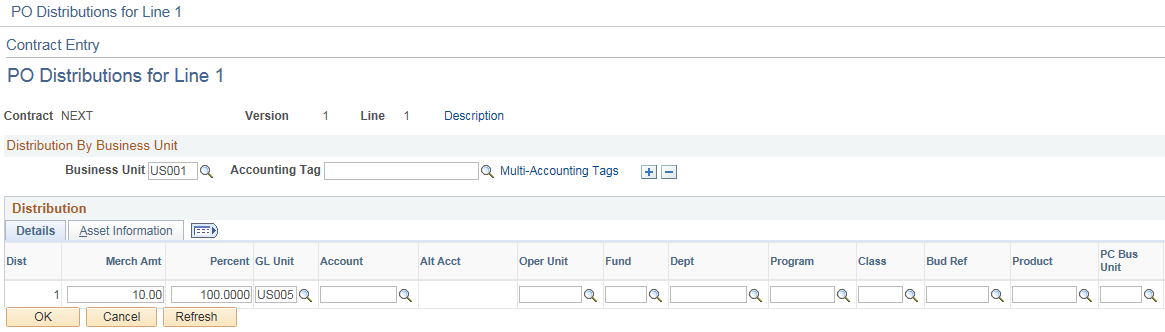
Use the PO Distributions for Line (purchase order distributions for line) page (CNTRCT_DSTRBPO_SEC) to enter contract line-level distribution defaults.
This enables you to maintain unique sets of purchase order distribution defaults for each business unit. You can use the distribution entries as default values during the contract release process, based on the affected purchasing business unit.
Navigation:
Click the PO distribution button PO Distribution Details button on the Contract page.
This example illustrates the fields and controls on the PO Distributions for Line page. You can find definitions for the fields and controls later on this page.
Field or Control |
Description |
|---|---|
Business Unit |
Select the business unit to which to apply the defined distribution. If the distribution was created from an RFQ or strategic sourcing event, all distribution fields are populated by the RFQ or Strategic Sourcing Event distribution. If the RFQ or SS event originates from a requisition, you cannot delete distribution rows for the requisition or RFQ or SS event business unit. Suppose that on one line you set up business units US001 and FRA01. When you insert a second line, these same business units are inserted into the business distribution rows for this second line. If you then delete one of the business unit rows from one of the lines, the business unit row on the other line is not deleted. |
SpeedChart |
Select a SpeedChart code to assign preset distributions to the line. Note: The field is enabled only when the default option is set to override. Accounting Tags appear in lieu of Speedcharts when the Accounting Tag check box is selected for Purchasing on the Accounting Tag Registration page. See Setting Up Accounting Tags |
Accounting Tag |
Enter an Accounting Tag that will be used to populate ChartFields on transaction distribution lines. The system automatically prorates the distribution amounts according to the proration percentages defined on the Accounting Tag. Note: Accounting Tags appear in lieu of Speedcharts when the Accounting Tag check box is selected for Purchasing on the Accounting Tag Registration page. See Setting Up Accounting Tags |
Multi Accounting Tag |
Click to access the Multi Accounting Tag page, where you can append and override accounting tags for the distribution lines. Note: Multi Accounting Tag link appears only if amount only check box is selected on the Contract line details page. Note: Accounting Tags appear in lieu of Speedcharts when the Accounting Tag check box is selected for Purchasing on the Accounting Tag Registration page. See Setting Up Accounting Tags |
Details
Select the Details tab.
Field or Control |
Description |
|---|---|
Dist Merch |
This field becomes visible on Contract PO Default Distributions for general contract and purchasing order contract, if the corresponding line ‘Amount Only’ flag is checked. The total distribution amount and the related line merchandise must be equal and the total percentage should be 100. If you change any of this value, the distribution merchandise and percentage is recalculated. The same functionality applies also in case you have multiple business units. The Distribution Merchandise amount is calculated as Line merchandise amount * percentage of accounting tag (or speedchart) when using accounting tag (or speedchart) template to default the distributions. |
Percent |
Enter the distribution percent. This percentage is calculated based on the amount on the purchase order distribution. The total percentage must equal 100. Note: Account marked as open-item cannot be used for PO releases. |
Asset Information
Select the Asset Information tab.
Note: The fields on this page do not appear by default from the item definition for an asset item. If you are associating an asset item with the contract, you need to enter the fields on this page.
Field or Control |
Description |
|---|---|
Business Unit and Profile ID |
If you consider an item to be an asset and plan to pass it on to the PeopleSoft Asset Management application through the PeopleSoft Receiving business process, you must complete both the Business Unit (PeopleSoft Asset Management business unit) field and the Profile ID field. If both fields contain values, the system writes data to the PeopleSoft Asset Management staging tables. Both fields must be completed for the system to treat the item as an asset. If only one of the fields is completed, the system does not treat the item as an asset. All of the information that you enter on this page is passed to PeopleSoft Asset Management. |
Use the Price Adjustments for Item Line page (CNTRCT_PRC_ADJ_SEC) to enter price adjustments for fixed items that apply only to the specific line item.
You can use this page for order releases only.
Navigation:
Click the price adjustments buttonPrice Adjustments button on the Contract page.
The Price Adjustments for Item Line page is similar to the Open Item Price Adjustments page. The Price Adjustment for Item Line page optionally allows more granular percentage and amount adjustments for a specific UOM. This enables price adjustments by unit of measure and optionally multiple quantity breaks for those units of measure and amount adjustments rather than just percentage adjustments.
If you select the Match UOM check box, the system displays the UOM field, where you can select the unit of measure to match. For example, you might want to give a 3 percent discount if you purchased in 1–10 cases, a 4 percent discount if you purchase 11–20 cases, and one dollar (USD) off for each case at 21 cases and above. When you select the Match Shipto check box, the Ship To field becomes a required field. You can enable an additional discount/surcharge percentage when shipping to a specific shipto location.
See Open Item Price Adjustments Page.
If you select the Match UOM check box, the system displays the UOM field where, you can select the unit of measure to match.
You can also enter multiple quantity price breaks when the UOM Match check box is selected. The following fields are available when you select the Match UOM check box.
Field or Control |
Description |
|---|---|
Min Qty (minimum quantity) |
Enter the minimum quantity for the price adjustment. |
Max Qty (maximum quantity) |
Enter the maximum quantity for the price adjustment. The maximum quantity of one line cannot be greater than the minimum quantity of the next line. For example, if the maximum quantity of a line is 5, the minimum quantity of the next line must be greater than 5. |
Method |
Select the line item adjustment. You can select a percentage adjustment (like the other types of adjustments) or an amount adjustment. If you select Amount, the Amount field appears. If you select Percentage, the Percentage field appears. In either case, the system calculates the adjusted price for you. |
Amount |
Enter an adjustment amount for the line item. The system applies the value against the adjusted price for the adjustment method to arrive at an adjusted price |
Percentage |
Enter an adjustment percentage for the line item. The system applies the value against the adjusted price to arrive at a final adjusted price. |
Adjusted Price |
Displays the price after the adjustment is applied. This field is for information only and is more of an estimate than a final price. This is because the calculation takes into account only those adjustments on this price sequence, and multiple price sequences could exist. |
Use the View Catalog Hierarchy page (CAT_PARENTAGE_SEC) to view information about where a category resides in the entire catalog tree hierarchy.
Navigation:
Click the View Category Hierarchy link on the Contract page.
Field or Control |
Description |
|---|---|
Catalog ID |
Select a catalog ID to display the catalog's hierarchy. Click the folder buttons to display item categories and subcategories that are contained in the selected catalog. |
Use the Category Search page (CAT_SEARCH_SEC) to search for and select an appropriate category ID for the item when entering an ad hoc item.
You search for the category ID using a category hierarchy tree.
Navigation:
Click the Category Search link on the Contract page.
Field or Control |
Description |
|---|---|
Catalog ID |
Select the catalog ID that the system uses to locate the catalog in which you want to search for item categories. |
All Items |
Click to display all categories that are associated with the selected catalog. Select a category to populate the Category field for the transaction. |
Use the Order By Catalog page (ORD_BY_ITEM_CAT) to search for and select items to order from a catalog.
Navigation:
Click the Catalog link on the Contract page.
Field or Control |
Description |
|---|---|
Order |
Click to add items to the transaction document. To add an item, select the check box for the item, enter a quantity, and click the Order button. |
Line Page |
Click to return to the page from which you accessed the Order By Catalog page. |
Use the Item Details page (ITM_CAT_DETAIL) to view catalog item details.
Navigation:
Click the Item Details link on the Order By Catalog page.
The fields on this page are automatically populated from the Item Definition: General tab - Common page and the Purchasing Attributes page. The manufacturer's description information appears by default from the Manufacturer page.
Field or Control |
Description |
|---|---|
UPN ID (Universal Product Number Identifier) |
Displays the UPN ID that is assigned to a unique combination of item ID, manufacturer ID, UOM, and supplier. The system uses the supplier location on the Create Releases page. |
Device Track |
Indicates whether the item is tracked by device. By default, this check box is selected and unavailable for device-tracked items unless they are description-only (no item ID). Select to track by device items that are description-only. |
Use the Item Supplier Priority page (ITM_CAT_VNDR) to view qualifying suppliers that are preapproved to provide selected items.
Navigation:
Click the Item Supplier link on the Order By Catalog page.
Field or Control |
Description |
|---|---|
Status |
Select the status of the item's availability. Options are:
|
Priority |
Enter the numeric rating that is assigned to each of the selected item's approved suppliers. It designates the priority that the organization places on ordering the selected item from that supplier. The field value appears by default from the Purchasing Attributes - Item Supplier Priority page. |
Price |
Enter the supplier's standard price for the selected item. This information appears by default from the Supplier's UOM & Pricing Info page. |
Use the Set Item Alias page (ITM_ALIAS) to set up an alias for the selected item so that you don't need the supplier's ID or description each time you order the part.
These aliases are stored according to user ID so that each user can have a different alias for the same item.
Navigation:
Click the Alias link on the Order By Catalog page.
Field or Control |
Description |
|---|---|
Item Alias |
Enter an item alias. The alias is available after you save the transaction document. If you don't save the originating transaction document, the alias is not saved. The item alias is associated with a user ID and is available only to that user. |
Use the Item Search Criteria page (ITEM_SEARCH_SP) to search for items.
Navigation:
Click the Item Search link that is located in the line area of the Contract page.
Click the Items button that is located in the line area of the Contract page.
The fields that are available for entry on this page make up the item search criteria. The system finds all items that match the search criteria that are entered. You can perform narrow or wide searches, but you must enter at least one search parameter. The values on this page are defined in the Item Definition component.
Select an item check box to select the associated item and populate the selected transaction line on the original page from which you access the Item Search Criteria page. Selecting an item check box causes the selected item to overwrite any existing item on the selected line on the original page.