Requesting Changes to Supplier Information
The supplier change request pages appear in a horizontal navigation with pages also known as train stops that guide users through the change request process. The actual pages and fields that appear on each page are determined by templates created during system setup for supplier change requests.
See Creating Templates for Supplier Change Requests.
Supplier change requests enable suppliers to request changes to supplier information in the system. Supplier information fields are discussed in more depth in Understanding Supplier Maintenance.
Depending on template setup, suppliers have access to these train stops to make a supplier change request:
Welcome
Company Profile
Addresses
Contacts
Payment Information
Categorization
Review and Submit
|
Page Name |
Definition Name |
Usage |
|---|---|---|
|
SCR_VNDR_SELECT |
Start a new supplier change request or select an existing request to continue the request process. External users see this page only when they have multiple in-progress change requests. The system always sends internal users to the selection page prior to the train stops because they have access to multiple suppliers. |
|
|
SCR_WELCOME |
Displays a personalized welcome message and request change instructions, as defined in the template. |
|
|
SCR_ID |
Update or change supplier information, including answering any profile questions set up for this supplier change request. Possible groups of information include ID numbers, government classifications, and standard industry codes, among others. |
|
|
SCR_ADDR_SEL |
Select an existing address for modification or create a new address. |
|
|
Address Information Page (Detail) |
SCR_ADDR_SEC |
Make changes to address information in the change request. |
|
SCR_CNTCT_SEL |
Select an existing contact for modification or create a new contact. |
|
|
Contact Information Page (Detail) |
SCR_CNTCT_SEC |
Make changes to information for the supplier contact in the change request. |
|
SCR_LOC_SEL |
Review and edit payment profile information. |
|
|
Payment Profile Page (Detail) |
SCR_PAYMENT |
Make changes to profile information in the change request. |
|
SCR_CATEGORY |
Add or remove categories from the available self-categorization tree. |
|
|
SCR_SUBMIT |
Review and submit or withdraw the change request. |
Use the Supplier Change Request Selection page (SCR_VNDR_SELECT) to start a new supplier change request or select an existing request to continue the request process.
External users see this page only when they have multiple in-progress change requests, otherwise the system directs them to the train stops for the change request.
The system always sends internal users to the selection page prior to the train stops because they have access to multiple suppliers. Internal users can create a new change request for any supplier they have access to (based on the associated SetID) or select a change request that they previously started and would like to continue.
Navigation:
Internal:
Supplier Secure Home Page: Supplier Secure Home Page Supplier Change Request
This example illustrates the fields and controls on the Supplier Change Request Selection page for an internal user with access to multiple supplier IDs. You can find definitions for the fields and controls later on this page.
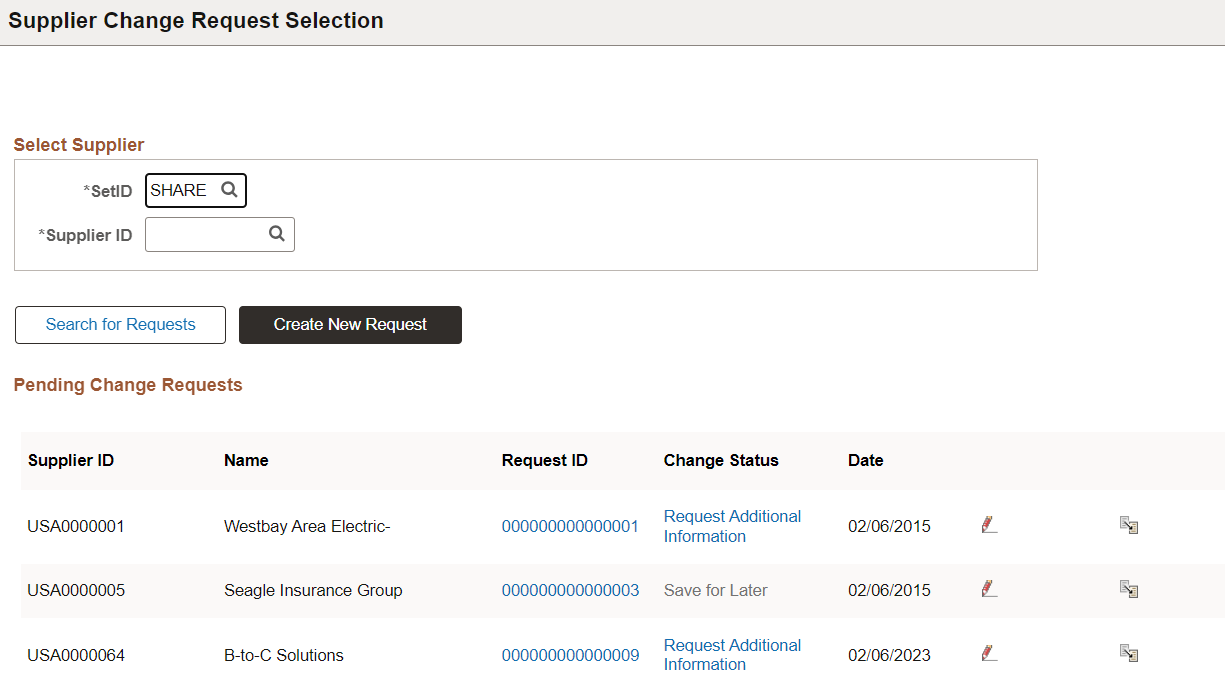
This example illustrates the fields and controls on the Supplier Change Request Selection page for a Supplier user. You can find definitions for the fields and controls later on this page.

Note: To Initiate Change Request, Primary Access Email Address should be defined for the Supplier.
Field or Control |
Description |
|---|---|
Select Supplier group box |
Enter or use the lookup prompt for a SetID and Supplier ID. You can search for previously started change requests for a specific supplier or leave the Supplier ID search field blank to retrieve your open change requests for all suppliers. The results include only requests created by the user performing the search. This group box is visible to internal users only. |
|
Generate Access Code |
To enhance supplier security, the user must authenticate by validating the access code before proceeding with the change request. The logged-in user's email address will receive the access code. To proceed, enter and validate the access code. The access code validation appears only when the Enable Access Code for User Authentication check box is enabled on the Supplier Request System Setup - General Page. Note: The Generate Access Code button appears only for creating change requests using the Supplier Secure Home Page, Manage Profile. According to the EDIT_PRIM_EMAILID role configuration, the Edit Primary Access Email ID link also appears on the Company Profile train stop. For more information about the Supplier Secure Home Page, see Viewing the Navigation Collection for Comprehensive Supplier Portal. |
Search for Requests |
Click this button to search for requests based on the entered search criteria. |
Create New Request |
Click this button to initiate a new supplier change request. |
Supplier ID and Name |
Displays the supplier ID and supplier name for the change request. |
Request ID |
Click this link to open the Review page for the change request. This link is available for all statuses. You can also access the Review page from the Submit train stop. |
|
Click this icon to open the change request for editing. This icon is available only for pending change requests with these statuses: Save for Later and Request More Information. You cannot edit a change request that has already been submitted for approval. |
|
Click this icon to withdraw, or cancel, the selected change request. This icon is available only for pending change requests with these statuses: Save for Later and Request More Information. You cannot withdraw a change request that has already been submitted for approval. Depending on the Reason Codes Reason Type Withdraw Request setting on the Supplier Request System Setup - General Page, you may have the option to select a Reason Code for the withdrawal. To withdraw a request with the Reason Code, see Withdraw Request Page. |
 (Edit)
 (Withdraw)
Field or Control |
Description |
|---|---|
Add Attachment |
Click the Add Attachment link or button to add one or more attachments. You can remove attachments added on the change request, but previously existing attachments cannot be removed. However, you may view the attachment. You can upload and view a variety of documents, including Microsoft Word and Adobe Reader documents, as well as Microsoft Excel, PowerPoint, and Access files. A link displays the number of attachments added for the supplier. |
Review Changes |
Click this link to review the changes made at any stage in the change request in a side-by-side display of current values and proposed changes. The review changes icon and link appear on the Welcome page or on any train stop page when the user is working on a “Save for Later” change request, is responding to a request for additional information, or has initiated a new change request. |
Communication Details |
Click this link to review reason codes or comments. This link is available only when a request for more information has occurred for the change request and reason codes or comments are present. |
Contact Us |
Click this link to enter a message to send to the contact set up to field questions for the supplier change request. Both the Contact Us email template ID and Contact User ID must be defined on the related registration template. |
Exit |
Click this button to exit out of the change process, or abort, without saving changes in a draft record or updating the master record. If the user continues with the exit process after a confirmation page, they are routed to the homepage and their changes are discarded. |
Save For Later |
Click this button after making changes to save changes and work on the change request sometime in the future. Confirm the save to continue. |
Use the Welcome page (SCR_WELCOME) to begin a supplier change request and read request change instructions as defined in the template.
Note: The system bypasses the Welcome train stop if no instructional text has been entered on the related template, or the Welcome check box is not selected on the Supplier Request Templates - General Page (Supplier Change Request). In that case, the user begins the change request on the first included train stop.
Navigation:
Email invitation.
FAQ link.
Supplier Portal:
Employee Portal:
This example illustrates the fields and controls on the Supplier Change Request: Welcome page.

Welcome page instructional text can be customized at the system level or at the template level.
Note: If Lookup/Select for Supplier Change Request Template check box is enabled on the Template Determination Setup, Change Request Templates page appears at the beginning. Select the appropriate template from the list and click OK to go to the Welcome page.
For more information about Template Determination Setup, see Supplier Request System Setup - General Page.
Note: You can define any field of the Change Request train stop as Personal Identifier (PII), Sensitive, or both on the Maintain Data Privacy Settings Page.
If Personal Identifier (PII) or Sensitive Information is available in the Change Request, Approver gets the alert message to review it on the Review page before approving the Change Request.
This message is only to alert the approver. It will not stop the approver from approving the Change Request.
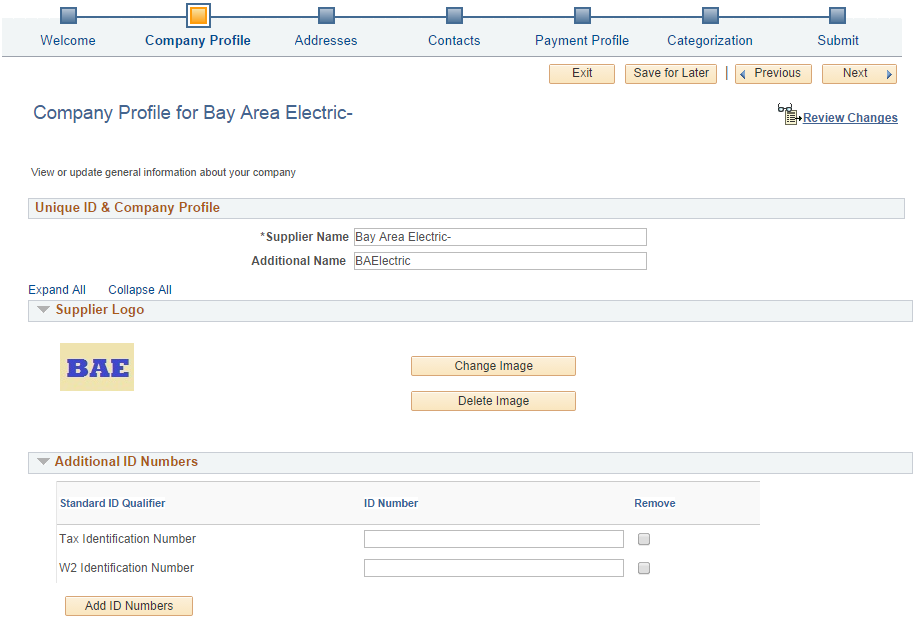
Use the Company Profile page (SCR_ID) to update or change supplier information, including answering any profile questions set up for this supplier change request.
Possible groups of information include ID numbers, government classifications, and standard industry codes, among others.
Navigation:
Click the Next button on the Welcome page, or click the Company Profile train stop in the horizontal navigation.
This example illustrates the fields and controls on the Supplier Change Request: Company Profile page (1 of 3).
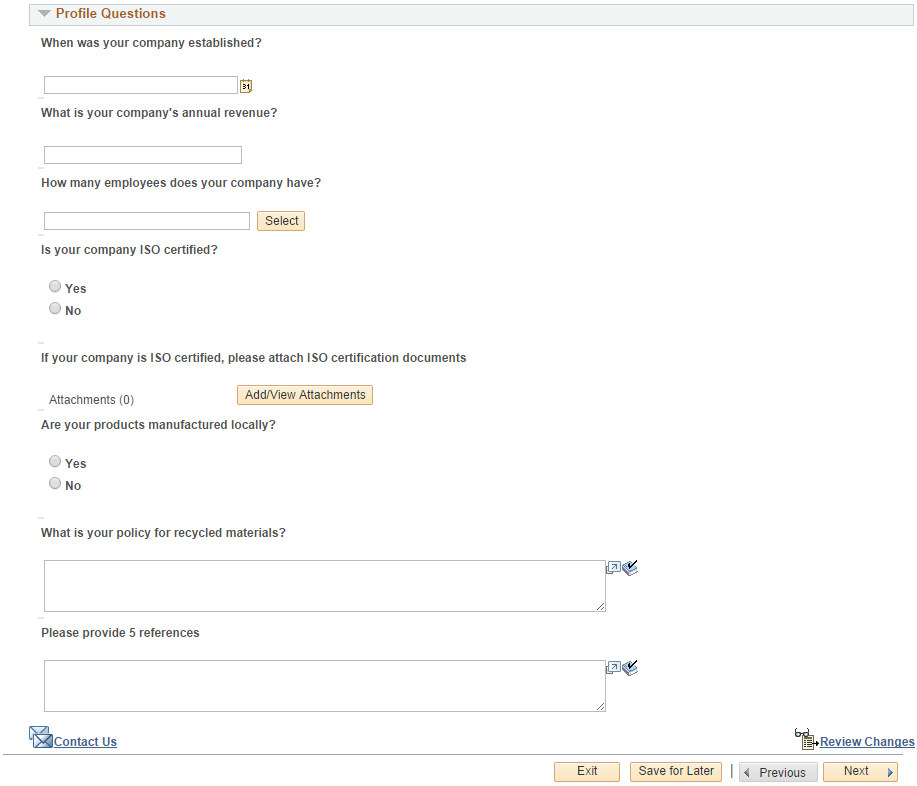
This example illustrates the fields and controls on the Supplier Change Request: Company Profile page (2 of 3).
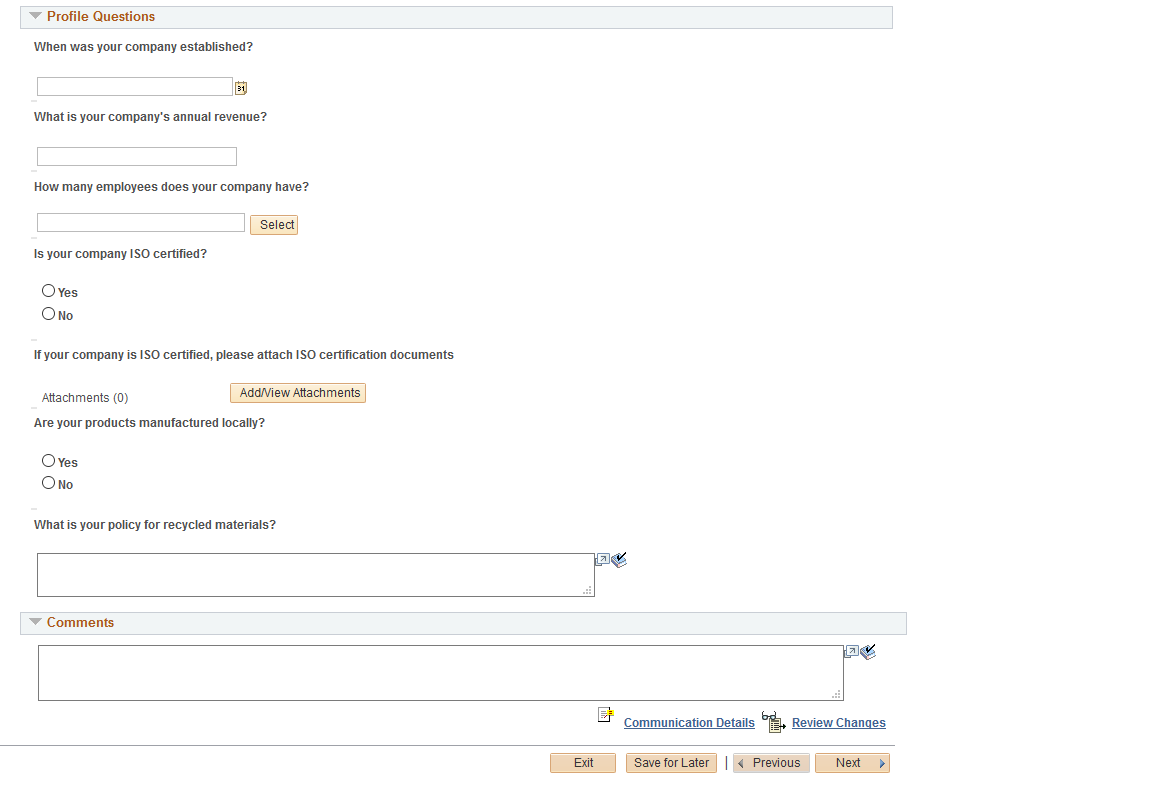
This example illustrates the fields and controls on the Supplier Change Request: Company Profile page (3 of 3).
The Identifying Information Page (New Bidder and New Supplier) used in online registration provides many of the same fields and their definitions.
These supplier information group boxes appear for internal users only:
Field or Control |
Description |
|---|---|
Supplier Relationship group box |
Identifies a parent supplier to which the current supplier is associated, when applicable. Also indicates whether the parent supplier is an interunit supplier as well as the interunit supplier ID. |
Supplier Rating group box |
Indicates a selection of Excellent, Good, Fair, Poor, or None for the supplier’s performance. |
Duplicate Invoice Settings group box |
Identifies the action that should be taken if a duplicate invoice number is entered on a transaction. Available options are Reject, Recycle, or Warning. The Duplicate Inv Indicator field defines what information should be compared when determining a duplicate. Options include Default from Higher Level or Specify at This Level. If specifying at this level, select which of these should be considered when comparing for duplicates: Business Unit, Supplier ID, Invoice Number, Invoice Date, and Gross Amount. The effective date can be the approval date or a date specified in the future. If there is an existing effective-dated record for the approval date or specified future date, the new effective dated record will be created for the following day. |
These supplier information group boxes appear for both internal and external users:
Field or Control |
Description |
|---|---|
Supplier Logo group box |
Click available buttons to add, change, or delete an associated logo image for the supplier. |
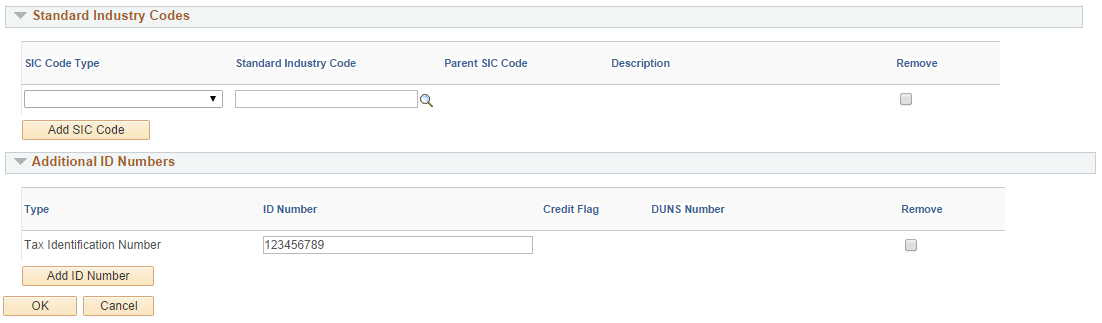
Additional ID Numbers group box |
Specify various types of ID numbers which uniquely identify the supplier, as well as a credit file indicator. Only the types of identifiers selected in the template are available for selection or display here. The duplicate supplier checking options selected on the supplier set control of the SetID for the supplier determine whether or not duplicate checking is performed when ID numbers are changed. See the Supplier Set Control Page for duplicate supplier checking options. |
Government Classifications group box |
Specify any pertinent certifications held by the supplier. Existing rows in the Government Sources grid cannot be modified; however, if changes are needed, you can delete an existing row and add a new row. |
Standard Industry Codes group box |
Indicate categorization of the types of goods or services provided by the supplier. This group box contains a grid for listing Standard Industry Codes. Existing rows in the Standard Industry Codes grid cannot be modified; however, if changes are needed, you can delete an existing row and add a new row. |
Additional Reporting Elements group box |
Specify information related to government regulations for minority and other protected classes, such as Type of Contractor, Historically Underutilized Business Zone program, Small Disadvantaged Business program, size of small business, veteran-owned or women-owned small businesses, ethnicity, and others. Enter a common parent’s TIN and name. |
VAT group box |
Select the VAT Applicable check box to indicate that this supplier is subject to VAT. If this check box is selected, at least one row must be entered into the VAT Registration grid in order to save. |
Profile Questions group box |
Enter additional data or answers to questions that are not otherwise captured in the fields of the supplier master. Click the Add Attachment button to add one or more attachments for questions. You can remove attachments added on the change request, but previously existing attachments cannot be removed. Note: You can select up to 99 files to upload at a time. |
Comments group box |
Enter any comments for the change request. Any comments entered at the time of supplier registration or at the Supplier master level is not visible here. |
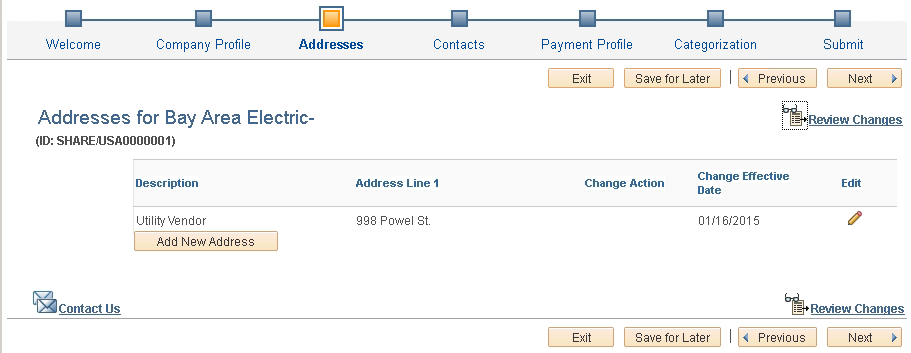
Use the Addresses page (SCR_ADDR_SEL) to select an existing address for modification or create a new address.
Navigation:
Click the Next button on the Company Profile page, or click the Addresses train stop in the horizontal navigation.
This example illustrates the fields and controls on the Supplier Change Request: Addresses page. You can find definitions for the fields and controls later on this page.
Field or Control |
Description |
|---|---|
Change Effective Date |
Displays the effective date if a future effective date was specified for the change, after a change has been made. Note: If there is an existing effective-dated record for the approval date or specified future date, the new effective-dated record will be created for the following day. |
Edit |
Click the Edit icon for an existing address to access the Address Information detail page (SCR_ADDR_SEC) for the contact. You can edit or delete address data from the secondary page, and indicate the date for the changes to take effect. Choose either a specified future date or the approval date. |
Add New Address |
Click this button to add a new address on the Address Information page (SCR_ADDR_ADD_SEC). Indicate the date for the changes to take effect. Choose either a specified future date or the approval date. |
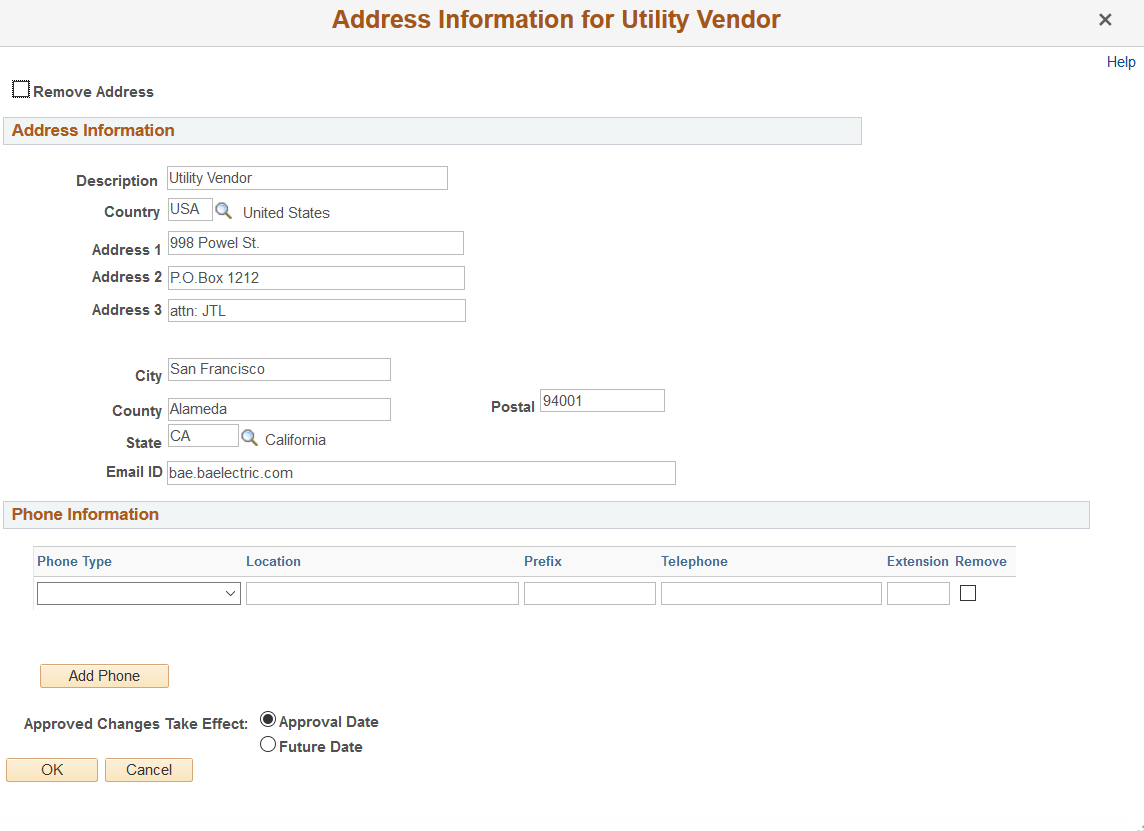
Address Information Page (Detail)
Use the Address Information detail page (SCR_ADDR_SEC) to make changes to address information in the change request.
Navigation:
Click the Edit icon for the address.
This example illustrates the fields and controls on the Address Information detail page.
Field or Control |
Description |
|---|---|
Remove Address |
Select this check box to remove a supplier address. You can remove a supplier address only if it is not in use by other supplier entities in PeopleSoft. If there are more than one supplier addresses, and you want to remove one of the supplier addresses, use the Contact Address drop-down list in the Contacts Page (Supplier Change Request) to change to a different address that is not in use, and then proceed to remove the address. The address that you remove for a supplier will be rendered as inactive with Effective Status as Inactive in the Supplier Information - Address Page Note: If you remove a supplier address on a date which is the same as the Supplier Address Effective Date, then the supplier address that you removed displays as new row with date-increment of 1, and Effective Status as Inactive in the Supplier Information - Address Page |
Approved Changes Take Effect |
Select Approval Date to indicate the change should occur upon the approval of the change request. Select Future Date to indicate the change should occur at a specified date in the future. Therefore, you have the option to remove an address even if it is in use by other supplier entities as long as the effective date is set for a future date. A message displays to remind you that the address you removed is going to be inactive on the future date. |
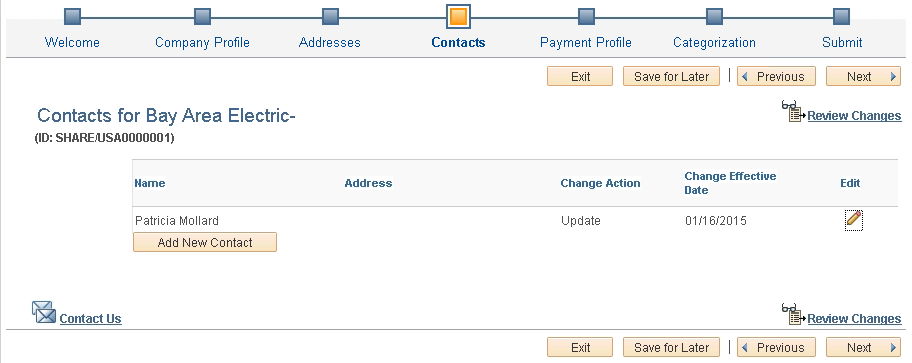
Use the Contacts page (SCR_CNTCT_SEL) to select an existing contact for modification or create a new contact.
Navigation:
Click the Next button on the Addresses page, or click the Contacts train stop in the horizontal navigation.
This example illustrates the fields and controls on the Supplier Change Request: Contacts page. You can find definitions for the fields and controls later on this page.
Field or Control |
Description |
|---|---|
Change Effective Date |
Displays the effective date if a future effective date was specified for the change, after a change has been made. Note: If there is an existing effective-dated record for the approval date or specified future date, the new effective-dated record will be created for the following day. |
Edit |
Click the Edit icon for an existing contact to access the Contact Information detail page (SCR_CNTCT_SEC) for making changes. You can edit or delete contact data from the secondary page, and indicate the date for the changes to take effect. Choose either a specified future date or the approval date. |
Add New Contact |
Click this button to add a new contact. Indicate the date for the changes to take effect. Choose either a specified future date or the approval date. A contact can have one phone number of each type. |
Note: Contacts added during online registration trigger the creation of a user profile, however, contacts added during the change request process do not trigger the creation a user profile.
Contact Information Page (Detail)
Use the Contact Information detail page (SCR_CNTCT_SEC) to make changes to information for supplier contacts in the change request.
Navigation:
Click the Edit icon for the contact.
This example illustrates the fields and controls on the Contact Information detail page.

Field or Control |
Description |
|---|---|
Remove Contact |
Select this check box to remove a supplier contact. You can remove a supplier contact only if it is not in use by other supplier entities in PeopleSoft. The contact that you remove for a supplier will be rendered as inactive with Effective Status as Inactive in the Supplier Information - Contacts Page Note: If you remove a supplier contact on a date which is the same as the Supplier Contact Effective Date, then the supplier contact that you removed displays as new row with date-increment of 1, and Effective Status as Inactive in the Supplier Information - Contacts Page |
Contact Address |
Select to use a specific contact address. |
Approved Changes Take Effect |
Select Approval Date to indicate the change should occur upon the approval of the change request. Select Future Date to indicate the change should occur at a specified date in the future. |
Use the Payment Profile page (SCR_LOC_SEL) to review and edit payment profile information only. Payment profiles cannot be deleted.
Note: Bank account numbers are considered sensitive data, and as such are partially masked for all users, regardless of role. Only the bank account’s last 4 digits are displayed, even during approval.
Navigation:
Click the Next button on the Contacts page, or click the Payment Profile train stop in the horizontal navigation.
This example illustrates the fields and controls on the Supplier Change Request: Payment Profile page. You can find definitions for the fields and controls later on this page.

Field or Control |
Description |
|---|---|
Default |
Select this check box to indicate a default supplier location. This check box is available when there are multiple supplier locations. |
Edit |
Click the Edit icon for a payment profile to access the Payment Profile secondary page (SCR_PAYMENT) for selected profile. Update payment information from the secondary page. All changes take effect immediately upon approval. |
|
Add New Location |
Click to add a new location for the supplier. All changes take effect immediately upon approval. The added location information will be available on the Review page. Add new location option is also available for Editors and any changes done will be displayed on the Adjustment History page. For additional information, see Reviewing and Editing Supplier Change Requests |
This example illustrates the fields and controls on the Payment Profile secondary page (1 of 2). You can find definitions for the fields and controls later on this page.
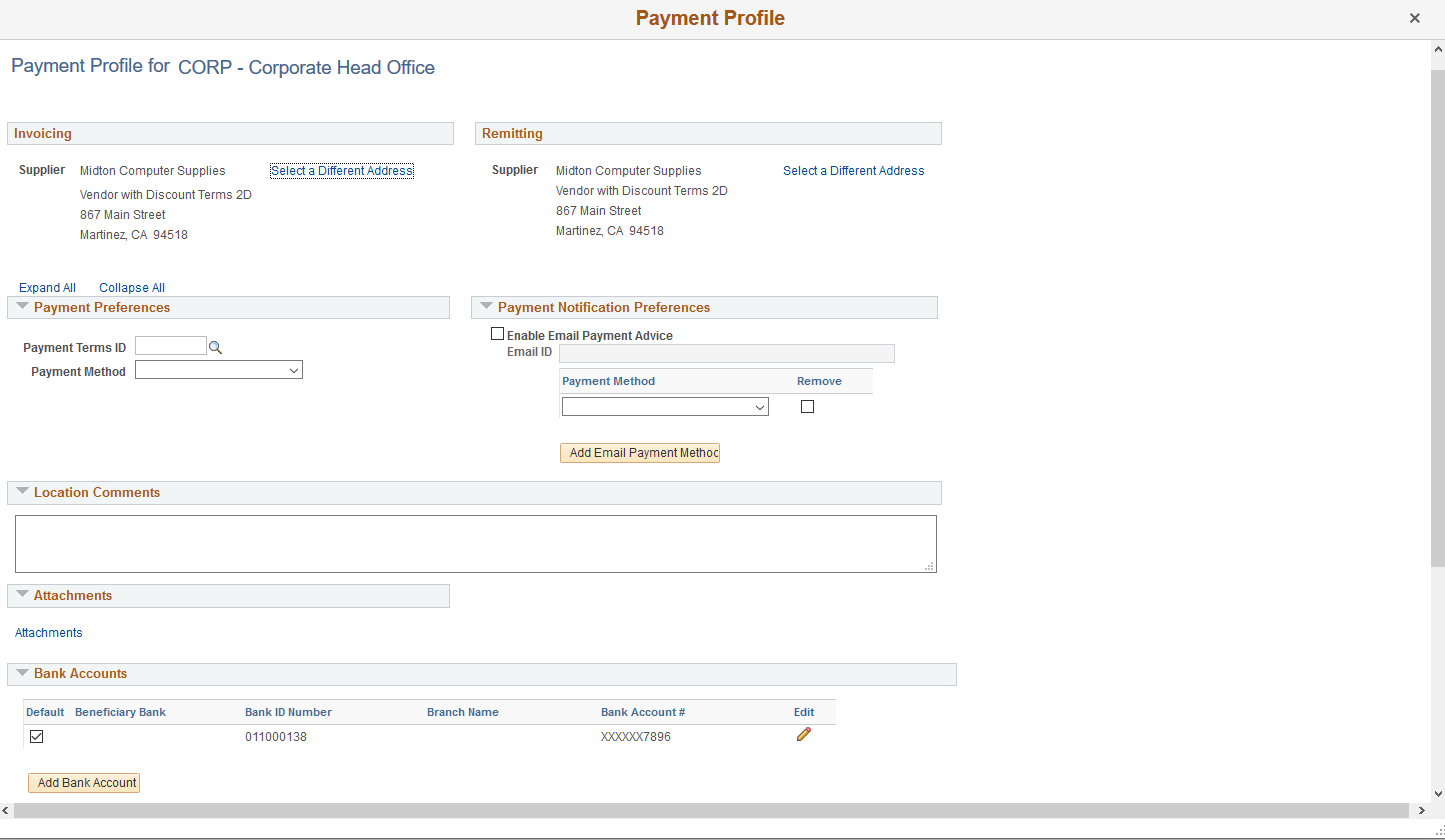
This example illustrates the fields and controls on the Payment Profile secondary page (2 of 2). You can find definitions for the fields and controls later on this page.
Field or Control |
Description |
|---|---|
Invoicing, Remitting and Payment Preferences |
Select a different invoicing address, select a different remitting address, or change payment preferences. The fields in these three sections are included or excluded from the page as a group, based on the template. See the Payment Terms, Invoice and Remit Addresses field in the Supplier Location Information grid on the Supplier Request Templates - Attributes Page (Supplier Change Request). |
Location Comments |
Enter any comments about the supplier location. Any comments entered at the time of supplier registration or at the Supplier master level is not visible here. |
Attachments, Standard Industry Codes, and Additional ID Numbers |
Add attachments, update SIC codes, and add additional ID numbers. These sections on the Payment Profile page have a format similar to the same sections used on the Company Profile train stop. Existing Payment Profile attachments are not available for viewing or removal in the change request pages. New attachments may be added only. |
|
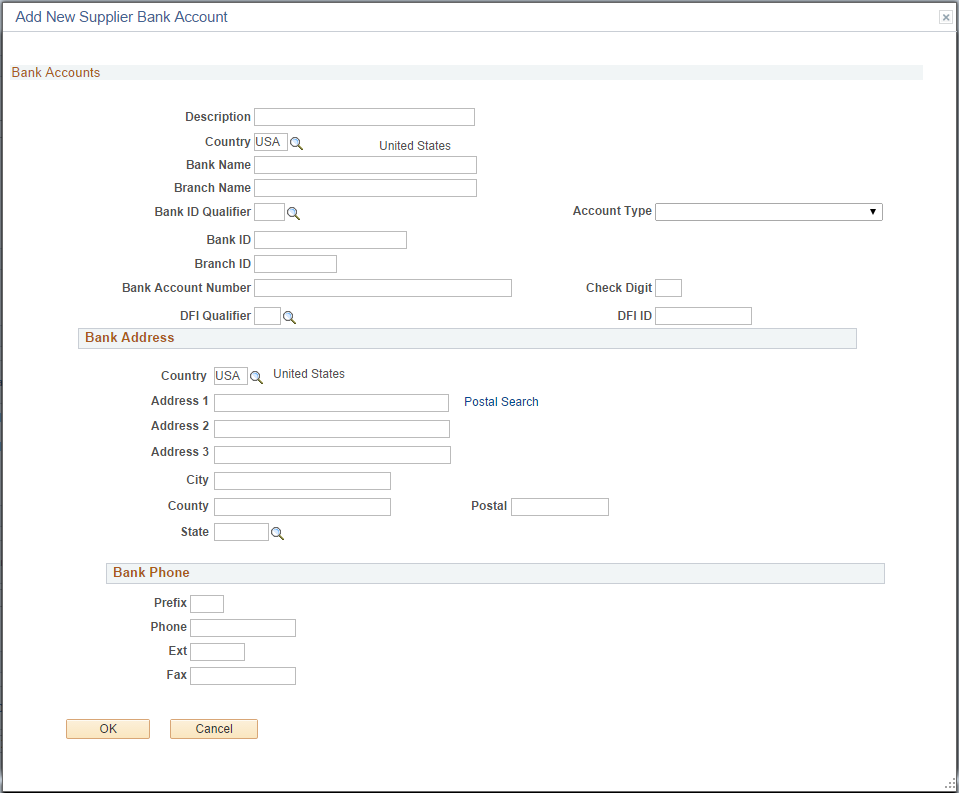
Bank Accounts |
Edit or delete bank account data. Only the last 4 digits of the bank account numbers are displayed. |
|
Bank Account Number |
If you set up bank account encryption, bank account number and IBAN are masked on the page. Only users with NACHA administrator role is allowed to view or edit supplier banking information. Note: NACHA administrator role is delivered only for internal users (employee portal) and not suppliers. The NACHA administrator role is not applicable for external users (supplier portal). For more information about bank account number encryption and the National Automated Clearing House Association (NACHA) data security requirements, see Understanding Bank Account Encryption and Setting Up Bank Account Encryption. |
This example illustrates the fields and controls on the Payment Profile - Add New Supplier Bank Account page.
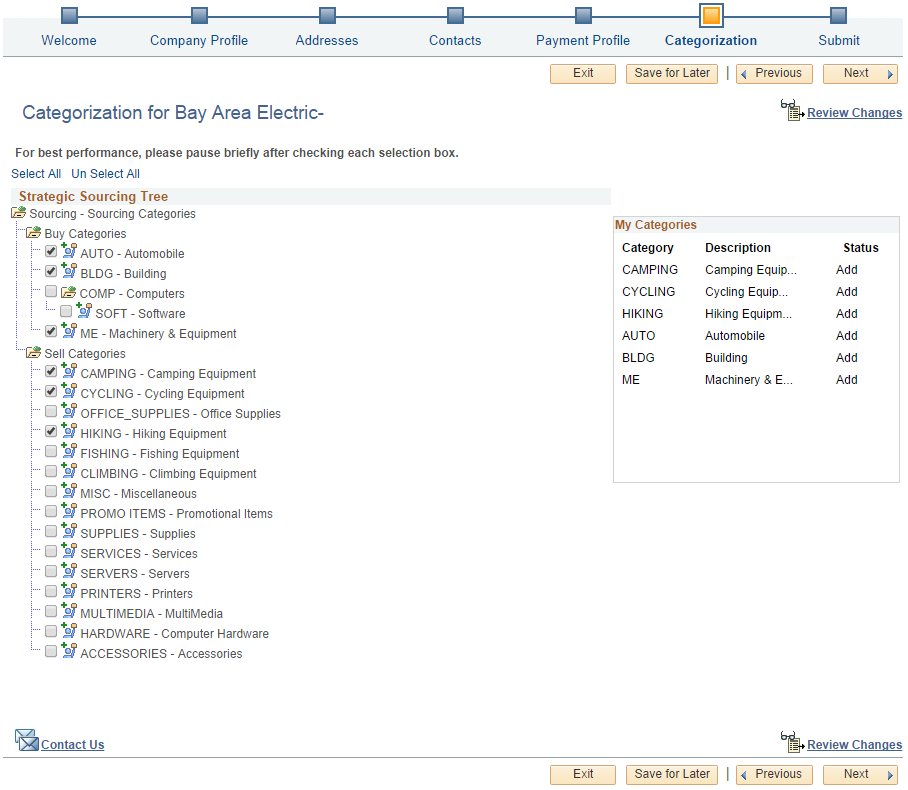
Use the Categorization page (SCR_CATEGORY) to add or remove categories from the available self-categorization tree.
Navigation:
Click the Next button on the Payment Profile page, or click the Categorization train stop in the horizontal navigation.
This example illustrates the fields and controls on the Supplier Change Request: Categorization page.
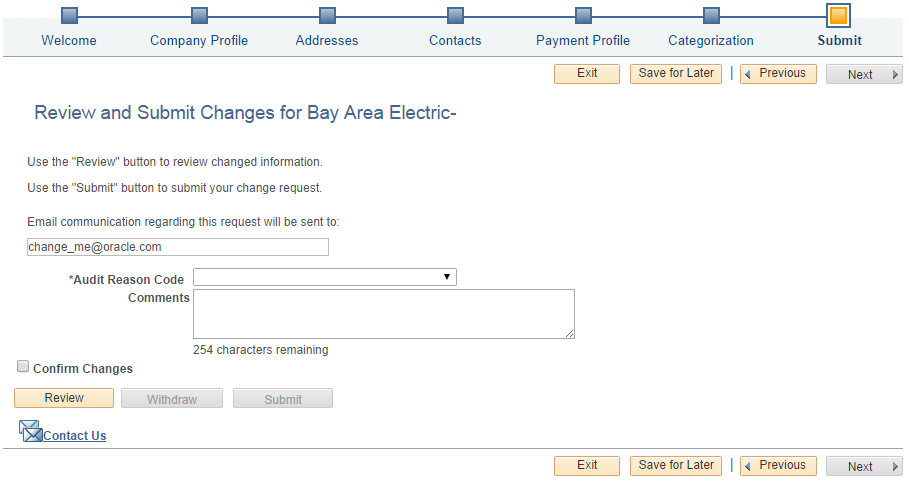
Use the Review and Submit page (SCR_SUBMIT) to review and submit or withdraw the change request.
Navigation:
Click the Next button on the Categorization page, or click the Submit train stop in the horizontal navigation.
This example illustrates the fields and controls on the Supplier Change Request: Review and Submit page. You can find definitions for the fields and controls later on this page.
Field or Control |
Description |
|---|---|
Email address field |
Enter an email address for notifying the user of the request status, for example, when the request has been approved or if there is a request for additional information. The email address is retrieved from the user profile, but the user may specify a different email address, if desired. |
Audit Reason Code and Comments |
Enter a reason code from the drop-down list and comments. Depending on the setup for supplier audit, reason codes and comments are required when submitting a change request. The Supplier Audit reason type is used for the reason code lookup when submitting a change request. If a change request has been sent back by the approver, an additional reason code may also be required when providing additional information that was requested. Only one reason code and comment is allowed per change request. Separate change requests will need to be submitted if there are multiple changes with different reason codes needed. |
Communication Details |
Access a secondary page to review the history of reason codes and comments between the approver and supplier or user submitting the request. This link is available only when the change request has been returned from the approver to the supplier or user submitting the request, with a request for more information. |
Confirm Changes |
Select this check box before submitting the change request (required). If the user has not yet reviewed the changes, or wants to review the changes again prior to confirming, they can click the Reviewbutton to access the Review page. |
Review |
Click this button to open a secondary page that displays the proposed changes. This Review page is also accessible by clicking the Review Changes link located on the other train stop pages. |
Submit |
Click this button to submit requested changes. This button appears unavailable upon initial navigation to the Review and Submit train stop, but is active after the user selects the check box to confirm the requested changes. |
Withdraw Request |
Click this button to withdraw a change request that was previously saved for later. Depending on the Reason Codes Reason Type Withdraw Request setting on the Supplier Request System Setup - General Page, you may have the option to select a Reason Code for the withdrawal. To withdraw a request with the Reason Code, see Withdraw Request Page. |
This example illustrates the fields and controls on the Review and Submit - Review secondary page.
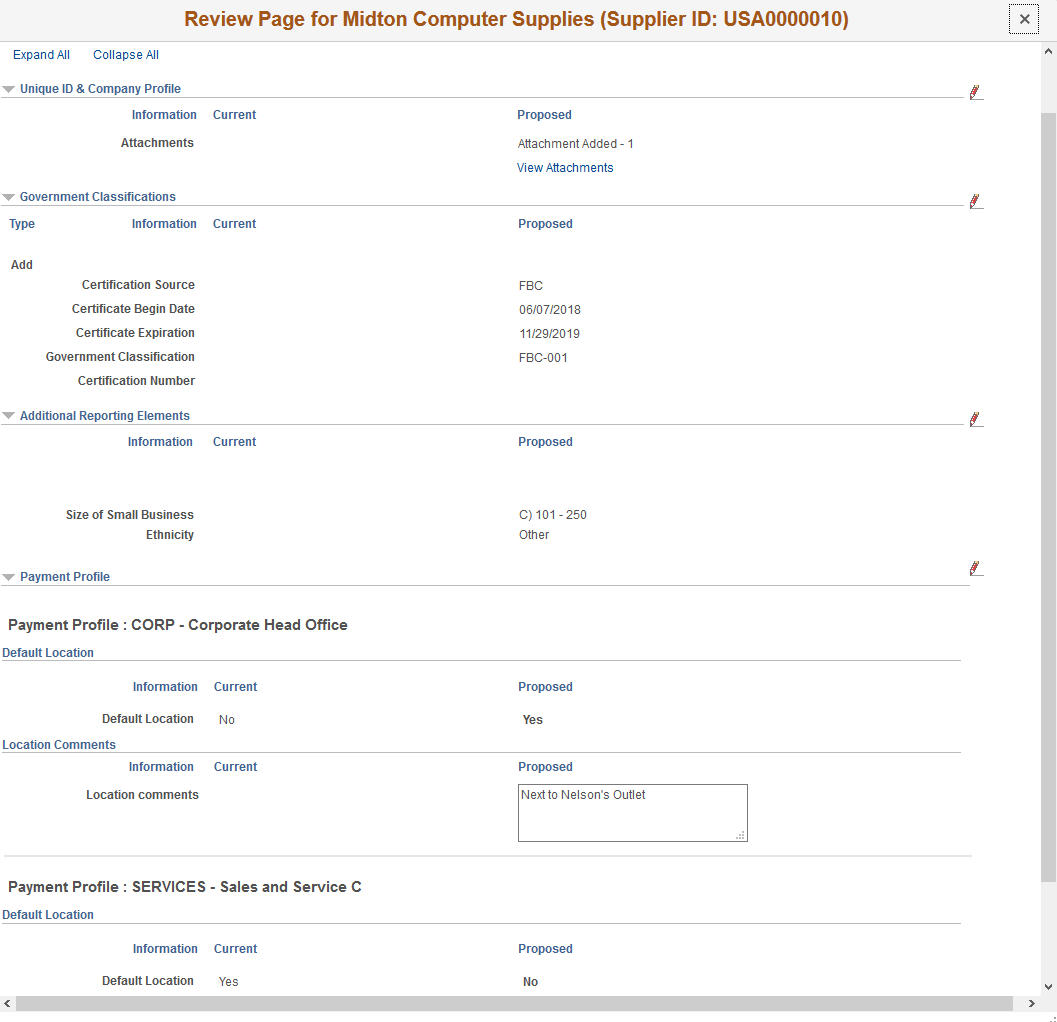
The Review page displays a side-by-side view of the current and proposed new values for all data entered in the change request. All proposed additions, changes, and deletions are included in the display.
On the Review page, select View Attachments link to review the list of available attachments. Click the attachment file name to view or download it.
The requesters (internal or external) may select the wrong template to use based on the actions they are performing and the type of supplier action is being performed.
The wrong template can vary depending on who determines that the template was incorrect and when that identification occurs. Following points describe the process for reconciling the change request if wrong template is selected.
Wrong template identified by the internal or supplier user before save
Exit the change request and create a new change request selecting a different Template.
Wrong template identified by the internal or supplier user after save, but before submit
Internal and supplier user have the authority to withdraw their Change Request in Saved or Request Additional Information status. After withdrawing, they can create a new change request selecting a different template.
Wrong template identified by the approver after submit
The approver, reviewer-editor, or administrator can use Additional Information action and MOR to return the Change Request back to the requester.
Reviewer-editor or approver can also manually adjust Supplier Master to correct any issues caused by using the wrong template for the Change Request. They can also Initiate a Supplier Change Request Invitation for the supplier to correct or provide missing information.
Wrong template identified by the internal or supplier user after submit
Internal user can contact Supplier Admin about the issue and supplier user contact the customer following instructions in Change Request Template and/or Portal Content page. Reviewer-editor or approver can use MOR to Notify Requester and withdraw the registration. After that requester can create new change request