Creating and Managing Work Orders
This topic provides an overview of the work order process flow and discusses how to create and manage work orders.
|
Page Name |
Definition Name |
Usage |
|---|---|---|
|
SPF_WORDER_ROSTER |
Manage services work orders. |
|
|
SPF_WO_REQ_VEN_DT |
Define and view work order details. |
|
|
SPF_WO_COST_PO_PG |
Maintain work order cost information. |
|
|
SPF_WO_COST_CONSUM |
Maintain work order consumption information. This only appears once the work order is released. |
|
|
SPF_WO_APPROVER |
Manage work order approvals and alerts. |
|
|
SPF_WO_COMMENTS |
Adding comments and attachments to work orders. |
|
|
SPF_WO_SUR_USR |
Enter work order survey information. The Survey tab is available only if the Using Surveys option is enabled for the business unit and the work order is saved. |
|
|
SPF_WO_SRVC_SUM |
Use work order services. |
|
|
SPF_SHIFT_BY_SRV |
View any shifts associated with this service. |
|
|
SPF_ASGN_BY_SRV |
View any assignments associated with this service. |
|
|
SPF_WO_TRK_RSRC |
Add and track new services providers for deliverable services. |
|
|
Progress Log Activity Page |
SPF_PRGLOG_MS_PG SPF_WO_ACTIVITY (resource based – only applicable when Project Costing integration is NOT installed) |
View activities associated with a progress log for deliverable services. Use this page for:
If you have the SP_ADD_WO_ADHOC_ACT role action, then the Add Ad Hoc Activities button is displayed on this page. When adding ad hoc activities to the Progress Log Activity page, the system automatically adds the new activity to setup tables. After the activity is added to setup tables, the activity is considered as predefined and can be used for future work order activities. |
|
Work Order Rates Page |
SPF_WO_PAYRATE |
(Optional) Update the work order rate by effective date. |
|
Service Work Order History Page |
SPF_WO_HISTORY |
View status and approval changes, including the service coordinator or team that was assigned to the work order at the time history was recorded. |
|
Services Work Order Template History Page |
SPF_WO_TE_TEMPLATE |
View templates that were linked to the work order. |
|
Document Attachment Page |
SPF_WO_ATTACH |
Upload file attachments for a work order. |
|
Quick Source Page |
PV_RUN_REQSORC_1 |
Run the process that creates purchase orders related to work orders. This process is only accessible if purchase orders are integrated with work orders. |
|
Maintain Purchase Orders Page |
PO_LINE |
Access the purchase order where you can run commitment control, check doc tolerance, and dispatch purchase orders. This process is only accessible if purchase orders are integrated with work orders. |
|
Work Order Approval Status Page |
SPF_WO_APPR_STATUS |
View work order approval information. The work order approval button is only accessible if the Enable Approval Process option is enabled for the business unit on the work order tab. |
|
Work Order Activity Page |
SPF_WO_ACTIVITY |
Identifies the activities associated with a resource-based work order. |
|
Bid Factors by Work Order Page |
SPF_WO_BIDFACTR |
Displays bid factors associated with a resource-based work order, including bid factor code, weighting, and activity. |
|
Timesheets by Work Orders View Page |
SPF_TIMEBYWO_VIEW |
Displays the timesheets related to a specific work order. |
|
Identify Work Order Services Page |
SPF_WO_SERVICE_DTL |
Define individual service details for work orders. The Services tab applies only to multi-resource work orders, and is not available for resource or deliverable work orders. |
|
SPF_WO_EXT_SRV_SEL |
Extend individual services on multi-resource work orders. |
Here is an overview of the steps in the work order process flow:
Use the Manage Services Work Orders page (SPF_WORDER_ROSTER) to manage services work orders.
Navigation
Note: You can click the generate work order button from the Bid Response page, the Assess and Award Bids page, or the Requisition Line Position Details page for a filled requisition line to automatically generate a service work order.
For manually created work orders, enter the business unit, work order ID, and service type in the Add New Work Order group box on the Manage Services Work Order page.
Note: The Service Type field determines whether the work order is resource-based or deliverables-based.
For manually created work orders, click the Add button to access the Maintain Service Work Order page.
Enter the required information on the Maintain Services Work Order page.
If you create a work order that is tied to a requisition, many fields (such as Start Date and End Date, Project, Service Provider, and so forth) appear by default from the original requisition. In addition, you must enter data in the Invoice Approver and Time Approver or Progress Log Approver and Expense Approver and Progress Log Template fields.
Save the page.
If your system is set up to share tasks with Microsoft Outlook, when you create a work order and save it, the associated tasks are queued up in the Desktop Integration queueing tables and sent to Outlook. When a task is in Outlook, the Outlook user can carry out the task and change the status of the task or delete it. Changes made in Outlook are synchronized in PeopleSoft Services Procurement and you can view the status on the View Task Checklist and View Task Detail pages. Likewise, the Services Procurement user can carry out the task and change the status. Changes that are made in Services Procurement are synchronized in Outlook.
When a task is deleted in Outlook, the Deleted in Outlook check box on the View Task Checklist page in Services Procurement is selected, indicating that it has been deleted. A task that is deleted in Outlook is not sent back to Outlook, but the user in Services Procurement can still carry out the task.
A task can be assigned to another user only in Services Procurement. You do this using the Assign To check box on the View Task Detail page. When this happens, the task is deleted in Outlook and a new task is created in Services Procurement and sent to Outlook with the new user assigned.
Click the View Task List link on the Maintain Services Work Order page to ensure that all mandatory preapproval logistical tasks are complete.
After all mandatory preapproval logistical task are complete, click the Submit button on the Maintain Services Work Order page.
Upon submittal, the work order submittal page displays approval information and the work order status changes to Submitted or Approved, if the work order creator has sufficient authority to approve work orders or the work order approval process is not used for the business unit.
After a work order is submitted for approval, it is routed to the work order approver as defined by the workflow rules.
There can be more than one approver for each work order, depending on the number of approvers set up in the workflow rules. A new task item appears on the approver's worklist indicating that the work order needs approval. An email notification is sent to the approver's in box. Once approved, the work order status changes from Submitted to Approved.
Access the Services Work Order Roster page, and locate the approved work order.
Click the Edit Work Order button on the Work Order Roster page to update the approved work order.
(Optional) Click the View Task List link on the Work Order - Details page to verify that all postapproval logistical tasks are complete.
You must complete all post approval tasks before releasing the work order.
If purchase orders are integrated with work orders, click the Process Purchase Order button on the Maintain Services Work Order page to complete purchase order distribution and accounting information, and then click the Quick Source link on the Cost tab to build the purchase order automatically.
Note: The Quick Source link appears for manually created work orders, as well as work orders that are associated with requisitions.
Click the button next to the created purchase order ID to verify that the purchase order has been approved, budget checked, checked for doc tolerance, and dispatched.
Use the purchase order page to perform these actions.
After the purchase order has been dispatched, you can release the work order by clicking the Release button.
Note: If password security is not enabled, a user profile will be created automatically upon release of the work order if one does not already exist.
Use the Manage Services Work Orders page (SPF_WORDER_ROSTER) to manage services work orders.
Navigation:
This example illustrates the fields and controls on the Manage Services Work Order page (1 of 2). You can find definitions for the fields and controls later on this page.

This example illustrates the fields and controls on the Manage Services Work Order page (2 of 2). You can find definitions for the fields and controls later on this page.
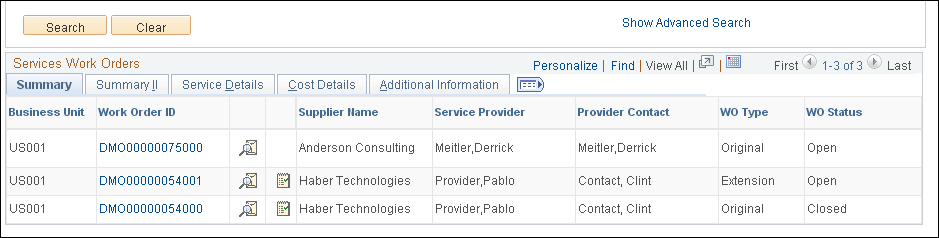
Use the Manage Work Order page as the central location to create, maintain, and extend work orders, including multi-resource service work orders. Use the Add New Work Order group box to create a new work order. Select a business unit and use the Work Order ID field to define a work order ID. The system assigns an ID if you do not enter one.
Note: A service coordinator cannot be the same as the service provider, and a service coordinator cannot access work orders for which he is the service provider or service provider/coordinator.
The content and use of the work order depends on the value you select in the Service Type field. You can select a service type that is based on a deliverable-, multi-resource-, or resource-based service method. Each of these methods has a different function for a work order.
After you enter the work order information, click the Add button to enter details about the work order. If you are creating a multi-resource work order, use the Services Summary tab to define default services or add a new service.
Note: The monetary amount appears only if you are a requester and have View or Define and View requester rate access for the business unit or if you are a service coordinator.
Search Services Work Orders
Use the Search Services Work Orders group box to streamline the search results for the work order. After you enter the search criteria, go to the roster area where you can edit, establish workflow, and cancel work orders. You can search for work orders based on a business unit, requester, work order ID, and work order name.
Note: Search results display only the top-line information for multi-resource transactions. When you expand the top-line work order ID, the system displays the corresponding services line details.
Note: If row-level security has been implemented for the business unit and permission list, you must enter a business unit before you can search for a requester using the Look up Requester button.
Field or Control |
Description |
|---|---|
Work Order Type |
Select a type of work order on which to base the search. Work order types determine the logistical task group and logistical tasks that are associated with the work order. Values include: Original, Extension, Replaced, and Reassigned. |
Work Order Status |
Select a work order status on which to base the search. The status is the work order's life-cycle stage. For example, Open, Submitted, and Closed are stages. |
Service Method |
Select the service method on which to base the search. Values include: Deliverable, Multi Resource, and Resource. |
Linked Work Order |
Select to base the search on a linked work order. This is a work order to which another work order has been linked by either extending, reassigning, or replacing the existing work order. Note: Linked work orders that are associated to multi-resource services do not display in the search results. Use the multi-resource search criteria instead. |
Date From andThrough Date |
Select a range of creation dates on which to base the work order search. |
Requisition ID |
Enter a requisition ID on which to base the search. |
Line Number |
Select a requisition line number on which to base the search. |
Search Criteria Applies to Both Parent and Child Work Orders |
Select to indicate that the search should include all lower-level individual service work orders related to a multi resource work order along with the top-line parent work order. This button applies only to multi-resource work orders. When you select this option, the system retrieves only child work orders if the child work order itself meets the search criteria that you select. |
Search Criteria Applies to Parent Work Orders Only |
Select to indicate that the search should include only the top-level parent work orders for multi resource services. This button applies only to multi-resource work orders. If you select this button, the system makes the Show Individual Child Services available. The system uses the criteria that you select to retrieve applicable parent work orders. |
Show Individual Child Services |
Select to display lower-level individual service work orders related to selected multi resource work orders in the search results. This check box applies only to multi resource work orders and is available when you select to search parent work orders only. It determines whether the system retrieves related-child work orders for those parent work orders that were selected. In this case, it doesn't matter whether the child work orders also meet the specified search criteria. If the parent work order meets the criteria and it is selected to show children, the system retrieves the children regardless. |
Show Advanced Criteria |
Click to view more search fields, including Survey ID, Supplier ID, Coordinator,Service Provider, Service Team, and Provider Contact. |
Services Work Orders: Summary Tab
Use this tab to review basic information for work orders that the system retrieves based on your search criteria.
Field or Control |
Description |
|---|---|
|
Click to access the Services Work Order History page, where you can view a summary and history of the work order. |
|
Click to access the Service Work Order - View Task Checklist page, where you can view the logistical tasks for the work order. |
|
Click to access the Work Order Approval Status page, where you can review the work order approval information. |
|
Click the Extend Work Order icon to extend the duration of the work order. This button appears only for resource- and multi-resource-based work orders. When you click the system displays the Service page, where you can enter a new end date for the work order. Logistical tasks that are associated with the work order type are used are associated with the new extended work order. A new purchase order amount associates with the extended work order, which requires additional approval. For multi-resource services, the system extends the top-line work order, along with all open individual child service work orders. Any individual service filled from the original parent work order after the extension has been created can be extended by using the Select Services for Extension page to create new work orders to extend the individual service work orders |
|
Click the Assign New Resources icon to assign a new service provider to the work order either by manually replacing the service provider or going through the fulfillment process. Note: Click this button to access the Maintain Services Work Order page, where you can enter a new start date and select a new service provider for the work order. You can assign new resources to resource-based work orders only. |


Summary II
Use this tab to view and access additional information about the work that includes the projected start and end dates. Other fields on this tab are the same as the field on the Summary tab.
Service Details
Use this tab to view and access additional information about the work order. This information includes the service method, such as multi resource, service type, service and job title. Other fields on this tab are the same as for the Summary tab.
Cost Details
Use this tab to view and access additional information about the work order. Information on this tab includes the loaded rate, work order amount, and purchase order status.
Additional Information
Use this tab to view and access more details about the work order that includes the projected start and end dates. You can view the requester, service coordinator, team, and survey ID. The tab provides the work order creation date and who created it. Also available is the parent work order ID and the sub line.
Use the Work Order - Details page (SPF_WO_REQ_VEN_DT) to define and view work order details.
Navigation:
Click the Add button on the Manage Services Work Order page.
Click a Work Order ID link on the Manage Services Work Order page.
This example illustrates the fields and controls on the Work Order Details page. You can find definitions for the fields and controls later on this page.
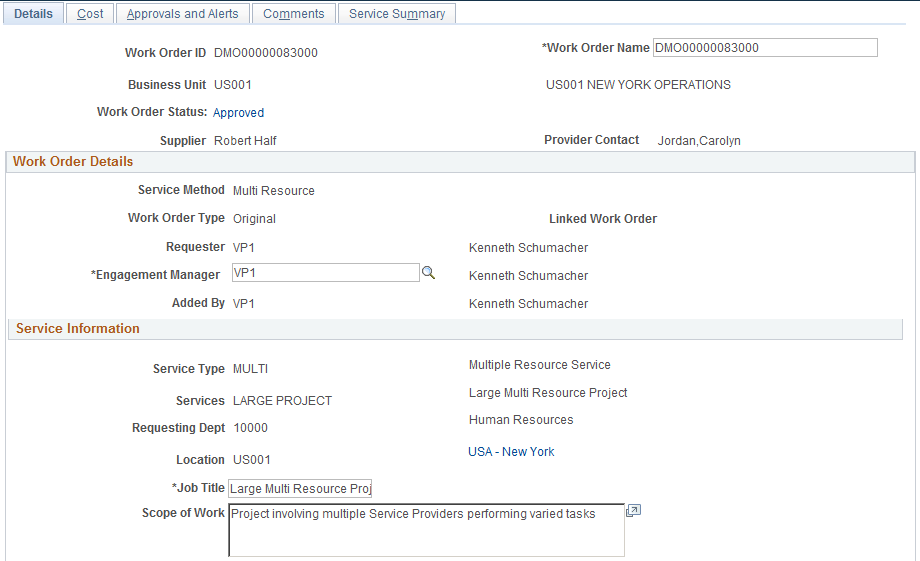
This example illustrates the fields and controls on the Work Order Details page. You can find definitions for the fields and controls later on this page.
Field or Control |
Description |
|---|---|
Work Order ID |
Displays the unique work order ID that is assigned when you create a new work order. |
Work Order Status |
Displays the status of the work order. Values are:
|
Work Order Name |
Enter a descriptive name for the work order. The requisition name (if one is associated with the work order) or to the work order ID is the default value. |
Work Order Details
Field or Control |
Description |
|---|---|
Service Method |
Displays the service method of Deliverable Based, Multi Resource, or Resource Based. Note: The service method is determined by the service type selected in the Add New Work Order group box. |
Work Order Type |
Displays the work order type. Work order values are Original, Extension, Replaced, or Reassigned. Note: Work order types determine the logistical task group and logistical tasks that are associated with the work order. Preapproval and postapproval logistical tasks are determined by the work order type values. |
Linked Work Order |
Displays a linked work order. A new work order is linked to an existing work order by either extending, reassigning, or replacing the existing work order. When you extend, reassign, or replace an existing work order, information from the original work order appears by default on the new work order. |
Engagement Manager |
This field is available for all service methods including the multi resource child service. The value for the Engagement Manager is passed on from the linked Requisition when one is present. When no requisition is linked, the value will be defaulted to the same value as the Requester upon initial creation for resource, deliverable, and parent multi resource services. For multi resource children, the value will be the same as the parent service. The Engagement Manager value for resource, deliverable, and multi resource parent work orders will be available for editing until the Work Order has been finalized for all types of work orders. You can also use the Replace Engagement Manager Page to change the engagement manager. |
Requisition Information
Field or Control |
Description |
|---|---|
Requisition ID |
(Optional) Enter the requisition ID associated with the service work order. The requisition line must have a status of Approved or Sourced. The system displays links to original sourcing requisitions. Click a Requisition ID link to access the Requisition Line Job Summary page for that requisition. Note: You can generate a work order from filled requisitions by clicking the Work Order button on the Requisition Details page or Assess and Award Bids page. |
Line Number |
Enter the requisition line number. When you link a requisition line, information from that line appears by default on the work order. Some of that information is not editable on the work order. |
Service Information
Field or Control |
Description |
|---|---|
Service Type |
Displays the service type selected in the Add New Work Order group box. Note: This can only be changed to a service type with the same service method. |
Services |
Select the specific service to be performed, for example, Program Manager or Java Developer. The services are linked to the service type on the Services by Service Type page. |
Track Resource |
Select this check box if this is a deliverable service method work order and you want the service provider resources to be included on the work order. |
Requesting Dept (requesting department) |
Select the requesting department which must be a valid HCM department (if HCM is enabled on the Services Procurement installation); otherwise select a valid department for PeopleSoft Financials/Supply Chain Management. |
Location |
Enter the ship to location for the work order. The ship to location appears by default from the requester defaults. |
Job Title |
Enter the job title for the work order. Note: This value defaults from the service attributes. |
Scope of Work |
Enter free-form comments to describe the type of work that the candidate needs to perform on the work order. |
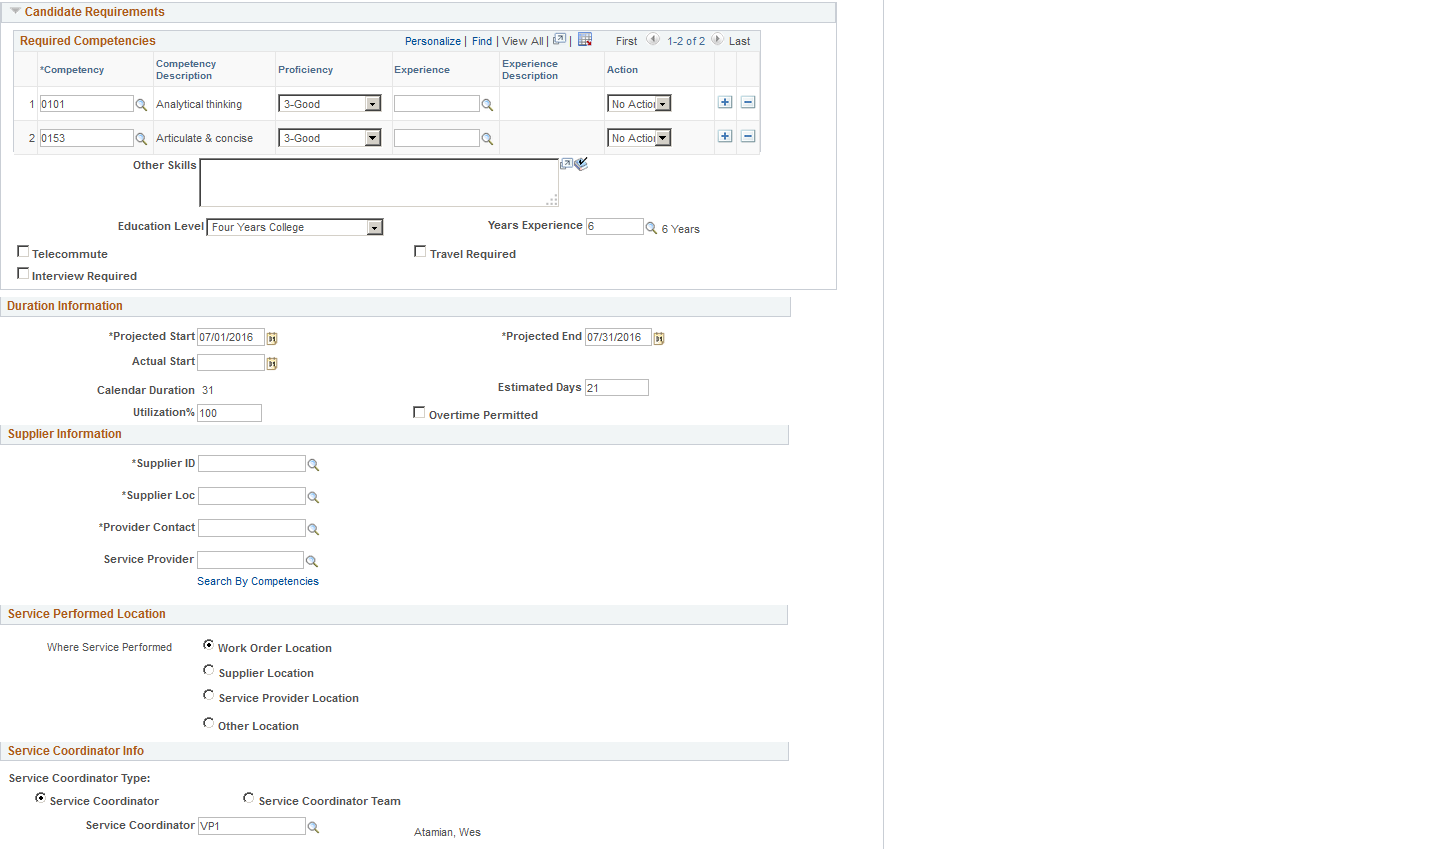
Candidate Requirements
This group box contains various candidate requirements. The default values come from the requisition if there are skills associated with the requisition; otherwise the values come from the competencies associated with the work order.
Field or Control |
Description |
|---|---|
Competencies |
This display-only field is used to screen candidates that do not have the competencies required for the work order. |
Proficiency |
This display-only field indicates the minimal level that the candidate should possess in order to be qualified for the position. Note: Proficiency is for informational purposes only |
Experience |
This display-only column indicates the minimum years of experience the candidate should possess, and is for informational purposes only. |
Action |
Select Block, No Action, or Warn depending on the action you want to occur if the service provider entered on the work order does not have the required competencies. |
Other Skills |
Enter any free-form text in this field to indicate additional skills that may be required for the position. |
Field or Control |
Description |
|---|---|
Settlement Options |
View the settlement method for a work order, which is based on the service selected. Progress will be recorded based on the method defined. Values include:
|
Duration Information
Field or Control |
Description |
|---|---|
Projected |
Enter a projected start and end date for the work order. The start date reflects the date when the work is projected to begin. The end date reflects the date when the work is anticipated to end. |
Actual |
Enter the actual dates when the work begins and ends. You must enter the actual start date before releasing the work order. Enter actual end date after the work order is canceled, terminated, or closed. |
Calendar Duration |
Displays the number of calendar days from work order start date to the end date. Note: This option appears for resource-based work orders only. |
Estimated Service Days |
Displays the total number of service days estimated for the work order. The value can be overwritten and the work order total is recalculated. Note: This option appears for resource-based work orders only. |
Utilization % (utilization percentage) |
Enter the percentage of time that the candidate spends in a work week. For example, if the candidate typically works a half day, the utilization would reflect 50 percent. If the candidate will work three days per week, the utilization will reflect 60 percent. The default value is 100 percent. Note: This option appears for resource-based work orders only. |
Overtime Permitted |
Select the check box if overtime is allowed for the work order. Note: This option appears for resource-based work orders only. |
Supplier Information
Field or Control |
Description |
|---|---|
Supplier ID |
Enter the supplier ID. |
Supplier Loc (supplier location) |
Enter the supplier location. If only one location exists for the supplier, it automatically appears on the work order. |
Track Resource(s) |
Select to track the service provider resources for deliverable-based engagements. |
Review Service Provider Eligibility |
Click to access the Service Provider Eligibility Review page. You use the page to view service providers that are marked as not eligible and are potential matches to the service provider on the current work order. The system does not allow actual matches for selection. Any potential matches of identifier ID against the selected service provider produces a system warning and provides service coordinators an opportunity to notify administrators if they feel the potential match is a true match. |
Search By Competencies link |
Click the hyper link to search for the existing service providers. A page with Competencies displays which you can use to enter search criteria and trigger the Search Framework. |
Service Performed Location
Field or Control |
Description |
|---|---|
Where Service Performed |
Select a service location. PeopleSoft Services Procurement calculates taxes based on the service performed location that you select. Taxes as per the location will be displayed on a purchase order, invoices and vouchers. The service performed location options will be available only if third party tax integration is enabled at the BU level. Note: The Supplier Location and Service Provider Location options can be selected only if you have entered the supplier details in the Supplier Information section. For more information, see SUT Processing on the Purchase Order, Manage Invoices Page, Invoice Information Page |
Service Coordinator Information
Field or Control |
Description |
|---|---|
VMS Supplier (supplier managed service supplier) |
View the name of the supplier who manages third-party suppliers performing the services. Note: This field appears only for work orders that are VMS managed, which is based on the settings for the business unit or service type. |
VMS Location (supplier managed service location) |
View the supplier location that manages third-party supplier performing the service. Note: This field appears only for work orders that are VMS managed, which is based on the settings for the business unit or service type. |
Service Coordinator Type |
Determines whether an individual service coordinator or a team is responsible for the work order. If the work order is VMS managed, this field is view only. |
Service Coordinator |
Select the specific individual service coordinator or team assigned to the work order. If the work order is VMS managed, this field is view only. |
Links and Other Status Buttons
Links change based on the status of a work order.
Field or Control |
Description |
|---|---|
Manage Service Work Orders |
Click to access the Manage Services Work Orders page. |
Work Order History |
Click to view the history for a work order. The history includes summary information, approval updates and date changes for the work order. |
Statement of Work |
Click to access the Document Attachment page, where you can attach files associated with previously created work orders. |
Task Check List |
Click to view logistical tasks that are associated with the work order. |
Task Check List |
Click to view logistical tasks that are associated with the work order. |
Bid Attachments |
Click to access the Bid Attachments page, where you upload attachments to bids. |
Process Purchase Order |
Click to submit the approved work order details to the PeopleSoft Purchasing application. This field is available after the work order has been approved and when PeopleSoft Purchasing integration is selected. Use the Integration Option group box on the eProcurement Business Unit Options page to define this setting. |
View Shifts for Service |
Click this link to access the View Shifts for Service inquiry page. This link is available only if the business unit is enabled to use shifts and if there are any valid shifts by service combinations associated with this work order. |
View Assignments for Service |
Click to access the View Assignments for Service inquiry page. This link is available only if the business unit is enabled to use assignments and if there are any valid assignments by service combinations associated with this work order. |
Scoring Criteria |
Click to enter bid factors for the service provider contact to respond to and by which the bid score is calculated. This enables the service coordinator to make an informed decision. You can define bid factors at the work order and work order service level. |
Cancel Work Order |
Click to cancel the work order. Note: If you cancel the work order, and if the work order is tied to a requisition line, the status of the requisition line is changed to Sourced. After the status of the requisition line is changed to Sourced, the requisition line is available for resourcing to suppliers. An exception to this is the individual child services for a multi-resource parent service. When these child work orders are canceled, the status of the individual service on the parent work order is not reset. |
Close Work Orders |
Click to close the work order after the service has been completed. The actual end date is specified when the work order is closed and no time or progress may be entered past this date. |
Submit |
Click to submit the work order for approval. Note: If the preapproval logistical tasks aren't complete, an error message appears and the status does not change to Submitted. |
Terminate |
Click to terminate the candidate. The work order is terminated prior to the expected date. |
Release |
Click to release the work order. After the work order is released, the supplier is notified that he can begin to log time or progress logs. Note: If the postapproval logistical tasks aren't complete, an error message appears and the status does not change to Released. |
Finalize |
Click to indicate that all time or progress is recorded and invoiced. Any associated purchase order is reconciled with the work order. |
Extended Work Order |
Click to extend the duration of the work order and track related rate, approval, and logistical task changes. This button appears for resource and multi-resource work orders only. |
Assign New Resources |
Click to assign a different service provider for this work order. This button appears for resource-based work orders only. Depending on the business unit setup, clicking the Assign New Resource button may enable users to choose the option to manually reassign the service provider or go through the fulfillment process. Note: If you want to reassign resources without using sourcing to a specific service provider, the work order has a type of Reassign. If you want to reassign resources using the bid process, it will populate the same work order associated with the requisition and will enable you to source it. Source it to different supplier from the original requisition, then submit the bid, accept and fill, and a new work order type of Replace will be created. |
Use the Work Order - Cost page (SPF_WO_COST_PO_PG) to maintain work order cost information.
Navigation:
Select the Cost tab.
This example illustrates the fields and controls on the Work Order - Cost page (1 of 2). You can find definitions for the fields and controls later on this page.
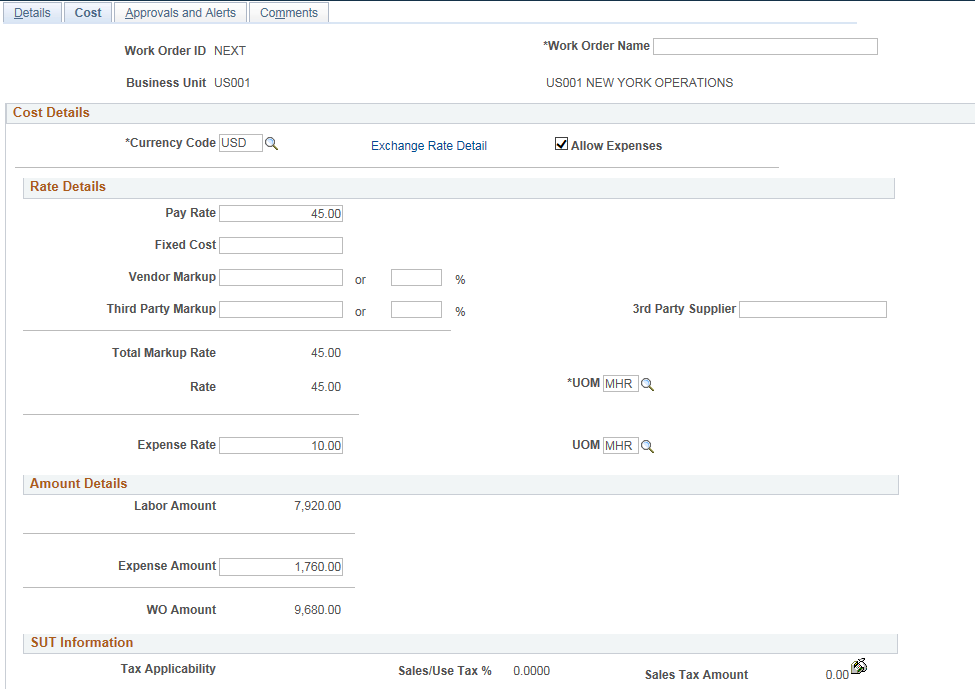
This example illustrates the fields and controls on the Work Order - Cost page (2 of 2). You can find definitions for the fields and controls later on this page.
Note: When you are creating a new work order and ChartField security has been established for work order prompts and fields, the system applies values according to the ChartField security rules and prevents you from entering prompt values that are not valid. Also when you are updating the Cost page, and do not have ChartField security, the system issues a message and does not display protected field values.
If you select the Use Pay Types check box on the Services Procurement Business Unit Options page and if the service method is Resource, then, the system displays the Rate Breakdown group box. Rate breakdowns are not used for work orders when the service method is Deliverable.
If you create a manual work order and rate sheet information is defined, rate breakdown and expense information defaults from the associated rate sheet.
Note: User role actions determine which users can view rate breakdown information.
Manual work orders created by a requester are routed to the service coordinator for rate definition prior to approval if the rate definition for the business unit is set to not allow rate definition for the requester.
Cost Details
Field or Control |
Description |
|---|---|
Currency Code |
Displays the currency code associated with the work order. |
Exchange Rate Detail |
Click the Exchange Rate Detail link for currency and exchange rate information. |
Allow Expenses |
Select to report expenses for work orders. When you select to allow expenses, you must enter an expense rate and amount. The system provides a warning message that indicates the Allow Expenses check box is selected, but an expense-related rate and amount have not been entered. Note: This check box is only available if the SP Expenses Enabled check box is selected on the Services Procurement Installation Options page. Although this setting defaults from the Services Procurement Business Unit page, you can override it here. |
Display in Work Order Currency and Display in Base Currency |
Toggle between Work Order and base currency. Select Display in Work Order Currency to view the currency code and rate in the work order currency. Select Display in Base Currency to view the currency code and rate in base currency. |
Rate Details
Field or Control |
Description |
|---|---|
Pay Rate |
Enter or view the amount that is paid to the service provider. The rate detail fields do not apply when the service method is deliverable or multi-resource. Note: This option appears when the pay types option is enabled on the Services Procurement Installation Options page. |
Fixed Cost |
Enter or view additional amounts that are used to cover fixed costs of the supplier related to providing the service. Note: This option appears when the pay types option is enabled on the Services Procurement Installation Options page. |
Supplier Markup |
Enter or view markups charged by the supplier for providing the resources to perform the service. Note: This option appears when the pay types option is enabled on the Services Procurement Installation Options page. |
Third Party Markup |
Enter or view additional markups that are charged when the supplier secures resources from a subcontractor. Note: This option appears when the pay types option is enabled on the Services Procurement Installation Options page. |
Total Markup Rate |
Displays the total markup rate. The system adds the Pay Rate, Fixed Cost, Supplier Markup, and Third Party Markup fields to determine this value. Note: This option appears when the pay types option is enabled on the Services Procurement Installation Options page. |
Rate |
Enter the rate of pay associated with the work order when pay types are not enabled. You can view the rate of pay when pay types are enabled. Modifications to the rate amount are validated against rate sheets defined for the project role and region. If you enter a rate amount that is out of tolerance withe rate sheet, you receive either an error or a warning message. |
|
Click to enter effective-dated rate. When time is logged against the work order, the rate effective for the time period is used to calculate the timesheet amount. Note: When a requisition is filled and a work order is created, there may be two entries in the effective-dated rate. The first entry is for the requisition rate and the second rate is the filled rate. This provides visibility of the rate history and enables comparison. If the rate is increased, the work order amount may be consumed at a quicker rate. An extension may need to be created if the amount is consumed before completion of the work order. |
UOM (unit of measure) |
Enter the unit of measure associated to the defined rate, or select a unit of measure from the list of available values. |
Expense Rate |
Enter the rate allowed for expenses. |

Amount Details
Field or Control |
Description |
|---|---|
Labor Amount |
Displays the total amount calculated for labor. It does not include any tax values and is updated when a new time report is entered. |
VMS Fee (supplier managed service fee) |
Displays the total amount calculated for the supplier managed services fees. Note: This value only appears for work orders that are VMS managed. |
Loaded Amount |
Displays the sum of the labor amount and the VMS fee. |
Expense Amount |
Displays the total amount of expense calculated for the work order. The system calculates the expense amount as the work order rate multiplied by the work order duration. |
WO Amount (work order amount) |
Displays the total amount for the work order, including labor, expense, and any applicable VMS markup. This amount is calculated based on the amounts entered in the Labor and Expense Amount fields. |
Note: You can edit the Expense Rate, UOM, and Amount fields only if the requisition is not associated with a work order. If the work order is associated with a requisition, the values appear by default from the requisition and can only be viewed.
The work order total calculation does not include any amounts for shift or assignment pay.
SUT Information and VAT Information
Field or Control |
Description |
|---|---|
Tax Applicability |
Displays SUT applicability for this work order. |
Sales/Use Tax % (sale and use tax percent) |
Displays the total SUT percentage. |
Sales Tax Amount |
Displays the total taxable amount. |
VAT Percent |
Displays the total percentage for all VAT authorities included for the VAT code. |
VAT Entity |
Displays the entity in the organization that reports VAT. The VAT entity is determined from the PeopleSoft General Ledger business unit associated with the PeopleSoft Purchasing business unit. If an entry exists for the PeopleSoft General Ledger business unit, then VAT calculations are performed on the work order. If not, VAT fields are hidden on the work order. |
VAT Amount |
Displays the VAT amount charged in the transaction line currency. |
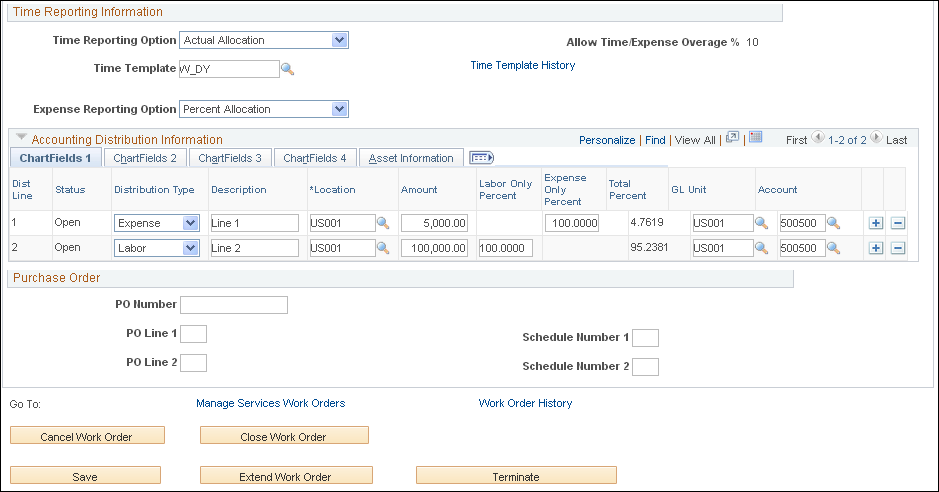
Time Reporting Information
Field or Control |
Description |
|---|---|
Time Reporting Option |
Select a value from the three given options. Options include: Actual Allocation, Percent Allocation, and Default from Business Unit. This value defaults from the service type or business unit when new work orders are created. The time reporting option indicates whether actual allocation or percentage allocation is used for recording time against the work order. If actual allocation is selected, the service provider must specify which ChartField distribution line to which the time is associated. If percentage allocation is selected, time is prorated automatically across all ChartField distribution lines based on the percentage of the work order labor total for each line. |
Time Template History |
Select an option that controls how time will be reported for the work order. This template defines options such as the time reporting period (weekly, monthly, and so on), the time reporting calendar, the ChartField accounts that are displayed during time entry, and any related time reporting rules. |
Activities |
Click to access the Activities page, where you can view activities associated with the work order. |
Expense Reporting Option |
Select a value from the three given options. Options include: Actual Allocation, Percent Allocation, and Default from Business Unit. This value defaults from the service type or business unit when new work orders are created. The expense reporting option indicates whether actual allocation or percentage allocation is used for recording expense against the work order. If actual allocation is selected, the service provider must specify which ChartField distribution line to which the expense is associated. If percentage allocation is selected, expense is prorated automatically across all ChartField distribution lines based on the percentage of the work order labor total for each line. Note: This field is available only if "Expenses Allowed" indicator is selected on the Work Order - Cost page. |
Allow Time Expense Overage |
Enter the percent tolerance for time and expense. This value defaults from the service requester or service coordinator setup. |
See Understanding Time Management in PeopleSoft Services Procurement.
Progress Reporting Information
This example illustrates the fields and controls on the Progress Reporting Information page. You can find definitions for the fields and controls later on this page.

Field or Control |
Description |
|---|---|
Progress Reporting Option |
Select a reporting option. This value defaults from the service type or business unit when new work orders are created. |
Progress Log Template |
Select an option that controls how progress will be reported for the Work order. The templates available for selection depends on the Progress Reporting Option you have selected |
Activities |
Click to access the Activities page, where you can view activities associated with the work order. |
Expense Reporting Option |
Select a value from the three given options. Options include: Actual Allocation, Percent Allocation, and Default from Business Unit. This value defaults from the service type or business unit when new work orders are created. The expense reporting option indicates whether actual allocation or percentage allocation is used for recording expense against the work order. If actual allocation is selected, the service provider must specify which ChartField distribution line to which the expense is associated. If percentage allocation is selected, expense is prorated automatically across all ChartField distribution lines based on the percentage of the work order labor total for each line. Note: This field is available only if "Expenses Allowed" indicator is selected on the Work Order - Cost page. |
Allow Progress Log Overage |
Enter the percent tolerance for Progress and Expense. This value defaults from the service requester or service coordinator setup. |
See Understanding Time Management in PeopleSoft Services Procurement.
Accounting Distribution Information
Use this section to enter and review distribution information.
Field or Control |
Description |
|---|---|
Distribution Type |
Select from the two available options when adding new distribution lines. Options for this field are "Labor" and "Expense". |
Expense Only Percent |
Enter the expense percent allocation for the requisition line that is charged to a ChartField combination. Note: This column is only available when the distribution type is Expense. |
Amount |
Enter the amount that is to be charged to a particular ChartField combination. Note: Changes to the labor percentage or total percentage triggers an automatic recalculation of the distribution line amount. |
Labor Only Percent |
Enter the labor percent allocation for the requisition line that is charged to a ChartField combination. Note: Changes to the total percentage or amount triggers an automatic recalculation of the labor percentage for the distribution line. |
Total Percent |
Enter the percent allocation of the total amount for the requisition line that is charged to a ChartField combination. For example, if you have one distribution and you enter 100 for that distribution line, the system charges 100 percent of the requisition request to the same department or project. However, if you have two distribution lines, and you enter 50 percent for the first distribution line and 50 percent for the second distribution line, the system evenly distributes the requisition line amount among both distributions. Note: Changes to the labor percentage or amount triggers an automatic recalculation of the total percentage for the distribution line. |
Account |
Enter the account that is to be charged to a particular ChartField combination. |
Budget Status |
Displays whether the distribution has been budget checked, when commitment control is on. Values for the field include Not Chekd and Valid. |
Budget Date |
Displays the date used by commitment control to determine the budget period to which this item cost belongs. |
Pre-Encumbrance Balance |
Displays the pre-encumbrance balance. Pre-encumbrance is created in your budget records by the budget-checking process when you generate a requisition. |
Note: If the work order is linked to a requisition, all distribution information defaults from the requisition. You can override the distribution information here.
In the case of multi-position requisitions, work order distribution amounts are recalculated to prorate the amounts for a single position, which is based on the percentage defined on each distribution line on the requisition.
For individual service work orders related to a multi-resource work order, the distribution information for the parent work order is also displayed as available distribution lines for selection . You can select the distribution line that you want to add to the lower-level individual service work order. After you select a distribution from the available distribution lines, that line no longer appears in the list of values available for selection in future searches.
Purchase Order Information
Field or Control |
Description |
|---|---|
|
Click to access the purchase order generated for the work order. The purchase order must be approved, budget checked (if commitment control is enabled), have valid doc tolerance, and must be dispatched before releasing the work order. Note: If the preapproval logistical tasks aren't complete, an error message appears and the status does not change to Submitted. |
Process PO (process purchase order) |
Click to populate the purchase order staging tables. Note: This button appears only if purchase orders are integrated with work orders. |
Quick Source |
Click to access the Requisition Sourcer run control page, where you can automatically build a purchase order. Note: This option does not appear before a work order is approved or after the work order is released. |

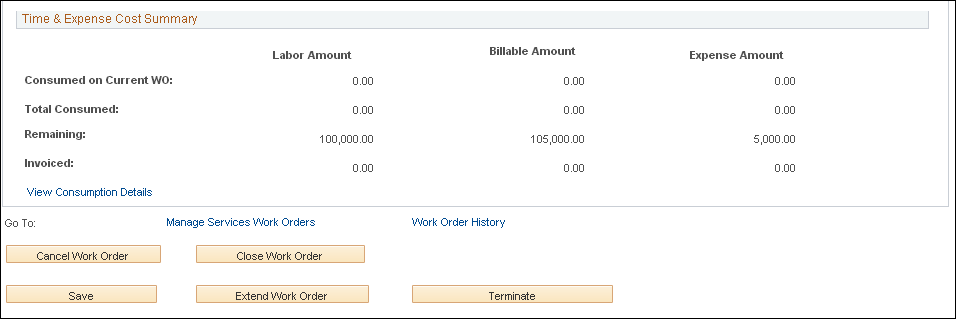
Use the Work Order Cost Consumption page (SPF_WO_COST_CONSUM) to maintain work order consumption information.
Navigation:
Services Procurement, Manager Services Work Orders, Work Order - Service
Select the Consumption tab on the Work Order page.
This example illustrates the fields and controls on the Consumption page (1 of 2). You can find definitions for the fields and controls later on this page.
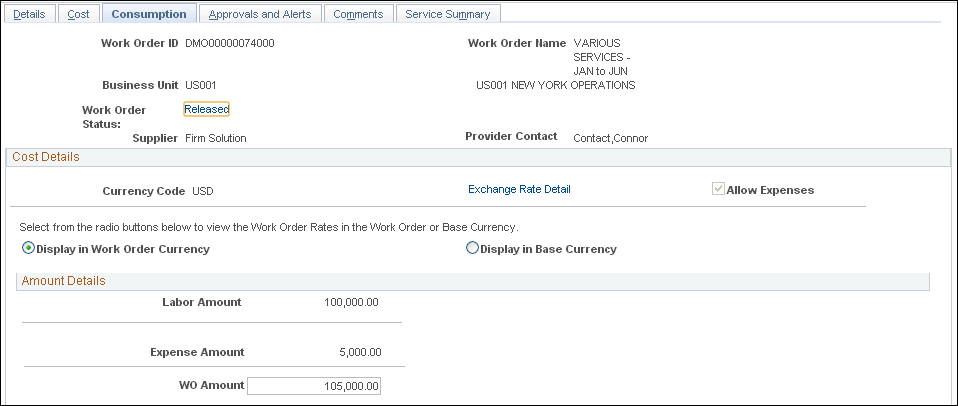
This example illustrates the fields and controls on the Consumption page (2 of 2). You can find definitions for the fields and controls later on this page.
Note: This page appears only when the work order is released.
Field or Control |
Description |
|---|---|
Billable Amount |
Displays the total billable amount service providers reported against a particular work order. It does not include any tax values and is updated when a new time report is entered. This amount reflects any shift or assignment pay. |
View Consumption Details |
Click to access the timesheets, expenses, and invoices that are related to this work order. |
Note: These fields appear after the work order is released and time and expense sheets have been logged. Multi-resource parent work orders display the cumulative consumption for all related individual service work orders. Individual service work orders display both the overall consumption for the related parent multi resource work order and the consumption for the specific individual service.
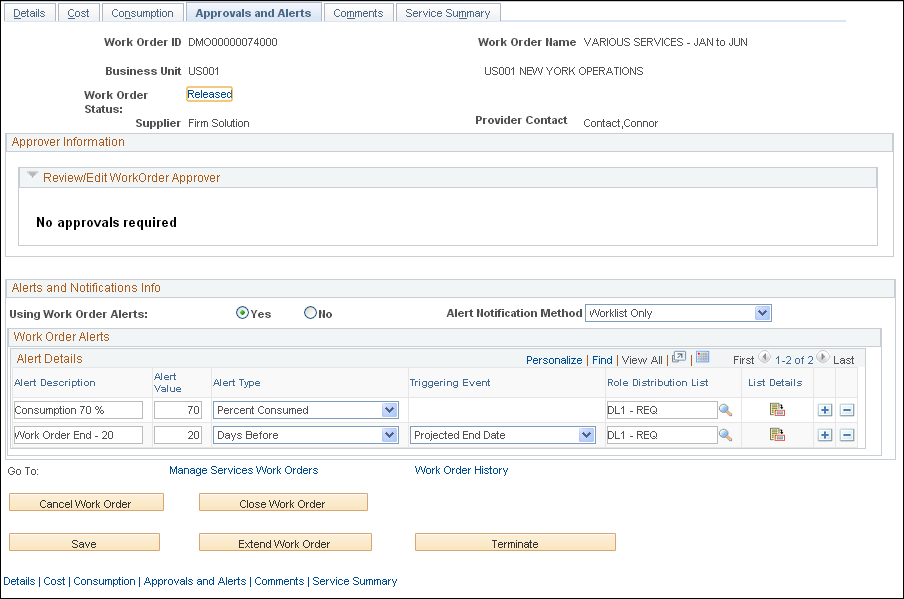
Use the Work Order - Approvals and Alerts page (SPF_WO_APPROVER) to manage work order approvals and alerts.
Navigation:
Select the Approvals and Alerts tab.
This example illustrates the fields and controls on the Work Order - Approvals and Alerts page. You can find definitions for the fields and controls later on this page.
Field or Control |
Description |
|---|---|
Using Work Order Alerts |
This default value comes from the Service Requester Defaults, Service Coordinator Defaults, Service Type, or Business Unit– in that order. Select Yes if you want alert notifications to be generated for the triggers entered in the Work Order Alerts grid. Select No if work alerts are not needed. |
Alert Notification Method |
This default value comes from the Service Requester Defaults,Service Coordinator Defaults,Service Type, or Business Unit– in that order. Select if you want alert notifications to be generated for the triggers entered in the Work Order Alerts grid. Specify if the alerts should be Worklist entries only or both Worklist and Email. |
Alert Description |
Enter a brief description for the work order alert notification. Alert information defaults from requester or service coordinator default information, service type, or business unit. |
Field or Control |
Description |
|---|---|
Alert Value |
Enter a value to determine when the work order event triggers. Note: This value is represented in days and percent. For example, if you create a work order alert description of Consumption 80%, the alert value will be 80. When the system reaches an 80 percent consumption rate, the work order event triggers. As well, if you create a work order alert description of Work Order End - 10, the alert value will be 10, to indicate that the work order will trigger 10 days before the work order projected end. |
Field or Control |
Description |
|---|---|
Alert Type |
Select the type of alert that the system uses to trigger the work order notification. Values are:
Note: The Alert Type and Alert Value fields work in combination together. |
Field or Control |
Description |
|---|---|
Triggering Event |
Select to indicate the trigger for the when the work order notification. For the Days Before alert type, the valid triggering events are Actual End Date, Projected Start Date, and Projected End Date. For the Days After alert type, the valid triggering events are Actual Start Date, Actual End Date, Approval Date, Cancel Date, Closed Date, Entered Date, Projected End Date, Projected Start Date, Released Date, and Terminated Date. For Alert Types or Days Before or Days After, the triggering event is used in conjunction with the alert value to determine when the alert is sent. |
Field or Control |
Description |
|---|---|
Role Distribution List |
Select the list of users that will receive the work order notification. |
Use the Work Order - Comments page (SPF_WO_COMMENTS) to adding comments and attachments to work orders.
Navigation:
Select the Comments tab.
This example illustrates the fields and controls on the Work Order - Comments page. You can find definitions for the fields and controls later on this page.
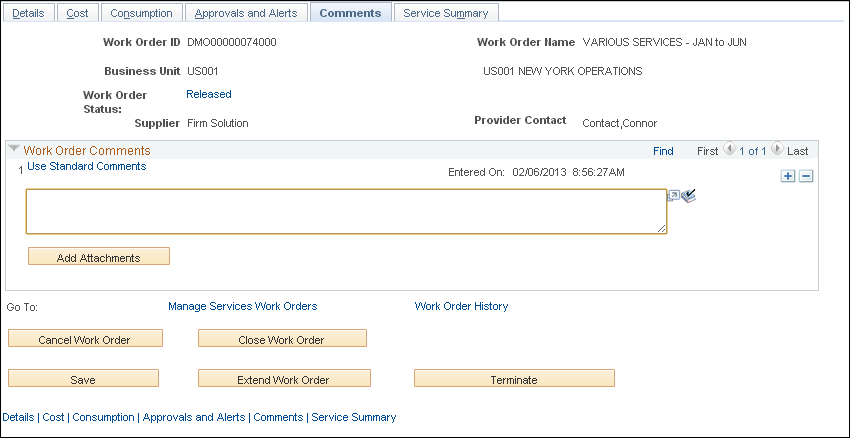
You use this page to add comments about the work order and to upload additional documents as attachments to the work order. To upload attachments, click the Add Attachment link. To view attachments that are associated with the work order, click the View button.
Use the Work Order - Surveys page (SPF_WO_SUR_USR) to enter work order survey information.
Navigation:
Select the Surveys tab.
Use the Work Order - Service Summary page (SPF_WO_SRVC_SUM) to use work order services.
Navigation:
Services Procurement, Manage Services Work Orders, Work Order - Service
Click the Service Summary tab.
This example illustrates the fields and controls on the Service Summary page. You can find definitions for the fields and controls later on this page.
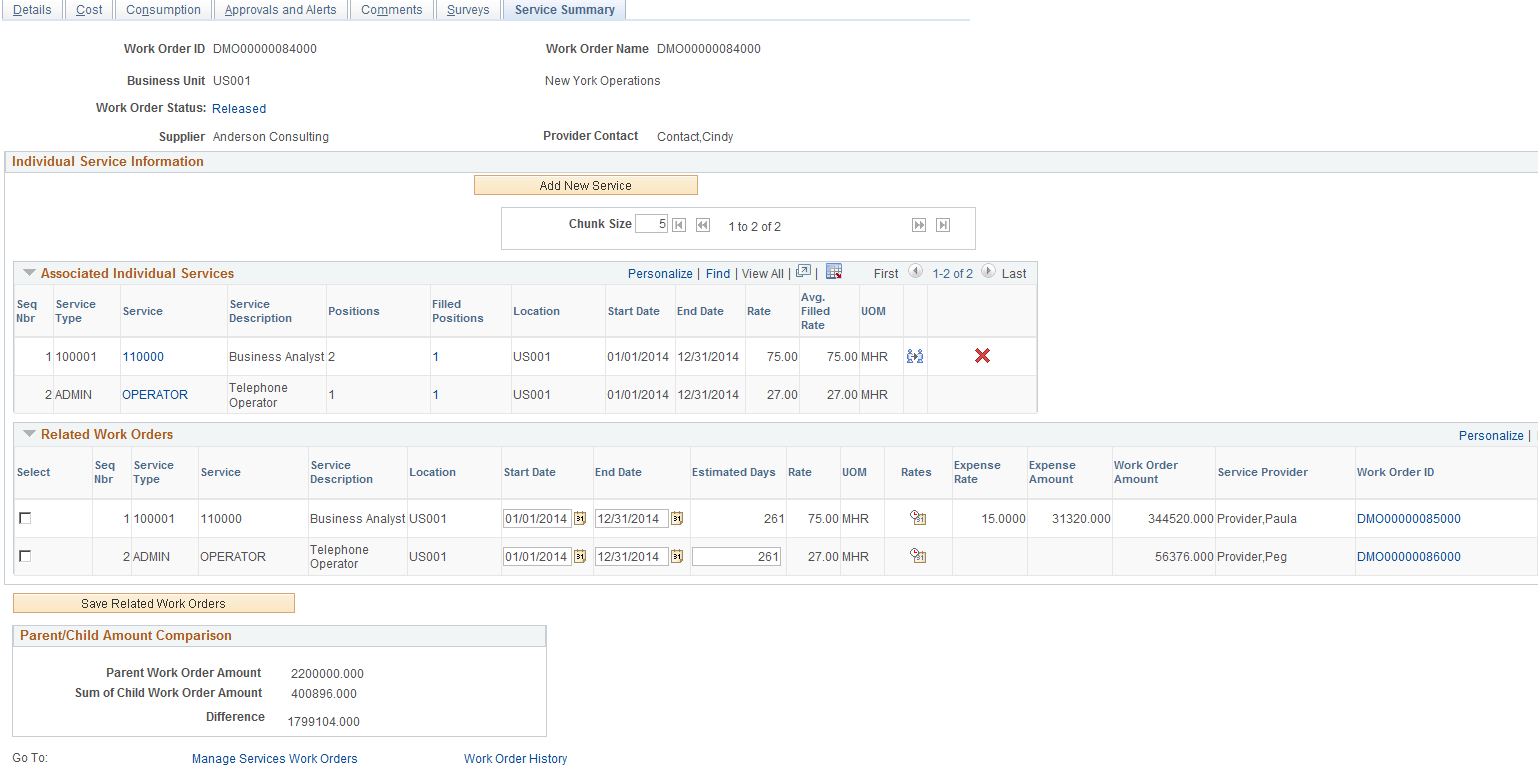
When you create a work order for a multi-resource service, you can access the individual child service information by selecting the Service Summary tab. Header information on the Service Summary page provides basic details about the work order. You can click the Status link to access the Service Work Order History page.
Click the Add New Service button to access the Identify Work Order Services page where you can add a lower-level service. You can add a new service until the parent multi-resource work order is cancelled, closed, terminated, or finalized. For individual child services, you can update the total number of positions until the last position is filled.
Add Individual Services
This grid displays the lower-level individual services and enables the sourcing process to fill them and create child work orders.
Field or Control |
Description |
|---|---|
Seq Num (sequence number) |
Displays the service sequence number. This is the unique identifier for the individual child services because it is possible to have more than one occurrence of the same kind of service. You can sort individual services information and the system maintains the sequence number with the work order to which it was assigned. |
Service |
Displays the service associated with this work order sequence. Click the link to access the Identify Work Order Services page where you can maintain detailed information. Individual services are resource-based services. |
Positions |
Displays the number of positions that have been defined for this service. |
Filled Positions |
Displays the number of positions that have been filled for this service. The field appears in the grid after you fill a service position and a child work order has been created. Click the value to highlight the corresponding services work order rows on the Related Work Orders grid box. |
|
Click to access the Assign Sourcing page where you can select to manually assign the work order to a service provider without sending it out for bid negotiations. Or, you can select to use the sourcing process to assign work order to a service provider through bid negotiations. For multi-resource position services, the Select Resource button is available until you fill the last position. Note: If the business unit is not set to allow manual selection of service provider, you must use the sourcing process to fill the work order service. The Manage Work Order Sourcing page in the Review and Source component is used to manage the sourcing of individual services. |
|
Click to remove this service from the work order. |
|
Click to cancel this service from the work order. |


Related Work Orders
This grid box provides information about any work order in which multi-resource service positions were filled. The grid box appears with the highlighted work orders when you click the Filled Positions link in the Add Individual Service grid box.
Click the Work Order ID link to access review and maintain the work order.
This grid box is a centralized area for making changes to the child work orders. A limited set of data can be edited on the central maintenance page. For all other updates or other information, you need to drill into the existing work order page.
Field or Control |
Description |
|---|---|
Start Date |
Displays the start date of the child work order. This field can be edited on the grid from the parent work order. |
End Date |
Displays the end date of the child work order. This field can be edited on the grid from the parent work order. |
Estimated Days |
Displays the estimated time period of the work order in terms of days. |
|
Click this icon to view effective dated rate information. |
Expenses |
Displays the expenses amount of the work order. |
Work Order Amount |
Displays the overall amount for the work order |
|
Click this icon will navigate to the View Task Checklist page |
|
Click the icon to navigate to either the Assign New Resources page to select the method of replacement or directly to the Work Order Replacement sourcing page, depending on the Business Unit setup defined. |
|
Click this icon to extend the work order. |


Click Save Related Work Orders after you make any changes to the child work orders in the grid box.
Parent/Child Amount Comparison
The Parent/Child Amount Comparison group box displays the sum of the child work orders and compares it to the parent work order amount.
The child work order hours/cost totals will change dynamically so the impact of proposed changes made to the child work orders can be seen before new child work orders are created. This ensures the spend amount does not exceed the parent work order amount. A warning message displays if the child work order cumulative total exceeds the total of parent work order.
Use the View Shifts for Service page (SPF_SHIFT_BY_SRV) to view any shifts associated with this service.
Navigation:
Services Procurement, Manage Services Work Orders, Work Order - Service
Click the View Shifts for Service link at the bottom of the work order.
Use this page to view the shifts that are associated with a specific service.
Important! When a work order is associated to a time template that uses a 24-hour clock and the Derive Shifts from Time of Day option is selected, the start and end times that appear on this page are the start and end times from the time template rather than from the Shifts by Service definition because the time template information takes precedence.
Use the View Assignments for Service page (SPF_ASGN_BY_SRV) to view any assignments associated with this service.
Navigation:
Services Procurement, Manage Services Work Orders, Work Order - Service
Click the View Assignments for Service link at the bottom of the work order.
This example illustrates the fields and controls on the View Assignments for Service page. You can find definitions for the fields and controls later on this page.
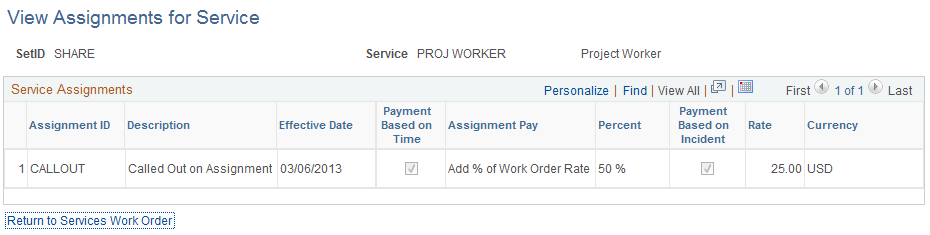
Use this page to view the assignments that are associated with a specific service.
Navigation:
click the Work Order ID link, select the Service Summary tab, and click theAdd New Service button.
You use this page to define the service type and service, the number of positions for the additional service for multi-resource work orders. You can source on lower-level individual services before you release the top-line work order.
After completing the service details, click the Go To Main Transaction link to return to the Services Summary page. The new service will appear in the Associated Individual Service grid along with the information you define on this page. Using the Services Summary page, you can then source the individual services. Depending on the business unit setting, you might have the option to manually assign the work order to a service provider without sending it out for bid negotiations. Regardless of the business unit setting, you can always use the sourcing process to assign work order to a service provider through bid negotiations.
Navigation:
and after completing the work order search, click the Work Order ID link, select the Service Summary tab, and click the Select Resource button
Use the page to select a method for assigning resources to the multi-resource work order that you selected when the business unit is defined to allow manual assignment of service providers. Click the OK button after making your selection and the system accesses the appropriate page for you to assign the resource.
Field or Control |
Description |
|---|---|
Assign Known Service Provider |
Select to use the work order process to assign the work order to a service provider without sending it out for bid negotiations. When you click the OK button, the system displays the Manage Services Work Orders - Service page. |
Assign Service Provider through Bid Process |
Select to Use the sourcing process to assign work order to a service provider through bid negotiations When you click the OK button, the system displays the Work Order Service Sourcing Select page. |
Use the Select Services for Extension page (SPF_WO_EXT_SRV_SEL) to extend individual services on multi-resource work orders.
Navigation:
After completing the work order search, click the Extend Work Order link.
You can extend individual services for multi-resource work orders when the top-line, multi-resource work order is extended. After you select a service, adjust the position value, if needed, and click the OK button, the system displays the Service page with the original work order and service values. After you update the work order, click the Save button and the system creates the extension work orders.
Note: If the work order was created using a manually-entered ID, you'll have to assign an ID for the work order.
Field or Control |
Description |
|---|---|
Select Service |
Select to include the corresponding service in a new work order to extend the service. |
Positions |
Select to include the corresponding service in a new work order to extend the service. You can adjust the number of position to extend. When the system creates the new work order, it will be for the positions that you select. The new position value must be less than or equal to the current value. |
Based on the status, there are some restrictions on extending individual services. Individual services that are not yet filled when the multi-resource service is extended will not be extended along with it. If they are subsequently filled, they can be manually extended. You cannot extend individual services that are closed or cancelled.
Note: Individual service work orders can be extended separately within the date range of the parent multi-resource service work order.