Setting Up and Publishing Notifications
To set up Notification Publisher to compose and send notifications, use the Security Settings (HCSC_NOTIF_INSTALL), Define Recipient Type (HCSC_RCPNT_AG_FL), Define Notification Links (HCSC_LINK_SETUP), Define Notification Category (HCSC_CAT_SETUP), Map Notification Category (HCSC_CAT_COMP_TBL), and Configure Email Template (HCSC_NOTIF_TMPL) components.
This topic discusses how to set up and publish notifications.
|
Page Name |
Definition Name |
Usage |
|---|---|---|
|
HCSC_NOTIF_INSTALL |
Restrict user access for publishing announcements and viewing notifications published by others if needed. |
|
|
HCSC_RCPNT_GEN_FL |
Enter general information about the recipient type. |
|
|
HCSC_RCPNT_SCRT_FL |
(Optional) Specify roles of users who can use the recipient type. |
|
|
HCSC_RCPNT_SRC_FL |
Define the recipient list population method. |
|
|
HCSC_RCPNT_REVW_FL |
Review recipient type settings prior to submission. |
|
|
HCSC_CAT_SETUP |
Specify groupings for notifications. |
|
|
HCSC_CAT_COMP_TBL |
Associate notification categories with fluid components for sending notifications. |
|
|
HCSC_LINK_SETUP |
Set up links that can be included in notifications. |
|
|
HCSC_NOTIF_TMPL |
Configure PeopleTools generic templates for use in email notifications. |
|
|
HCSC_GEN_TMPL_VAR |
Identify the variable values for the message text. |
|
|
HCSC_ADH_NOTIFY_FL |
Compose and send notifications. |
|
|
HCSC_NOTIF_ADV_SCF |
Specify options for future or recurring notifications. |
|
|
HCSC_CAT_NOTNC_SCF |
View details of the associated notification event. |
|
|
HCSC_RCPNT_LST_SCF |
View recipients of the notification. |
|
|
HCSC_NOTIF_ADH_FLU |
Compose and send notifications using the fluid pages. This page can be accessed from application pages via a related action or through a PeopleCode event. |
|
|
HCSC_NOTIF_LOG_SUM |
View notification logs. |
|
|
HCSC_NOTIF_LOG_DTL |
View additional log information and comments of processed email notifications. |
|
|
Schedule Notification Process Page |
HCSC_NOTIF_RC |
Run the HCSC_NOTIFY AE program to process pending, expired and recurring notifications. |
Follow these steps to set up and use Notification Publisher:
(Optional) Use the Security Settings Page to specify which roles can publish announcements (using a delivery method that includes Announcement), and view or update notifications created by other users.
Use the Recipient Type Information Page, Setup Security Page, Recipient Population Source Page, and Review and Submit Page to define recipient types for use in publishing notifications.
Create notification events in Notification Composer for notifications.
This setup step is required if you want to publish in-app notifications:
(If landing page is used) In a specific section on the landing page.
The notification type for the in-app message content must be Homepage.
Note: From the landing page perspective, announcements are in-app notifications that are displayed in an announcement-specific section, such as Announcements.
When you create a notification event with Notification Publisher as the notification source, the system sets the Notifications Details page (HCSC_NOTIF_DTL_FL) as the default target page for the announcement notification on the Compose Notification - Define Message Content - Notification Link Page
(If landing page is not used) On the Alerts or Actions tab of the Notifications panel.
The notification type for the in-app message content can be Alert or Actionable.
This setup step is also required if you want to publish email notifications using content from a notification event.
Use the Define Notification Category Page to define notification groupings.
A notification category must be selected for notifications to be sent on the Publish Notification Page.
A notification category can be associated with a notification event in Notification Composer to publish notifications. When associated, the system uses the message content definition of the selected event to send notifications belonging to that category.
Note: As mentioned previously, the notification category used for notifications on the landing page must be associated with a notification event configured to use the Homepage notification type for in-app notifications.
Note: To publish an announcement in the Banner Announcement section of the landing page, use the Banner Announcement category. This category is used specifically for that section and is not associated with any notification event.
(Optional) Use the Map Notification Category Page to associate notification categories with application components.
This setup step uses the specified notification category as the default for notifications that are sent from the corresponding application component using Notification Publisher.
(Optional) Use the Define Notification Links Page to set up links that can be embedded in notifications.
This setup step enables users to include an embedded link in the notifications that they create.
Use the Configure Email Template Page to configure PeopleTools generic templates.
This setup step enables users to select a template to prepopulate content when they publish email notifications.
Users can create and send notifications on the Publish Notification Page, or from application components that use Notification Publisher.
Administrators can view email notification logs on the Notification Log Summary Page if logging for email is enabled. They can publish pending, expired, and recurring notifications on the Schedule Notification Process page if needed.
The system delivers user roles and permission lists for setting up and using Notification Publisher.
|
User Role |
Assigned To Permission List |
|---|---|
|
Notification Publisher Admin |
EONC1020 EONC1030 |
|
Notification Publisher User |
EONC1030 |
Use the Security Settings page (HCSC_NOTIF_INSTALL) to restrict user access for publishing announcements and viewing notifications published by others if needed.
Navigation:
This example illustrates the fields and controls on the Security Settings page.
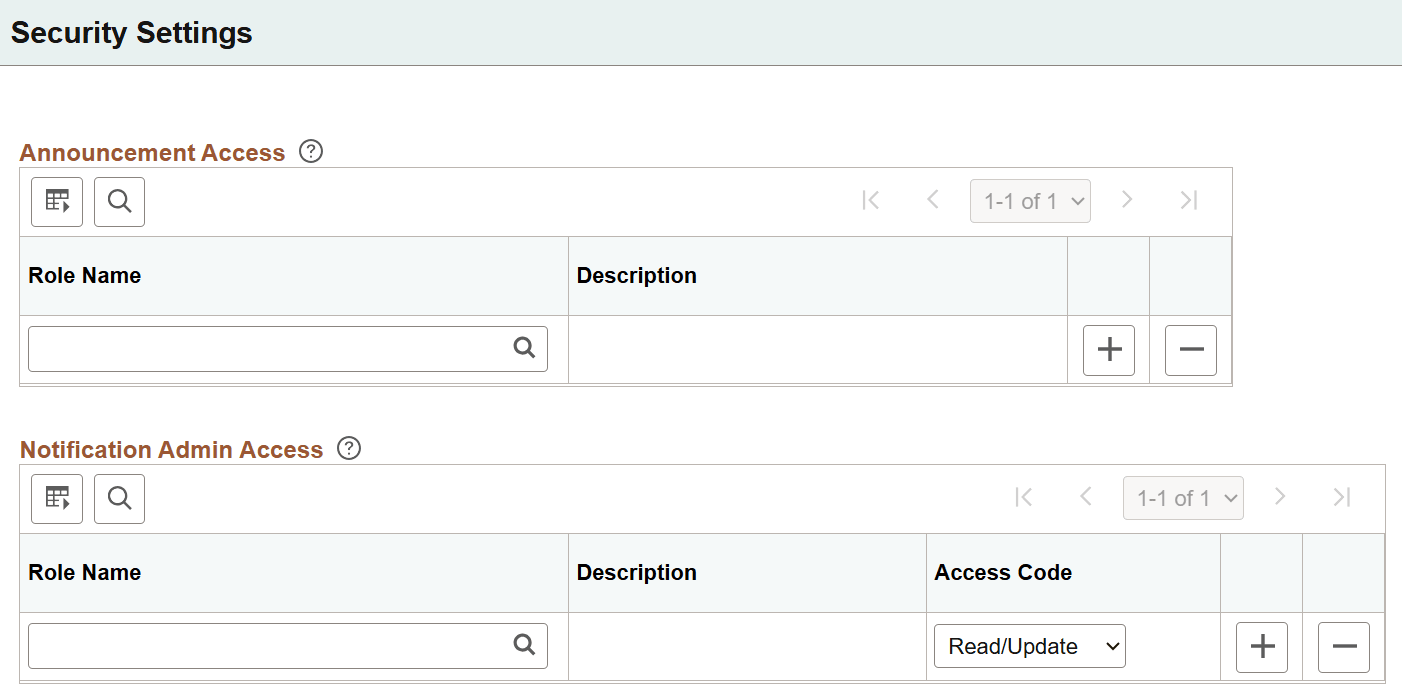
If you need to restrict who can publish announcements or view notifications created by other users, specify the corresponding user roles on the Security Settings page.
Use the Security Settings page to restrict users from publishing announcements using the "Announcement" or "Announcement and Email" delivery methods from the Publish Notification page, and from viewing notifications published by other users.
Announcement Access
|
Field or Control |
Description |
|---|---|
|
Role Name |
Specify the user role that allows publishing announcements using the Announcement or Announcement and Email delivery method on the Publish Notification Page. If no roles are selected, all users are able to publish announcements. Announcements are messages that can be posted to users' homepages, dashboards, or workcenters. |
Notification Admin Access
|
Field or Control |
Description |
|---|---|
|
Role Name |
Specify the user role that can view or update notifications that are created by other users. If no roles are selected, users will only have access to the notifications created by themselves. |
|
Access Code |
Select the access level, Read Only or Read/Update. |
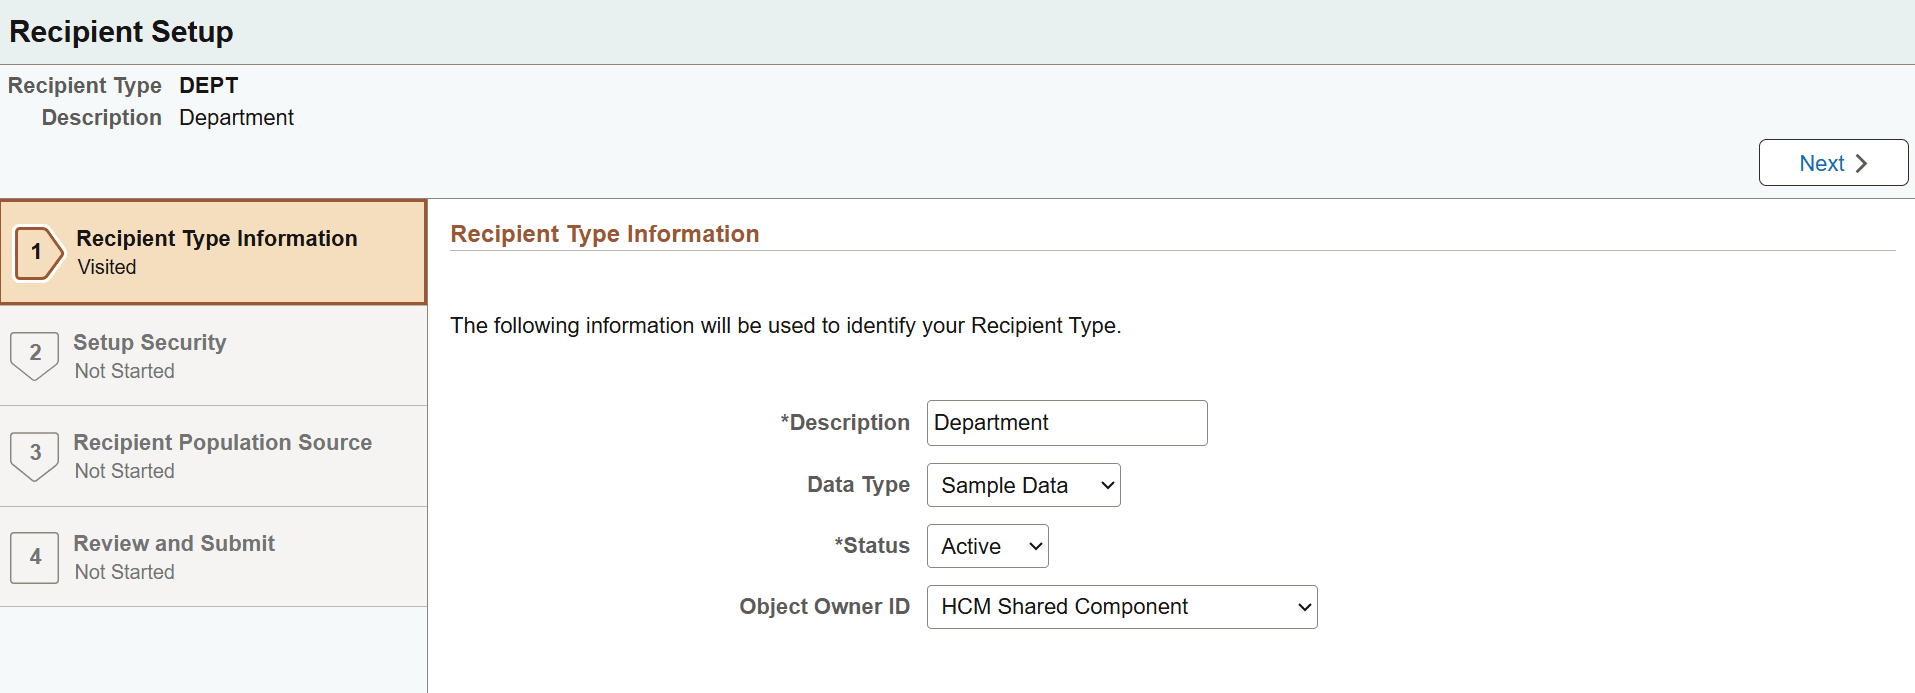
Use the Recipient Type Information page (HCSC_RCPNT_GEN_FL) to enter general information about the recipient type.
Navigation:
This example illustrates the fields and controls on the Recipient Type Information page.
|
Field or Control |
Description |
|---|---|
|
Data Type |
Specify if the recipient type is customer data, sample data, or system data. |
System-Delivered Recipient Types
This table lists the delivered recipient types in HCM for use in publishing notifications:
|
Recipient Type |
Description |
User List Source |
|---|---|---|
|
ALL |
System Wide Distribution |
All |
|
COMPANY |
Company |
App Class |
|
DEPT |
Department |
App Class |
|
EMPL |
Employee |
App Class |
|
GP_PYGRP |
GP Paygroup |
SQL |
|
HR BU |
HR Business Unit |
App Class |
|
HR GROUP |
HR Group ID |
App Class |
|
JOBCODE |
Job Code |
App Class |
|
PAY ADM |
Payroll Administrator |
Role Based |
|
PAYGROUP |
Paygroup |
Query |
|
POS_NUM |
Position Number |
App Class |
|
TASKGRP |
Taskgroup |
App Class |
|
TASKPRFL |
Task Profile |
App Class |
|
TL_GRPID |
TL Group ID |
App Class |
|
UNION CD |
Union Code |
App Class |
|
WORK GRP |
Workgroup |
App Class |
Use the Setup Security page (HCSC_RCPNT_SCRT_FL) to optionally specify roles of users who can use the recipient type.
Navigation:
Select the Next button on the Recipient Type Information Page.
This example illustrates the fields and controls on the Setup Security page.
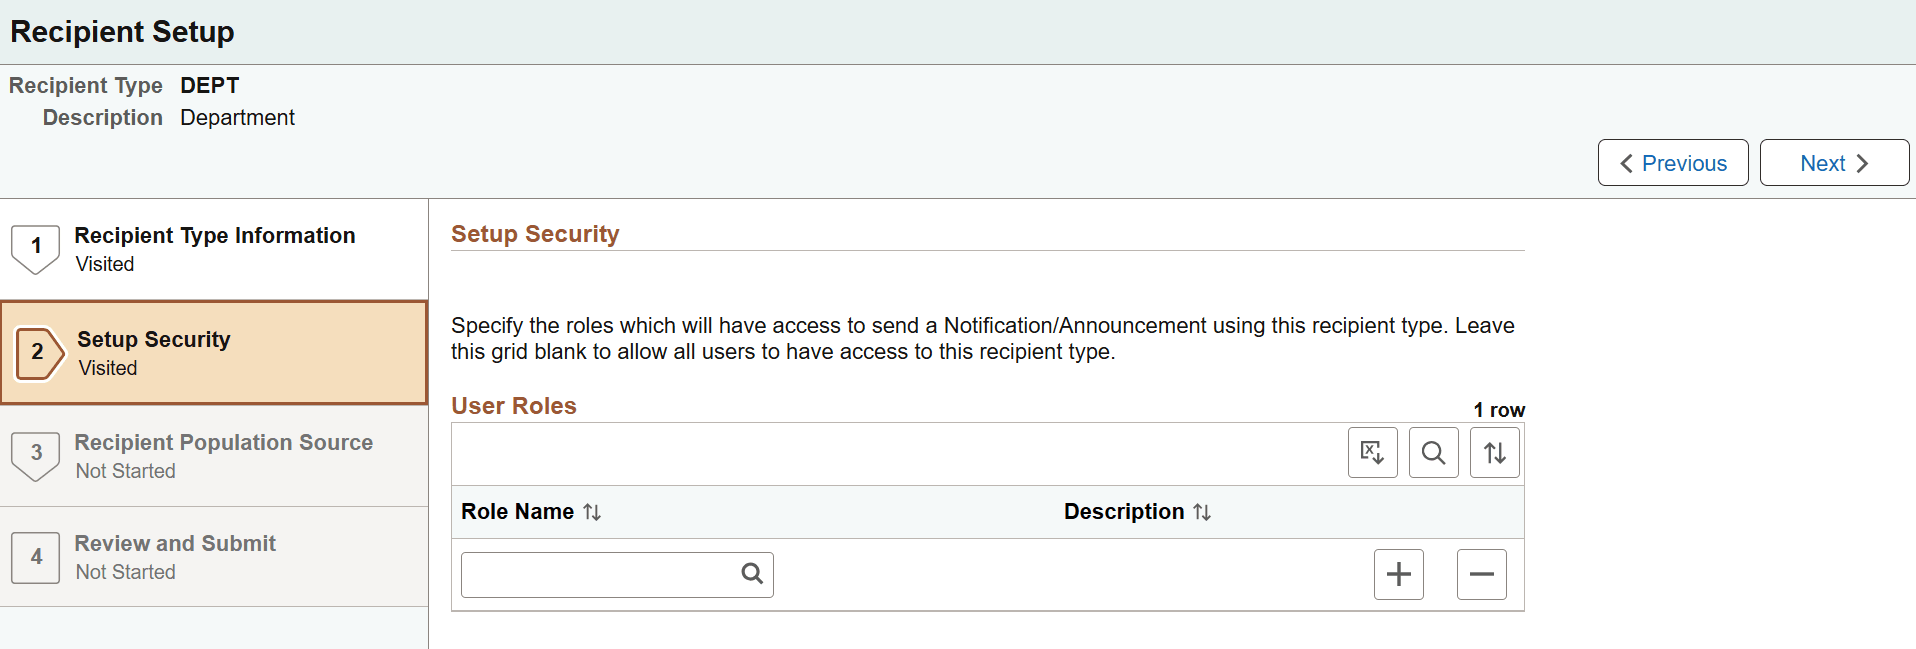
The system uses the user’s operator ID to validate role-based security for recipient type. When drafting notifications or announcements, only recipient types that have access to are available for selection.
|
Field or Control |
Description |
|---|---|
|
Role Name |
Specify the role of users who can use this recipient type to send notifications. If no roles are selected, all users can use this recipient type. |
Use the Recipient Population Source page (HCSC_RCPNT_SRC_FL) to define the recipient list population method.
Navigation:
Select the Next button on the Setup Security Page.
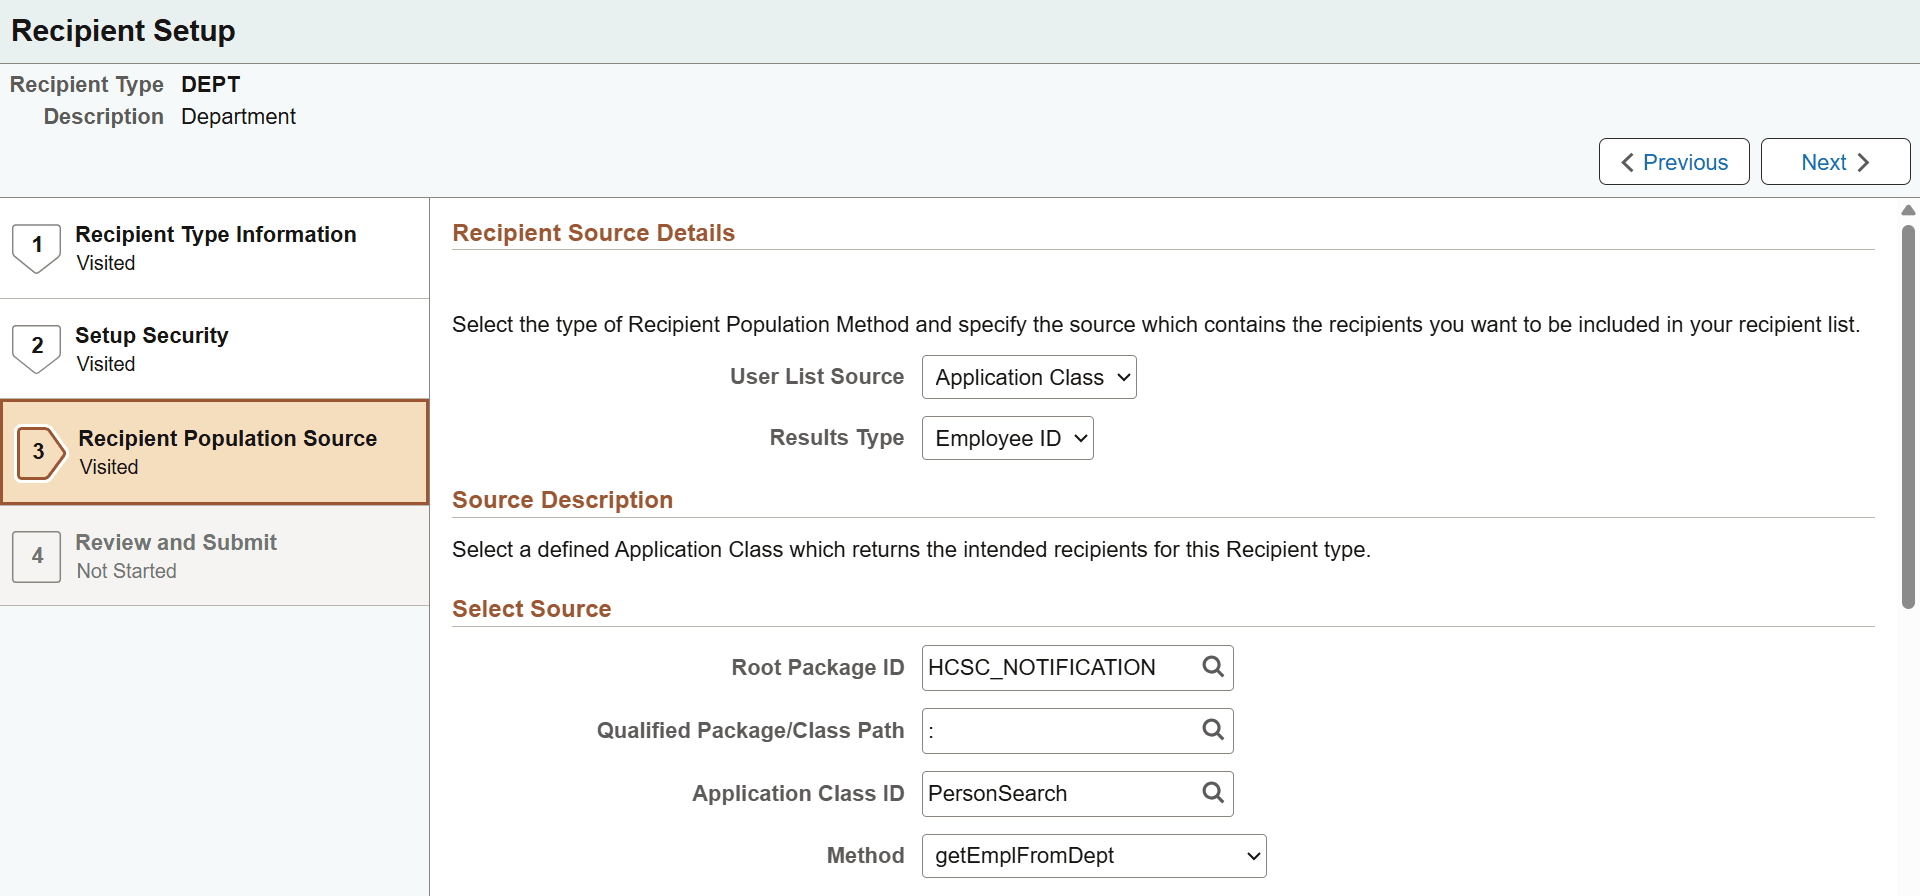
This example illustrates the fields and controls on the Recipient Population Source page (1 of 2).
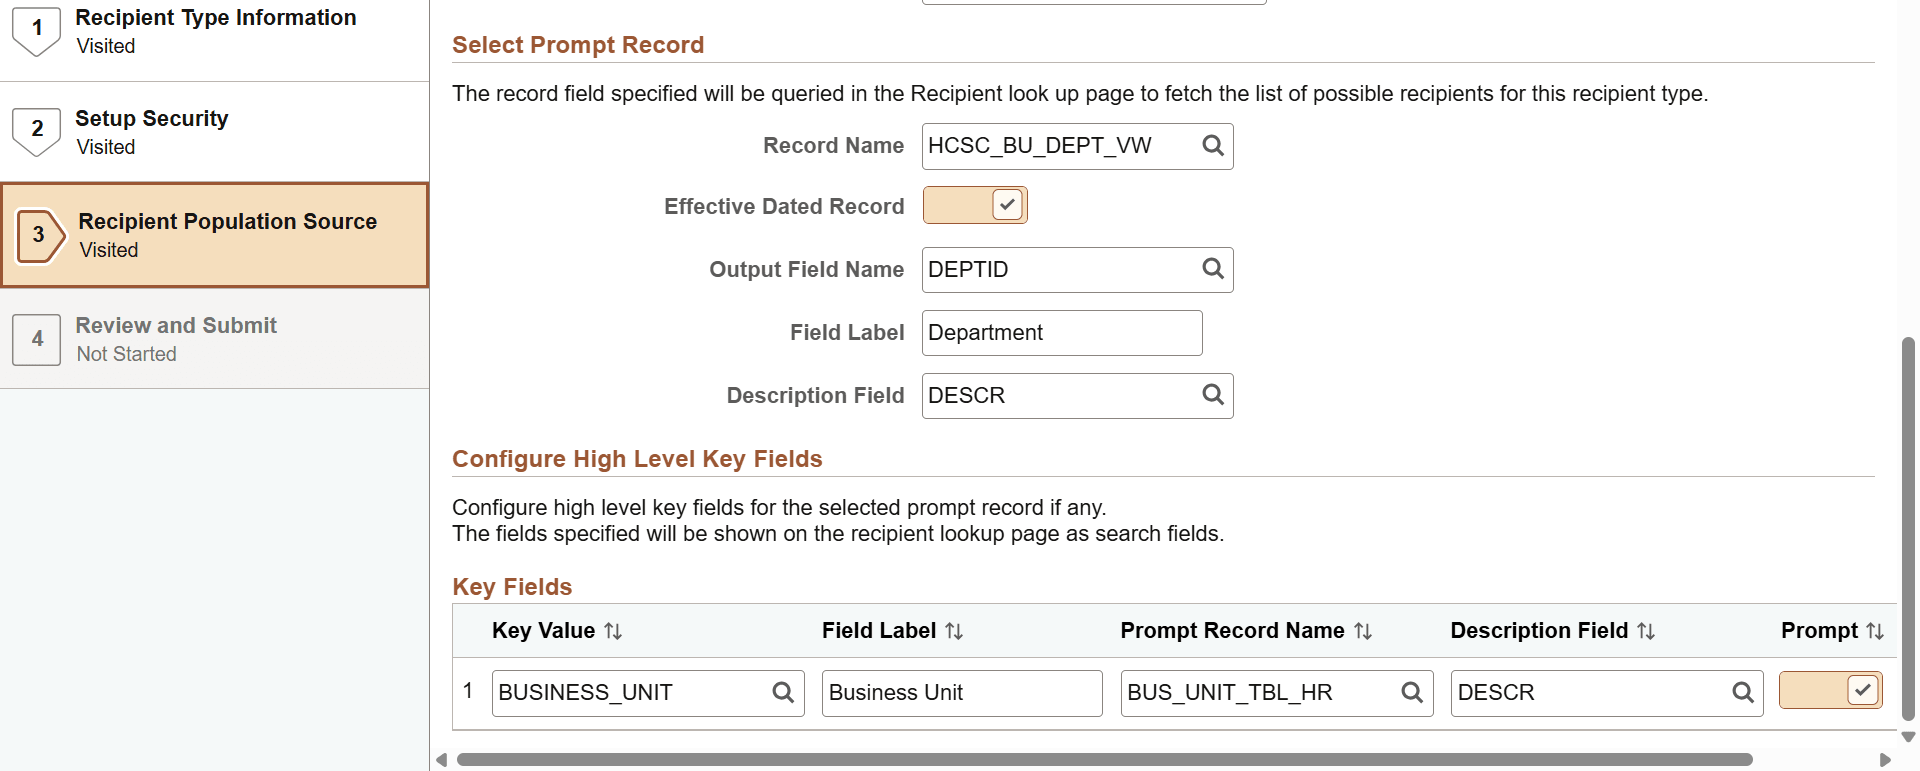
This example illustrates the fields and controls on the Recipient Population Source page (2 of 2).
|
Field or Control |
Description |
|---|---|
|
User List Source |
Select the method used to resolve the list of intended recipients for the recipient type. Options are:
Before sending notifications or announcements, the AE program resolves (using the selected method) recipient types to get a list of intended recipients with their email IDs and User IDs. |
Select Source
Fields in this section change based on the selected user list source. Enter additional information for the selected source.
If the selected user list source is:
SQL Definition, enter the SQL object identifier.
Role Based, enter the user role.
Query Based, enter the query.
Application Class, enter the application class, package, and method.
This section is not applicable to the All Users user list source.
Select Prompt Record
Use this section to specify the record field to be shown and queried on the recipient lookup page (when composing notifications or announcements) to fetch the list of possible recipients for this recipient type.
This section is not applicable to the All Users and Role Based user list sources.
Key Fields
Use this section to configure high-level key fields for the selected prompt record, if any. Fields specified here will be shown as search fields on the recipient lookup page.
|
Field or Control |
Description |
|---|---|
|
Key Value |
Enter a key field to be displayed and used in recipient lookup as a search field. You can enter a maximum of four key fields. The lookup limits the selection of key fields to those that belong to the record selected in the Select Prompt Record section. |
|
Field Label |
Displays the user defined label of the key field as default. The label can be edited, and is used as the key field label in the recipient lookup of the Publish Notification Page. |
|
Prompt Record Name and Description Field |
Enter the record to be used to fetch values of the key field, if prompt lookup for the key field is needed. Enter the description field name as well. |
|
Prompt |
Select to make the prompt lookup available to the key field in the recipient lookup. This field is enabled only if record name and display name values are provided. |
Use the Review and Submit page (HCSC_RCPNT_REVW_FL) to review recipient type settings prior to submission.
Navigation:
Select the Next button on the Recipient Population Source Page.
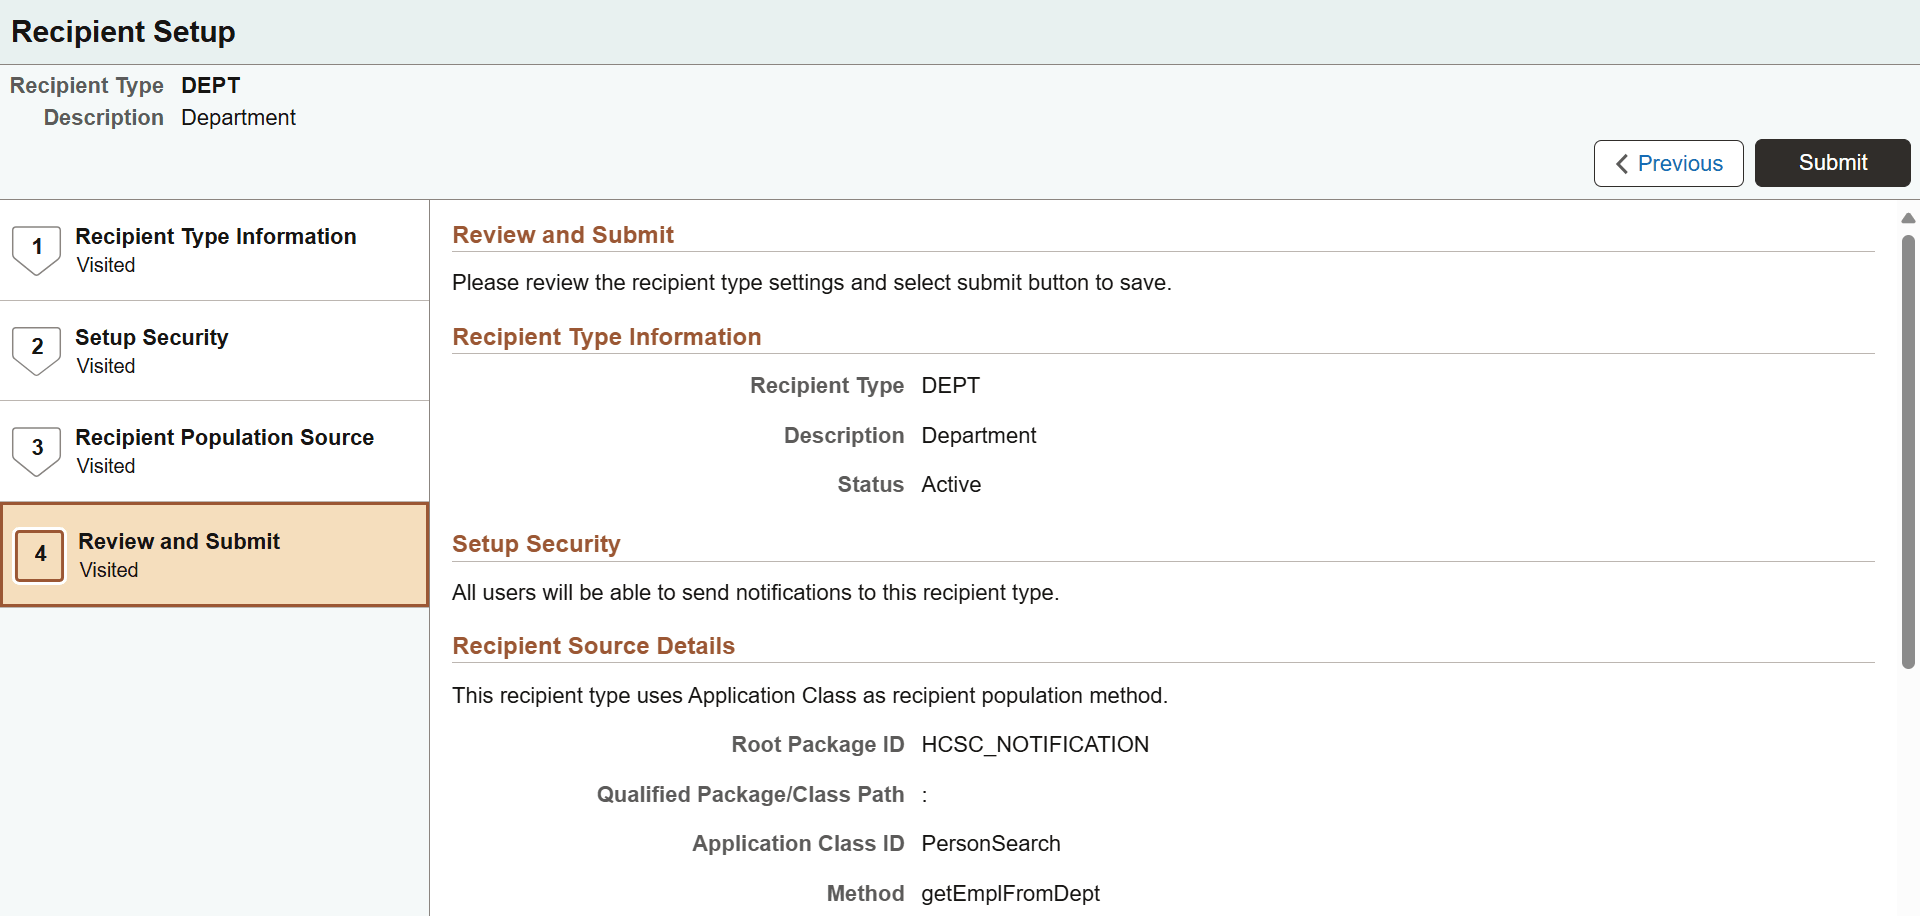
This example illustrates the fields and controls on the Review and Submit page (1 of 2).
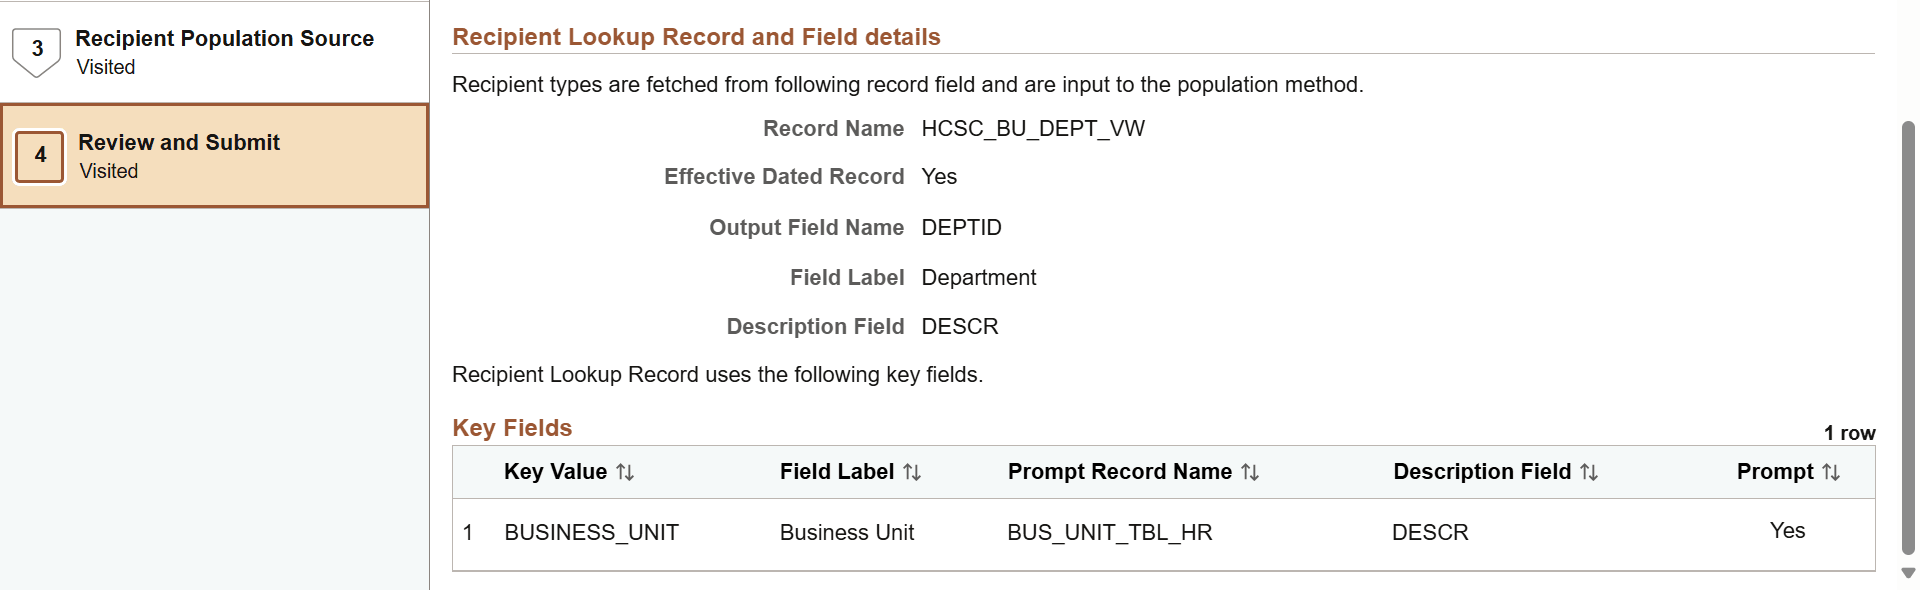
This example illustrates the fields and controls on the Review and Submit page (2 of 2).
Select the Submit button to complete the recipient type configuration.
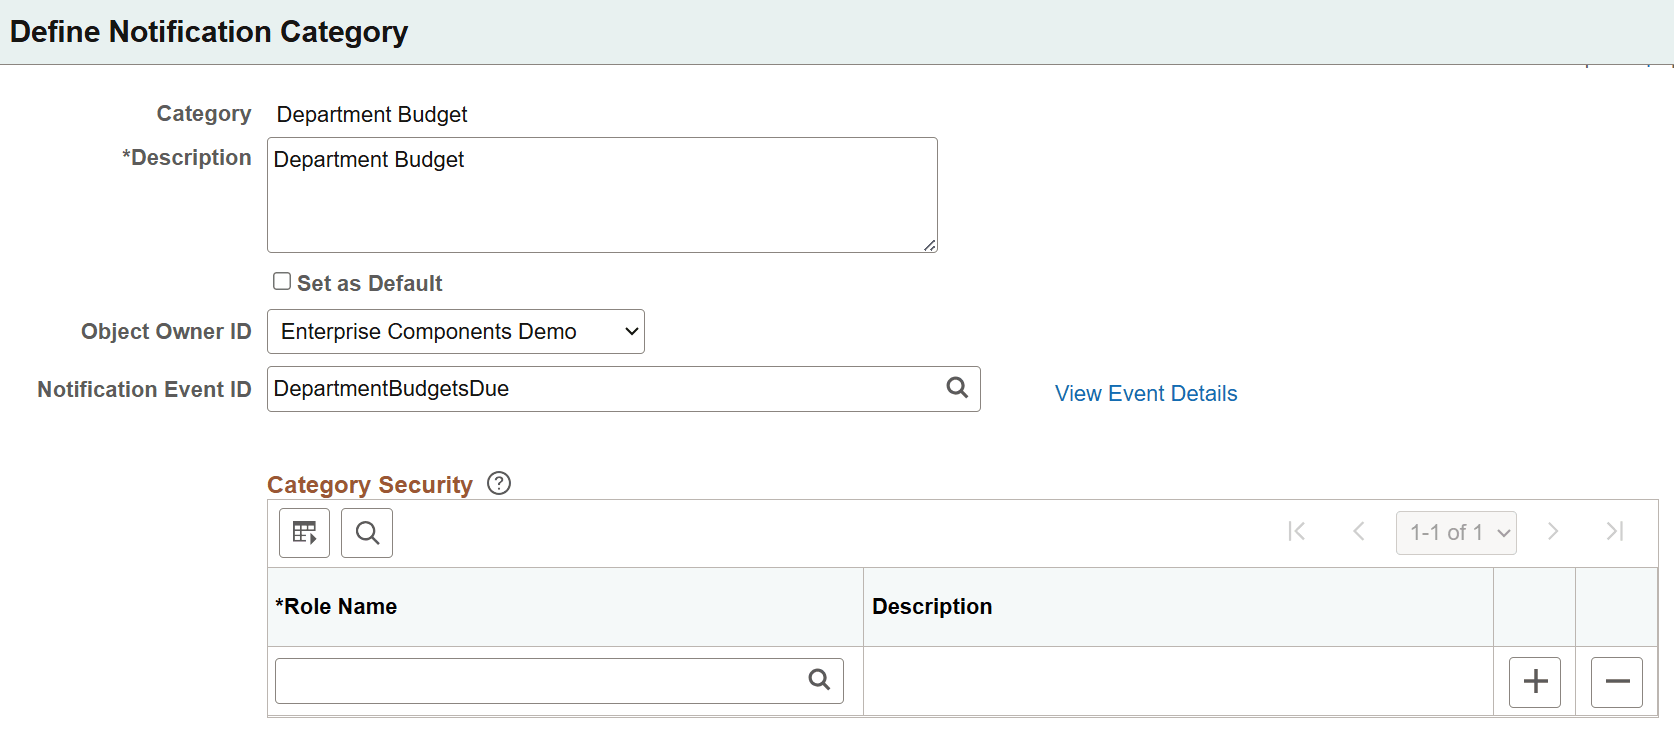
Use the Define Notification Category page (HCSC_CAT_SETUP) to specify groupings for notifications.
Navigation:
This example illustrates the fields and controls on the Define Notification Category page.
|
Field or Control |
Description |
|---|---|
|
Category |
Displays or enter a notification category name. Note: (For landing page) The system delivers the Banner Announcement category to be used for posting organization-wide announcements that appear in the Banner Announcement section of the landing page. |
|
Set as Default |
Select for this category to be used as the default value when users compose notifications on the Publish Notification Page. The default notification category is General Notification. When selected, the Category Security section is not shown and any associated security settings will be cleared. |
|
Object Owner ID |
Select the PeopleSoft application to which this category belongs. |
|
Notification Event ID |
Select a Notification Composer event for the category. This field is available when the feature is enabled in the system. Notification event ID is required for categories that are used for notifications that appear in dynamic landing page sections, such as Announcements. The system uses the message content definition of the selected event to send notifications belonging to the category. A notification event ID can be defined automatically while creating a new notification. For more information, see the Add New Notification Page topic for Notification Composer. Note: Although notification event IDs from both Application Notification and Notification Publisher sources are available for selection, it is recommended to select an event from the Notification Publisher source. For notifications to be published in landing page sections (with the exception of the Banner Announcement section), the selected notification event must be configured to use the Homepage notification type for in-app notifications. Notification event is not required for publishing banner announcements. |
Category Security
|
Field or Control |
Description |
|---|---|
|
Role Name |
Specify roles that will have access to this category. If no roles are added, all users are able to access this category. |
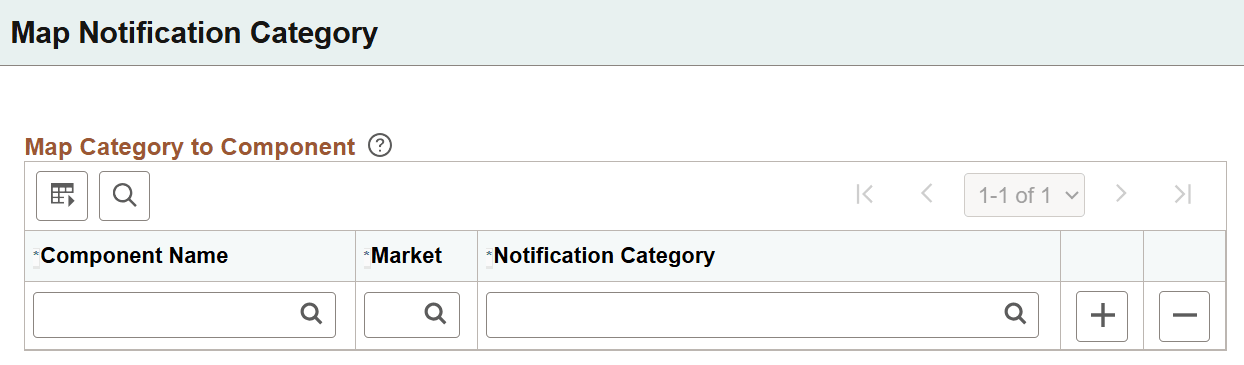
Use the Map Notification Category page (HCSC_CAT_COMP_TBL) to associate notification categories to fluid components for sending notifications.
Navigation:
This example illustrates the fields and controls on the Map Notification Category page.
|
Field or Control |
Description |
|---|---|
|
Component Name |
Enter a fluid component that uses Notification Publisher to send notifications using a modal window. |
|
Market |
Select a market. |
|
Notification Category |
Enter a notification category to be used for sending notifications by the component. For example, if the notification category is associated with a notification event from Notification Composer, the system uses setup from that notification event to send notifications. If no category is mapped, the default category will be used. |
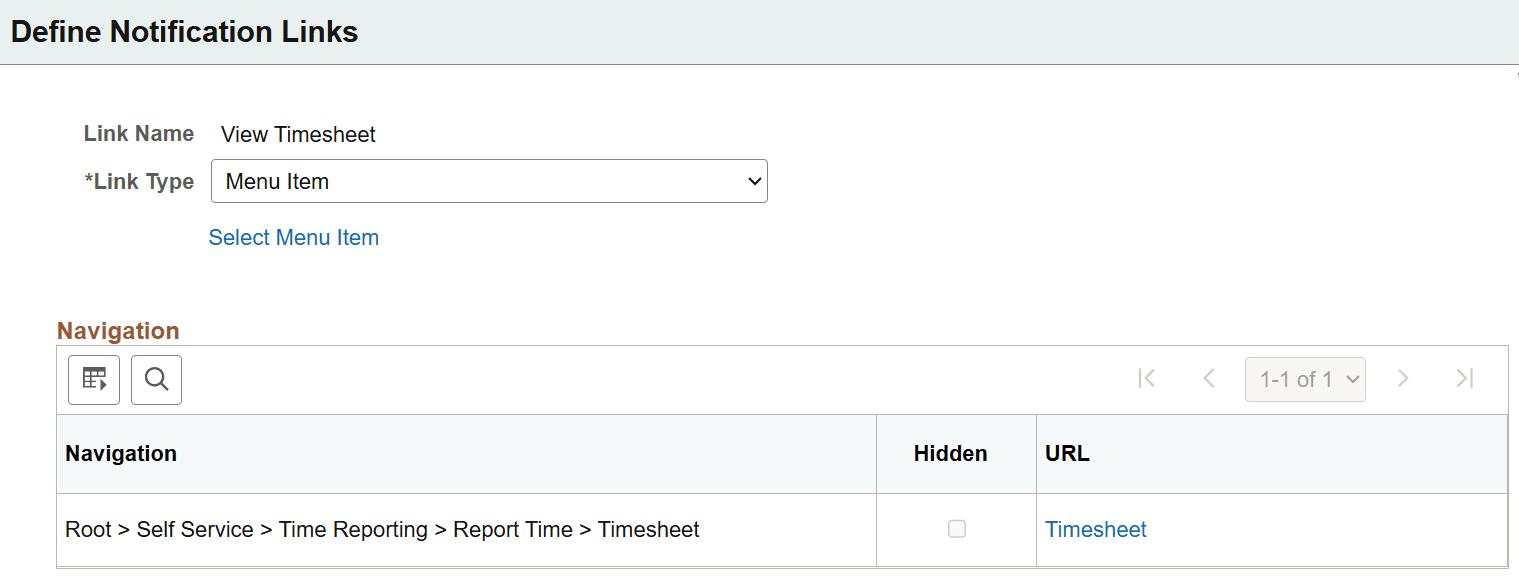
Use the Define Notification Links page (HCSC_LINK_SETUP) to set up links that can be included in notifications.
Navigation:
This example illustrates the fields and controls on the Define Notification Links page.
|
Field or Control |
Description |
|---|---|
|
Link Type |
Select the type of the embedded link you are creating. Options are:
|
|
URLs |
Enter the URL. This field appears if the selected link type is URL. |
|
Select Menu Item link |
Use this link to select a content reference from the tree structure on the Select a Content Reference page (HCSC_CRFURL_SELECT) for the menu item. |
Navigation
This section lists (if applicable) the navigation path of the selected menu item.
|
Field or Control |
Description |
|---|---|
|
URL link |
Select to access the page that recipients go to when they click this embedded link from the notifications they receive at runtime. |
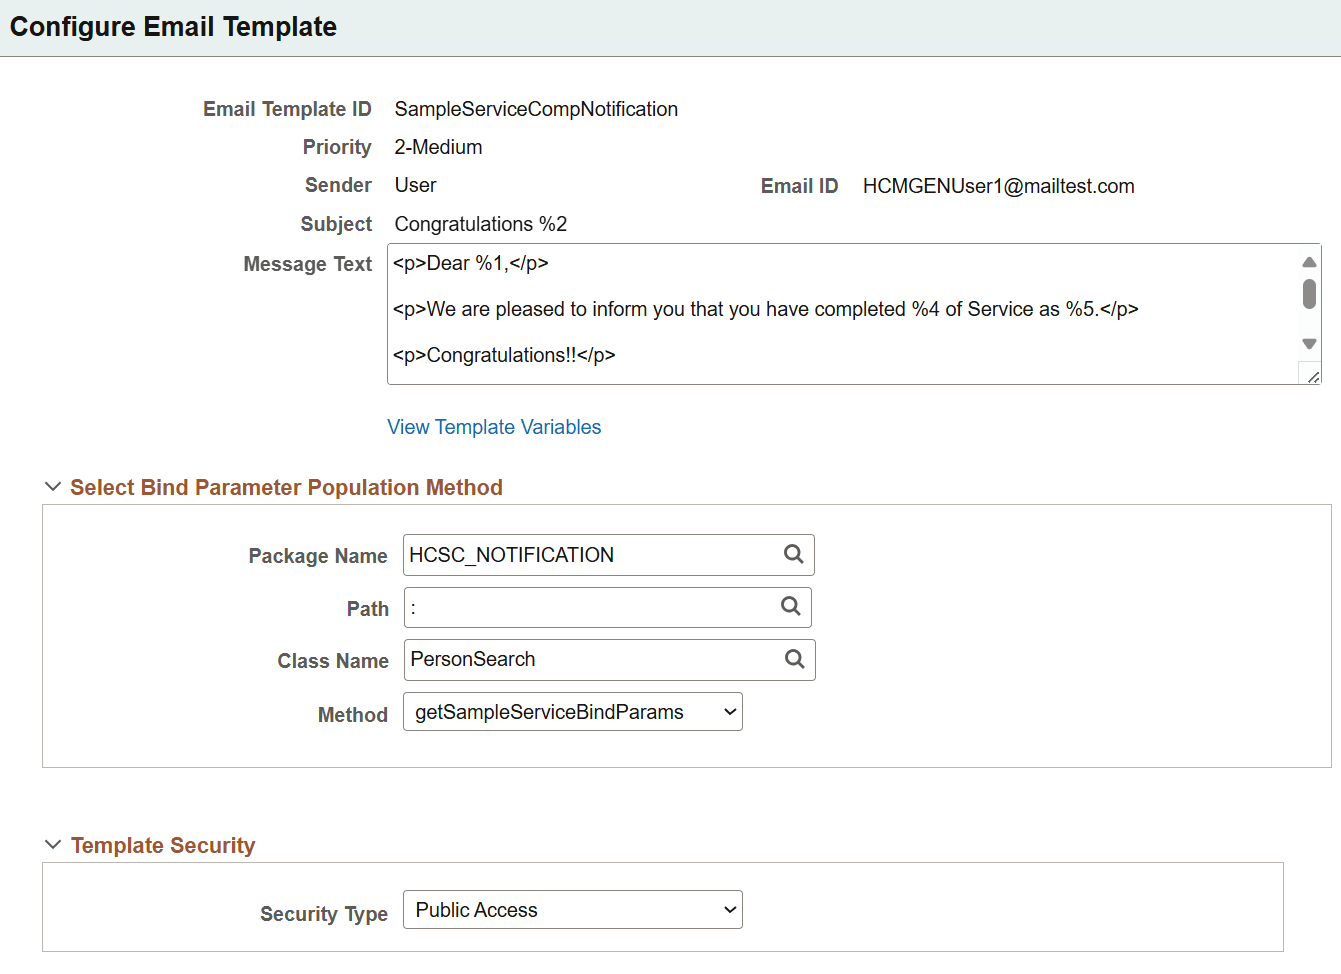
Use the Configure Email Template page (HCSC_NOTIF_TMPL) to configure PeopleTools generic templates for use in email notifications.
Navigation:
This example illustrates the fields and controls on the Configure Email Template page.
|
Field or Control |
Description |
|---|---|
|
Subject |
Displays the subject of the PeopleTools generic template. For more information about PeopleTools generic templates, refer to PeopleSoft: Workflow Technology: "Using Notification Templates," Defining Generic Templates. |
|
Message Text |
Displays the message text of the PeopleTools Generic Template. |
|
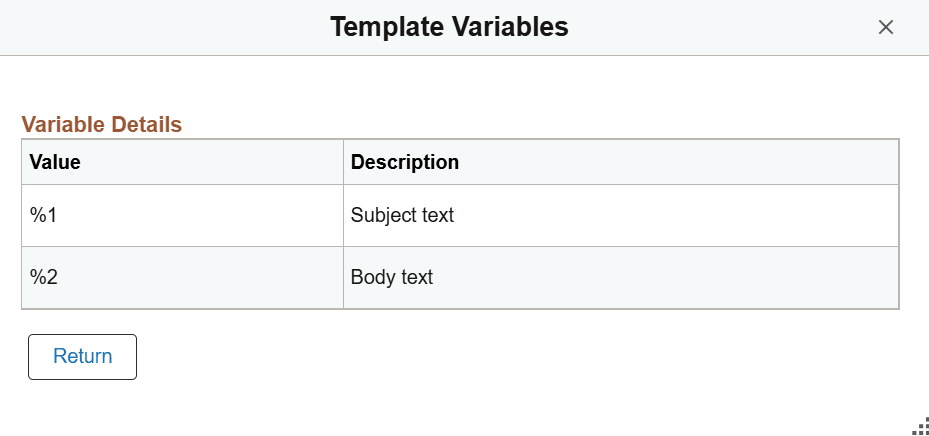
View Template Variables link |
Select to view the description of the bind values used in the Subject/Message Text. This link will be available only if Subject or Message Text has bind values. |
Select Bind Parameter Population Method
Enter the application package, class and method to resolve the list of bind parameters.
The Application Class method should return an array of string with values for an EMPLID. Before sending notification, the AE program resolves bind parameters using the selected method with the values.
|
Field or Control |
Description |
|---|---|
|
Package Name |
Select an application package. |
|
Path |
Select the qualified package or path of the application package. |
|
Class Name |
Select the class name of the application package. |
|
Method |
Select the method to be executed to resolve bind parameters. |
Template Security
|
Field or Control |
Description |
|---|---|
|
Security Type |
Select security access of the template: Public Access: All users have access. Security Access: Users of specific roles have access. |
|
Role Name |
Specify the role of users who can use this template to send email notifications. This field appears if the selected security type is Security Access. |
Use the Template Variables or Notification Variables page (HCSC_GEN_TMPL_VAR) to identify the variable values for the message text.
Navigation:
Select the View Template Variables link on the Configure Email Template Page.
The page name is Template Variables.
Select the View Notification Variables link on the Publish Notification Page.
The page name is Notification Variables.
This example illustrates the Template Variables page.
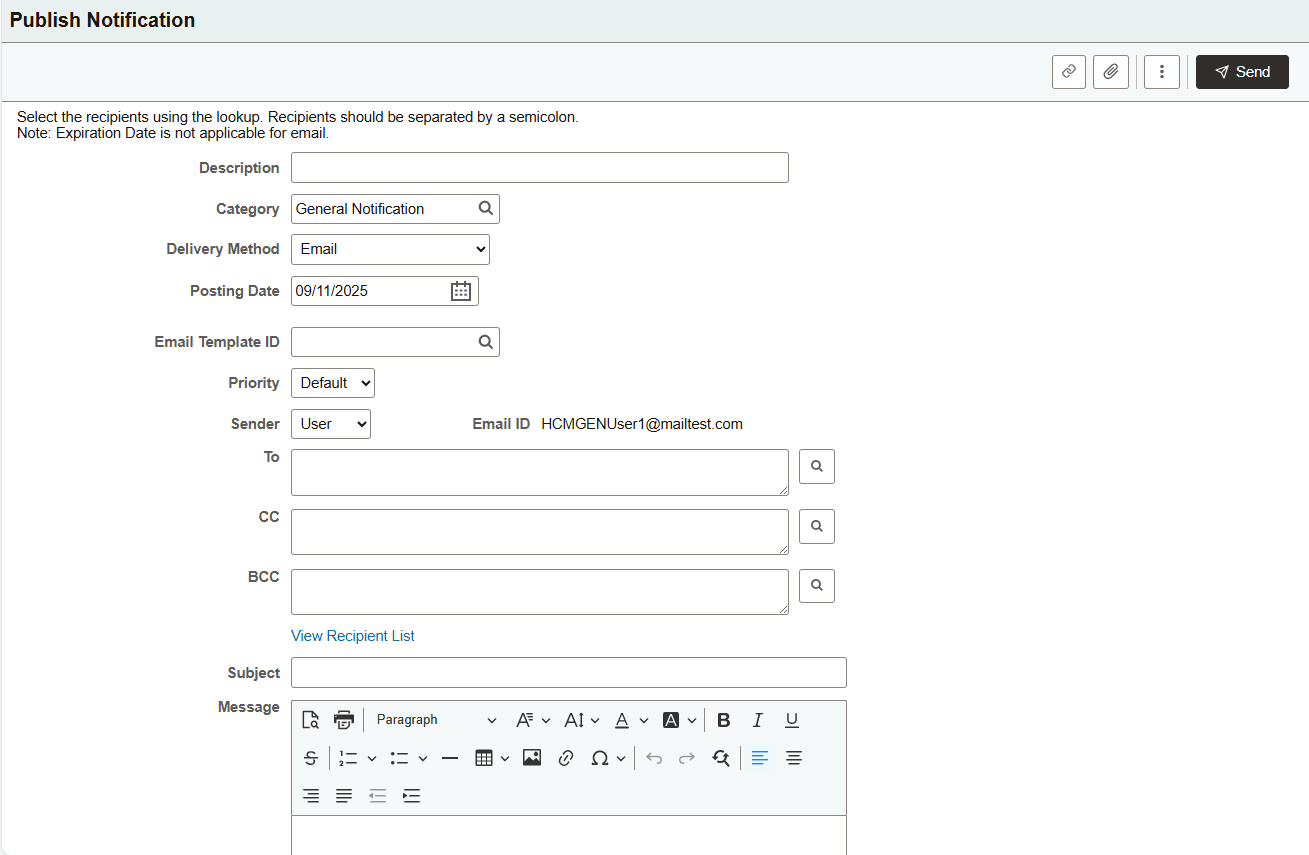
Use the Publish Notification page (HCSC_ADH_NOTIFY_FL) to compose and send notifications.
Navigation:
This example illustrates the fields and controls of the Publish Notification page that is used to create a new notification.
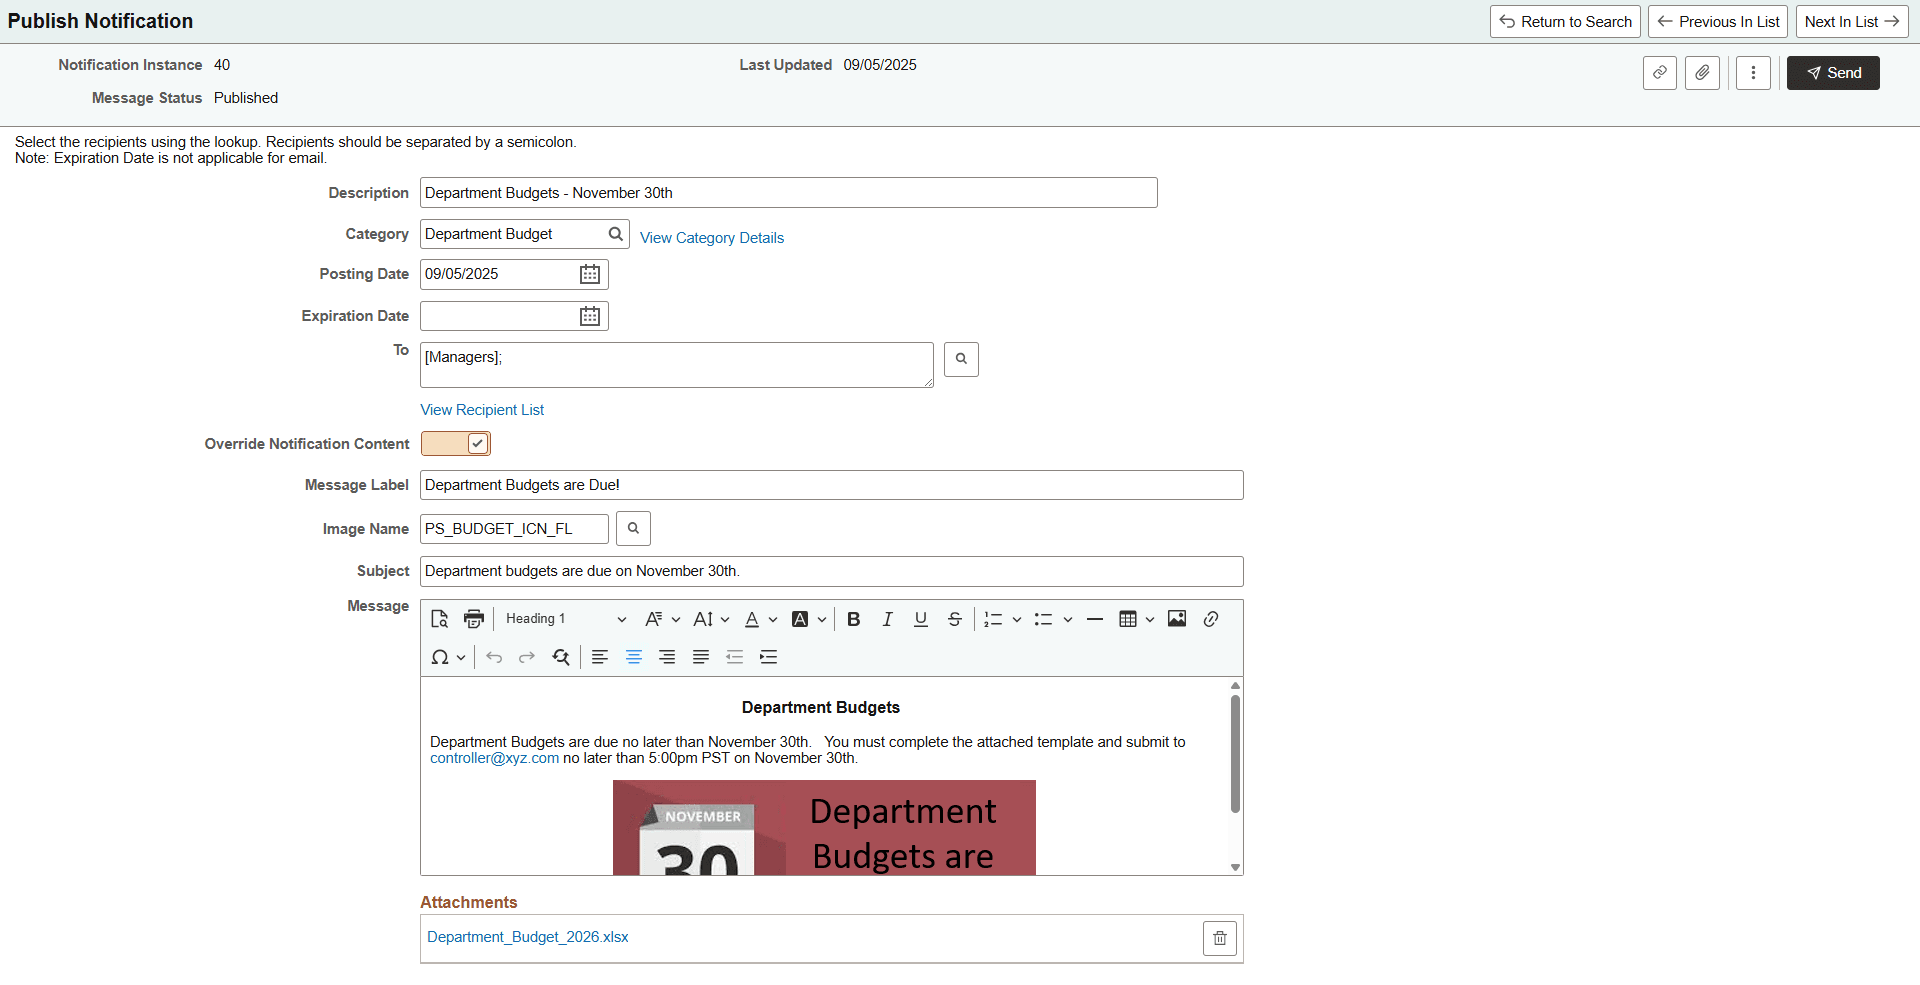
This example illustrates the Publish Notification page with a published notification displayed in a landing page section.
Use this page to compose and publish notifications. On the search page, you can find a list of notifications that have been delivered or are scheduled to deliver to recipients.
Note: Recipient Types using PS Query populates recipients based on the Query Security and Query Security Record associated with the Records in PS Query.
If the notifying user has access to PS Query and if the PS Query is joined with the Query Security Record, then the recipients are retrieved based on the security enforced.
|
Field or Control |
Description |
|---|---|
|
Notification Instance |
Displays the system-generated ID for the notification. Not applicable to new notifications. |
|
Message Status |
Displays the status of the notification. Values can include Published, Dismissed, and Ready To Send. Not applicable to new notifications. |
|
|
Select to access the Select Link page (HCSC_NOTIF_LIN_SCF) and select an embedded link to add to the notification as needed. Embedded links are defined on the Define Notification Links Page. |
|
|
Select to access the File Attachment page and upload a file attachment to the notification as needed. |
|
|
Select to perform one of these actions: Advanced Options: Select to access the Advanced Options Page to specify options for recurring notifications and logging. Dismiss: Select to remove published notifications of this notification instance so that recipients can no longer view or access them. This option is not applicable to email notifications. Delete: Select to remove this notification instance from the system. If you are drafting the notification, select this option to clear all of its content. |
|
Send |
Select to trigger the notification process (HCSC_NOTIFY) to publish the notification to recipients. If the notification has a future posting date, it is saved and will be sent on the posting date. The Process Monitor link appears in the confirmation message, allowing you to view the status of the notification process. |


|
Field or Control |
Description |
|---|---|
|
Description |
Enter a description for the notification. |
|
Category |
Displays the default category or select a category for the notification. Categories are defined on the Define Notification Category Page. Note: (If landing page is used) To post an organization-wide announcement notification in the Banner Announcement section of the landing page, use the Banner Announcement category. Only one announcement appears in this section. If there are multiple banner announcements, the one with the highest priority and most recent posting date is displayed. |
|
View Category Details link |
Select to access the Notification Category Details Page to view details about the Notification Composer notification event that is associated with the selected category. This link appears when the selected category is associated with a notification event ID in the category definition. Notification Publisher uses the message content definition of that notification event to send notifications. |
|
Delivery Method |
Select how the notification will be delivered to intended recipients. Note: The Delivery Method field is not shown if the selected category is associated with a notification event ID. In this case, the system uses the delivery method information that is defined in the associated notification event in Notification Composer to send the notification. Options include:
Note: To send in-app notifications from this page, select a category that is associated with a notification event configured for in-app notifications. |
|
Posting Date |
Select the date to send the notification to intended recipients. Future notifications are saved and will be sent on the specified future date. Note: Do not enter a past date as the posting date. |
|
Expiration Date |
Specify the date when the notification expires and no longer shows. This field is not applicable to email notifications. |
|
Recipients can dismiss this announcement |
Select to give recipients the option to dismiss the announcement notification from the Announcements Page if needed. This field is available if the delivery method includes Announcement. |
|
Email Template ID |
Specify the email template to be used for the notification if needed. Information from the template is populated to the Priority, Sender, Subject and Message Text fields automatically. This field is available if the delivery method is Email. |
|
Priority |
Specify the priority for the notification. This field is not shown if the selected notification category is associated with a notification event ID. |
|
Sender and Email ID |
Specify the sender and email address. This field is available if the delivery method includes Email. |
|
To, CC, and BCC |
Select recipients for the notification using the Recipient lookup button. For example, select System Wide Distribution to display notice in the Banner Announcement section for everyone in the organization. On the Select Recipients page, select a recipient type and enter search criteria in the respective search fields. The user can see and select the recipient types to which he or she is given access when drafting notifications. CC and BCC fields are not applicable if the selected delivery method is Announcement, or if the selected notification category is associated with a notification event. See also Setup Security Page. |
|
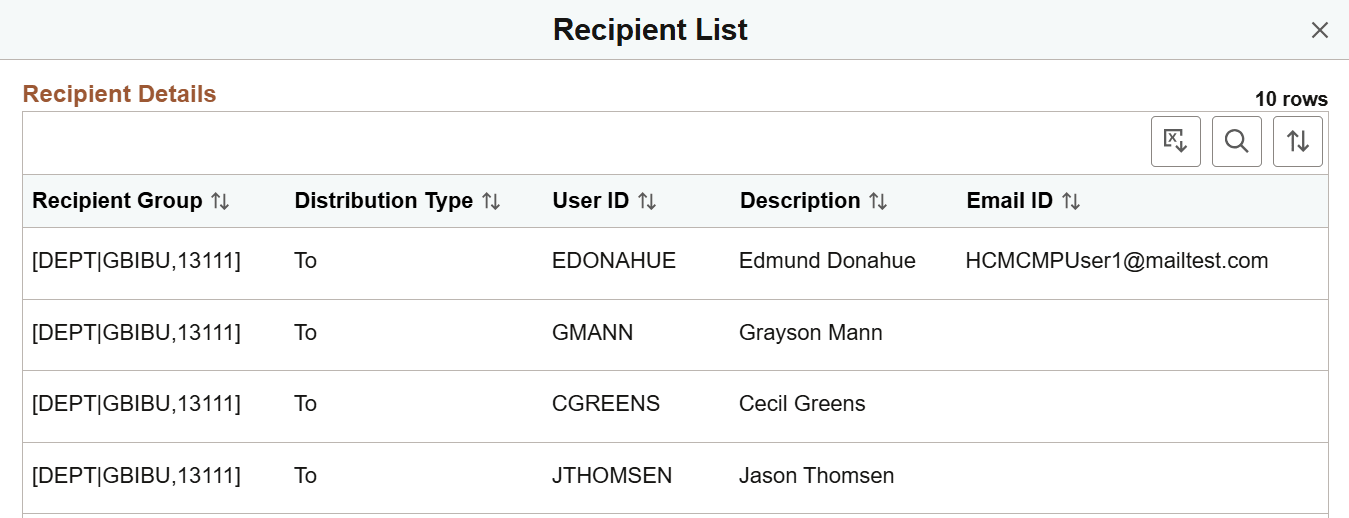
View Recipient List |
Select this link to access the Recipient List Page to preview the list of selected recipients for the notification. |
|
Override Notification Content |
Select to not use the subject and message text from the associated notification event and enter your own content. This option appears when the selected category is associated with a notification event ID in the category definition. When selected, the Notification Content Details section is no longer displayed. Additionally:
|
|
Subject |
Displays or enter the subject of the notification. For email-only notifications, the subject that comes from the email template is read only. |
|
Message |
Displays or enter the content of the notification in the rich text editor. For email-only notifications, the message text that comes from the email template is read only. |
Notification Content Details
This section displays the notification subject and message texts of the Notification Composer event that is associated with the selected category. This content can be overridden using the editable fields that appear subsequently.
Link List
This section, if displayed, lists the embedded link that is added to the notification.
Use the Advanced Options page (HCSC_NOTIF_ADV_SCF) to specify options for future or recurring notifications.
Navigation:
Select the More Actions button and then select Advanced Options on the Publish Notification Page.
This example illustrates the fields and controls on the Advanced Options page.
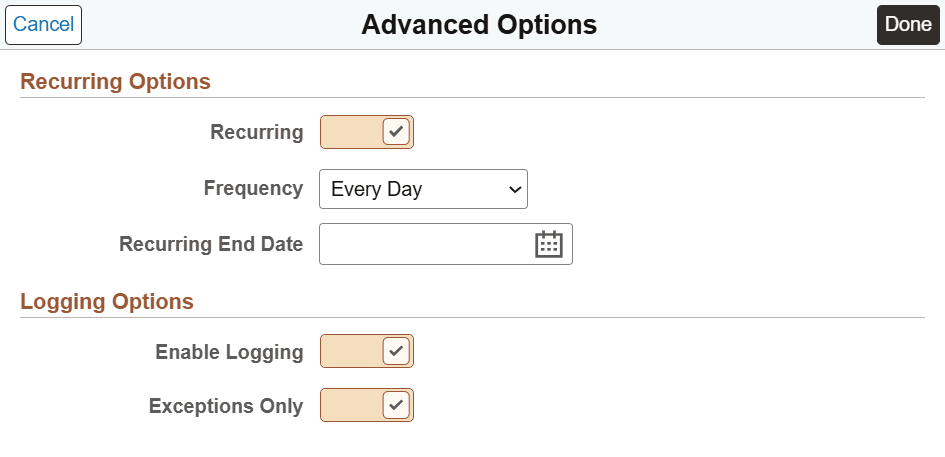
Recurring Options
|
Field or Control |
Description |
|---|---|
|
Recurring |
Select to mark the notification as recurring. |
|
Frequency |
Select the frequency of the recurring notification. Options are:
|
|
Start Day |
Enter the day of the week or the day of the month to start sending the recurring notification or announcement. This field is not visible if the selected frequency is Every Day. Note: If the user selects the last date of the month, the system assumes that the user intends to send the notification at the end of every month. For example, if 31st is selected, the system sends the notification on the 31st of January, 28th or 29th of February, 31st of March, 30th of April and so on. |
|
Recurring End Date |
Enter the date when the delivery of the recurring notification ends. |
Logging Options
|
Field or Control |
Description |
|---|---|
|
Enable Logging |
Select to enable logging. Log information is stored in HCSC_NLOG_TBL record. Note: Logging is available to email notifications only. |
|
Exceptions Only |
Select to log only exceptions. This field becomes editable when the Enable Logging field is selected. |
Use the Notification Category Details page (HCSC_CAT_NOTNC_SCF) to view details of the associated notification event.
Navigation:
Select the View Category Details link on the Publish Notification Page.
This example illustrates the fields and controls on Notification Category Details page.
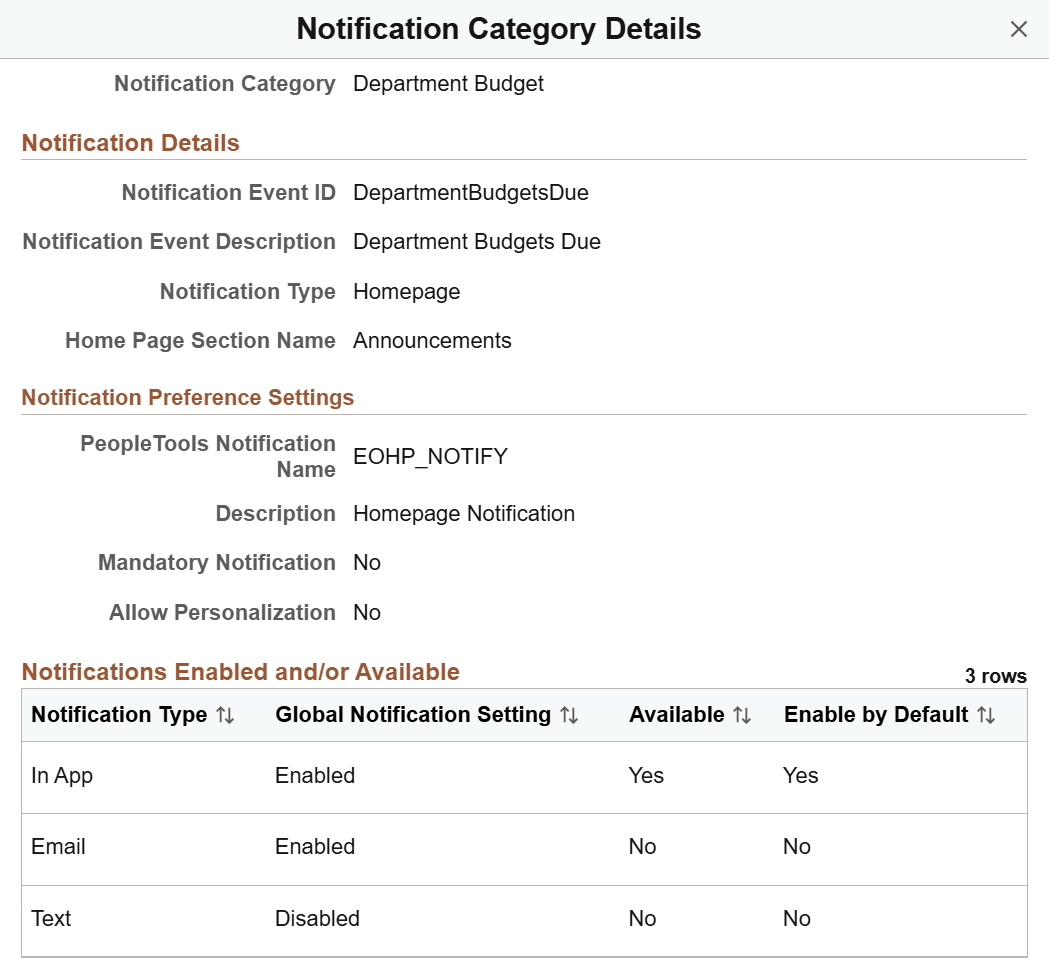
Note: This page is available only if the selected notification category is associated with a notification event on the Define Notification Category Page. It displays details of the notification event in Notification Composer, such as preference settings, and availability by notification type.
Use the Recipient List page (HCSC_RCPNT_LST_SCF) to view recipients of the notification.
Navigation:
Select View Recipient List link from the Publish Notification Page.
This example illustrates the fields and controls on the Recipient List page.
Use the notification modal page (HCSC_NOTIF_ADH_FLU) to compose and send notifications from fluid application pages.
Navigation:
Select the Related Actions icon next to an individual's name on fluid pages and select a notification action, such as Notify Employee or Send Notification in HCM.
Note: This notification functionality is available as a Related Content Service (Service ID: EONC_NOTIFY_RECIPIENTS), and can be configured as a related action on any fluid application page. The title of this modal page is configurable in the related action setup.
To access this page, the user profile should be associated with role Notification Publisher User.
This example illustrates the fields and controls on the Notify Employee page that is available from the My Team page in HCM.
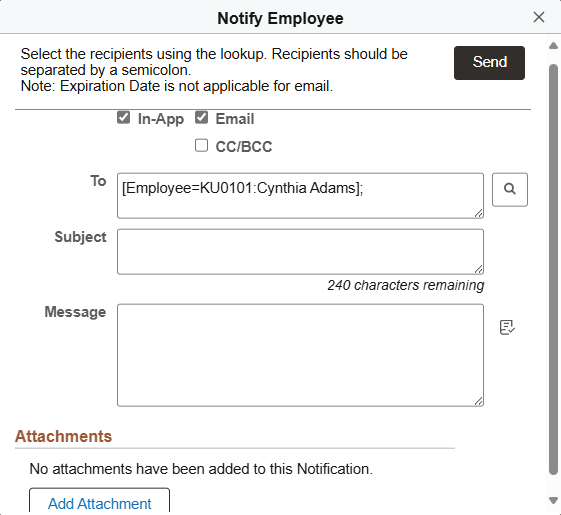
Select the type of notification to be delivered to intended recipients. You can select In-App, Email, or both.
|
Field or Control |
Description |
|---|---|
|
In-App and Email |
Select to send in-app, email, or both types of notifications to recipients. Note: The In-App and Email delivery method options are not available on the notification modal page, if either the category that the fluid application page is mapped to on the Map Notification Category Page or the default category of the system is associated with a notification event in the category definition. The system uses the delivery method information from the associated notification event to send the notification. |
|
CC/BCC (carbon copy/blind carbon copy) |
Select this option to show the CC and BCC fields to copy other individuals on the email notification. This check box appears when you select Email as a delivery method. |
|
To, CC, or BCC |
Select recipients for the notification using the Recipient lookup icon. On the Recipient Lookup page, enter search criteria in respective search fields. |
|
Subject |
Enter the subject of the notification. |
|
Message |
Enter the content of the notification. |
|
Add Attachment button |
Select to access the File Attachment page and upload a file attachment to the notification. |
|
Send button |
Select to send the notification. This triggers the HCSC_NOTIFY process to send notifications (in-app, email, or both) to intended recipients. A copy of the notification is available for review on the Publish Notification Page. |
Use the Notification Log Summary page (HCSC_NOTIF_LOG_SUM) to view notification logs.
Navigation:
This example illustrates the fields and controls on the Notification Log Summary Page.
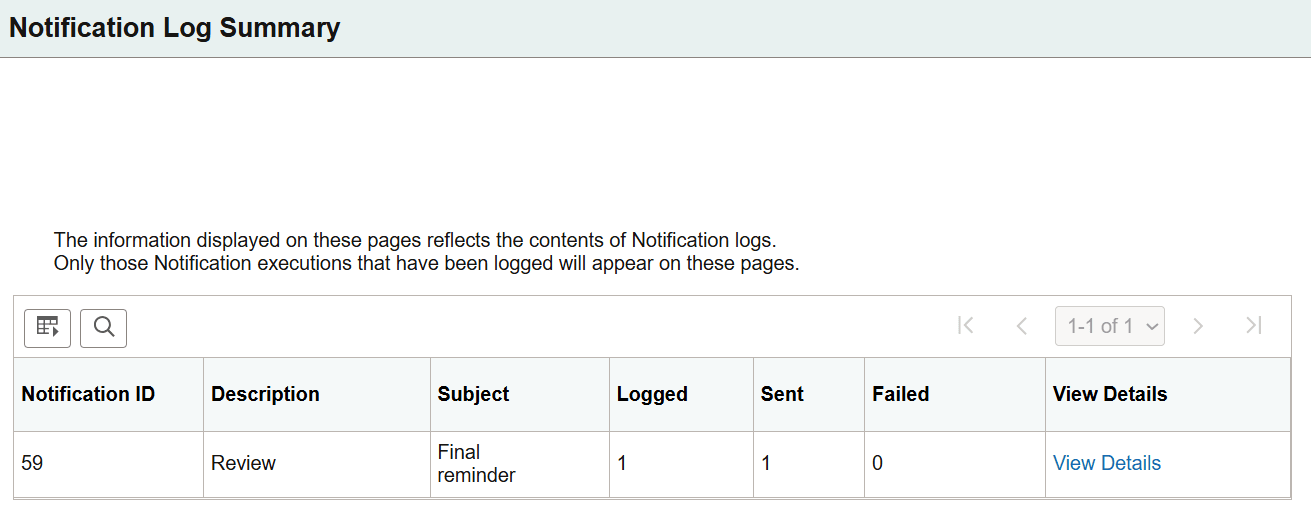
Note: If an email notification is composed and sent with the logging option enabled, log results are displayed on the Notification Log Summary page. You can enable logging for all emails or just the failed attempts.
|
Field or Control |
Description |
|---|---|
|
View Details |
Select this link to access the Notification Log Details Page to view the notification log details. |
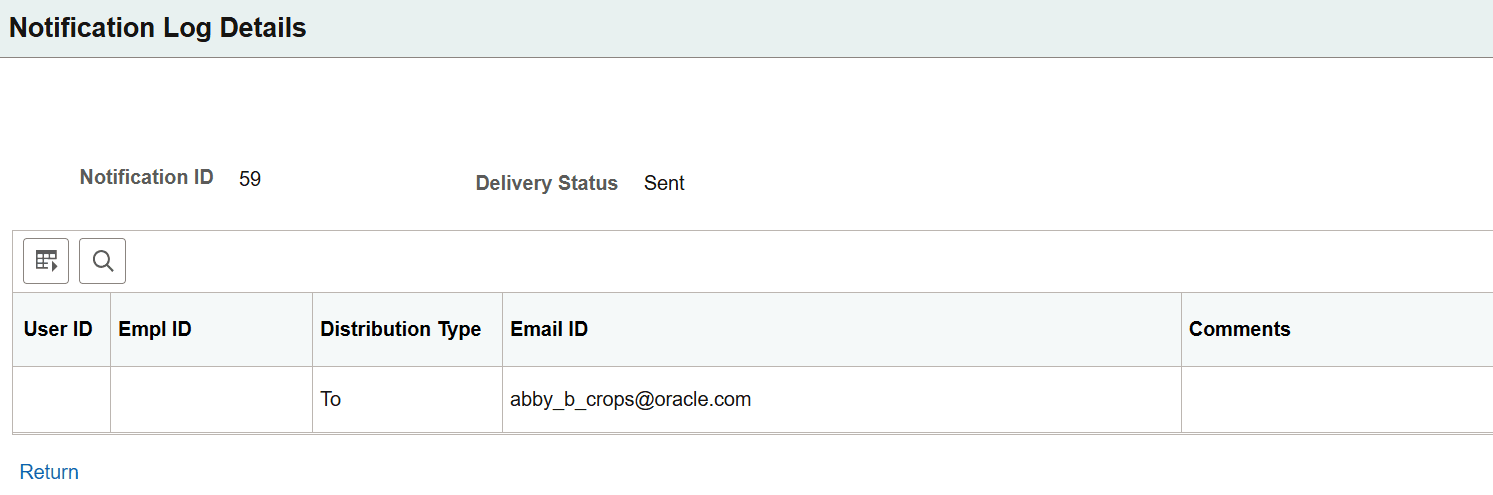
Use the Notification Log Details page (HCSC_NOTIF_LOG_DTL) to view additional log information and comments of processed email notifications.
Navigation:
Select the View Details link on the Notification Log Summary Page.
This example illustrates the fields and controls on the Notification Log Details page.