Setting Up Unified Navigation Clusters
A unified navigation cluster setup enables seamless single signon (SSO) and navigation between multiple PeopleSoft applications (HCM, FSCM, ELM, CRM) from a single homepage. Use the Environment Cluster Setup page (ECL_CLUST_SETNG_FL) to create and manage unified navigation clusters.
After defining the portal system and content nodes on the Cluster Settings page, Cloud Manager opens Policy Editor. You verify the required information on the delivered Configure IB PORTAL Cluster policy and run it to complete the setup
A unified navigation cluster in Cloud Manager is comprised of a portal system node and multiple content nodes. You can designate any PeopleSoft application as the portal system node that federates all participating content nodes into a single cluster. A content node is a PeopleSoft application (HCM, FSCM, ELM, CRM) that provides content to the portal system.
Note that the PeopleTools documentation uses the term "content provider" for the content nodes. For more information, see the product documentation PeopleTools: Portal Technology, Understanding Unified Navigation, on Oracle Help Center at https://docs.oracle.com/en/applications/peoplesoft/peopletools/index.html.
A unified navigation cluster must fulfill these requirements:
Common gateway: Each cluster must have a common, or shared, Integration Broker (IB) gateway.
The IB configuration for each environment specifies the shared gateway URL.Select the PeopleSoft environment with the latest PeopleTools release to serve as the common gateway. All other nodes in the cluster will point to the common gateway for communication.
Unique content nodes: Each content node (environment) added to a cluster must be unique in terms of its application type.
For example, you cannot add a second FSCM environment to a cluster with FSCM and HCM environments.
Integration Broker: At least one node (a host that contains an application server) within each environment in a cluster must have Integration Broker configured to facilitate seamless data exchange.
For example, if an environment includes multiple mid-tier nodes, ensure that at least one has Integration Broker configured.
Process Scheduler domain: The environments used for the cluster must include at least one Process Scheduler domain.
The environments can be full-tier or combinations of mid-tier and database tiers. Process Scheduler is required to run the Automated Configuration Manager plugins for the cluster setup.
Common authentication domain: All environments must use the same authentication domain.
The authentication domain is part of the template definition, under web server settings.
Node names: When you configure a unified navigation cluster or shared IB gateway through Cloud Manager, do not use the names of delivered nodes, such as PSFT_EP for FSCM or PSFT_CS for Campus Solutions.
Enter a name of 5-15 characters. Use only uppercase letters, numbers, and underscores (_) for node names.
To review the delivered nodes, select . See the product documentation concerning nodes in PeopleTools: Integration Broker Administration on Oracle Help Center at https://docs.oracle.com/en/applications/peoplesoft/peopletools/index.html.
Common Portal User: The same default portal user (for example, VP1 or PS) must exist on the portal system node and content nodes.
If the user account is missing from either system, it must be manually created. This step ensures that the user has the necessary access to both the portal system and content node environments, which is essential for proper functionality within the cluster. After creating a new user on a portal system node or content node, restart the node.
Common Portal User Passwords: The password for the default portal user in the portal system node must match the password for the same user in the content nodes.
The password for the default content user should also be same in both the systems.
This synchronisation ensures that both systems can authenticate the same user seamlessly across the cluster. After changing passwords, restart the node.
Common Gateway keystore password: The password must be the same on the portal system node and content nodes in order for SSO to work.
Set up a new cluster with environments created in Cloud Manager. Access the environment that you have chosen as the portal system. Define the portal system and content nodes, and then run a policy to create the cluster.
Click the Environments tile on the Cloud Manager home page.
Click the environment card to access the details for the environment that you have chosen as the portal system.
Alternatively, click the Related Action button for the environment and select Details.
Select Cluster Settings on the left panel of the Environment Details page.
Click Create Cluster.
On the Create Cluster dialog box, the Portal System field is automatically populated with the environment name.
This example illustrates the Create Cluster dialog box.
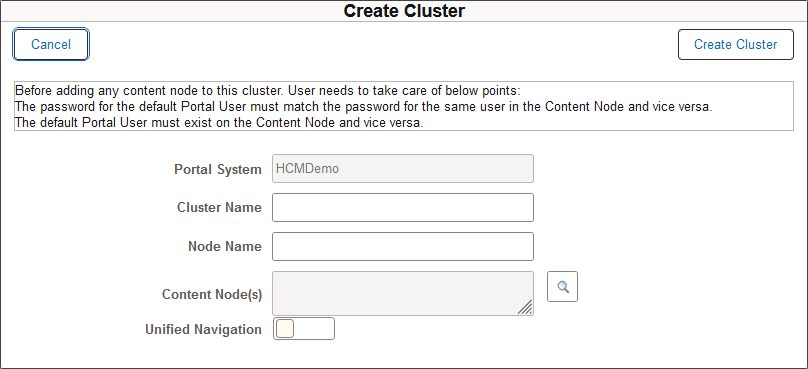
Enter a Cluster Name.
The cluster name is a logical identifier for recognizing the nodes within the cluster. Enter a name between 5-15 characters. Use only letters, numbers, and underscores (_).
Enter a Node Name for the Portal System node.
Enter a name of 5-15 characters. Use only uppercase letters, numbers, and underscores (_) for node names.
Click the browse icon and select one or more environments to serve as content nodes.
You can only use environments that are not already part of another cluster.
This example illustrates the Environment Name dialog box.
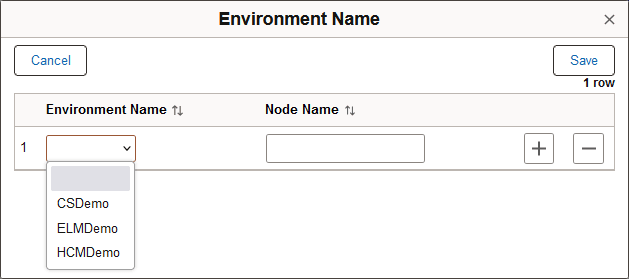
Enter a node name.
Click the plus icon to add more content nodes, or click Save to close the dialog box.
To register the menu from the content node into the portal system menu, enable the Unified Navigation option.
When you enable this option, a top-level menu item for the content node will be created in the portal system navigation menu.
If you do not enable this option, the remote folder from the content node will not be registered in the portal system, but communication between the nodes will still happen through the shared gateway.
Click Create Cluster.
Cloud Manager opens the Policy Editor page for the policy Configure IB PORTAL Cluster<internal>. This is a delivered policy that cannot be deleted. It is an Adhoc policy that you run immediately after completing the configuration.
The page opens with the following populated attributes, which cannot be modified:
Name — Configure IB PORTAL Cluster<internal>
Policy Object — Environment
Policy Type — Adhoc
Policy Conditions — Selected Portal System and Content Nodes environments in Running status.
This example illustrates the Configure IB PORTAL Cluster<internal> policy.
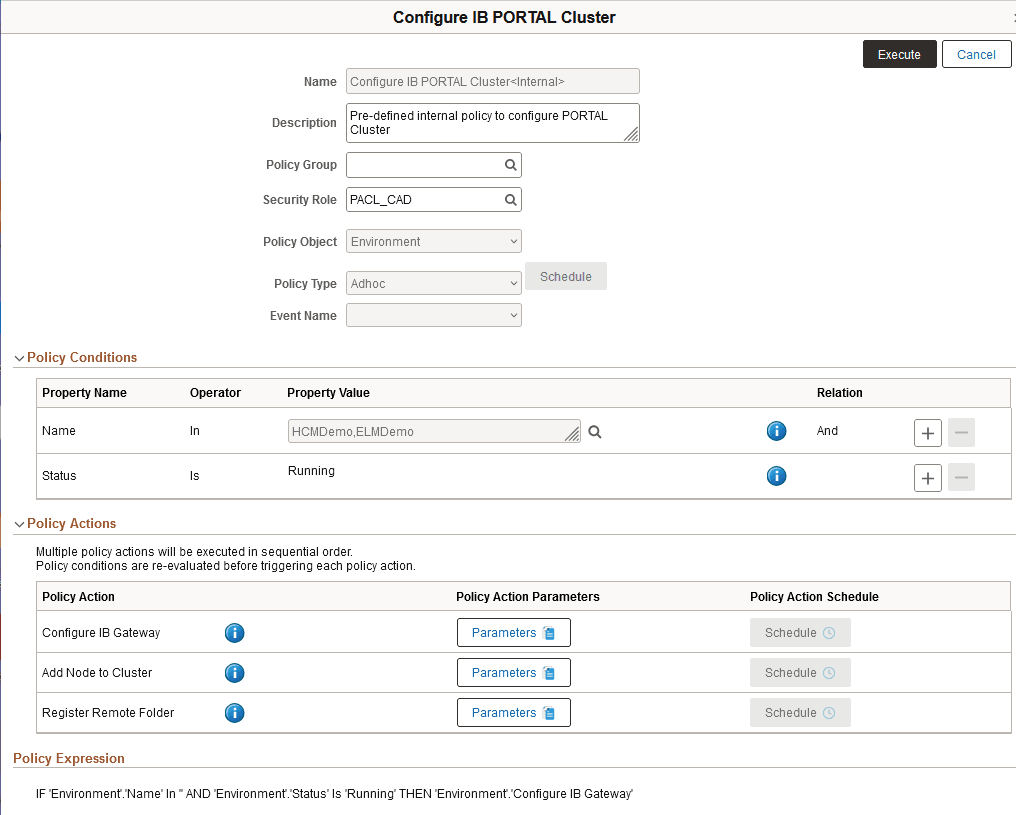
Select the Policy Group if desired.
Under Policy Actions, click the Parameters button for the Configure IB Gateway action.
Verify or supply the required data and then click Apply to return to the policy.
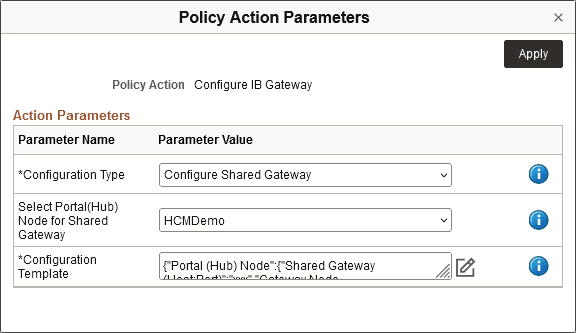
This example illustrates the Policy Action Parameters dialog box.
Field or Control
Description
Configuration Type
Accept the value Configure Shared Gateway. This is the only acceptable configuration type when creating a unified navigation cluster.
Select Portal (Hub) Node for Shared Gateway
The field is populated with the name for the environment from which you launched the policy.
Configuration Template
Click the edit icon to open a form to define parameters required for IB gateway configuration.
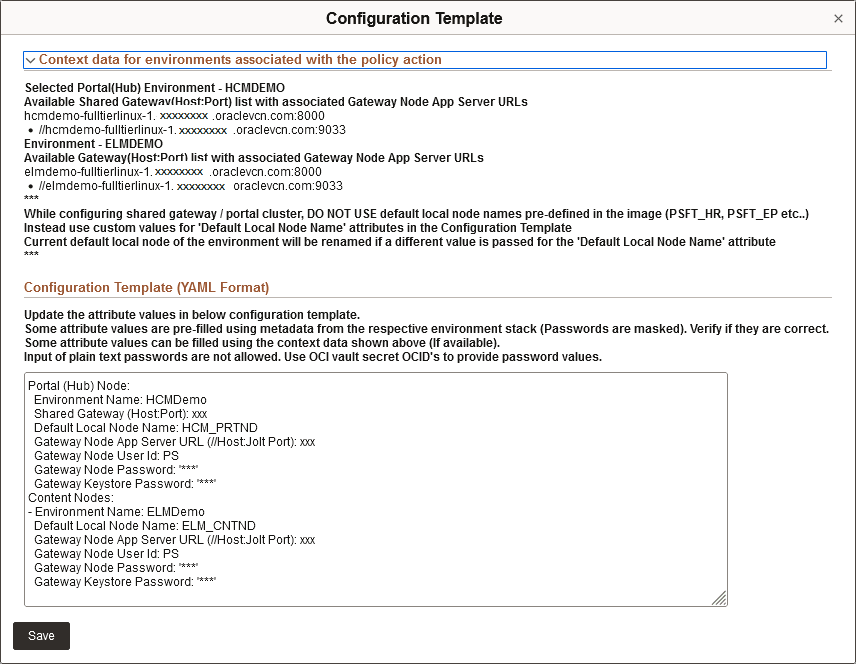
The context data section at the top includes data for the portal system and content nodes from the cluster associated with the policy. In the Configuration Template (YAML Format) field verify the values and make any required changes.
Copy and paste attribute values from the context data section. Update the values for Shared Gateway (HostPort) and Gateway Node App Server URL.
The password values include default masking characters ('***'). If you want to use the same passwords used in provisioning the environment, do not change the values. If you want to change the passwords, do not enter passwords in clear text. You must supply the vault OCID values. The OCIDs do not require single quotes.
After supplying the values, click Save to return to the Policy Action Parameters dialog box.
This example illustrates the Configuration Template for the Configure IB Gateway policy action.
Click the Parameters button for the Add Node to Cluster action.
This action registers each content node to the IB network, and configures the portal node in the portal cluster.
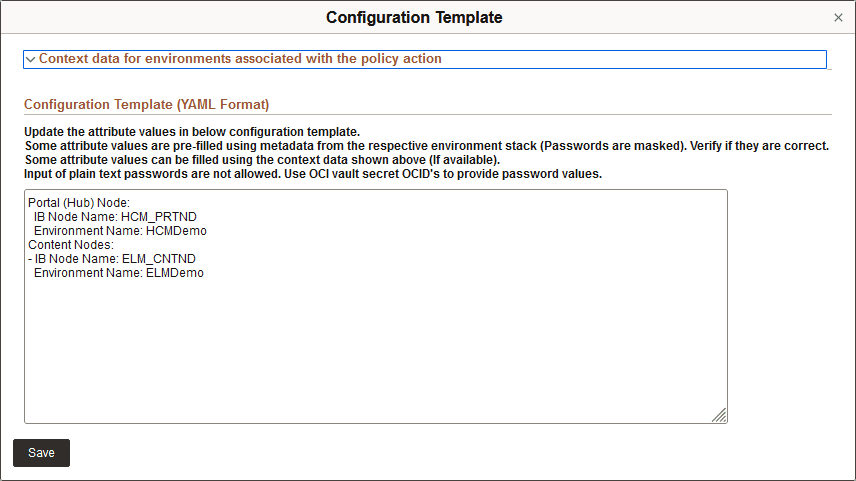
The only parameter is a Configuration Template. Click the edit icon to open the template. The attribute values are populated with the IB node names and environment names for the portal system and content node. You can accept the values, or enter new node names. Review the information and then click Save to close.
This example illustrates the Configuration Template for the Add Node to Cluster policy action.
Click the Parameters button for the Register Remote Folder action.
The parameters are Unified Navigation and Configuration Template. The Unified Navigation field displays the choice you made on the Cluster Settings page, and cannot be changed here.
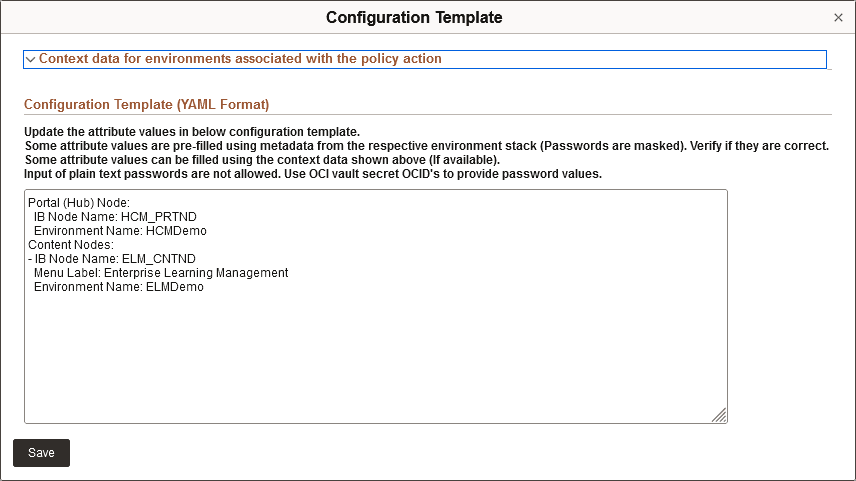
Click the edit icon to open the Configuration Template. The attribute values are populated with the IB node names and environment names for the portal system and content nodes.
This action sets up the navigation folder for the content node within the portal system navigation. If the cluster was defined with the Unified Navigation option enabled, the Menu Label will be used to group the menu from the content node environment under the top-level of the portal system menu. You can modify the menu label or accept the default. The default menu labels correspond to the PeopleSoft applications—Campus Solutions, Customer Relationship Management, Enterprise Learning Management, Financials and Supply Chain Management, Human Capital Management, and Interaction Hub.
If you did not select the Unified Navigation option when defining the cluster, the parameter is set to "N", and this policy action runs without registering the navigation folder for the content node.
On the portal system home page, the home pages for the content nodes will be added to the homepage drop-down selector at the top left of the home page.
Click Save after verifying the information on the Configuration Template, and then click Apply to close the Policy Action Parameters dialog box and return to the policy.
This example illustrates the Configuration Template for the Register Remote Folder policy action.
Click Execute to run the policy.
The Policy Monitor page opens. Click the status arrow for the Configure IB PORTAL Cluster policy to follow the progress.
See Using Policy Monitor.
You can also follow the progress on the Environments landing page. The environment cards for the portal system and content nodes display these status messages:
Configuring Shared Gateway
Register remote folder
Configure Portal
Adding Node to Cluster
The Provision Task Status page also shows the progress.
After the policy runs, stop and start the content node environments.
To stop an environment, select Stop from the Related Action menu on the environment card. After it is stopped, the Start action becomes available.
Alternatively, you can use policies to stop and start the environments. You can create a single Adhoc policy with stop and start policy actions, associate the content node environments with the policy, and then run the policy. See Setting Policy Conditions and Actions for Environment Policy Object.
After setting up and running the policy, it is advisable to trigger the policy from the Cluster Settings page of the portal system node. Expand the IB Gateway Configuration section, and click Configure to open the page where you can run the policy.
View details after creating a new cluster or adding a node to an existing cluster.
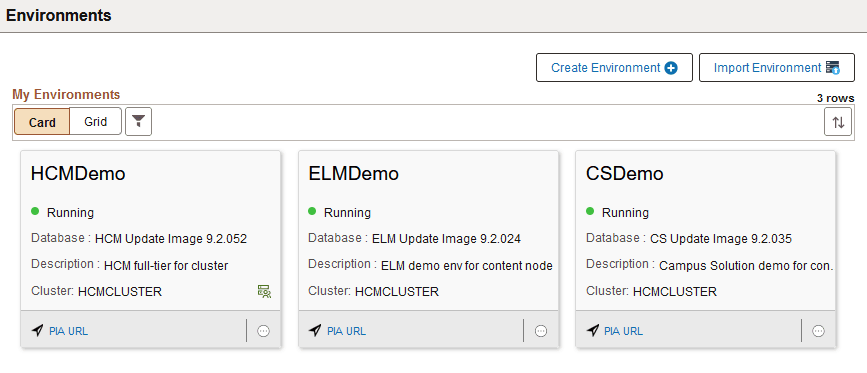
Environment Cards
The card for the portal system
environment displays a cluster symbol and the name of the cluster. The card for
the content node environment displays the name of the cluster. If the portal
system is stopped, the cards for the content node environments display warning
symbols ( ).
).
This example illustrates the environment cards for a portal system environment and two content node environments.
Shared Gateway
After you restart the content node environments, click Refresh Metadata. Expand the IB Gateway Configuration section. The node definition points to the shared gateway.
The shared gateway is also specified in each environment. Sign in to the environment and select .
Cluster Settings Page
When the creation process is complete, the portal system and content nodes, with their environment names and the gateway type, are displayed in separate sections on the Cluster Settings page for each environment in the cluster.
After a cluster is discovered or created, the data in the Cluster Settings page for the content node is read-only and the user cannot take any action.
This example illustrates the Portal System and Content Node(s) sections on the Cluster Settings page.
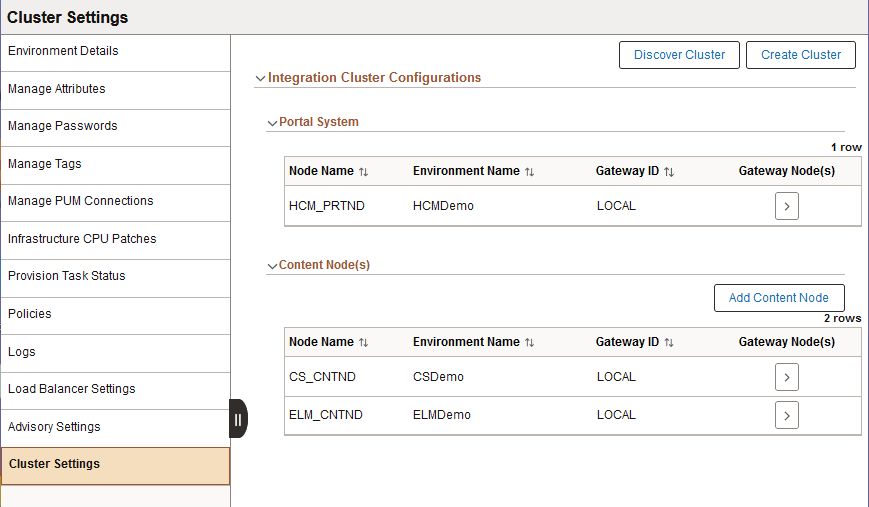
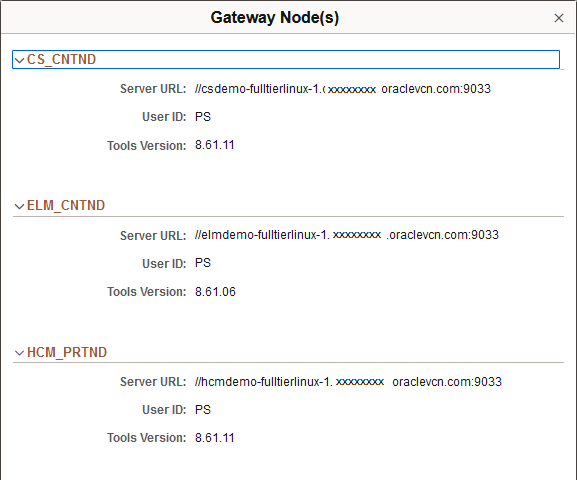
Gateway Node Details
In the row for the portal system or a content node, click the arrow under Gateway Node(s) to view the details of the Integration Broker Gateway node. The details include the Server URL (application server name and Jolt port number), User ID, and PeopleTools version. The Gateway Node(s) page for a content node is similar, but it includes only the specific content node and the portal system.
This example illustrates the Gateway Node(s) page for a portal system node.
Import PeopleSoft environments and run a discovery process. If the imported environment is part of an existing unified navigation cluster, the cluster discovery process investigates the Integration Broker configuration, gateway URLs, and other integration properties for the imported system.
If the imported environment is not part of a cluster that was created outside of Cloud Manager, you can import it and create the cluster in Cloud Manager. The discovery process also identifies the content nodes in the cluster that are managed by Cloud Manager.
Import the portal system and content node environments that make up the cluster.
Click the environment card for the environment that you have designated as the portal system to access the details.
Select Cluster Settings on the left panel of the Environment Details page.
Click Discover Cluster.
The Portal System field is automatically populated with the environment name.
This example illustrates the Discover Cluster dialog box.
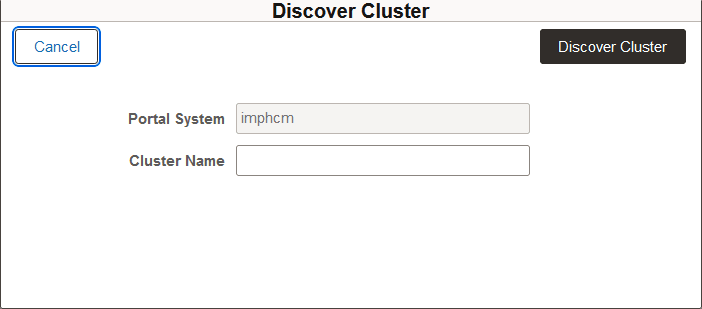
Enter a cluster name.
Click Discover.
When the discovery process is complete, the portal system node and content nodes are displayed in separate sections on the Cluster Settings page, as shown in the example in Reviewing Cluster Details.
You can add a content node to an existing cluster that was imported or created in Cloud Manager.
Click the environment card for the environment that you have set up as the portal system node to access the Environment Details page.
Select Cluster Settings on the left panel of the Environment Details page.
Click Add Content Node.
Note: The Add Content Node button appears for an environment that is already in a cluster.
The Portal System, Cluster Name, and Node Name fields are automatically populated.
This example illustrates the Add Content Node(s) dialog box.
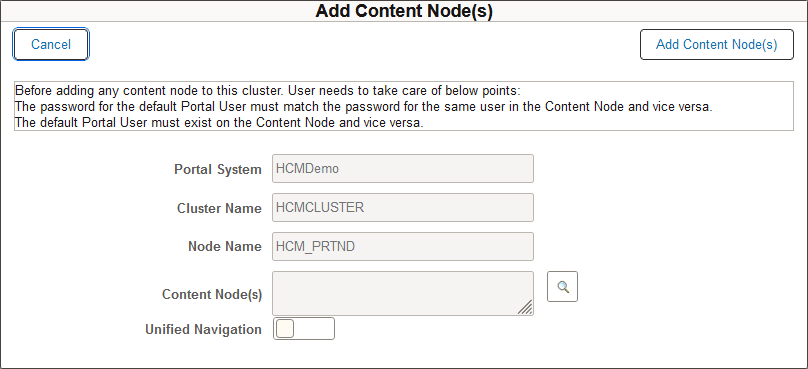
Click the Content Nodes(s) browse button and select one or more environments to serve as content nodes.
You must select only environments that are not already part of another cluster. Do not select an environment if the cluster already contains the same PeopleSoft application.
To register the menu from the content node into the portal system menu, enable the Unified Navigation option.
When you enable this option, a top-level menu item for the content node is created in the portal system menu.
Click Add Content Node(s).
Cloud Manager opens the Policy Editor page for the delivered policy Configure IB PORTAL Cluster<internal>. This is a predefined policy that cannot be deleted. The name and Policy Object, Environment, cannot be modified. Because it is an Adhoc policy you can run it immediately. See the policy example in Creating a New Unified Navigation Cluster.
If you have already discovered a cluster but later realize that some participating nodes were not imported, you need to rediscover the cluster to include the missing nodes. To add those nodes, use the following steps.
Import the missing node.
Click the environment card for the environment that you have set up as the portal system node to access the Environment Details page.
Select Cluster Settings.
Click Discover Cluster.
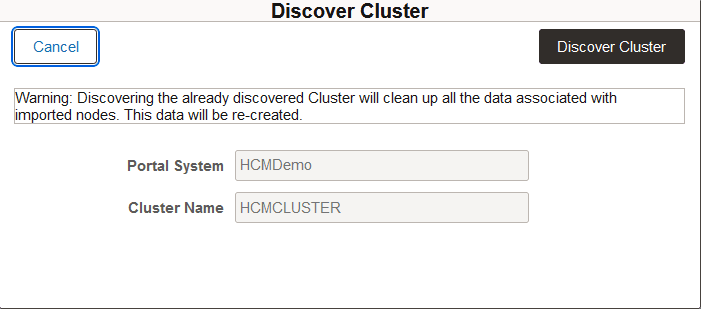
On the Discover Cluster dialog box the Portal System and Cluster Name fields are populated and cannot be edited. You see a message that Cloud Manager will remove all the data associated with the imported nodes and recreate the configuration.
This example illustrates the Discover Cluster dialog box for an existing cluster.
Click Discover.
Select the Gateway Node arrow for the Portal System to verify that the configuration was updated with the added node data.
To delete an environment that is designated as the portal system in a cluster:
Click the Related Action button for the environment and select Delete.
A dialog box appears with this message:
Warning: Current Environment is the Portal System in <Cluster_name> Cluster with Multiple Content environment associated with this IB cluster. Click on delete to ignore the warning and proceed with the Environment Deletion.
If you want to delete the environment from Cloud Manager but retain the environment resources in OCI, select Retain OCI Resources.
Click Delete to proceed or Cancel to return to the Environments landing page.
When you delete an environment that is designated as the portal system in a cluster, the Gateway URL configured in the content node environments, which is the portal system URL, will be stale. You should reconfigure the content nodes to point to a valid Gateway URL. Do this for all the content nodes that were part of the cluster.
To reconfigure the Gateway URL for content nodes after deleting the portal system node:
Click the environment card for the content node environment.
On the Environment Details page, expand the IB Gateway Configuration section and click Configure.
This opens the Policy Editor page for the Configure IB Gateway<internal> policy. This is an adhoc policy with one policy action.
Click Parameters for the Configure IB Gateway policy action.
On the Policy Action Parameters dialog box, select configuration type Configure Local Gateway.
Click the edit icon for the Configuration Template, and supply the required values.
The template includes these parameters:
Environment Name: <selected environment name>
Gateway (Host:Port): xxx
Default Local Node Name: xxx
Gateway Node App Server URL (//Host:Jolt Port): xxx
Gateway Node User Id: xx
Gateway Node Password: '***'
Gateway Keystore Password: '***'
Click Execute to run the policy.
To delete an environment that is designated as a content node in a cluster:
Click the Related Action button for the environment and select Delete.
A dialog box appears with this message:
Warning: Current Environment is the Content Node in <Cluster_name> Cluster. Click on delete to ignore the warning and proceed with the Environment Deletion.
If you want to delete the environment from Cloud Manager but retain the environment resources in OCI, select Retain OCI Resources.
Click Delete to proceed or Cancel to return to the Environments landing page.
After performing a PeopleTools upgrade or applying a PeopleTools patch you must re-create the cluster.
If you performed a PeopleTools upgrade or applied a PeopleTools patch on either the content node or portal system node, you must re-create the cluster. You can use the same IB node names as in the original cluster. Follow the same procedure as when creating a new cluster, in Creating a New Unified Cluster.
In addition, after you create a cluster, you have the option to rename the nodes that are part of the cluster, and then re-create the cluster, as follows:
On the Environment Details page for the portal system environment, expand the IB Gateway Configuration section and click Configure.
This opens the Policy Editor page for the Configure IB Gateway <internal> policy.
Click Parameters for the Configure IB Gateway policy action.
On the Policy Action Parameters dialog box, select Rename Node as the configuration type.
Click the edit icon for the Configuration Template, and supply the required values.
Rename all the non-local IB nodes in the portal system, which corresponds to the Local Default node of each content node. The Configuration Template includes these parameters:
Environment Name: — Enter the environment name of the portal system.
Current Node Name: — Enter the current non-local IB node name for the portal system node.
New Node Name: — Enter the new non-local IB node name for the portal system node.
Is Default Local Node (Y / N): — Enter N.
On the Environment Details page for each content node environment, expand the IB Gateway Configuration section and click Configure.
This opens the Policy Editor page for the Configure IB Gateway <internal> policy.
Click the edit icon for the Configuration Template, and supply the required values.
Rename the non-local IB node in each content system, which corresponds to the Local Default node of the portal system. The Configuration Template includes these parameters:
Environment Name: — Enter the environment name of the content node.
Current Node Name: — Enter the current non-local node name for the content node.
New Node Name: — Enter the new non-local IB node name for the content node.
Is Default Local Node (Y / N): — Enter N.
On the Environment Details page for the portal system environment, select the Cluster Settings page and create a new cluster with the new node names.