Replying to Inbound Email
These topics discuss how to handle inbound emails. You can reply to email either from the context of the email itself, or from the context of a transaction that is associated with the email. The methods are similar, except that when you reply from a transaction, you must explicitly indicate that you are replying to an email. In addition, you must identify the email to which you are replying.
|
Page Name |
Definition Name |
Usage |
|---|---|---|
|
RB_EM_IB_RESP |
Reply to an inbound email. |
|
|
RB_EM_OPERATE_SEC |
Start a new email thread from the CRM transaction or reply to an email of that transaction. |
|
|
RB_EM_OB_VIEW |
Review outbound email and process approval (RB_EM_OB_VIEW). |
Use the Response page (RB_EM_IB_RESP) to reply to an inbound email.
Navigation
Click the Reply button on the Email page.
Click the Notification button from the toolbar of a transaction (for example, case) and select the Reply to Another Email check box (with an existing email selected) on the Email Reply or Start New Thread page.
Image: Response page (1 of 2)
This example illustrates the fields and controls on the Response page (1 of 2). You can find definitions for the fields and controls later on this page.
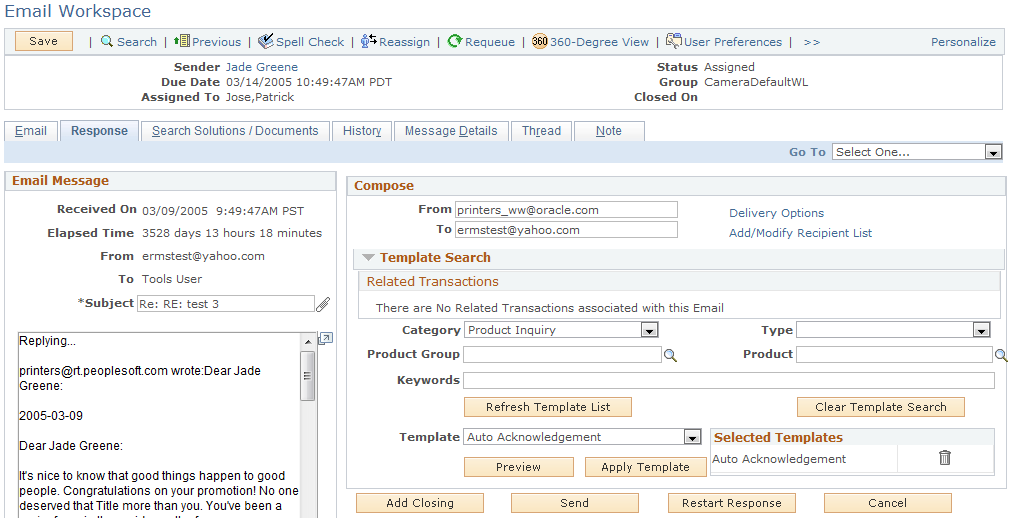
Image: Response page (2 of 2)
This example illustrates the fields and controls on the Response page (2 of 2). You can find definitions for the fields and controls later on this page.

Compose
If the system is unable to find any matching template for the email response when agents access the Response page, a warning message appears, and the Template Search section is expanded automatically. The agent can modify the classification criteria and refresh the template list.
|
Field or Control |
Definition |
|---|---|
| From |
Displays the from address of the response. The system populates it with the reply to address that is specified in the mailbox definition. |
| To |
Displays the to address of the response. The system populates it with the sender's primary to address of the inbound email. Additional to addresses can be added by accessing the Add/Modify Recipient List link. Important! If you change the primary to address either by updating the To field directly or accessing the Add/Modify Recipient List link, the system restarts the correspondence because the templates that are applied may include old recipient information. Restarting the correspondence is the same as clicking the Restart Response button in the section. |
| Delivery Options |
Click to access the Delivery Options page, where you can set the delivery date and time. |
| Add/Modify Recipient List |
Click to access the E-mail Workspace - Look Up Recipient page, where you can search for and select recipients for the email. You can specify additional recipients to the To, CC, and BCC lists or modify the primary to sender. |
| Related Transactions |
Displays CRM transactions that are associated with the email. Select transactions that you want the system to consider in the template search. |
| Solutions |
Displays the list of solutions that are added to the proposed list, if applicable. This grid displays only proposed solutions that are available. |
| Category, Type, Product Group, Product, and Keywords |
Enter values in these fields as criteria the system uses to perform the template search for the email. Click Refresh Template List to run the template search after you update any of these values or related transactions. Click Clear Template Search to remove values from these fields and search for templates using only related transactions. |
| Template |
Select a template to use for the email response. The results of the template search appear as values in this drop-down list box, along with the documents that are added to the proposed list. |
| Preview |
Click to access the Template Text Viewer page (RB_EM_TEXT_VIEWER) to view the email response that is formatted with the selected template. |
| Apply Template |
Click to populate the email response to which a template is applied in the Message Area group box. One or more templates may be applied to an email message. Templates are appended to the email body in the order that they are applied. Applied templates appear in the Selected Templates grid. |
| Add Closing |
Click to add a closing text to the end of the email response. |
| Send or Send for Approval |
Click to submit the email response, or if approval is required for the sign-on agent, send a notification to the approver's Action Request worklist, notifying the approver that the original notification needs to be reviewed. After an email is submitted for approval, the response is reset. You cannot view a submitted email from the email workspace unless you go to the Thread page and refresh the thread tree. The system allows the sending of blank email (email without message body). |
| Restart Response |
Click to begin the response mode again with the initial state in which the page was first presented. |
| Cancel |
Click to cancel the response operation and return to the previous page before accessing the Response page. The system displays a message stating that the response is canceled. |
You can set up the system to request notes from agents after they send email response or submit them for approval. If agents are email owners, sending responses automatically updates the email status to closed - response, removes the email item from the owner's individual worklist, and deletes the email task from the Multichannel Toolbar if the email was opened from it. In this case, the message about adding a note, if enabled, appears after these tasks are completed.
If you click the Notification button on the toolbar from a transaction to send an email, the system either transfers you directly to the Outbound Notification page to start a new email thread, or displays a page where you can select to start a new thread or reply to an existing email of the transaction.
If you select to reply to an existing email, the Response page of the email workspace appears.
If you select to start a new thread, the Outbound Notification page appears where you compose the new message. If the Use Email Workspace while responding to an existing notification option is selected, the Response page is used instead.
Note: The Thread page is not available when you create an outbound email; you will see the information when you review the outbound email by navigating under
Use the Email Reply or Start New Thread page (RB_EM_OPERATE_SEC) to start a new email thread from the CRM transaction or reply to an email of that transaction.
Navigation
Click the Notification button from the toolbar of a transaction (for example, case), which you navigated to from another email.
Image: Email Reply or Start New Thread page
This example illustrates the fields and controls on the Email Reply or Start New Thread page. You can find definitions for the fields and controls later on this page.
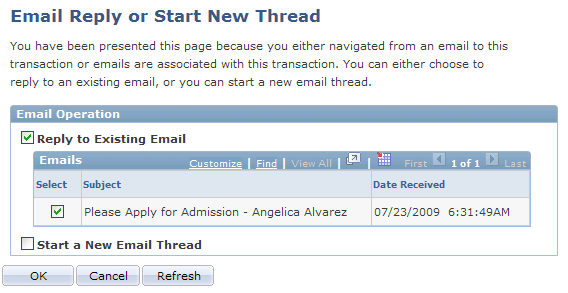
Email Operation
When you click the Notification button on the toolbar of a transaction, you see this page if you previously navigated to the transaction from an email or if the transaction is associated with other emails. This page is available only if PeopleSoft Multichannel Communications is licensed.
Note: This page does not appear if the transaction is not associated with any inbound emails. Agents are transferred directly to the Outbound Notification page to start new email thread.
|
Field or Control |
Definition |
|---|---|
| Reply to Another Email |
Select to send a response to an existing email that's associated with the transaction. Specify the email to which the new one responds in the Emails grid. This grid lists the emails that are related to the transaction. If you navigated to the transaction from an email, the system identifies that email to be as the current one and preselects it in the grid. The Response page of the email workspace appears after clicking OK, and the selected email appears as the inbound email. |
| Start a New Email Thread |
Click to start a brand new email with no links to any existing email. The Outbound Notification page appears if the Use Email Workspace while responding to an existing notification option is not selected. If the option is selected, the Response page is used. |
Use the Outbound Email page (RB_EM_OB_VIEW) to review outbound email and process approval (RB_EM_OB_VIEW).
Navigation
Image: Outbound Email page (1 of 2)
This example illustrates the fields and controls on the Outbound Email page (1 of 2). You can find definitions for the fields and controls later on this page.
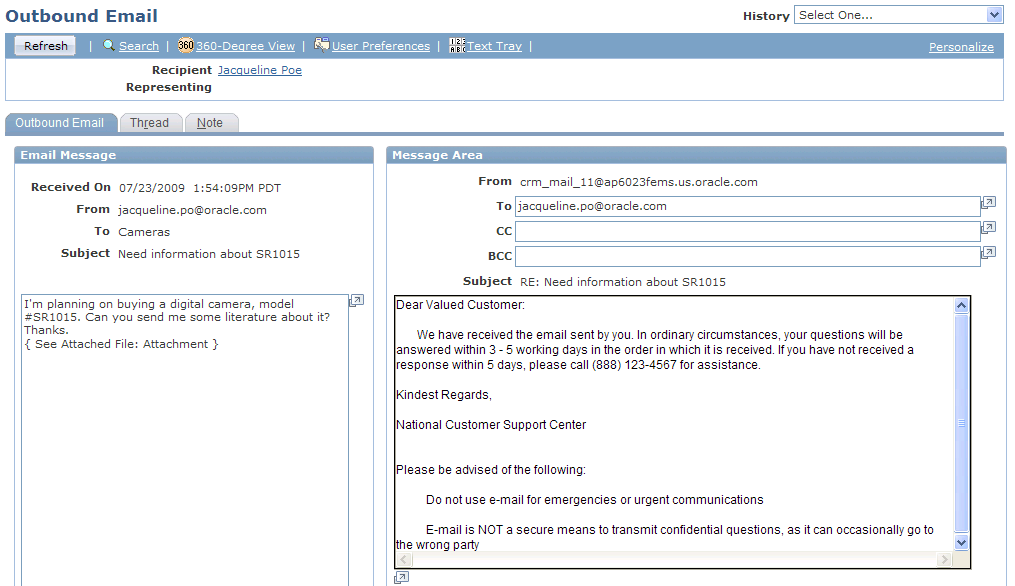
Image: Outbound Email page (2 of 2)
This example illustrates the fields and controls on the Outbound Email page (2 of 2). You can find definitions for the fields and controls later on this page.
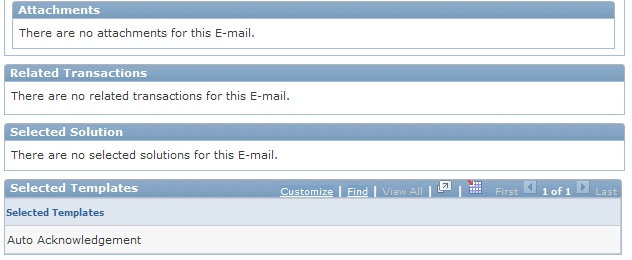
The Outbound Email component is in read-only mode when you access it from the menu navigation. The interface is similar to the Response page of the email workspace. You can review the content of the outbound email and the corresponding inbound email. The interface also lists any related transactions and solutions for the email, and as well as the template used to format the final email body.
Email approvers use the Outbound Email component to approve or disapprove emails. If you associate an agent with an approver in the system, the system sends an action request worklist entry to notify the approver whenever the agent sends an email. The approver must approve the email before it is delivered. When the approver clicks the approval request link from the worklist, the system opens the email in the Outbound Email page. The approver can edit the subject and message before clicking the Approval button on the toolbar, or disapprove it. The email is sent when it's approved; if it's not approved, the system sends a notification to the agent indicating that the email has been disapproved.
For agents whose emails require approval before delivery, the Submit for Approval button appears on the Response page instead of the Send button.
Access the Thread page (Correspondence, Search Outbound Emails, Thread).
The system uses the same Thread page for inbound and outbound emails.
See Thread Page.
Access the Note page (Correspondence, Search Outbound Emails, Note).
The system uses the same Note page for inbound and outbound emails.