Sending Manual Notifications From CRM Transactions
To define notifications, use the Notification component. Use the RB_EM_OB_NOTIFY component interface to load data into the tables for this component.
This section discusses how to send an email or worklist notification and search for recipients and templates.
|
Page Name |
Definition Name |
Usage |
|---|---|---|
|
RB_EM_OB_NOTIFY |
Send outbound notifications. This page can be used to respond to inbound emails (if configured at the system level). |
|
|
RB_OB_RECP_LKUP_SC |
Search for additional recipients for the notification. Recipients can be persons and groups in the CRM system. |
|
|
Outbound Notification - Select Recipient to Personalize the Notification Page |
RB_OB_SEL_RECP_SC |
Select which recipient information to use to resolve recipient-specific terms when apply a template to the notification. |
|
RB_OB_TMPLT_SRCH |
Search for additional correspondence templates to use in the notification. |
Use the Outbound Notification page (RB_EM_OB_NOTIFY) to send outbound notifications.
Navigation
Click the Notification button in the component from which you are sending an outbound notification.
The name and image on the button for sending notifications may vary by component.
To send notifications based on a transaction note, select the note from the transaction's note grid and click the Email button associated with the grid.
Image: Outbound Notification page (1 of 2)
This example illustrates the fields and controls on the Outbound Notification page (1 of 2).
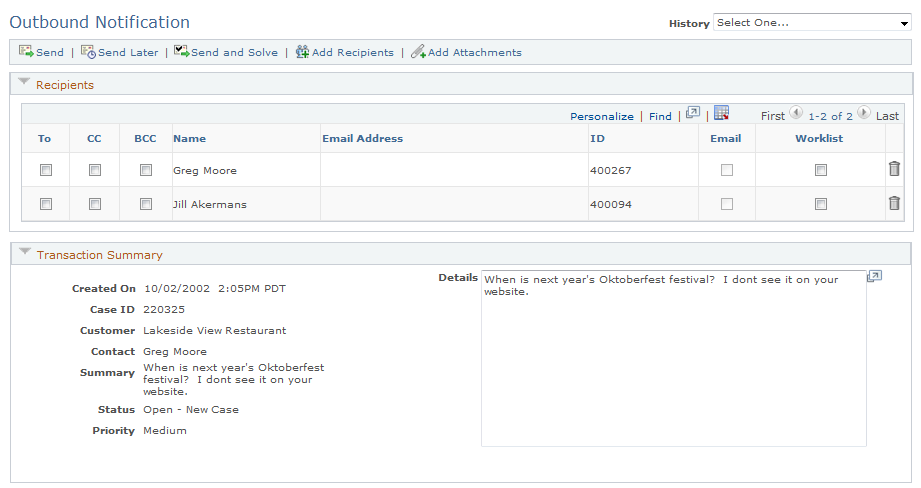
Image: Outbound Notification page (2 of 2)
This example illustrates the fields and controls on the Outbound Notification page (2 of 2).
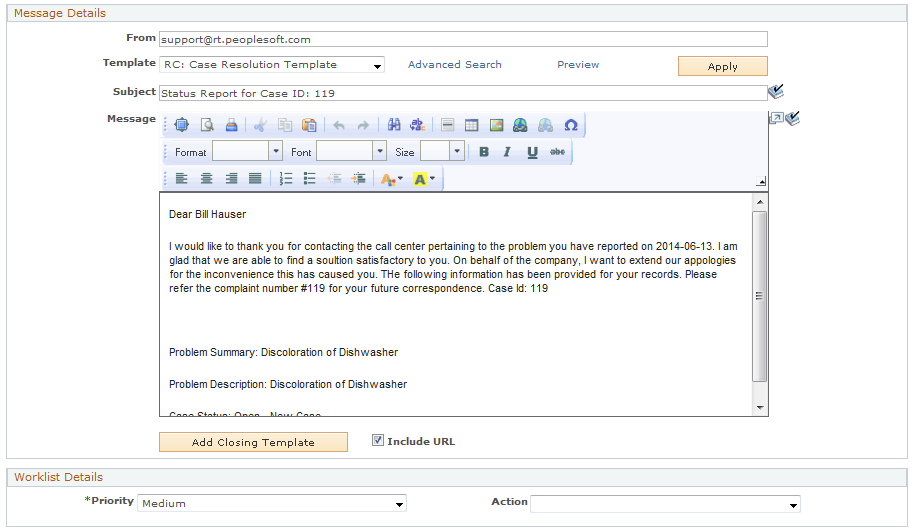
This screenshot shows the Outbound Notification page that is initiated from a support case. The look and feel of this page is consistent across all transactions and varies slightly depending on the component from which you access the page. For example, the Send and Solve toolbar button applies only to notifications that are case-related. Similarly, the Transaction Summary section displays transaction-specific information and is visible to users as long as the originating component passes the information to the notification successfully. The system returns a message in the section if transaction information cannot be displayed.
Outbound Notification Toolbar Functions
The outbound notification toolbar is configurable at the system level. As delivered, the toolbar includes these action buttons.
|
Field or Control |
Definition |
|---|---|
| Send or Send for Approval |
Click to send the notification instantly. The Send button becomes the Send for Approval button if you (creator of the notification) are associated with an approving person, who needs to approve all outbound communications that is sent by you, including email and worklist notifications. Clicking the Send for Approval button sends a worklist item to the approving person, who either approves the notification to be delivered or returns the request back to you for rework. |
| Send Later |
Click to access the Delivery Time page (RB_EM_OB_LATER_SBP) to schedule the delivery date and time for the notification. The date and time are represented based on your time zone. |
| Send and Solve |
Click to send the notification, attach a canned solution to the associated case (if the notification does not include any solutions), and set the case to the resolved case status (specified in the corresponding call center business unit definition). This button appears if these conditions are met:
Note: This button is not applicable to outbound notifications that are initiated by clicking the Set Reminder button from a Case toolbar. See Case Defaults Page. |
| Add Recipients |
Click to access the Search for Recipients page to look up additional recipients to add to the list. |
| Add Attachments |
Click to add an attachment to this notification. You will be prompted to select a file from a local or network location. The system then uploads the attachment to the CRM attachment server. |
See Configuring Toolbars.
Recipients
|
Field or Control |
Definition |
|---|---|
| To, CC (carbon copy), and BCC (blind carbon copy)To, CC, and BCC fields, Outbound Notification page |
Specify the delivery option for each recipient on the list. A recipient can be a person or a group (provider group, contact group, or sales team). This grid is prepopulated with recipients that are passed from the associated transaction. For example, if you send a notification from a case, the system populates the recipient grid with the case contact, the assigned to person and the provider group if the values are all present from the case. To add new recipients to the grid, click the Add Recipients toolbar button. You can search for recipients by first name, last name, email address, person ID, and group name. CC and BCC fields are hidden if the notification is initiated from the My Contacts page. |
| Name |
Displays the name of the recipient, which can be a person or a group. This field is blank if the recipient is added by email address but the email address is not stored in the CRM system. When you open the actual notification in the system, Anonymous User is displayed as the recipient name. |
| Email Address |
Displays the recipient's email address; this field is blank if the recipient does not have one. If a recipient does not have an email address, the notification will not be delivered to the recipient as an email. It is possible for different recipients to be associated to the same email address. |
| ID |
Displays the recipient's ID, which can be a person ID or a group ID. This field is blank if the recipient is added by email address but the email address is not stored in the CRM system. |
|
Select to send the notification to the recipient as an email. This check box is only available for edit if the recipient has an email address. For external recipients who do not have access to the worklist functionality, the system selects this check box by default if they have email addresses. As for internal recipients (for example, workers and provider groups), this check box is selected for them by default if their preferred notification method includes email and they have email addresses specified in the system. |
|
| Worklist |
Select to send the notification to the recipient as a worklist item. This check box is only available to internal recipients who have user IDs to sign into the CRM system. This check box is selected for qualified internal recipients by default if their preferred notification method includes worklist and they have userIDs in the system. |
Transaction Summary
This section displays summary information that pertains to the associated transaction. Available information varies from one transaction type to the next. To view the related transaction in greater detail, you can always use the History field to return to the transaction from which the notification originates.
If no information is passed to this section from the originating transaction, a message is returned indicating that content is not available for display.
Message Details
|
Field or Control |
Definition |
|---|---|
| From |
Enter the email address to be used as the From address for any notifications sent by email. By default, the system prepopulates this value with the Reply-to email address that is specified for the agent on the Agent Setup page. If no email is specified for the agent initiating the notification, the system uses the sender's email address that is defined on the Correspondence Management Installation Setup page as the default From email address. See Agent Setup Page, Correspondence Management Installation Setup Page. |
| Template |
Select a correspondence template package to be applied to the notification. If the notification is initiated from a transaction, the system populates this drop down list box with templates that pertain to the usage that is associated with the originating transaction. In order for a correspondence template package to be eligible for selection in this field, it has to contain an internal text template that is targeted for the email channel. See Templates and Terms. |
| Advanced Search |
Click to access the Template Search page to search for other templates by category, type, product group, product, and keyword. If the manual notification is initiated from a transaction, performing an advanced search means finding templates that match the advanced search criteria from a list of templates pertaining to the usage of the originating transaction. For example, if you create a notification from a sales lead and select to look up templates by a category, the system returns templates that match the category and are associated with the Sales usage. Note: For notifications that are initiated from cases, the advanced search supports template lookup by keywords only. |
| Preview Template |
Click to preview the selected template. If recipient-specific terms are present in the template and there are multiple TO recipients, the system uses information of the first TO recipient to resolve them in the preview mode. |
| Apply Template |
Click to add the selected correspondence template to the message. Any additional template you apply to the notification is by default appended to the end of the current message. While applying the template, if the selected template contains any recipient-specific terms (for example, recipient name) and there are multiple recipients for the TO delivery option, a page appears with a list of TO recipients. From this page, you select a recipient from the TO list whose information is then used to resolve the recipient-specific terms in the template. Alternatively, you can select the Personalize for each recipient option if you want the system to resolve the recipient-specific terms from the template for each TO recipient when the notification is sent. |
| Subject |
Enter the subject of the notification. If the subject is empty when you apply a template package, the subject from the internal text template in the package is entered here. |
| Message |
Enter the message text manually, apply template text to the notification, or both. As you apply template packages, the system concatenates existing text with newly applied template-based text. If you have a custom signature (defined on the Worker - Signature page), the signature text appears in the message. You can modify or delete the signature text as you compose the message. The message area is HTML-compatible, which lets the text appear in different colors, font types and sizes, indentations and so on. |
| Add Closing Template |
Click to append a closing template to the end of the notification message. |
| Include URL (uniform resource locator) |
Select to include a URL of the associated transaction in the notification. This check box is selected by default. Clear this check box to not include a link of the transaction. This setting has no impact on worklist notifications because they always include links to the originating transactions. The URL will go to a different component if the URL Setup page is so configured. |
Note Attachments
When sending notifications for transaction notes, any associated attachments from the note will automatically be prepopulated in this grid. You may choose which of these files to include as attachments when the notification is sent.
Note: The system does not deliver attachments to worklists, only to email addresses.
|
Field or Control |
Definition |
|---|---|
| Include |
Select this check box to include the corresponding file as an attachment to the notification. |
| File Name |
Displays the attachment's file name. The name is a link; click it to view the attachment. |
| Visibility |
Displays the visibility associated with the corresponding file. Use this to help determine which files to include in the notification. For example, for notifications that are being sent to external recipients you may not want to include files whose visibility is designated Internal. By default, the Include check box will not be selected for any attachments whose visibility is Internal. Note: This field only displays if the originating transaction has a visibility designation for its attachments (for example, case notes). |
Attachments
This section displays any files that you have uploaded for the notification. When the notification is sent as an email, these files are delivered as email attachments.
|
Field or Control |
Definition |
|---|---|
| File Name |
Displays the attachment's file name. The name is a link; click it to view the attachment. |
Note: The system does not deliver attachments to worklists, only to email addresses.
Worklist Details
Settings in this section are informational only for users who receive the notification in their worklists and are not applicable to email notifications.
|
Field or Control |
Definition |
|---|---|
| Priority |
(optional) Select a priority for the notification for recipients who will be receiving it as a worklist item. Values are High, Medium, and Low. |
| Action |
(optional) Select an action that the recipient of the worklist notification needs to perform. Define action requests using the Action Requests component under |
Use the Search for Recipients page (RB_OB_RECP_LKUP_SC) to search for additional recipients for the notification.
Recipients can be persons and groups in the CRM system.
Navigation
Click the Add Recipients toolbar button on the Outbound Notification page.
Image: Search for Recipients page
This example illustrates the fields and controls on the Search for Recipients page.
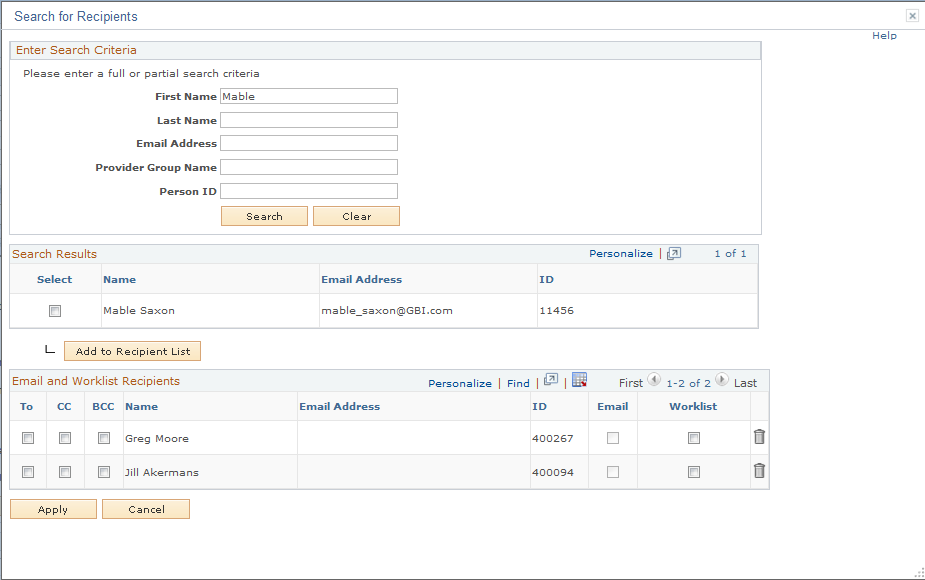
Enter Search Criteria
Use this section to look for persons and groups (provider groups, contact groups and sales teams) as recipients of the notification. Both partial or full search values are acceptable.
The group name search field (Provider Group Name as shown in the screenshot) changes label dynamically based on the initiating transaction or component. For provider group search, the system only returns matching provider groups that are linked to the same setID as the business unit of the initiating transaction.
You can enter a combination of (full or partial) first name, last name and group's name to search for people in the system. To look for groups, enter a full or partial group name.
Entering an email address performs people and group search by the specified email address. If the email address (full) does not match with any group or person in the CRM system, it can still be added to the recipient list with a blank name, and the only notification delivery method is by email.
To perform a search by person ID, you need to enter a complete person ID for the system to return the matching person.
Search Results
This section displays results of the recipient search. To add a new recipient to the current recipient list, select the entry and click the Add to Recipient List button. The system updates the Email and Worklist Recipient section with the new entry.
The system returns only the first 300 rows if the search result contains more than 300 rows. Refine search criteria as needed.
Email and Worklist Recipient
This section displays a list of individuals and groups who will receive the notification. Before sending the notifications, be sure to indicate the delivery option (TO, CC, or BCC) and delivery method (email, worklist, or both) for each recipient.
Use the Send Notification - Select Recipient to Personalize the Notification page (RB_OB_SEL_RECP_SC) to select which recipient information to use to resolve recipient-specific terms when apply a template to the notification.
Navigation
Click the Apply Template button or the Send button (or the Send for Approval button) on the Outbound Notification page. This page appears if the selected template for the notification contains recipient-specific terms and the notification contains multiple TO recipients.
Image: Outbound Notification - Select Recipient to Personalize the Notification page
This example illustrates the fields and controls on the Outbound Notification - Select Recipient to Personalize the Notification page.
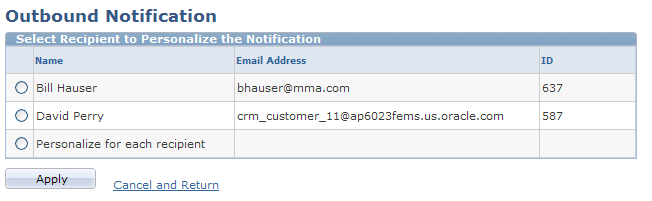
This section lists the TO recipients currently selected for the notification, plus an option to personalize the notification for all recipients.
If you choose a TO recipient from the list and click the Apply button, the system uses information of that recipient to resolve any recipient-specific terms in the template and displays the draft message in the Subject and Message fields.
If you choose to personalize the notification for all TO recipients, the system does not resolve recipient-specific terms in the draft message that is displayed. Instead, it resolves recipient-specific terms and prepares the message for all TO recipients at the time of delivery. For CC and BCC recipients, recipient-specific terms are unresolved in the notifications they receive.
Note: If you select multiple TO recipients and also select Personalize for each Recipient while resolving terms, you should not manually add any content into the middle of text that has added to the message from a template. Any such text that is manually added to the middle of template text will not be used at send time. This condition only applies to manual additions within a block of template text. You may add multiple sequential blocks of different template text, or manually add text before or after template text.
In order for the system to be aware of recipient-specific terms and resolve them when applying templates, you must first identify these terms on the Recipient Specific Terms page, under
Use the Template Search page (RB_OB_TMPLT_SRCH) to search for additional correspondence templates to use in the notification.
Navigation
Click the Advanced Search link on the Outbound Notification page.
Image: Template Search page
This example illustrates the fields and controls on the Template Search page.
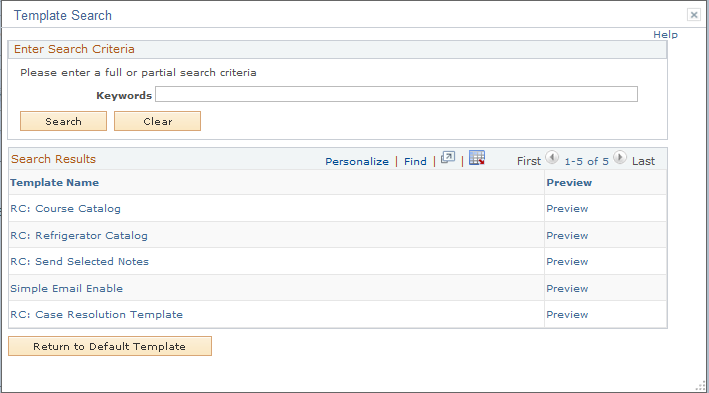
You can search for additional correspondence templates by category, type, product group, product and keywords. If you initiate the notification from a transaction, the system performs the advanced search among templates that belong to the usage of the originating transaction.
For cases, the supported search filter is by keyword.
Search Results
This section lists the templates that are returned from the search. Click the template name to select it for the notification. Click the Preview link to review the content of the corresponding template.