Defining Call Center Business Units
To define call center business units, use the Call Center Definition (RC_BUS_UNIT) component.
This topic lists prerequisites and discusses how to define call center business units.
|
Page Name |
Definition Name |
Usage |
|---|---|---|
|
BUS_UNIT_RC1 |
Create call center business units and establish default business units to use when integrating with other PeopleSoft applications. |
|
|
BUS_UNIT_RC2 |
Define business rules for a call center business unit. |
|
|
RC_MATCH_SUMMARY |
View the case matching criteria defined for this business unit and associated SetID. |
|
|
BUS_UNIT_RC_RDT |
Associate display template families and display templates with the business unit. |
|
|
BUS_UNIT_RC_DEF |
Set up defaults for all call center applications. |
Before you can associate a call center business unit with a default business unit in PeopleSoft FieldService, Inventory, Quality Management, or Sales, you must first create business units for the specific application.
You may also want to do some other setup tasks, such as creating case statuses, provider groups, category/type/details, and so on.
Use the Call Center BU page (BUS_UNIT_RC1) to create call center business units and establish default business units to use when integrating with other PeopleSoft applications.
Navigation
Image: Call Center BU page
This example illustrates the fields and controls on the Call Center BU page.
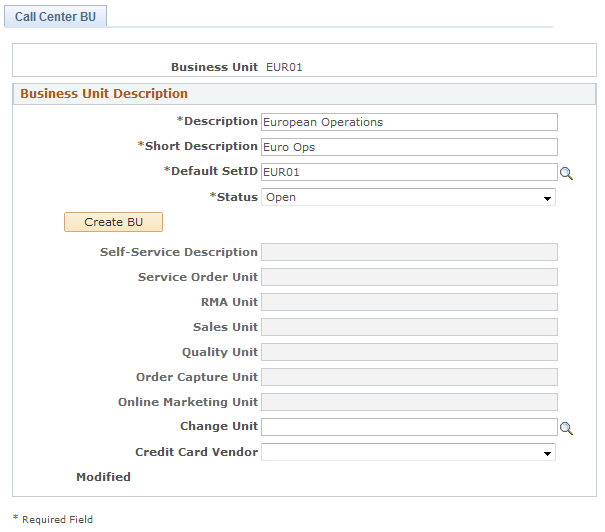
The preceding page is shown in the Add a New Business Unit mode. In Add mode, the system hides the other pages in the component and many fields are not available for entry.
|
Field or Control |
Definition |
|---|---|
| Business Unit |
Displays the business unit identifier you entered when you first accessed the page. To maximize system performance, always use exactly five characters. |
Business Unit Description
|
Field or Control |
Definition |
|---|---|
| Description |
Enter the description that you want to appear on the Case page and other places where the business unit appears. |
| Default SetID |
The Default SetID field appears only when you open the Call Center BU page in Add mode. Once you create the business unit, the system sets up default tableset control information, and you must use the TableSet Control page to change the default. Enter or select the default setID for the business unit. When you create a business unit, the system copies the setID for each record group from the tableset control of the setID you have entered. In the tableset control record, each of the delivered record groups is associated with the setID that you enter here or a setID that is being shared (SHARE) with other setIDs. Note: The system will always create a setID that is equal to the business unit that you create. Every business unit is also a setID. |
| Status |
Indicates the call center status. Values are: Open (active) or Closed (inactive). The system does not process transactions for closed business units. Note: You cannot create a new case for a closed business unit, but you can continue working a case that has already been created with a business unit that was closed after the case was opened. |
| Create BU (create business unit) |
This button appears only when you open the Call Center BU page in Add a New Business Unit mode. Click to establish the tableset controls for the call center business unit based on the default setID that you specify. Other pages in the component and many of the fields on this page are unavailable until you click the Create BU button to create the business unit. |
The following fields are not available until you click the Create BU button. Use these fields to specify default business units to use when creating certain types of objects from the Related Actions section on the Case page, the Related Actions section on the Case Summary page, or from the Related Actions page within the Case component.
These fields are relevant only if you integrate with the specified product. Agents can override the defaults that are established here.
|
Field or Control |
Definition |
|---|---|
| Self-Service Description |
Enter a description for self-service application users. This description should be meaningful to users who are unfamiliar with the organization of your call center business unit. |
| Service Order Unit |
Enter the default FieldService business unit to use when creating service orders from call center cases. When you establish tableset sharing, ensure that the field service business unit and the call center business unit prompt against the same set of customers. |
| RMA Unit (return material authorization unit)RMA Unit |
Enter the default RMA business unit to use when creating a return material authorization from a case. |
| Sales Unit Sales Unit field |
Enter the default Sales business unit to use when creating a sales lead from the Related Actions page in a call center case. When you establish tableset sharing, make sure that the sales business unit and the call center business unit prompt against the same set of customers. |
| Quality Unit |
Enter the default Quality Management business unit to use when creating or relating a defect to a case. You can create a new defect or relate an existing defect. In either case, the system displays the business unit that you enter here on the page. |
| Order Capture Unit |
Enter the default Order Capture business unit to use when entering an order related to a case. Note: If you use a lead qualification script to transfer to Order Capture from either the Support or HelpDesk case component, the business unit must be valid for your Order Capture application or you must select a default order capture business unit on this setup page. |
| Online Marketing Unit |
Select the online marketing business unit that you want the system to use by default in the Dialog Business Unit field when a user selects the Case Survey related action to launch a customer survey from the Case page. |
Use the Business Unit - Options page (BUS_UNIT_RC2) to define business rules for a call center business unit.
Navigation
Image: Business Unit - Options page (1 of 3)
This example illustrates the fields and controls on the Business Unit - Options page (1 of 3).
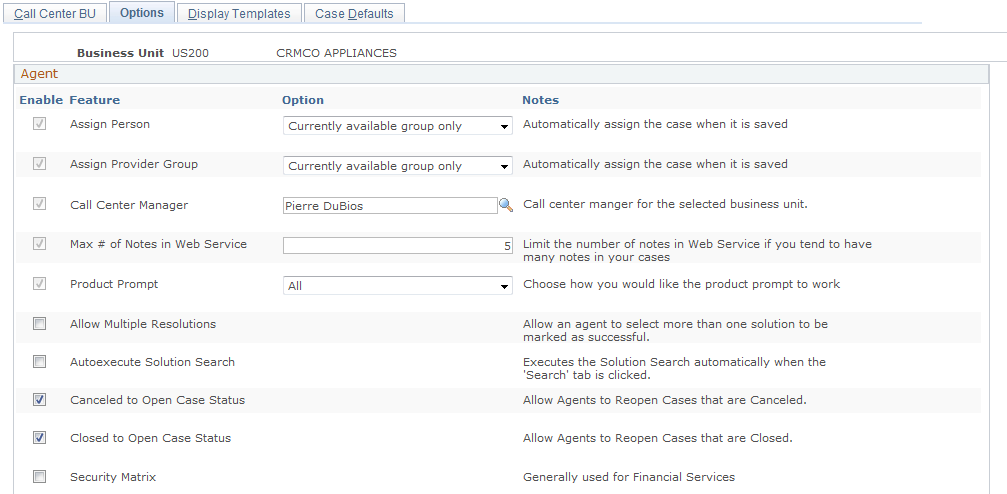
Image: Business Unit - Options page (2 of 3)
This example illustrates the fields and controls on the Business Unit - Options page (2 of 3).
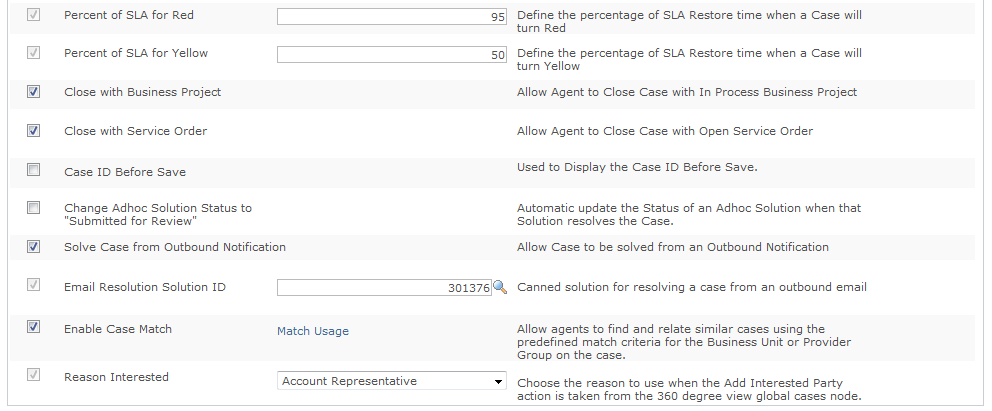
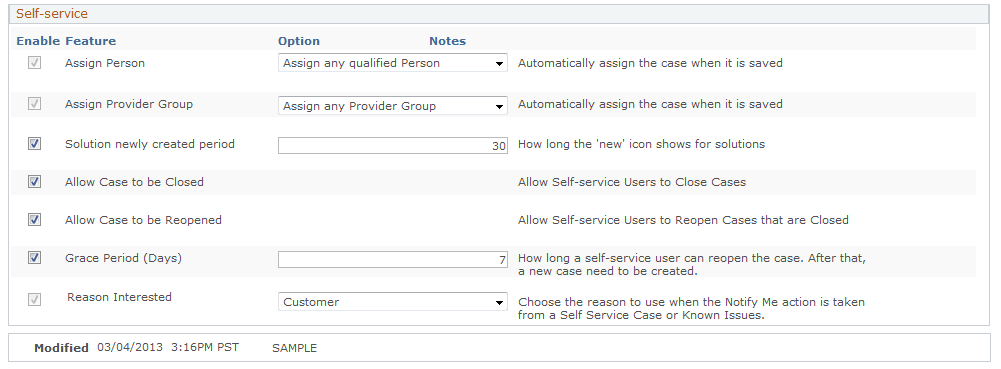
Image: Business Unit - Options page (3 of 3)
This example illustrates the fields and controls on the Business Unit - Options page (3 of 3).
The fields on this page are not available for entry until you create the business unit by clicking the Create BU button on the Call Center BU page.
Agent
|
Field or Control |
Definition |
|---|---|
| Assign Person |
Select the option that you want the system to use to automatically assign new cases to individual agents. See Person Assignment. |
| Assign Provider Group |
Select the option that you want the system to use to automatically assign provider groups to new cases. See Person Assignment. |
| Call Center Manager |
Select your default call center manager. You can use the selection here to route workflow using AAF notifications. |
| Max # of Notes in Web Service |
If you tend to have many notes in your cases, enter a number that limits the volume of notes that you want included in a web service. If you leave this field blank, the system includes all notes. |
| Product Prompt |
Select how you want the product prompt to work. The options are:
See Defining Products. |
| Allow Multiple Resolutions |
Select if you want to allow an agent to select more than one solution to be marked as Successful. |
| Autoexecute Solution Search |
Select if you want the PeopleSoft search to automatically execute when the Search page is accessed. |
| Canceled to Open Case Status |
Select to allow agents to reopen cases that are in a canceled status. |
| Closed to Open Case Status |
Select to allow agents to reopen cases that are closed. |
| Bill for Cases |
Select if you are using the billing functionality for support cases. Select the Details link to enter price by currency and rate type information. Note: This field appears only if you selected the Send Billing Transactions to Contracts and Calculate Price on Case check boxes on the Installation Options - Billing and Pricing Options page. |
| Percent of SLA for Red (percent of service level agreement for red) |
Enter a number to indicate the percentage of SLA (Service Level Agreement) restore time that needs to pass before the system turns the case to red. For example, enter 90 (enter a whole number, not a decimal amount) if you want a case to turn red when it has reached 90 percent of the SLA restore time. In addition, this calculation takes into account the time the case is on hold. |
| Percent of SLA for Yellow percent of Service Level Agreement for yellow) |
Enter a number to indicate the percentage of SLA restore time that needs to pass before the system turns the case to yellow. The number you enter in this field must be lower than the red number or you will receive an error message. As such, a case should turn yellow before it turns red. These fields will accept numbers between 1 and 999. Do not enter decimal amounts. |
| Close with Business Project |
Select to allow agents to close cases with business projects that are at the In Process status. |
| Close with Service Order |
Select to allow agents to close cases that have an open service order. |
| Case ID Before Save |
Select to generate a case ID when the agent first opens the case. |
| Change Adhoc Solution Status to "Submitted for Review" |
Select to automatically update the status of an ad hoc solution to Submitted for Review when a solution resolves a case. |
| Solve Case from Outbound Notification |
Select to allow cases of this business unit to be resolvable when outbound notifications are sent. This option is selected by default. When selected, the Send and Solve toolbar button appears on the Outbound Notification page if the initiating transaction is case. You can click this button for the system to perform these tasks:
|
|
Field or Control |
Definition |
|---|---|
| Email Resolution Solution ID |
Select to specify a solution that attaches to cases when users click the Send and Solve button on the Outbound Notification page. Solutions meeting these criteria are available for selection:
When the system resolves a case from an outbound notification, it attaches a solution to the case with a solution status of Successful Resolution and then sets the status of the case to the predefined resolved case status. As a result, the system also increases the usage count of the canned solution by one as well. Note: If you access the Outbound Notification page by clicking the Email button to email a solution and click the Send and Solve button, the selected solution is then used to attach to the related case as the successful resolution. The canned solution does not apply when a solution is already selected. This option is selected automatically if the Solve Case from Outbound Notification option is selected. Make sure to specify an email resolution solution; otherwise, an error message appears if you click the Send and Solve button but no canned solution is available to attach and resolve the case. In this case, the system sends the notification but it does not resolve the case. |
| Enable Case Match |
Select this to enable case matching for this Business Unit. Case matching enables you to instruct the system to find cases that are similar to the case you are presently viewing. This provides a quick way to check if the issue from the current case you are viewing has already been reported in or is related to another case. Note: The rules for defining case matches are defined on the Match Detail page, and can be viewed using the Match Usage link on the Options page for Call Center Business Unit defaults. |
| Match Usage |
Click this link to view the match usage criteria that have been defined for this business unit and associated SetID on the Match Detail page. |
| Reason Interested |
Specify the reason to be associated with the entry for interested party on a case when the Add Interested Party action is taken from the 360-Degree View global cases node. |
Self-Service Options
|
Field or Control |
Definition |
|---|---|
| Assign Person |
Select the option that you want the system to use to automatically assign self-service cases to individual agents. See Person Assignment. |
| Assign Provider Group |
Select the option that you want the system to use to automatically assign provider groups to new cases. |
| Solution Newly Created Period |
Specify how long (in days) the new icon should appear for solutions. |
| Allow Case to be Closed |
Select to allow self-service application users to close cases. |
| Allow Case to be Reopened |
Select to allow self-service application users to reopen cases that are closed. |
| Grace Period (Days) |
Enter the number of days after a case has been closed during which self-service application users are permitted to reopen the case. This option is only allowed if you select the previous option—allowing a case to be reopened. If you allow cases to be reopened, the grace period will default to 7 days. |
Use the Match Usage page (RC_MATCH_SUMMARY) to view the case matching criteria defined for this business unit and associated SetID.
Navigation
Image: Match Usage page
This example illustrates the fields and controls on the Match Usage page.
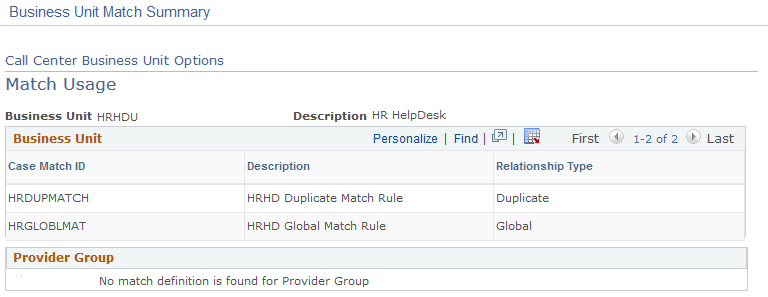
Use this page to view the case match options defined for the business unit and any applicable provider groups.
These options are defined on the Match Detail and Match Usage pages. The system uses these options to find cases that are similar to one another, thus enabling the user to identify potentially duplicate cases.
Note: If there is no Match Definition associated with this business unit (as defined in the Match Definition itself), then the two grids on this page will display "No match definition is found for Business Unit" and "No match definition is found for Provider Group."
Use the Business Unit - Display Templates page (BUS_UNIT_RC_RDT) to associate display template families and display templates with the business unit.
Navigation
Image: Display Templates page
This example illustrates the fields and controls on the Display Templates page.
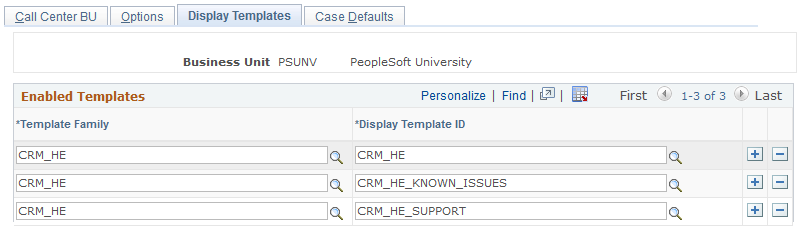
Use this page to enable the business unit for the display template family. For example if the US200 business unit needs to be enabled for support cases, then you are required to establish the link between US200 and the RC_SUPPORT family on this page.
When you select the display template ID, the system displays only the display template IDs that are associated with the display template family you selected.
If an agent changes the business unit while on the Case page, the system looks at this page to display the correct display template family and ID.
Use the Case Defaults page (BUS_UNIT_RC_DEF) to set up defaults for all call center applications.
Navigation
Image: Case Defaults page (1 of 2)
This example illustrates the fields and controls on the Case Defaults page (1 of 2).
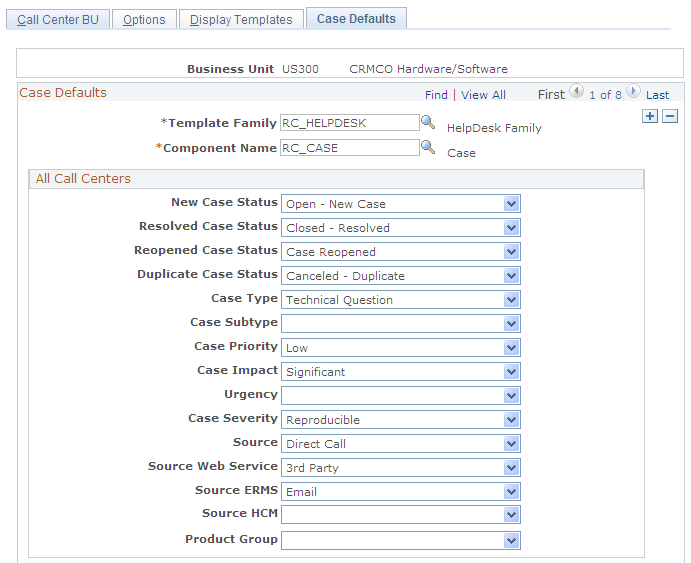
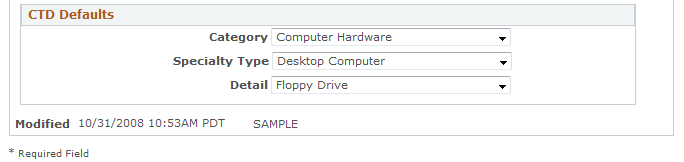
Image: Case Defaults page (2 of 2)
This example illustrates the fields and controls on the Case Defaults page (2 of 2).
The fields on this page are not available for entry until you create the business unit by clicking the Create BU button on the Call Center BU page.
Case Defaults
|
Field or Control |
Definition |
|---|---|
| Template Family |
Select the display template family that you want to use for this business unit. The system shows all the existing display template families that are defined in the system. |
| Call Center Component |
Select the component that you want to associate with the display template family that is displayed in the previous field. The system displays the components that are defined for the selected display template family. You can set up different defaults for different components on the same template, and you can set up different default values for different templates that use the same business unit. When you select a component, the system may display a different set of fields, as not all default fields apply to each call center component. |
All Call Centers
|
Field or Control |
Definition |
|---|---|
| New Case Status |
Select the status that you want the system to use when an agent opens a new case. Note: Although most defaults are optional, the New Case Status default is required for the component that is used to report new self-service cases. Without a default value, the system cannot save the case. Also, because Case Status is a required field for a case, an agent reporting a case through a self-service application cannot set the case status. |
| Resolved Case Status |
Select the value that you want the system to use when an agent identifies a successful solution and resolves the case. Both agents and self-service application users can resolve cases. Agents resolve cases by setting a solution status to Successful Resolution.Self-service application users resolve cases by answering Yes when asked whether a particular solution resolved their problem. The default can be different for a self-service user than it is for an agent. |
| Reopened Case Status |
If you selected the Allow Case to be Reopened check box on the Business Unit - Options page, select the status that you want the system to use when the self-service application user reopens a case. If you do not enter a status here, then, when an agent or self-service user reopens a case, the status will not change. The result could be cases closing without a successful resolution—a condition that the system does not normally allow. |
| Duplicate Case Status |
If you relate one case to another, and the associated relationship type definition has the Set status of child case using duplicate case status from the Business Unit Defaults check box selected, then the child case status will be automatically set to the value specified in this field. Note: If this field has no value, then the child case status will not be updated when it is related to another case, even if the associated relationship type definition has the Set status of child case using duplicate case status from the Business Unit Defaults option checked. |
| Case Type |
Select the default case type for a new case. |
| Case Subtype |
Select the default case subtype for a new case. |
| Case Priority |
Select the default case priority for a new case. |
| Case Impact |
Select the default case impact for a new case. |
| Urgency |
Select the default case urgency for a new case. |
| Case Severity |
Select the default case severity for a new case. |
| Source |
Select the default source for the case. This field enables you to tell which cases were entered by way of self-service applications or by agents. |
| Source Web Service |
Select the default source for a case that is created through a web service. |
| Source ERMS |
Select the default source for a case that is created through the PeopleSoft CRM ERMS system. |
| Source HCM |
Select the default source value to populate for cases that are automatically created when personal or job data updates have occurred in the integrated HCM system. Use this field when the automatic case creation feature is enabled. |
| Product Group |
Select the default product group for a new case. When an agent or user selects a Product Group on a case, the system filters the values for the product and installed product to only display the products and installed products contained within the specified product group. |
Category/Type/Details (CTD) Defaults
|
Field or Control |
Definition |
|---|---|
| Category |
Select the default case category for a new case. |
| Specialty Type |
Select the default case specialty type for a new case. |
| Detail |
Select the default case detail for a new case. |
Defaults for Self-Service
These fields, which were described previously, may also appear in this section: Source, Case Type, Case Subtype, Case Priority, Case Severity and Product Group.
|
Field or Control |
Definition |
|---|---|
| Assign to Provider Group |
Select the provider group that you want the system to use when a user opens a case for the self-service business unit. |
| Note Type |
Select the note type that you want the system to use when a user opens a case for the self-service business unit. |
| New Case Status |
Select the case status that you want the system to use when a user opens a new case for the self-service business unit. |
| Resolved Case Status |
Select the status that you want the system to use when a user identifies a successful solution a case for the self-service business unit. |
| Closed Case Status |
Select the status that you want the system to use when a user closes a case for the self-service business unit. |
| Reopened Case Status |
Select the status that you want the system to use when a user reopens a case for the self-service business unit. If you do not enter a status here, then the status will not change when the self-service user reopens a case. The result could be cases being closed without a successful resolution—a condition that the system does not normally allow. |
| Contact Me Provider Group |
Select the provider group that you want the system to use when a user clicks the Contact Me button on a case for the self-service business unit. |