Working with Inbound Email
These topics provide an overview of the email workspace toolbar and discuss how to work with inbound email.
|
Page Name |
Definition Name |
Usage |
|---|---|---|
|
RB_EM_IB89 |
Manage an email that you have accepted. You can start working on the email, requeue it to its original group worklist, or reassign it to another group worklist. |
|
|
RB_EM_DOC_VIEWER |
Preview document content, add a document to the proposed list, and reply to the email with the document as an attachment. |
|
|
RB_EM_SOL_VIEWER |
View solutions, add a solution to the proposed list, and reply to the email with the solution. If the solution is associated with notes, attachments, or other solutions, the system uses the Solution component to display complete solution information. |
|
|
RB_EM_IB_SEARCH |
Search for solutions and documents to help resolve an email. |
|
|
RB_EM_IB_HIST |
Review an email's event history, routing history, audit trail, and content analysis scores. |
|
|
RB_EM_IB_MESSAGE |
Review email message properties. |
|
|
RB_EM_THREAD |
Review an email's thread information. You cannot modify the thread information in the Outbound Email component. As for inbound emails, you can modify the information modified on the Recent Activities tab under the Assistance section on the Email page. |
|
|
RB_EMAIL_NOTE |
Enter and view email notes. |
|
|
RB_EW_PREFERENCE |
Personalize the email workspace. |
|
|
RB_EM_MBXFORW_SBP |
Submit emails to another mailbox. This functionality resets most data of the email before sending it back to the ERMS system for reprocessing. |
|
|
RB_EM_IB_RAS_SEC |
Reassign an email to a another group or individual worklist. |
Toolbars are configurable and customizable. In addition, you can give end-users the ability to personalize their toolbars.
See Understanding the Configurable Toolbar.
PeopleSoft CRM delivers these buttons for the email workspace:
|
Field or Control |
Definition |
|---|---|
 |
Click the Reassign button to access the Select Worklist page and select a group or individual worklist to which the email reassigns. |
 |
Click the Requeue button to cancel the email's current assignment and return the email to the group worklist. This action is not available to unassigned emails. |
 |
Click the Accept button to take ownership of an unassigned email. This action is available to any member of the email's group worklist. The system moves the corresponding worklist entry to that person's individual worklist, and several fields in this component become editable. |
 |
Click the Accept button to navigate to the sender's 360-degree view. The system determines which 360-degree view to display based on the type of mailbox that the email was sent to (external, internal, internal HR, or partner) and the role of the person who accesses the 360-degree view. |
 |
Click the User Preferences button to access the Email Workspace User Preferences page to personalize the email workspace default behavior on sending responses, available activities to display and keyword search. |
 |
Click the Mailbox Reset button to send the email through ERMS for reprocessing, if the email was sent to the current mailbox by mistake. The system retrieves the email from within the CRM database, not from the mail server. Before the email is being reprocessed, the system removes any mailbox-related information from it (for example, activities, language setting, business unit, business object searching, and content analysis information). |
 |
Click the Text Tray button to create personal quick keys or use available public quick keys. |
 |
Click the Mark as Done button to remove the completed email from the task list of the Multichannel Toolbar. This button appears when an email that was sent to the agent through the Multichannel Toolbar was closed outside of the browser window that is controlled by the Multichannel Toolbar. In other words, the email was responded to or closed on some other page (for example, the Search for Inbound Emails page, My Worklist, the History page on a related transaction, the Thread page of an outbound email and so on). In this case, the email remains on the agent's Multichannel Toolbar task list. If the email is opened from Multichannel Toolbar and it was closed previously on another page, the Mark as Done button appears in the Toolbar to allow the email to be removed from the task list. |
 |
Click the Take Ownership button to accept the email, which is currently assigned to another member of the same group worklist. Taking ownership is similar to the accepting an email. The difference is that an agent clicks the Take Ownership button to take over an email that has been assigned to someone else in the same group worklist (in this case, the Accept button is unavailable). The agent clicks the Accept button to take over a new email that has not been unassigned to anyone (in this case, the Take Ownership button does not appear). |
 |
Click to spell check the subject and message body of the email response. |
| Go To |
Select Actions Taken, Routing History, Audit History, or Content Analysis Scoring to navigate to a view of the History page. |
The area beneath the toolbar button displays summary information about the email, which includes the email sender, email status, and the computed email due date. This date is based on the mailbox-level final notification time period.
If the final notification time period for the email's mailbox is two days, then the due date is two days after the email was received.
The customer value comes from PeopleSoft Enterprise Performance Measurement. This customer value appears if the sender is a consumer or the representing value is either a company or consumer.
|
Field or Control |
Definition |
|---|---|
| Select |
Click to select one or more documents or solutions and click the Add Selection(s) to Proposed List button to add them to the Proposed Solutions/Documents group box on the Search Solutions/Documents page. |
| Add Selection(s) and Reply |
Click to access the Response page, where solutions or documents that are currently selected in a grid are appended to the message area automatically as part of the email response. However, if the email response has been modified before this button is clicked, the system will not add selected items automatically; agents need to do so manually if deemed necessary. In addition to appending selected solutions and documents to the email response, the system also applies the history setting, as well as the greeting and closing templates to the email message as configured in the mailbox definition. The system adds these solutions and documents to the list in theProposed Solutions/Documents group box on the Search Solutions/Documents page. Added documents are also available in the Template field on the Response page. If no preselected documents or solutions are available, clicking this button transfers agents to the Response page. |
| Add and Reply |
Click to transfer from a solution or document preview page to the Response page. The system appends the solution or document that is being viewed currently to the email response. The logic behind the Add and Reply and the Add Selection(s) and Reply buttons is identical. The difference is that the former handles a single selection whereas the latter can handle multiple selections simultaneously. |
| Add Selection(s) to Proposed List |
Click to add the solutions or documents that are currently selected in a grid to the list in the Proposed Solutions/Documents group box on the Search Solutions/Documents page. |
| Add to Proposed List |
Click to transfer to the page from where the solution or document link was clicked. The system adds the solution or document that is being viewed currently to the list in the Proposed Solutions/Documents group box on the Search Solutions/Documents page. The viewed item is not yet part of the email response. |
| View Selection(s) |
Click to view selected solutions or documents on the corresponding preview page. If agents select multiple items to view, the preview page provides the Previous and Next buttons for them to navigate from one item to the next. |
| Return to Email |
Click to close the solution or document preview page and transfer to the Email page. |
Use the Email page (RB_EM_IB89) to manage an email that you have accepted.
You can start working on the email, requeue it to its original group worklist, or reassign it to another group worklist.
Navigation
Click the email ID link for a worklist entry of type Email Alert.
Click the node for an inbound email interaction on any 360-Degree View or pages where interactions are listed.
Image: Email page
This example illustrates the fields and controls on the Email page. You can find definitions for the fields and controls later on this page.
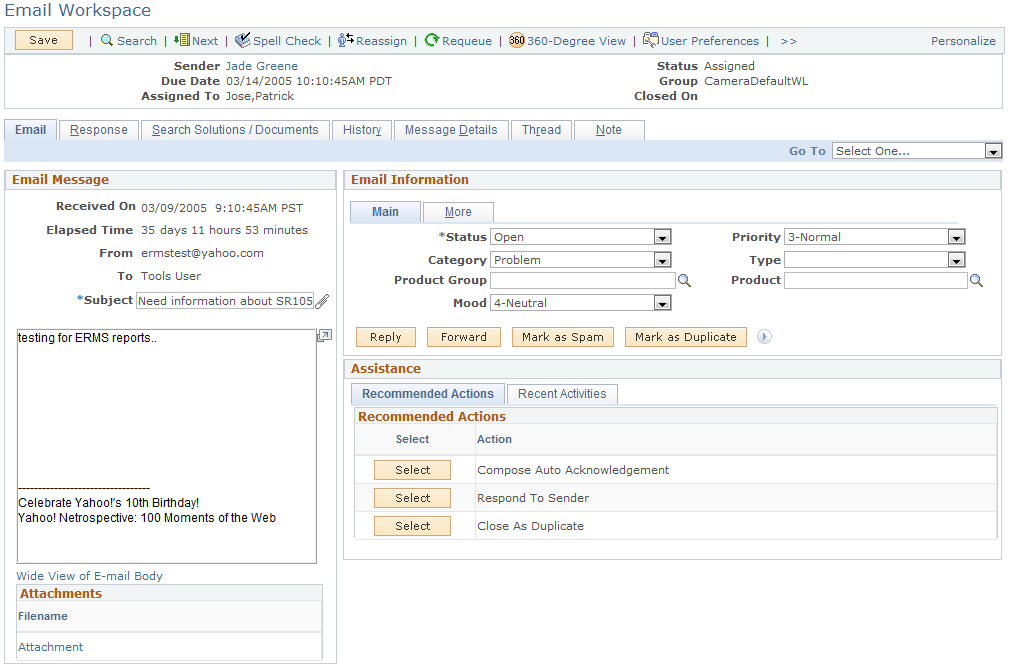
Email Message
This group box displays basic information and the content of the inbound email. It appears on the Email page, the Response page, and the Search Solutions/Documents page to provide persistent email information wherever agents perform research.
|
Field or Control |
Definition |
|---|---|
| Received On |
Displays the date and time when the email was either received by the mail server or the date and time when it was saved into the database (if the received date is not populated, as in the case of POP3). These date and time values are the basis for the external response time alert computation. This group box is also used to compute the elapsed time for the email. |
| Elapsed Time |
Displays the days and hours that have passed since the date and time that are specified in the Received On field until the email is closed. The system changes the email status to closed after a response has been submitted. |
| From |
Displays the address from which the email was sent. The system uses this email address to identify the sender when an email arrives in the system. |
| To |
Displays the name of the mailbox to which the email was sent. The Cc field appears if the incoming email has a Cc email list. |
| Subject |
Displays the subject of the email as specified by the sender. If the email doesn't have a subject, ERMS populates the standard no subject phrase as defined on the System Installations page. |
| Wide View of E-mail Body |
Click to access the E-mail Viewer page (RB_EM_TEXT_VIEWER) to view the email on a full page. You can edit the content from the full page view, but changes are not saved to the system. |
| Attachment |
Click to view a list of attachments (in active links) for the email, if available. Files that were originally sent as attachments retain their original file names. Attachments that PeopleTools creates when it transfers the email from the mail server to the PeopleSoft system have the generic name attachment. |
Email Information - Main
This group box contains two tabs: Main and More.
The Main tab displays the email's status that agents work with. Agents can update these values manually.
The system provides action buttons to perform common email functions quickly. You can define these action buttons at the system or mailbox level.
|
Field or Control |
Definition |
|---|---|
| Status |
Displays the status of the email: Open, Closed - Auto Response, Closed - Canceled, Closed - Duplicate, and Closed - Response. |
| Priority |
Specify an appropriate priority for the email. You can define priorities on the Priority Setup page. |
| Category and Type |
Specify a appropriate category and a type within that category for the email. You can define categories on the Category Setup page; establish types on the Associate Types page. |
| Product Group |
Specify an appropriate product group for the email. Product groups that are available for selection belong to the same setID as the email, which is determined using one of these options:
Establish product groups on the Product Group page. |
| Product |
Specify an appropriate product for the email. If a product group is selected, only products that are associated with the product group are available for selection. Establish products on the Product Definition page. |
| Mood |
Specify an appropriate mood for the email if applicable. You can define moods on the Mood Setup page. |
| Reply, Reply All, and Forward |
Click to access the Response page to send a reply or forward the inbound email to others. The operations of these buttons are the same, with several exceptions:
|
| Mark as Spam |
Click to label the email as spam mail; the email closes automatically. |
| Mark as Duplicate |
Click to mark the email as a duplicate mail; the email closes automatically. |
| Create New <CRM transaction> |
Click to create a new CRM transaction for the email. Specify the quick create action buttons in the Mailbox Activity List page of the mailbox definition. Enable only one quick action button for a mailbox to avoid scrolling. Agents who need to create these transactions must be given the permission to add them in advance. Otherwise they cannot create any transactions for the email. |
See Defining Products, Defining Template Categories and Types, Defining Priorities and Moods.
Email Information - More
The More tab displays customer information. This tab also lists any CRM transaction that the email is associated with or any solution that the email has attempted to resolve its issue.
|
Field or Control |
Definition |
|---|---|
| Business Unit |
Displays the email business unit that is specified in the mailbox definition. The email business unit can be updated, and the change is limited to business units that belong to the same setID as the current business unit You cannot create transactions from the email if the setID of the email business unit does not match the sender's setID. |
| Language |
Displays the language to be used to handle the email. You can modify the value if the system identifies the language incorrectly. |
| Sender |
Displays the sender of the email. If you select a different sender, the system automatically updates the corresponding value in the toolbar summary area. The role of the sender is shown if the selected sender has more than one role. You must identify the sender completely (by specifying the sender role) before attempting to create transactions. |
| Representing |
Displays the company or consumer that the sender represents. If you modify the value here, the system automatically updates the corresponding value in the toolbar summary area. This field applies to external and partner mailboxes and still appears in the toolbar summary area even if the value is unavailable. Note: If the sender is associated with more than one representing entity, and later some of these relationships are deactivated in the system, these relationships don't expire immediately; instead, they expire at the end of the day (that is, midnight). |
| Related Transactions |
Displays CRM transactions that are selected on the Response page to associate with the email, if available. |
| Attempted Solutions, Status, and Update Solution Status |
Displays solutions that are associated with the email. This grid appears after the email response, including selected solutions, is sent. Agents can update the solution status based on customer's feedback. For example, if the customer sends a reply and confirms that the solution resolves the issue, the agent can select the solution and change its status to successful resolution. If the solution doesn't solve the issue, change the status to failed resolution instead. |
See Defining System Settings for Email Processing, Email Sender Identification, Quick Action Buttons.
Assistance
This group box provides recommended actions that the agent can choose to perform on the email and search capability on recent activities and transactions that relate to the email.
The Recommended Actions tab contains a list of recommended actions for the agent to perform. You can define a list of recommended actions based on category in the mailbox definition.
|
Field or Control |
Definition |
|---|---|
| Select |
Click to perform the corresponding activity. The list is short, and most recommended actions are related to replying email. |
Recent Activities
This section contains a list of most recent activities that are associated with the sender of the email.
|
Field or Control |
Definition |
|---|---|
| Activity Type |
Select the CRM transaction to relate to or create for the email:
After you create and save the new transaction, you can return to the Email page using the History drop-down list box that is available on the transaction's toolbar. You can also use the new transaction's interaction list, which automatically includes the original email. If agents set up their personalized activity lists on the Email Workspace User Preferences page, this setup overrides the default activity list, which is what appears when the Activity Type drop-down list box is empty (it is the default behavior when you enter the component initially). |
| Rows to Retrieve |
Enter the maximum number of rows to return for the selected activity type, if search matches are found. |
Use the Document Viewer page (RB_EM_DOC_VIEWER) to preview document content, add a document to the proposed list, and reply to the email with the document as an attachment.
Navigation
Click a document link on the Email page, the Response page, or the Search Solutions/Documents page.
In addition to viewing the current document and navigate to other documents in the document list, you can also choose to add it to the proposed list, add it to the proposed list and reply the email with it.
Use the Solution Viewer page (RB_EM_SOL_VIEWER) to view solutions, add a solution to the proposed list, and reply to the email with the solution.
If the solution is associated with notes, attachments, or other solutions, the system uses the Solution component to display complete solution information.
Navigation
Click a solution link on the Email page, the Response page, or the Search Solutions/Documents page.
See Common Element Used in Working with Inbound Email, Case - Solution Page, Service Order - Solution Page or Quality Management - Solutions Page.
Use the Search Solutions/Documents page (RB_EM_IB_SEARCH) to search for solutions and documents to help resolve an email.
Navigation
Image: Search Solutions/Documents page
This example illustrates the fields and controls on the Search Solutions/Documents page. You can find definitions for the fields and controls later on this page.
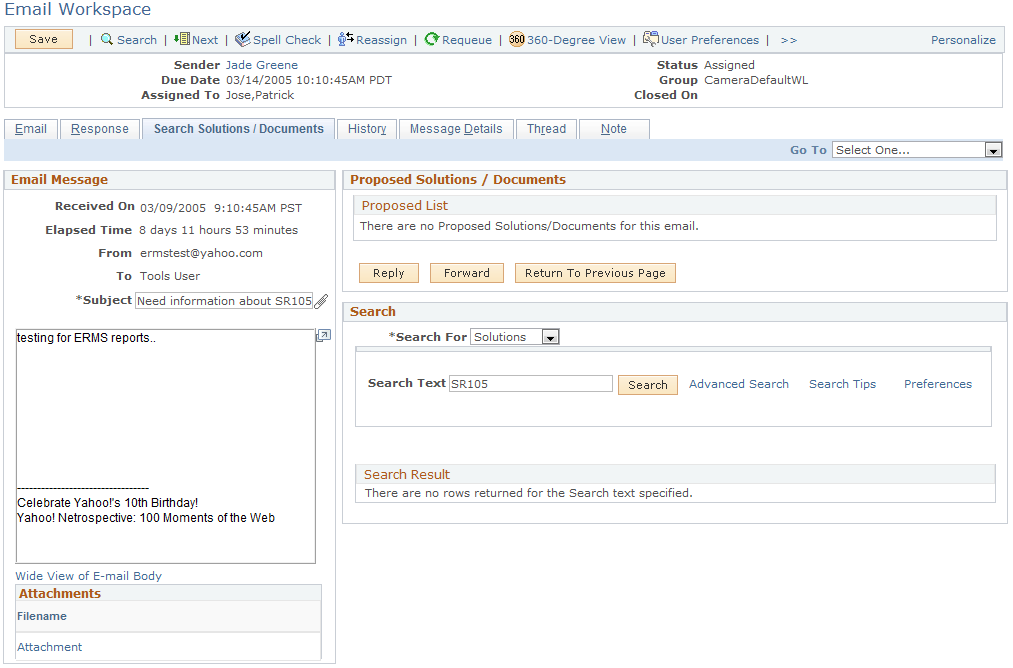
Proposed Solutions/Documents
This group box contains the collection of solutions and documents that can be content sources for the email (for example, to perform template search) and can potentially resolve customer issues. You can select items in the list to send to customers. Selecting an item means that you are adding it to the list of content sources to be associated with the email and its possible response. When you perform search on solutions or documents on the Email page or the Search Solutions/Documents page and click the button to add selected items to the proposed list, the system populates those items here in the Proposed Solutions/Documents group box.
Search
This section allows you to perform keyword search against the selected repository (solutions or documents) using PeopleSoft Search.
|
Field or Control |
Definition |
|---|---|
| Search For |
Select which type of content to search on: solutions or documents. You cannot search across both solution and document repositories at the same time. To specify the default repository for this field, click the User Preferences button on the toolbar and select the default search. |
| Search Text |
Enter keywords in this field for the search. This field appears when you're in the basic search mode. |
| Search |
Click the Search button to invoke the keyword search. |
| Advanced Search |
Click to perform a more refined search where you can enter keywords with these variations:
|
| Rows to Display |
Specify the number of items to show in the search results list. This field appears when you're in the advanced search mode. |
| Search Tips |
Click to access the page (RB_SEARCH_TIPS_SEC) that lists the definition and sample for each search criterion. |
| Preferences |
Click to access the page (RB_USR_PREFERENCES) to specify the default search mode and settings for each search mode: basic and advanced. You can specify the same options available on this page on the Email Workspace User Preferences page. |
Use the History: Actions Taken page (RB_EM_IB_HIST) to review an email's event history, routing history, audit trail, and content analysis scores.
Navigation
Image: History: Actions Taken page
This example illustrates the fields and controls on the History: Actions Taken page. You can find definitions for the fields and controls later on this page.
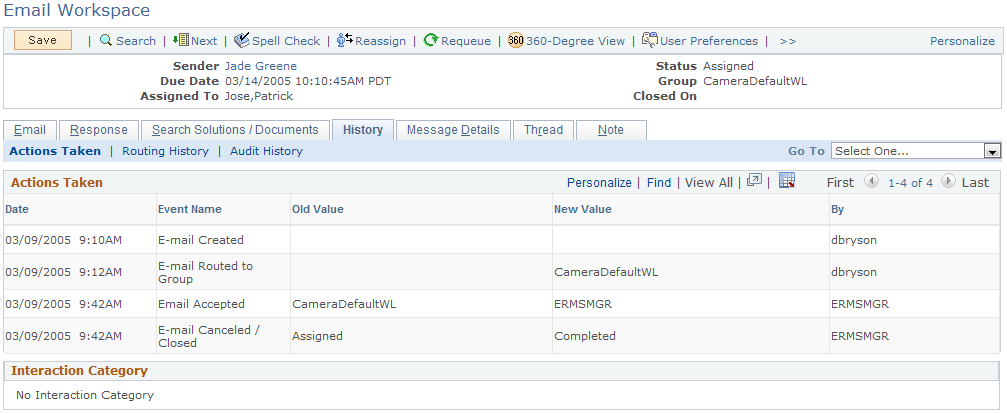
Actions Taken
This grid displays email history events that the system captures.
|
Field or Control |
Definition |
|---|---|
| Date |
Displays the date that the event occurred. |
| Event Name |
Displays the event name that is defined in the ERMS application. ERMS logs four types of events:
|
| Old Value and New Value |
If the event captures changes to a specific field, these fields display the original and changed values. |
| By |
Displays the user ID of the user who triggered the event. |
Interaction Category
This section displays information of interaction category that is associated with this email, when it was processed and closed through the Multichannel Toolbar. If more than one entry is available, they are listed chronologically (the most recent appears first). If the email is not associated with a category, the No Interaction Category message is displayed.
Use the History: Routing History page (RB_EM_IB_HIST) to route history.
Navigation
Click the Routing History link on the History page.
Image: History: Routing History page
This example illustrates the fields and controls on the History: Routing History page. You can find definitions for the fields and controls later on this page.
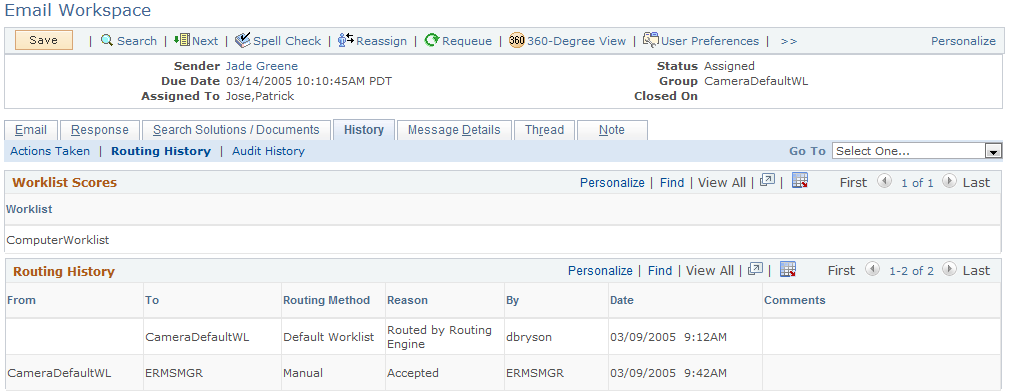
Worklist Scores
This grid displays the worklist routing score for the email. Based on the content analysis of the email that is performed by PeopleSoft Search, a routing score is computed for each worklist that is associated with the email's mailbox. The system then assigns the email to the worklist with the highest score. The email is assigned to the default worklist of the mailbox if no scoring information is available, for example, if none of the returned worklist scores meets the minimum threshold value that is set, or the mailbox is not associated with any worklists.
Routing History
This grid displays email routing events. The system creates a new row of data every time that the email is reassigned to a new group worklist or individual worklist.
|
Field or Control |
Definition |
|---|---|
| From and To |
Displays the name of the worklist from which the email was routed and to which it is sent. Individual worklists are identified by the associated user ID. The first entry in the routing history represents the routing that the unstructured email process performs. Because this is the first time that the email is routed, the From field is empty. |
| Routing Method |
Routings that occur after the first routing by the unstructured email process have a routing method of Manual. Other routing method values apply only to the initial routing action of the unstructured email process. The following values indicate the criteria that the unstructured email process uses to select a worklist: Thread, Customer Event, Address, Domain, Content, and Worklist. |
| Reason |
The following routing reasons indicate why the unstructured email process routed an email to the mailbox's default worklist: Routed, Bypassed, Oversized, and Encoding. The following reasons are set by the system when it automatically moves an email to a new worklist: Accepted, Reassigned, and Requeued. In addition to the reasons used by the system, the following reasons are available when users perform manual routing actions: Escalated, Misrouted, Overridden, and Other. |
| By and Date |
Displays the user ID of the person who performed the routing, along with the date and time when the routing was performed. The user ID for the routing that the unstructured email process performs is the user ID that was used to schedule the process. |
| Comments |
If an agent who manually reassigns an email to a new group worklist enters comments in the Select Worklist page, those comments appear here. Comments are required if the routing reason is Other. |
Use the History: Audit History page (RB_EM_IB_HIST) to review an audit trail.
Navigation
Click the Audit History link on the History page.
Image: History: Audit History page
This example illustrates the fields and controls on the History: Audit History page. You can find definitions for the fields and controls later on this page.

The Audit History grid displays record level and field level audit information, including the type of change performed (add, update, or delete), field values before and after the change, the user ID of the person who made the change, and the date and time of the change.
The PeopleSoft system is delivered with auditing features turned off. Turning on auditing can have a significant impact on application performance. Analyze your audit needs carefully to ensure that you turn on auditing only when there is a strong business reason to do so.
Use the Message Details page (RB_EM_IB_MESSAGE) to review email message properties.
Navigation
Image: Message Details page (1 of 2)
This example illustrates the fields and controls on the Message Details page (1 of 2). You can find definitions for the fields and controls later on this page.
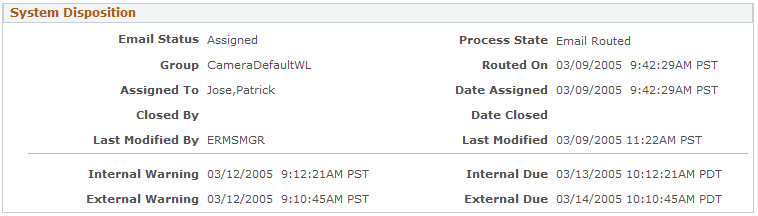
Image: Message Details page (2 of 2)
This example illustrates the fields and controls on the Message Details page (2 of 2). You can find definitions for the fields and controls later on this page.
Computed Message Body
This group box displays essentially the same email message that you see on most pages. The bigger display area enables for better readability.
System Disposition
This group box contains information about the email regarding status, routing, assignment, and response time deadlines that comes from the CRM system. It provides a visual indicator next to each response date and time that indicates if this email close to missing the deadline.
|
Field or Control |
Definition |
|---|---|
| Email Status |
Displays the current status of the email to reflect where the email stands. This status is read only and is maintained by the system. The same email status is shown in the toolbar summary area. The email workspace uses this value when it evaluates the response time alerts. |
| Process State |
Displays the status of the mail processor in regards to the email. The mail reader process refers to the process state of emails when resending them through the system. Values are:
The process state is a system level status of where the email is in the preprocessing phase of the system. If you open emails from a worklist or the Multichannel Toolbar, the process state of the email is typically Email Routed. However all emails (regardless of the processing state) can be accessed using the Search Inbound Email component. |
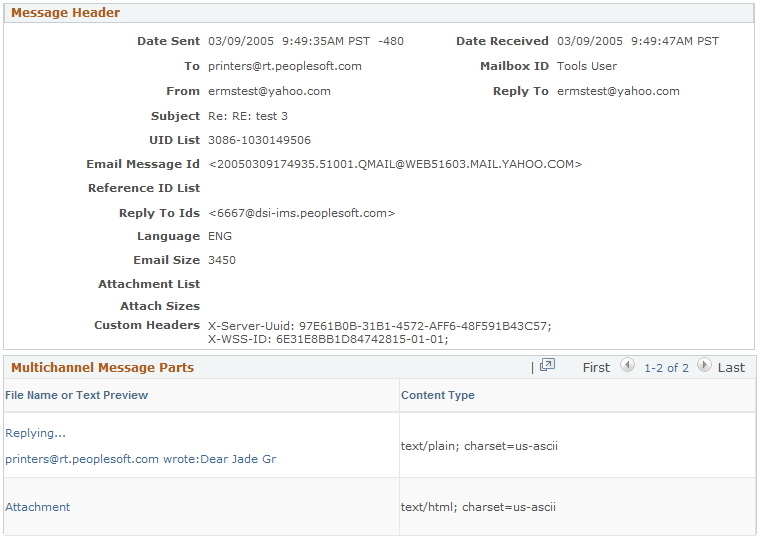
Message Header
This group box displays email data that comes from PeopleTools (with the exception of the Mailbox ID field). The values in the Date Sent and the Date Received fields are followed by a number, which is the respective time zone offset.
|
Field or Control |
Definition |
|---|---|
| Date Sent and Date Received |
Displays the date and time when the inbound email was sent and received. The values for these fields come either from the mail server or the CRM database, depending on the mail server type (POP3 or nonPOP3). The number at the end of the values is the time zone offset between the mail server and the CRM database, in minutes. Take the Date Received value as an example. If the mail server is of type POP3, ERMS uses the date and time when the email was saved to the CRM database as the value of this field. In this case, the offset value is zero. But if the mail server is not a POP3 type, ERMS displays in this field the date and time information that was returned from the mail server. In this case, the offset value is present, ranging from +720 to -720. The PeopleTools: PeopleSoft MultiChannel Framework contains more information on time zone offsets. |
Customers can take advantage of the custom header information to drive additional business processes. PeopleSoft Multichannel Communications does not provide the infrastructure to facilitate customization projects of this kind.
See PeopleTools: PeopleSoft MultiChannel Framework
Multichannel Message Parts
This group box lists the message parts as stored by the PeopleTools Email Repository. A message part can be:
The inline text, which can be a representation of the computed message body displayed on the left of the page.
A sender specified attachment, which has a specific filename and content type.
A PeopleTools generated attachment that is created when a system-size threshold is violated (meaning that the size of the text exceeds the threshold value) or the content type is not plain text. For example, if the mail client is configured to send both plain text and HTML email messages, two different parts appear in this section: a plain text part and an HTML part.
Use the Thread page (RB_EM_THREAD) to review an email's thread information.
You cannot modify the thread information in the Outbound Email component. As for inbound emails, you can modify the information modified on the Recent Activities tab under the Assistance section on the Email page.
Navigation
Image: Thread page
This example illustrates the fields and controls on the Thread page. You can find definitions for the fields and controls later on this page.
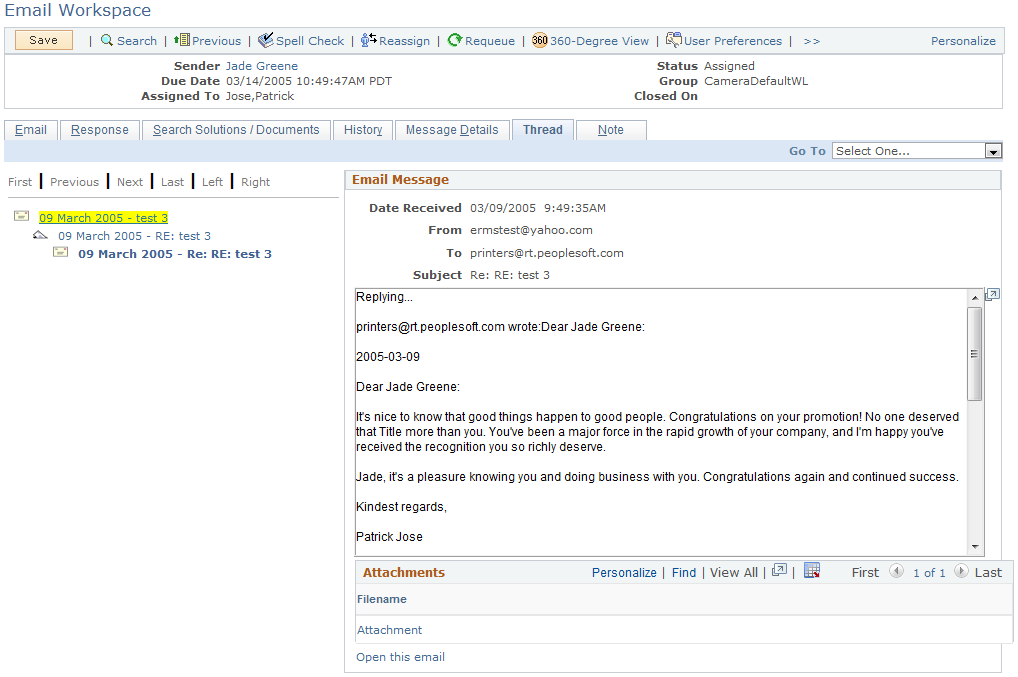
The construction of the thread tree on the left is based on the interaction thread information that is stored as part of a conversation. When you click an email link, the email content shows in the message area on the right. If you want to change the association of the current email (change email threading), perform the action on the Recent Activities tab on the Email page by relating the current email to another email as the new parent.
|
Field or Control |
Definition |
|---|---|
 |
Indicates that the corresponding email is an inbound email. |
 |
Indicates that the corresponding email is an outbound email. |
| Open this email |
Click to open the email that appears in the message area. If the email is an outbound email, the Outbound Email page appears. If the email is an inbound email, the Email page of the email workspace appears. |
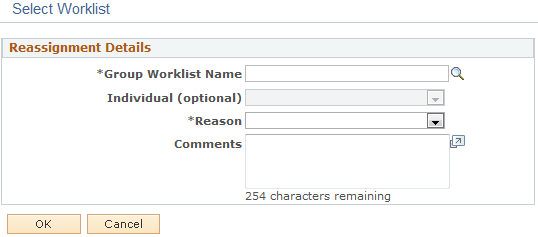
Use the Select Worklist page (RB_EM_IB_RAS_SEC) to reassign an email to a another group or individual worklist.
Navigation
Click the Reassign button on the toolbar.
Image: Select Worklist page
This example illustrates the fields and controls on the Select Worklist page. You can find definitions for the fields and controls later on this page.
|
Field or Control |
Definition |
|---|---|
| Group Worklist Name |
Select the group worklist where you want to reassign the email. |
| Individual (Optional) |
Select the person in the selected group worklist to whom you want to reassign the email. |
| Reason |
Select a routing reason. Use the following values for manual rerouting: Escalated, Misrouted, Overridden Reassigned, or Other. Other values that are used during automatic rerouting are also available. These values are Accepted, Bypassed, Encoding, Oversized, Requeued, and Routed. |
| Comments |
Enter a comment that provides information about the reassignment. This is required if the routing reason is Other. |
| OK |
Click to reassign the email to the selected worklist. |
Note: Similar functionality is available from My Worklist.
Reassign Email Item to Selected Worklist
This section appears if the system returns worklists in the Worklist Scores grid of the History: Routing History page. From the grid, select a group worklist and optionally select a member of the group. The last row of the grid is a free form field where you can enter any group worklist and optionally select an individual from that worklist.
Use the Note page (RB_EMAIL_NOTE) to enter and view email notes.
Navigation
Here's some considerations for adding notes in the email workspace:
You cannot email notes that you create for emails.
Email notes don't use the visibility feature.
Use the Email Workspace User Preferences page (RB_EW_PREFERENCE) to personalize the email workspace.
Navigation
Click the User Preferences toolbar button on the email workspace.
Image: Email Workspace User Preferences page (1 of 2)
This example illustrates the fields and controls on the Email Workspace User Preferences page (1 of 2). You can find definitions for the fields and controls later on this page.
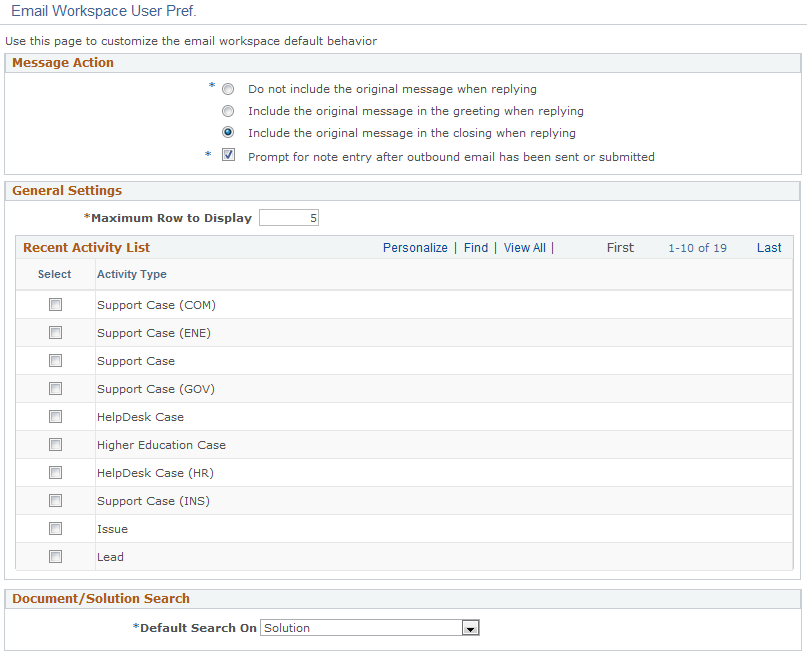
Image: Email Workspace User Preferences page (2 of 2)
This example illustrates the fields and controls on the Email Workspace User Preferences page (2 of 2). You can find definitions for the fields and controls later on this page.
Message Action
|
Field or Control |
Definition |
|---|---|
| Response |
Specify if you want to include email history when responding to inbound email, and if so, indicate if the history should appear at the beginning or the end of the response. |
| Note Entry Warning |
Select to enable the system to prompt agents to enter a note after they have submitted outbound responses from the email workspace. |
General Setting
|
Field or Control |
Definition |
|---|---|
| Maximum Row to Display |
Specify the default maximum number of rows that users see from the activity result grid on the Recent Activities tab on the Email page. |
| Recent Activity List |
Select the types of transactions (activities) to be included when the email workspace retrieves the default activity result list initially. If no activity is selected in the Activity Type drop-down list box, the system uses the default activity list (those activities that are marked with the Default check box in the mailbox definition) to determine which activities to display on the Recent Activities tab of the email workspace. Agents, however, can override the default activity list defined on the mailbox by selecting rows in the Recent Activity List grid of the Email Workspace User Preferences page. Activities that are selected do not change the actual list that appears in the Activity Type drop-down list box but changes the types of activities that are retrieved as part of the default activity list retrieval (when the Activity Type drop-down list box is empty). Note: If the activity selected in the user preferences is not enabled for the mailbox with which the email is associated, it does not appear in the default activity results. When no activities are selected in the Recent Activity List grid of the user preferences, the email workspace uses the mailbox definition of default activities. |
Document/Solution Search
|
Field or Control |
Definition |
|---|---|
| Default Search On |
Select whether the default search repository is document or solution. The default value is used in the Search group box on the Search Solutions/Documents page. |
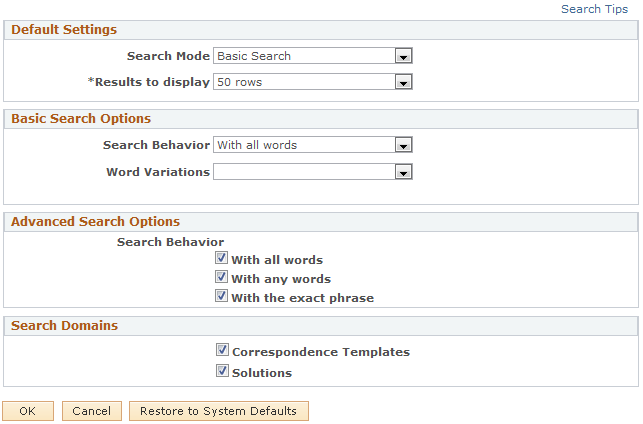
Default Settings
|
Field or Control |
Definition |
|---|---|
| Search Mode |
Select the default search mode that is used to perform PeopleSoft Search keyword search. Options are basic search, advanced search, and advanced search - more search options. |
| Results to display |
Specify the default maximum number of rows that users see from the search results grid on the Search tab on the Search Solutions/Documents page. |
Basic Search Options
|
Field or Control |
Definition |
|---|---|
| Search Behavior |
Select a default behavior to use based on user-entered text in the basic search. Options are:
|
| Word Variations |
Select a default word variation type to incorporate into the basic search. Options are:
|
| Case Sensitive |
Select if you want the solution and document search to be case sensitive. |
| Display noise words |
Select if you want to view the list of noise words that were used in a search. Noise words are excluded from the search process because they are often not meaningful to the search. Examples are prepositions (from, to, in, and up) and articles (a, an, and the). |
Advanced Search Options
|
Field or Control |
Definition |
|---|---|
| Search Behavior |
Select behavior (none or multiple) that users can choose to use in the advanced search. |
| Restore to System Defaults |
Click to overwrite the personalization setting with the system default setting. |
Search Domains
Select the template package and solution specific fields as well as solution libraries that you want the system to use to search for documents and solutions.
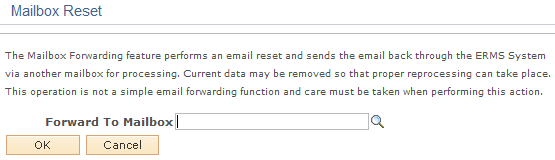
Use the Mailbox Reset page (RB_EM_MBXFORW_SBP) to submit emails to another mailbox.
This functionality resets most data of the email before sending it back to the ERMS system for reprocessing.
Navigation
Click the Mailbox Reset toolbar button on the email workspace.
Image: Mailbox Reset page
This example illustrates the fields and controls on the Mailbox Reset page. You can find definitions for the fields and controls later on this page.