Using Multichannel Toolbar
These topics discuss how to:
Connect to voice and multichannel queues.
Accept incoming tasks.
Review queue statistics.
Navigate to different tasks.
Process phone calls.
Use the phone directory.
Process emails.
Process chat requests.
Switch agent status.
Switch to another queue.
Disconnect from voice or multichannel queues.
When agents (voice, multichannel, or blended) first log on to PeopleSoft Pure Internet Architecture, they are automatically logged on to the voice queue and the multichannel queue (if marked with the auto-login property) that are selected in the agent configuration through Multichannel Toolbar. The queue status of the connection is shown on the toolbar while the logon process is in progress. If the logon process fails, for example, the CTI server or multichannel queue server is not in service, error messages appear. Contact the system administrator and log on to the system at a later time.
If the connection to the corresponding server drop after an agent logs on to the system, the queue status automatically changes to Not in Service.
Click task notifications that appear on the Multichannel Toolbar to accept new tasks.
For chat, email, and generic tasks, if the accept mode of any of these window preferences is set to automatic, notifications do not appear. When any of these tasks is routed to an agent, the acceptance becomes automatic and the corresponding workspace appears.
These examples show task, call, email, and chat notifications on the Multichannel Toolbar:
Image: Example of a voice call notification on Multichannel Toolbar before acceptance
This example illustrates the an example of a voice call notification on Multichannel Toolbar before acceptance.
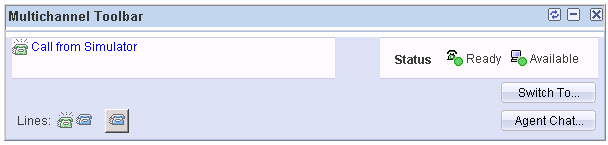
Image: Example display of Multichannel Toolbar after voice call acceptance
This example illustrates an example display of Multichannel Toolbar after voice call acceptance.

Image: Example display of Multichannel Toolbar after email acceptance
This example illustrates an example display of Multichannel Toolbar after email acceptance.

Image: Example display of Multichannel Toolbar after customer chat acceptance
This example illustrates an example display of Multichannel Toolbar after customer chat acceptance.

Note: If the length of the task description exceeds one single line, the remainder is truncated and displayed in ellipsis. To view the entire description, place the mouse over the task icon.
If an agent works on more than one open task concurrently, task-related action buttons for these tasks appear on the toolbar in each task window.
After an agent accepts a new incoming task, the application dispatcher passes state-specific details to allow the toolbar to:
Remove the notification from the toolbar and display the current task.
Render task-related action buttons on the toolbar, depending on the current state of the agent.
Register the accepted task in the task list.
The task appears in the task navigation window when the agent clicks the Switch To button on the toolbar.
Make task-specific queue statistics available in the queue status window.
Maintain the status or state of queues on to which the agent logs.
Note: If the agent closes the application dispatcher window while working on some tasks, the status area of the toolbar on each Unified Agent Desktop (UAD) window shows “Activate UAD Toolbar.” To relaunch the application dispatcher and reregister current tasks with the application dispatcher, the agent must click the “Activate UAD Toolbar” message in each task window. For voice task windows, it is recommended that the agent close them before restarting the application dispatcher.
The agent should log on to the PeopleSoft application again if all browser windows (including the initial home session) are closed.
Click the queue status (this status must be available) on the Multichannel Toolbar to access queue details in the Queue Status window.
This example shows the Queue Status window:
Image: Example of the Queue Status window
This example illustrates an example of the Queue Status window. .

Note: For voice queues only, the Resynchronize Queue option is available in the Queue Status window. Agents use this option to synchronize the CRM CTI system with the CTI switch manually. A resynchronization restores the correct CTI state from the CTI system and updates it on the Multichannel Toolbar.
Click the Switch To button on the Multichannel Toolbar to access the task navigation window.
Image: Task navigation window
This example illustrates the fields and controls on the Task navigation window.
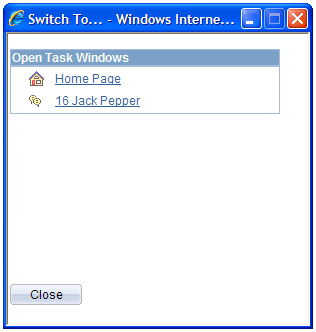
If the agent works on multiple task windows concurrently, use this window to navigate to another open task or the initial browser session (indicated by the house icon) by clicking the appropriate icon or text description.
Access the call-related transaction page that appears after you accept a call on the Multichannel Toolbar.
Image: Display of the call-related transaction after accepting a call
This example illustrates the fields and controls on the Display of the call-related transaction after accepting a call.
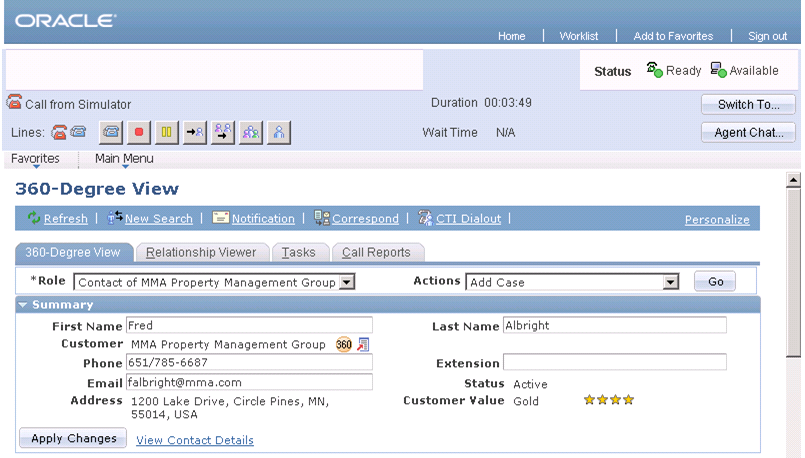
When a call arrives, it carries call details to the CRM system. Call details contain a transaction ID that is used to identify the CRM transaction that appears on the agent's desktop when the call is accepted. For example, if the customer call is an inquiry to case number 116, its call details contain the transaction ID for the Case component and case number 116. Upon acceptance, the Case component appears in a separate browser window with information about case number 116.
Call-Specific Action Buttons
Depending on the current state of the call, different action buttons that pertain to the state appear. For example, when a call is on hold, only relevant action buttons, such as release, dial (using the other line), retrieve, and complete, are available on the toolbar. These call-specific action buttons are available for call processing:
|
Field or Control |
Definition |
|---|---|
 (dial) (dial) |
Click to dial out using an available phone line. A phone directory appears for phone number selection. Phone book entries are defined in the agent configuration. |
 (retrieve) (retrieve) |
Click to retrieve the customer call from a hold state and continue the phone conversation. |
 (release) (release) |
Click to release the customer call after a transfer or the conversation ends. |
 (hold) (hold) |
Click to place the customer call on hold. Click the Retrieve button to resume the call. |
 (transfer) (transfer) |
Click to transfer the customer call to an agent, a queue, or an external number without talking to the target party. |
 (conference) (conference) |
Click to invite a target agent to join the customer call that is in progress. When the target agent accepts the conference request and session bookmark details are attached to the request, the customer chat window appears on the target agent's desktop and the task is registered to the task navigation list. |
 (consultative transfer) (consultative transfer) |
Click to transfer the customer call to an agent, a queue, or an external number after talking to the target party. The customer call is placed on hold while waiting for the target party to respond. The agent can either retrieve the call if the target party doesn't reply or release the call after transferring the call to the target party. |
 (consult) (consult) |
Click to dial out to an agent, a queue, or an external number using a second line while talking to a customer on the first line. The customer call is placed on hold while the agent awaits a response from the target party. After consultation completes, the agent releases the line 2 phone call and resumes the customer call on line 1. |
 (complete) (complete) |
Click to end the customer call when it is in a hold state, to complete a transfer to an internal agent, or to join another voice agent to a conference. |
Categorization
The agent needs to categorize the call after it is released or completed.
Note: In addition to phone calls, categorization also applies when agents finish working on chat sessions and email messages through the Multichannel Toolbar. The selected category value is displayed in the interaction that is created for the associated phone call, chat session or email message, as well as on the Chat Details page (for chat) and the History: Actions Taken page (for email).
This example shows the Category field on the Multichannel Toolbar:
Image: Example of categorizing a call on the Multichannel Toolbar after the call is ended
This example illustrates the fields and controls on the Example of categorizing a call on the Multichannel Toolbar after the call is ended. You can find definitions for the fields and controls later on this page.

|
Field or Control |
Definition |
|---|---|
| Category and Categorize |
Select a category for the closed phone call and click the Categorize button to confirm the categorization. Default options are:
Category codes are defined on the Category Codes page. See Category Codes Page. |
The phone directory appears when users perform these call actions: dial, transfer, conference, transfer, and consultative transfer.
This example shows the Phone Directory page:
Image: Phone Directory page
This example illustrates the fields and controls on the Phone Directory page. You can find definitions for the fields and controls later on this page.
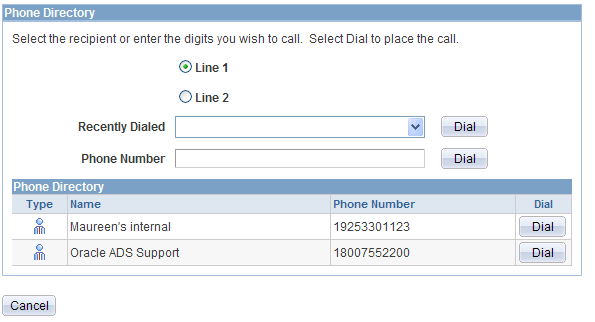
The Phone Directory grid lists phone number entries that are defined in the agent's phone book.
|
Field or Control |
Definition |
|---|---|
| Send Current Page |
Click to attach the current page to the call segment and transfer it to the target party. |
| Recently Dialed |
Displays the 10 most recently dialed phone numbers that agents can use to make calls. |
| Line 1/2 |
Select an open phone line to make an outbound call. |
| Phone Directory |
Displays the phone book entries that you set up on the Voice Configuration page of the Configure Agent component. |
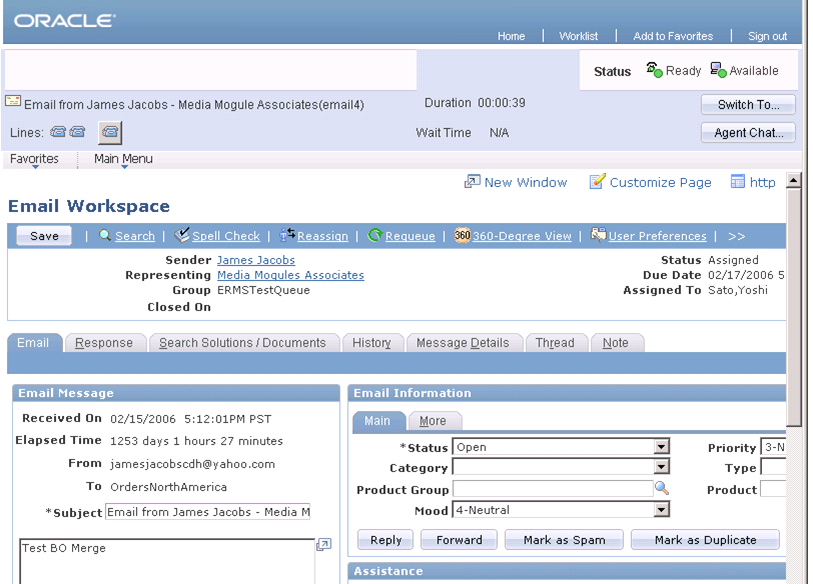
Access the email workspace to process email after accepting (manually or automatically) an email notification on the Multichannel Toolbar.
Image: Email workspace
This example illustrates the fields and controls on the Email workspace. You can find definitions for the fields and controls later on this page.
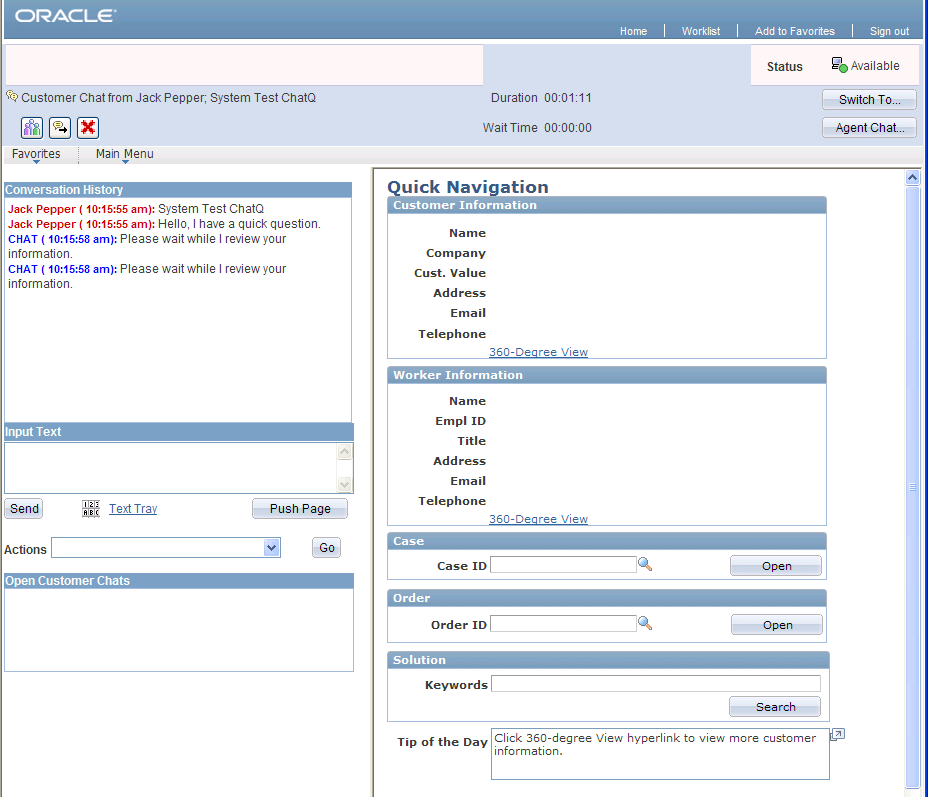
Access the chat workspace to process a chat request after accepting (manually or automatically) a chat notification on the Multichannel Toolbar.
Image: Customer to Agent Chat window
This example illustrates the fields and controls on the Customer to Agent Chat window. You can find definitions for the fields and controls later on this page.
|
Field or Control |
Definition |
|---|---|
| Agent Chat |
Click to initiate a chat session with any agent on the buddy list, whether or not the target agent is currently logged on or in an available state. Agent buddy list for chat is established in the agent configuration. |
Chat-Specific Action Buttons
|
Field or Control |
Definition |
|---|---|
 (conference chat) (conference chat) |
Click to access the Conference Chat dialog box to select an agent with whom to discuss the customer issue. |
 (forward chat) (forward chat) |
Click to access the Transfer Chat dialog box to select a queue to transfer this chat session. |
 |
Click to close this chat session. The chat window displays a drop-down list box for categorization purposes. Categorize the chat session appropriately using the values provided. |
Click the queue status to switch agent status in the Queue Status window.
Image: Queue Status window
This example illustrates the fields and controls on the Queue Status window. You can find definitions for the fields and controls later on this page.

The agent uses this window to switch to another status by clicking the appropriate icon or text description.
Access the Switch Queues window by clicking Queues... in the Queue Status window.
Image: Switch Queues window
This example illustrates the fields and controls on the Switch Queues window. You can find definitions for the fields and controls later on this page.
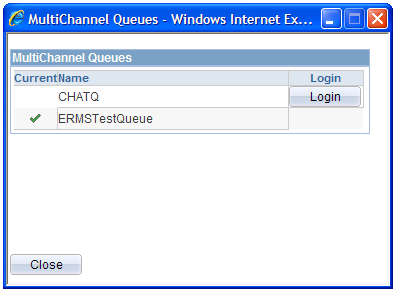
This window lists all the available queues for the logon user. The queue onto which the agent currently logs is marked by a green check mark. To switch to another available queue, click the Login button of the target queue.
Click Disconnect Toolbar or Logoff in the Queue Status window to terminate all sessions, close the application dispatcher, and log off from the server. A message appears for agents to confirm the action.
Note: If the agent wants to reactivate the toolbar and clicks Activate UAD Toolbar on a window, the system first starts the application dispatcher if it's not up already, and registers only that window session to the application dispatcher. To reactivate the toolbar in other previously terminated window sessions and register them with the application dispatcher, click Activate UAD Toolbar in each of them.