Presenting Data
This chapter covers the following topics:
- Presenting Data Analysis Results
- Using Insights Analysis
- Using Predictive Analysis
- Using Genealogy and Trace
- Viewing the Factory Command Center
Presenting Data Analysis Results
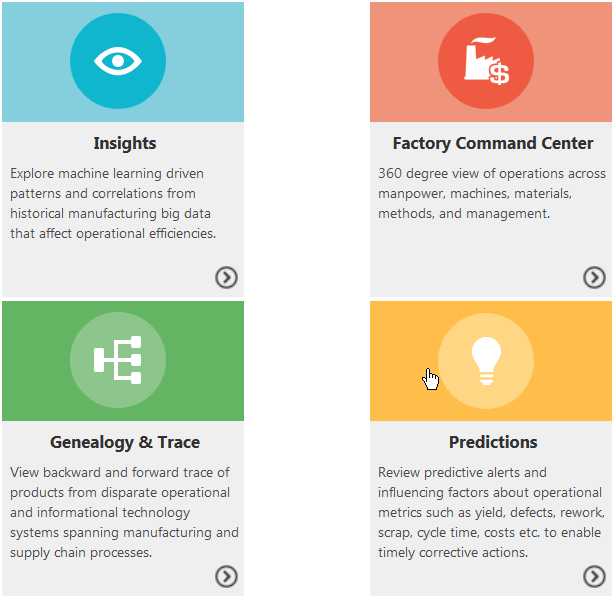
The Home page enables you to quickly navigate to the results of your data analysis of the past (Insights) or predictions of the future (Predictions). Alternatively, you can view every action on the shop floor using the Factory Command Center or view the linkages between actions and materials using Genealogy & Trace. This chapter explains the information you can gather from the data presented in these four modules.
Home page
Using Insights Analysis
The Insights page enables business users to explore published insights in order to understand the hidden factors influencing the output. Each tile on the Insights page summarizes the latest published insights for an output type (if there are no published insights for an output type, no tile displays). Output types include custom KPIs and the seeded KPIs of quality, yield, serial unit quality, and serial unit yield.
Insights page
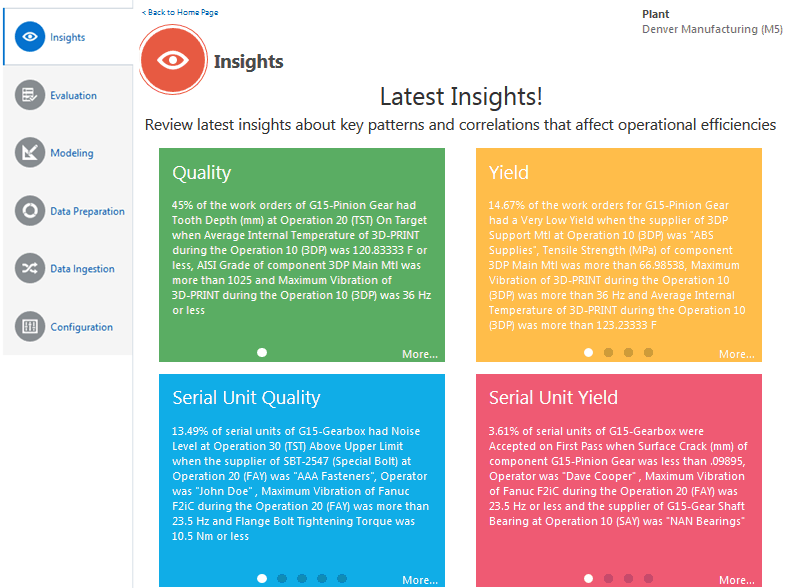
Click the text for one of the top insights shown to navigate directly to the Insight (detail) page for that insight. Click the More link for one of the output types to view the last 90 days of published insights on an Insights (summary) page.
Tip: Click the filter, then change the Published Date Range to view a time period other than the last 90 days.
Yield Insights page
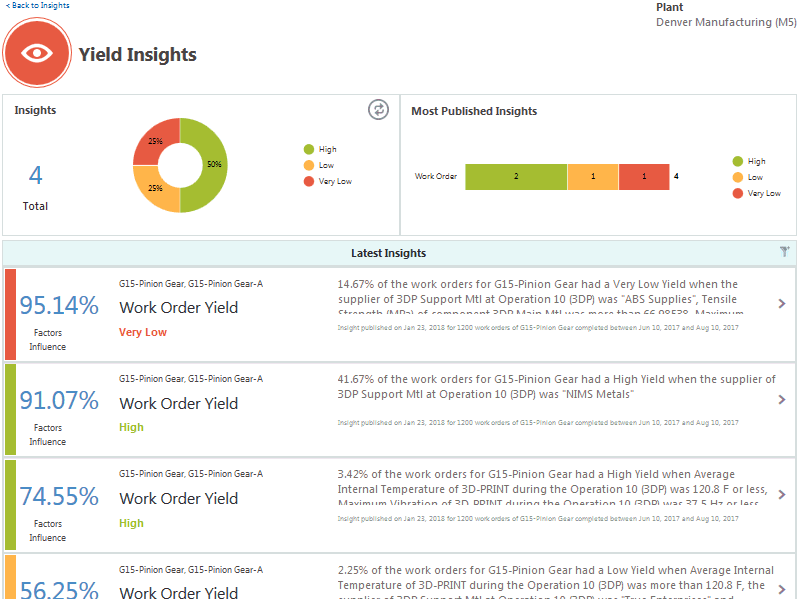
One insight model might result in multiple insights related to different output classifications. Depending on whether you are a process manufacturing, or discrete manufacturing user, you can search for insights using the following filter categories:
-
Product Category
-
Product
-
Recipe/Work Order
-
BOM Type/Revision
-
Routing Type/Revision
-
Operation
-
Target Measure
-
Insight
-
Published Date Range (defaults to the last 90 days)
The insights are listed in the order of the published date. Users can drill into each of the insights using the right arrow to understand the correlations and data distribution of the influencing factors for the output over the historical data analyzed. An example of an insight drill-down page is shown below as one page, and then displayed in two parts. This is the same page used when evaluating an insights model. See: Evaluating a Model.
Yield Insight (detail) page
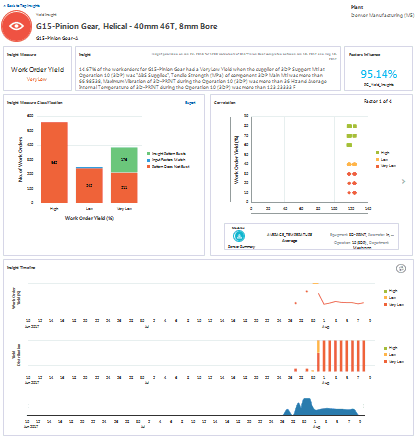
Yield Insight (detail) page, Part 1
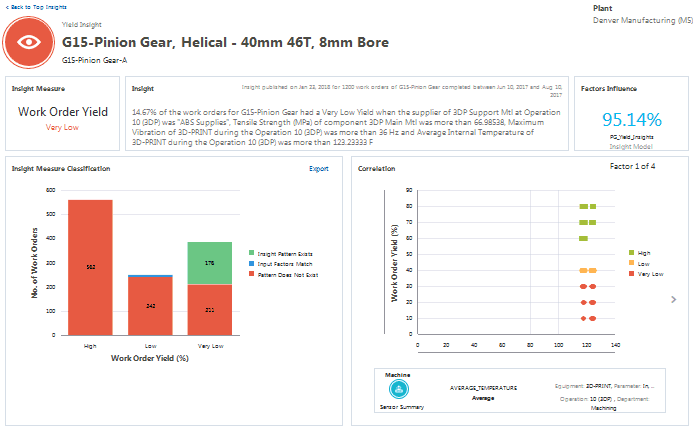
The first part of the above insight detail page displays the following:
-
Insight Measure - a short description of the insight measure, in this case Work Order Yield, and the classification of this insight measure (Very Low).
-
Insight - a written description that summarizes the insight pattern.
-
Factors Influence - the percentage of historical work orders that match the pattern out of all the historical work orders that match only the input factors.
-
Insight Measure Classification graph - shows the number of historical work orders where:
-
an insight pattern exists. The total number of work orders where the insight pattern exists (both the input factor and the insight measure or the target measure match, as per the insight). The color of the Insight Pattern Exists bar matches the insight measure defined bin color.
-
the input factors match. The total number of work orders where the input factors match as per the insight, but the target measure or the insight measure values are different from that of the insight.
-
a pattern does not exist. The total number of work orders where the input factor and the target measure values do not match with the insight.
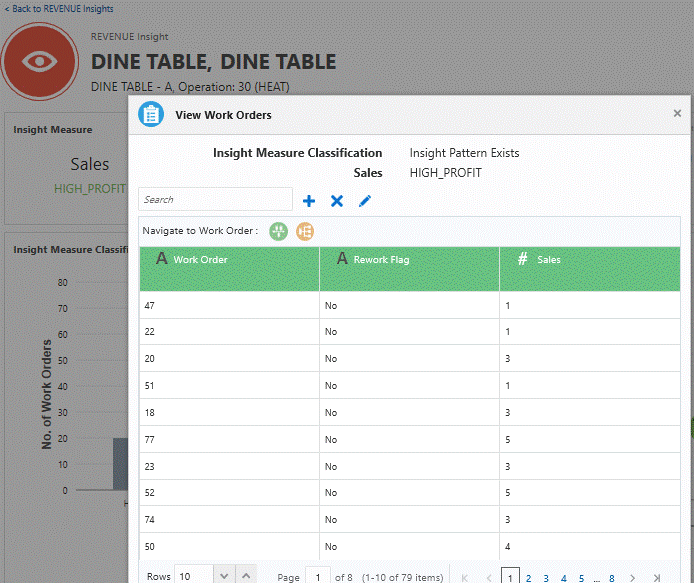
To view the history of a work order, serial number, or equipment instance:
-
Click on the number of work orders (or serial numbers or equipment instances) in one of the above Insight Measure Classification graph categories to open the View Work Orders page.
-
Optionally, use the Search field to search for a particular work order or input factor.
Use the +, X, or Edit icons to add, delete, or edit search fields.
-
Select a work order (or serial number) in the list.
-
In the Navigate to Work Order (or Serial Number) region, select either the Timeline Viewer or Network Viewer icon.
The Genealogy and Trace page opens. See: Using Genealogy and Trace
-
Yield Insight (detail) page, Part 2
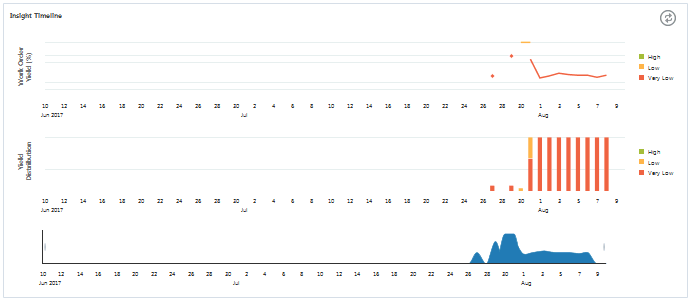
The second part of the above insight detail page displays the:
-
Correlation graph, which shows the distribution (scatter plot) between each influencing factor of the insight versus the target measure.
-
Insight Timeline, which shows the target measure value information for all work orders matching the insight along a timeline. The legend displays the target measure values with their classification labels.
Using Predictive Analysis
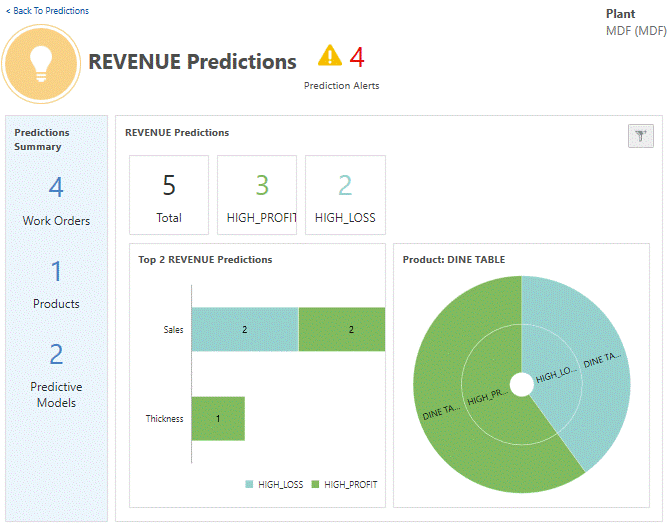
Begin using predictive analysis by clicking Predictions on the Home page. The Predictive Analysis page appears and provides a starting point for reviewing the predictions across products in a plant, for a given product, and at the level of a work order and output (quality element, operation yield, work order yield, or custom KPI) combination. Next, select predictions for one of the seeded KPIs (Quality, Yield, Serial Unit Quality, or Serial Unit Yield), or predictions for a custom KPI.
Predictive Analysis page
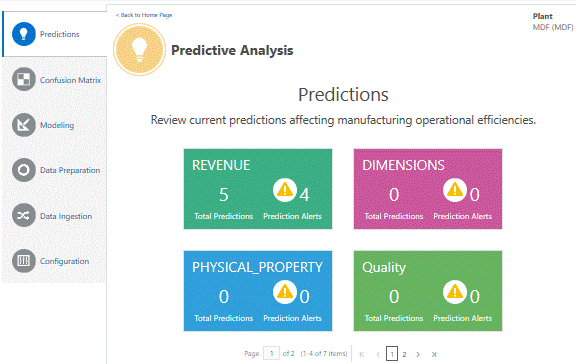
Each Predictions page provides the following overview information for their type of prediction. Each type of Predictions page consists of two regions, both of which compile overview information for multiple predictions models, if more than one model is deployed. The two regions are:
-
Predictions Summary.
-
KPI Predictions, depending on the type of prediction selected.
The two regions are described below.
Predictions Summary
-
Work Orders - the number of in process work orders for which the predictions models are running.
-
Products - the number of products for which the predictions models are running.
-
Predictive Models - the number of predictive models deployed and running.
-
Serial Units (if applicable) - the number of individual serial units for which the predictions models are running.
KPI Predictions
-
Total - the total number of predictions of this type for all products and all deployed models.
-
Various classification predictions.
-
Top KPI Predictions.
-
Top Product Predictions.
Tip: Use the Filter icon to view only certain predictions. Filter by:
-
Product category
-
Product
-
Operation
-
Target measure
-
Prediction (of a particular predefined classification label).
-
Status (of work orders). The Predictions page displays work orders with a status of In Process by default.
View up to one month of completed or closed work orders.
-
Prediction with Alerts Only
Example of a KPI Predictions page
In the KPI Predictions region, click a prediction number or chart point to view a list of the specific work orders or serial units predicted.
Tip: Use the Filter icon to view only certain work orders or serial units. Filter by:
-
Product category
-
Product
-
Operation
-
Target measure
-
Prediction (of a particular predefined classification label).
-
Status (of work orders). The Predictions page displays work orders with a status of In Progess by default.
View up to one month of completed or closed work orders.
-
Prediction with Alerts Only
Revenue Predictions of High_Profit
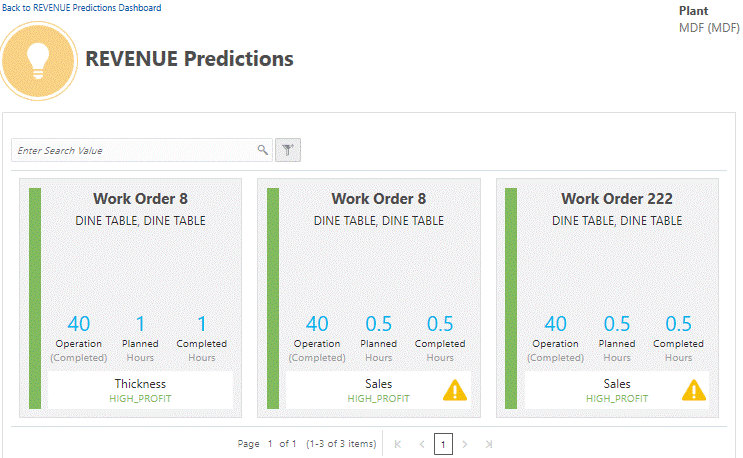
Additional Information: Predictions for work orders from case record data only specify whether the work order operation is In Progress or Completed.
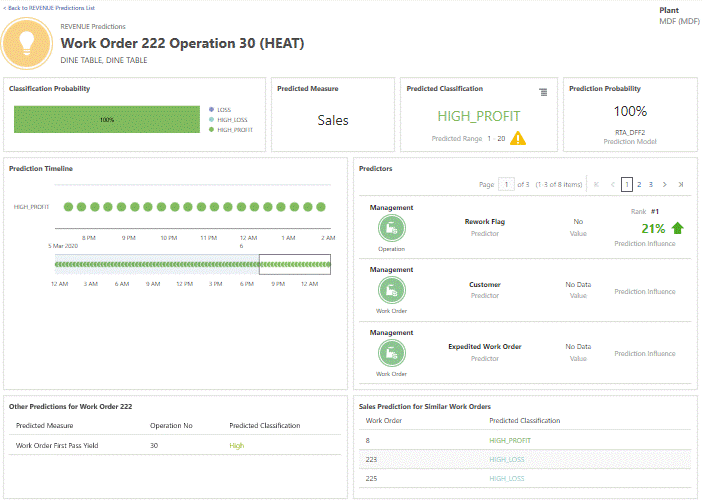
Click on an individual work order or serial unit to view the prediction details. Prediction details include:
-
Classification Probability - The probability of each classification occurring for this work order.
-
Predicted Measure - The predicted measure displays the display name of the target element used in the prediction model.
-
Predicted Classification - Displays the current predicted classification. Click the Actions icon to display a pop-up list of all prediction classifications.
-
Prediction Probability - The probability of the predicted measure falling within the predicted classification.
-
Prediction Timeline - Displays the prediction values over a selected time range.
-
Predictors- Displays the percentage of the influence that each predictor had on the probability of the predicted measure. It can be positive or negative.
-
Other Predictions - Displays the predictions for other predicted measures if there are any models built with the same context operation but with a different predicted measure.
-
Prediction for Similar Work Orders (or Serial Units)- View other Pending or In progress work orders or serial units to see how the same model predicts the same predicted measure for the other work orders or serial units.
Work Order Prediction Detail page
Viewing Predictor Details
From the work order or serial number prediction details, select a predictor to access the Predictor Details page. This page explains the distribution of the predictor data from the training data set and the related statistics. Regions on the page include:
-
Prediction - displays the predicted classification and the related context for the predicted output. The context includes output, the product item, work order or serial unit, operation, and department.
-
Predictor - displays the predictor display name and context. The context for the predictor includes the category, subcategory of the predictor, and the parameters related to the context. For example, for the resource usage, the context parameters include resource information at the first level, then operation and activity information at the second level.
-
Value - displays the absolute value for the predictor for the currently running work order or serial unit, the range this predictor falls within the model, the prediction influence, and rank.
-
Historical Dataset - Refers to the data set that matches the context criteria. The model building process excludes records with no output.
-
Predictor Details - The feature significance model supplies the descriptive statistics of the predictor. Therefore, predictor details only display if the predictor is chosen as the significant feature through a deployed feature significance model. The descriptive statistics like min, max, mean, mode, quartile ranges, and so on, are displayed for the predictor. For more information about the descriptive statistics, see: To evaluate a feature significance model in Evaluating a Model.
-
Predictor Histogram - Displays the total number of work orders or serial units for each predictor value range. A gray box highlights the range which contains the current predictor value.
-
Predictor Matches - Displays the distribution of the predictor data by prediction classification. The information displayed includes:
-
The total number of work orders or serial units.
-
The number of work orders or serial units that fall within a predictor range.
-
The number of work orders or serial units that match a predictor absolute value.
-
-
Predictor Detail page

Using Genealogy and Trace
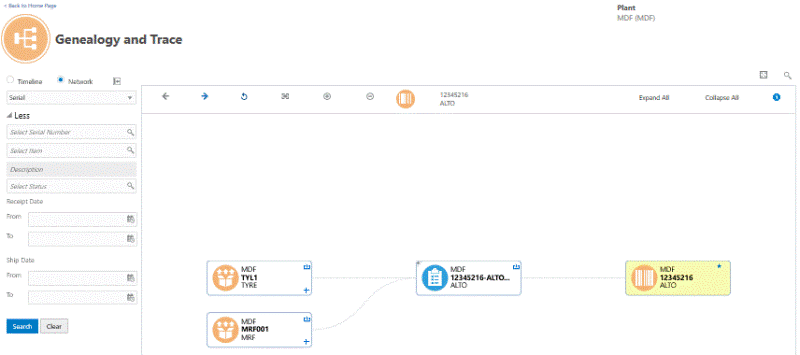
The Genealogy and Trace page enables you to navigate through the entire history of a work order, serial number, equipment instance, or lot using a Timeline Viewer. Events that appear in the timeline in relation to an entity include Enterprise Resource Planning (ERP) events related to work orders, purchase orders, sales orders and other logistical movements of entities, and events captured by sensor devices.
Genealogy and Trace also includes a Network Viewer, which traces the history of item lots and serial units from their inception to their current location within and across organizations. Every action performed on the entities through their journey is mapped. Users can drill down into the details of a relationship between two nodes in a genealogy, details of participating entities, and genealogies of all the participating entities. You can launch a genealogy by providing a purchase order, lot, serial number, work order, sales order, or a user defined entity. Using the two viewers together enables users to quickly isolate the event or material that resulted in a quality issue and/or a yield loss in a finished product.
You can extend the timeline and network viewer by adding new types of events or entities using REST services. Customize a timeline event in the following ways:
-
Choose the type of entity for which the event occurs, the entity name, and the manufacturing plant (for example, Work Order, Work Order Number and Organization Code).
-
Specify text that describes the event.
-
Specify the date on which the event occurs.
-
Choose an icon and its background color to visually represent the new event. Choose from the icons listed in Icon Mapping.
-
Choose the text font and color to use when displaying the event node.
-
Specify the details of the event to display when a user right clicks on an event node and selects Show Details.
Customize a node or entity in the Network Viewer by:
-
Choosing the type of entity that the node represents and its code (for example, Lot, Work Order, Lot Number and Work Order Number).
-
Choosing the inventory item associated with the entity.
-
Entering text to describe the node.
-
Selecting an icon for the node (only required if the entity is user defined).
-
Choosing the text font and color to use when displaying the network node.
-
Specifying the details of the entity to display when a user right clicks on a network node and selects Show Details.
-
Adding user defined indicator icons for use in Network Viewer entity nodes. Choose from the indicator icons listed in Icon Mapping.
-
Use object types above 100 for user defined entities.
-
Review the following two inbound web service sets in Overview of Oracle Adaptive Intelligent Apps for Manufacturing REST Web Services to understand how you can customize an event:
-
Custom events for Timeline Viewer.
-
Custom nodes for Network Viewer.
-
To use the Timeline Viewer
The Genealogy and Trace page presents the timeline history in a split screen, with machine and custom event data displayed in the bottom half of the screen. Events related to a work order, equipment, serial number, or lot are captured directly by machines and display in the bottom half. ERP events display in the top half. Different icons represent each event type. See: Icon Mapping.
-
Navigate to the Genealogy and Trace page. Click the Search icon. Select Timeline.
-
In the Select Entity field, select Work Order, Equipment, Serial, or Lot.
A search criteria region appears.
-
Enter your search criteria, then click Search.
-
Select an entity from the search results.
A timeline view of all events associated with the entity appears. The timeline extends over the entire period of events. For example, if all of the events in a work order occur in a 4 hour window, the timeline extends to this entire duration, with scaling in hours. For equipment, the timeline initially displays one week, but you can change the start and finish dates at the top of the timeline as needed. A lot or serial timeline, like a work order timeline, displays the entire history of the serial unit or lot.

-
Optionally, adjust the timeline to zoom in or out on a time period. Perform this adjustment by moving the left and right ends of the lower region timeline slider. You can also drag your view of events to the left or right.
Additional Information: The timeline slider uses boxes to represent the concentration of events along the timeline. In the upper section of the timeline, scroll up, down, left, and right to view all events, if necessary.
-
Optionally, select an event or entity, right click, then select Show Details.
-
For all entities, you can right click to View Network or View Serial Timeline, if the entity selected is a serial assembly.
-
For a serial entity, you can also right click to View Serial Timeline. The timeline opens to the same point in time, but only displays events relevant to the serial number.
-
For an equipment entity, you can also right click to View Equipment Timeline. The timeline opens to the same point in time, but only displays operations and events relevant to the equipment. If multiple equipment instances exist, all instances appear above the timeline. Select one of the instances to view in the timeline.
-
For equipment entities, operations appear in the top half of the timeline, while events and alerts appear in the lower half.
-
For a lot entity, you can also right click to View Lot Timeline from the inception to the consumption of the lot. Examples of lot timeline events include receipt to stores, RMA return, miscellaneous receipt/issue, WIP issue, WIP completion, and lot translate.
-
Events do not appear on the timeline if the events occur in an organization for which you do not have access.
-
If more than one event occurs at the same time, the events appear stacked. The number of stacked events displays in the lower right corner of the top event. Click this number to expand the view of all events.
-
-
Optionally, narrow the list of entities and events shown on the timeline by selecting the operations or types of events to display at the top of the timeline.
-
For work orders, select the operations and types of events.
-
For equipment, serial, and lot numbers, select the types of events.
-
To use the Network Viewer
Network Viewer enables you to trace a serialized or lot controlled item from a supplier, through its consumption in a manufacturing work order, to its shipment to a customer. Access the Network Viewer from a selected entity in the Timeline Viewer or directly from the Genealogy and Trace page.
Warning: The Network Viewer appears blank when viewed with Microsoft Internet Explorer. Use another supported browser. See: Supported Browsers, Oracle Adaptive Intelligent Apps for Manufacturing Data Ingestion User's Guide.
-
Navigate to the Genealogy and Trace page. Click the Search icon. Select Network.
-
In the Select Entity field, select Lot, Serial, Work Order, Purchase Order, Sales Order, or User Defined.
A search criteria region appears.
-
Enter your search criteria, then click Search.
Note: For entities with a large list of values, you can not view any values unless you narrow the list of values by entering search criteria.
-
Select an entity from the search results.
Once the genealogy of an entity appears, the entity itself is highlighted yellow. You can navigate through the genealogy and drill into the details of all participating entities. Whenever you perform a navigation action on a different entity, that entity is identified by a star in the top right corner. So, at any given time, you can identify the entity at the current center of analysis (the entity with the star) and the original entity (the entity highlighted yellow).
Additional Information: A red work order indicates scrap produced.
-
Optionally, right click on an entity and select one of the following options:
Note: Options vary depending on the type of entity selected.
-
Show Details - displays entity header information, including alerts.
-
View Work Order, Equipment, Lot, or Serial Timeline - displays the Timeline Viewer.
-
Show Parent and Child Nodes Only - shows all entities directly related to the entity with a star.
-
Highlight Parent and Child Nodes - displays all nodes, but indirectly related nodes are grayed out.
-
Show Adjacent Nodes Only- displays only the entities immediately before and after the entity with a star.
-
Unhide Adjacent Nodes - reveals nodes adjacent to visible nodes when the hidden, adjacent nodes were either not part of the original genealogy retrieved or were hidden when an option such as "Show Parent and Child Nodes only" was used.
-
Show Entire Network - comprehensively explodes through the entire supply chain, showing all nodes connected to the selected node.
-
-
Notice the following types of lines that connect the entities in a network:
-
Solid black - the entities have a direct relationship to each other. For example, a solid black line connecting a purchase order to multiple serial numbers indicates that the serial numbers were purchased with that purchase order.
-
Dotted - the entities have some sort of relationship, but you must further expand the entities shown to understand the relationship. For example, a serial number may have a relationship with a work order, but you can only see that a parent serial number was used to make a child serialized assembly once you expand the work order.
-
Solid red - indicates an item return.
Additional Information: A link to a lock icon labeled “No Access” indicates a transfer to an organization that is inaccessible to the user.
-
-
Optionally, right click on a connecting line to view the transaction details.
-
To display the object type of an entity, hover over the entity's icon.
-
Optionally, expand entities with a plus sign next to them. An expanded purchase order, for example, might display multiple lots. An expanded lot might display all of the serial items contained in the lot.
-
Use the Expand All and Collapse All links in the upper right corner of the page to expand or collapse all entities at once.
-
Use the Control Panel icon in the upper left corner of the page to zoom in, out, or to fit the view to the page.
-
Use the Backward, Forward, and Refresh icons in the upper left corner of the page to view previous or next pages and to reset the view to where you started.
-
A serial number displayed as a stack of cards indicates that multiple serial numbers of the same item have a relationship with the selected entity.
-
Note: If you are using Business Entity Data, the information you can view for process manufacturing and discrete manufacturing organizations in the Genealogy and Trace module depends on the Business Entity Data ingestion method.
The following table displays the information associated to the Genealogy and Trace module that is supported and not supported for both process manufacturing and discrete manufacturing organizations, depending on the Business Entity Data ingestion method you use:
| Genealogy and Trace | Information | Support Using CSV file Upload | Support Using REST Web Services Upload |
| Network | Node Details (Some of the Details attributes) | No | No |
| Internal Orders | No | Yes | |
| Equipment Timeline | Maintenance Events | No | No |
| Serial Timeline (Some of the Details attributes like Subinventory and so on.) | No | No | |
| Subinventory Transfers | No | Yes |
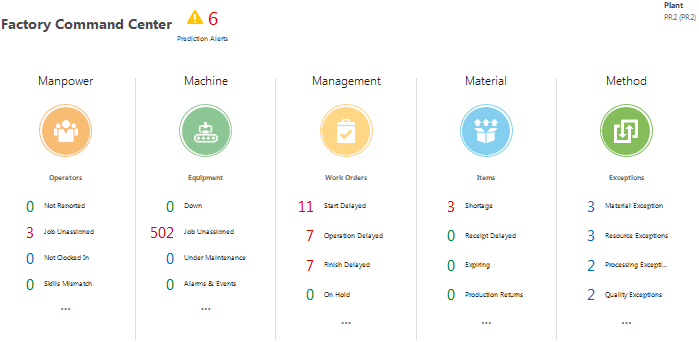
Viewing the Factory Command Center
The Factory Command Center displays a real-time overview of factory events, categorized into the 5 Ms of the factory: manpower, machines, materials, management, and methods, which are all linked to shop floor work orders. These are the same categories by which predictors are grouped in the Insights and Predictions modules and there is a continuous correlation between the current factory status and predictions of future events at any given time.
The Factory Command Center enables you to view at a glance the numerical information for the seeded key performance indicators (KPIs) listed under each category of Manpower, Machine, Management, Material, and Method on a single page. The numerical values are color coded to indicate a positive (green), neutral (blue) or negative (red) value. You can customize KPIs in each category as described below using REST web services:
-
Add custom KPIs.
-
Reorder KPIs according to priority and relevance.
-
Hide KPIs that hold no significance to your organization.
See REST Web Services for more information.
From the Factory Command Center, click Manpower, Machine, Management, Material, or Method to view details of each of the 5 Ms of the factory.
Apart from showing the key performance indicators (KPIs), the Factory Command Center also displays the total number of prediction alerts that exist for the plant at the top. The information on this page is shown in the context of the specific plant (and, potentially, the department) selected in the User Preferences.
Factory Command Center
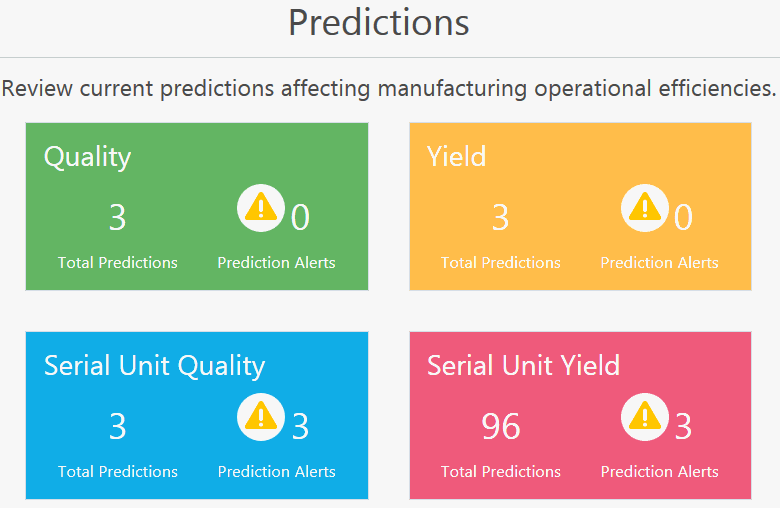
Viewing Predictions
The number of Prediction alerts that display at the top of the Factory Command Center indicate the total number for the plant/organization selected on the User Preferences page. See Setting Up User Preferences for more information.
From the Factory Command Center, click Prediction Alerts that appears at the top of the page. The Predictions page appears, which groups the alerts into the seeded and user defined Key Performance Indicators (KPIs) according to the display sequence setup from the KPI definition.
Predictions page
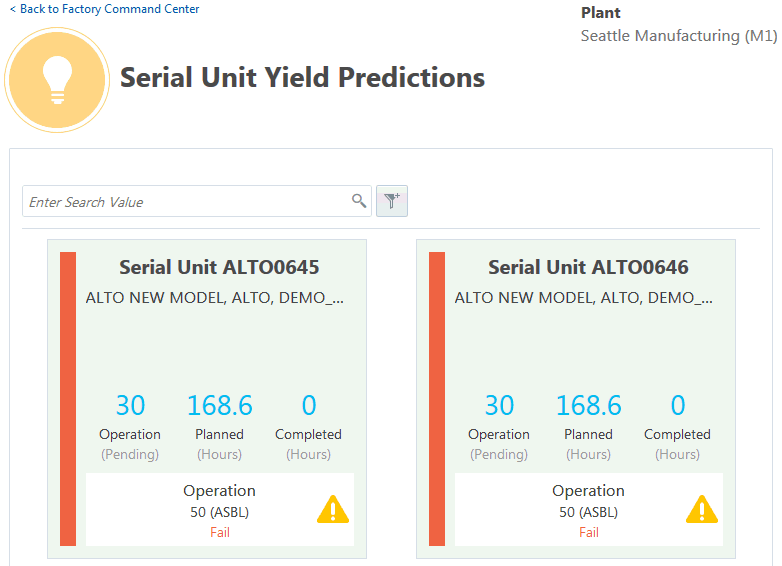
At this point, you have left the Factory Command Center and navigated to the Predictions module. See Using Predictive Analysis for more information about the Predictions module. You can click the prediction alerts for each of the above categories to see details, but, from the Serial Unit Yield Predictions page, for example, you can also click the Back to Factory Command Center link to return to monitoring the factory status.
Yield Predictions page
Viewing Manpower
The Factory Command Center displays the numerical values for the following KPIs listed under the category of Manpower. These KPIs enable you to monitor personnel on the shopfloor:
-
With Prediction Alert: Number of operators who are currently assigned or clocked in for work orders which have prediction alerts.
-
Total: Number of operators in the plant or department, if specified, for the current work shifts.
-
Not Reported: Number of operators who have not reported for work shifts.
-
Job Unassigned: Number of operators who have not been assigned or associated with any of the currently running open work orders
-
Not Clocked in: Number of Operators who are not clocked-in to any of the currently running open work orders.
-
Skills Mismatch: Number of clocked-in operators of the currently running open work orders whose skill set defined in the human resource system does not match the required skills for the job operation defined in the production execution system.
-
Clocked in: Number of operators who are clocked-in to any of the currently running open work orders.
Click any of the above KPIs to filter the list of operators working by KPI in the Manpower page. To filter by another KPI, click a KPI listed on the left side of the Manpower page.
Tip: You can also sort information using the following Sort By options: Full Name or Step completion date.
The Manpower page displays the last and first name of the operator, the option to email the operator, and the operator status. The equipment description or equipment number and job description or number of jobs for which they are clocked in also displays.
Manpower page

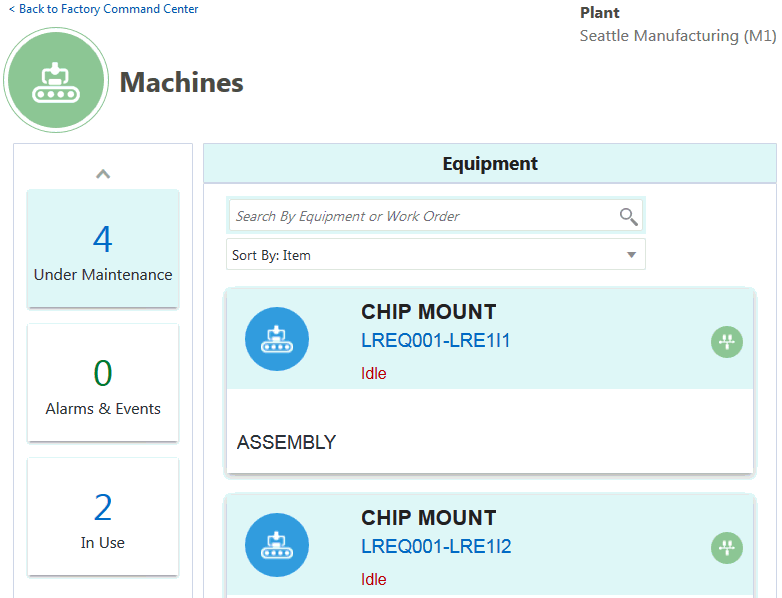
Viewing Machines
The Factory Command Center page displays the numerical values for the following Machine KPIs, which enable you to monitor equipment on the shopfloor:
-
Down: Lists the equipment currently down or not providing event information.
-
Job Unassigned: Equipment without a work order operation assigned.
-
Under Maintenance: Equipment with open scheduled maintenance work requests.
-
Alarms & Events: Equipment with alarms, such as vibration spike, temperature spike, humidity spike or other events, such as machine door open/closed, machine power up/power down, machine up/down, or job started/job paused/job resumed/job completed within the configured display window time.
Additional Information: You can specify the last number of hours over which to show the alarms that occurred by entering a value in the User Preferences page, Alarms last N hours field. See Defining User Preferences for more information.
-
In Use: Equipment currently running and providing event information.
-
Total: Total equipment and equipment instances within the plant and selected department, if any.
-
With Prediction Alert: Lists equipment with currently assigned work order operations that have prediction alerts.
Click any one of the KPIs to view details in the Machine page. To view details of another KPI, click a KPI listed on the left side of the Machine page.
Tip: You can sort information for a KPI in the Machine page using the following Sort By values:
-
Item
-
Work Order
-
Equipment
-
Completion date
Filter information by equipment or work order using the Search By field.
The Machine page displays each equipment instance as an individual tile. The header of each tile includes the machine/resource name and instance name. Other possible tile information includes:
-
Alarm/event
-
Equipment instance status (up, down, in use, etc.)
-
In process product currently in production
Machines page
Viewing Management
The Factory Command Center displays the numerical values for the KPIs listed under the Management category, which enable you to monitor work orders currently in process on the shopfloor. Additionally, you have the option to include work orders that are:
-
due to start soon.
-
delayed beyond a certain number of hours.
-
recently completed.
Include future, delayed, and completed work orders by setting the following parameters in the User Preferences page. See Setting Up User Preferences for more information.
-
Pending Work Order Time Fence (days): Display all work orders scheduled to start within the number of days specified in this field.
-
Delay Tolerance (hours): Display all work orders delayed beyond their scheduled start time plus the delay tolerance specified in this field.
-
Completed Work Order Time Fence (days): Display all work orders completed within the past number of days specified in this field.
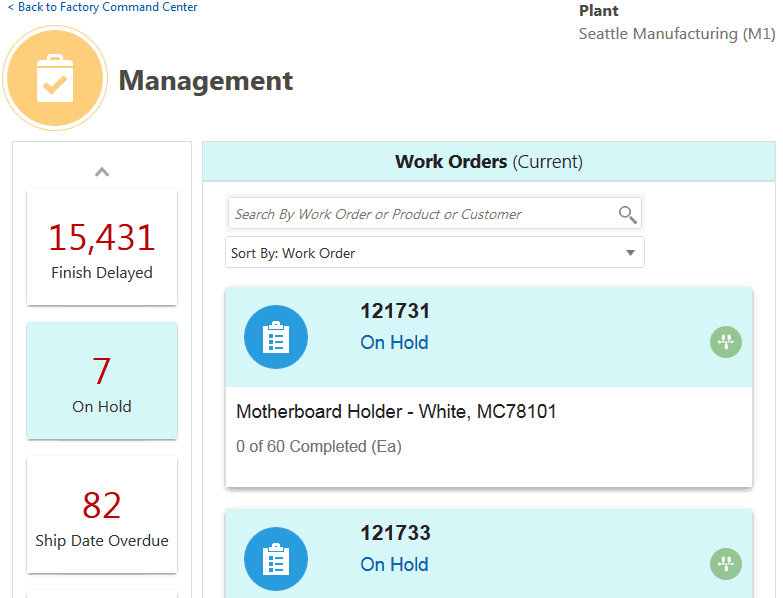
The Factory Command Center displays the following KPIs:
-
Start Delayed: Number of work orders not started that have a scheduled start date/time in the past and greater than the delay tolerance.
-
Operation Delay: Number of work orders with any operation not started that have a scheduled completion date/time in the past and greater than the delay tolerance.
-
Finish Delayed: Number of work orders with a scheduled completion date/time in the past and greater than the delay tolerance.
-
On Hold: Number of work orders with the status On Hold.
-
Ship Date Overdue: Number of work orders with a reserved sales order ship date/time in the past and greater than the delay tolerance.
-
Pending Inspection: For Discrete Manufacturing, this includes the number of work orders with any operation that has a shop floor status of Pending Inspection. For Process Manufacturing, this includes the number of samples with a status of Pending Testing.
-
Quality Issues: Number of currently running open and recently completed work orders with rejected and/or scrap quantities.
-
Total: Number of currently running open work orders.
-
With Prediction Alerts: Number of currently running open work orders that have prediction alerts.
Click one of the KPI to view details in the Management page. To view details of another KPI, click a KPI listed on the left side of the Management page.
Tip: You can sort information for a KPI in the Management page using the following Sort By values:
-
Work Order
-
Due Date
-
Product
-
Customer
Filter information by work order, product, or customer using the Search By field.
The Management page displays the following details for a work order:
-
Work order number.
-
Work order status of In Progress (blue), On Hold, Start Delayed, or Finish Delayed (the last three statuses appear in red).
-
Work progress status of On Track (blue), Start Delayed, Finish Delayed, or Operation Delayed (the last three statuses appear in red).
-
Work order scheduled completion date and time, which appears in red if the work progress status is Finish Delayed.
-
Item description and item number.
-
Work Order Quantity, indicating the completed quantity out of the total start quantity.
Each work order tile on the Management page includes a Genealogy and Trace icon. Click this icon to view detailed lot and genealogy information about the work order in the Genealogy and Trace page.
Management page
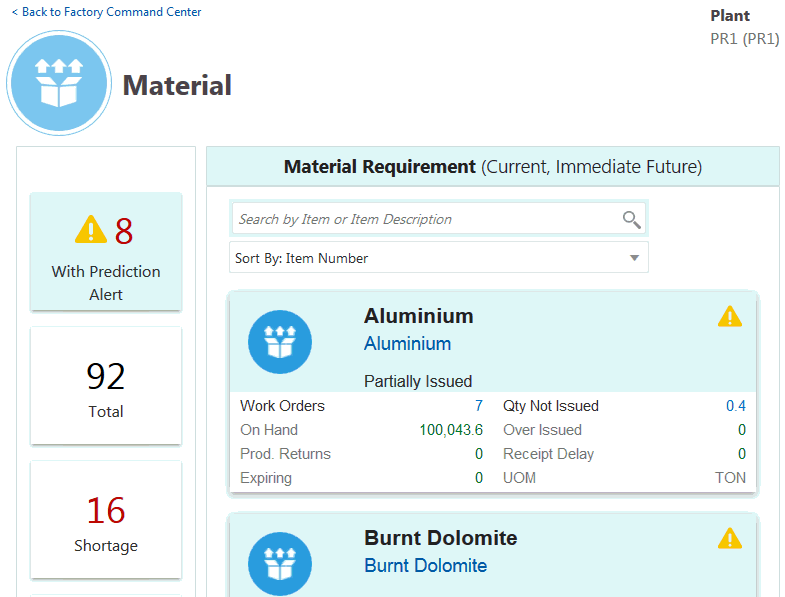
Viewing Material
The Factory Command Center displays the numerical values for the following KPIs listed under the Material category, which enable you to monitor items on the shopfloor.
-
Shortage: Number of components/ingredients of any currently running open work orders for which the remaining quantity to be issued is greater than the on hand quantity available for production.
-
Receipt Delayed: Number of components/ingredients with currently pending PO receipts that are past due beyond the Receipt Delay Tolerance (See Setting Up User Preferences for more information).
-
Expiring: Number of components/ingredients which are set to expire within the Expiration Time Fence (See Setting Up User Preferences for more information).
-
Production Returns: Number of components/ingredients returned from currently running open and recently completed work orders within the WIP Return Time Fence (See Setting Up User Preferences for more information).
-
Unallocated: Number of components/ingredients in any currently running open work orders for which the remaining quantity to be issued has not been allocated.
-
Total: Number of components/ingredients related to the currently running work orders.
-
With Prediction Alerts: Number of components/ingredients related to the currently running work orders that have prediction alerts where a component/ingredient parameter is a predictor.
Click a KPI to view details in the Material page. To view details of another KPI, click a KPI listed on the left side of the Material page.
Tip: You can sort information for a KPI in the Material page using the following Sort By values:
-
Item Number
-
Item Description
-
Shortage
-
Expiring
Filter information by item or item description using the Search By field.
The Material page displays the following details for components/ingredients:
-
Item Number
-
Item Description - appears in blue if the job status is In Progress or Released and in red if the job status is On Hold.
-
Component/ingredient issue status of Fully Issued (green), Shortage (red), or Partially Issued (black).
-
Work Orders - number of currently running open work orders that use the component/ingredient.
-
Qty Not Issued - quantity of the specific component/ingredient not yet issued for the operations/steps requirements in all currently running open work orders.
-
On Hand - quantity of the specific component/ingredient available in Inventory for production (including already allocated).
-
Over Issued - excess quantity of the specific component/ingredient issued for the operations/steps requirements in all currently running open work orders.
-
Prod. Returns - quantity of the specific component/ingredient currently issued and returned from currently running open and recently completed work orders within the WIP Return Time Fence.
-
Receipt Delay - quantity of the specific component/ingredient with currently pending PO receipts that are past due beyond the Receipt Delay Tolerance.
-
Expiring - quantity of the specific component/ingredient set to expire within the Expiration Time Fence.
-
UOM - the primary unit of measure of the specific component/ingredient.
Material page
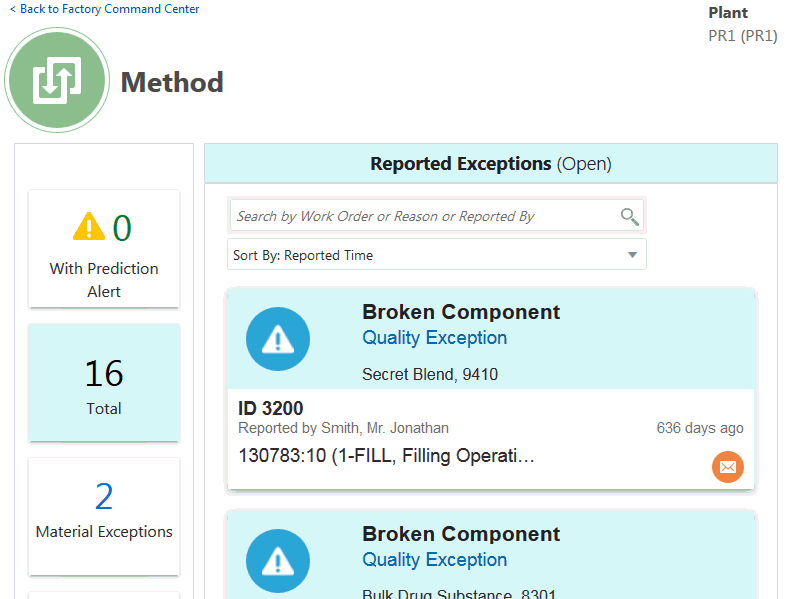
Viewing Method
The Factory Command Center displays the numerical values for the following KPIs listed under the Method category, which enable you to monitor exceptions on the shopfloor.
-
Material Exceptions.
-
Resource Exceptions
-
Processing Exceptions: The number of open exceptions of the type In Process/Assembly Exception.
-
Quality Exceptions
-
Other Exceptions
-
Total: The number of all types of open exceptions.
-
With Prediction Alerts: The number of exceptions related to the currently running work orders that have prediction alerts.
Click a KPI to view details in the Method page. To view details of another KPI, click a KPI listed on the left side of the Method page.
Tip: You can filter information for a KPI in the Method page using the following Sort By values:
-
Reported Time
-
Item Number
-
Reported By
-
Work Order
The Method page displays the following details for open manufacturing operation/step execution related to currently running open work orders:
-
Exception reason
-
Exception type
-
Exception details, such as:
-
Resource Exceptions: Resource Instance Name, Number of the Equipment or Operator Name in the case of an Operator Resource Exception.
-
Material Exception: Item or Component/Ingredient Description, and Number
-
Processing Exception: Assembly/Product/Recipe Description and the number of the context work order
-
Quality Exception: Assembly/Product or Component/Ingredient Description, and the number of the context work order
-
Other Exception: Assembly/Product/Recipe Description, and the number of the context work order
-
-
Person who reported the exception
-
Time elapsed since reporting the exception
-
Exception Identifier/Number
-
Context Work Order:operation seq/step(operation code, operation)
-
Email icon, which opens the email application and defaults the email To field with the email ID of the person who reported the exception, the Subject field with the Exception ID, Exception Type, Exception Reason, and the email body with all the information given for the open exception.
Method page
Note: Support for KPIs for the 5 Ms in the Factory Command Center depends on the Business Entity Data ingestion method you are using to import the data.
The following table displays the KPI and the KPI tile attribute associated to each M of the Factory Command Center that are supported and not supported for process manufacturing organizations, depending on the Business Entity Data ingestion method:
| Factory M | KPI | KPI Tile Attribute | Support Using CSV file Upload | Support Using REST Web Services Upload |
| Management | Ship Date Overdue | No | No | |
| Pending Inspection | No | No | ||
| Quality Issues | No | No | ||
| Material | Shortage | No | No | |
| Receipt Delayed | No | No | ||
| Expiring | No | No | ||
| Onhand | No | No | ||
| Component Summary Status | No | No | ||
| Method | Exception Reported By | No | Yes | |
| Resource (Person) Exception | No | Yes | ||
| Reason | No | Yes | ||
| Manpower | No | Yes | ||
| Machine | Under Maintenance | No | No |
The following table displays the KPI and the KPI tile attribute associated to each M of the Factory Command Center that are supported and not supported for discrete manufacturing organizations, depending on the Business Entity Data ingestion method:
| Factory M | KPI | KPI Tile Attribute | Support Using CSV file Upload | Support Using REST Web Services Upload |
| Management | Ship Date Overdue | No | No | |
| Pending Inspection | No | No | ||
| Material | Shortage | No | No | |
| Receipt Delayed | No | No | ||
| Expiring | No | No | ||
| Onhand | No | No | ||
| Component Summary Status | No | No | ||
| Method | Exception Reported By | No | Yes | |
| Resource (Person) Exception | No | Yes | ||
| Reason | No | Yes | ||
| Manpower | Skills Mismatch | No | No | |
| Not reported | No | Yes | ||
| Not Clocked in | No | Yes | ||
| Machine | Under Maintenance | No | No |