Managing Security and Access Control
This chapter covers the following topics:
- Managing User Roles and Access
- Creating and Managing Users
- Setting Up Your IDCS User Profile
- Defining User Preferences
Managing User Roles and Access
Oracle Adaptive Intelligent Apps for Manufacturing uses the following application persona and roles in process or discrete manufacturing to access the four modules, namely Insights, Predictions, Genealogy and Trace, and Factory Command Center, as well as the Setup page:
-
Business User
-
Data Analyst
-
Data Scientist
-
Application Administrator
These persona have access to the application modules, features and data relevant to their role. Based on their roles they have access to perform the following functions:
Metadata Extraction and Data Preparation
The data analyst and data scientist can perform the following functions related to extracting metadata and preparing the data:
-
Extract feature metadata to analyze the production quality or yield for a given product, recipe or bills of material (BOM), and routing operation context.
-
Use the Key Performance Indicators page to create and manage key performance indicators.
-
Use the Time Series Features Sets page to create and manage time series features sets.
-
Use the data preparation support for out of box seeded features from structured data (imported through various methods of data ingestion) and configurable Time series data (equipment sensor summaries).
-
Use Feature Significance models to find the most significant features, and rank features using the Chi-Square or the Random Forest Classifier algorithms.
-
Use Feature Significance model feature rankings information to select features when building Insight and Prediction model definitions.
Model Building for Predictions and Insights
The data analyst and data scientist can perform the following functions related to model building for predictions and insights:
-
Build Prediction and Insight models using features for process or discrete manufacturing.
-
Define analysis models using a simple and visually rich wizard.
-
Build Insight models using the Apriori algorithm (Association Rules) or the Decision Tree Classification algorithms.
-
Build Prediction models using the Support Vector Machine or the Decision Tree Classification algorithms.
Model Evaluation and Publication
The data analyst and data scientist can perform the following functions related to evaluation and publishing models:
-
Evaluate how much each feature influences target measure results. Use the most significant features to create your Insights and Predictions models.
-
Evaluate the insight patterns and rules generated and deploy the insights model, enabling collaboration with business analyst and users.
-
Evaluate prediction models using the confusion matrix and deploy the right model for production use.
Predictive Analysis
The business user, data analyst, and data scientist can perform the following functions related to predictive analysis:
-
View classified predictions of the KPI targets such as production quality elements, production yield or cycle time at the work order and operation level.
-
Comprehensively understand the influencing predictors by visualizing the statistics generated on the training data set (Descriptive Stats, Histogram and Box plot).
-
Take corrective actions to improve KPI targets using predictions early in the production cycle.
-
Leverage support for the historical data analysis of the following use cases:
-
Analyze target measure of quality, yield, or custom KPI for Process Manufacturing.
-
Analyze target measure of quality, yield, or custom KPI for Discrete Manufacturing.
-
Analyze target measure of quality, yield, or custom KPI for Discrete Serialized Manufacturing.
-
Historical Data Analysis
The business user, data analyst, and data scientist can perform the following functions related to historical data analysis:
-
Discover hidden patterns between the influencing factors and target measure for quality, yield, or custom KPIs.
-
Visualize insights in an easy-to-understand format.
-
Comprehensively understand influencing factors by visualizing the correlations and distributions with the target measure.
-
Leverage support for the historical data analysis of quality, yield, or custom KPIs in the following manufacturing scenarios:
-
Process manufacturing
-
Discrete manufacturing
-
Discrete serialized manufacturing
-
Factory Command Center
The business user and data analyst can monitor the following functions using the Factory Command Center:
-
Monitor the 5M facets of the factory: Manpower, Machine, Management, Material, and Method from a single page.
-
Track key metrics for each category.
-
Monitor and resolve alerts, exceptions and errors as they occur in near real time.
-
Access details (like equipment, work orders, and items) underlying each category, evaluate the status (such as machine down, work order delayed, and operator unassigned) and the supporting numbers and reasons.
-
View prediction alerts for the monitored entities. Navigate to the predictive analysis module to further evaluate the prediction and underlying statistics.
Genealogy & Trace
The business user and data analyst can perform the following functions related to genealogy and trace:
-
View time lines of:
-
a work order to review work order operations, operators, process exceptions, components used, quality test results, machine alerts and parametric data related to the machine.
-
a machine to review work order exceptions, maintenance events and schedules, machine alerts and parametric data related to the machine.
-
a serial unit to review serial unit from purchase or production to consumption or sale showing the lineage of the serial unit from its creation to final consumption in the supply chain.
-
a lot to review the lot creation transaction, expired lot and failed quality inspection alerts, the item, and the lot's status.
-
-
Access details of every event and zoom in and out of time periods.
-
View complete genealogy of lots and serials and easily traverse complex networks by highlighting key paths and nodes and controlling their visibility and explosion.
-
Navigate back and forth between networks and time lines like for example navigate to the genealogy of a serial controlled component from the timeline of the work order in which the serial unit was executed.
-
Use the Network Viewer to visualize the genealogy from the perspective of the lot or serial or by purchase order, production work order, sales order, or user defined entity.
Administration
The applications administrator can perform the following functions:
-
Use the Organization Access page to provide:
-
Access to multiple organizations for a user.
-
Access for multiple users to an organization.
-
Access to the Create Organization page.
-
-
Use the Background Process page to submit a new request.
REST APIs
To use REST web services, a user must have access to Oracle Identity Cloud Service with either the Identity Domain Administrator or Application Administrator role. The user must first register the AIAMFG Client Application in Oracle Identity Cloud Service, then use a third-party client such as Postman to access REST web services.
Warning: REST web services do not verify a user's organization access.
User Roles and Access
The following table shows the access to the modules and pages based on user roles:
| Adaptive Intelligent Apps For Manufacturing Menu | Roles and Access | |||
| Business User | Data Analyst | Data Scientist | Application Administrator | |
| Home | Yes | Yes | Yes | Yes |
| From the Home page: | ||||
| Insights | Yes | Yes | Yes | Yes |
| Factory Command Center | Yes | Yes | No | Yes |
| Genealogy & Trace | Yes | Yes | No | Yes |
| Predictions | Yes | Yes | Yes | Yes |
| Setup | No | No | No | Yes |
| From the Insights page: | ||||
| Quality | Yes | Yes | Yes | Yes |
| Yield | Yes | Yes | Yes | Yes |
| Serial Quality | Yes | Yes | Yes | Yes |
| Serial Yield | Yes | Yes | Yes | Yes |
| Evaluation | No | Yes | Yes | Yes |
| Modeling | No | Yes | Yes | Yes |
| Data Preparation | No | Yes | Yes | Yes |
| Data Ingestion | No | Yes | Yes | Yes |
| Configuration | No | Yes (but not Time Series Feature Sets) | Yes | Yes |
| From the Genealogy & Trace page: | ||||
| Timeline Viewer | Yes | Yes | No | Yes |
| Network Viewer | Yes | Yes | No | Yes |
| From the Predictions page: | ||||
| Quality | Yes | Yes | Yes | Yes |
| Yield | Yes | Yes | Yes | Yes |
| Serial Quality | Yes | Yes | Yes | Yes |
| Serial Yield | Yes | Yes | Yes | Yes |
| Confusion Matrix | No | Yes | Yes | Yes |
| Modeling | No | Yes | Yes | Yes |
| Data Preparation | No | Yes | Yes | Yes |
| Data Ingestion | No | Yes (but not Sensor Devices Data) | Yes | Yes |
| Configuration | No | Yes (but not Time Series Feature Sets) | Yes | Yes |
| From the Setup page: | ||||
| Organization Access | No | No | No | Yes |
| Key Performance Indicators | No | No | No | Yes |
| Time Series Feature Sets | No | No | No | Yes |
| From the User Name menu: | ||||
| Preferences | Yes | Yes | Yes | Yes |
| Background Processes | No | No | No | Yes |
| Profile | Yes | Yes | Yes | Yes |
For complete navigation details, see: Oracle Adaptive Intelligent Apps for Manufacturing Navigation
Creating and Managing Users
AIAMFG uses Oracle Identity Cloud Service to manage users and provide access to AIAMFG. When your organization signs up for an Oracle Cloud account and then orders subscriptions to cloud services, including AIAMFG, your organization designates one person to receive an email containing a link used to activate the services ordered. See: Getting Started with Oracle Cloud
Your Oracle Cloud account includes Oracle Identity Cloud Service (IDCS) as well as AIAMFG. See: Oracle Identity Cloud Service. The person who activates the services ordered is assigned the Identity Domain Administrator role by Oracle and can create other users with various roles. See: Managing Oracle Identity Cloud Service Users. The user with the Identity Domain Administrator role can manage AIAMFG users themselves or they can create one or more users with the IDCS User Administrator role to add the AIAMFG users and with the IDCS Application Administrator role to grant the AIAMFG application and roles to users.
The newly created user receives an email with a link to activate their Oracle Cloud account. Once the new user activates their account and they have been assigned a role for an application instance, then they can log in to the system and define their user preferences. Each user must specify their preferred organization and category set, at a minimum. See Defining User Preferences.
Your Identity Domain Administrator applies default settings to the entire identity domain in the cloud. If the identity domain encompasses multiple time zones and languages, for example, you may prefer to specify personal settings. AIAMFG supports multiple languages. To select one of these languages, see Setting Up Your IDCS User Profile.
To add a new user
Either a user with the IDCS Identity Domain Administrator role or the IDCS User Administrator role can add a new user.
-
Navigate to Oracle Identity Cloud Service. Click your name icon, then Admin Console.
-
In Oracle Identity Cloud Service, add a user. Refer to Creating User Accounts for the remaining steps.
-
The user receives an email, asking them to activate their account. The user must click the link provided.
The user still requires access to an application and an application role, as described in the next steps, before they can use the account.
To assign a user to an application
Either a user with the IDCS Identity Domain Administrator role or the IDCS Application Administrator role can assign a user to an Oracle application and application role.
-
Navigate to Oracle Identity Cloud Service. Click your name icon, then Admin Console.
-
In the Identity Cloud Service console, expand the Navigation Drawer, click Oracle Cloud Services, and then click your application, named AIAMFG_<Instance_Type>.
Additional Information: Oracle Identity Cloud Service can have multiple application instance types. Examples of instance types include production (with an application name of AIAMFG_PROD) and test (with an application name of AIAMFG_TEST).
-
Refer to Assigning Users to Oracle Applications for the remaining steps.
Choose from the following roles:
-
Application Administrator
-
Data Analyst
-
Data Scientist
-
Business User
-
To assign organization access to a user
Only a user with the AIAMFG Application Administrator role can assign organization access to a user.
-
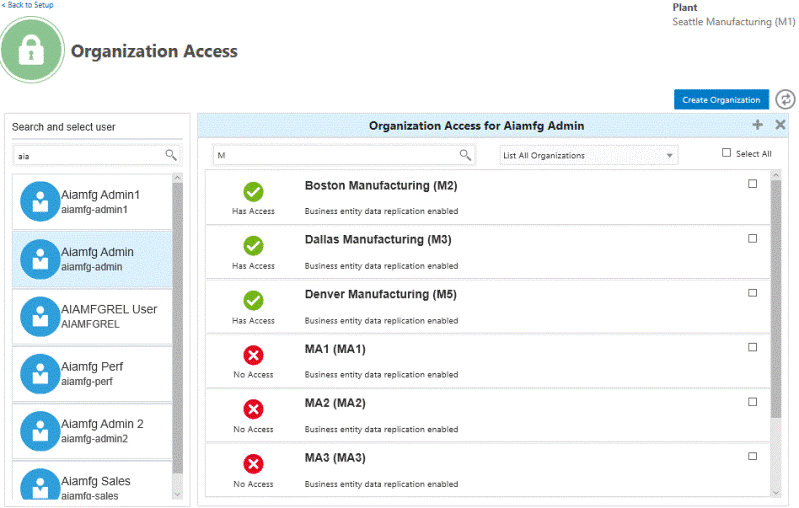
Navigate to the Organization Access page.
From the Home page, click Setup, then Organization Access.
-
In the Organization Access page, use the Person Name search field to search for a user.
-
Use the Org Code, Name search field to search for an organization.
Tip: You can also narrow the list of organizations by selecting:
-
List all organizations
-
List organizations with user access
-
List organizations with no user access
-
-
Select the check box for the organization.
Tip: Select multiple organizations to update them all for the same user at the same time.
-
Click the plus icon to assign organization access to the user or click the X icon to remove organization access.
A green check mark appears beside the organization name once user access is assigned. A red X appears beside the organization name to indicate no user access.
Tip: Using the steps above, you can add or remove organization access to multiple organizations at one time for one user. Alternatively, use the Swap button (to the right of the Create Organization button) to update multiple users for one organization at the same time.
To create a data ingestion organization
As Oracle Adaptive Intelligent Apps for Manufacturing displays analysis data by organization, the data collected from various data sources using different ingestion methods belongs to a unique organization code. You must define and be assigned to a Case Record Data Ingestion organization to upload case record data files and a Business Entity Data organization to upload the business entity data files.
To create a Case Record or Business Entity data ingestion organization, see Setting Up Data Ingestion, Oracle Adaptive Intelligent Apps for Manufacturing Data Ingestion User's Guide.
Related Topics
Assigning Groups to Oracle Applications
Removing Groups from Oracle Applications
Setting Up Your IDCS User Profile
Your IDCS domain has user profile settings that you can choose to personalize, such as a preferred language and your login password. AIAMFG supports the following languages, in addition to the default language, English (United States):
-
Dutch
-
French
-
French (Canada)
-
German
-
Italian
-
Japanese
-
Korean
-
Portuguese (Brazil)
-
Russian
-
Spanish
-
Latin American Spanish (includes all variants of Spanish used outside of Spain)
-
Turkish
IDCS by default shows all languages, but AIAMFG supports only a subset of these languages. AIAMFG selects a language for translation of the user interface in the following order, until it finds a supported language. AIAMFG selects:
-
The language in the My Profile Details tab of the My Profile console in IDCS, unless this language is not supported. See: Set Up or Modify Your Profile or To set up your IDCS user profile.
-
The supported base language of a selected variant language, unless this base language is not supported. For example, if you select Dutch (Netherlands), the variant language, AIAMFG reverts to Dutch, the supported base language.
-
The IDCS domain default language, unless this language is not supported. See: Change Default Settings.
Tip: Use this option to set the language for a larger group of users instead of setting the preferred language for each user.
-
English (United States), the default language.
Data Ingestion Methods and Supported Languages
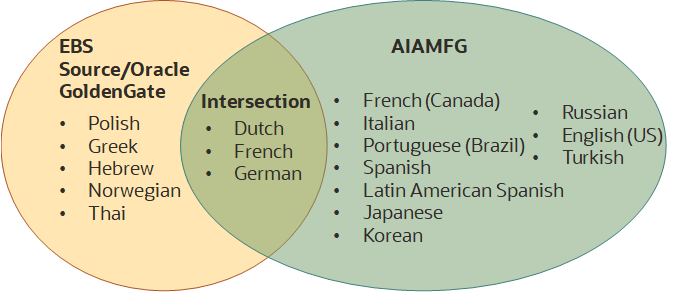
Users can ingest data into AIAMFG using either CSV files for any data or using Oracle Data Pump and Oracle GoldenGate, which is only used by E-Business Suite (EBS) customers who implement AIAMFG. Users who only ingest data using CSV files can view the AIAMFG user interface (UI) and messages in a supported language, but the languages available can change for users who ingest data using a combination of CSV files and Oracle GoldenGate or only Oracle GoldenGate. Oracle GoldenGate supports any language, which may or may not be supported by AIAMFG. This intersection of supported languages determines the languages to which the UI and messages can be translated.
Important: At this time, AIAMFG only translates the UI and messages, not data. You can ingest data in any language. For example, if you ingest data in Korean, the data remains stored as Korean text for all users, regardless of a user's selected language.
There are four data ingestion scenarios:
-
Only ingest data using CSV files; never enable Oracle GoldenGate. AIAMFG renders in any of the supported languages.
-
Initially ingest data using CSV files, but enable Oracle GoldenGate later. Initially, AIAMFG renders in any of the supported languages. Later, if Oracle GoldenGate ingests data, it collects data from the EBS source in any language. For example, if Oracle GoldenGate ingests data in Dutch, French, German, and Polish, the AIAMFG UI and messages only render in Dutch, French, and German, which are the common languages at the intersection between the Oracle GoldenGate data from EBS and the AIMFG supported languages. If Oracle GoldenGate ingests Spanish data later, then AIAMFG renders in Spanish, in addition to Dutch, French, and German.
-
Only ingest data using Oracle GoldenGate. Oracle GoldenGate can ingest data in any language. If any ingested languages intersect with the AIAMFG-supported languages, AIAMFG renders in those intersection languages. For example, if Oracle GoldenGate ingests data in Dutch, French, German, and Polish, AIAMFG renders in Dutch, French, and German.
-
Initially ingest data using Oracle GoldenGate, but ingest data using CSV files later. Initially, if any ingested languages intersect with the AIAMFG-supported languages, AIAMFG renders in those intersection languages. For example, if Oracle GoldenGate ingests data in Dutch, French, German, and Polish, AIAMFG renders in Dutch, French, and German. Later, when French, German, and Spanish data is ingested using CSV files, AIAMFG only renders in French and German. If Oracle GoldenGate ingests data in Spanish later, then AIAMFG can render in Spanish, French, and German from that point on.
Action: Run the background process "Maintain Multi-lingual Tables" if you enable a supported language after transaction data already exists in other languages. The program adds the newly enabled language. When a user logs in with the new language, they will be able to view the updated data. See: Running Background Processes.
The graphic below illustrates how AIAMFG can only render in the languages at the intersection of the Oracle GoldenGate-ingested languages and the AIAMFG-supported languages. This restriction only applies when ingesting EBS data using Oracle GoldenGate.
Supported Languages Depend Upon the Data Ingestion Method Used
To set up or change your preferred language
You can navigate from AIAMFG to IDCS by selecting Profile from the User Name drop-down list. From the IDCS My Profile console, you can configure many of your user settings and change your password, in addition to selecting your preferred language. For information about configuring each of the user settings available from the My Profile console, see: Configure User Settings.
-
Navigate to the My Profile console.
From the User Name drop-down list, select Profile.
-
In the Preferred Language field, select one of the languages supported by AIAMFG.
-
Click Save.
-
Sign out of AIAMFG, then sign in.
The Home page now displays in your preferred language.
Note: If you selected a language not supported by AIAMFG, the application renders in the default language of English (United States).
Defining User Preferences
The information in the Insights, Genealogy and Trace, Predictions, and Factory Command Center modules is shown in the context of the specific plant and department selected in the User Preferences page. You can set user preferences to specify how information is displayed in the module pages available for analyzing insights, genealogy and trace, predictions, and factory current status.
-
Navigate to the User Preferences page.
Click the user name, and then click Preferences.
-
In the General region, specify values in the following fields. The Insights, Genealogy and Trace, Predictions, and Factory Command Center modules automatically display data only associated with the selected values.
-
Organization Code – Mandatory. Select a preferred organization from the list of organizations assigned to you in the Organization Access page.
-
Category Set – Mandatory.
-
Department Code – Optional, for discrete manufacturing organizations only.
-
-
In the Factory Command Center: Material region, optionally specify a numerical value in the following fields:
-
Expiration Time Fence (days) – number of days prior to the expiration date that users are notified through the Item Expiring KPI.
-
Receipt Delay Tolerance (hours) – number of hours beyond the receipt due date before a receipt delay is reported.
-
WIP Return Time Fence (hours) – number of past hours to consider and display component return transactions for open work orders.
-
-
In the Factory Command Center: Machine region, optionally select a value in the Alarms last N hours field to show the alarms during the last N hours. You can choose to view alarms up to a maximum of 24 hours.
-
In the Factory Command Center: Management region, optionally select a numerical value in the following fields:
-
Pending Work Order Time Fence (days) – the interval during which a soon to be started work order displays.
-
Delay Tolerance (hours) – the number of hours beyond which a work order or operation displays a delay in starting or completing.
-
Completed Work Order Time Fence (days) – the interval during which recently completed work orders display.
-
-
In the Logging region:
-
click the Enable Log button to enable logging.
-
select from the following in the Log Level field:
-
Error
-
Warning
-
Info
-
Statement.
-
-
-
In the Background Process Tracing region:
-
click the Enable Trace button to enable background process tracing.
-
select from the following in the Trace Level field:
-
Regular Trace
-
Trace with Binds
-
Trace with Waits
-
Trace with Binds and Waits
-
-
select the background process to trace in the Program Name field.
-
-
Click Save to save your preferences.