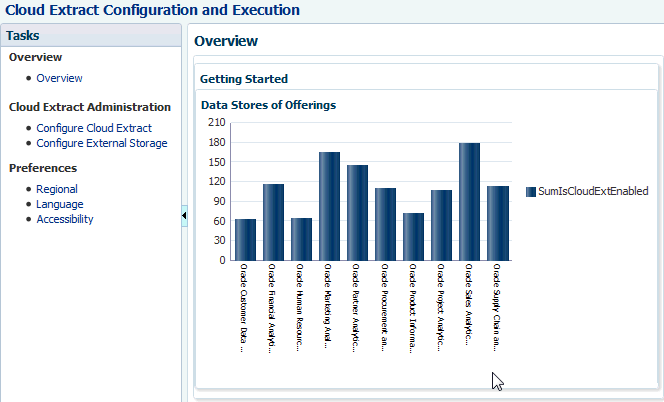
If you are deploying a Fusion Applications HCM Cloud data source (either Release 9.2 or 10), you first load your data into your Oracle Storage Service (this process is known as a Cloud Extract). Then, you load the data into the OTBI-Enterprise data warehouse. To load data into your Oracle Cloud Storage Service, you use BI Cloud Connector Console, which is deployed on your Fusion Applications HCM pod.
Before you start, log into BI Cloud Connector Console using the Web link and user name supplied to you by Oracle Cloud Support. You can also start BI Cloud Connector Console using a HTTP URL based on the following format: http://<FA OHS Host>:<FA OHS Port>/biacm.
To operate BI Cloud Connector Console, users must be provisioned with the Application role – ESSAdmin and the Enterprise Role – ASM_APPLICATION_IMPLEMENTATION_ADMIN_ABSTRACT, as described in the topic
Provisioning a User for Oracle Business Intelligence Cloud Connector Access, in
Oracle Transactional Business Intelligence Enterprise Administering Your Deployment for Oracle Transactional Business Intelligence Enterprise.

To extract data from a cloud source to an Oracle Cloud Storage Service:
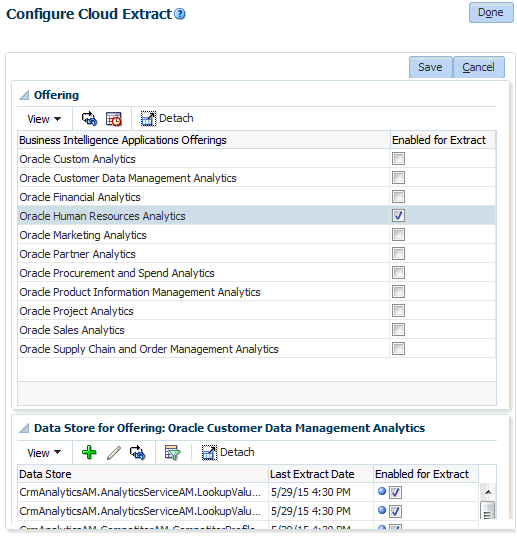
- In BI Cloud Connector Console, select the Configure Cloud Extract link on the Tasks pane.
- In the list of Offerings, select the check box next to the Cloud source system functional areas that you want to deploy.

- Click Save, then Done.
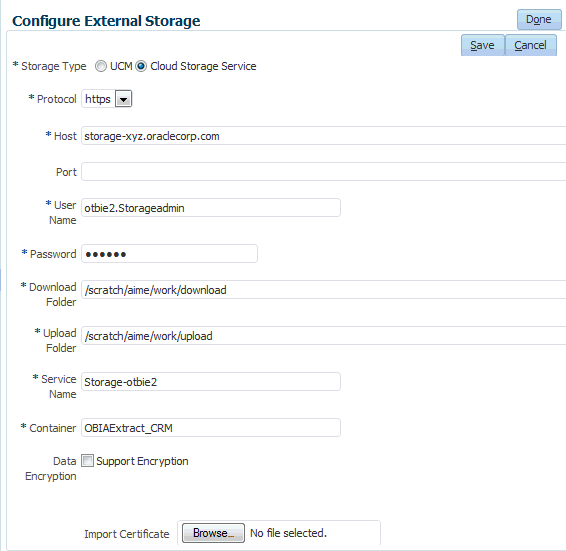
- Click the Configure External Storage link on the Tasks pane.
- Under Storage Type, click the Cloud Storage Service option.

- Specify the following details:
- Protocol — Select https.
- Host — Enter the domain name of your Oracle Cloud Storage Service. The domain of the storage service is typically formatted as: identitydomain.storage.oraclecloud.com. You can obtain this domain name from the Service REST Endpoint data field in the storage service’s details area from Oracle Cloud My Services. It is the first part of the address, before the first forward slash.
- Port — Leave blank.
- User Name — Use the Oracle Cloud account user name that will be used to authenticate to the Storage Service. The account must have the following storage cloud service role: ‘StorageServiceName Storage Read Write Group’.
- Password — Enter the password for the Oracle Cloud account user name that you specified in the User Name field.
- Download Folder — This should be filled in automatically. If it is not, select UCM as storage type, copy the download folder value, navigate back to Cloud Storage Service and paste.
- Upload Folder — This should be filled in automatically. If it is not, select UCM as storage type, copy the upload folder value, navigate back to Cloud Storage Service and paste.
- Service Name — Identifies the specific service to upload files to. This is a concatenation of the service name and the identity domain, separated by a dash, for example: storageservicename-identitydomainname. You can obtain this service name from the Service REST Endpoint data field in the storage service’s details area in Oracle Cloud My Services. It is the last part of the address, after the last forward slash.
- Container — Name of the container to upload data to in the storage service. This should be the same container specified in Configuration Manager where the Fusion data source was registered (that is, in Configuration Manager navigate to System Setups\Define Business Intelligence Applications\Source Systems tab).
- Data Encryption — Select the check box to enable data encryption at rest within storage cloud service. Click Choose File, and navigate to and select the key pair file that you saved when you registered your data source in Configuration Manager (that is, in Configuration Manager navigate to System Setups\Define Business Intelligence Applications\Source Systems tab). Note: if you revisit this page after logging out and then logging back in, the certificate file name will no longer be visible. This is a system limitation, and does not mean that the uploaded certificate details were not saved.
- Click Save, then Done.
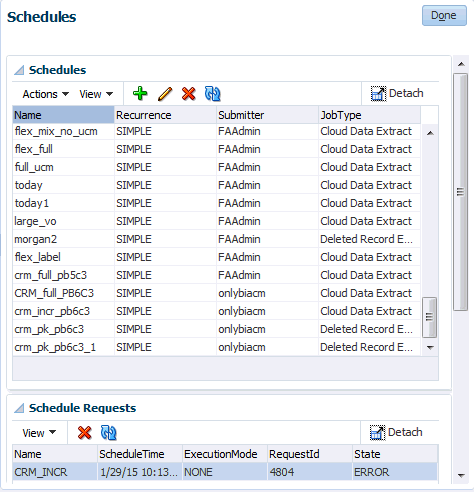
- Select the Configure Cloud Extract link on the Tasks pane.
- Click the Manage Extract Schedules icon (

Description of GUID-DC8A2A2F-7AD5-406B-B7BD-90A7B433141B-default.gif) to display the Schedules dialog.

- Click the Add icon (
 ) to create a new schedule.
- Specify when you want to perform the Cloud Extract.
Note: To perform a once-only Cloud Extract, select the ‘Simple’ option under Recurrence.
You typically schedule a daily extract to run at a time when the load on the Fusion Applications source system is low, for example, during off-peak hours. In addition, you must schedule the extract so that it completes before the load plan executes to load data from the Oracle Cloud Storage Service into the OTBI-Enterprise data warehouse.
- Click Save, and then Done.


