向 Responsys 注册 Lightbox 添加其他字段
重要提示:仅当为账户启用了此功能并且您有 Oracle Maxymiser 时,此功能才可用。
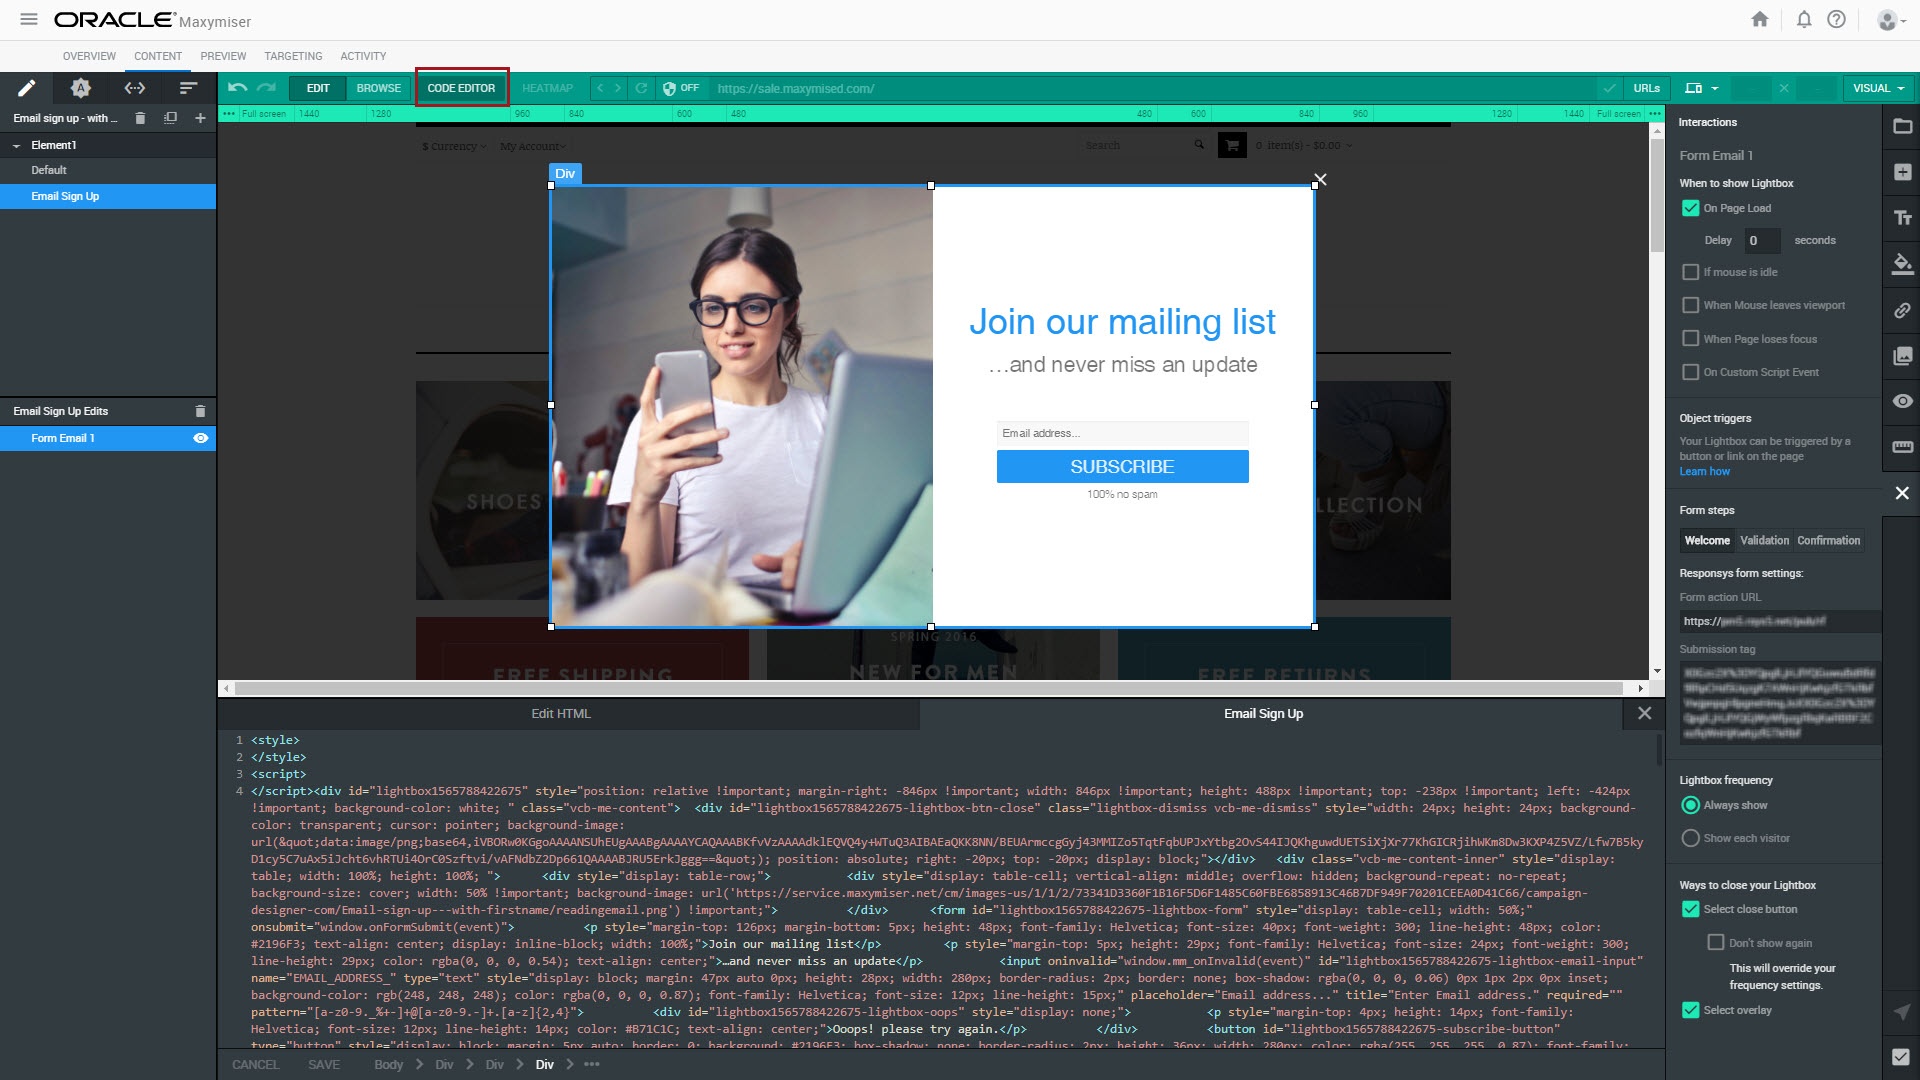
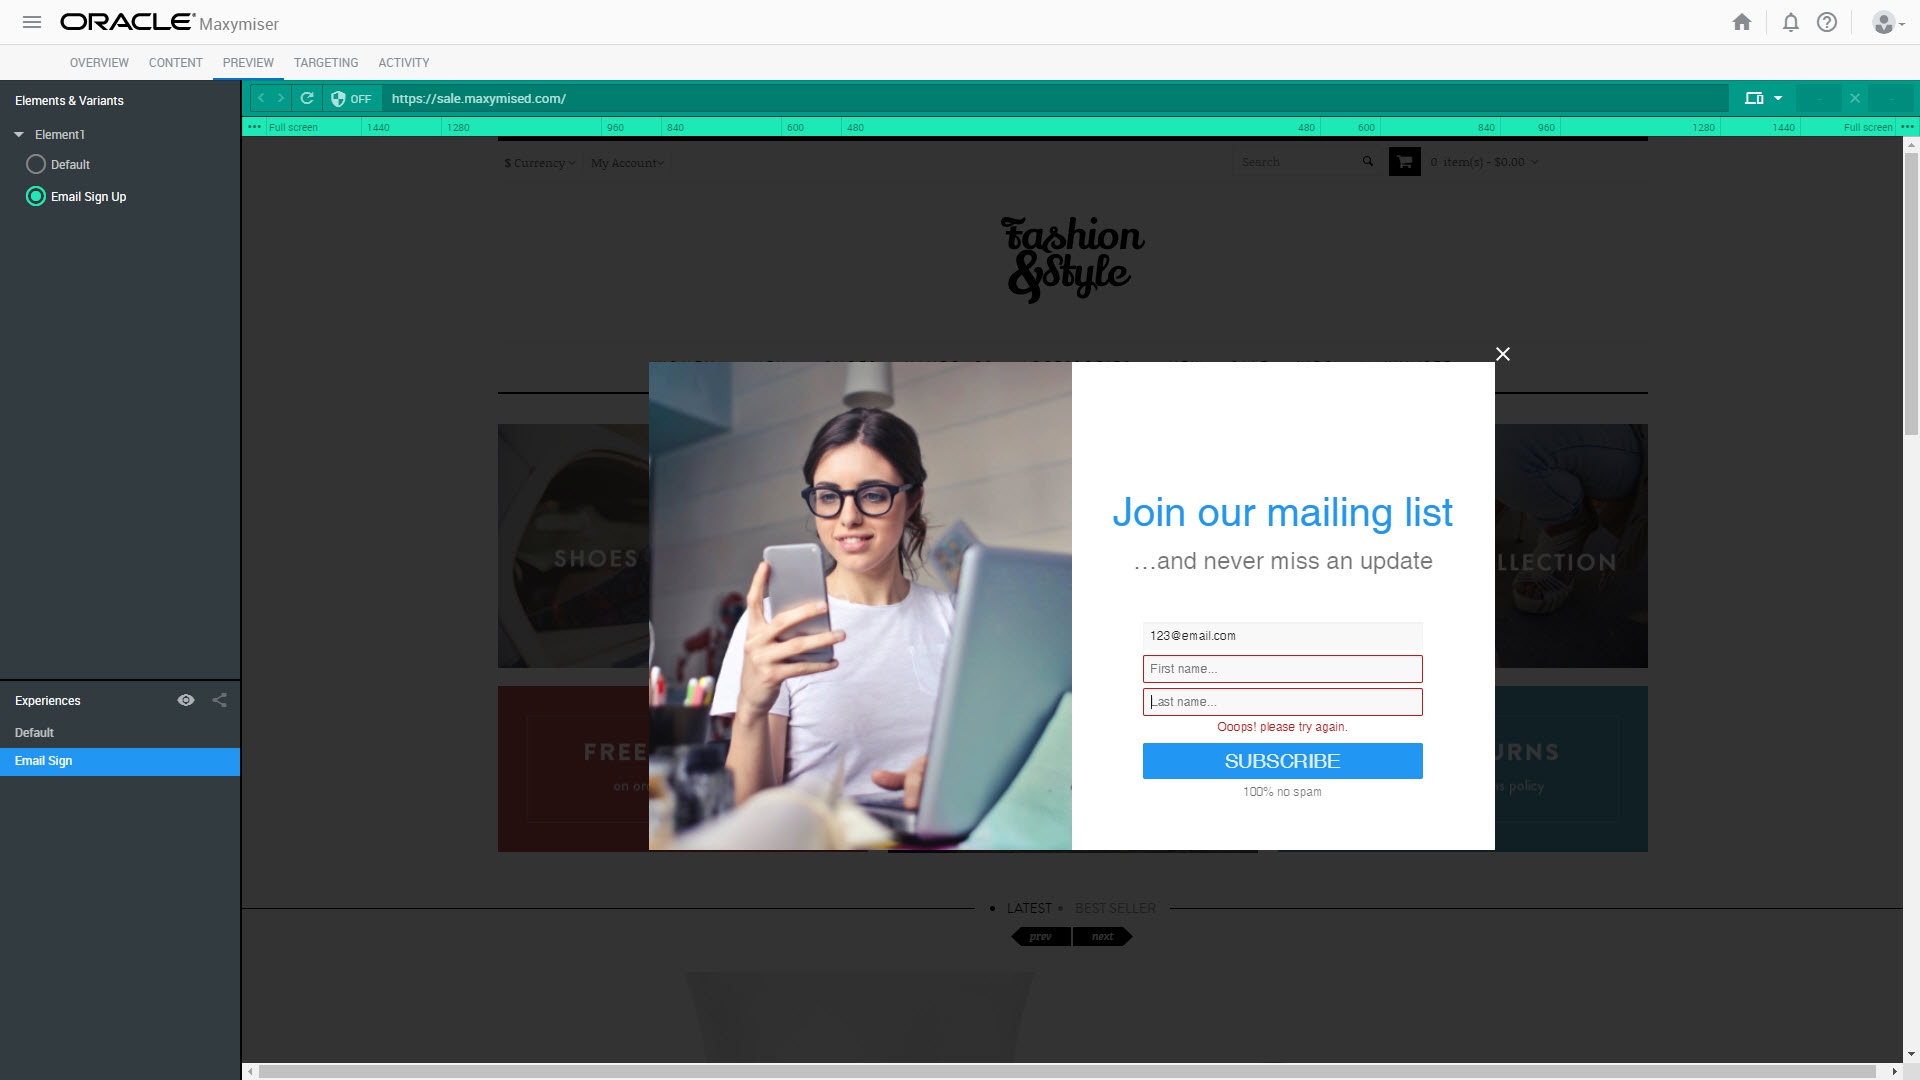
默认情况下,电子邮件注册 Lightbox 模板只有 Emailaddress 字段。可以通过手动编辑 Lightbox 的代码添加其他特性,如名字、姓氏或国家/地区。
以下示例说明了如何向电子邮件注册 Lightbox 添加名字和姓氏字段:
- 在 Responsys 列表模式中,选中要添加到 Lightbox 的字段名称,因为它们需要与 Oracle Maxymiser Lightbox 中的字段名称相匹配。在此示例中,字段名称如下:
FIRST_NAMELAST_NAME
- 创建 Oracle Responsys 注册 Lightbox。
- 单击 Code Editor(代码编辑器)。
- 在
<form>标记中:- 搜索
<input>标记找到emailaddress字段: - 在上述标记后,为名字添加新的
<input>标记: - 按如下所示修改
<input>属性: - Id:由 Lightbox id 和输入字段名称及类型组成的唯一 id。例如:
lightbox1565788422675-lightbox-firstname-input。 - Name:步骤 1 中 Responsys 表内的字段名称。
- Placeholder:文本框为空时显示的提示文本。
- Pattern:确定可向文本框中输入哪些字符的正则表达式。在此示例中,允许使用的字符包括 a-z 或 A-Z,但您也可以允许使用其他字符,如连字符或空格。
- 为姓氏添加和修改另一个
<input>标记:
<input oninvalid="window.mm_onInvalid(event)" id="lightbox1565788422675-lightbox-email-input" name="EMAIL_ADDRESS_" type="text" style="display: block; margin: 47px auto 0px; height: 28px; width: 280px; border: none; box-shadow: rgba(0, 0, 0, 0.06) 0px 1px 2px 0px inset; background-color: rgb(248, 248, 248); color: rgba(0, 0, 0, 0.87); font-family: Helvetica; font-size: 12px; line-height: 15px;" placeholder="Email address..." title="Enter Email address." required="" pattern="[a-z0-9._%+-]+@[a-z0-9.-]+.[a-z]{2,4}"><input oninvalid="window.mm_onInvalid(event)" id="lightbox1565788422675-lightbox-firstname-input" name="FIRST_NAME" type="text" style="display: block; margin: 5px auto 0px; height: 28px; width: 280px; border-radius: 2px; border: none; box-shadow: rgba(0, 0, 0, 0.06) 0px 1px 2px 0px inset; background-color: rgb(248, 248, 248); color: rgba(0, 0, 0, 0.87); font-family: Helvetica; font-size: 12px; line-height: 15px;" placeholder="First name..." title="Enter First name." required="" pattern="^[a-zA-Z]+$">
注意:在您创建 Lightbox 时,我们已为其指定唯一 id,可在 Lightbox 的外部 div 或上述电子邮件字段 id 属性的一部分中找到该属性。
<input oninvalid="window.mm_onInvalid(event)" id="lightbox1565788422675-lightbox-lastname-input" name="LAST_NAME" type="text" style="display: block; margin: 5px auto 0px; height: 28px; width: 280px; border-radius: 2px; border: none; box-shadow: rgba(0, 0, 0, 0.06) 0px 1px 2px 0px inset; background-color: rgb(248, 248, 248); color: rgba(0, 0, 0, 0.87); font-family: Helvetica; font-size: 12px; line-height: 15px;" placeholder="Last name..." title="Enter Last name." required="" pattern="^[a-zA-Z]+$">
- 搜索
- 提交表单时,确保新的输入字段已添加到提交 URL:
- 找到
window.onFormSubmit函数,在其中查找以下代码行: - 在此行下,添加以下行在变量中存储名字和姓氏:
var emailInput = document.getElementById(id + '-lightbox-email-input');
var firstnameInput = document.getElementById(id + '-lightbox-firstname-input');
var lastnameInput = document.getElementById(id + '-lightbox-lastname-input');
在检查是否存在错误和提交表单时会用到这些变量中存储的值。
- 找到
- 需要更新错误检查代码来验证名字和姓氏字段的内容。
- 对于此示例,我们将现有代码:
- 替换为以下代码:
var re = /[a-z0-9._%+-]+@[a-z0-9.-]+.[a-z]{2,4}/;if (!re.test(emailInput.value)) {oops.style.display = 'block';
emailInput.style.cssText = emailInput.style.cssText.replace(/border:[^;]*;/, "border: 1px solid #B71C1C;");
emailInput.style.cssText = emailInput.style.cssText.replace(/border-radius:[^;]*;/, "border-radius: 2px;");
return;
}
var re = /[a-z0-9._%+-]+@[a-z0-9.-]+.[a-z]{2,4}/;var reName = /^[a-zA-Z]+$/;
emailInput.style.cssText = emailInput.style.cssText.replace(/border:[^;]*;/, "border: none;");
firstnameInput.style.cssText = firstnameInput.style.cssText.replace(/border:[^;]*;/, "border: none;");
lastnameInput.style.cssText = lastnameInput.style.cssText.replace(/border:[^;]*;/, "border: none;");
if (!re.test(emailInput.value) || !reName.test(firstnameInput.value) || !reName.test(lastnameInput.value)) {oops.style.display = 'block';
if (!re.test(emailInput.value)) {emailInput.style.cssText = emailInput.style.cssText.replace(/border:[^;]*;/, "border: 1px solid #B71C1C;");
emailInput.style.cssText = emailInput.style.cssText.replace(/border-radius:[^;]*;/, "border-radius: 2px;");
}
if (!reName.test(firstnameInput.value)) {firstnameInput.style.cssText = firstnameInput.style.cssText.replace(/border:[^;]*;/, "border: 1px solid #B71C1C;");
firstnameInput.style.cssText = firstnameInput.style.cssText.replace(/border-radius:[^;]*;/, "border-radius: 2px;");
}
if (!reName.test(lastnameInput.value)) {lastnameInput.style.cssText = lastnameInput.style.cssText.replace(/border:[^;]*;/, "border: 1px solid #B71C1C;");
lastnameInput.style.cssText = lastnameInput.style.cssText.replace(/border-radius:[^;]*;/, "border-radius: 2px;");
}
return;
}
- To ensure the new values get submitted when the visitor clicks the Subscribe button, find the following code:
- 在此代码后,添加以下行来向表单提交 URL 添加名字和姓氏:
- 切换到 Preview(预览)面板,在 Lightbox 上测试新创建的字段。

注意:如果在代码编辑器中手动编辑 Lightbox 代码,然后切换回交互面板进行更改,则对 formSubmit 函数所做的手动更改会被交互面板覆盖。
parameters.push(encodeURIComponent('EMAIL_ADDRESS_') + '=' + encodeURIComponent(emailInput.value));
parameters.push(encodeURIComponent('FIRST_NAME') + '=' + encodeURIComponent(firstnameInput.value));parameters.push(encodeURIComponent('LAST_NAME') + '=' + encodeURIComponent(lastnameInput.value));
相关主题
启动集成的 Maxymiser-Responsys 市场活动
Oracle Responsys 集成(Oracle Maxymiser 帮助中心)